
On the large design wall in my hallway is something that resembles a “hot mess“.

This “hot mess” actually represents quite a bit of progress. I struggled with what to do with the 20 blocks I made during a “traditional piecing” binge I went on October to November 2016 and discussed in the following series of posts:
- Revisiting Traditional Piecing
- Revisiting Traditional Piecing: The Blocks Part I
- Revisiting Traditional Piecing: The Blocks Part II
- Revisiting Traditional Piecing: The Blocks Part III
A little background:
Prior to working these blocks, it seems like the last couple of years I was primarily focused on improvisational quilting. I was craving structure (and a break from designing my own quilts) and pulled out my old Ladies’ Art Company Block Tool by Connie Chunn (2007) and started making blocks using a jelly roll I found in my stash of Northcott Cobblestone Stonehenge; and some Stonehenge scraps another quilter gave me.


Unfortunately, I did not have enough of the blue Stonehenge scraps to use them in more than just one block so I had to return those to the fabric scrap basket.
(Now I could have titled this post “Revisiting Traditional Piecing…Part IV” but this binge of working on “traditional pieced blocks” has intermittently continued while I sporadically work on Farm Girl Vintage blocks.)
The dilemma – designing the final quilt layout
The reason why the 20 blocks pictured below got put aside after my “piecing binge” was that I could not find a pleasing way to lay them out. I auditioned many different ways of setting the blocks to include traditional ways such as lattice, putting them on pointing, floating them, and various ideas suggested by my readers (much appreciated!)

I even thought about the unique and spectacular block layout that Martha Ginn shared in her Martha’s Blog post: Shapely Challenge Revealed.
(Martha and met through this quilt: She bought the green ombre setting fabric for this exquisite sampler quilt through my tierneycreates Etsy shop…glad I met her before I closed the shop!)
Alas, none of the numerous options I explored appealed to me.
Farm Girl Vintage Strikes!
My next venture into traditional-block-piecing-binging was with Lori Holt’s Farm Girl Vintage. In this book I discovered the perfect setting for my blocks! It is called the “Picnic Setting”
For copyright reasons I did not want to photograph the page in Farm Girl Vintage showing the setting, but I did find this photo on Pinterest, pinned by Deborah Thomas, of a quilt in the Picnic Setting:

The setting is a mixture of 12″ (finished) and 6″ (finished) blocks. The 6″ blocks are the setting for the 12″ blocks!
At first I thought of returning to the Ladies’ Art Company Block Tool and creating a bunch of different 6 inch pieced blocks. Thinking through this idea, I realized the quilt top would NEVER get done if headed down this path. How daunting to make 36 different 6″ blocks to set my 12″ blocks! I needed at least 36 of them to make the block setting work, and it would be 2020 before I posted about this quilt in progress again!.
Nine-Patch, an old stand-by
Finally I settled on making “old school” 6″ (finished) nine-patch blocks using up the scraps from the original jelly roll from piecing the 12″ blocks.
Here is the beginning of playing with the layout as I make the nine-patch blocks:
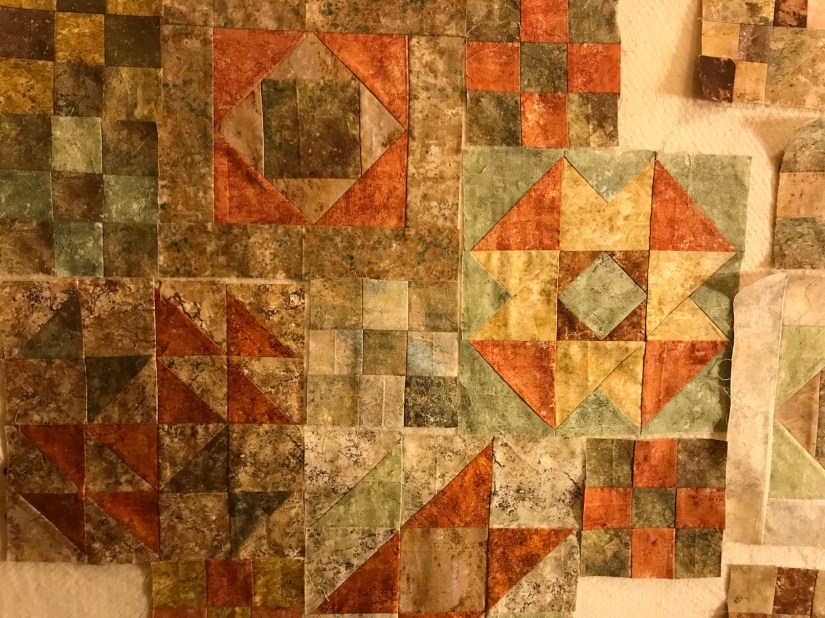
There will not be a lot of contrast, and that is intentional. I want the quilt top to have the feel of looking at a stone floor and the patterns and the colors of the stones flowing into one another.
More to come as I progress on the quilt top (perhaps even better photos, but do not get your hopes up!)
Postscript
Decorating with Pillows
A quick follow up to my previous post – Petite Pillow Power! – here is a little vignette in my living room with one of the new pillow, a batik basket I made (the top one), a lidded store bought basket, and a Longaberger basket someone gave me as a gift 20 years ago:

Quilting Meets Couture
In case you’d like to learn more about the project that got me started on my art quilting journey, check out this post on , Improvisational Textiles:
Quilting Meets Couture
You can also check out the new page on Improvisational Textiles that showcases the entire Quilting Meets Couture collection:
QUILTING MEETS COUTURE
Check out the Improvisational Textiles blog if you would like to follow our collaborative improvisational art quilting journey.

The “hot mess’ looks great.
My last three quilts have been in the traditional block piecing.
I am wanting to venture out into improvisational quilting.
Last year, I visited a shop in Austin that introduced me to Shannon Brinkley.
I eventually want to try some of her ideas.
She also designs great fabric.
In the meantime, I am looking for a good pattern/idea for a quilted floor pillow.
I have seen some on Pinterest, but many have zippers, and I have this “thing” about zippers.
Any suggestions are welcome.
LikeLiked by 1 person
I want to do a nice quilted floor pillow too someday! I am still learning to be comfortable with adding zippers. Thanks for your comments 😀
LikeLike
Looks like you are headed in the right direction. Love how the arrangement looks so far. Can’t wait to see it finished!
LikeLiked by 1 person
I can’t wait either but then the journey is most of the fun 😀
LikeLiked by 1 person
It is! But then you can start or finish another one!
LikeLiked by 1 person
I checked out your improv pieces on the Quilting Meets Couture post. Absolutely love all of them….but especially the flying triangles!!! So amazing!!!
LikeLiked by 1 person
Thanks for checking that site out 😀
LikeLiked by 1 person
My pleasure!
LikeLike
Thank you for sharing the link.
LikeLiked by 1 person
Love those blocks and fabrics and I love the Picnic Quilt Setting. The 9-patch blocks blend in perfectly.
LikeLiked by 1 person
Thanks 😀
LikeLike
Why not 😀
LikeLike
Love the new pillow setting…I have one of those baskets, also a gift. I’m thinking I should get it out and put it someplace prominent!
LikeLiked by 1 person
Thank you and I am glad that my dogs know that the little pillow is not a Chew toy 😀
LikeLike
Love the colours in your upcoming quilt! It does look like you are looking at a very old stone floor …can’t wait to see the finished product.
LikeLiked by 1 person
Why thank you for your comments I really appreciate them😀
LikeLike
What a great idea! I love it. It really gives the traditional squares a more modern flair.
LikeLiked by 1 person
Thanks so much😀
LikeLike
goodness! with all you have going on, I feel like a slacker! You have lots of nice projects in progress!
LikeLiked by 1 person
Thank you! The problem is that I was a “slacker” for a long time and now I am trying to “un-slack” – ha 🙂
LikeLiked by 1 person
That’s PERFECT! I do love star quilts with multiple sizes of stars. Last year I made one for a wee niece, but the blocks were not all edge-to-edge as yours is shown. Yes yes, the 9-patches is just the right solution. You are so smart. 🙂 Now I am really excited about your project.
LikeLiked by 1 person
Thank you and you will see next post I made much progress. I am ready to sew it all together – yay!
LikeLiked by 1 person
I can’t even imagine the cool stuff you have in your home. Excellent colors on that quilt. Subdued and earthy, but still colorful. Serene and tranquil. I like the shapes also. So pretty, but something a guy could appreciate also. Loving the basket! As always, the pillows are so dang cute!
LikeLiked by 1 person
Thanks so much – I like that my quilt can be appreciated by male or female! I do not usually quilts that are too “girly” as that is not my style. Yes my house is kind of crazy – crammed with a lot of my creations, ha! But then I imagine your home filled with your wonderful paintings! 🙂
LikeLiked by 1 person
I appreciate that as well! My husband hates when I get too girly. My house is crazy filled. Yes.
LikeLiked by 1 person
I love all your colors. Beautiful.
LikeLiked by 1 person
Thank you, your comment is much appreciated 🙂
LikeLike