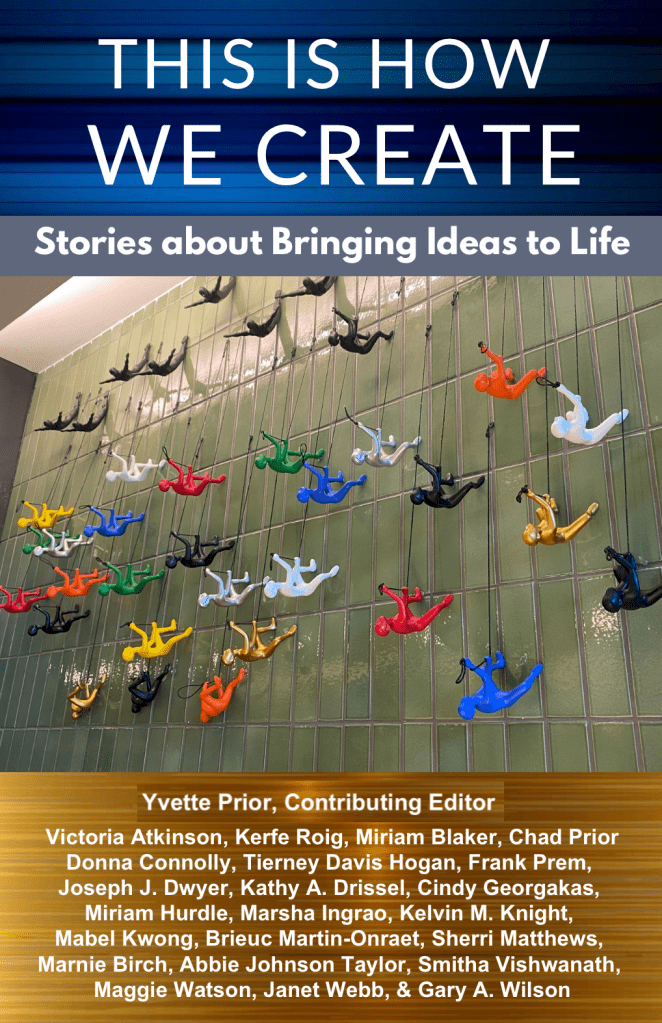
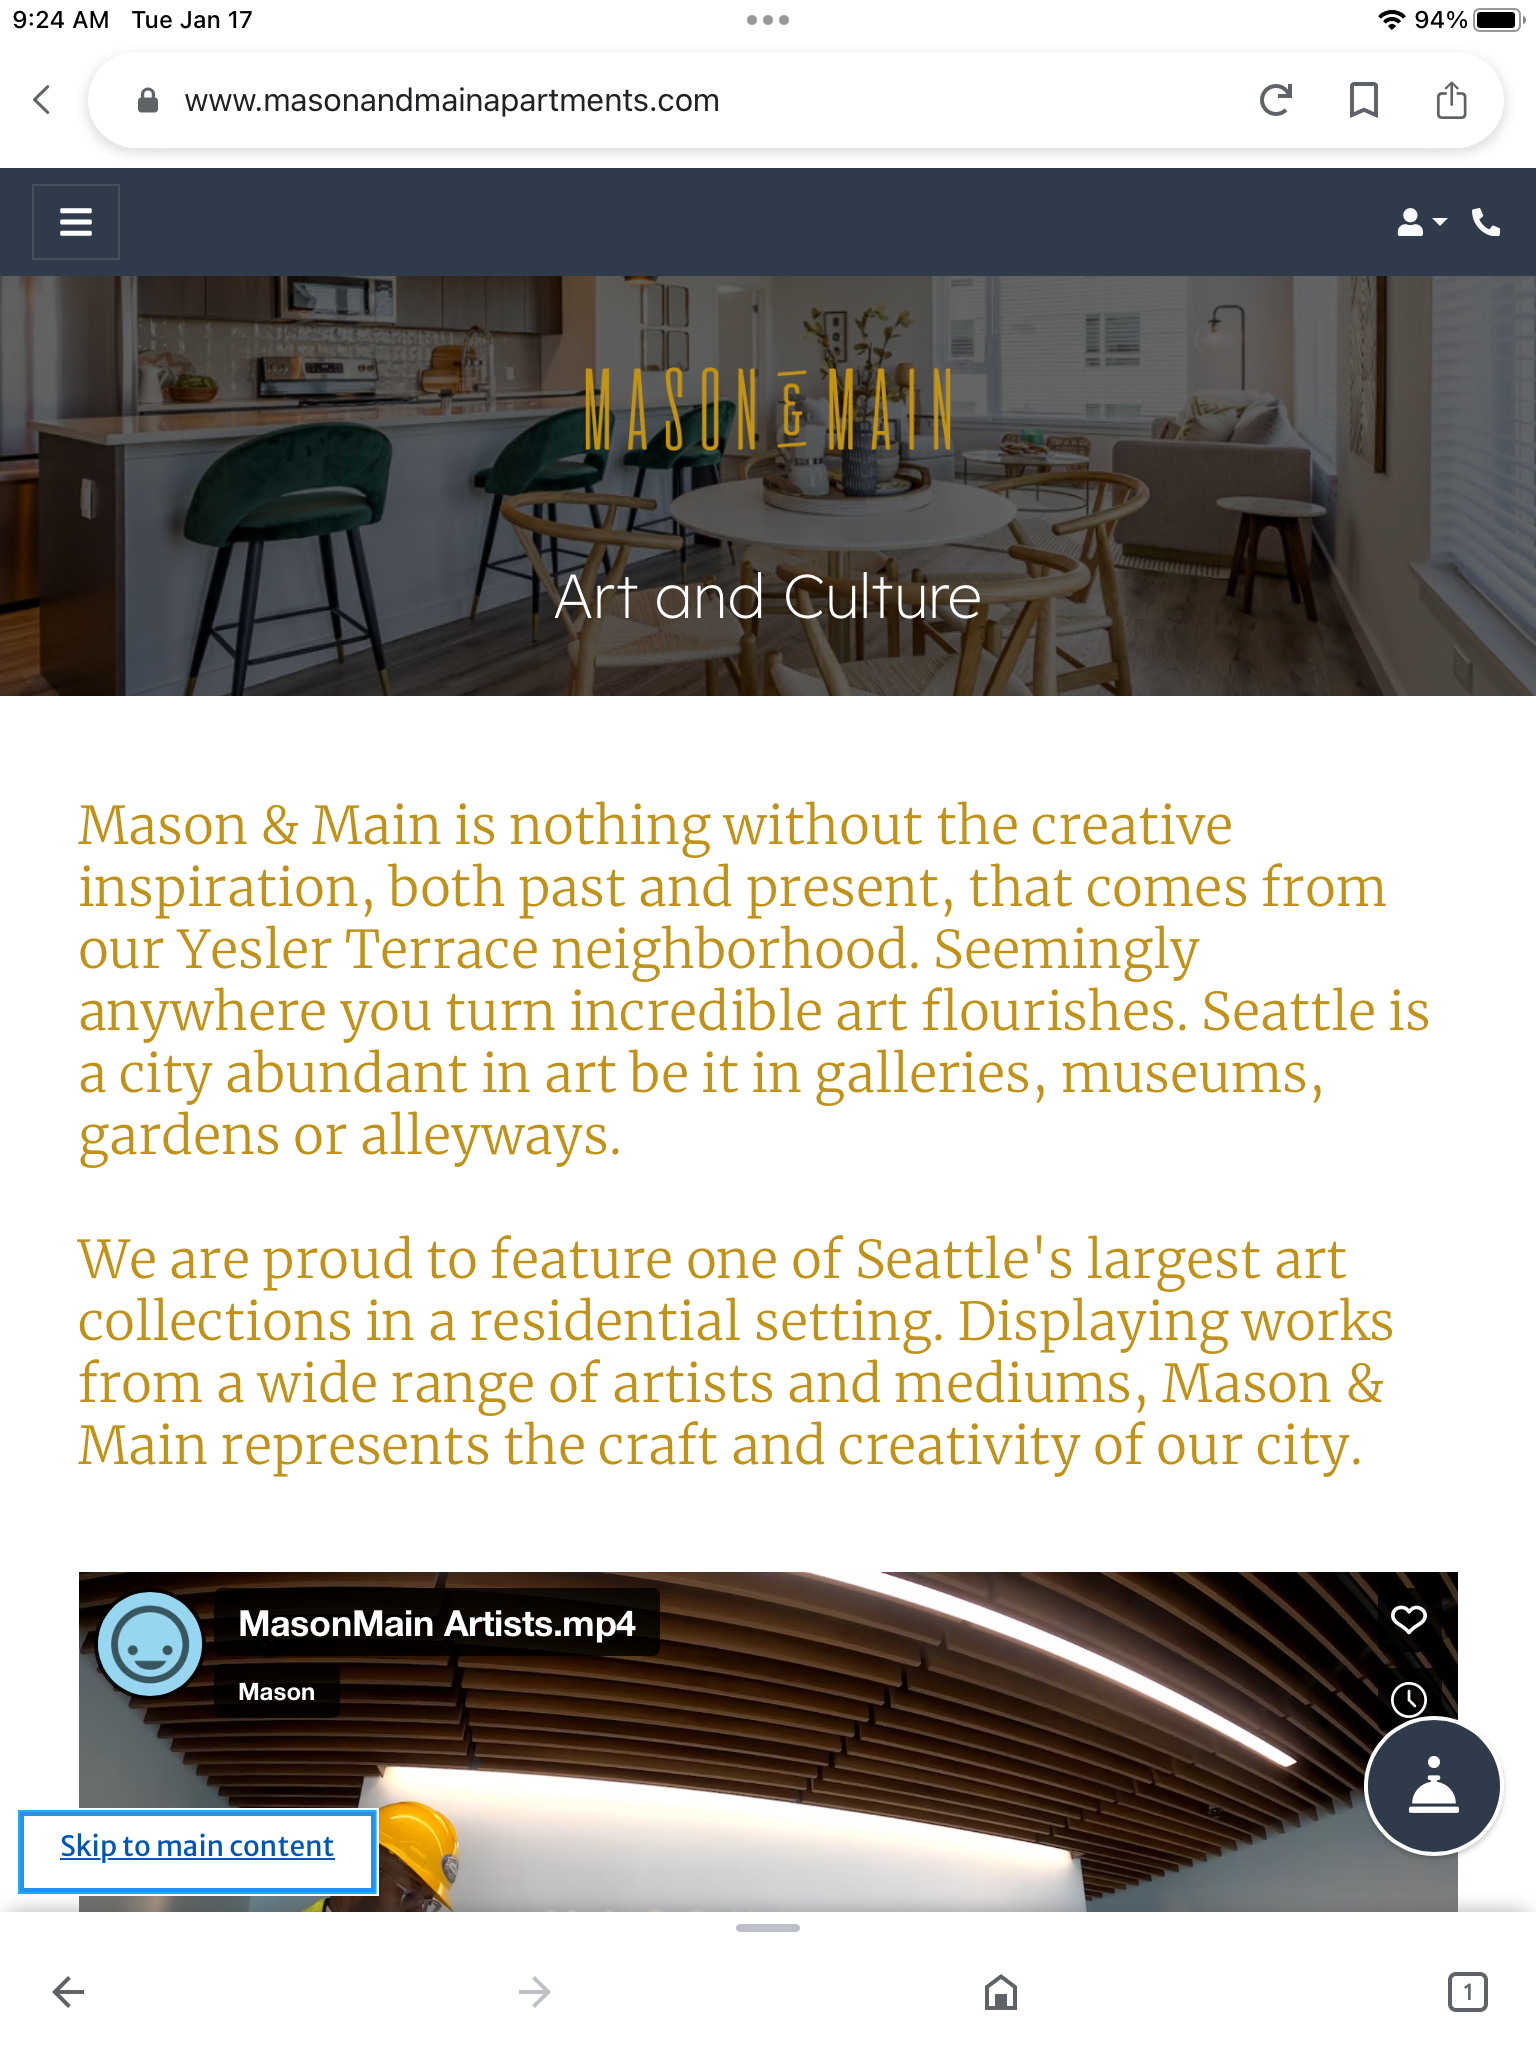
I am excited to share that an essay I wrote on creativity will be part of the anthology This is How We Create, edited by Dr. Yvette Prior of priorhouse blog and PRIORHOUSE WRITES.
Here is the draft book cover:
According to Dr. Prior’s Book page on her PRIORHOUSE WRITES it is scheduled for release in September 2026. Based on other books listed on that blog page, I think it will be available as a paperback from Amazon, a Kindle book and perhaps other mediums.
Recently my friend K reacquainted me with an old quilt with emotional ties I had forgotten about.
I’ve been quilting since the late 1990s and I’ve made a lot of quilts, most of which I’ve given as gifts or in some cases sold, so you kind of forget some of the quilts after a while; and sometimes the emotional connection you had with a particular quilt.
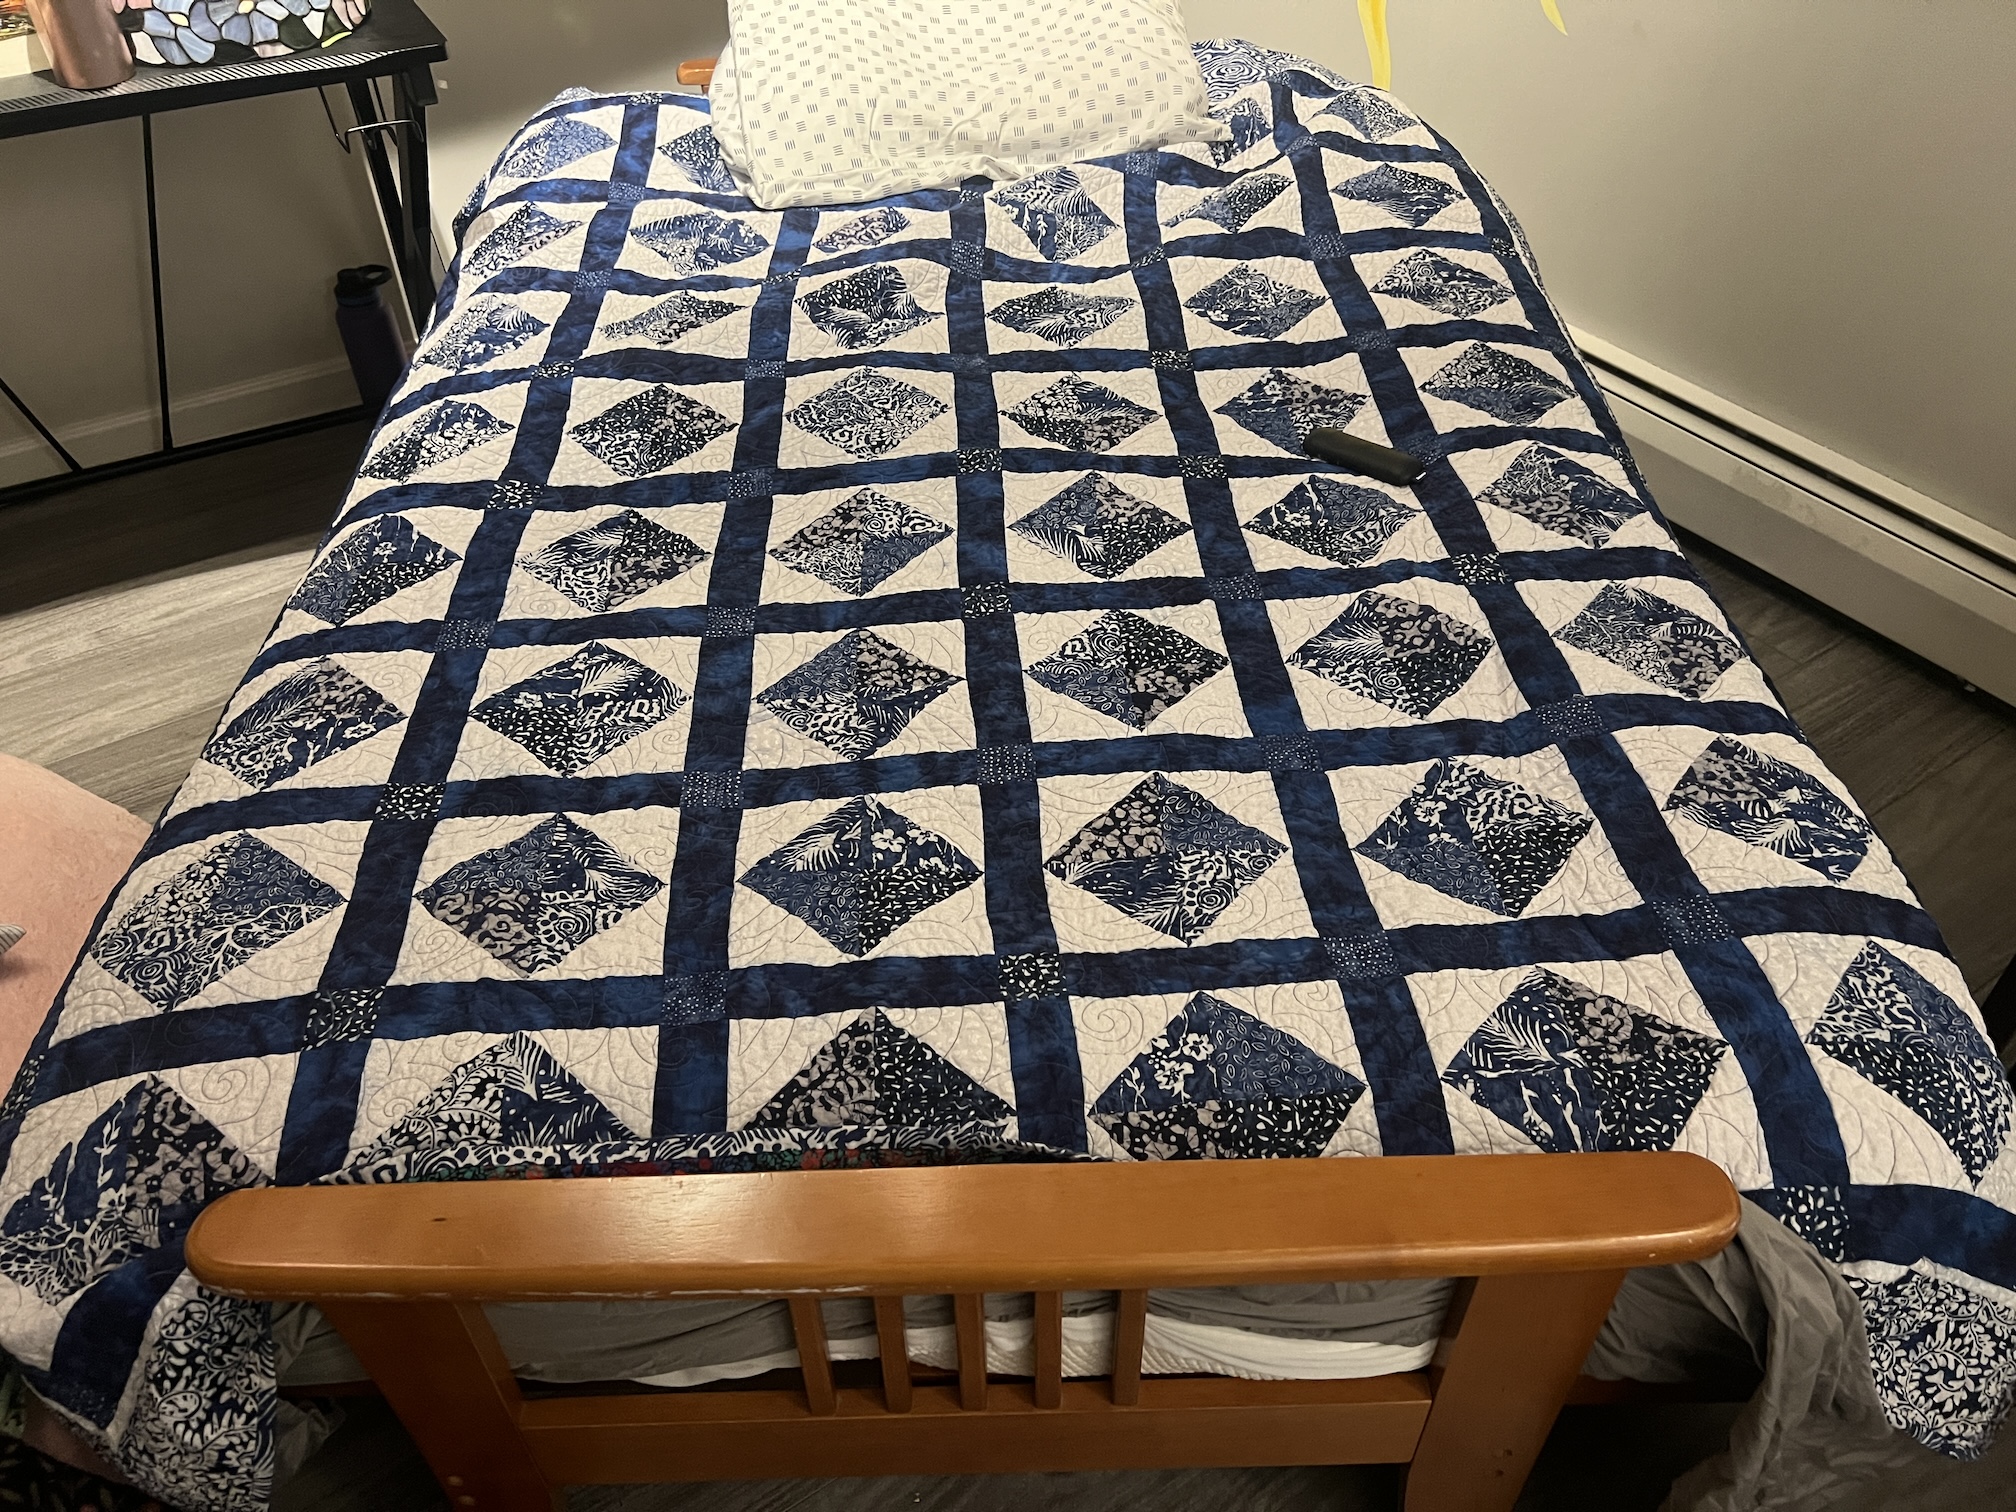
One of the quilts I had forgotten about was a blue and white quilt that I made from a pattern many years ago (10 years ago?) and ended up sellling (for basically the cost of the fabric and the professional longarm quilting) to a quilting friend L who fell in love with it.
Last week my friend K was staying at L’s home in New Hampshire and ended up sleeping under that blue and white quilt I made (and had forgotten about) and sent me photos:
It was nice to see the quilt but I forgot the emotional connection I had with the quilt until K mentioned that the quilt had a spectacular backing.
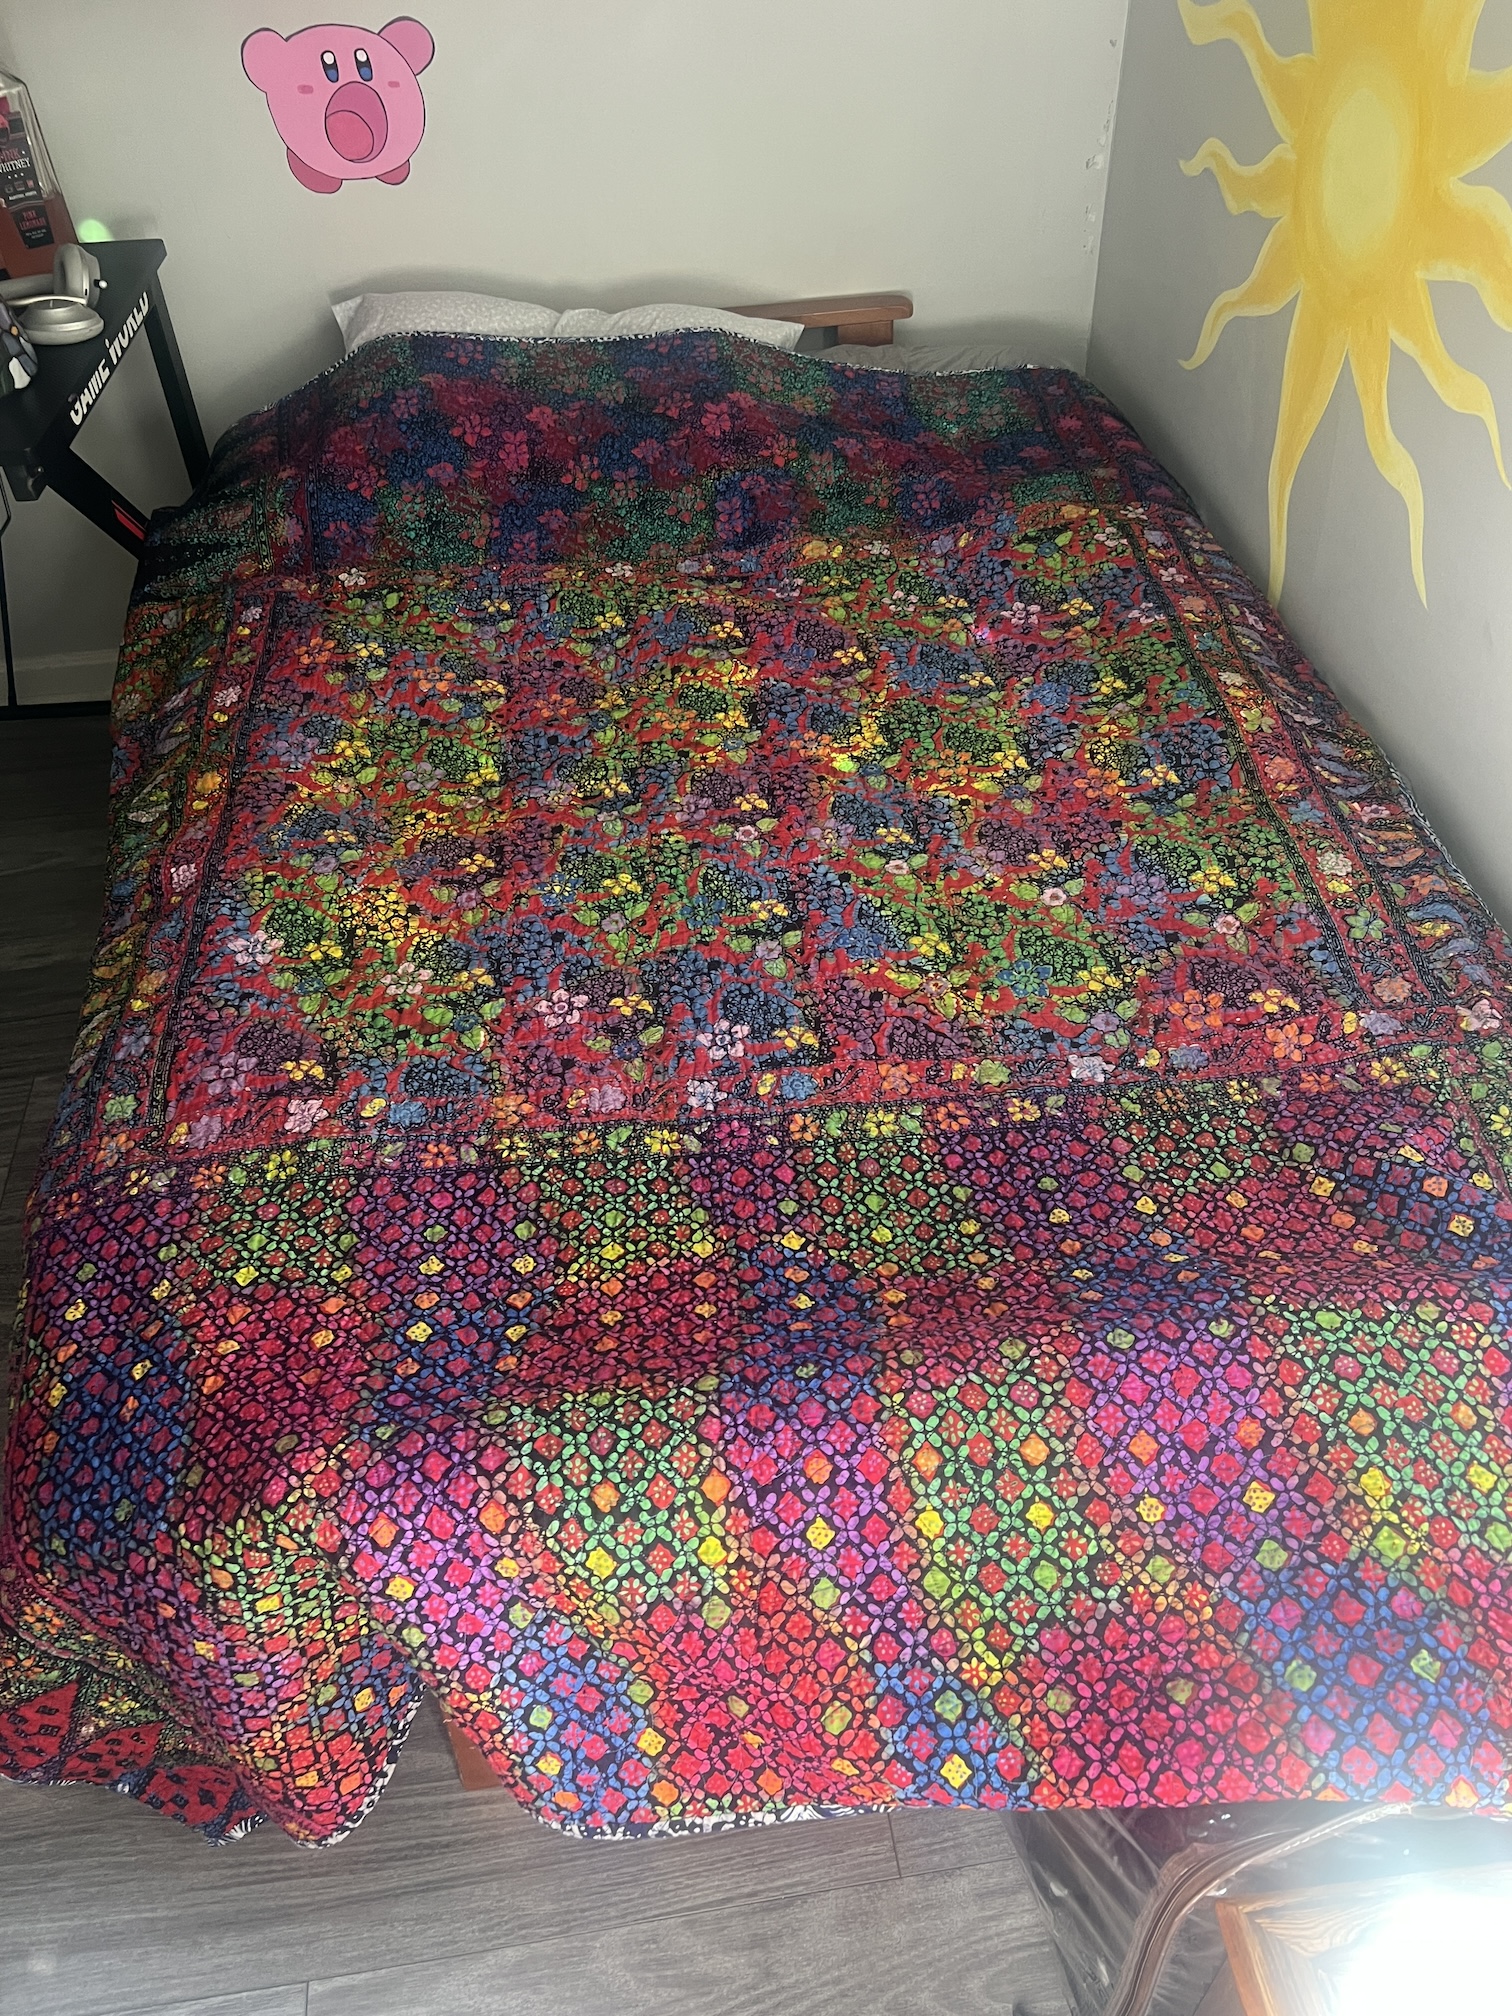
I gasped as I suddenly remembered the backing I put on the quilt and asked K to send me a picture of the back of the quilt so I could see it again:
On the back of what one might consider a “quiet quilt” (blues and white in a traditional setting) I put what one might consider a “very bold” fabric!
At the time I made the quilt I thought the front of it was “boring” and decided to spice it up with a colorful backing fabric I found in my stash.
That fabric was from my friend Tracy who suddenly died a couple years after giving me the fabric which she found at a thrift shop.
I met Tracy at work back in the 1990s when I lived in Houston, Texas and we stayed friends for many years, occasionally losing touch but finding each other again. I started quilting while livingi in Seattle, Washington and she, unknown to me at the time, had also started quilting! When we reconnected a couple years after each of us becoming quilters we were very elated that we now shared the same hobby.
I however have some intense regret related to Tracy. Over a year before she died we were supposed to go to the International Quilt Festival in Houston in October, and I cancelled and said it would work better for us to go next year.
There was no next year quilt festival for Tracy as she passed away the following year before the festival. I had missed a glorious opportunity and memory with my friend because I delayed going to the event with her a year. I also missed an opportunity to spend time with her before she left this existence.
Perhaps this is why many years ago I decided to sell the quilt to L. L loved the quilt and the quilt was just making me sad, reminding me of Tracy’s passing and my regret on not going to the quilt festival with her.
Now of course I wish I’d kept the quilt and honored Tracy’s memory by still having a quilt a made with a backing she gave me.
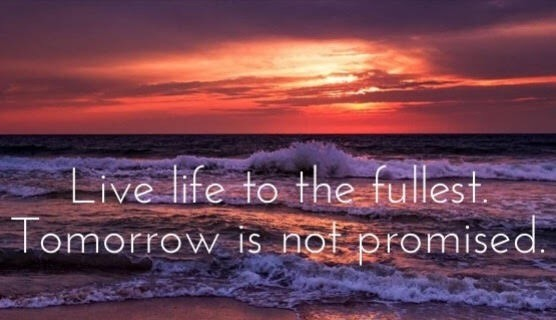
However, all I can do now is be grateful that is being used and not in a closet somewhere tucked away; to remember not to wait to do special things with special people; and tomorrow is not promised.
I sat down this morning to catch up on reading blog posts and to write a blog post and I discovered that Yvette @Priorhouse Blog has posted the interview I did for her blog.
A couple of months ago she invited me to be interviewed for her Summer 2025 series of blogger interviews. I accepted and here is the interview on her blog:
Hopefully clicking the above image where I’ve imbedded link to the interview works to open it.
I’ve enjoying seeing galleries/summaries of what my blogging buddies made in 2024 and thought I would share the same type of post. I thought I would share my finished projects (no other work to be done on them) and my open/ongoing projects (that I hope to finish in 2025):
Finished
Curiously I did’t finish a lot of projects in 2024 but here are the crafting projects I actually finished 2024:
Unfinished
Here are the pieces I began in 2024 and didn’t finish; or worked on in 2024 that I started before 2024:
You might be thinking: “Tierney, you didn’t get a lot done in 2024”! That’s what I am thinking but then I did a lot of traveling in 2024 – see my next post.
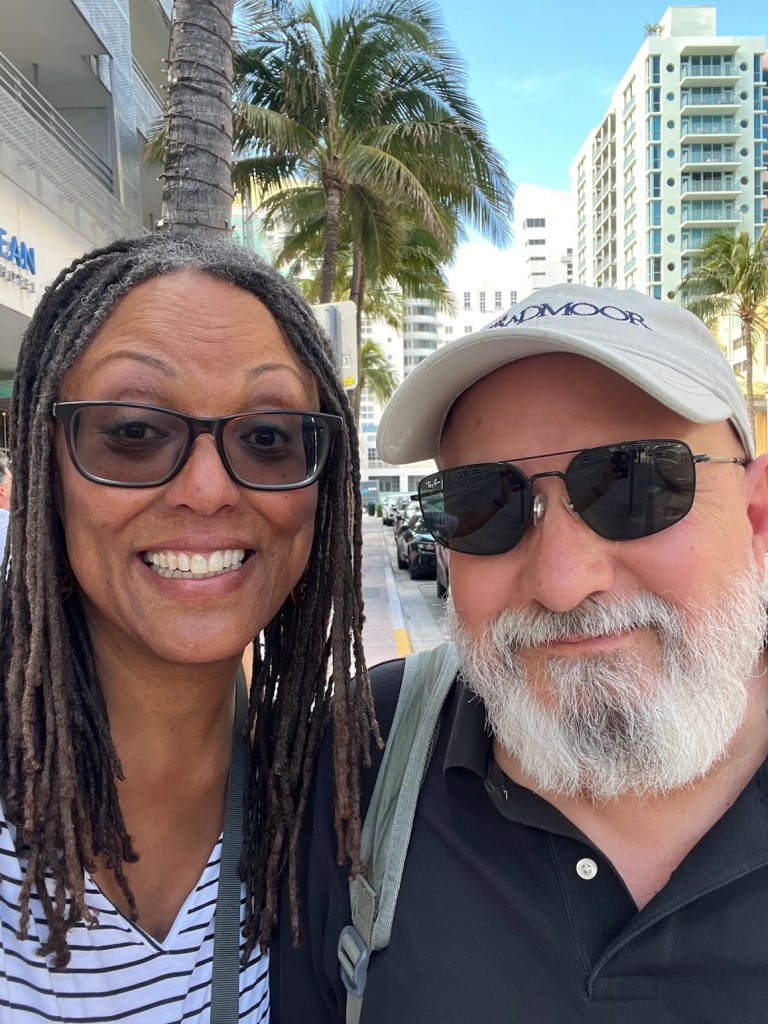
As I mentioned in the post Rock & Roll Icons’ Guitars and Outfits, John and I recently returned from a trip to Miami and Hollywood, Florida where John attended a poker tournament.
Before John played in his day long poker tournament, we spent a couple days wandering about in Hollywood and Miami (South Beach), Florida.
Here’s a little photo travelogue of some of our fun adventures.
HOLLYWOOD, FLORIDA
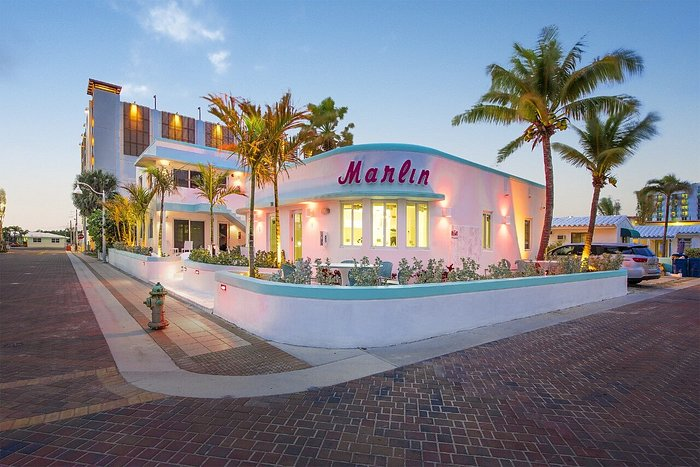
We stayed at the Marlin Beachside in the Hollywood Beach area, right on the beach:
Images credit: Tripadvisor
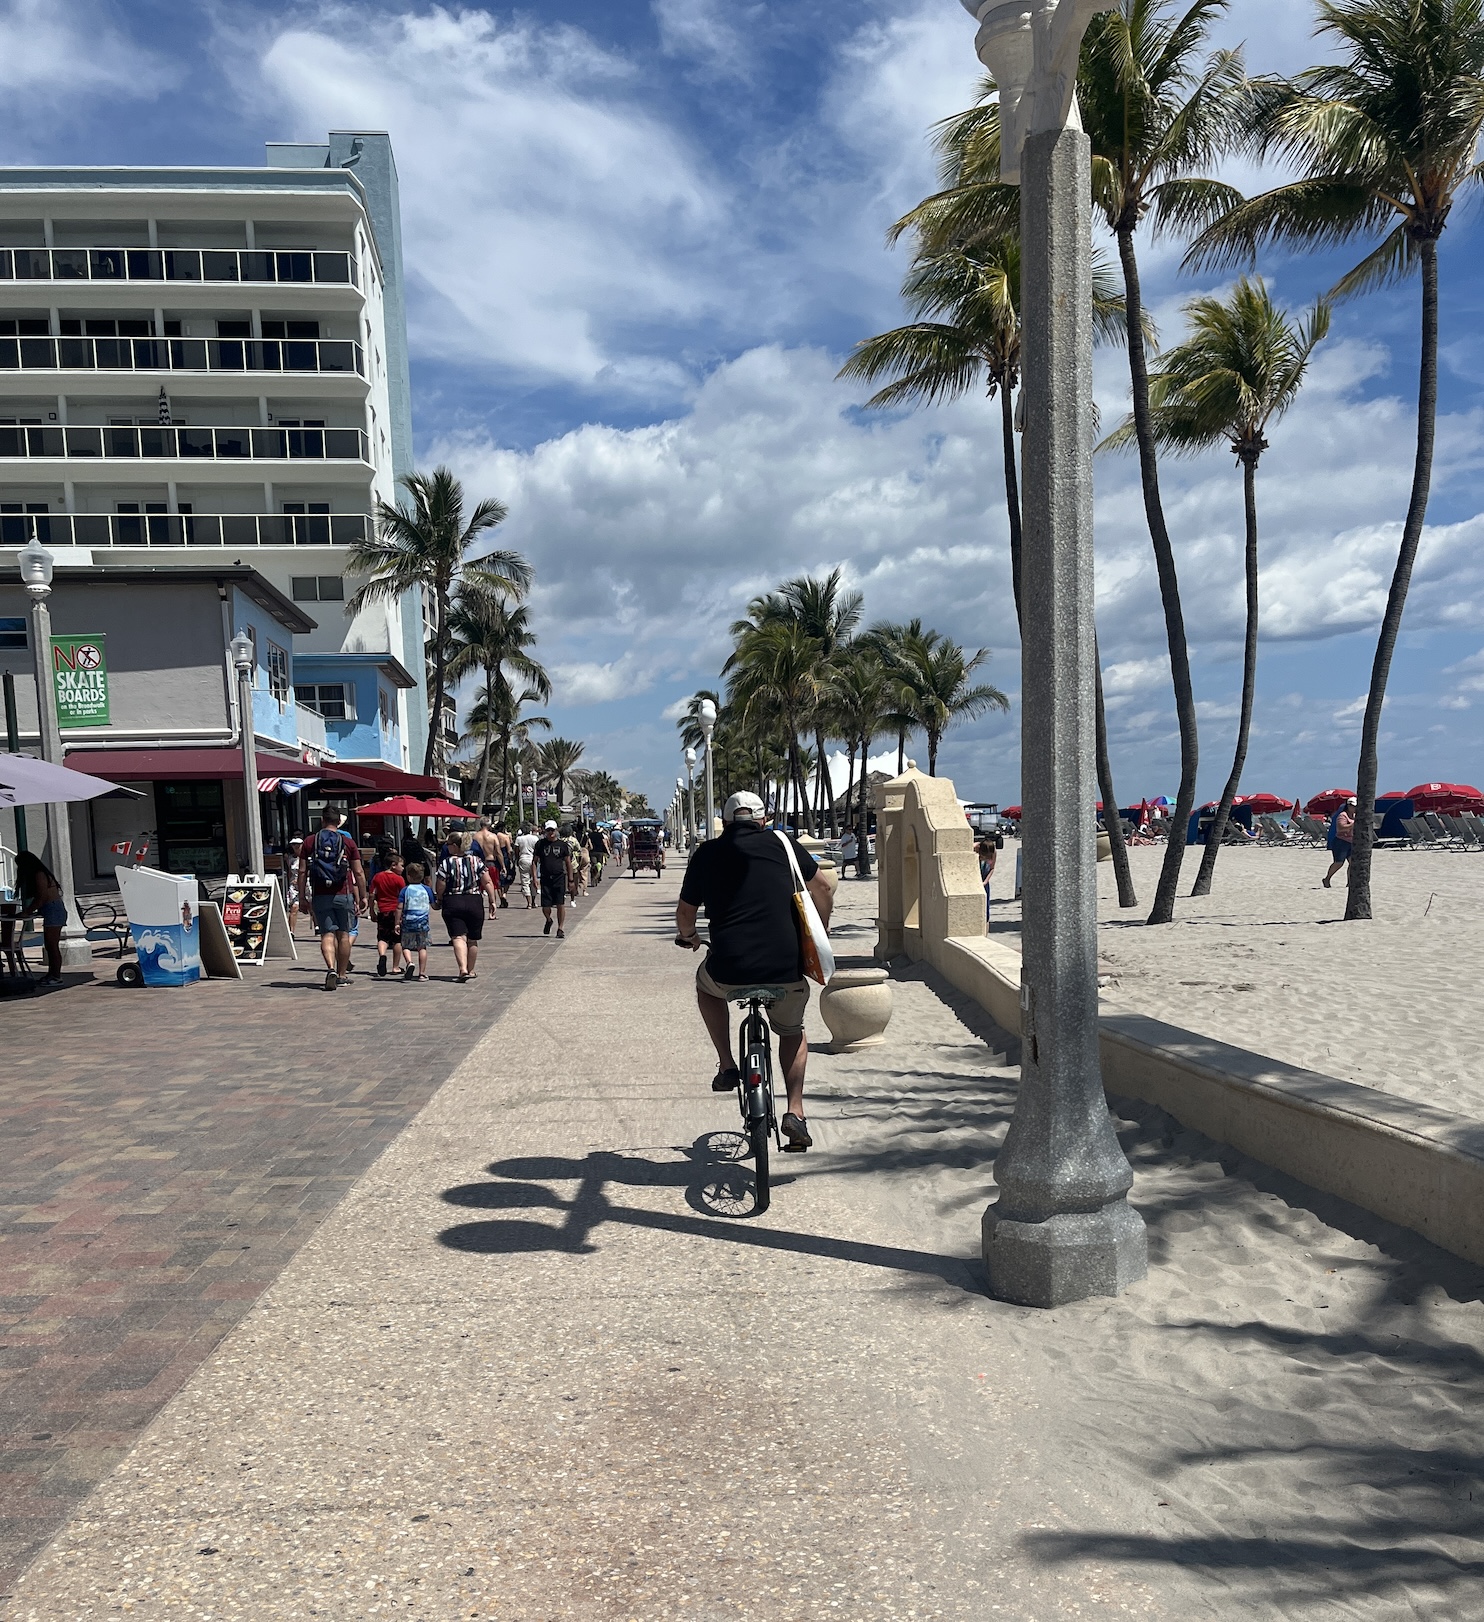
They had free bikes for guests, so every morning we went for a 8 – 10 mile bike ride along the beach on the boardwalk and then to breakfast:
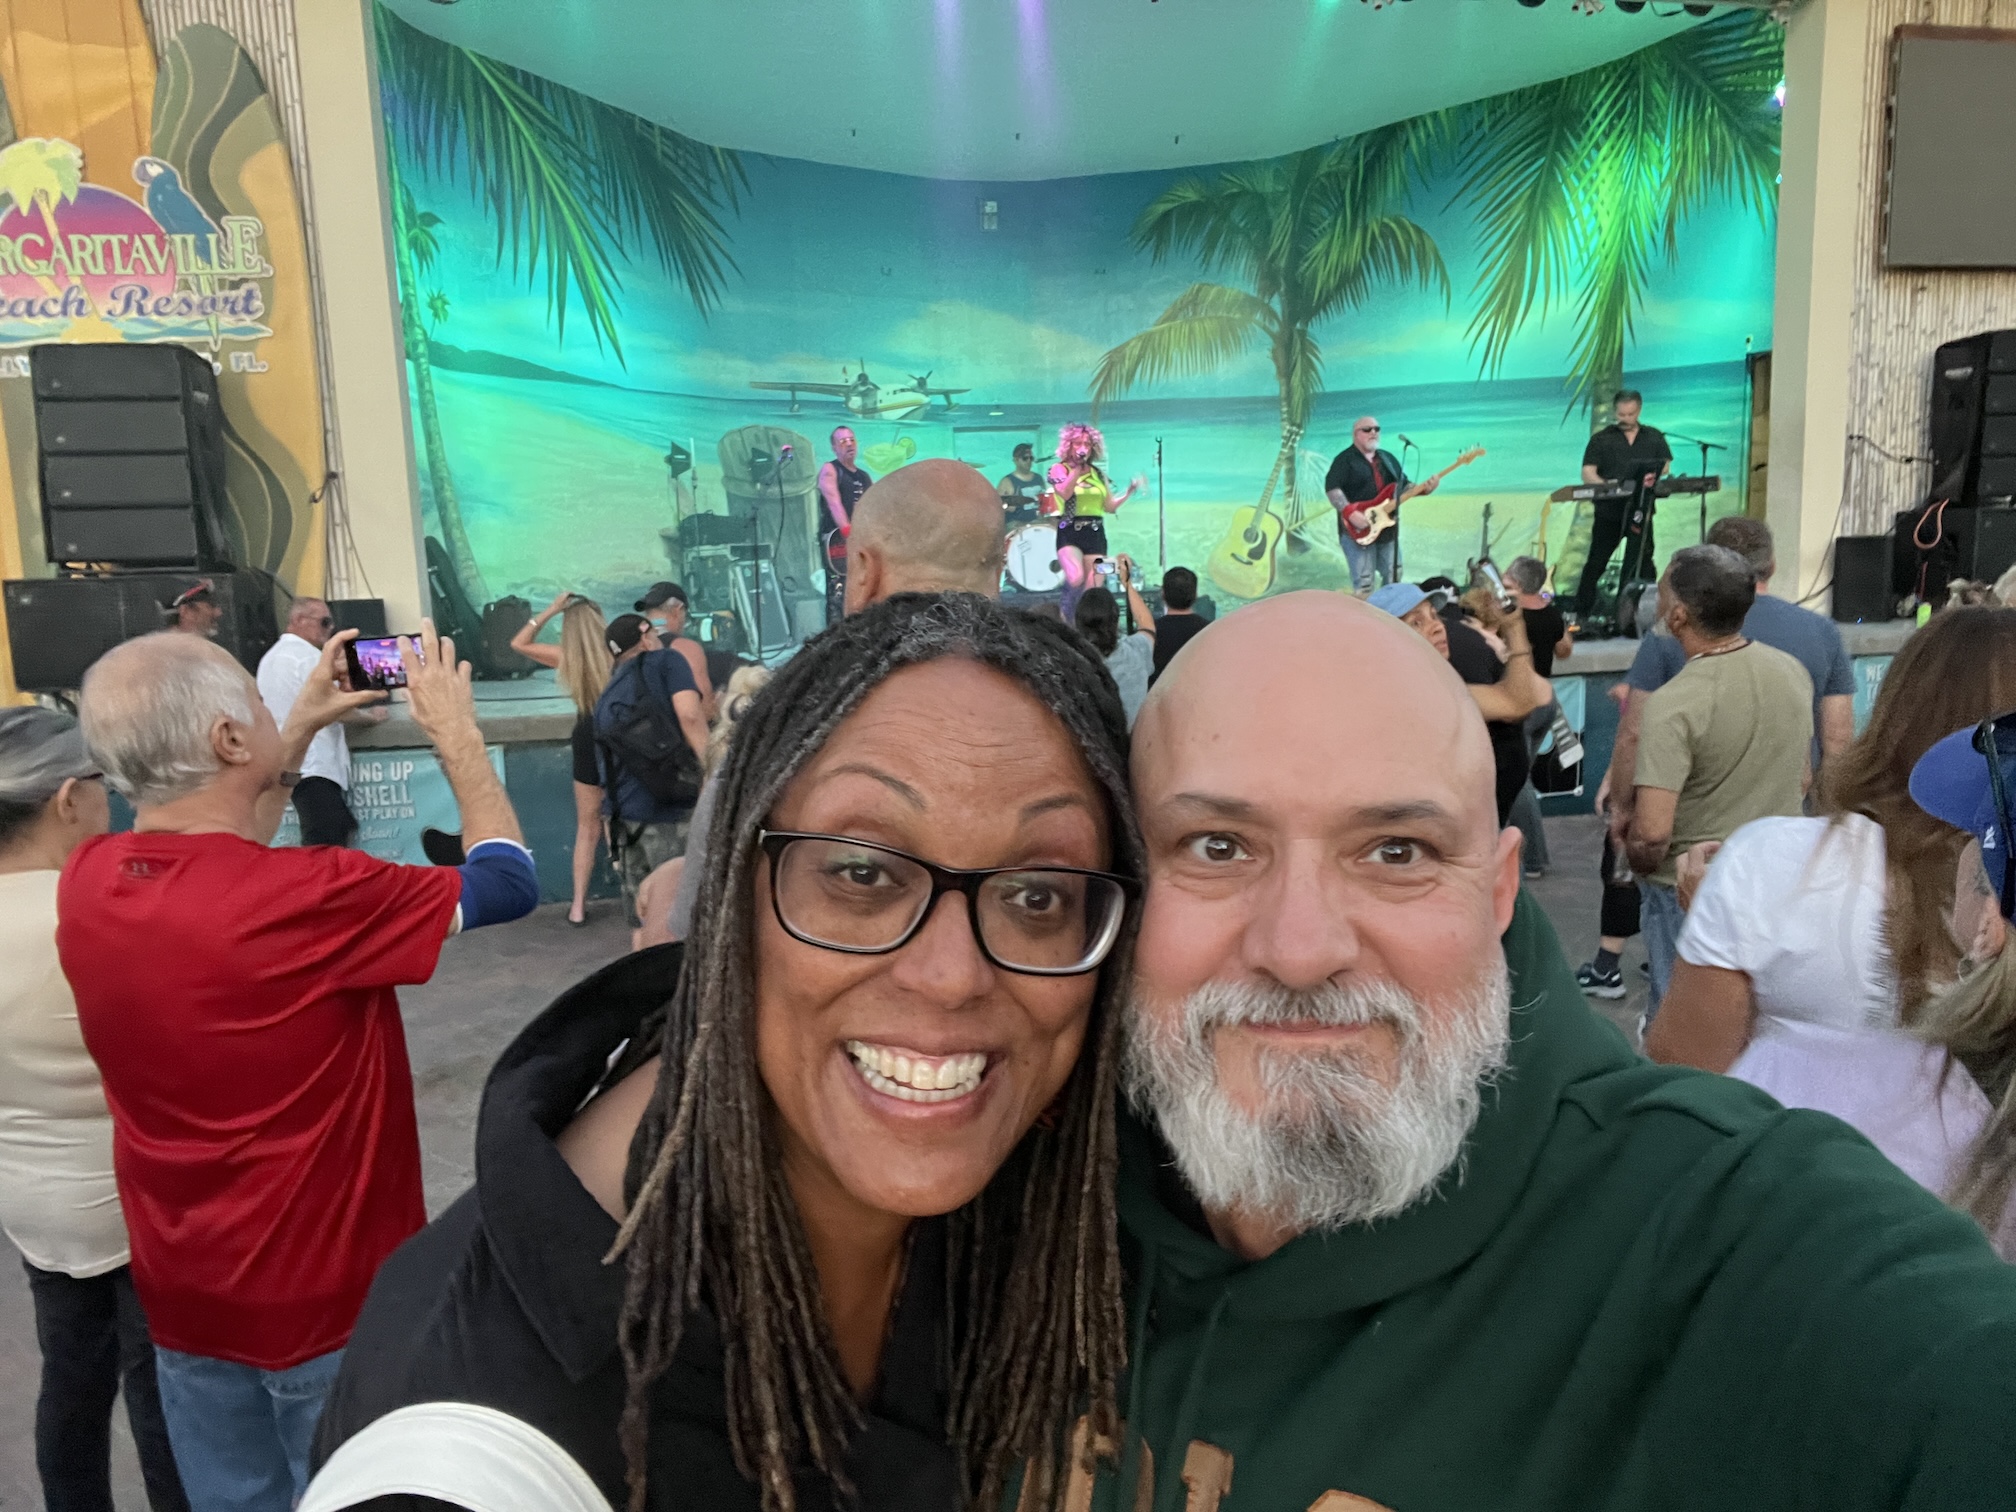
Nearly every evening there was a free rock concert on the boardwalk by a cover band. Some of them were kind of “cheesy” but one evening they had an amazing band that did excellent Classic Rock covers. Here we are enjoying the music!
SOUTH BEACH, MIAMI, FLORIDA
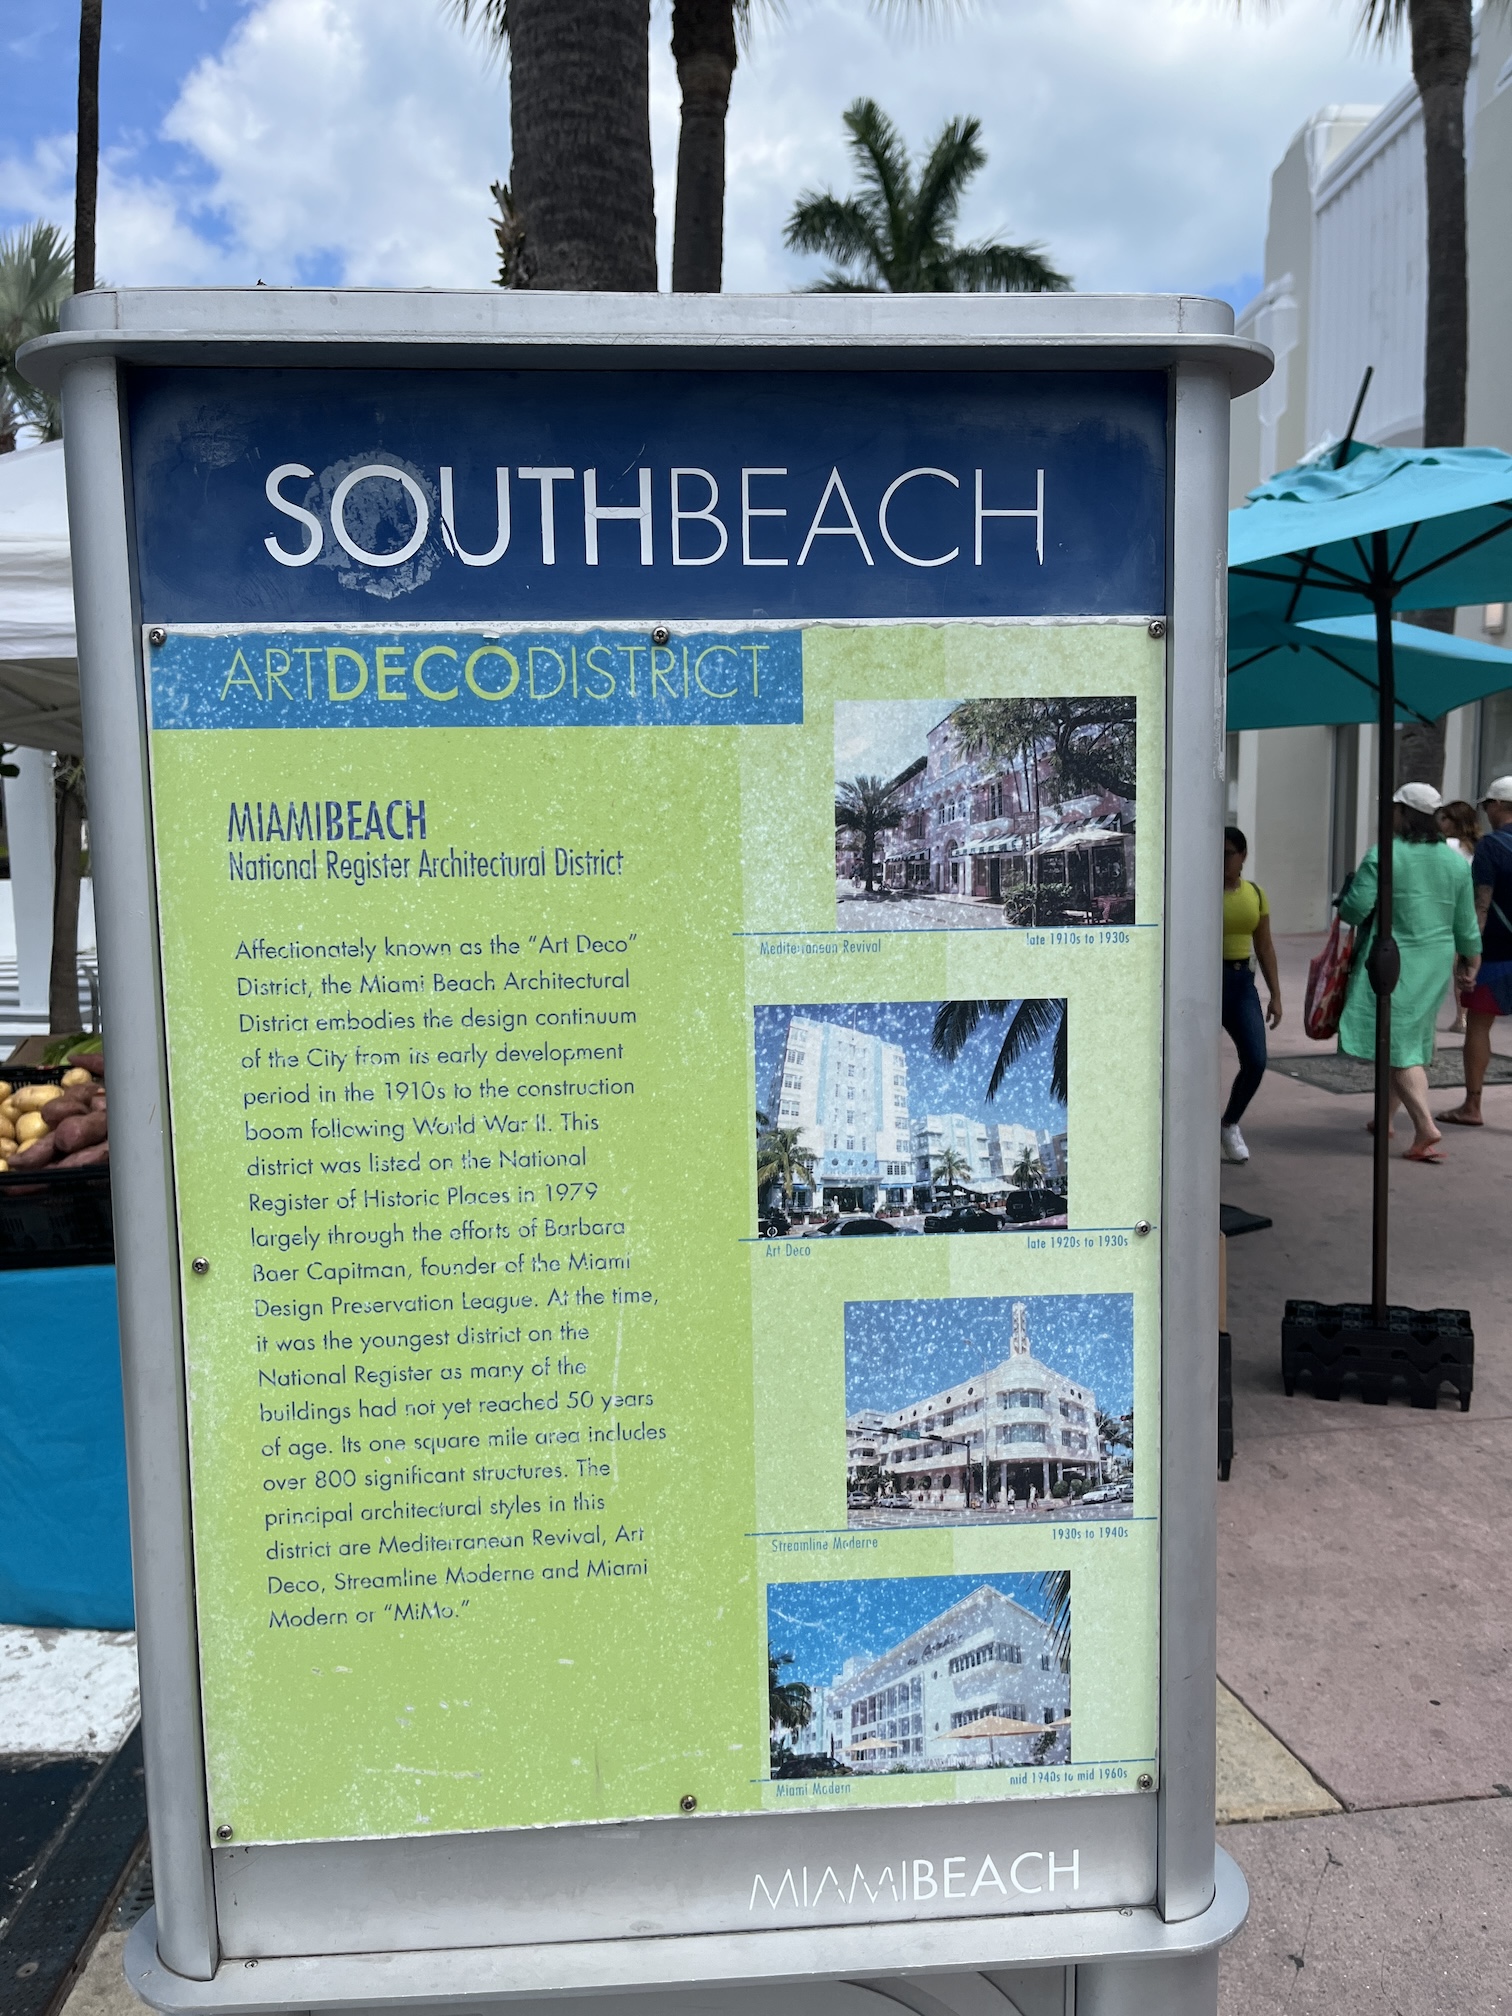
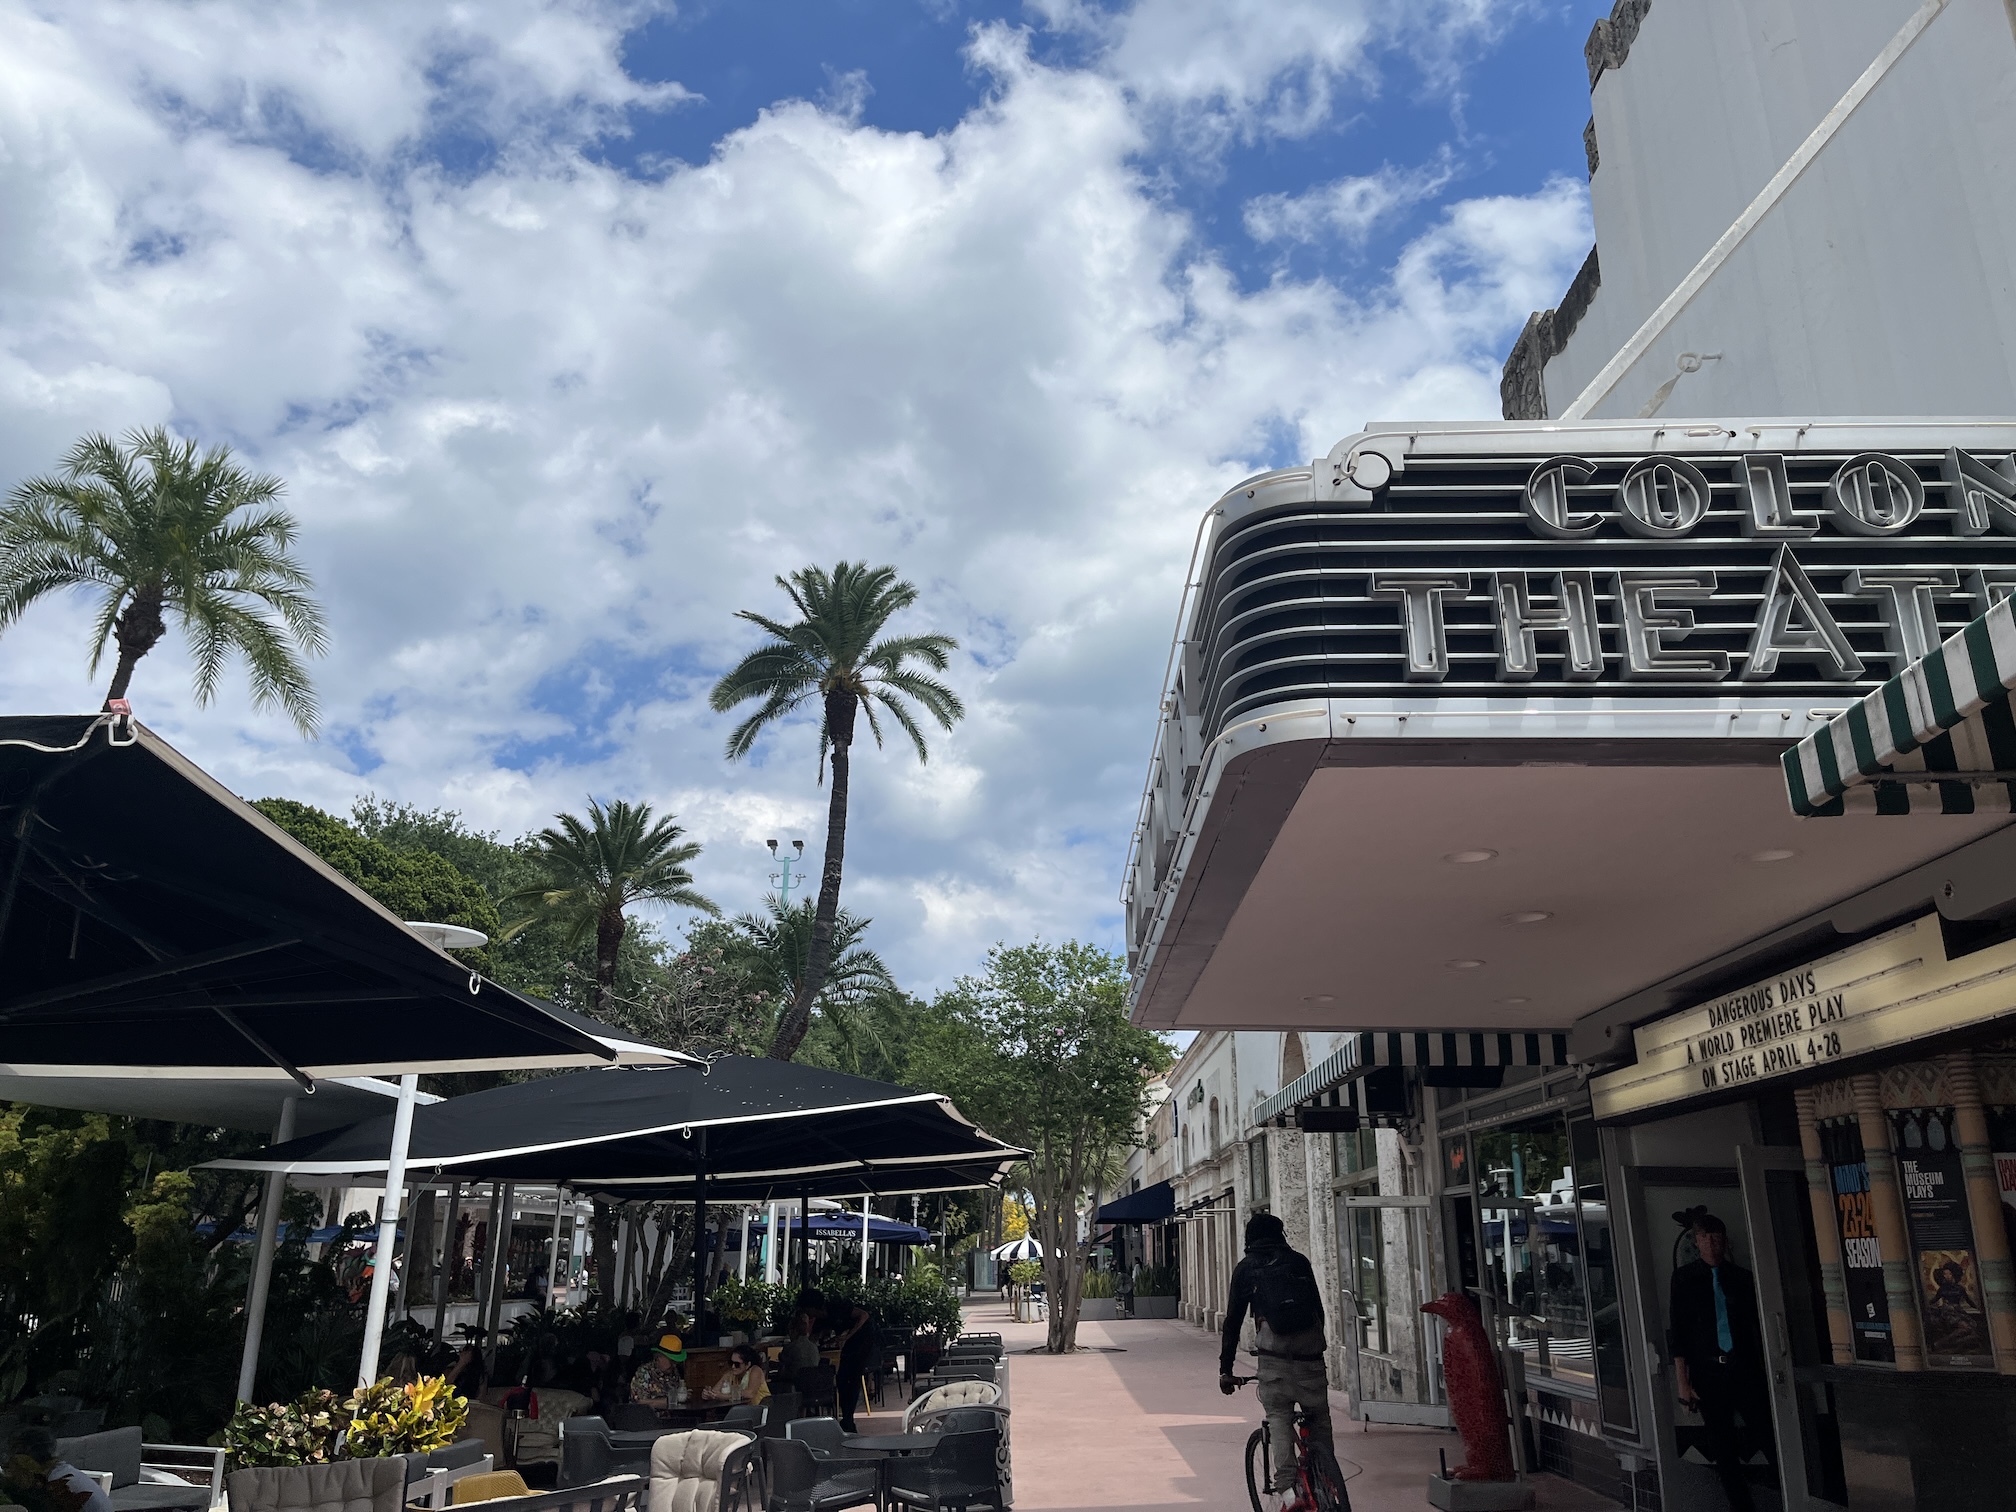
We had a rental car to get around and we spent an afternoon in the South BeachArt Deco Historic District in Miami.
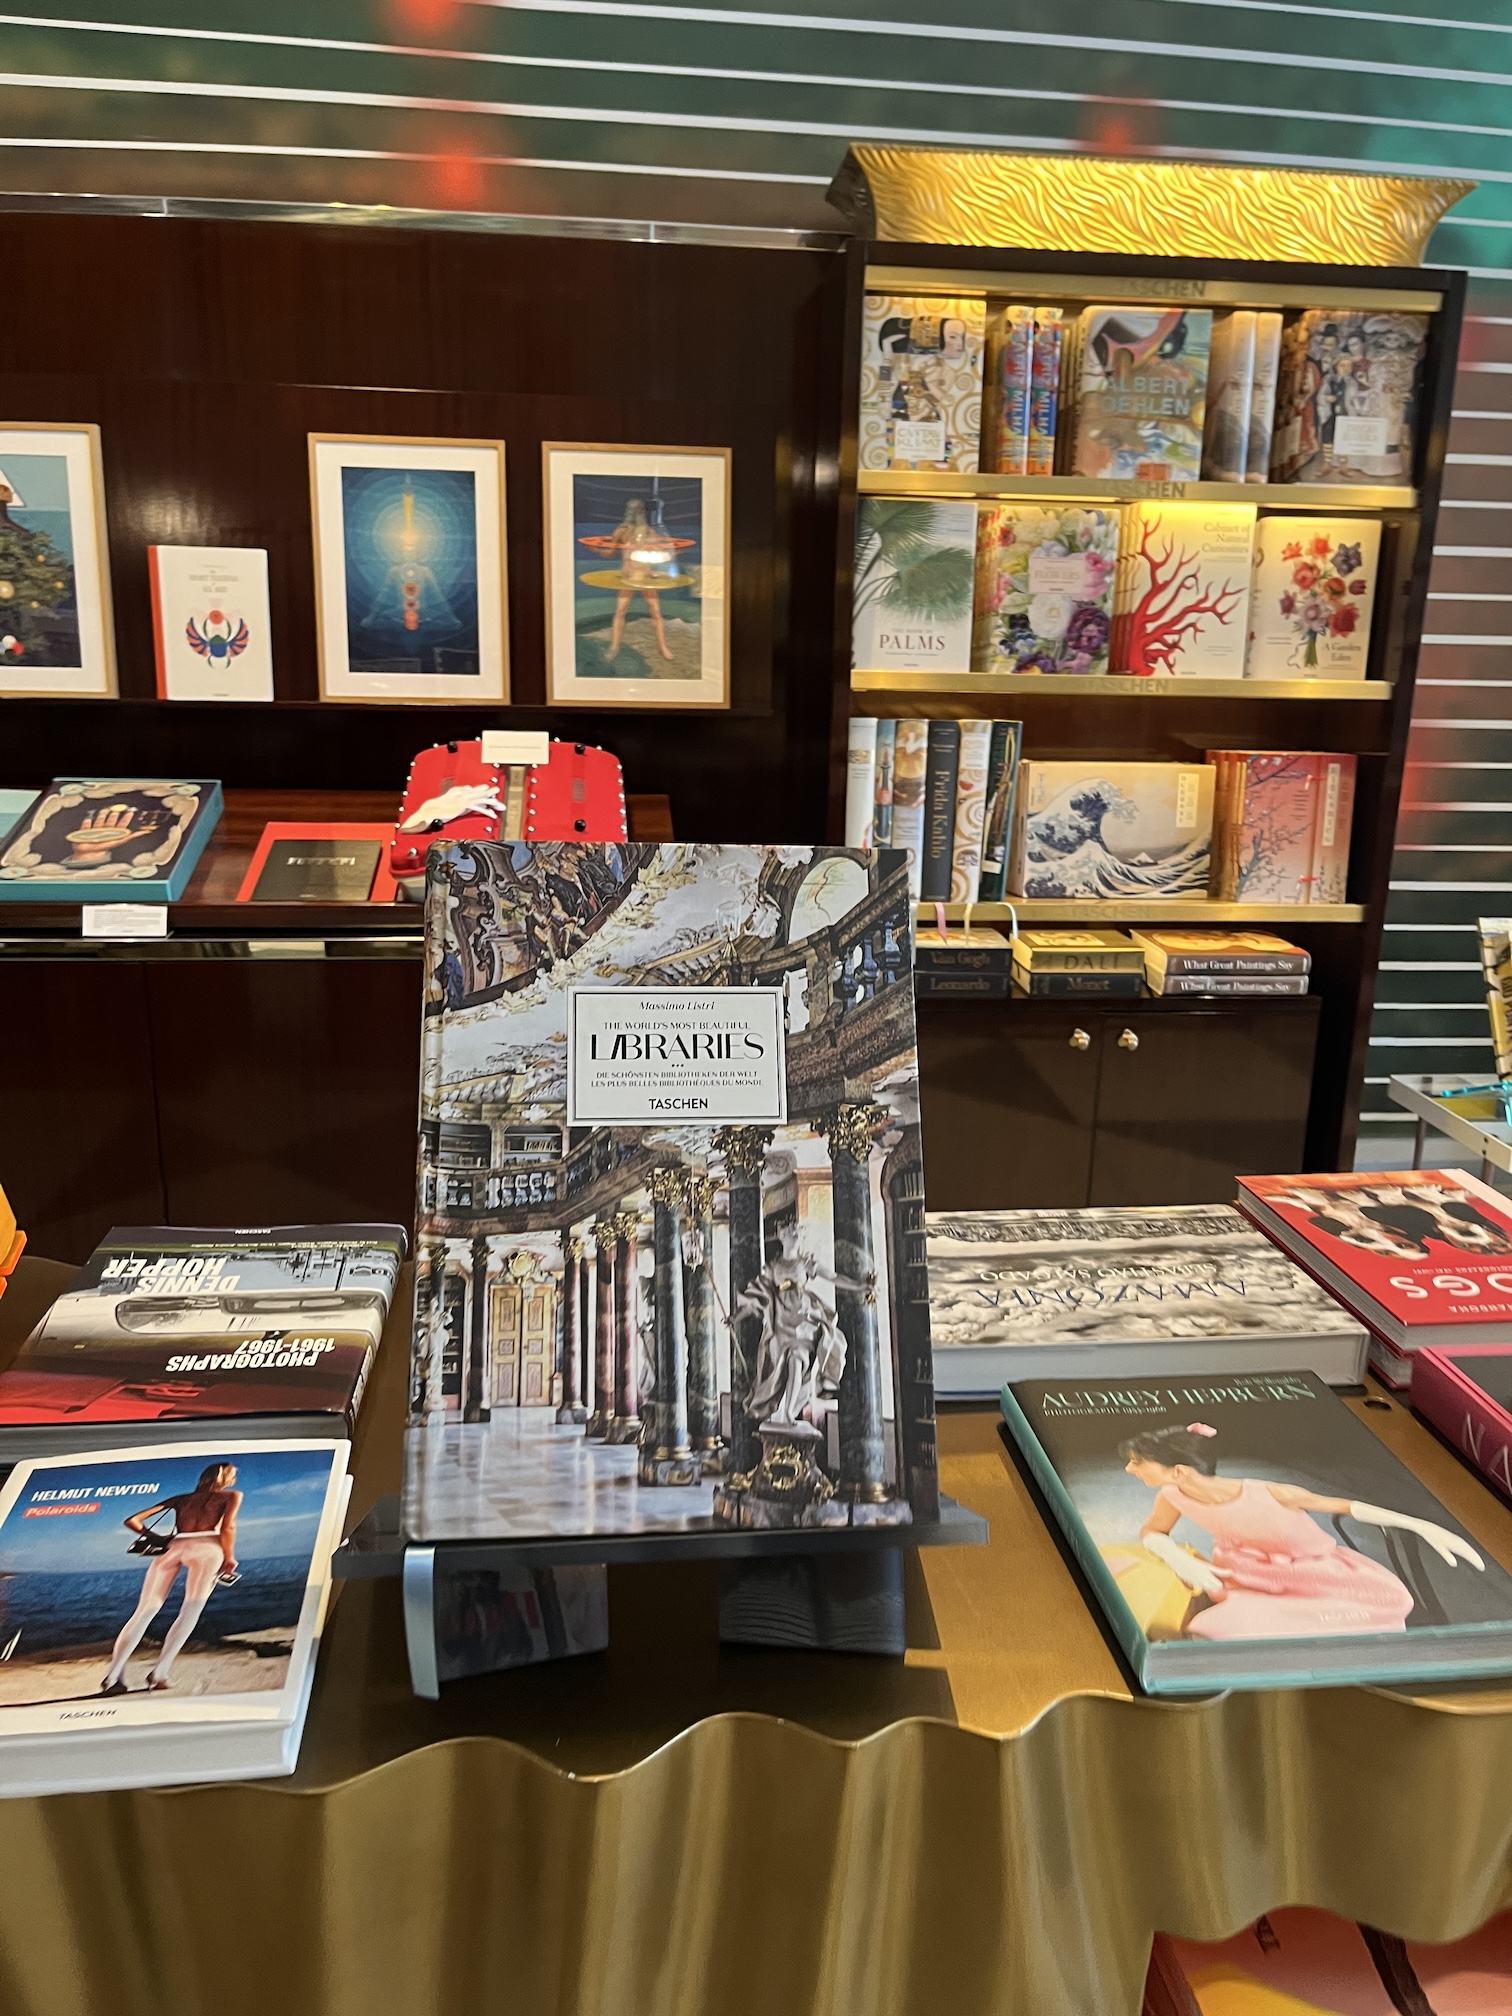
Our wandering about the outdoor shopping district began with a visit to an amazing German bookstore – Taschen Books. There are only two US bookstore locations for this store – in Hollywood, California and in Miami, Florida.
The store featured mind blowing oversized coffee table books, which started at around $80 USD in price. My favorite of their books was one about the world’s most beautiful libraries:
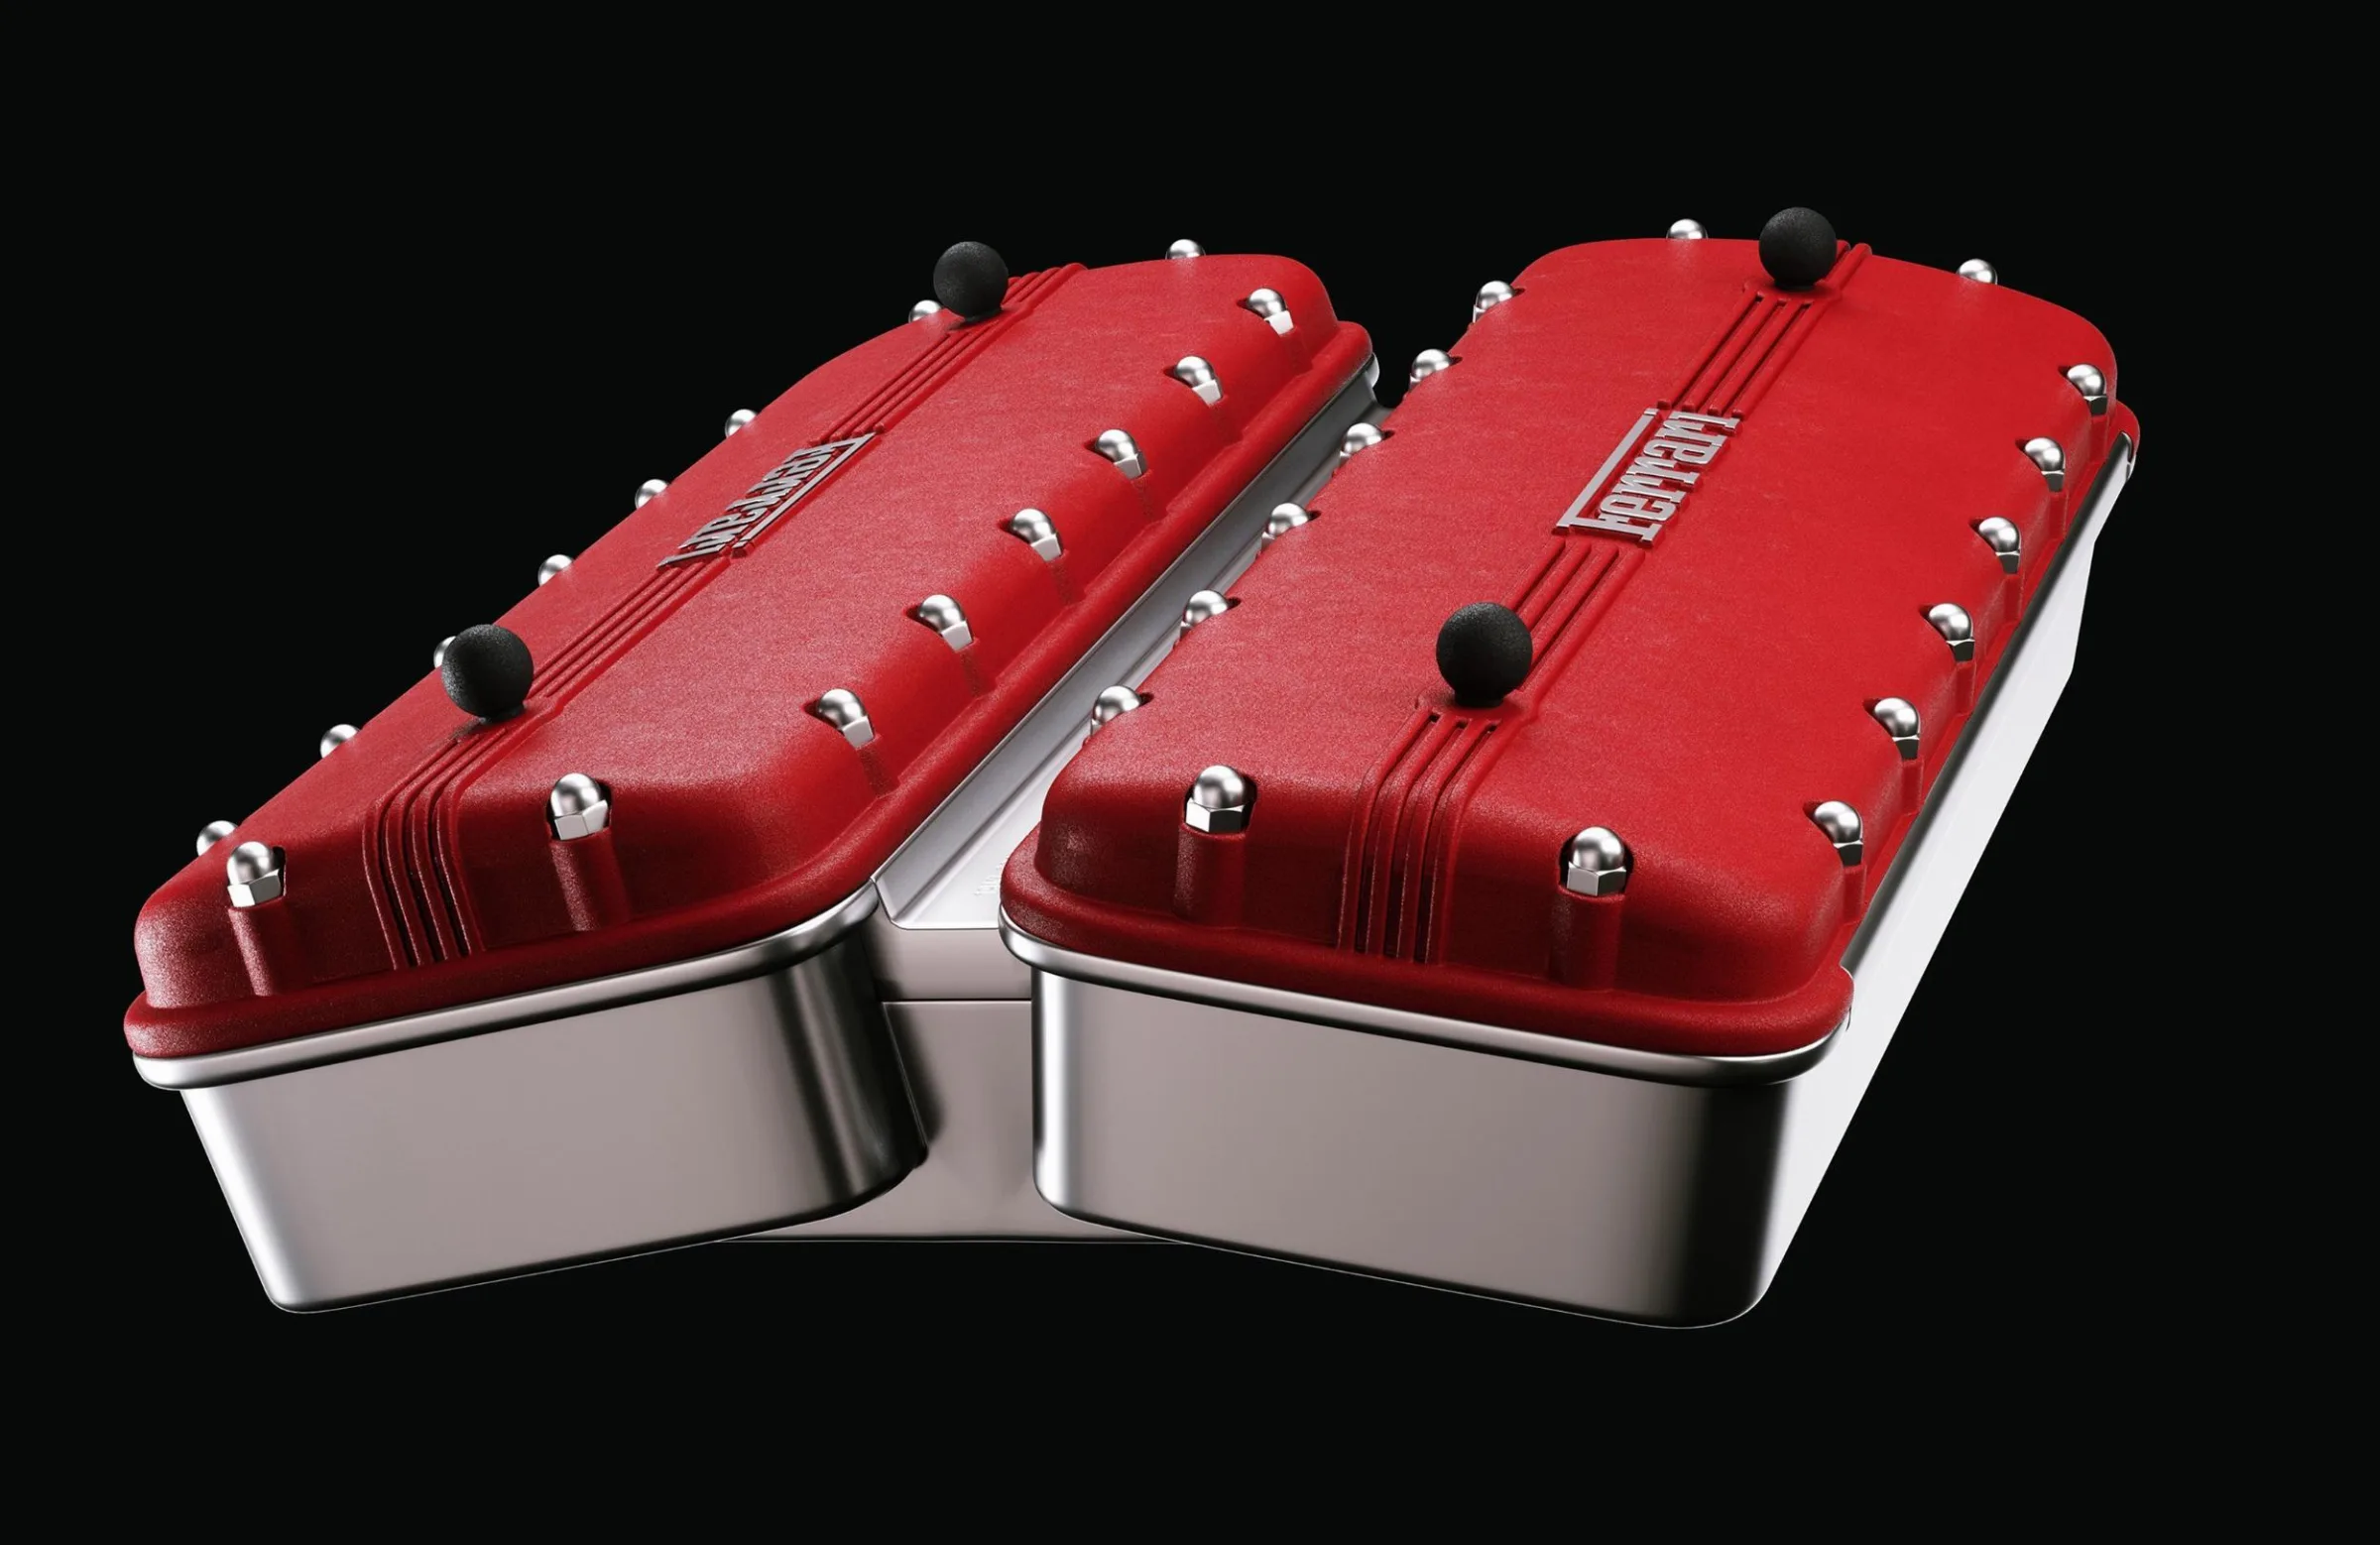
They had on display an amazing book on Ferrari race cars that retailed for $7500 USD and was encased in a special display case, which John, a race car buff, enjoyed looking through with the required white gloves on his hands.
Image credit; Taschen Books website
Wandering around the shopping area, we came across a very cool window display at one of the many art galleries around the Art Deco District – a display of human sized matches with human heads!
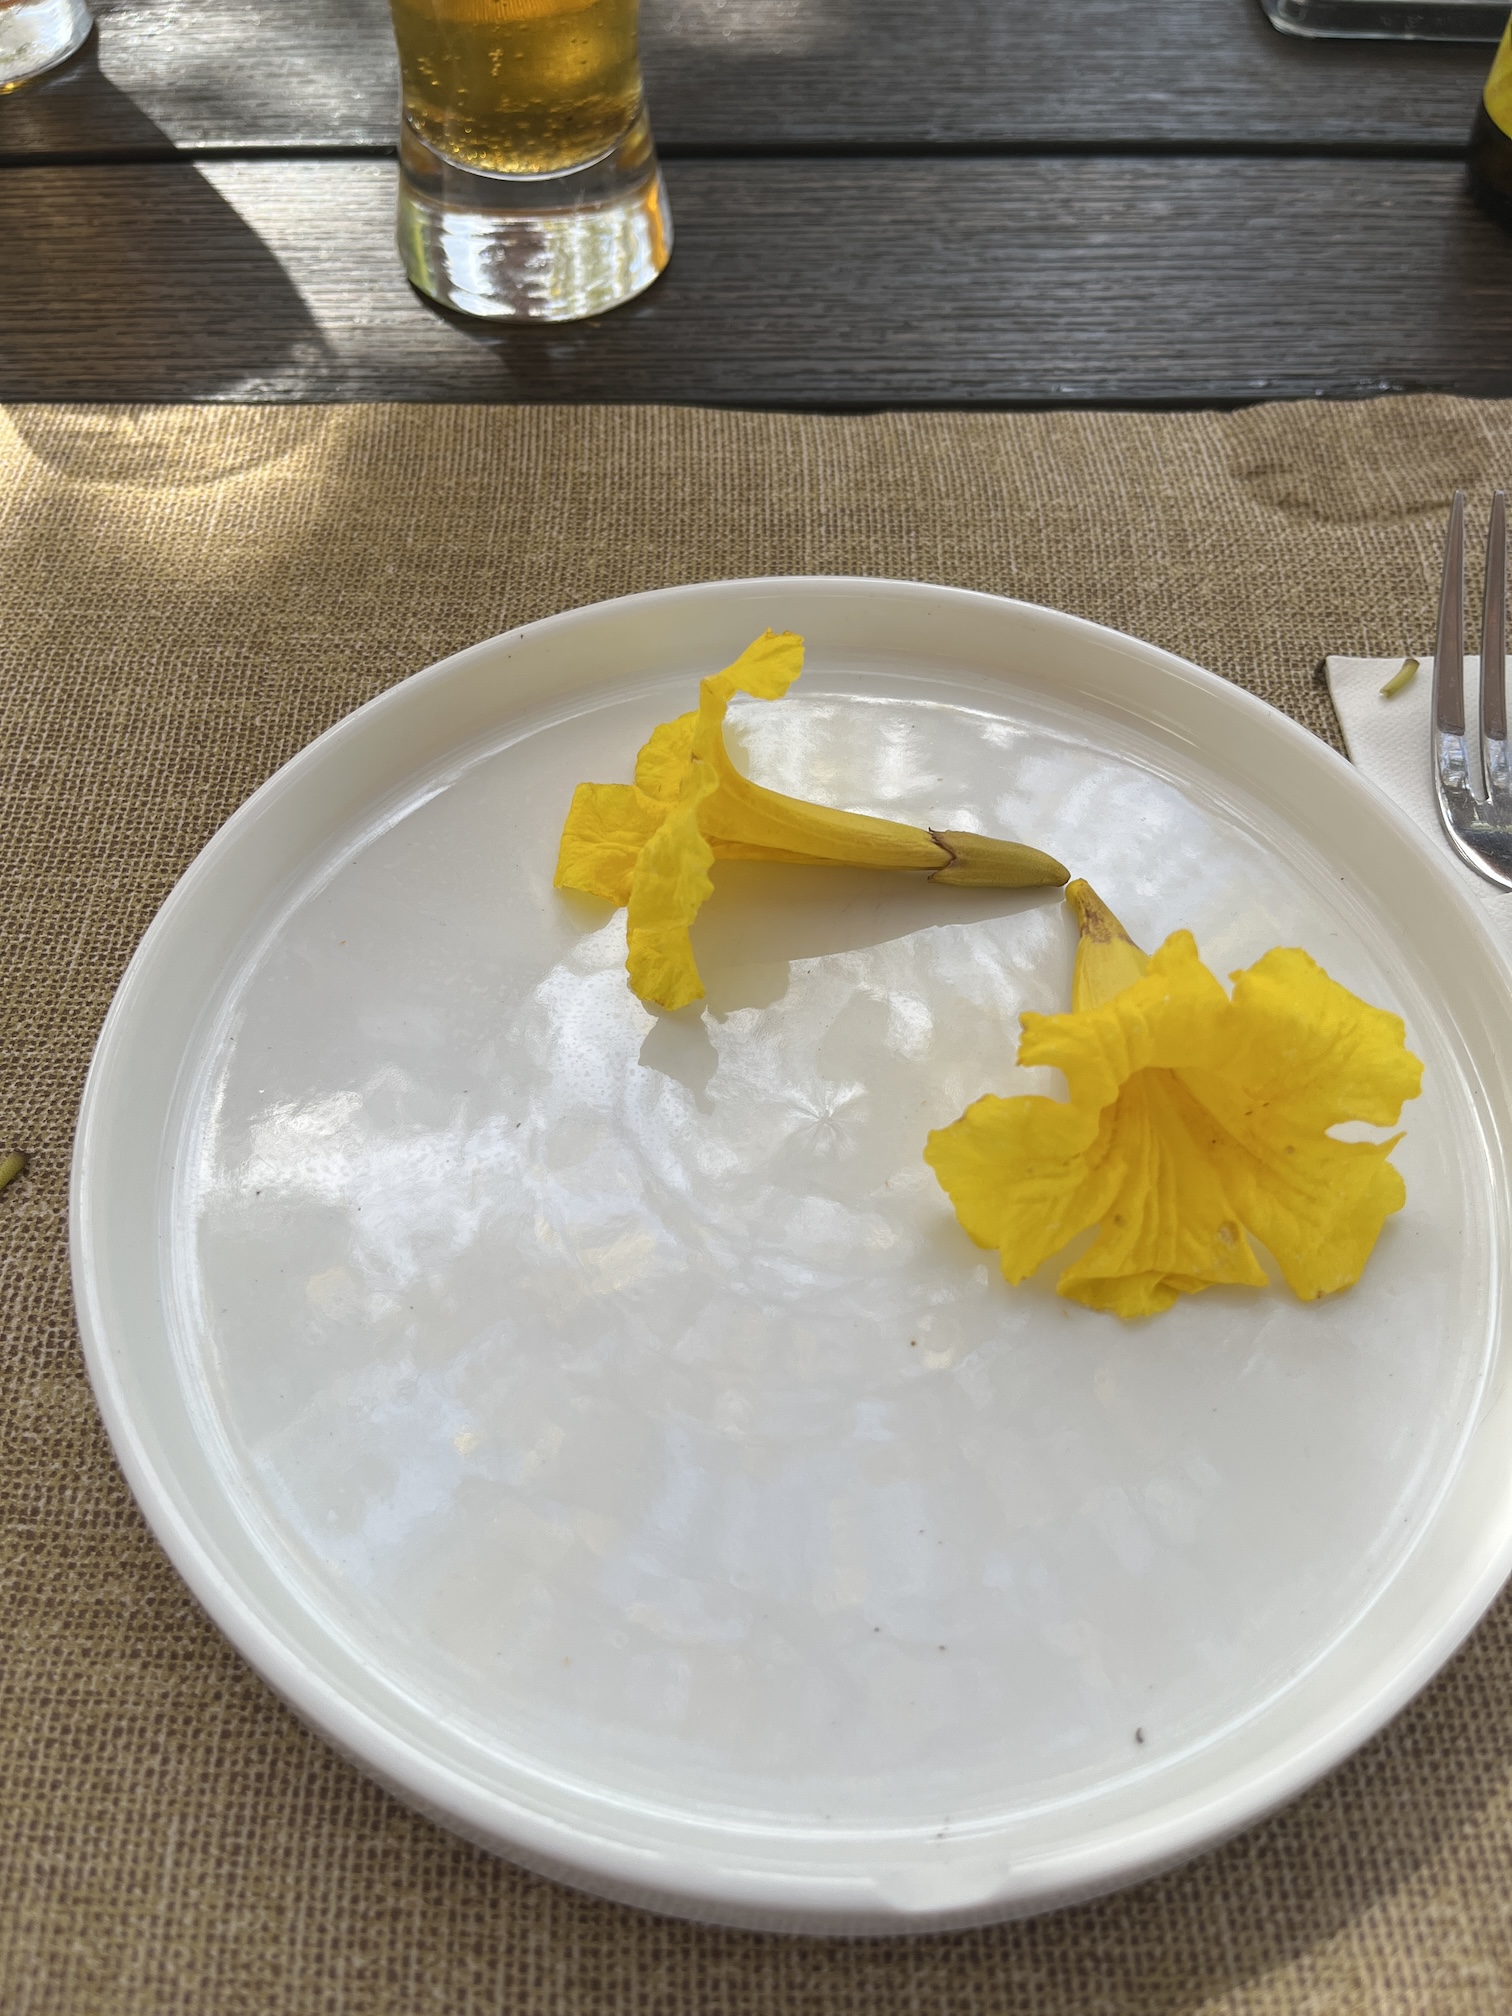
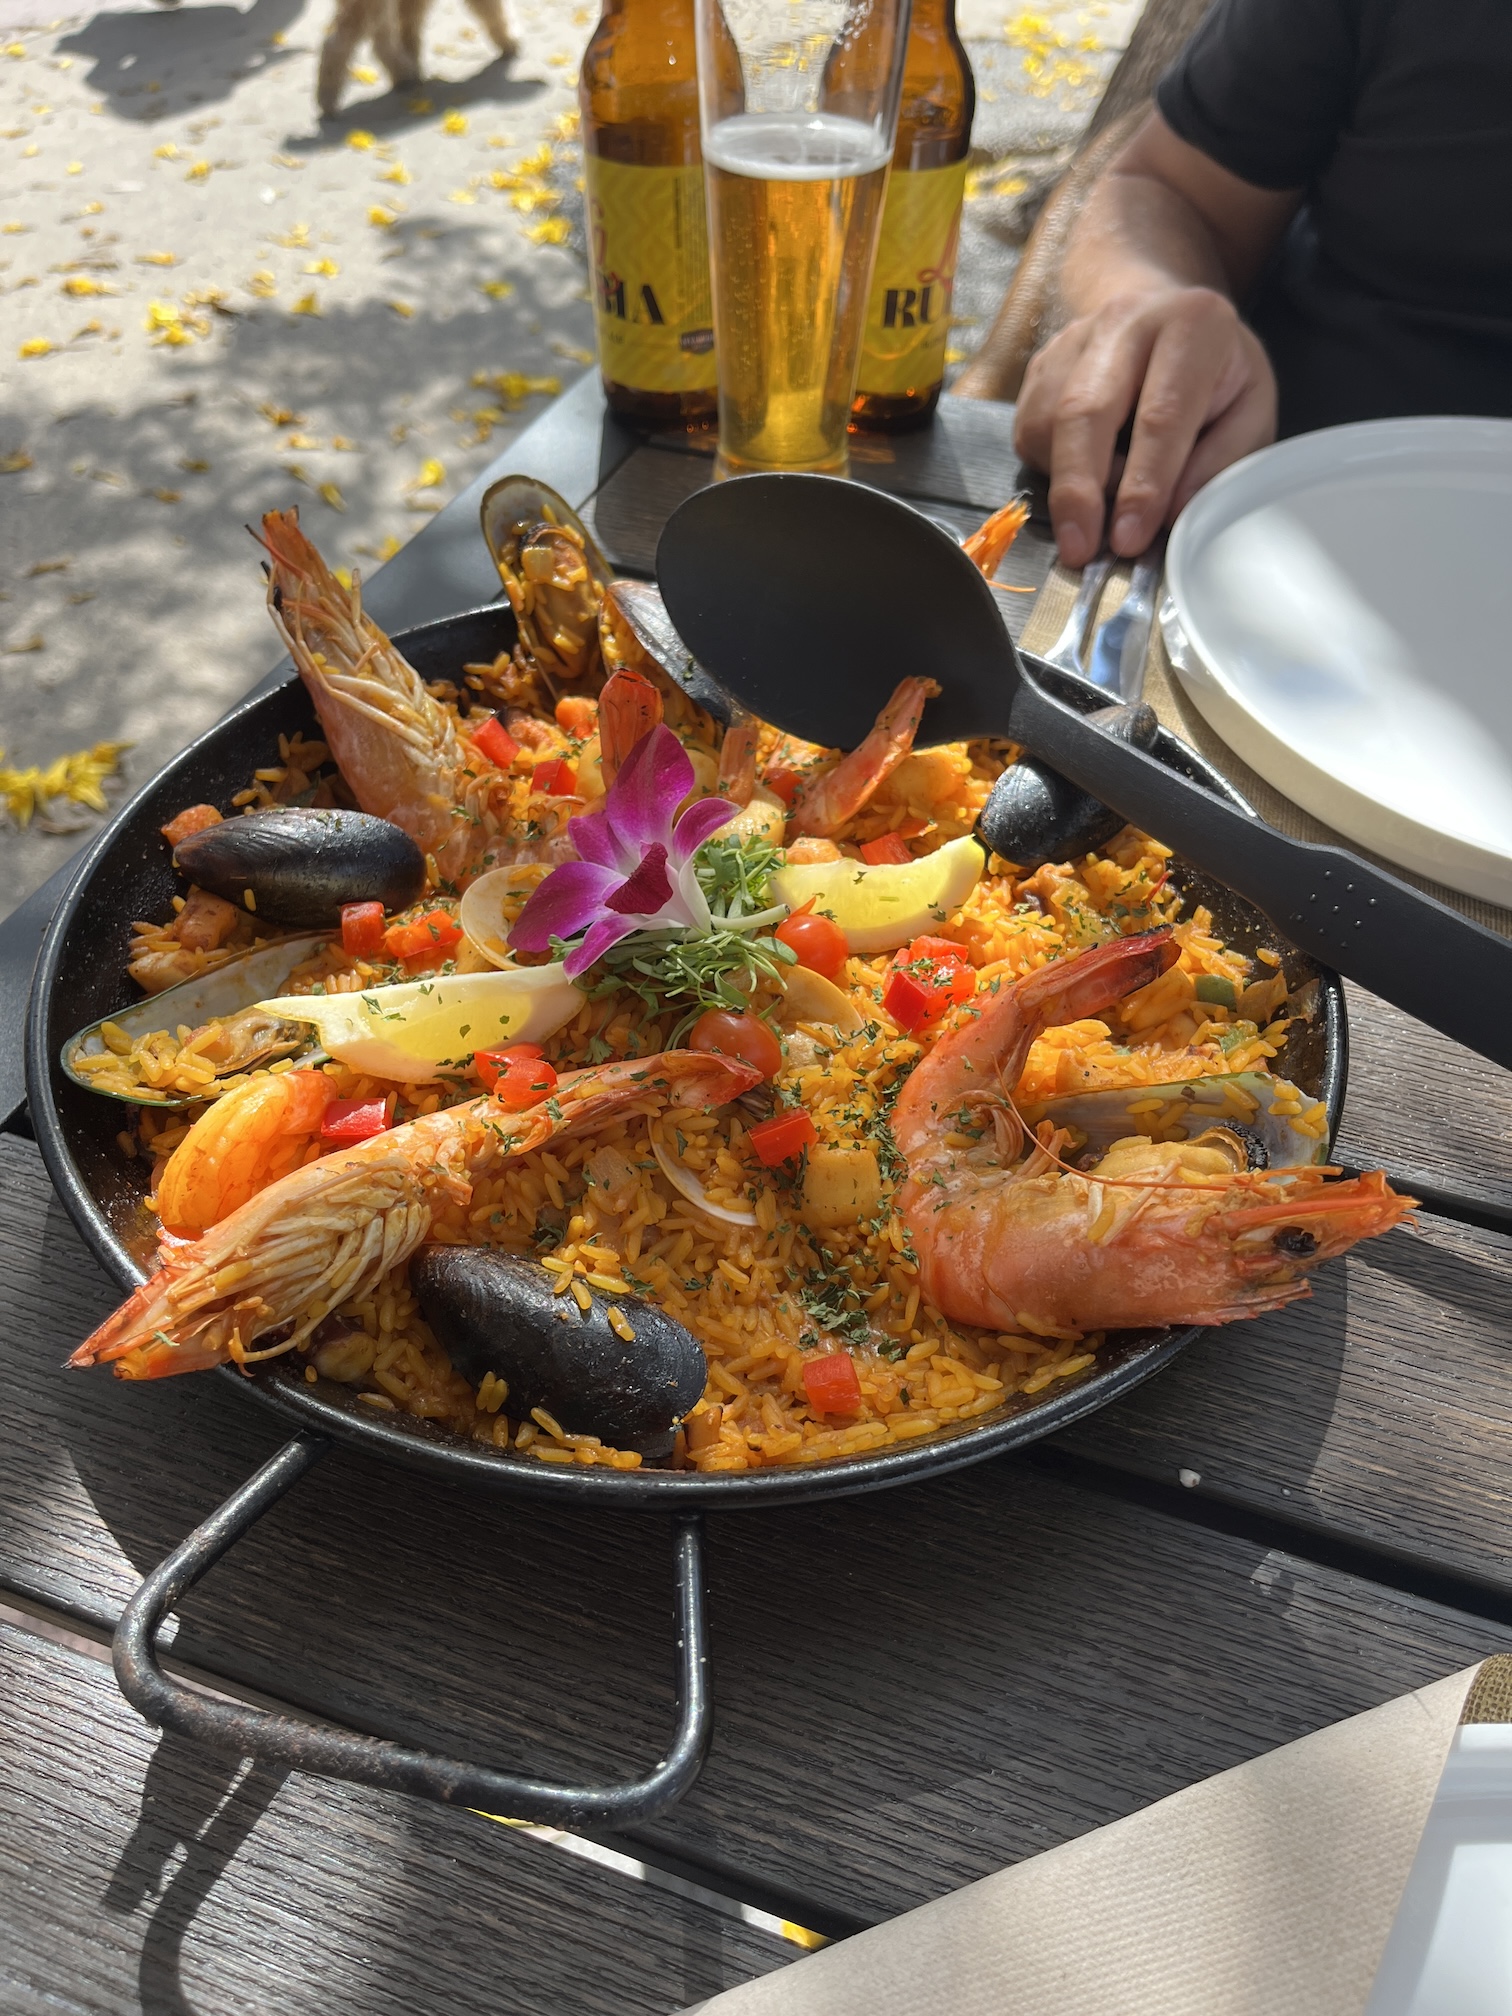
We had paella for lunch under a tree in one of the outdoor courtyards in the Art Deco Historic District. While waiting our food, beautiful flowers keep falling from the tree about onto my plate.
Something special about flowers falling from the sky and arranging themselves on your plate while you await your delicious meal.
Finally the paella arrived and I removed the flowers from my plate to make room!
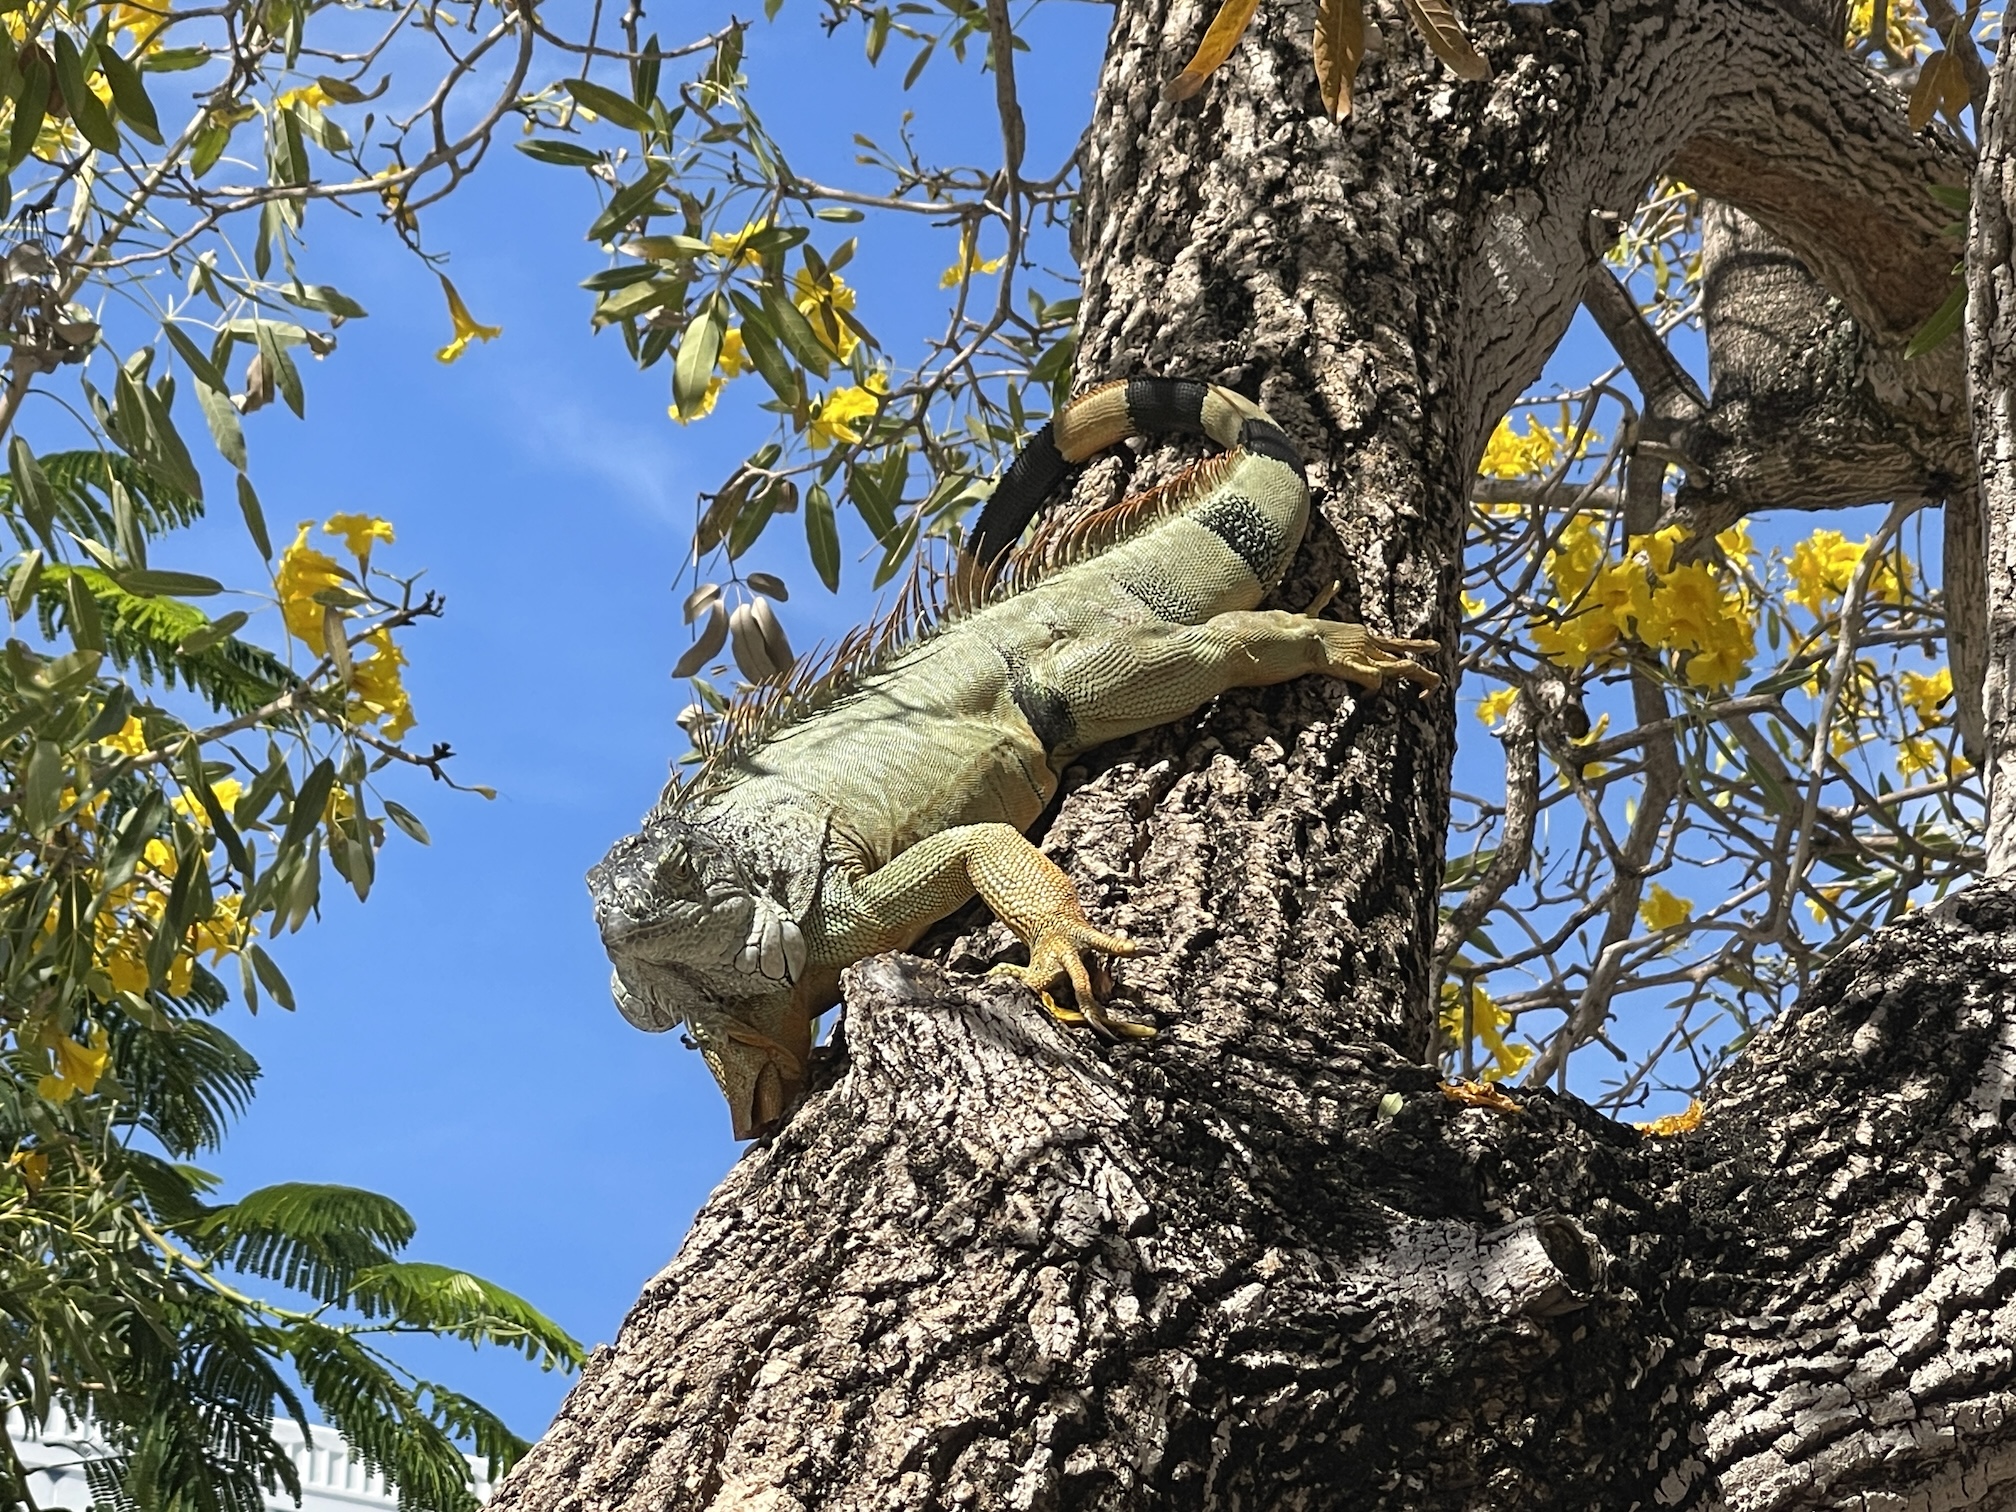
Towards the end of the meal a rain of a liquid substance came down on John. Turned out a HUGE Iguana in the tree above was spitting at him or something!
We didn’t realize at the time it was only a harmless Iguana – our mind went to other things like a poisonous Gila Monster! So we paid the check quickly and got out of them – ha! The restaurant staff gave John some clothes with some type of cleaner on them to clean his arms where the “Iguana-rain” had fallen!
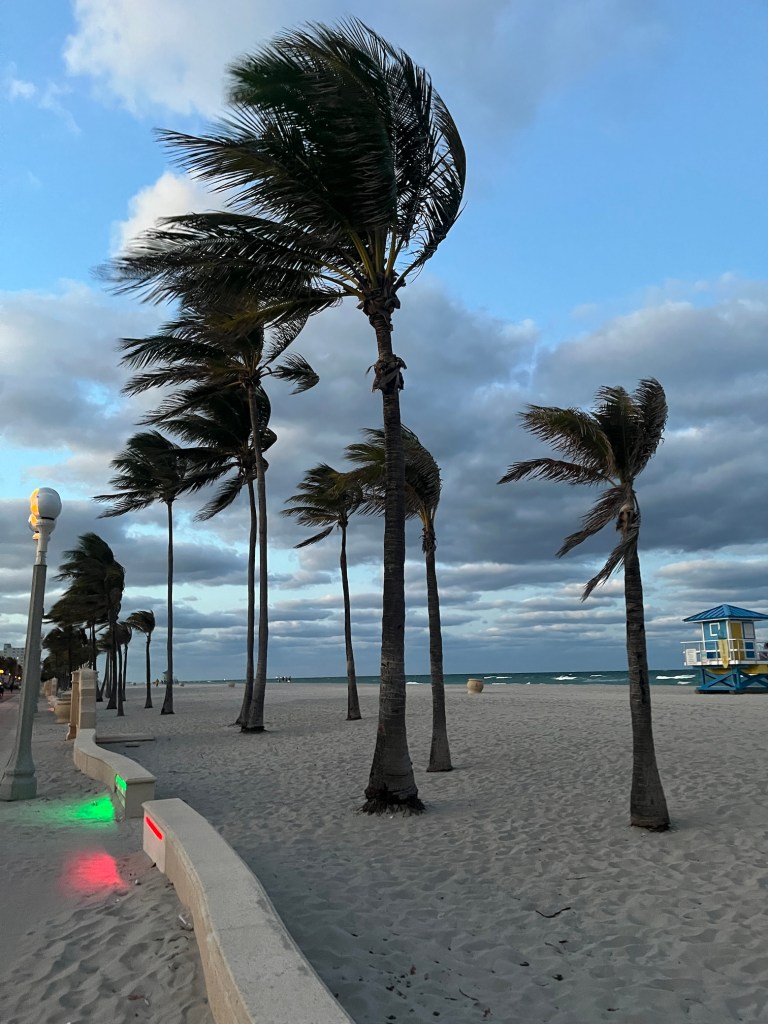
After that we wandered over to a jazz concert in the park in front of the beach area and then wandered along the beach
It was nice to put my toes in the Atlantic Ocean!
We had a wonderful trip and thanks for reading!
(IFor someone who lives very far away from palm trees, it was cool seeing palm trees bending with the wind at dusk along the beach!)
All quilted and on the dining room/library table now!
After I finished quilting it and putting on the binding, I decided to launder it (and then try and iron out wrinkles) so it was ready for any future laundering after spills. I want it to be a “working” table runner that will stay on the table during a meal.
(Before company comes for dinner I will give it a better pressing, I was just so excited to put it on the table!)
I am plugging along with this great-to-work-on-while-watching-TV in the evening project. I’m working on attaching the 7th row of blocks. It will be an 8 by 10 blanket when done as I made 80 granny squares. I will add an extra border or two of the same yarn I am using as the lattice (to attach the granny squares).
As I mentioned in that previous post, I decided to use a collection of traditionally pieced “orphan blocks” that my friend Wendy gave me as the backing for this table runner.
I figured that if I got a stain on the front of the runner while entertaining, I could flip it over and use the other side!
I’ve completed the machine quilting of the table runner and just need to sew the binding strips together, sew on the binding, and sew down the binding.
For the quilting I just went with a simple double crosshatch pattern (no that is not a real pattern name, I just made it up on the spot), following the lines of the pieced blocks.
I plan to press it, ha! It just came off the machine and I just finished trimming off the excess batting and backing so it is pretty wrinkly!
I am so looking forward to hand quilting this quilt (yes I decided to hand quilt it)!
I got the batting and backing put together with the quilt top to make the “quilt sandwich”. I’ve also auditioned some threads (I plan to use multiple and to use pearl cotton weight) for the hand quilting.
Other WIPs Growing Inpatient As They Sit in Queue…
I have two more quilt tops awaiting quilting by me:
I haven’t decided on machine vs. hand quilting but if I do hand quilt it I have some cool threads I collected many years ago I want to use.
I will get to these two quilt tops eventually – ha!
I’ve been trying not to start any additional MAJOR projects before finishing my existing WIPs…but then some small projects might sneak in…you know how us crafters are!
Oh Mike wants me to tell you that he’s happy he doesn’t have to fill in for me with blogging since I seem to be back at it again (see his recent post Guest Blog Post: Humans Traveling and Dog Camp).
This leaves him more time for napping in the sun, on fleece blankets, in the upstairs bedroom (with the occasional waking up to intensely bark at people walking by and delivery trucks coming into the neighborhood).
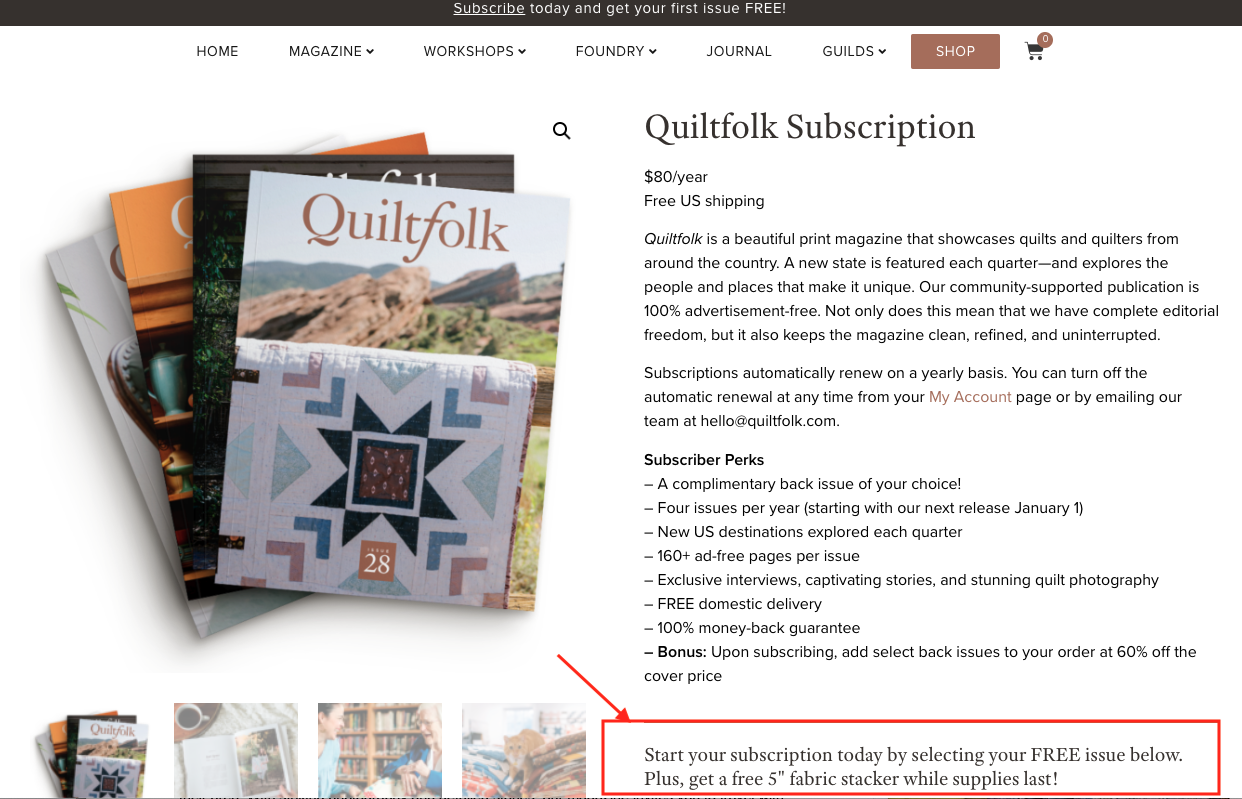
This is a pretty nice way to start October, which is the 10th Anniversary of my tierneycreates blog month (first blog post on October 27, 2013): Issue 28 of Quiltfolk Magazine – Colorado – hits newsstands today, October 1, 2023, and is available for purchase online.
Before I go any further, I want to give credit to those involved with the article:
Photography: The photographer was Melanie Zacek (Instagram: @melanie.zacek), and her stylist was Kimberlee Zacek (Instagram: @kimberleezacek)
Writer: The writer who did my interview was Dr. Sharbreon Plummer (Instagram: @sharbreon)
Guess what? Quiltfolk has provided me with a 20% coupon code (TierneyQF28) to share with family, friends and my social media family (those of you who have been with my blog a long time, we are practically family now aren’t we…or am I delusional, ha!):
I thought it was creative that they took one of the photos from the photoshoot for the article and made it into the coupon 🙂
Here is the link if you are interested in the issue (hey we can still be social media friends even if you do not read the article, no obligation): Link to Issue 28: Colorado Info/Purchase page: https://www.quiltfolk.com/issue-28-colorado/
Although they are providing me with three (3) free copies of the issue since I am one of the quilter’s featured in it, I did go out to this link to buy another copy with the coupon code and discovered it worked for the year subscription also, so I got that instead.
Additionally I discovered they were having quite the special deal for their introductory $80 per year subscription price: besides the 4 quarterly issues include in the subscription, you could get one back issue for free (and Issue 28 – Colorado was one of the choices…) but you also got some free fabric (Riley Blake Shades of Autumn 5″ squares) and the ability to buy 2 more back issues 60% off! Not sure how long this deal is going to be active but wanted to make you aware of it.
I know I sound like a salesperson for Quiltfolk, but I just wanted you to be aware of this awesome deal.
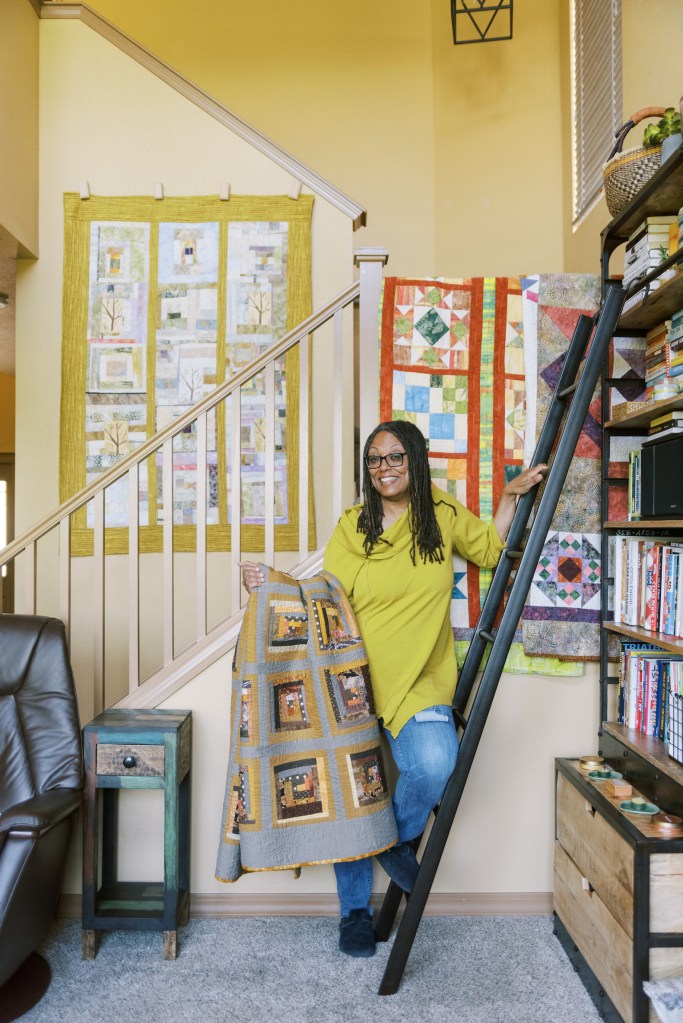
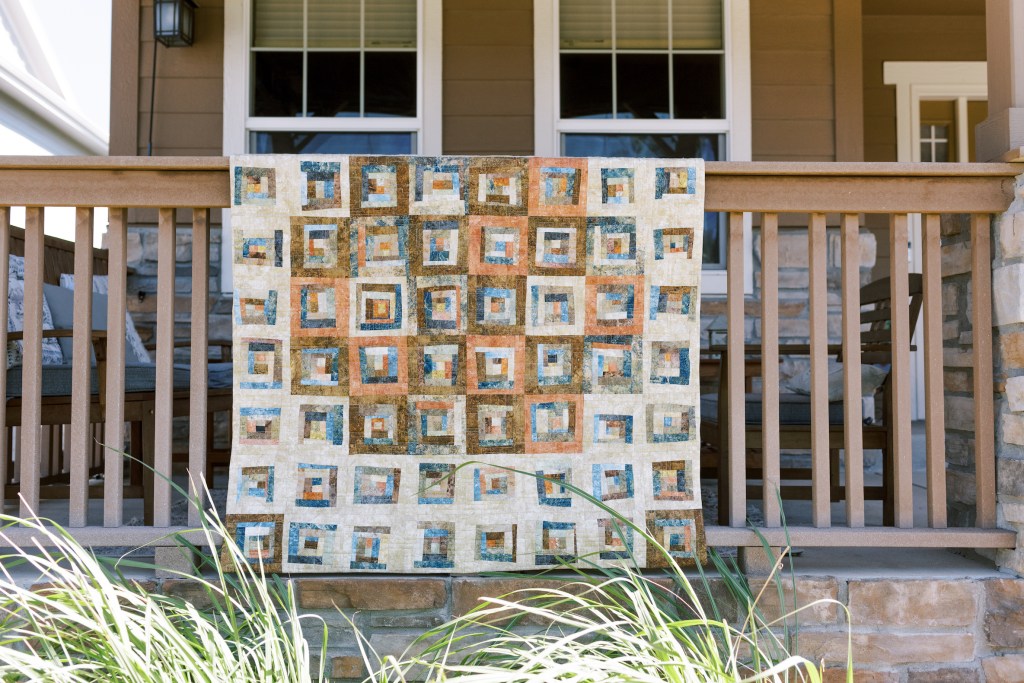
Quiltfolk provided me with the photos from my photoshoot to share what I wanted on social media. I’ve selected a few of my favorites to share with you.
In the photo above they made me take off my glasses because of the glare from the sun causing my lenses to be very dark (they are Transition lenses). I never take off my glasses, I’ve been wearing them since 2nd grade and I feel naked without them, so I was trying to control my super awkward feeling!
Well that’s my big announcement to start October 2023 and my 10th Anniversary Month of being a blogger!
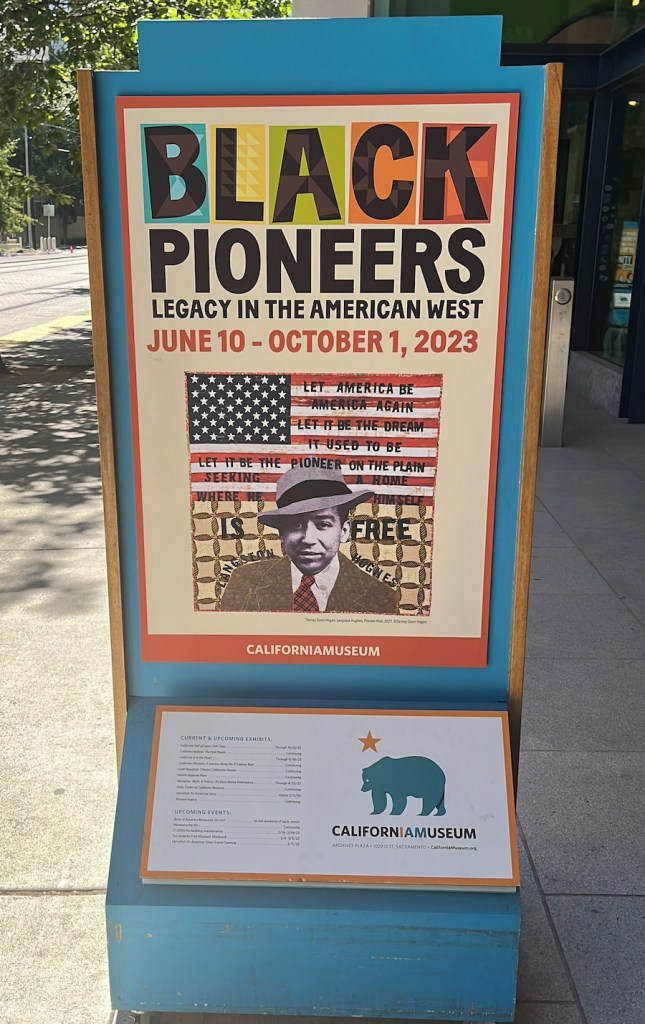
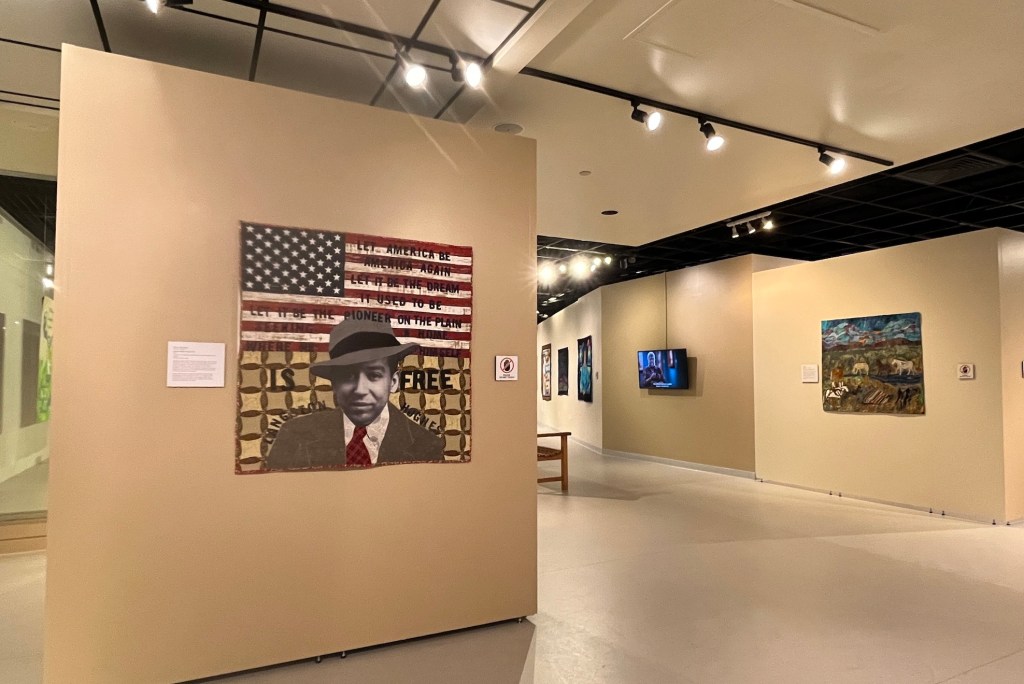
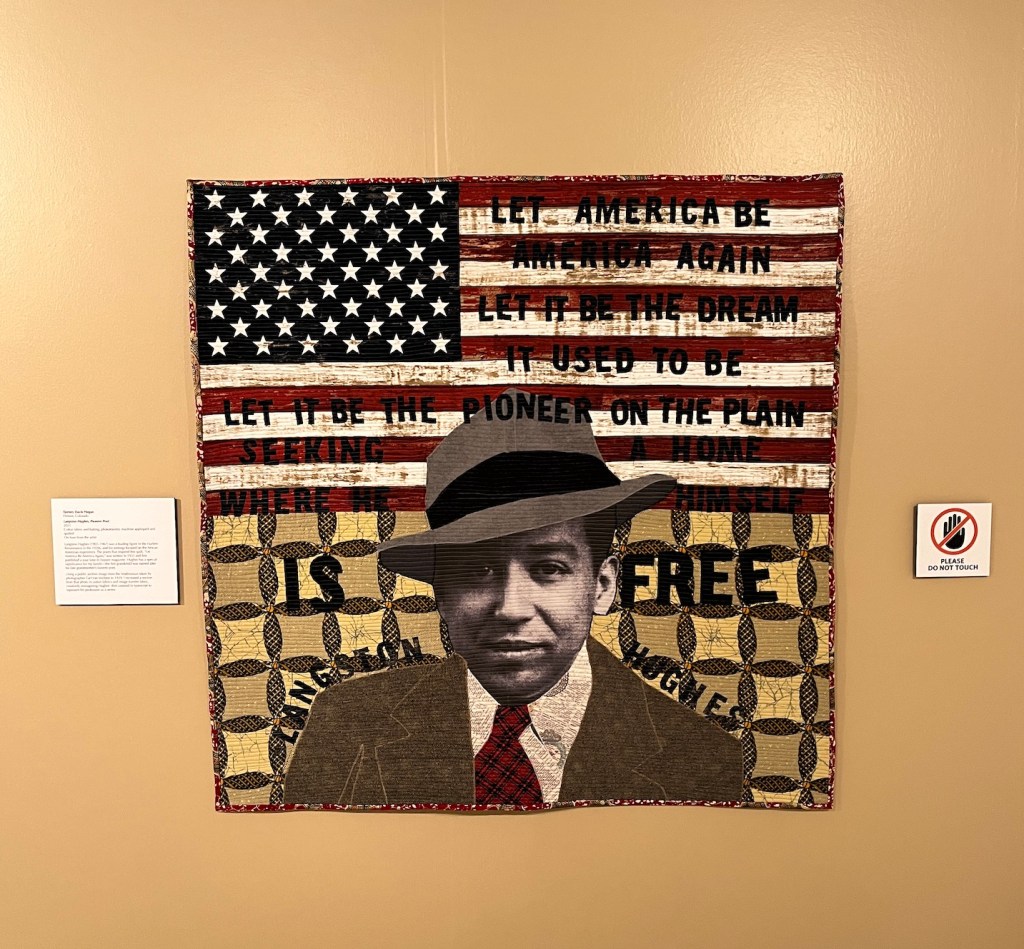
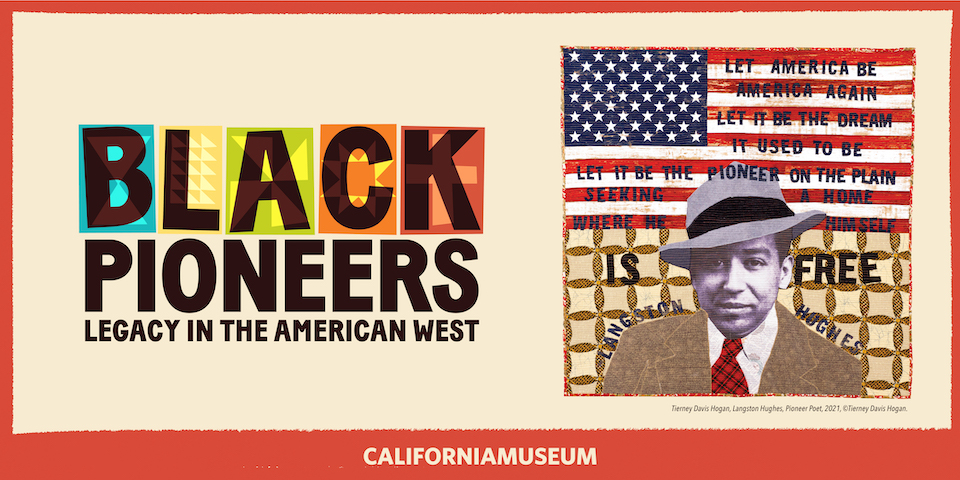
The Black Pioneers: Legacy in the American Westexhibit opened at the California Museum in Sacramento, CA on June 10, 2023 however the official exhibit opening event occurred on July 15, 2023 and I attended.
I was so surprised to discover my quilt Langston Hughes: Pioneer Poet was used as their show poster! The museum staff told me how much they loved my quilt.
Here are some of the photos I took (including the poster and my piece, see videos below to see the other quilts in the show):
This quilt has gotten a lot of mileage! I also found it posted on other online advertisement for the show:
GoodDay Sacramento morning show had a segment on the exhibit (you will see my piece toward the end of the segment):
GoodDay Sacramento
CBS News Sacramento also had a segment on the exhibit:
CBS News Sacramento
And here is the walk-through video I took while at the exhibit:
I recently returned from a long weekend in California. John and I visited family and friends in Oakland and Sacramento California. I’ll share some photos/stories from those visits in a future post.
Funny how you get sentimental over a sewing machine…
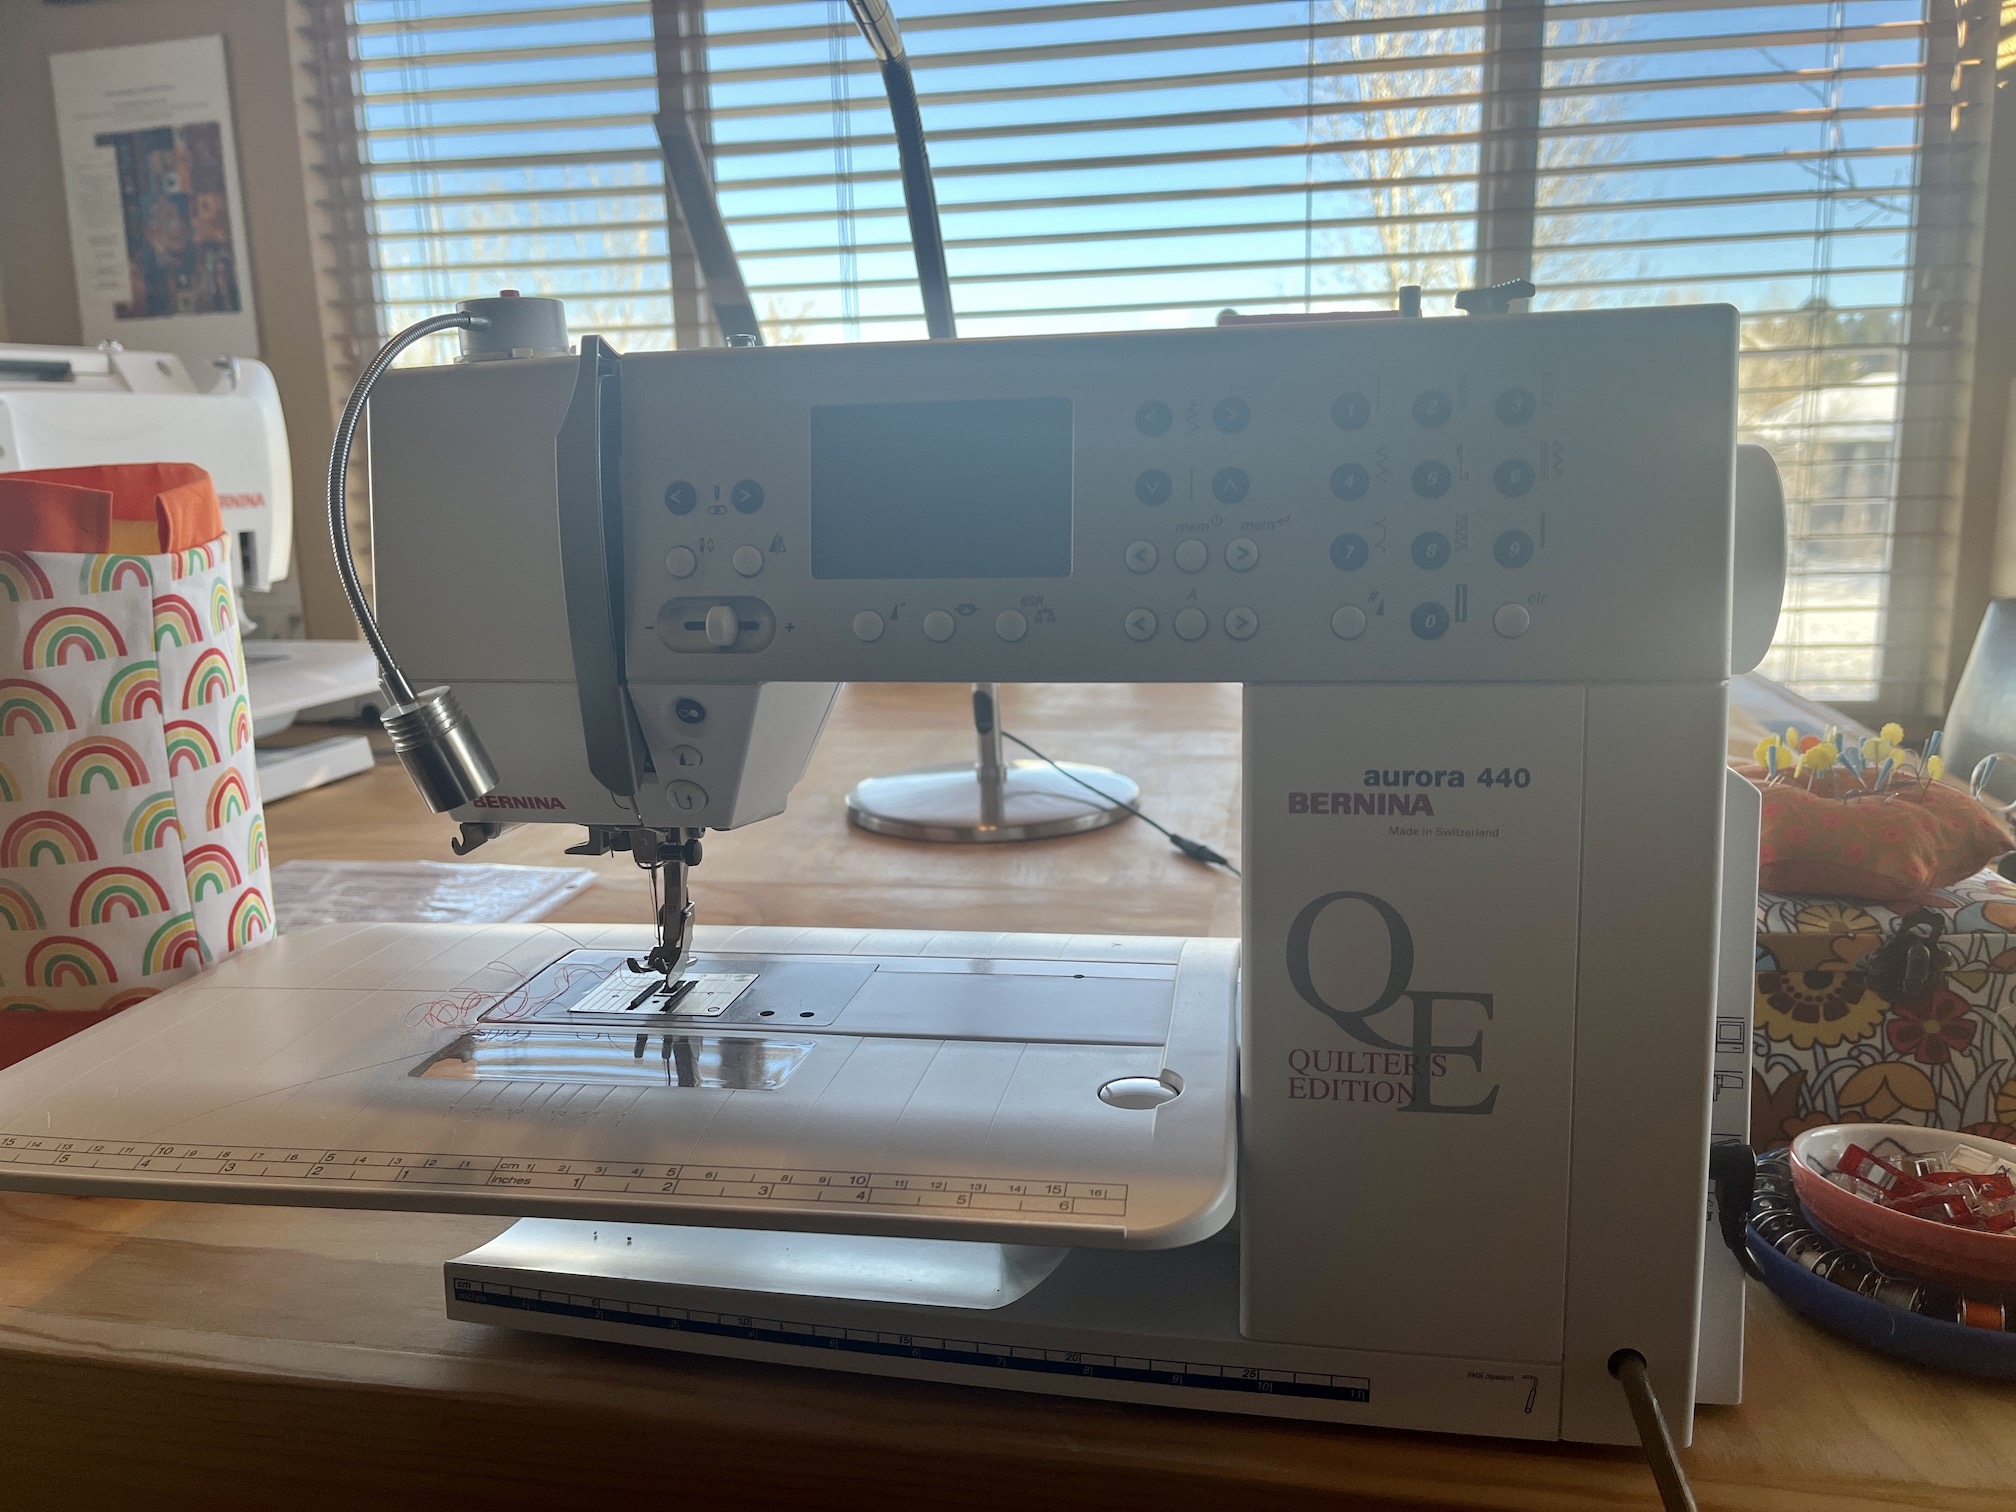
Last year I got my Bernina Aurora 440 QE (Quilter’s Edition) sewing machine serviced at a local Bernina dealer called Thread Play with Bernina. It just needed routine maintenance work and a “tune up”.
The awesome Bernina Service Technician told me when I picked it up after the service was complete, that I had sewn over SEVEN (7) MILLION STITCHES the machine!
Wow that is a lot of stitches!
I got really sentimental when I found that out as this Bernina sewing machine and I have been together since 2006, when I did a “24 months same as cash” financing to buy it. It was the most expensive sewing machine I ever imagined buying. But I’ve made so many things on the machine from utility quilts to art quilts; and lots of craft projects like bags, I definitely got my money’s worth!
I started quilting around 1999, while living in Seattle, WA, on a basic Singer sewing machine. A year or so later into quilting, I upgraded to a Husqvarna Viking sewing machine. I thought I had made it to the “big time” on that $300 machine!
As a beginner quilter I bought my fabric at discount stores like Joann Fabrics in Seattle. After a couple years of quilting and being influenced by other quilters, I began buying more expensive (and higher quality) quilting cotton fabrics from Quilt Shops.
By the time I moved to Bend, Oregon in 2005, I only bought fabric for quilt projects at Quilt Shops and one of those shops was Sew Many Quiltsin Bend, Oregon.
Sew Many Quilts is a Bernina Sewing Machine Dealer; and every time I shopped there I began to drool over the beautiful engineered (that Swiss engineering and all metal internal parts) Berninas they had on display. Too many conversations with the friendly staff led to the purchase of my first Bernina!
Fast forward to 2022: My original Bernina is over 16 year old and although I’ve faithfully maintained it (nearly annual maintenance/tune-up visits; and staying on top of routinely cleaning and oiling it myself after each major use), the technology and features of Berninas has significantly advanced.
And now I am drooling over the latest Bernina models…
In early 2022, John decides to buy me one of the latest Berninas – the Bernina 770 QE Plus:
It is an AMAZING sewing machine, light years in features and functions than my old Bernina 440 QE.
But it just sat around looking pretty on the table in my studio, yet not being used. Despite my amazing new sewing machine, I keep sewing on my old and beloved sewing machine with 7 million+ stitches on it!
Recently I made myself put away the Bernina 440 QE and start using my dream machine the Bernina 770 QE. I made myself “break up” with my “longtime sewing buddy” and give the new machine a chance.
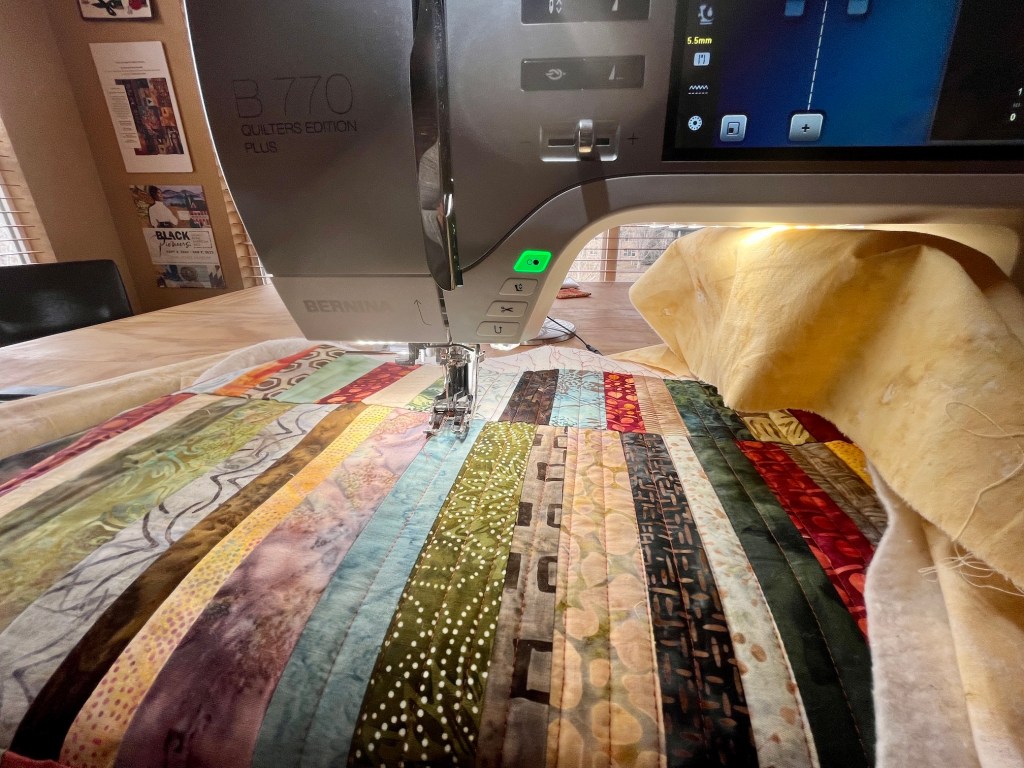
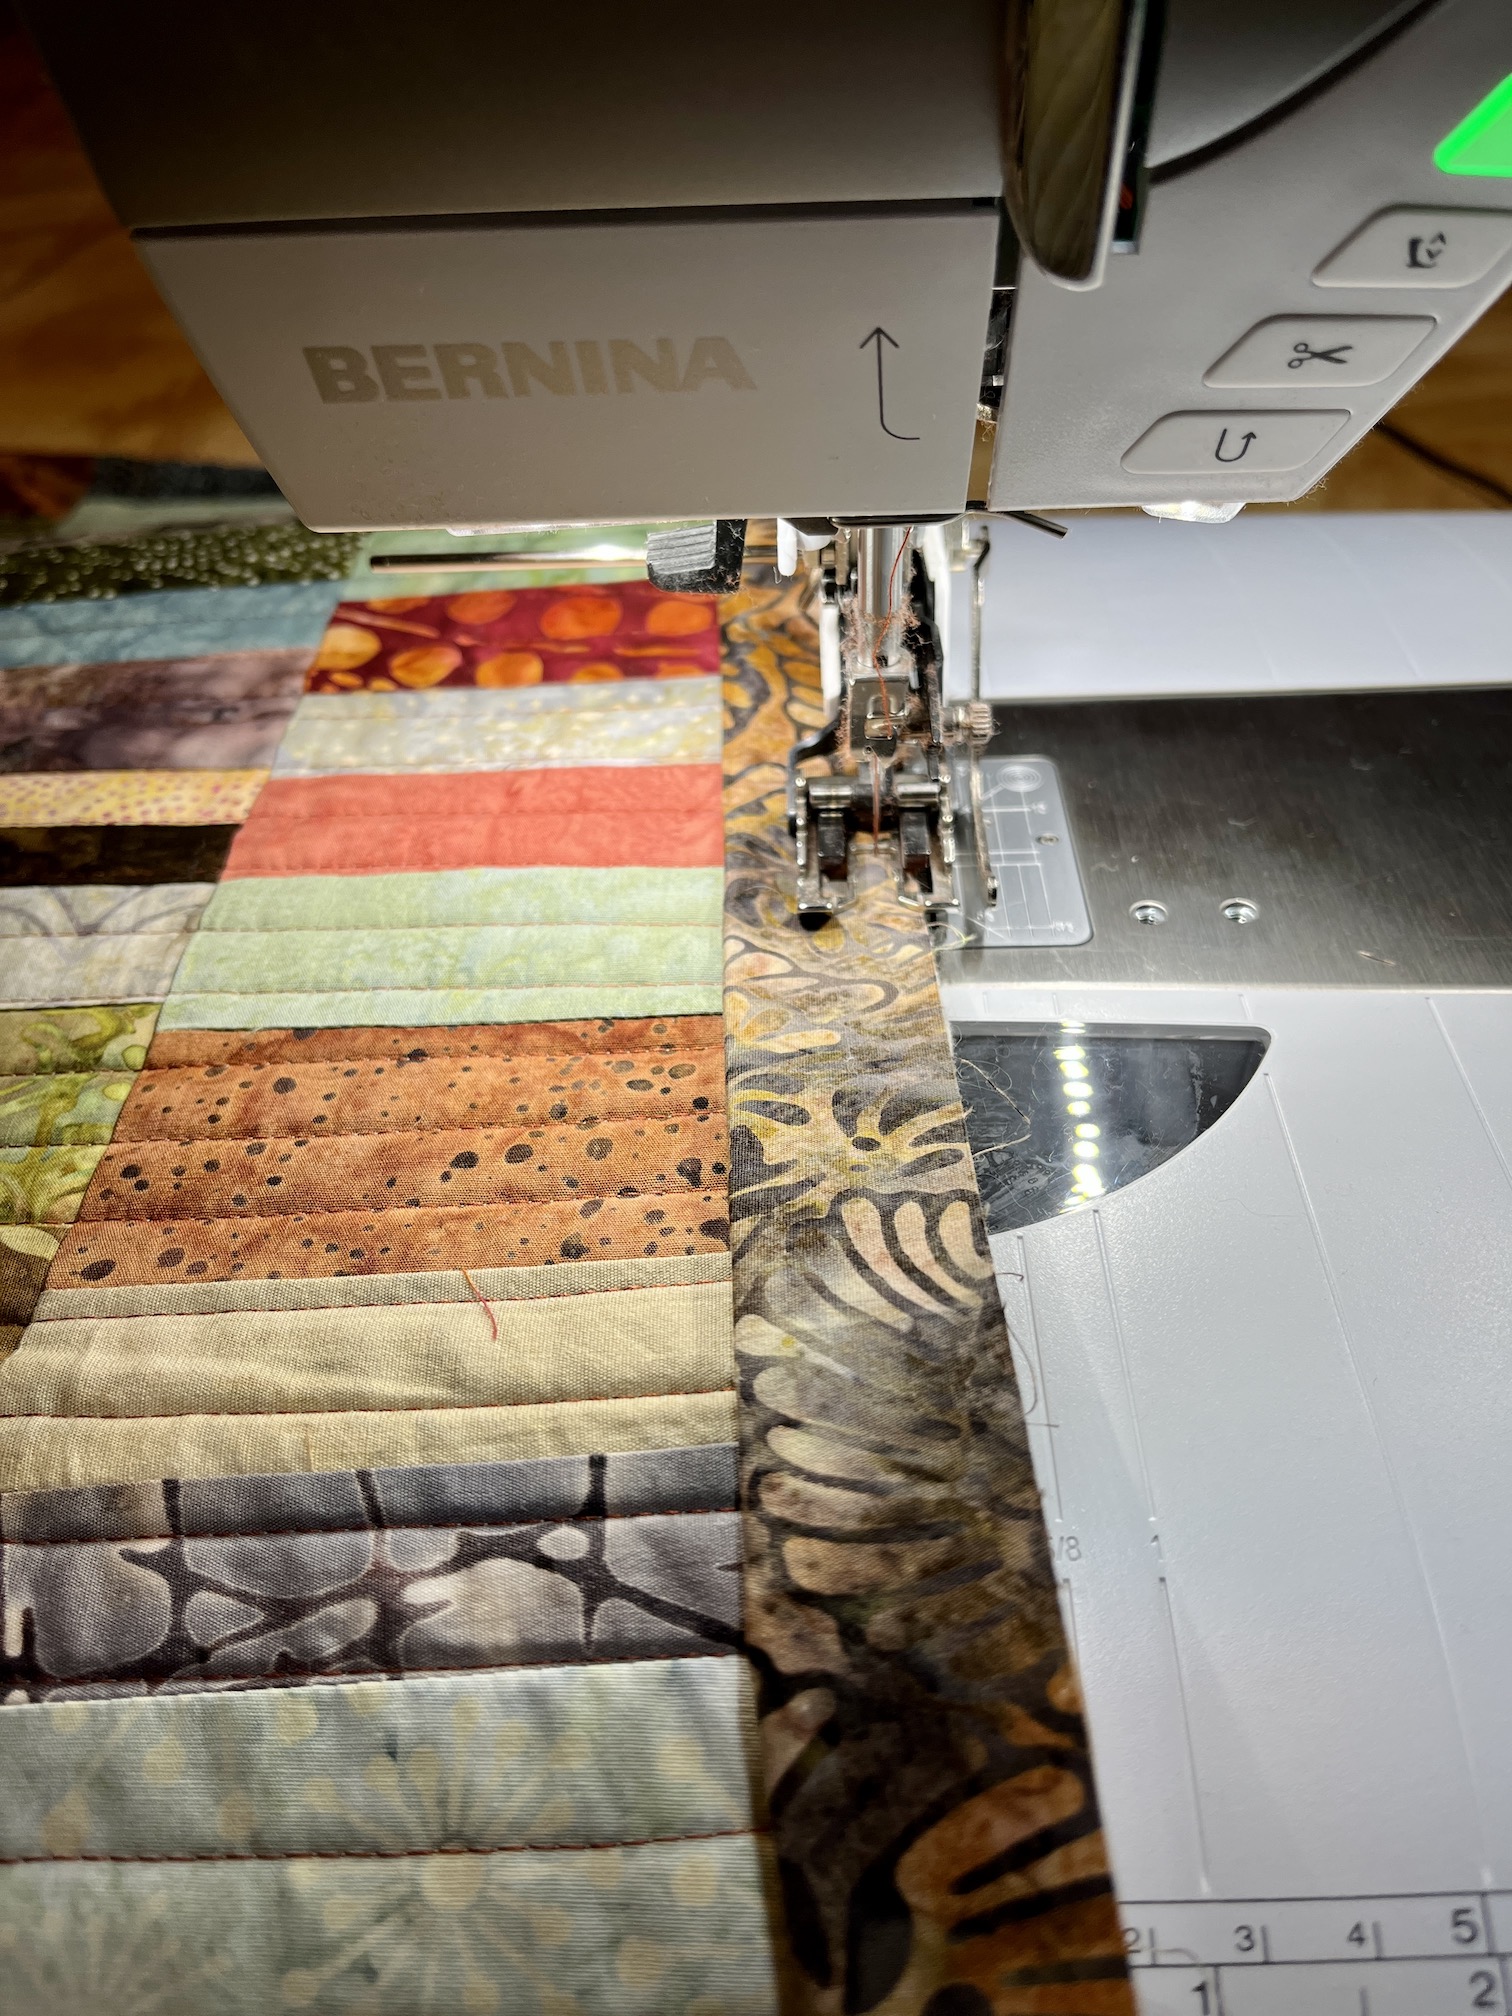
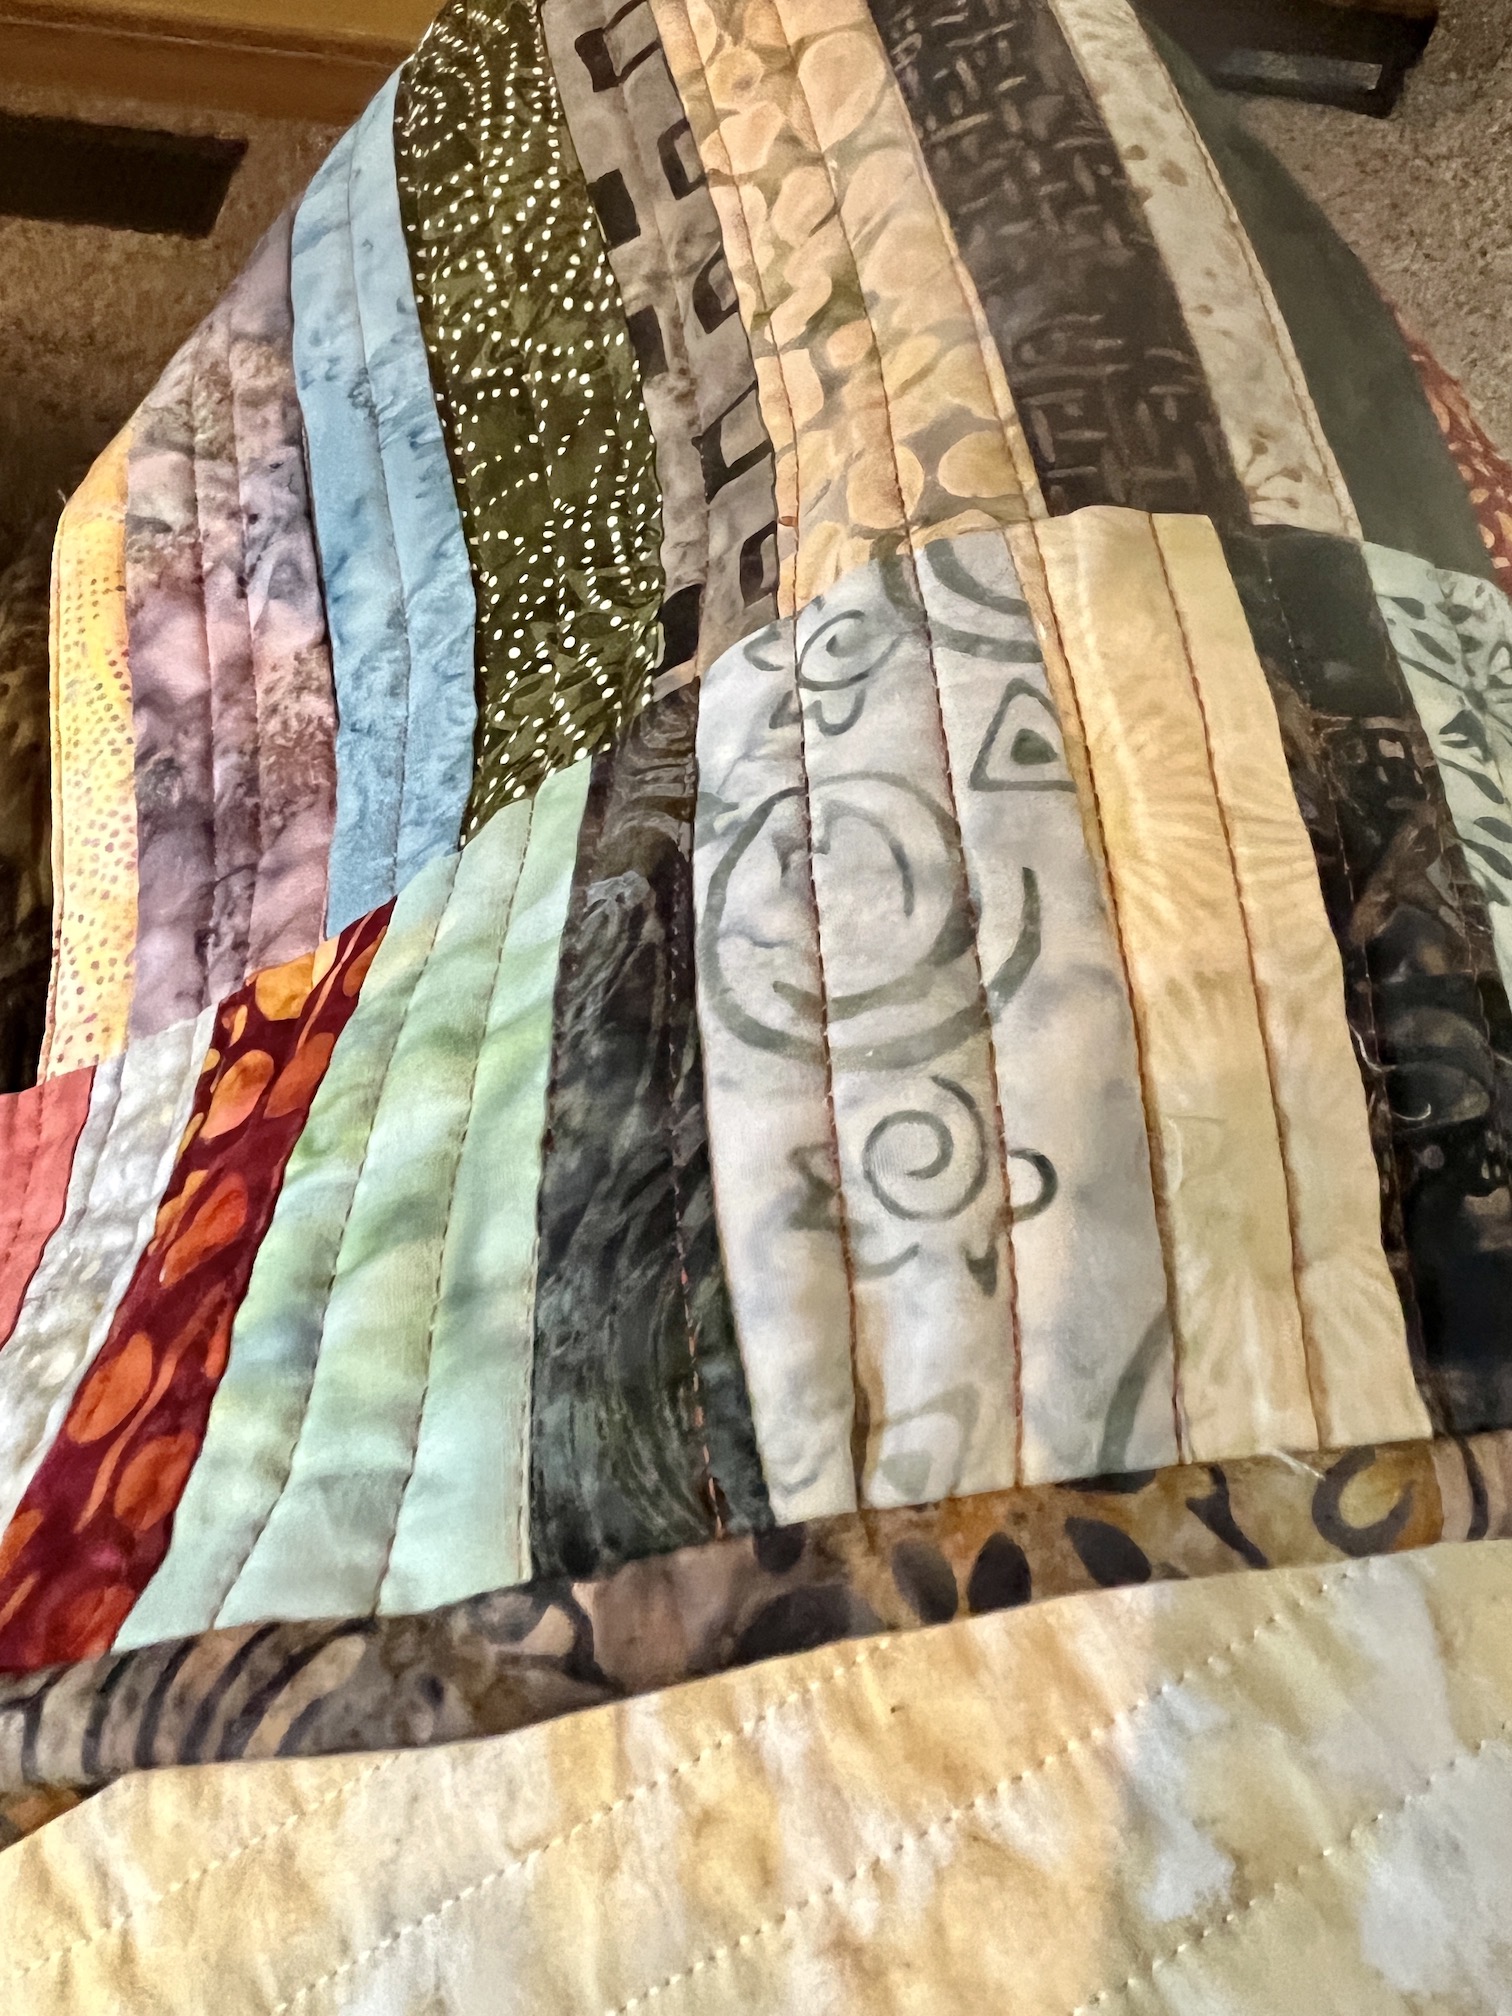
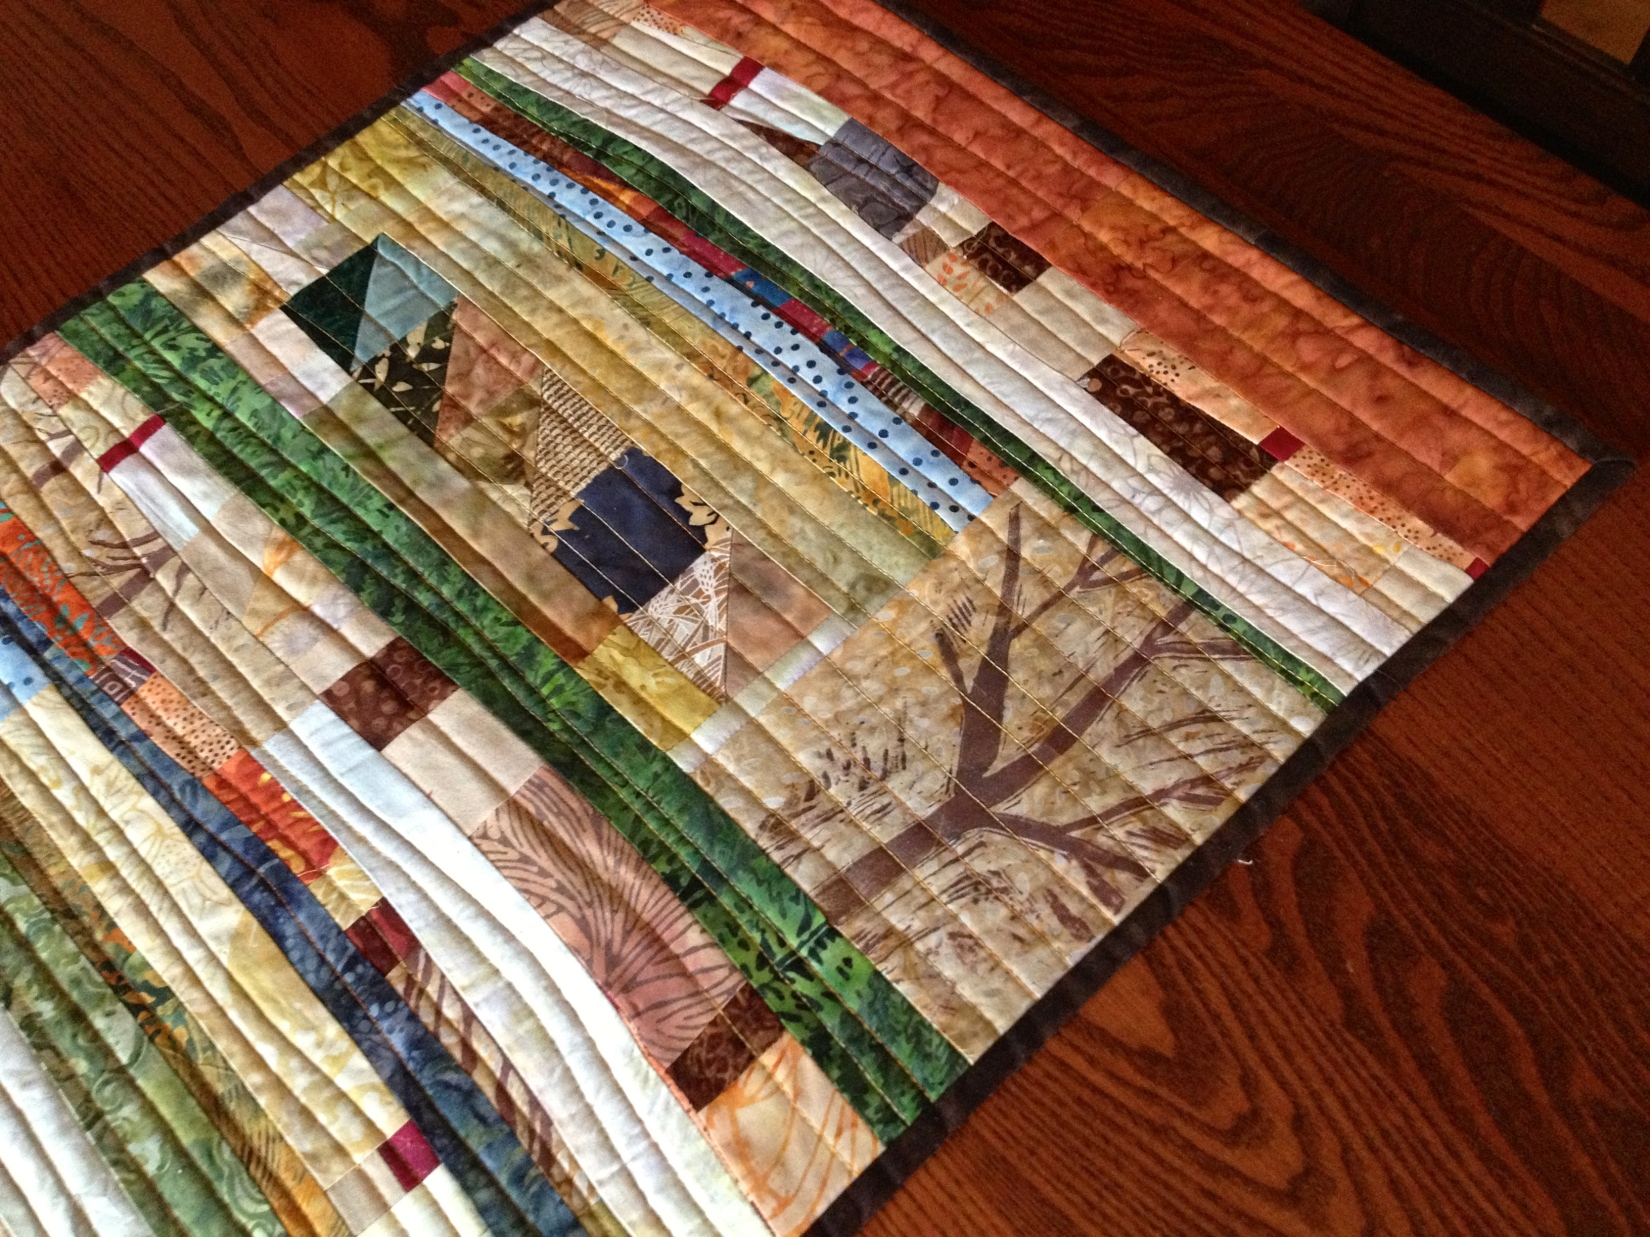
As part of the A Year of Finishes – 2023project, I worked on quilting and adding the binding to a table runner I made from Batik fabric scraps (see post Update on Batik Scrappy Table Runner) for a friend which I promised a table runner many years ago.
I just did straight line quilting with a Walking Foot but the quilting was a breeze and so quick! It took half the time (or less) than it would have taken to quilt the table runner on my old Bernina.
I am now at the point where I am sewing down the binding so the table runner is nearly done and ready to ship off to my friend.
After she receives it I will share the full photo of the finished piece.
I hope my old Bernina is okay sitting around in its case not doing anything. Sigh, I love that machine so much but I need to be with more awesome technology now! My first Bernina sewing machine will always hold a place in my “sewing heart” and I am so grateful it got my through 7 million+ stitches!
(What I’ve left out from this story is how in 2021 I impulsively bought a used Juki sewing machine, but I’ll save that for another post once I figure out what I am going to do with the Juki. We ended up not getting along very well…)
Postscript
While I worked on the table runner, Mike the Miniature Schnauzer lounged under my studio cutting/work table.
He looked especially cute because he was snuggling with his favorite toy – Beary. Mike used to rip out the crotches of his toys (we do not know why) but he stopped a couple years ago. John and I thought the photo looks like Beary is looking gratefully at Mike because he still has his crotch – ha!
Recently I blogged about “baby approved” (well multiple kids in one family used the same quilt, so perhaps I should say “parent approved”) quilt in the post AReminder on Why I Make Quilts; and Mike the Miniature Schnauzer discussed a “(multiple) dog approved” quilt in the postGuest Blog Post: Dog Approved.
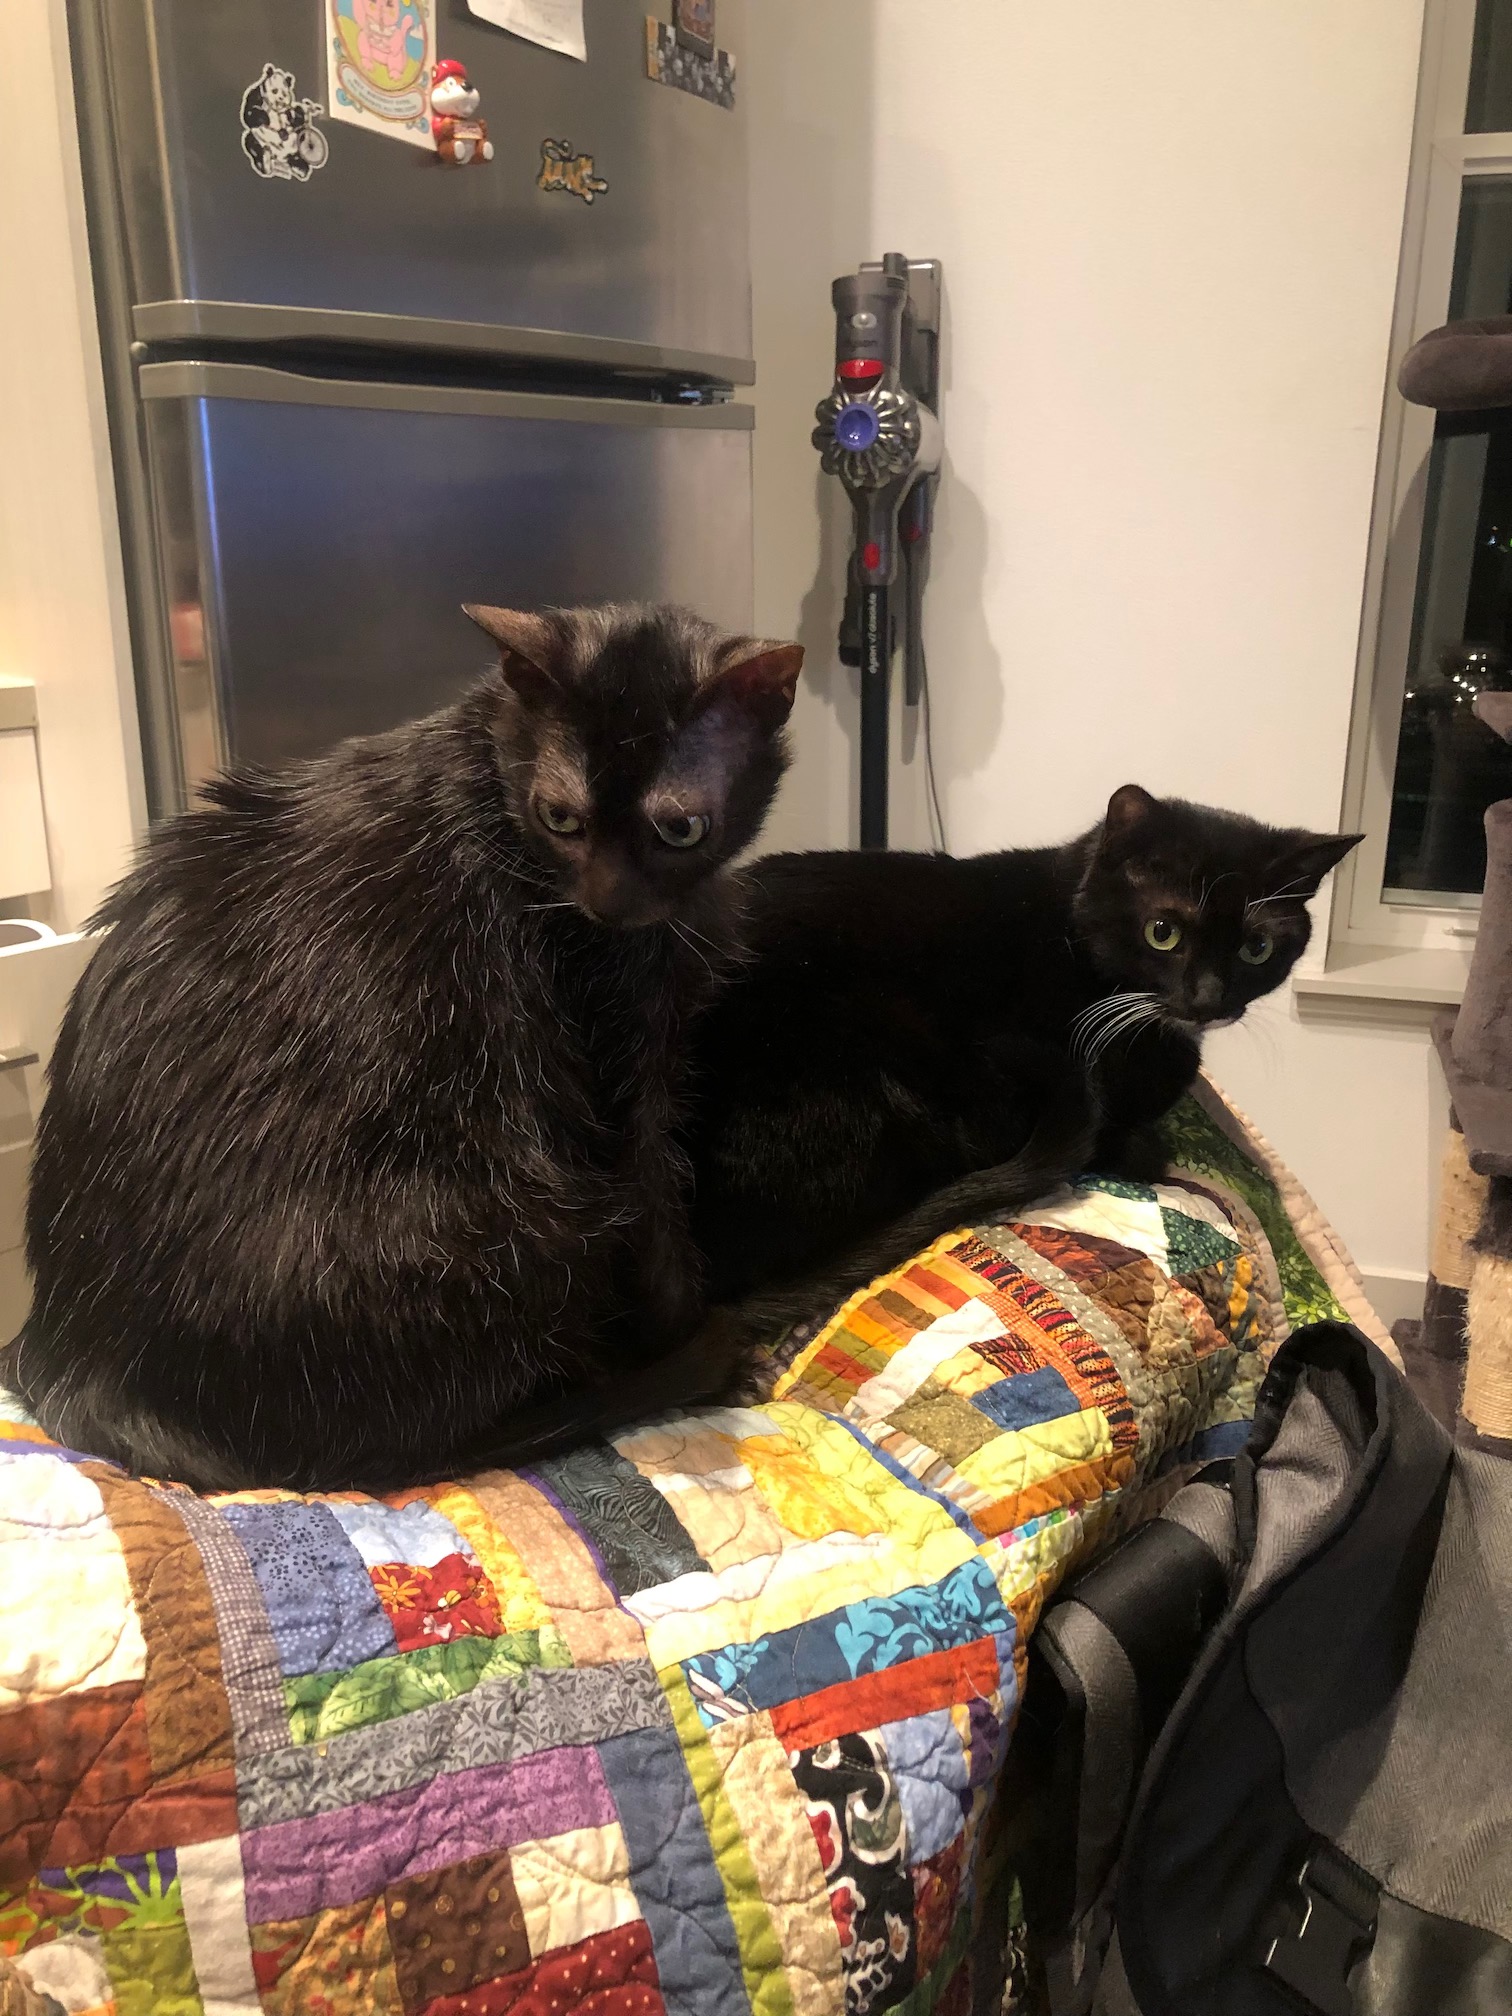
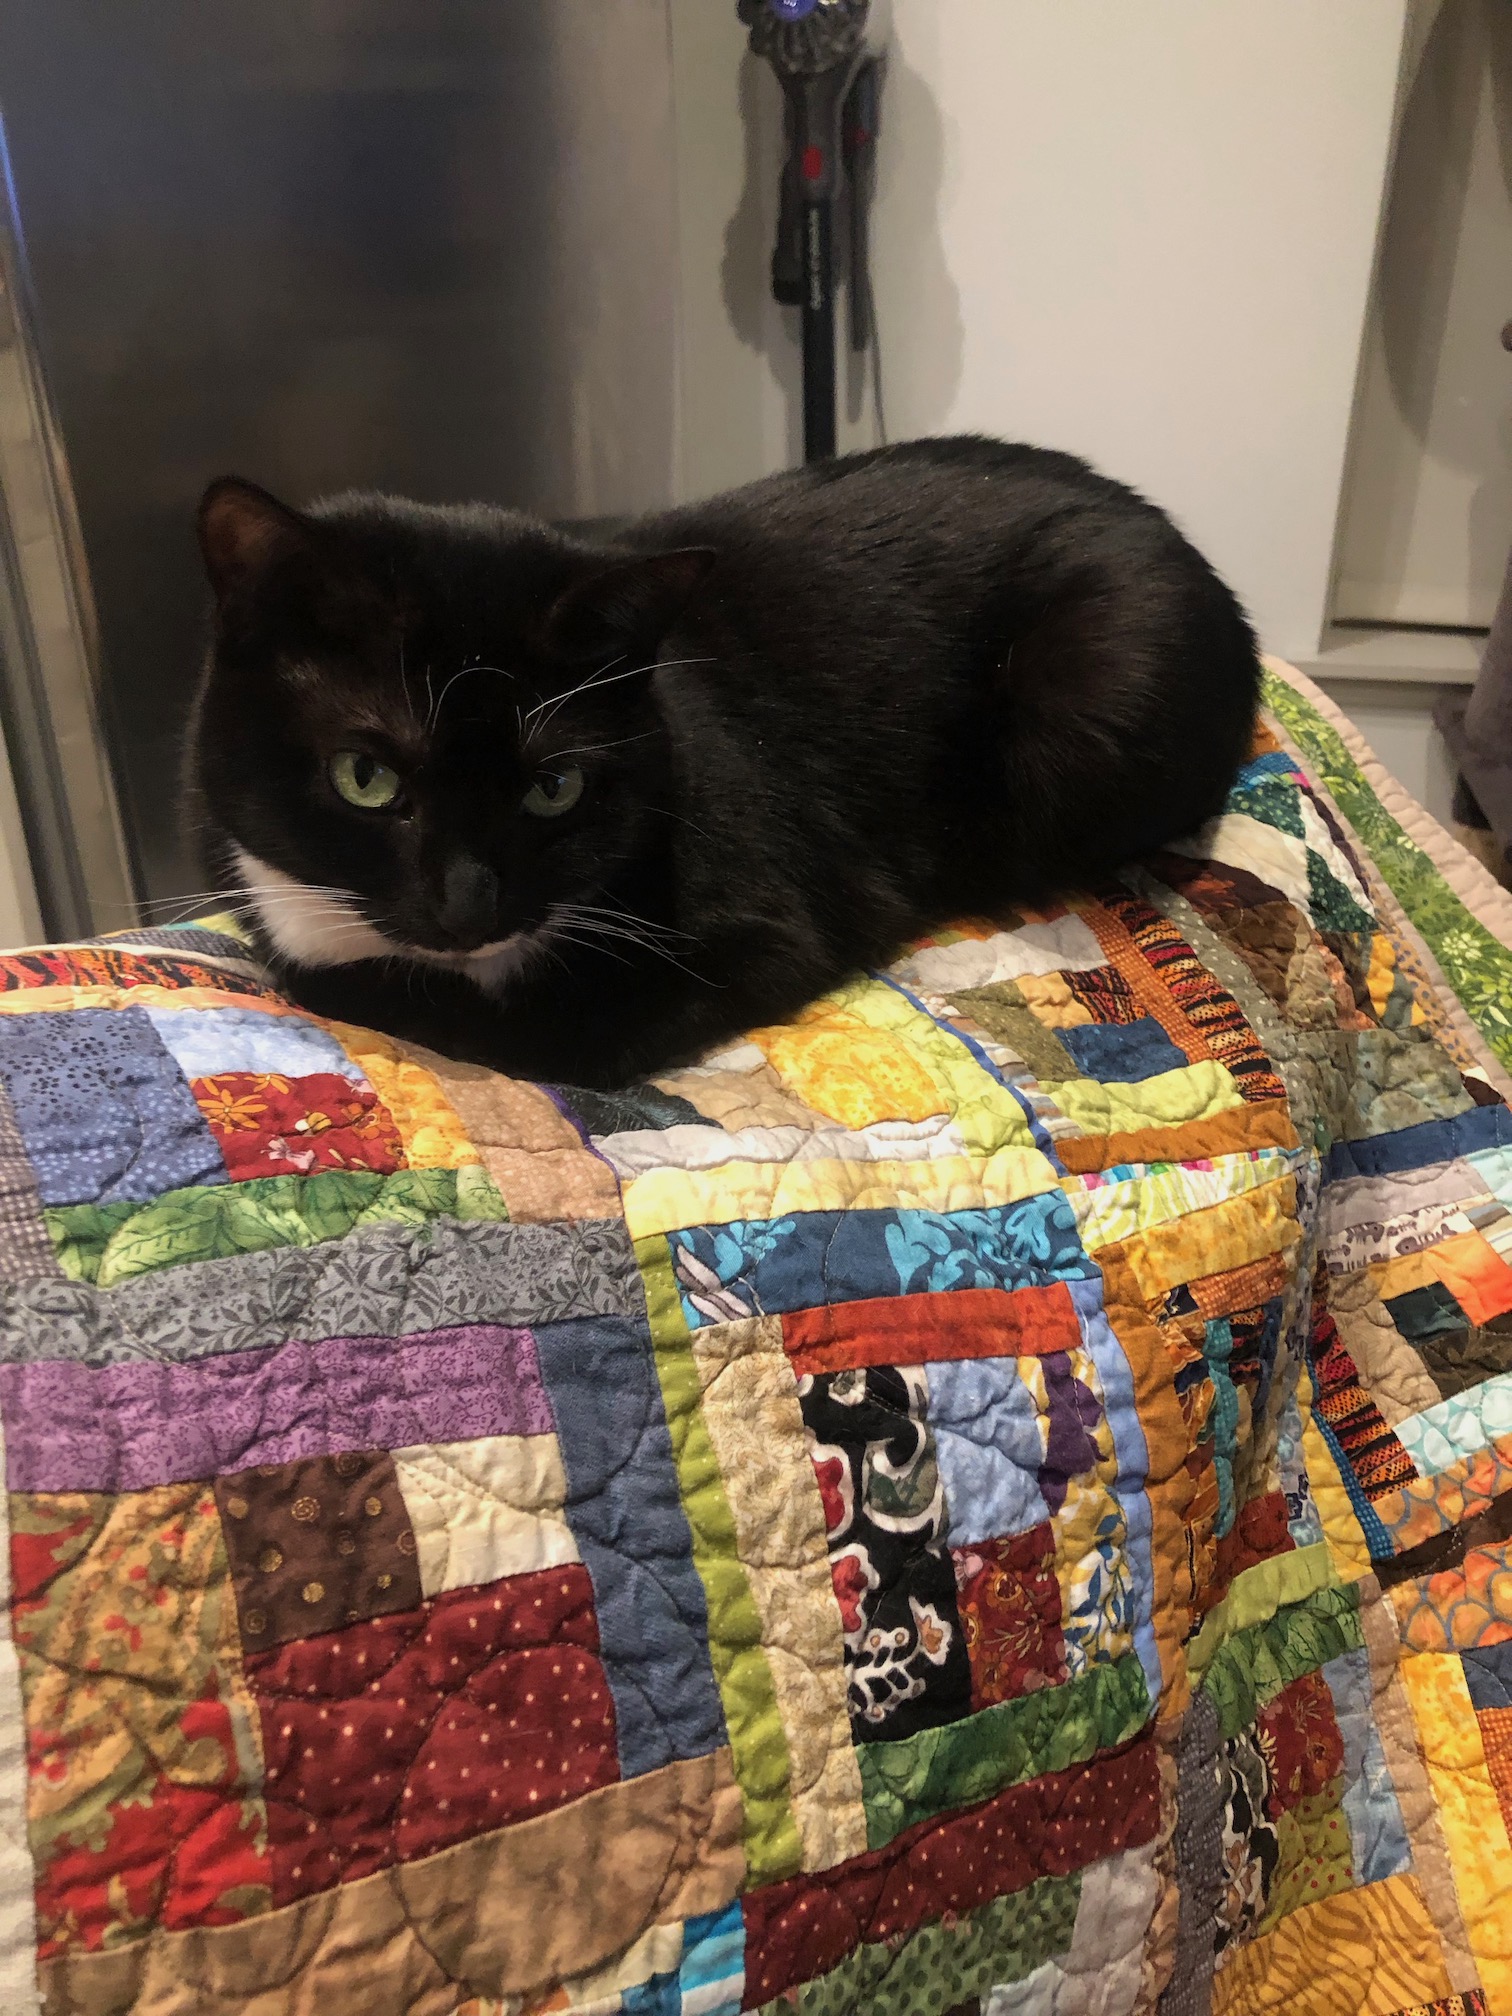
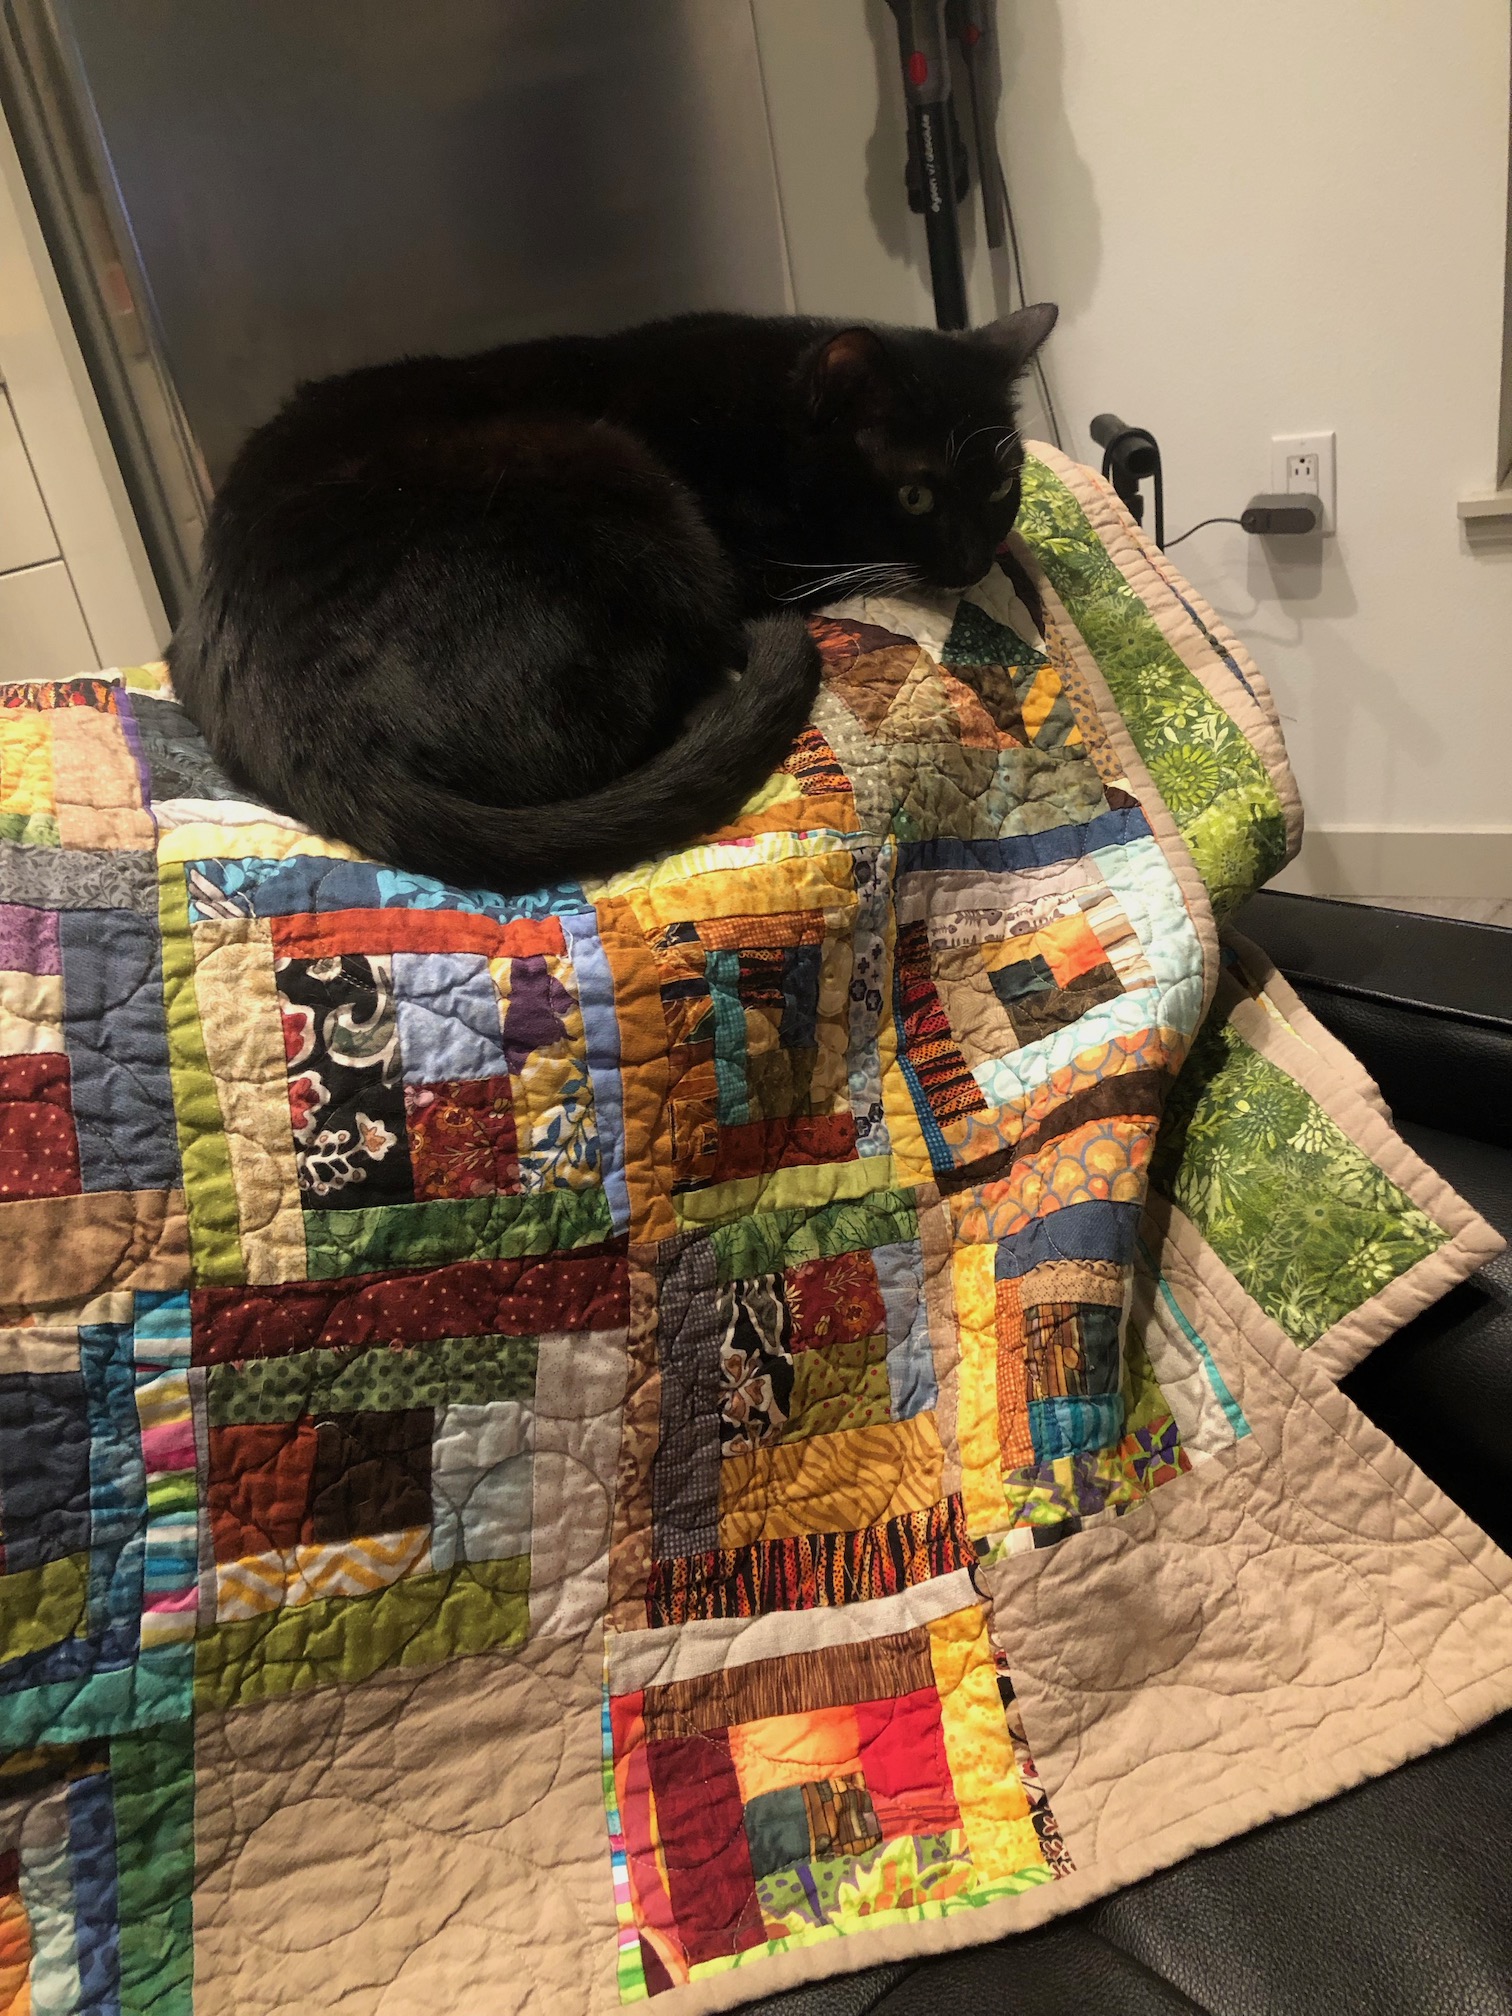
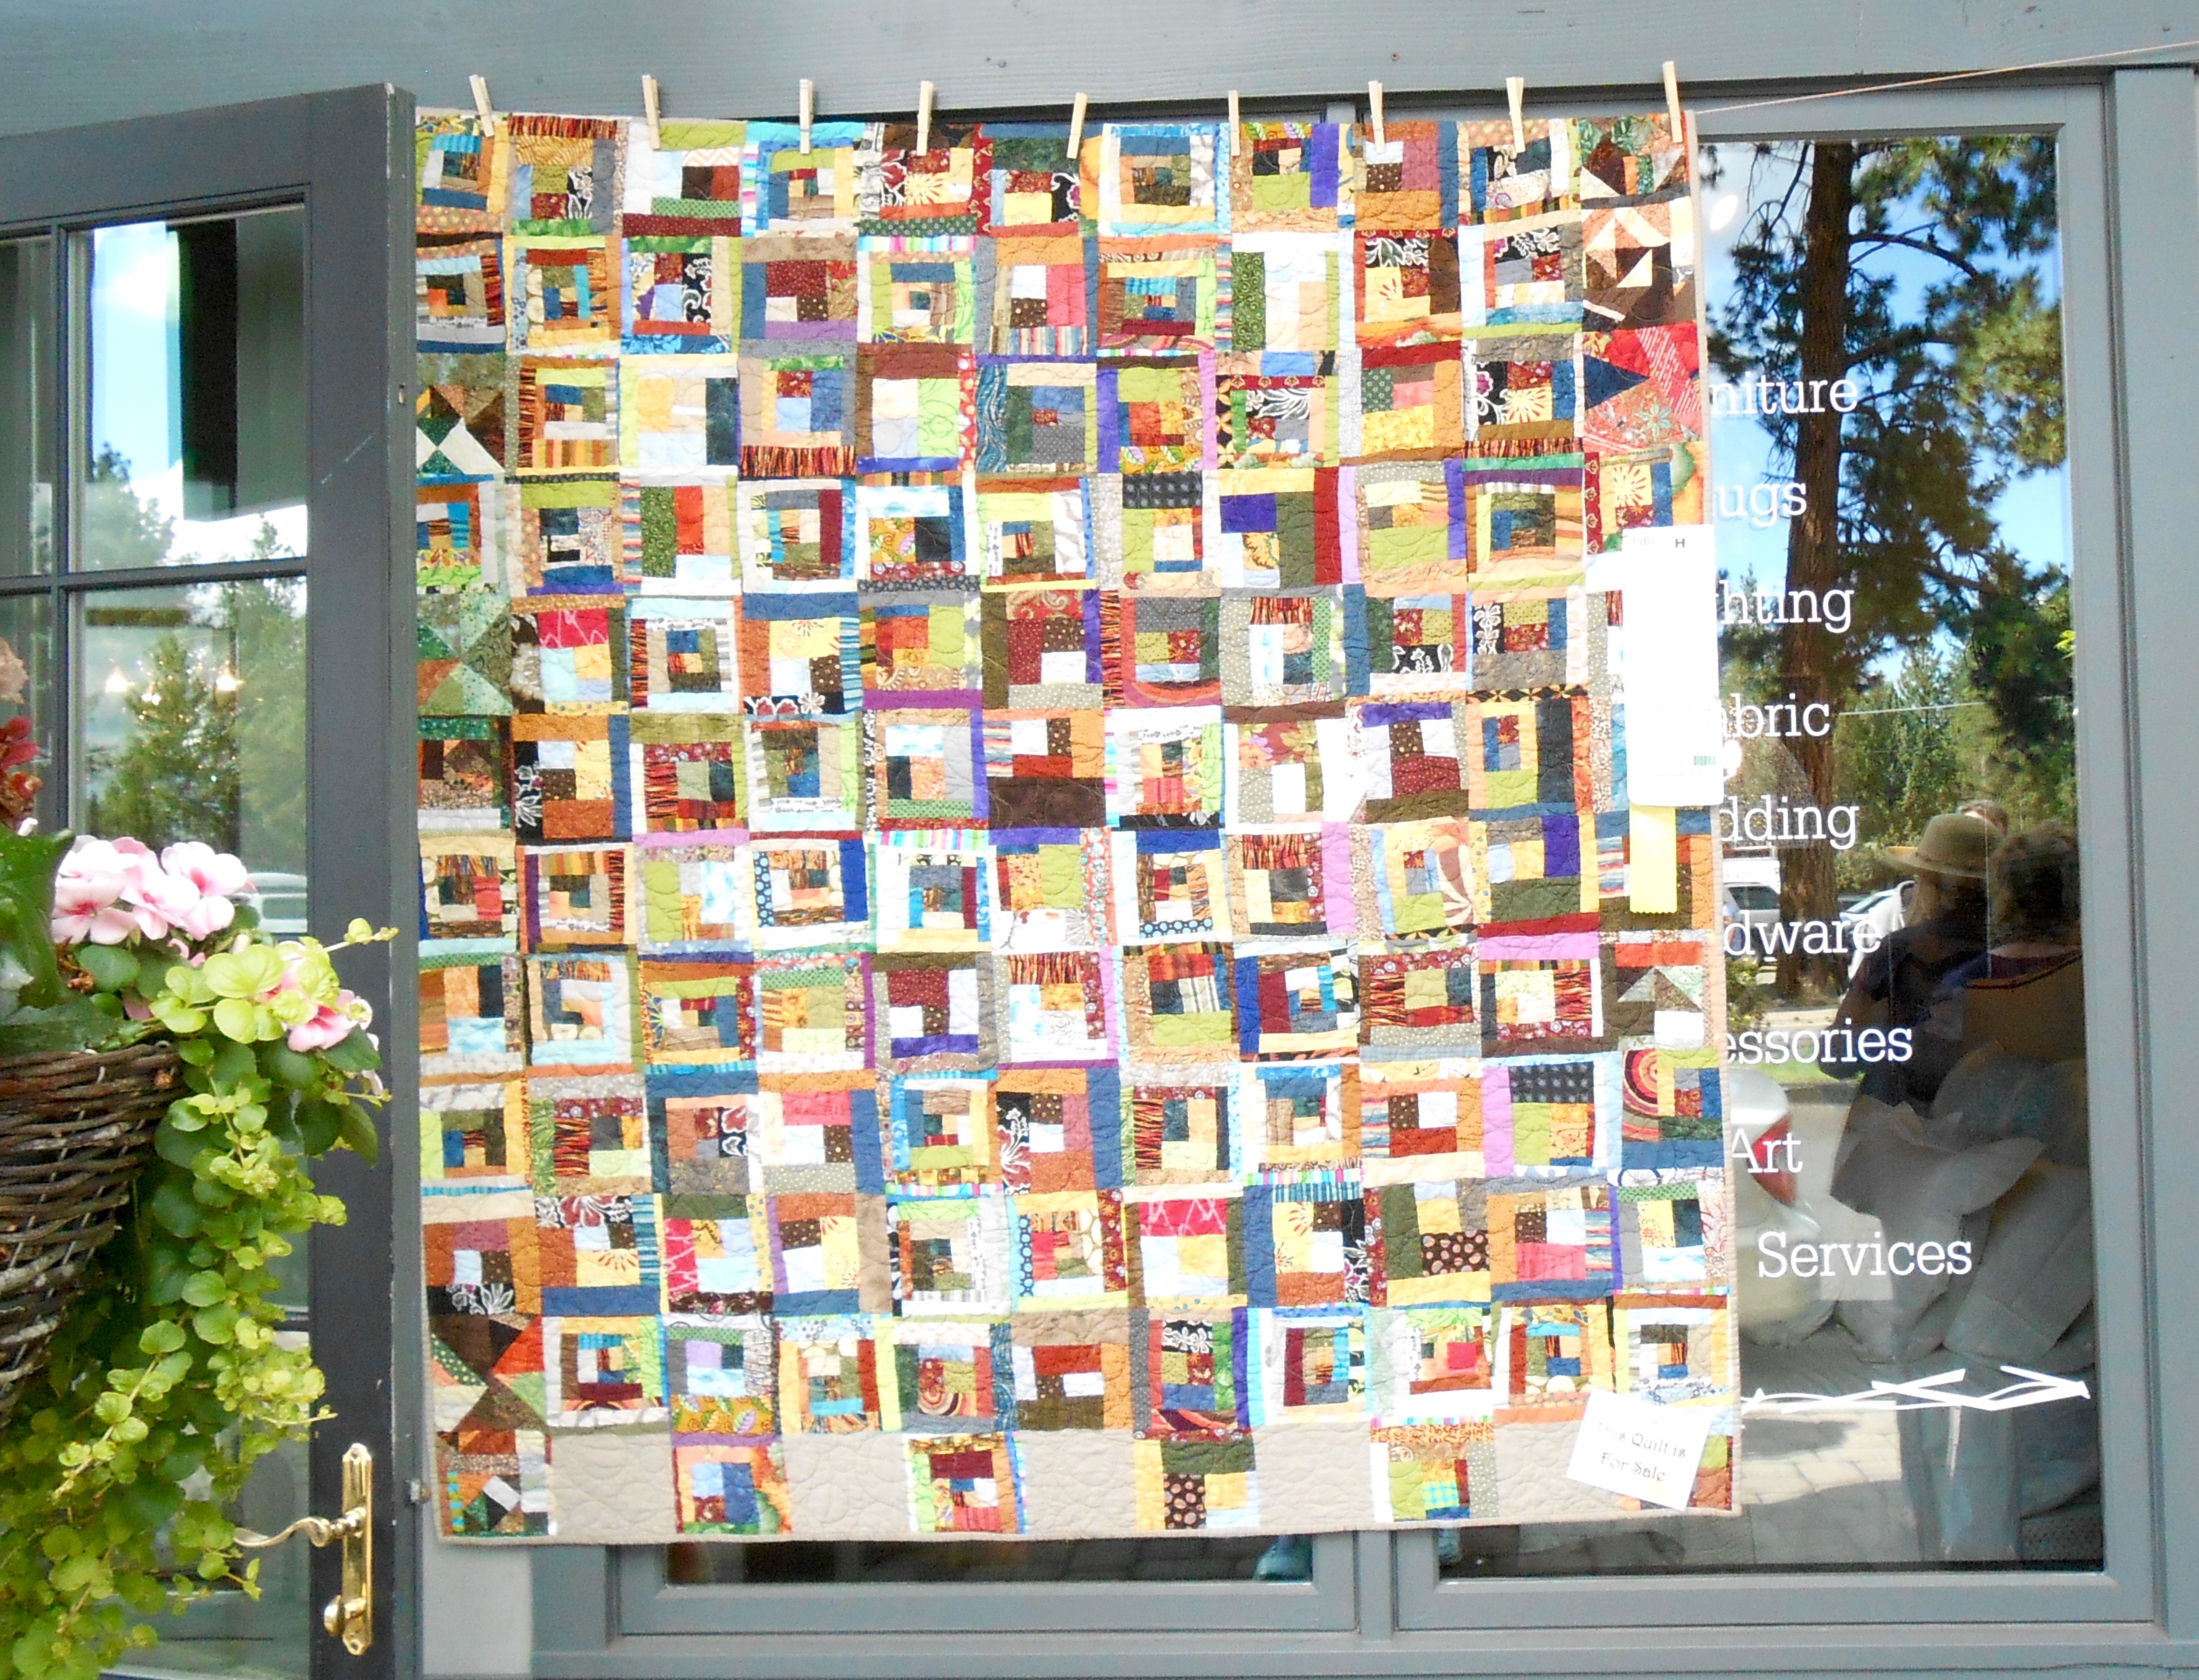
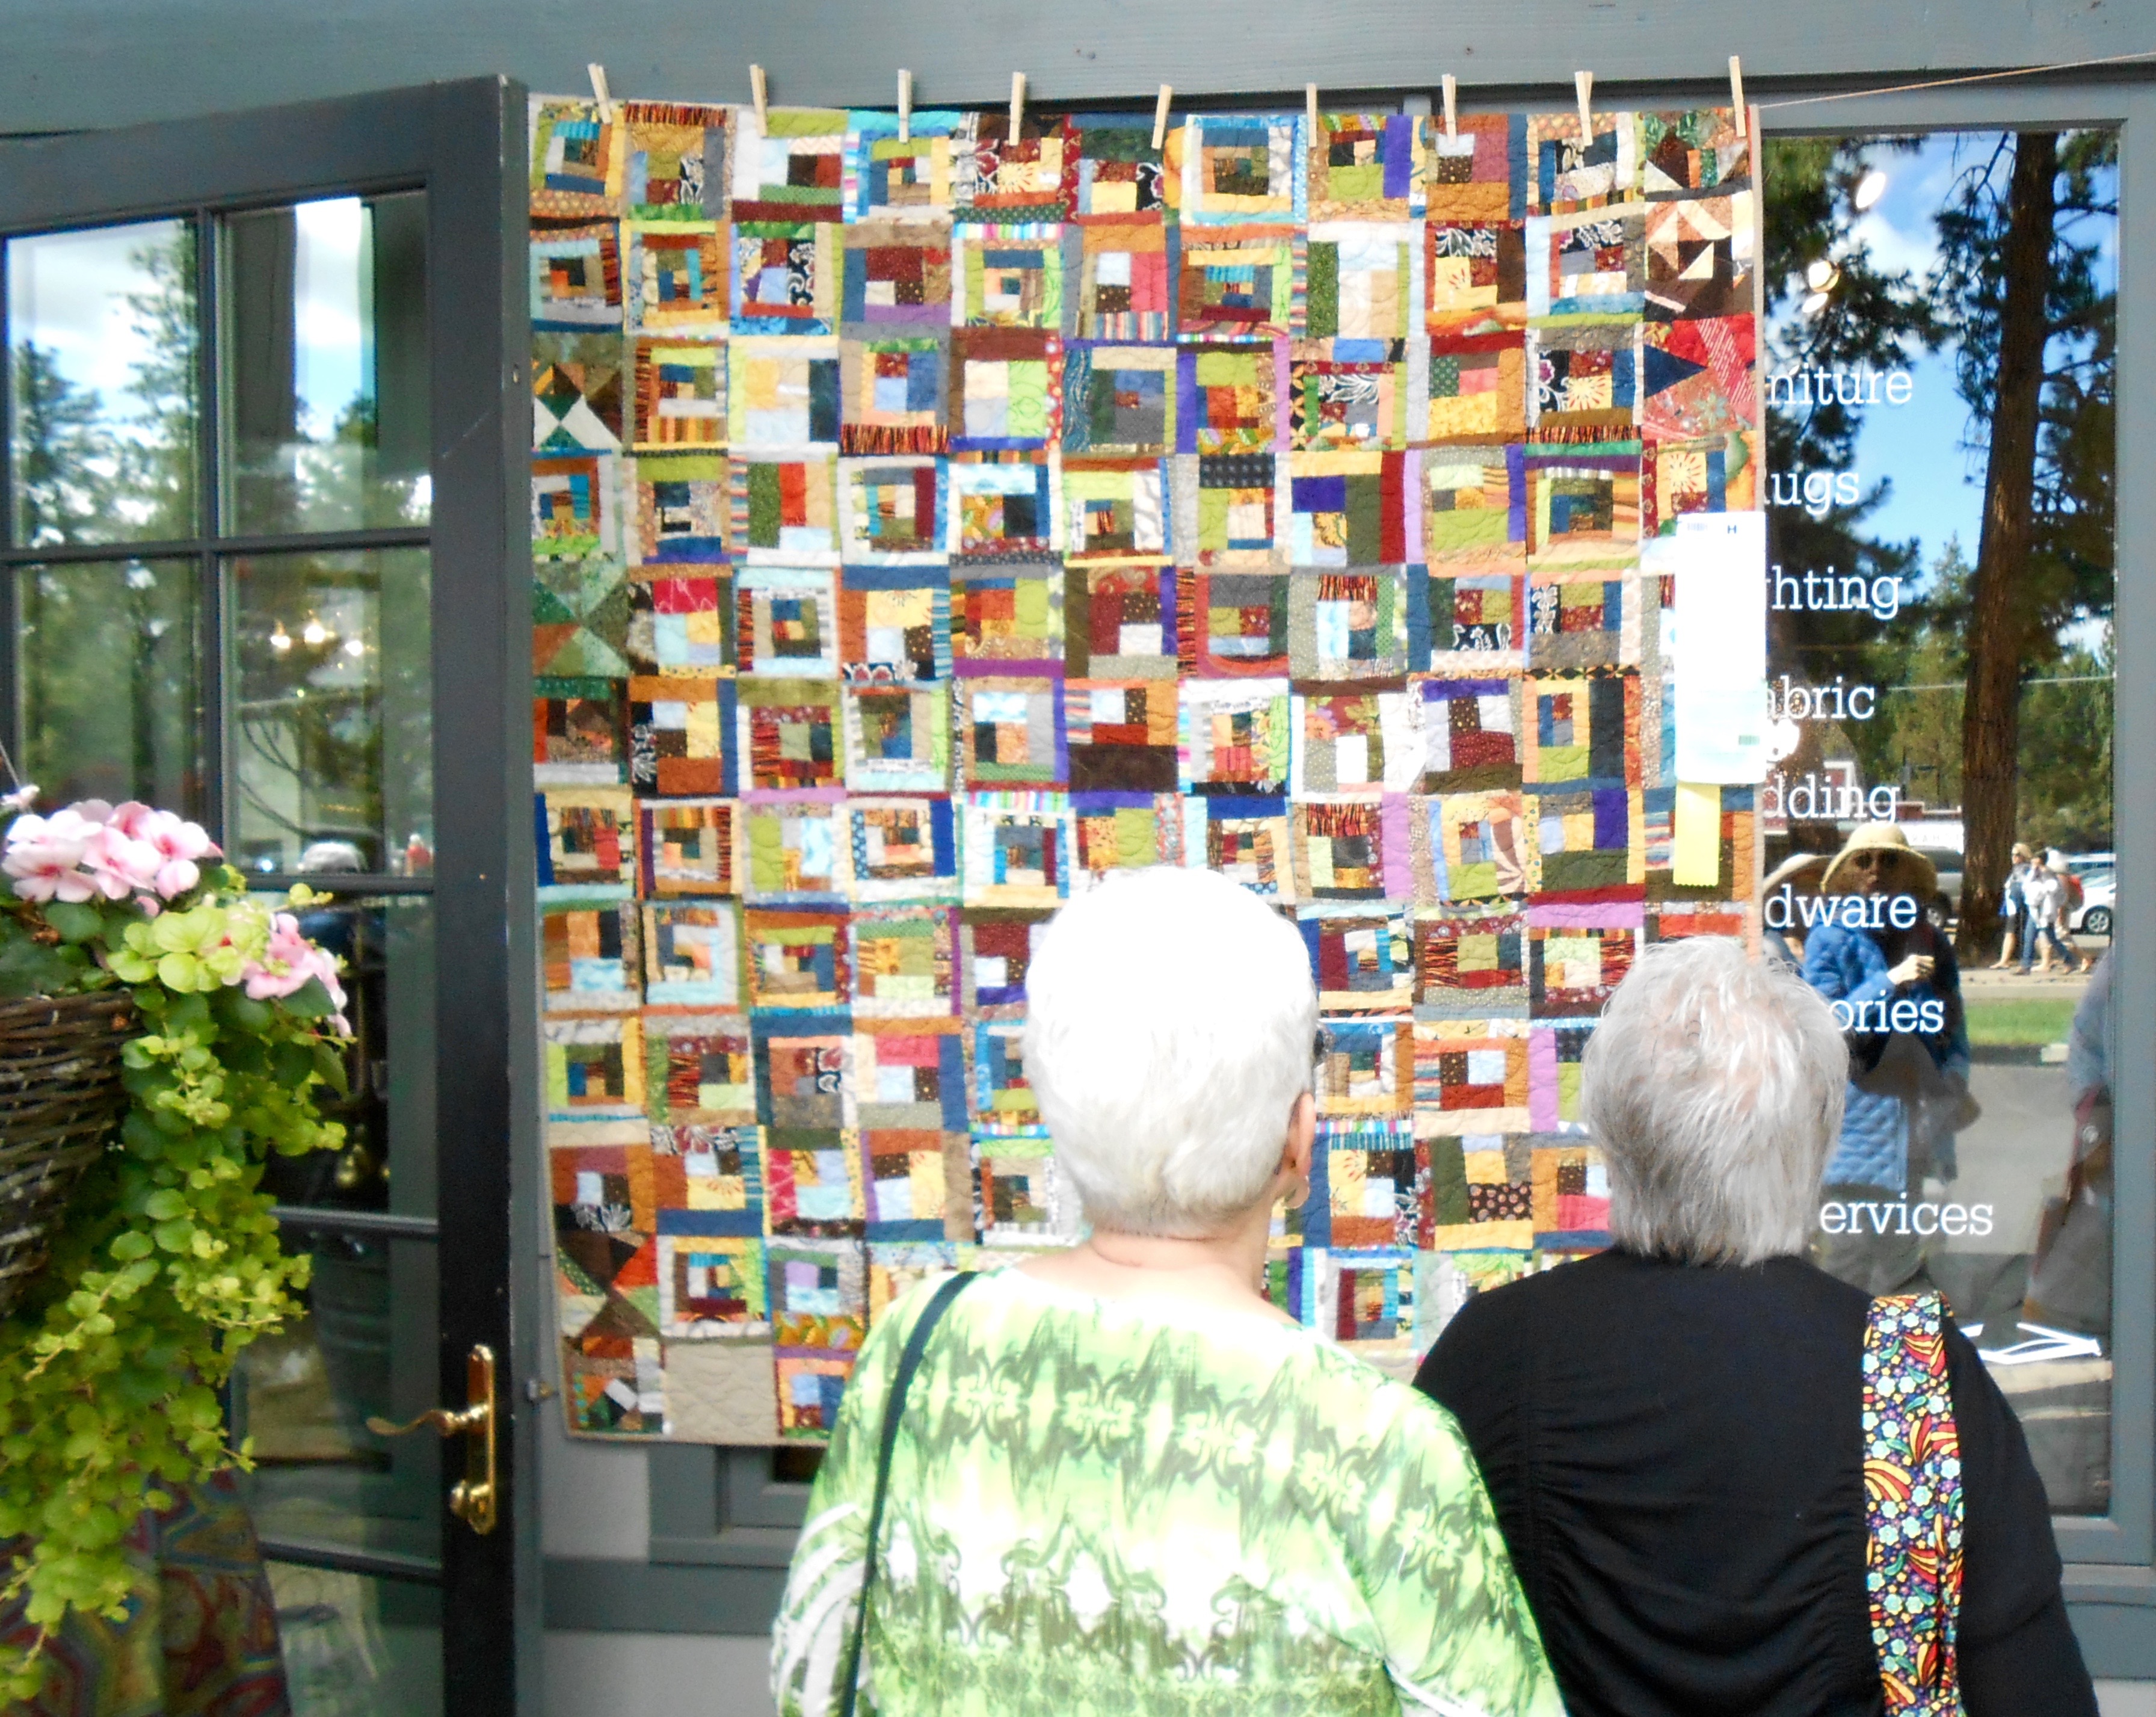
Well, just to be fair, it’s time to share a “CAT APPROVED” quilt!
A couple weeks ago I sent my stepson Z a quilt I made in 2016 from fabric scraps using a “log jam”/improvisational log cabin piecing technique. Recently he sent me photos his rescue kitty Morticia enjoying the quilt!
I remember lingering around the quilt during the show, waiting to hear comments by attendees to the show (like a “quilt stalker”…I know it was pretty silly but I was so excited to have quilts hanging in the show).
This quilt has been sitting around in storage for a while and thought it would be happier if it was enjoyed in someone’s home (and by kitties is a bonus) instead of gathering dust.
The end of last week I received a wonderful reminder of why I became a quilter and why I make quilts.
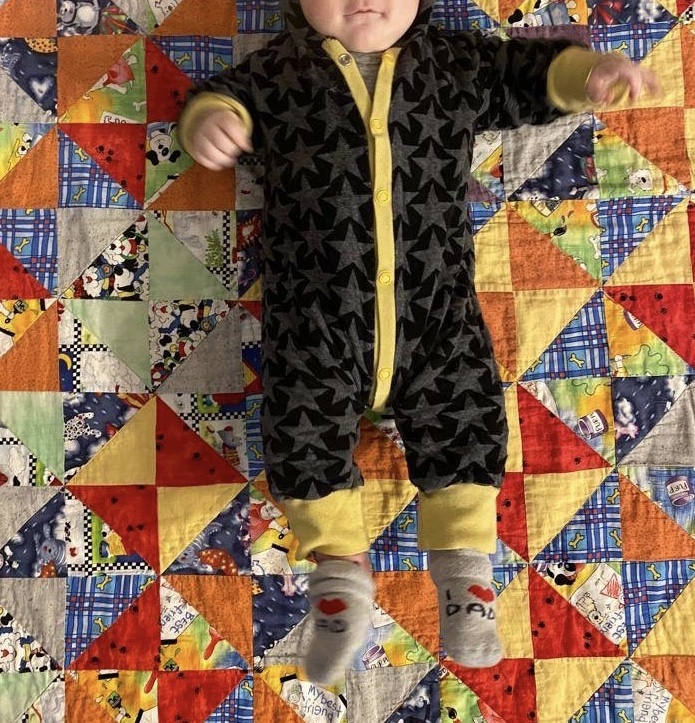
Many years ago I made my a baby quilt for my Danish Brother’s (longtime friend that I spent part of the summer in Denmark with him and his family in the late 90s, he now lives in Austria) first born son (14? years ago).
It was a fairly simple quilt as 14 years ago I still in my early days of quilting.
Little did I know this quilt would become sort of a family heirloom for them and is passed around family members as they have babies.
Last year I received an e-mail and photo from my Danish Brother with his sweet nearly 3 year old niece (his brother’s darling daughter) wrapped in the quilt when she was feeling under the weather to comfort her:
A very sweet face but must protect this little one’s privacy
And at the end of last week I received an e-mail with a photo of his new nephew (his brother-in-law’s son) using the quilt!
A very sweet looking baby but face obscured for his privacy, you’ll just have to trust me on his sweetness 🙂
It was one of those “my heart is going to explode” feelings, my eyes filled with tears, and I got to so overwhelmed and grateful (and surprised) that a simple baby quilt I made was bringing comfort to 14+ years of babies/children so far in one family!
Here is a quote from my Danish Brother from his e-mail with the photo of his niece wrapped in the quilt in 2022:
... you know what…is precious to me? The blankie that is comforting her! I am sure you recognised it immediately of course. I just wanted to put that smile on your face! Thank you for the fine gifts you have lovingly crafted for me. It warms my heart every time I look at them. Every one of them is my favorite!
Hey Universe, thanks for the reminder, I will keep making quilts.
You quilters out there reading this you understand!
Back in November 2021 I posted that one of my art quilts made from recycled materials, RECYCLED HOPE III: WINDOWS OF CONVERSATION, sold to a private collector via a Seattle based art consultant – Another Recycled Fabric Art Quilt Sold.
I thought perhaps the quilt went to a private home. I did not ask what became of the quilt after I sold as the art consultant did not disclose her client’s details.
Well my random decision to google “tierneycreates” the other day led to this result:
I discovered my quilt is hung in Building A, L7 at this upscale apartments in downtown Seattle Washington and that my photo and Artist Statement is on their website.
I had fun exploring their website, learning more about this lovely looking downtown Seattle residence.
I also watched a YouTube video posted on the residence’s website…
And found my quilt hanging on the wall in their lounge at time 0:19 into the video (see left side of image below, a screen shot from their YouTube video):
Wow! What an unexpected surprise!
In December I sketched out some plans to continue my Recycled Hope series someday. Coming across this info of what happened to that quilt has inspired me to revisit this series of art quilts in the near future and expand my portfolio.
Was it a message from the Universe to get back to working with recycled materials and making art quilts? Maybe…
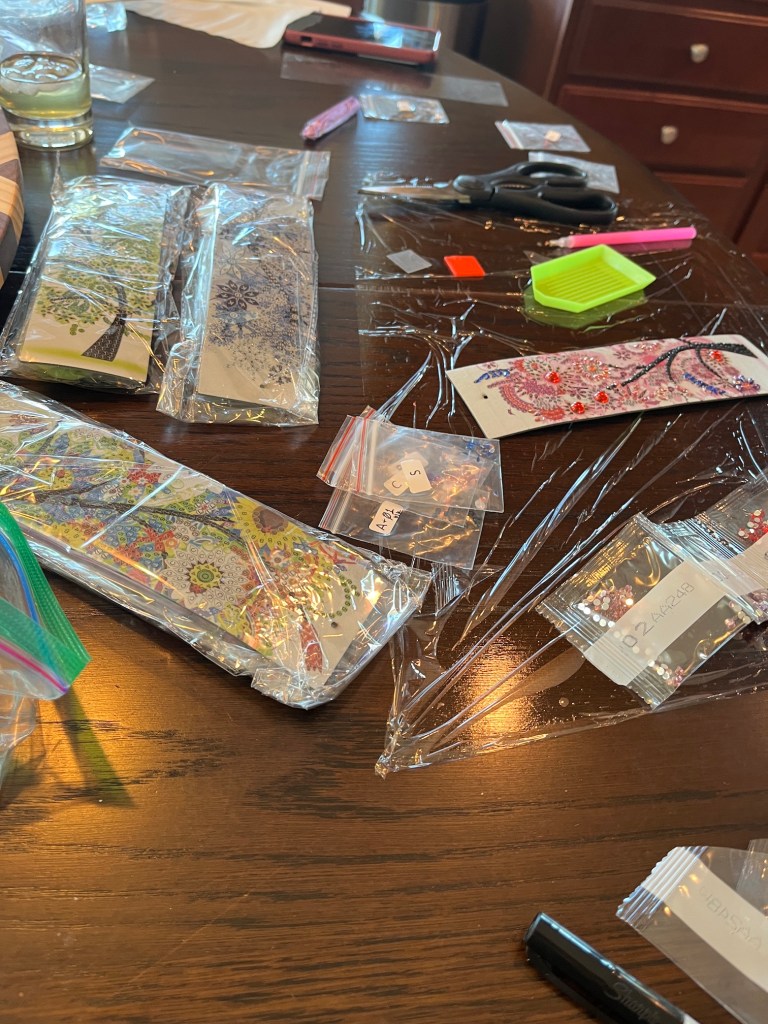
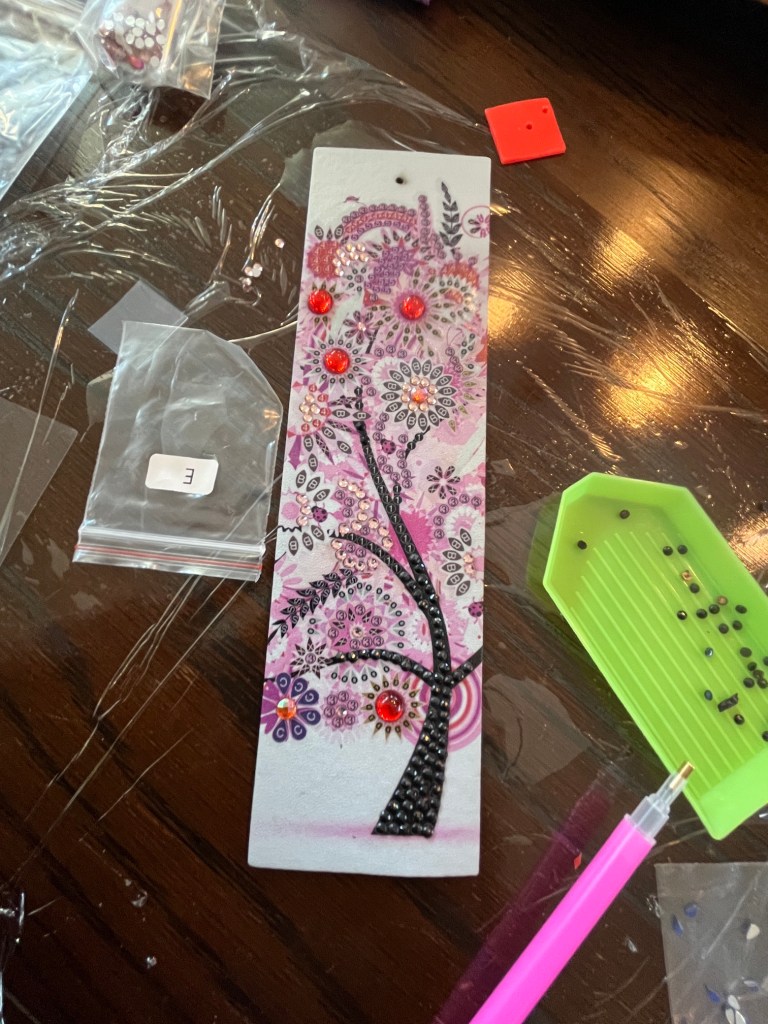
Last Friday I went over my friend’s house for an afternoon of crafting. She got me and herself a kit of “Diamond Painting” bookmarks and we worked on making our first diamond painting bookmark.
The kit has 4 bookmarks, one representing each season (Winter, Spring, Summer and Autumn):
At first it was confusing to us on how to do the diamond painting and how it worked (no directions) but we figured it out. We decided since it was currently Autumn to work on the Autumn (the purple/pink one) bookmark.
Here are some photos:
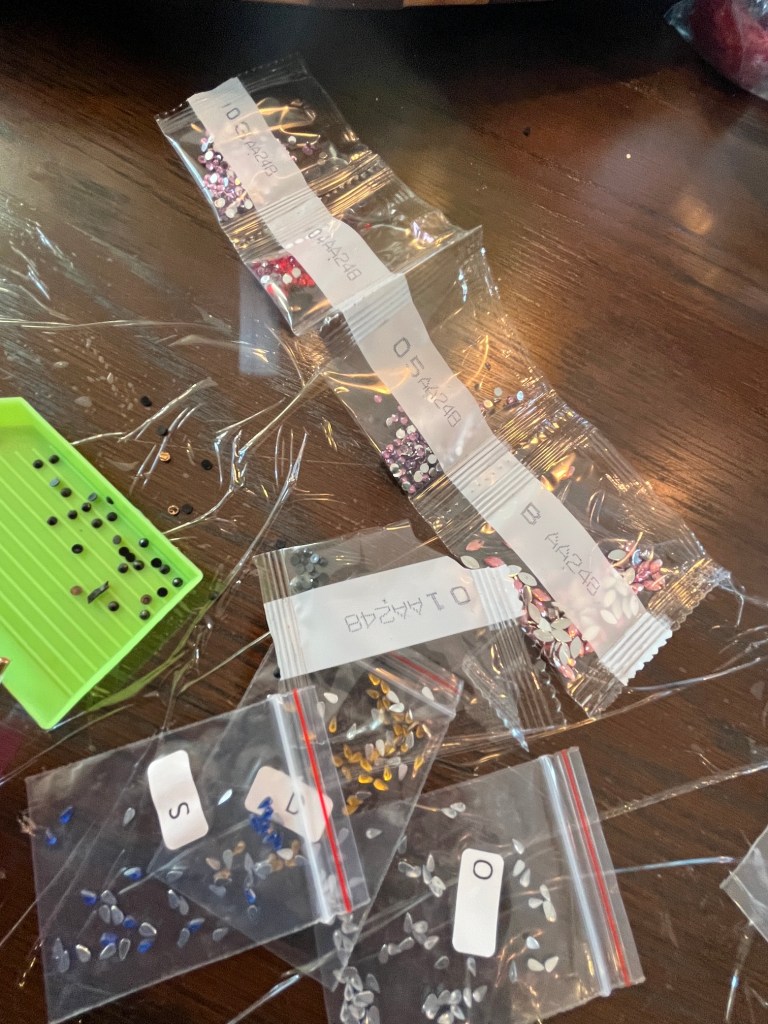
Because of the tiny little beads you work with, we put plastic wrap on our work area to try and capture stray beads.
At time is was tedious to do diamond painting but it was fun to see the progress and of course fun to hang out with a friend.
My friend actually finished her bookmark and here is the lovely finished Autumn bookmark:
The notification I received by e-mail from Public Art Program Coordinator stated:
“Your submission has been selected to be part of Prospectus #268 Southwest Artist Series Purchase Initiative. The submitted artworks will be made available for purchase through the Art in Public Places Program. Your work will be shown to various sites throughout New Mexico with available 1% for public art funds. If your work is selected for purchase, I will contact you directly to begin the purchase process. The work will be made available for purchase for two years…”
Fingers crossed my art quilt gets selected for purchase! If I does I will need to get the art quilt (which measures 18 inches by 39 inches) professionally framed and have it professionally installed at the location in New Mexico it was purchased for. An estimate of the cost to have this done was included in the price I proposed to New Mexico Arts. It would so fun to travel to our neighboring state and oversee the installation!
If you’d like to read the Artist Statement for this piece which was created for a Central Oregon SAQA show several years ago, here it is:
18” W x 39″ L, recycled clothing, recycled denim, and recycled home decorating fabric
THE STORY OF THIS PIECE:
If you peek inside the window to my creative heart you will see it filled with a desire to reuse, repurpose, and reimagine materials which otherwise would have been discarded. Part of my Recycled Denim Stories Series, this piece blends a corduroy shirt and pants, denim jeans, sweat pants, a tweed jumper, an old curtain, and home decorating fabric sample scraps into an assemblage of window-like structures.
This is the second piece I’ve had selected by the NMA for their Art in Public Places program. The first piece was Recycled Hope III: Windows of Conversation in 2020 (see post Recycled Hope and Acclaimed Artist Series). Recycled Hope III: Windows of Conversation however was sold to a private collector in 2021, so I had to pull it from New Mexico Arts’ catalogue of prospective art for purchase.
This post is not about starting a specific art quilt* (though I will share an art quilt I am in the progress of making), it about a little of the process I use to design a new art quilt.
*When I use the term “art quilt” I mean a quilt using an original design that you design/create; not based on an existing pattern (though a pattern could inspire it); and either improvisational or based on a specific idea/concept/photo that inspired the quilt.
What do you find successful when you are creating a design?
What is one thing you do that helps you focus and get rid of all the noise and clutter that come with color, design, prints, etc.?
There are so many complicated variables (in making an art quilt), how do you start?
I let her know I would answer her questions in a blog post in case anyone else finds my musing interesting and possible useful. (And at the end of this blog post I am going to invite you all to weigh in with your answers, so start thinking about them now as you read mine!)
What do you find successful when you are creating a design?
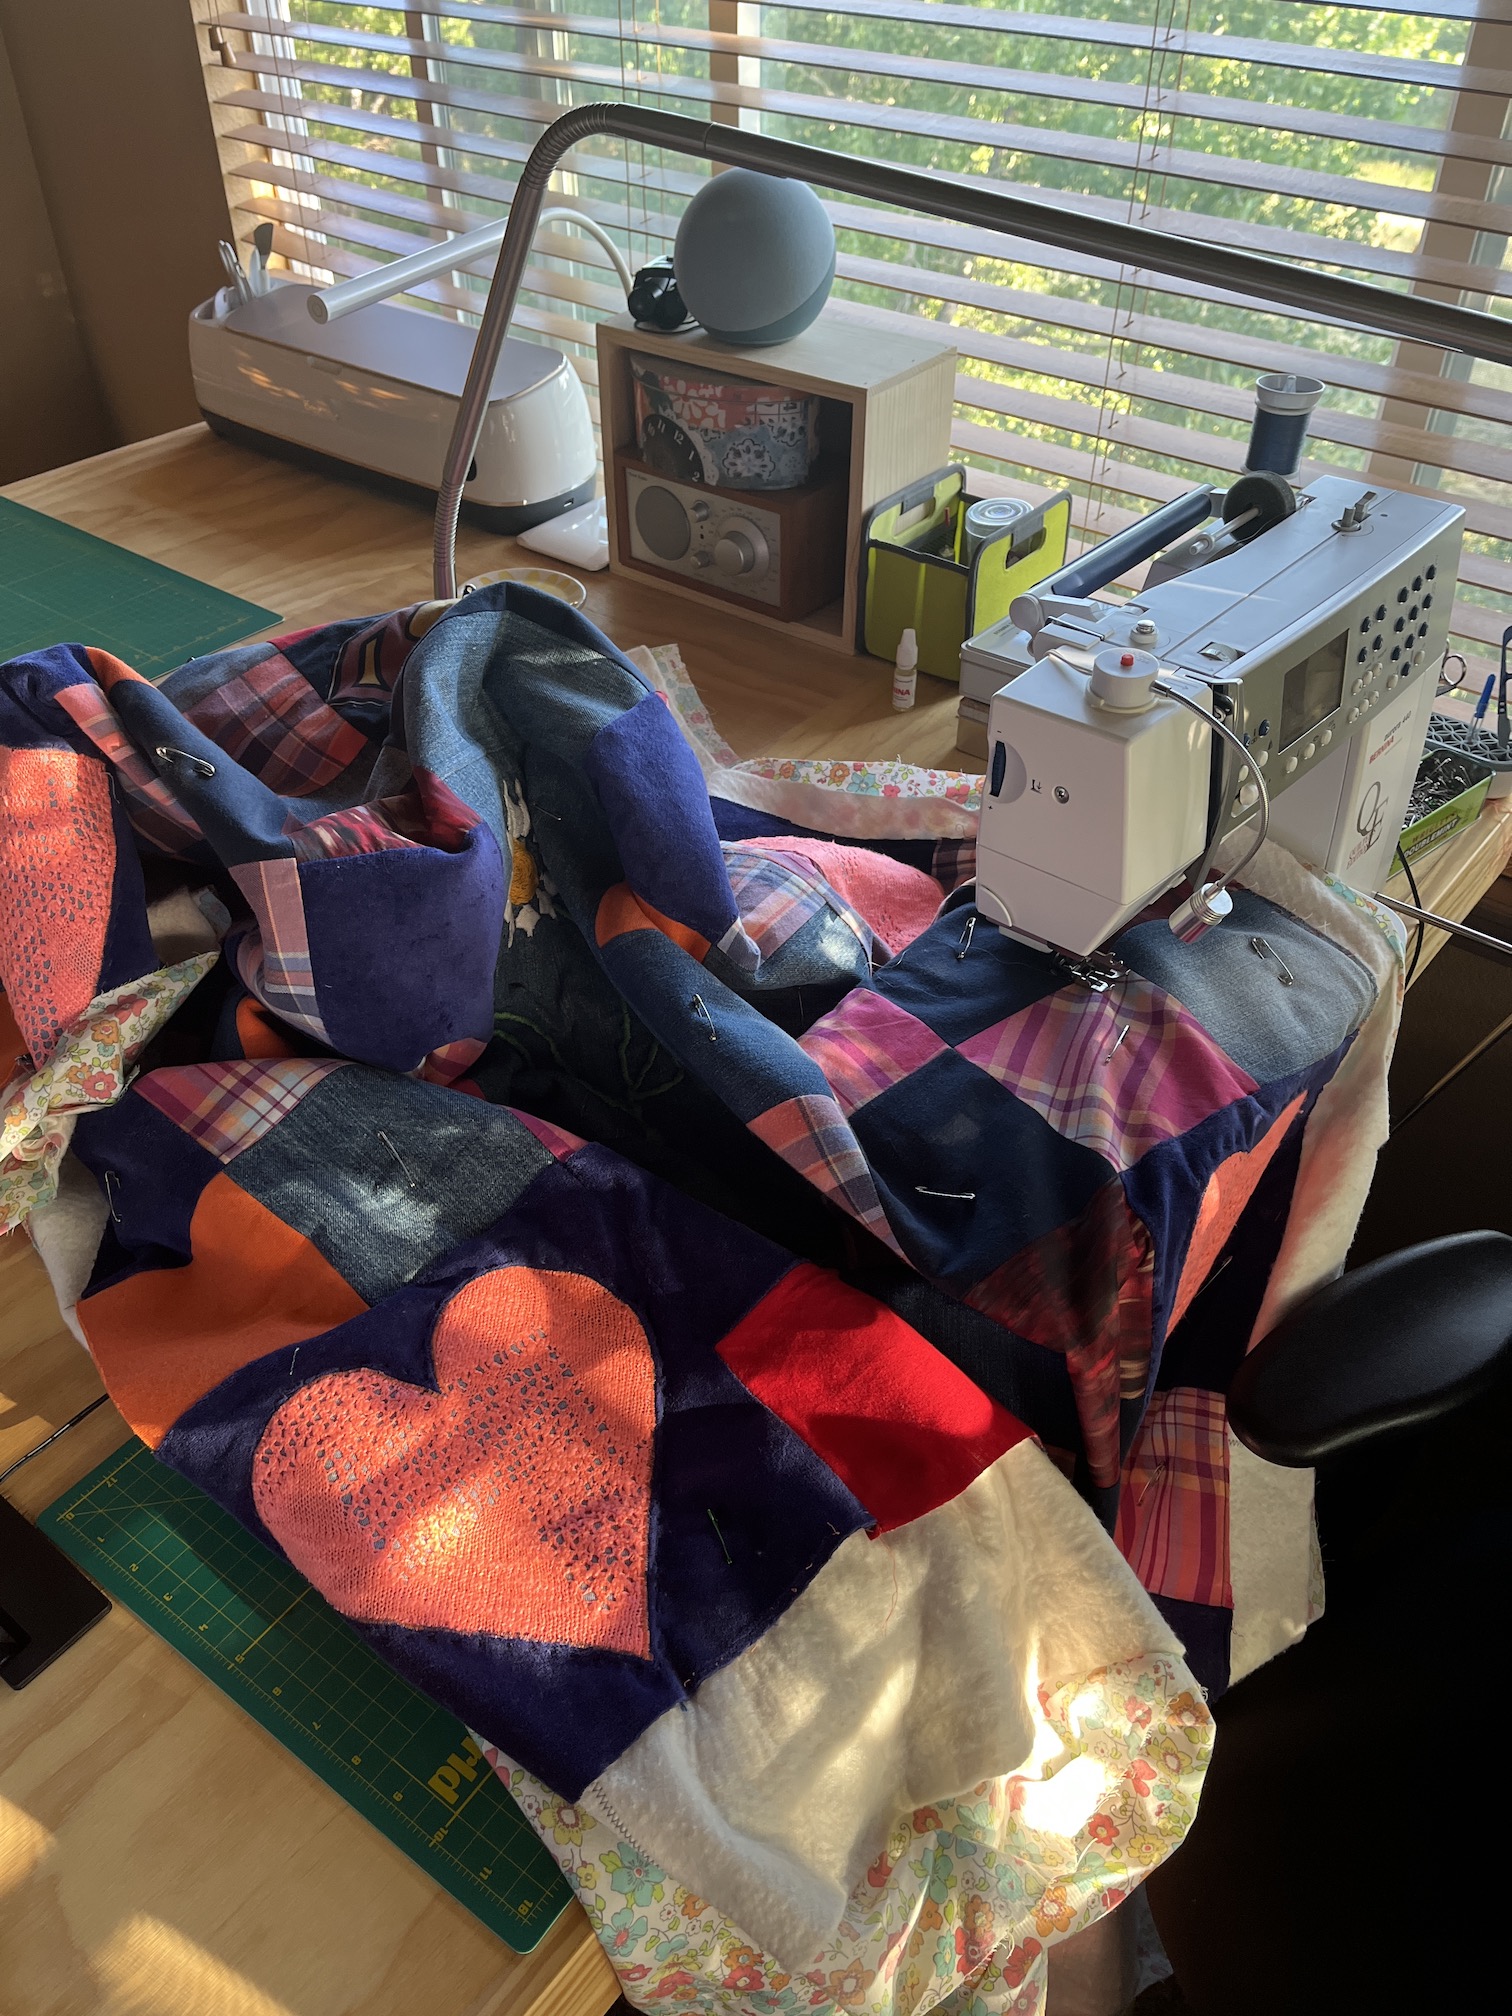
THE MEMORY QUILT
What I find successful in creating a design is to sit down and write out my general concept and what I want to accomplish with this quilt. For example on the memory quilt I made my friend I wanted to 1) make a quilt from as many of her mother’s favorite clothes that I could; 2) make something that feels like it is a hug from her late mother; 3) try and use some of the more challenging fabrics in the design.
In writing out my general concept, I consulted some traditional quilting books for ideas. I did not want to make it “improvisational” with a lot of little pieces placed randomly (or in a format such as a free form log cabin). I wanted it to have some defined structure.
During my research (looking through my collection of quilting books) I found a pattern that had hearts appliquéd over plaid (via four patches) squares. I thought – “yes that is it!” – the hearts could represent love from her late mother; and the plaid design (four patches) was doable with the challenging fabrics I needed to work with (like velour, a polyester scarf, etc.).
MY CURRENT ART QUILT IN PROGRESS
Recently I’ve started a new art quilt for a special show I am hoping to get into. It would be my first international show. I’ve been invited to submit a quilt for it but it has to be acceptable for the exhibit in order to make it into it. That’s all the details I’ll provide on the reason for the quilt for now, but more to come in the future.
My art journal where I sketch out ideas, I made a cover for it to make it special
Ideas about the quilt are not just focused on how the finished quilt might look. They are also about what I’d like a viewer of the quilt to see, experience, think about, etc. What feelings and thoughts so I want to evoke when someone looks at the quilt? What do I want the quilt to say (or try to say). What is the theme of the art quilt, what is it about. I might also start to write a draft Artist Statement for the quilt to really get me thinking what I want the quilt to “say”. See my little “side bar” below for more discussion on this concept.
*** SIDE BAR ***
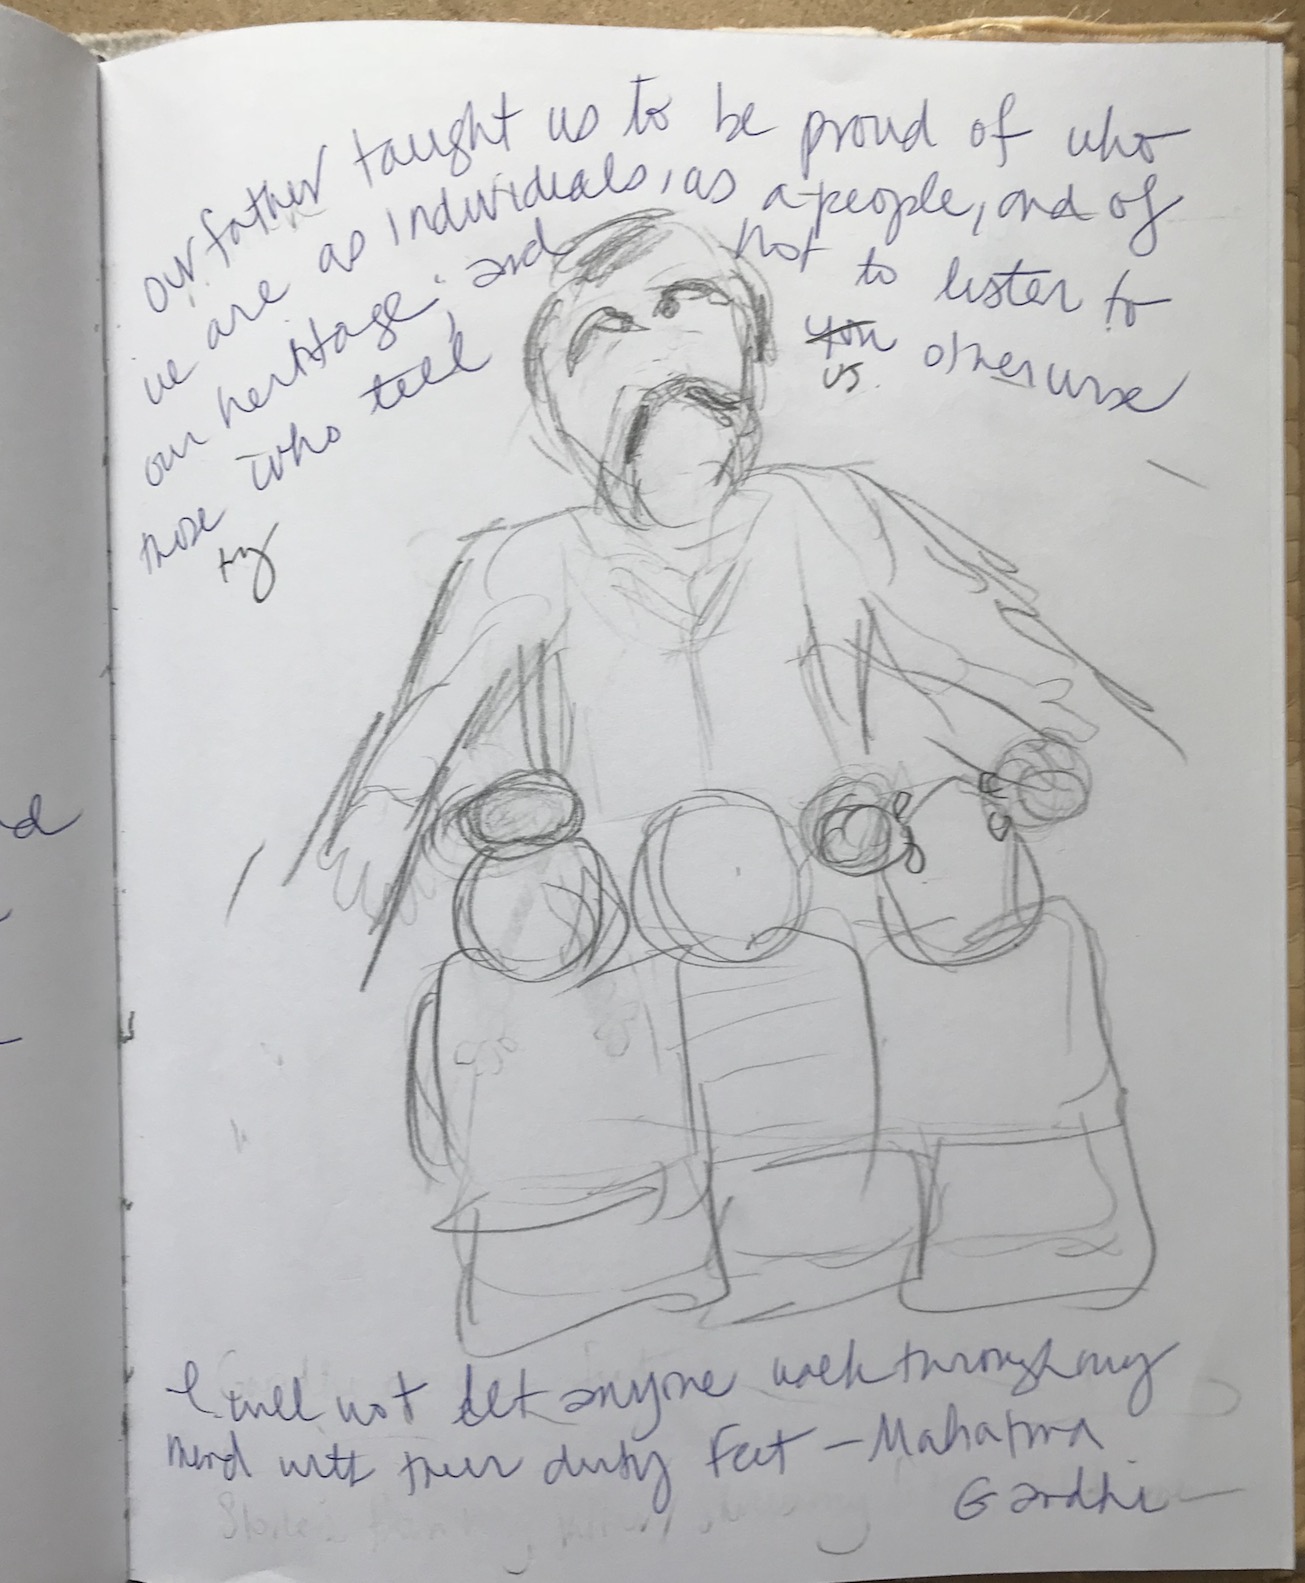
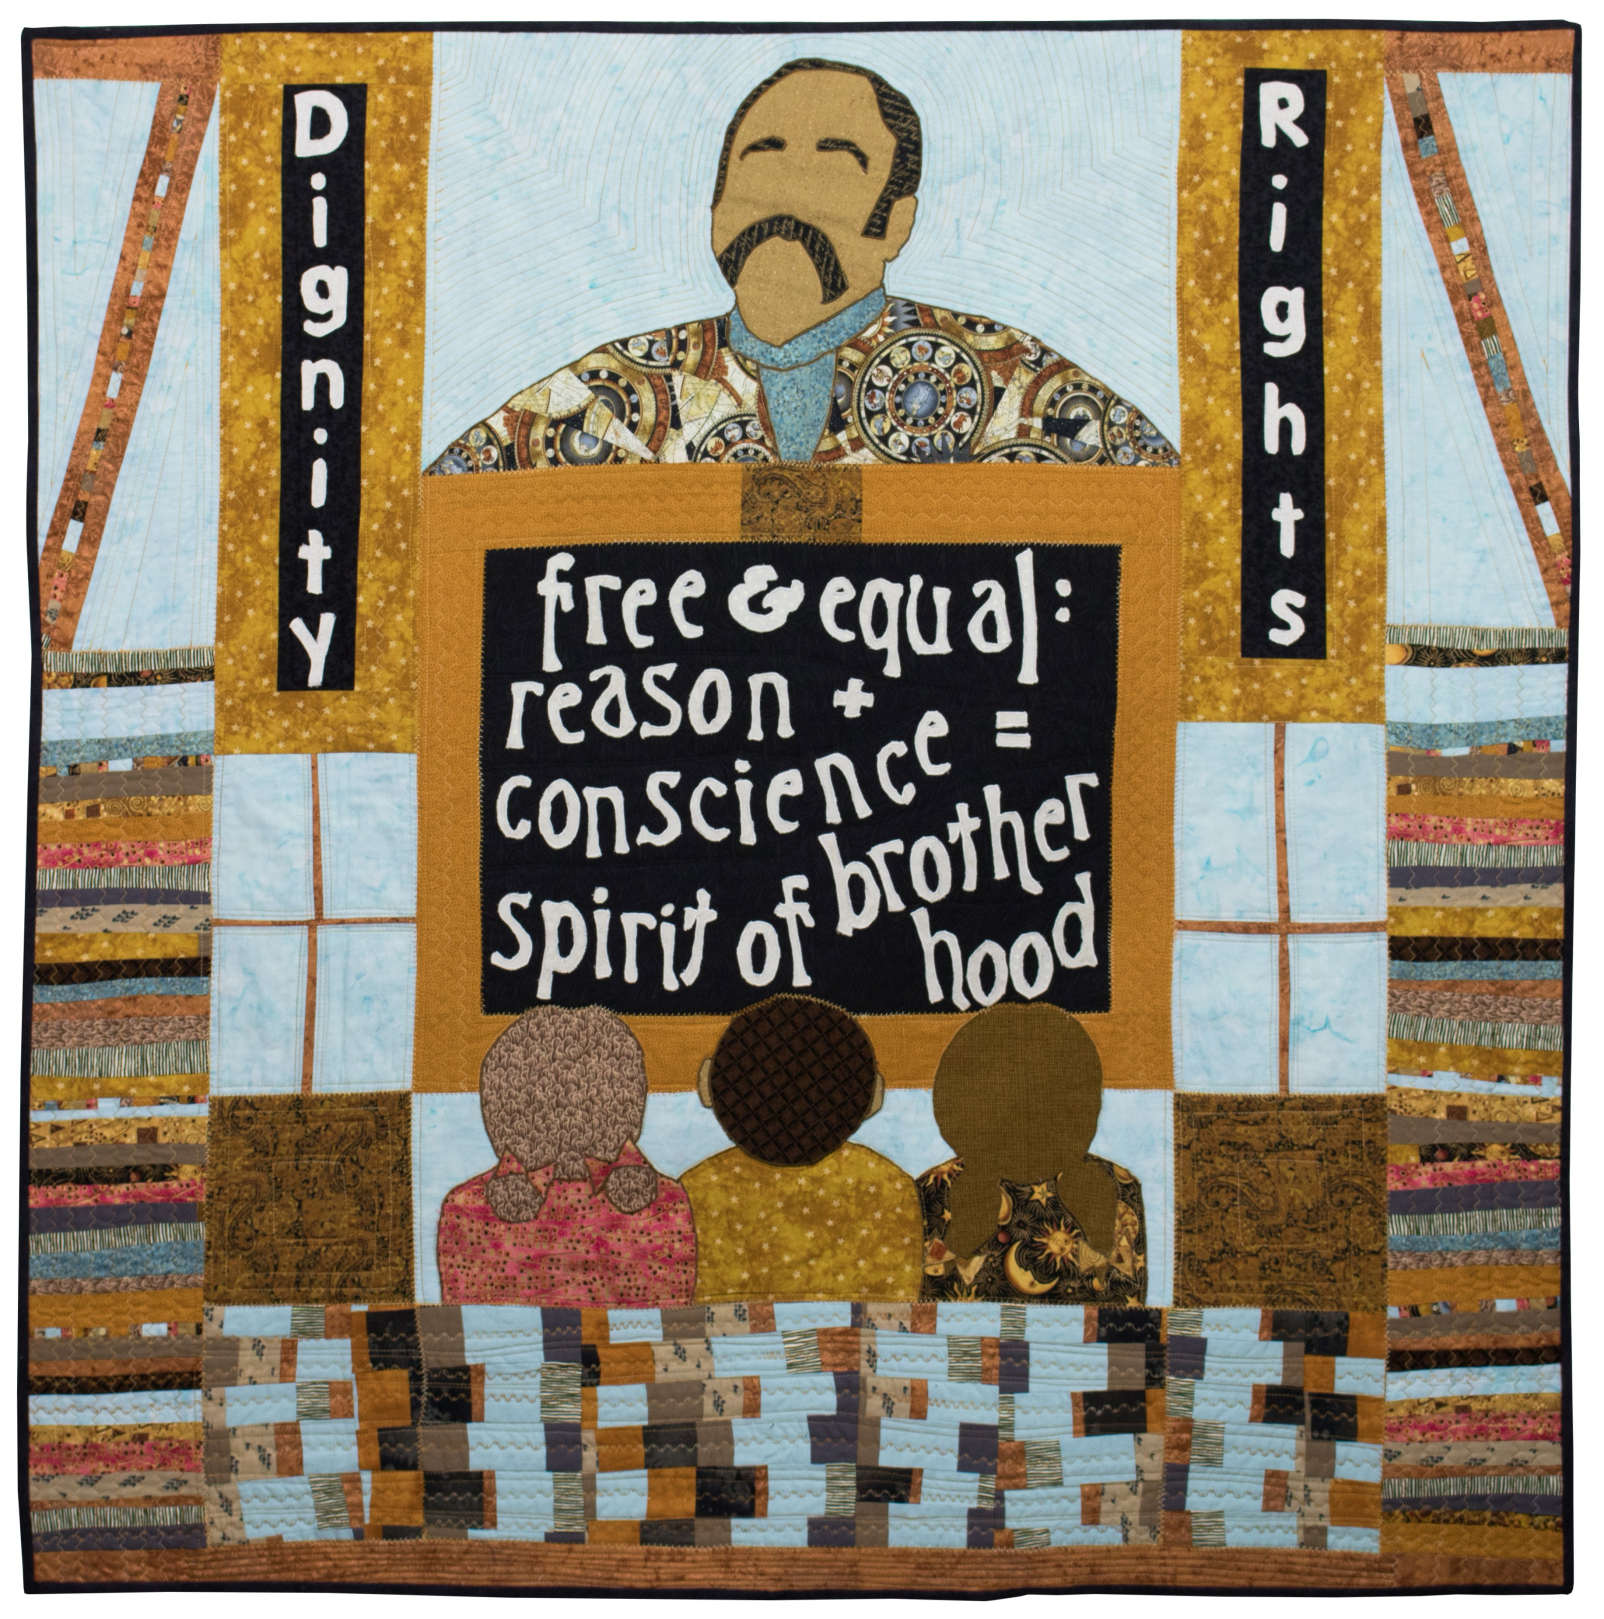
For example, all of quilts I’ve made for the Women of Color Quilting Network (WCQN) shows that I’ve been in had specific themes so I had a starting point. I knew what the quilt needed to in general “be about”and from there I had to narrow it down to what I wanted to share about that topic. Example below with the quilt I did for the WCQN show “Visioning Human Rights in the New Millennium: Quilting the World’s Conscience“ which was inspired by the U.N. Universal Declaration of Human Rights. I was assigned (actually I got to select which Article from the Declaration I wanted to use) Article I: All human beings are born free and equal in dignity and rights. They are endowed with reason and conscience and should act towards one another in a spirit of brotherhood.”
So that was my starting point. I knew what I needed to portray in the quilt, I just had to figure out how to get there.
Here is an early sketch from my journal as I was working on the quilt:
And here is the completed quilt:
I am not sure how to put in to words how I got from the sketch to the completed quilt but it was through trial and error, and lots of experimentation. But I knew I wanted it to be a classroom with a person who looked like my father in the 1970s teaching because he was the one who taught my two siblings and myself the values in Article I. Also I come from a long line of teachers and I wanted to honor education/teaching.
If you know what you want to accomplish with the art quilt, then it helps you have a clearer vision.
Okay that the end of the side bar, so back to the current art quilt in progress….
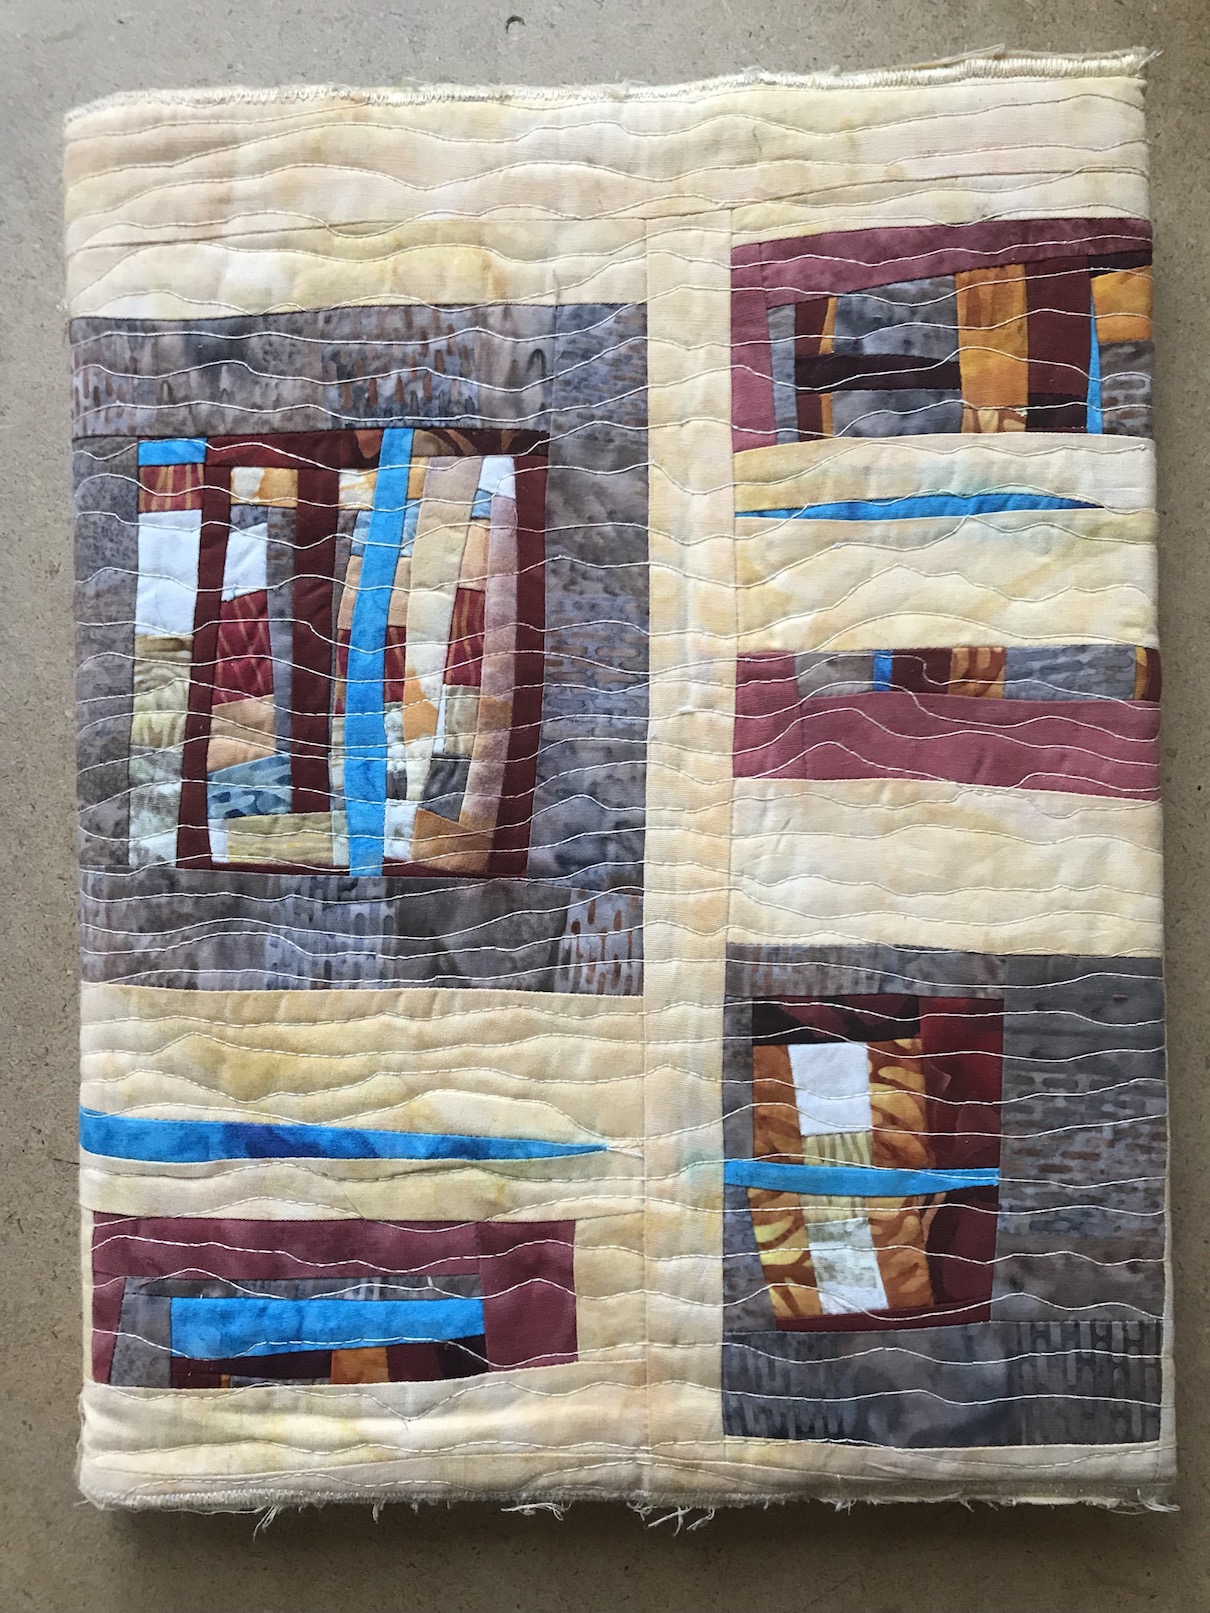
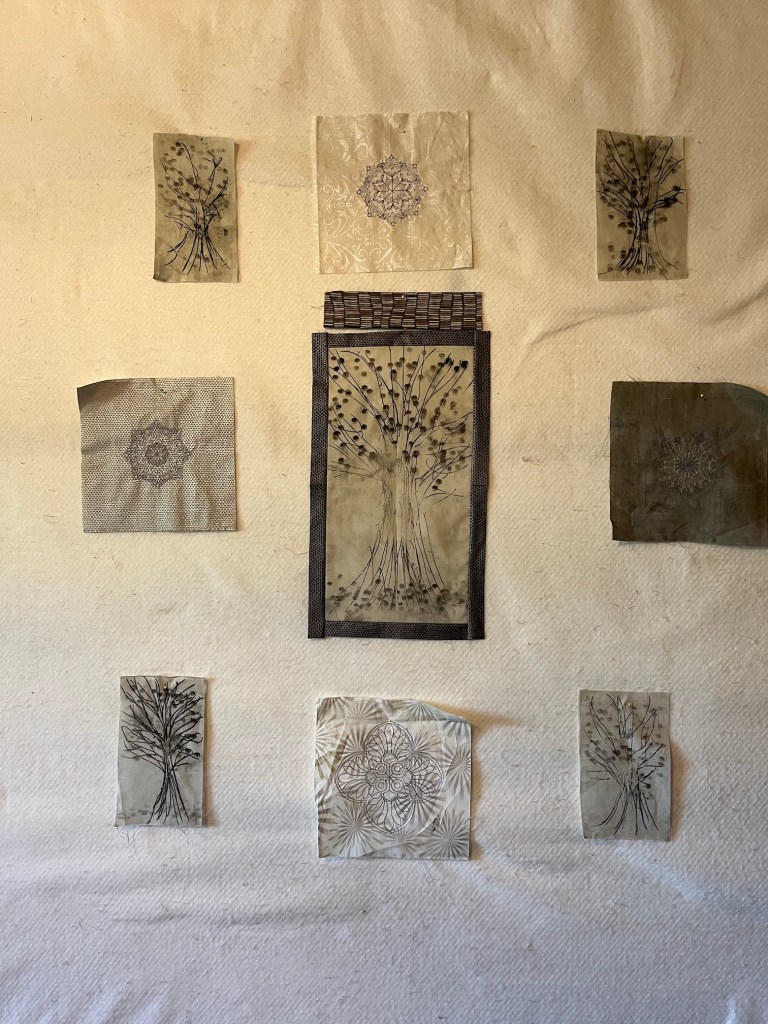
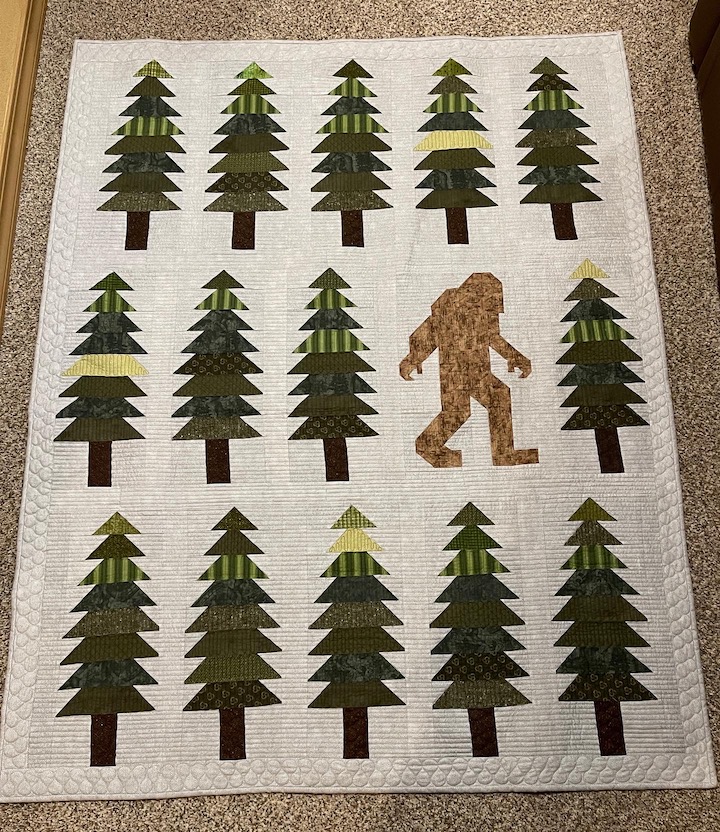
This time the quilt was inspired by a collection of machine embroidered blocks a friend gave me years ago along with coordinating 10 inch x 10 inch sections of coordinating fabric; as well as a group of fabric printed “trees” I designed and printed years ago in a fabric ink printing class.
What I want to accomplish with this quilt I am still working out. I am thinking through whether I want it to be a deeply personal piece about grief based on the somber colors of the quilt and the tree images, or it if I want it to be more uplifting (or some blend of both).
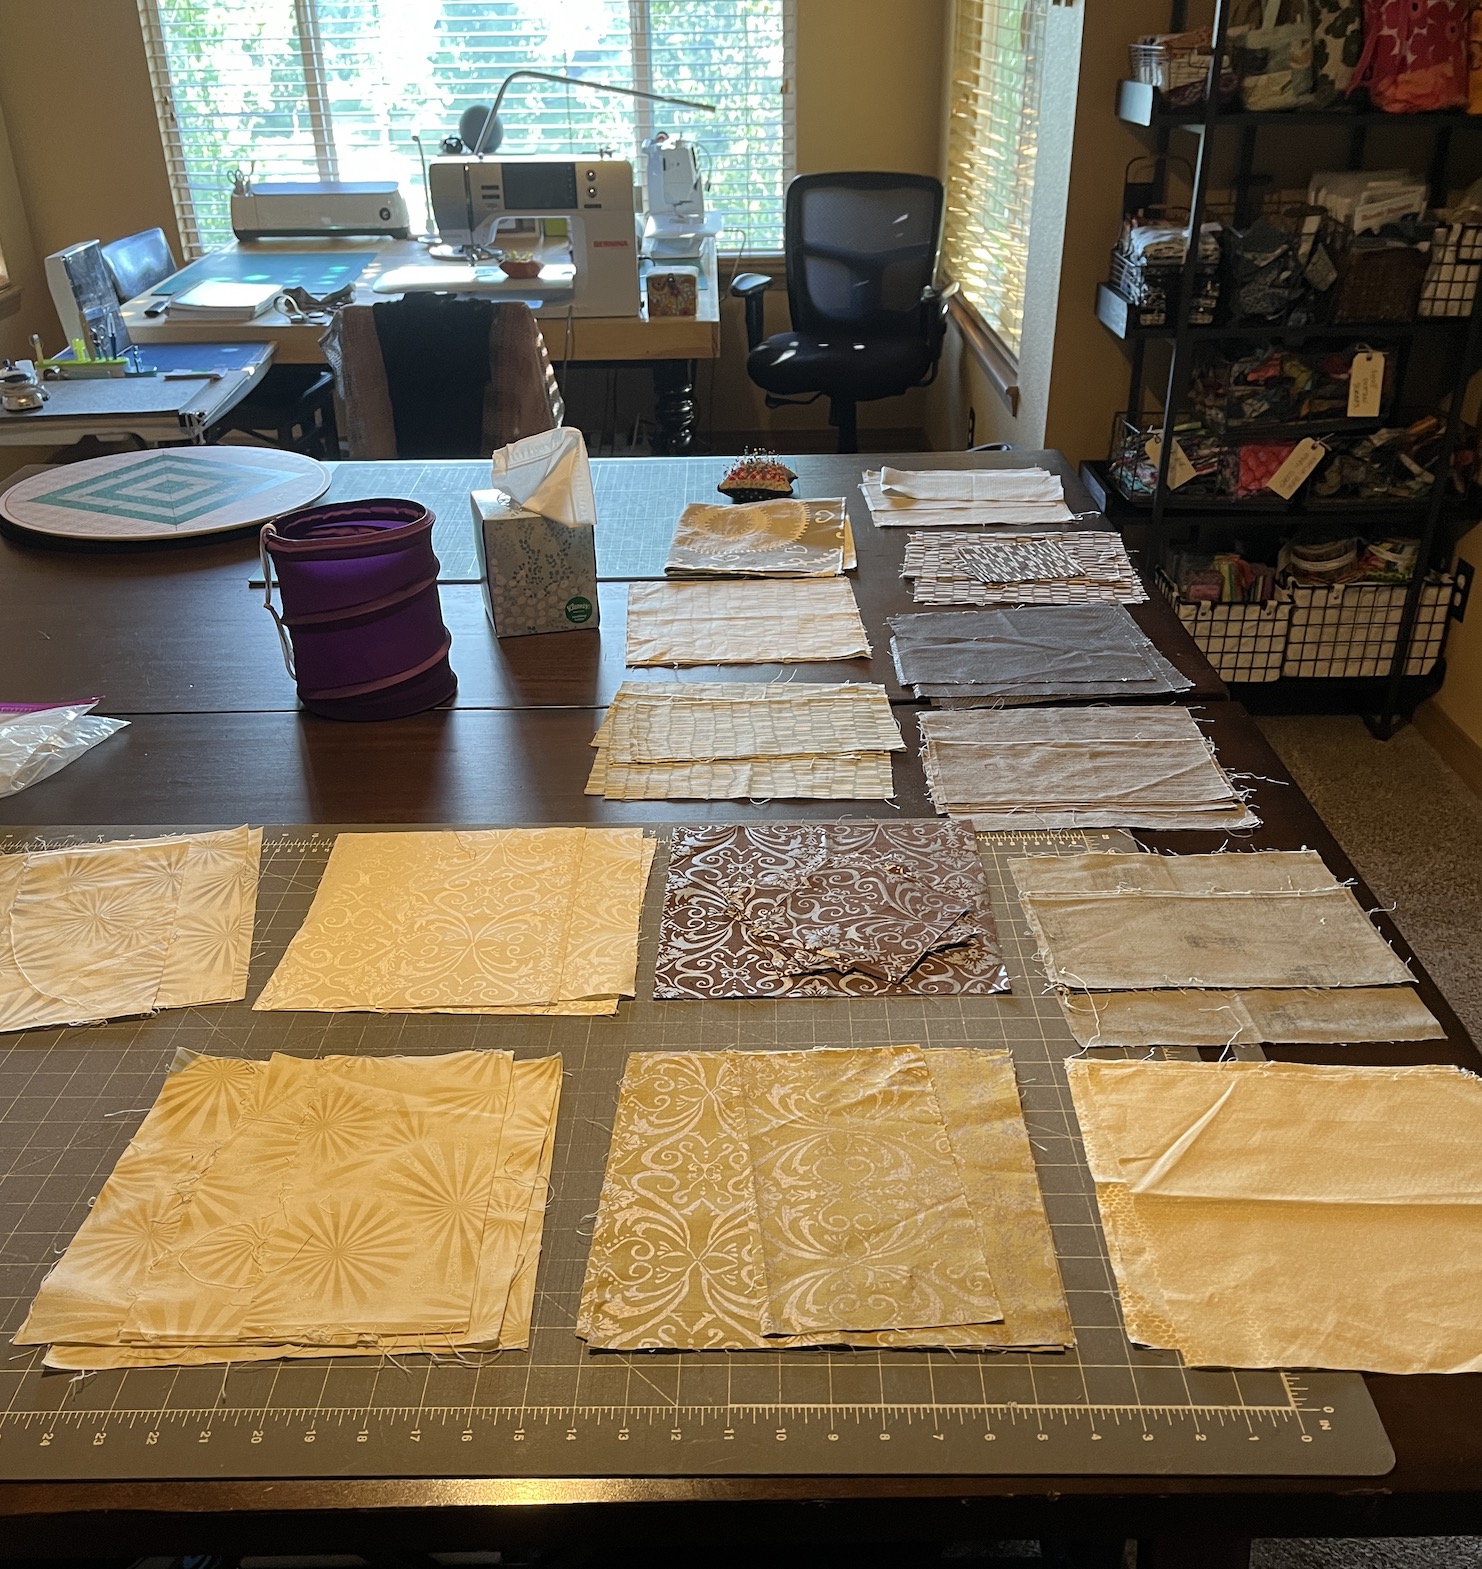
After I came up with my initial concept/idea/layout, I laid out all the fabrics I’d selected for the piece on my cutting table in my studio:
All the fabrics I am considering laid out on the table
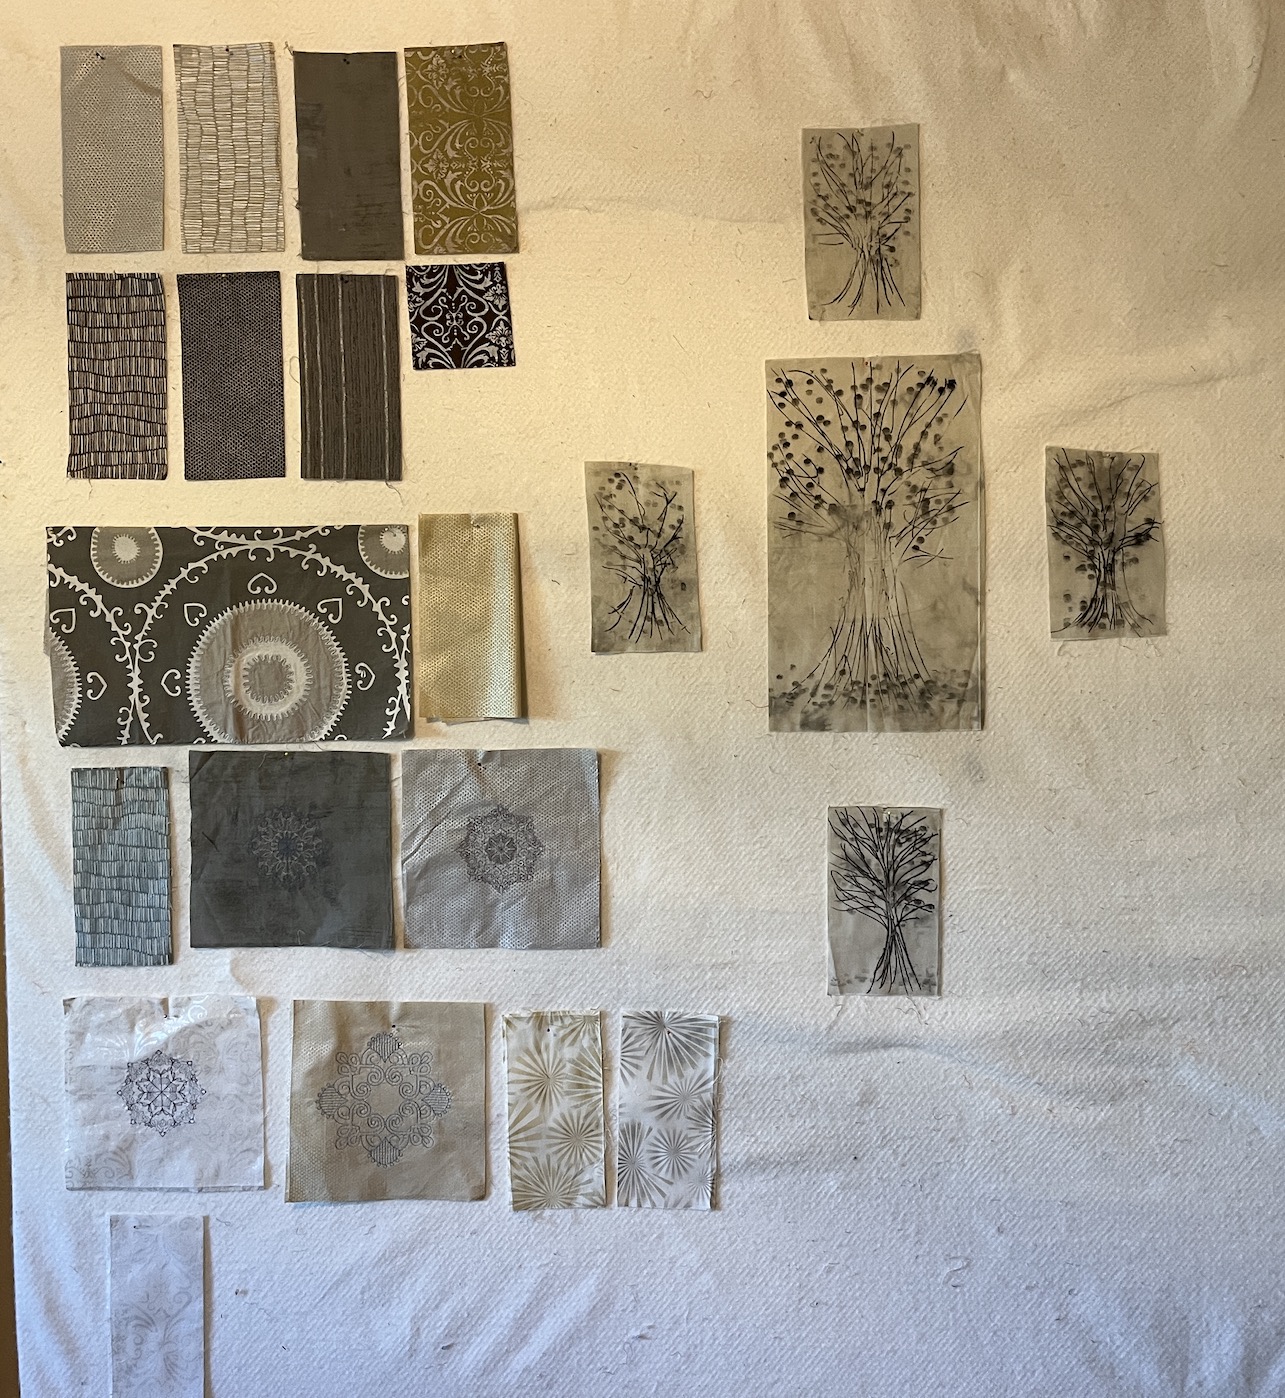
Then I put up a sample of each fabric and the special blocks (the embroidered blocks and the printed trees) up on my studio’s design wall:
One of each laid out on the design wall
Having the fabrics up on the wall helped me think about addition and subtraction (what I need to add to the design as far as fabrics, and what I need to take away) and I decided not to use the gold tinged fabrics in my design. I decided to just stick with muted grays, browns and taupes.
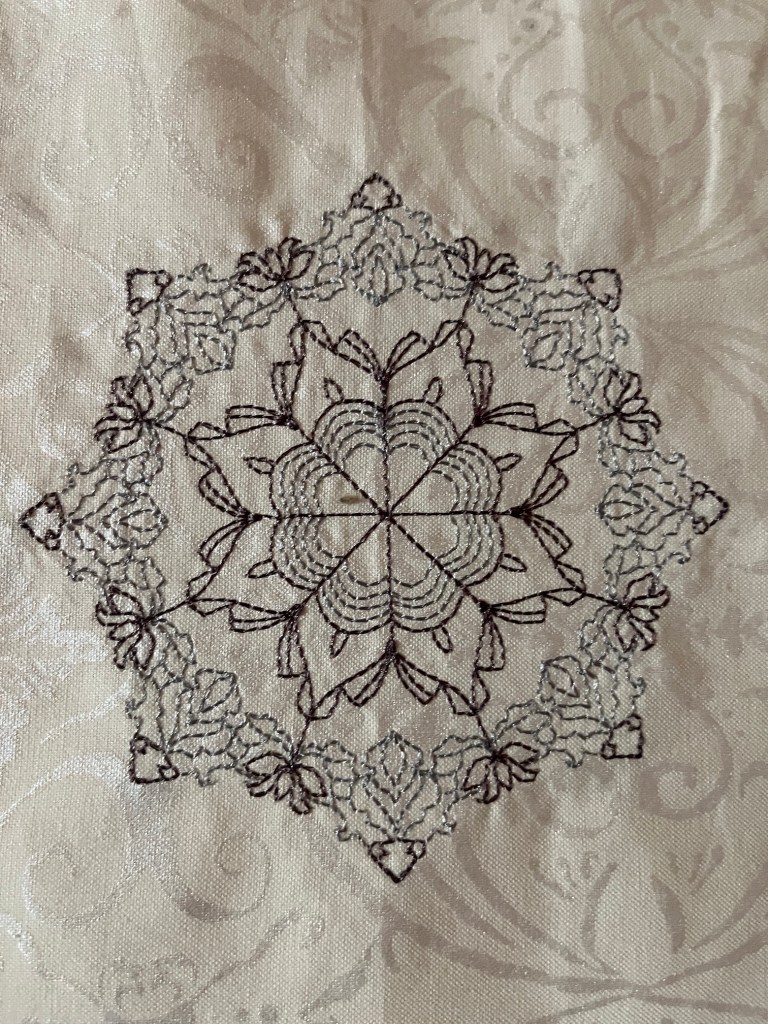
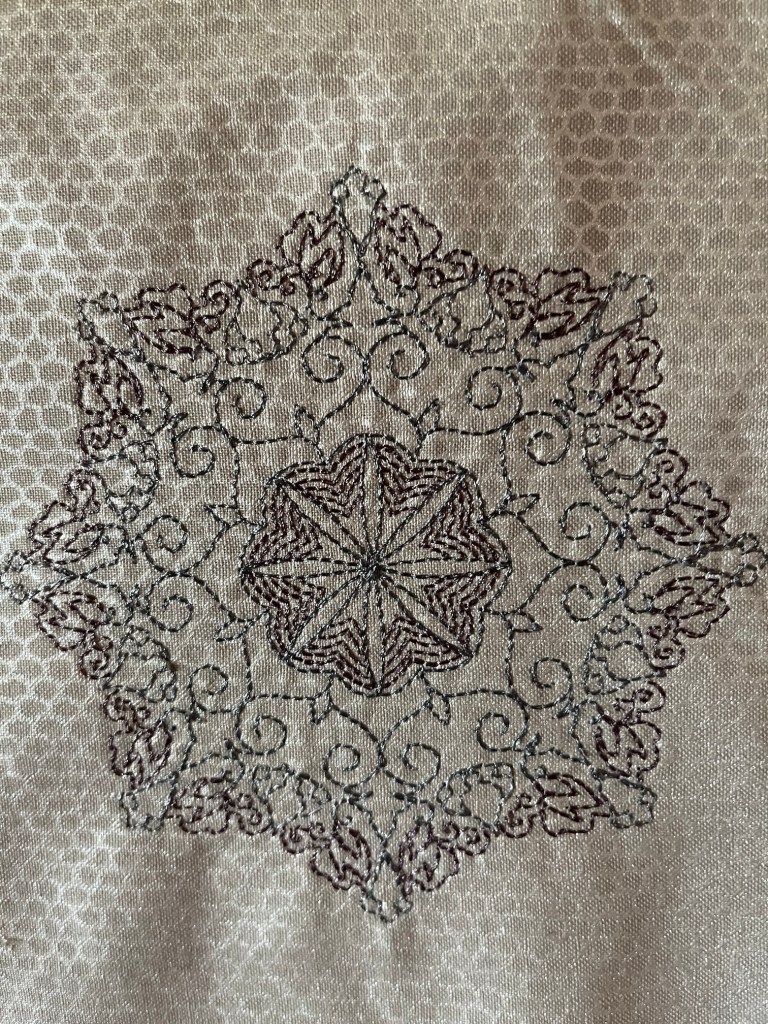
Here is a close up of some of the embroidered blocks I am using in the piece, one of the printed trees, and an example of the cool fabric my friend gave me:
If these fabrics looks familiar (and you’ve been following my blog a long time) I first shared them back in 2018 in a post called What’s Simmering on the Design Wall. But I abandoned the project as something else caught my attention (I guess I let it “simmer” too long and the inspiration evaporated away!).
Here I am with the quilt design right now – I am thinking of a medallion quilt layout…
Okay time to move on to the next question…
What is one thing you do that helps you focus and get rid of all the noise and clutter that come with color, design, prints, etc.?
Writing down my ideas on in my art journal, that is the number one thing that helps me focus. If my ideas change as I play with the fabrics on the design wall or the table I have them laid out upon, then I write down my new ideas.
As far as eliminating “the noise and clutter”, for me that is reduced by having a clear concept of what I want to accomplish (see “SIDE BAR” above).
I usually select a color palette early on in designing a piece. I’ve noticed that I am attracted towards “Southwest” and “Desert” type colors – rusts, beiges, greens, sky blues, etc. and I have repeated that palette in several art quilts. I read somewhere that if artists select a palette that they usually work from it can become a signature of their work.
Here is an example of an early art quilt I did called Central Oregon is Central to Me which uses that palette:
And then you can see I repeated this palette years later in a quilt I made for the WCQN show Yours for Race and Country: Reflections on the Life of Colonel Charles Young”. The name of this piece is Giant Among the Sequoias.
Color is very powerful and I’ve read a couple books about select coloring in the design of quilts. Two that I highly recommend were written by one of my teachers when I lived in Central Oregon – Jean Wells Keenan: Intuitive Color and Design and Journey to Inspired Art Quilting.
It was actually in her Journey to Inspired Art Quilting Workshop series that I took at the Stitchin’ Post in Sister, Oregon that I began the quilt Color Story V: Abandoned Water Structure, which was the first of my art quilts purchased by the City of Seattle for their Portable Works Collection (the City of Seattle now owns 4 of my art quilts made from recycled silks which they rotate through their municipal offices).
I might be rambling at this point, but I want to take a moment to share two additional major things that have helped me “get rid of all the noise”: 1) reading books about art quilting; and 2) taking classes with experienced art quilters (ongoing workshops are especially helpful – a series of classes with the same instructor helps you build upon concepts learned). You can also find a mentor and that can come from joining either a local or national art quilting group.
You cannot become an art quilter on your own (well maybe you can but I couldn’t) – you need mentors and teachers and it is very helpful to learn some formal art quilting concepts and techniques so you have them in your “tool bag”.
I know I need to take some more in person classes in the future. For now I just read art quilting journals, watch YouTube videos, and read books. So many awesome books have been written by some very talented art quilters!
Now on to the last question.
There are so many complicated variables (in making an art quilt), how do you start?
See above (smile).
So those were my answers to the three questions:
What do you find successful when you are creating a design?
What is one thing you do that helps you focus and get rid of all the noise and clutter that come with color, design, prints, etc.?
There are so many complicated variables (in making an art quilt), how do you start?
I INVITE YOU TO SHARE YOUR ANSWERS AND FEEL FREE TO RAMBLE AS I DID 😉
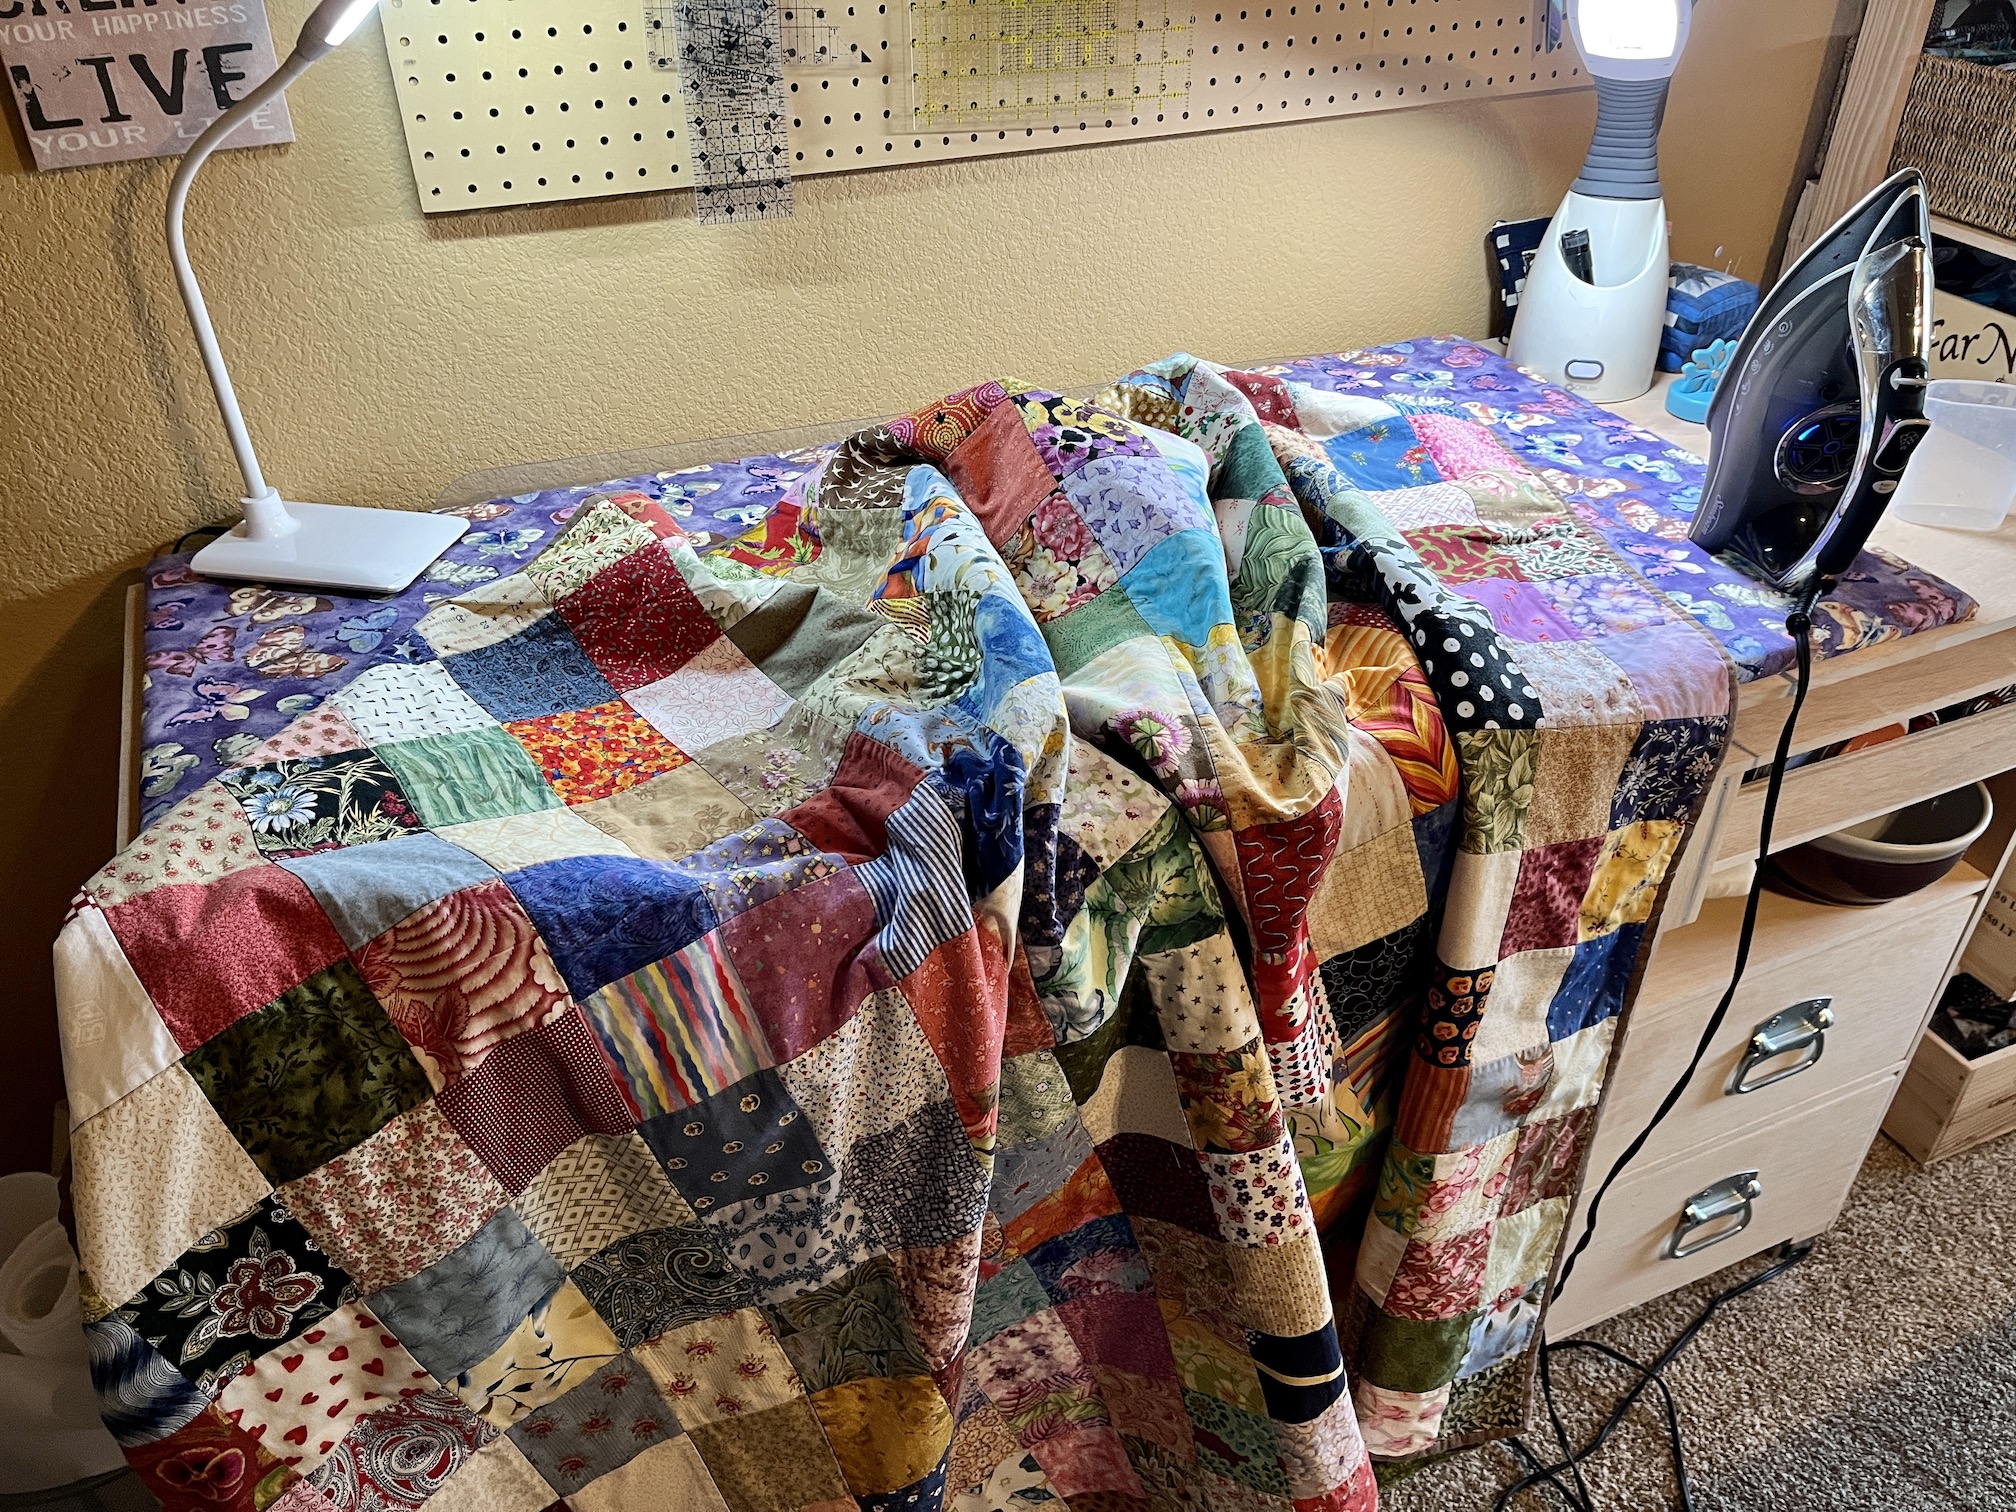
I decided to quilt is myself and did a combination of hand and machine quilting. I talk more about this (and share photos) on the previous post “Update on Memory Quilt “.
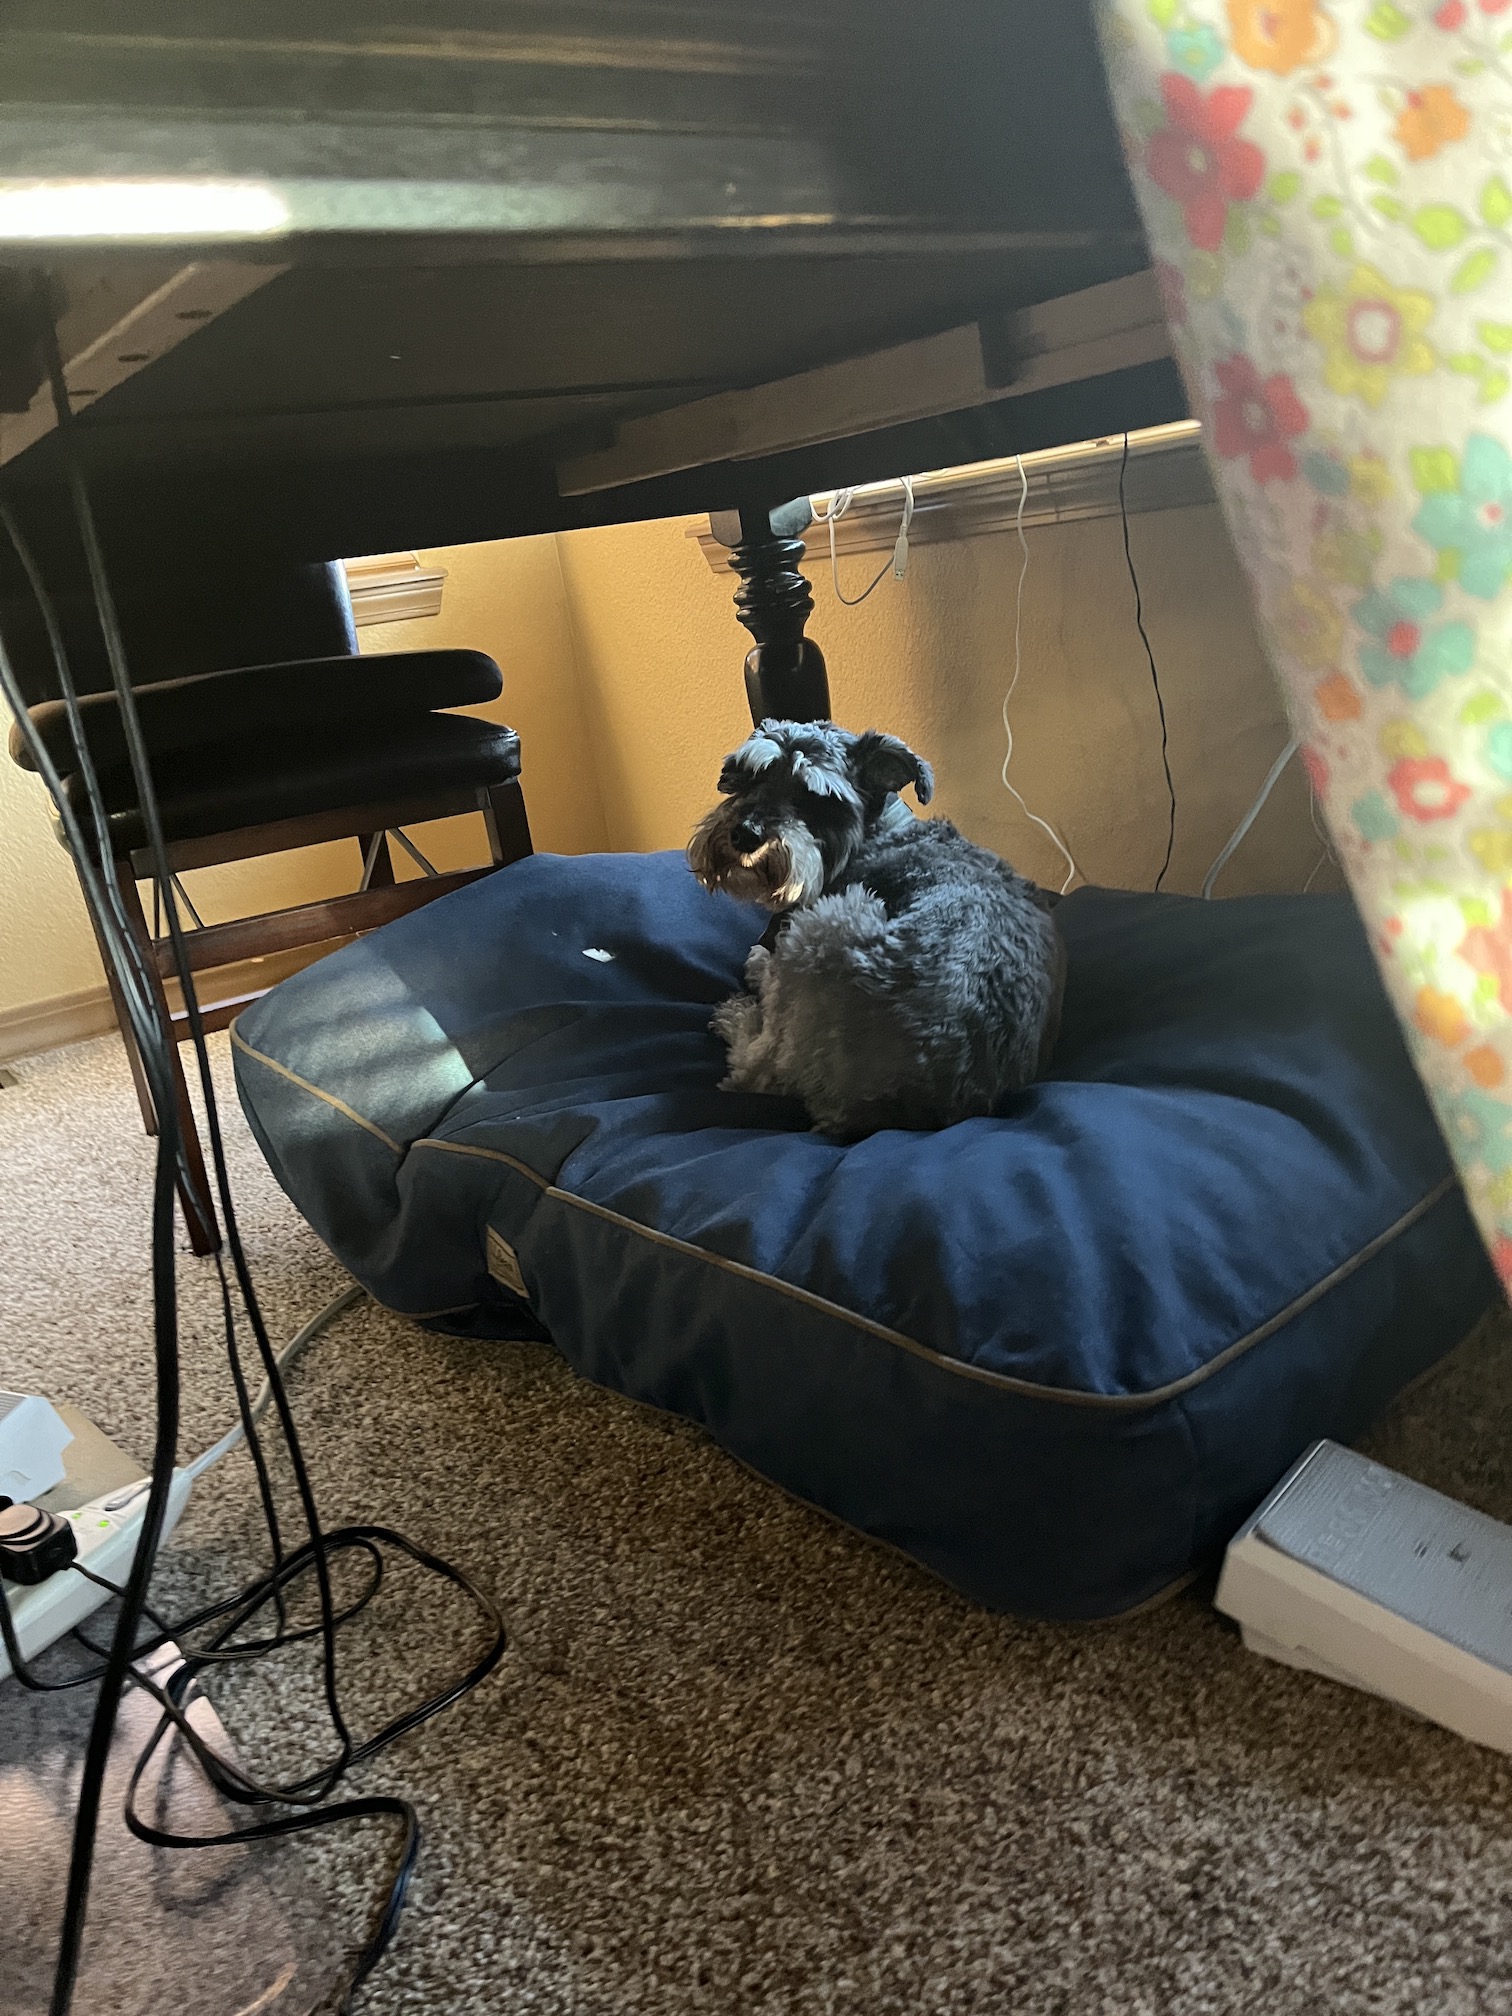
Slogging through machine quiltingMike the mini schnauzer providing emotional support under the table while I quilt
I used a floral fabric with the colors in the quilt top as the back and the binding.
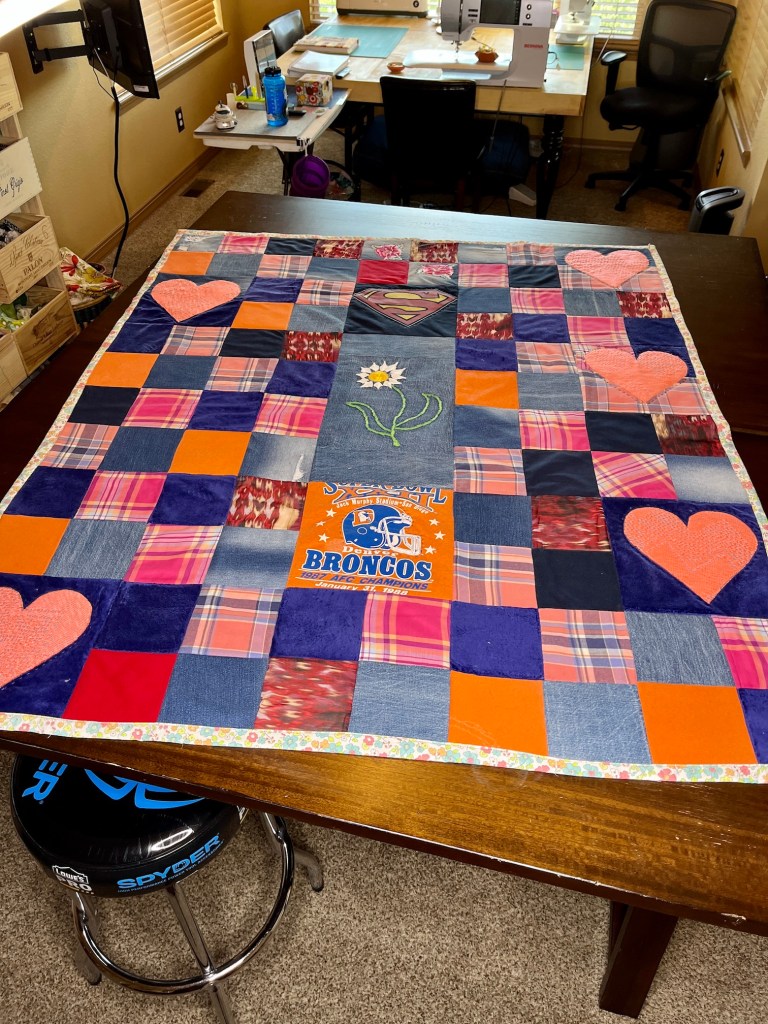
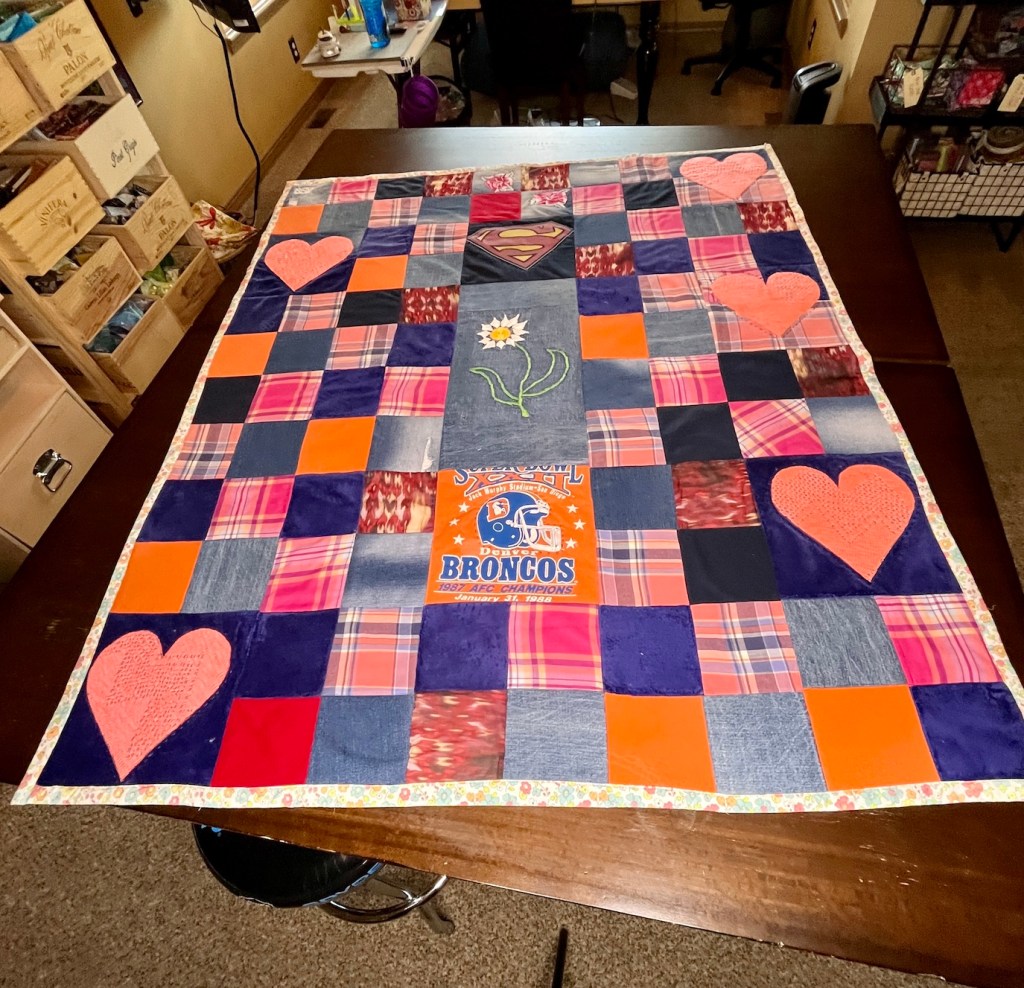
Here’s the completed quilt (which is of course a rectangle, it just looks triangular from the camera angle) in my studio:
A couple more photos:
And yes that is me at the bottom of the photo above awkwardly trying to take a photo of the quilt on my cutting table in my studio while trying to use my ring light.
Something I did not mention in the previous post on this quilt – before I quilted it, we met my friend and her husband for dinner while my sister was visiting a couple of weeks ago. I brought the quilt top (not quilted yet) with me to show her.
At the restaurant I pulled out the quilt top and handed it to her to look at before our food arrived.
She started crying. She was so touched and overwhelmed with seeing her mother’s favorite clothes made into a quilt top she could not contain her emotions. My eyes started to get moist too and I was touch.
She was very happy with the final product which was delivered to her on Saturday. She wants to hang the quilt on the wall but I strongly encouraged to cuddle under it and let it be a “hug from her Mom”.
My friend Chela let me know that the quilt group in Uvalde, Texas, called Quilts of Grace is looking for “comfort quilts“.
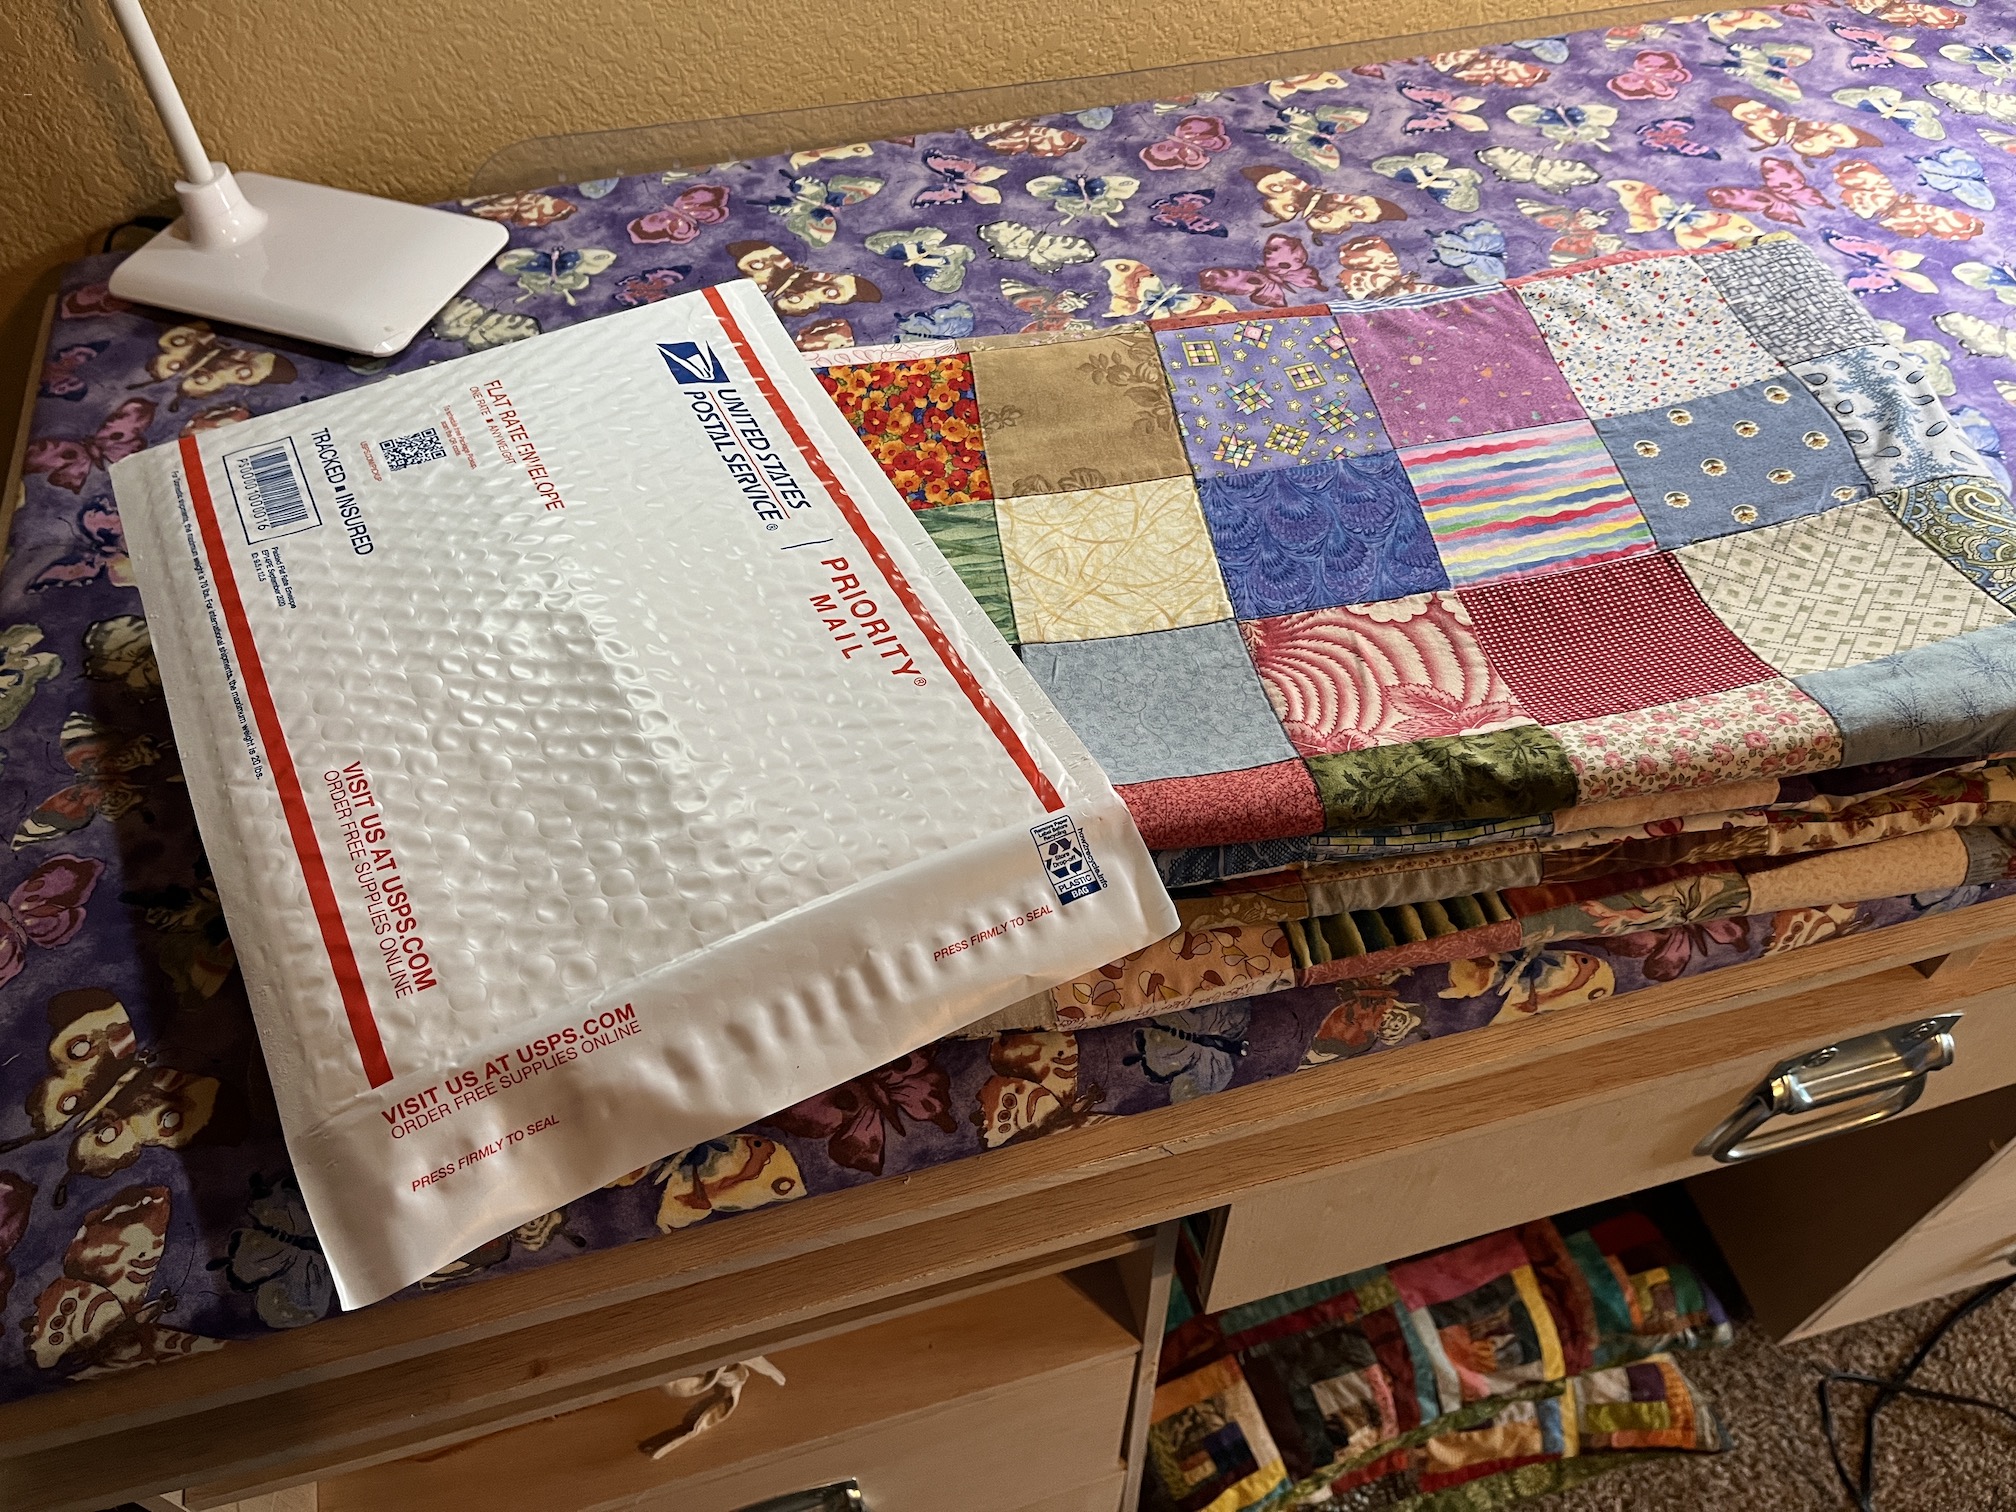
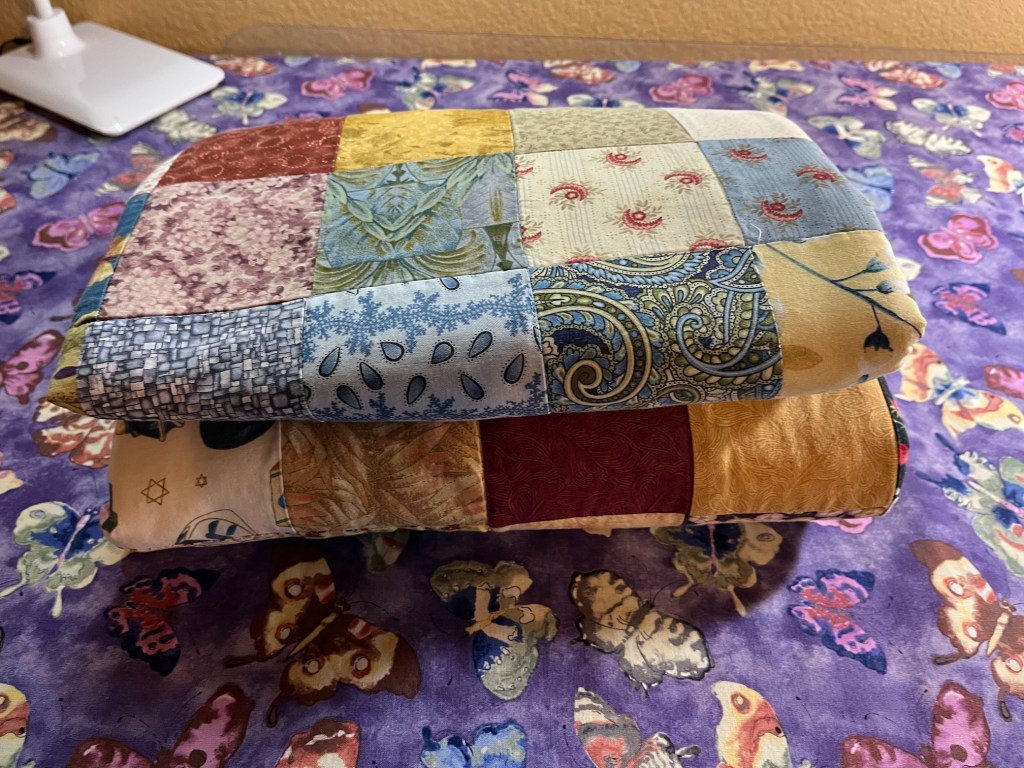
Here is the scrappy “postage stamp quilt” (but with 3.5 inch scrap squares used instead of the traditional 1.5 to 2 inch squares) that I packaged up this morning to send to the group:
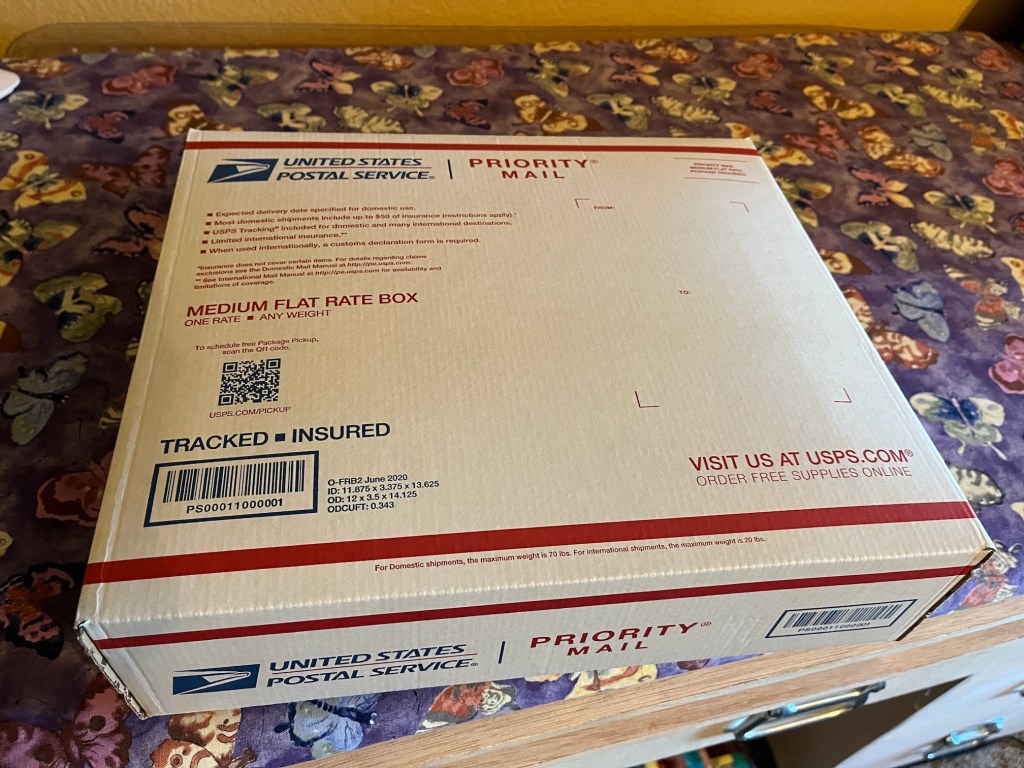
I was ambitious on trying to save money to postage and tried to fit it into a smaller flat rate padded envelope…
Many different quilting folder strategies did not work, alas, and I had to put it in the larger flat rate envelope (which I should have done from the start):
I hope this quilt will comfort someone impacted by the devastating school shooting massacre.
Besides donating money to the victims fund and trying to make wise choices of who I vote for in elections, I’ve felt helpless in the face of so much devastation. This feels like something I can do to perhaps ease a tiny bit of suffering for those impacted. Hey even if someone give this quilt to their dog as a dog bed quilt, it will be something useful!
If you are a quilter interested in participating, here is the information that Chela sent me:
I better get this post out before the end of January! I’ve enjoyed seeing 2021 crafting retrospectives by my blogging buddies and thought I would do one myself.
So here is it is gallery format:
image credit – The James Museum
On one hand it seems like I made a lot of things in 2021, and on the other hand it seems like I definitely did not make all that I planned!
I am avoiding for some reason (unknown) any official New Year’s Resolutions this year but I would like to challenge myself to make more things in 2022 than I did in 2021.
I realized I had not shared a follow up to the August 2021 post Creating a back for a “Legendary” quilt. I received the quilt back from the long arm quilter just before Christmas and shared the finished quilt on my @tierneycreates Instagram, but not on my blog where I had talked about it in several posts over the years.
I was able to get the binding on right before Christmas and I gave it to my partner John for Christmas. Below are photos of the quilted quilt including where John keeps it on the sofa in the basement where his “man cave” is:
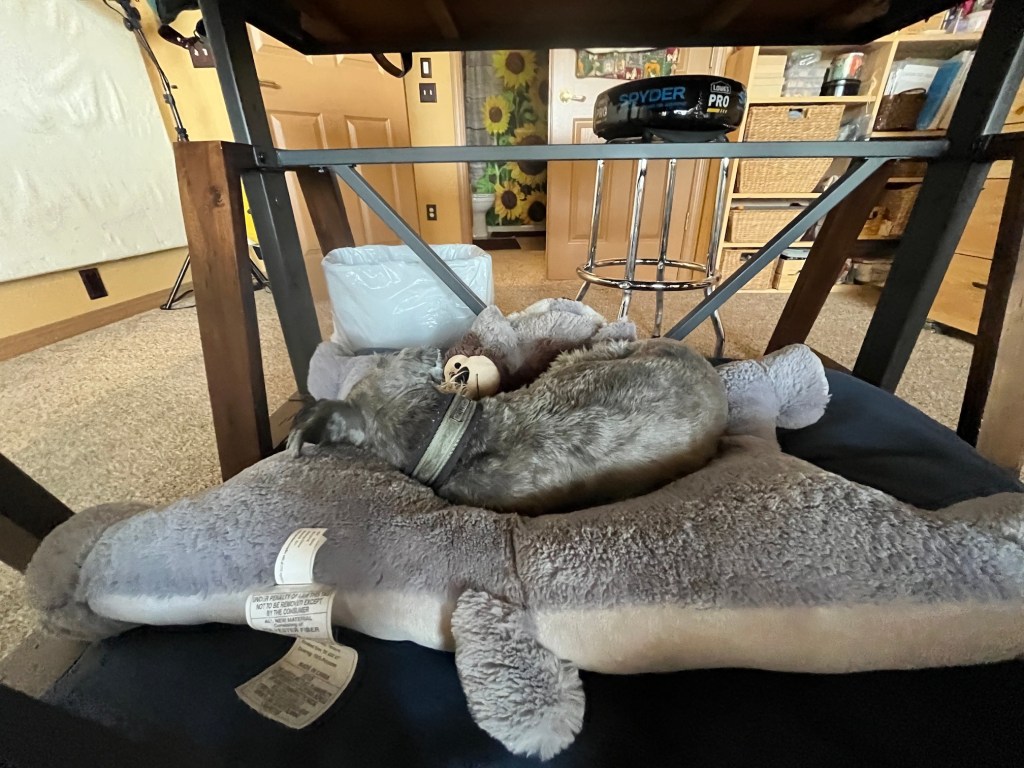
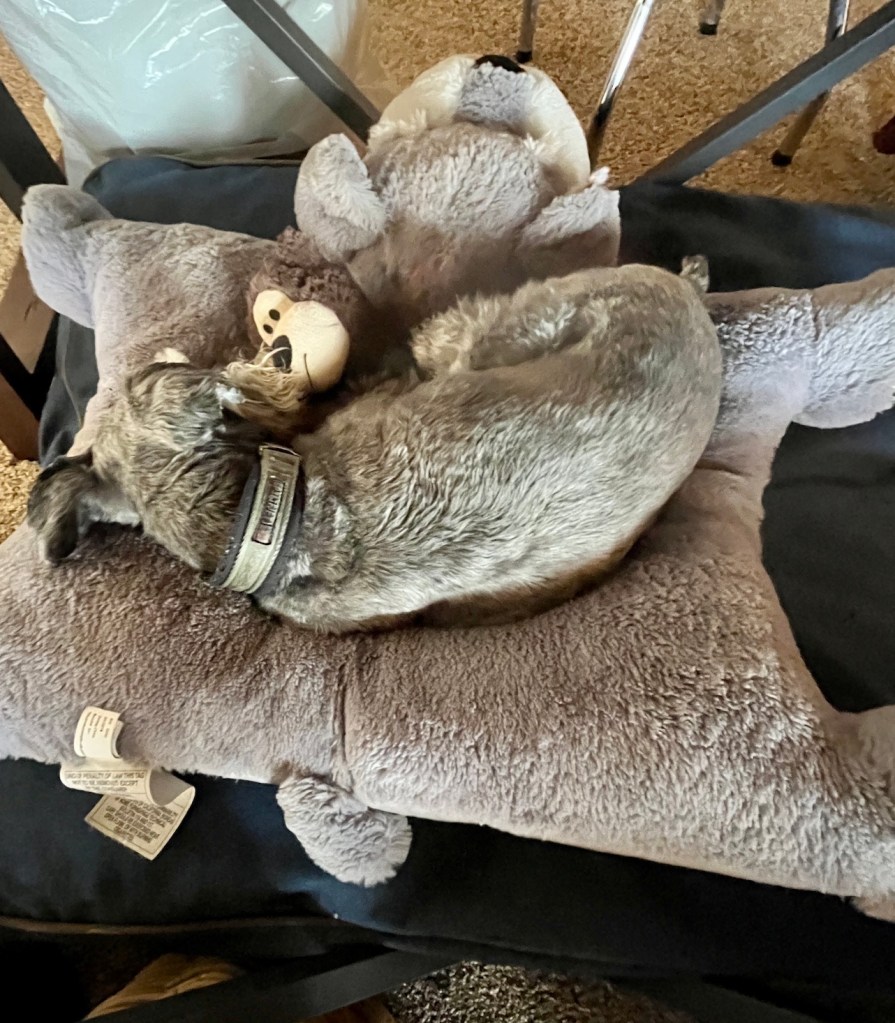
I was trying to take pictures of the back of the quilt and a miniature schnauzer slowly snuck into the photo (photo-bombing)!
Mike: Hey what you doing?Mike: Don’t mind if I sneak right on to the quilt while you try and photograph it!Mike: Hi, I am cuter than this thing you are photographing!Mike: Pay attention to me now!
This was taken before he got his haircut at the beginning of January. He got a bit furry through the holidays!
Oh the the extra tree block you see on the back of the quilt is by my friend Kathy, who gave me the scraps to make the quilt (plus scraps she got from our friend Dana). It was an extra she had when she made her quilt. That block reminds me/connects me to the love and generosity I constantly get from my long time quilting sisters!
I am feeling SO MUCH BETTER! Unfortunately now John has my “cold” but it seems to be milder for him.
I’ve been making quite a bit of progress on the quilt I showed you I started while self-isolating due to me “cold”. I should be able to share on my next post what it is looking like on the “design wall”.
I am glad to be regularly blogging and reading posts again, it is actually one of my 2022 New Years Resolutions I am putting in place now. I miss my blogging buddies when I am away!
This post is a follow up to the post – My Etsy Shop is Now Reopened – tierneycreates is now TextilesandSmiles which discusses how in late November 2021 I had to close my former “tierneycreates” Etsy shop instead of reopening it due to technical issues, and instead create a new Etsy shop – Textiles and Smiles (“textiles and smiles” is part of my tagline: “tierneycreates: a fusion of textiles and smiles”).
I started the shop with around 31 listings, added 2 more after opening and I’ve sold in a month’s time 11 items.
Most of my sales were from wonderful people I’ve connected with via social media platforms such as my blog, Instagram and Facebook. I also did a little e-mail marketing (just a one-time thing) to friends who are not on social media.
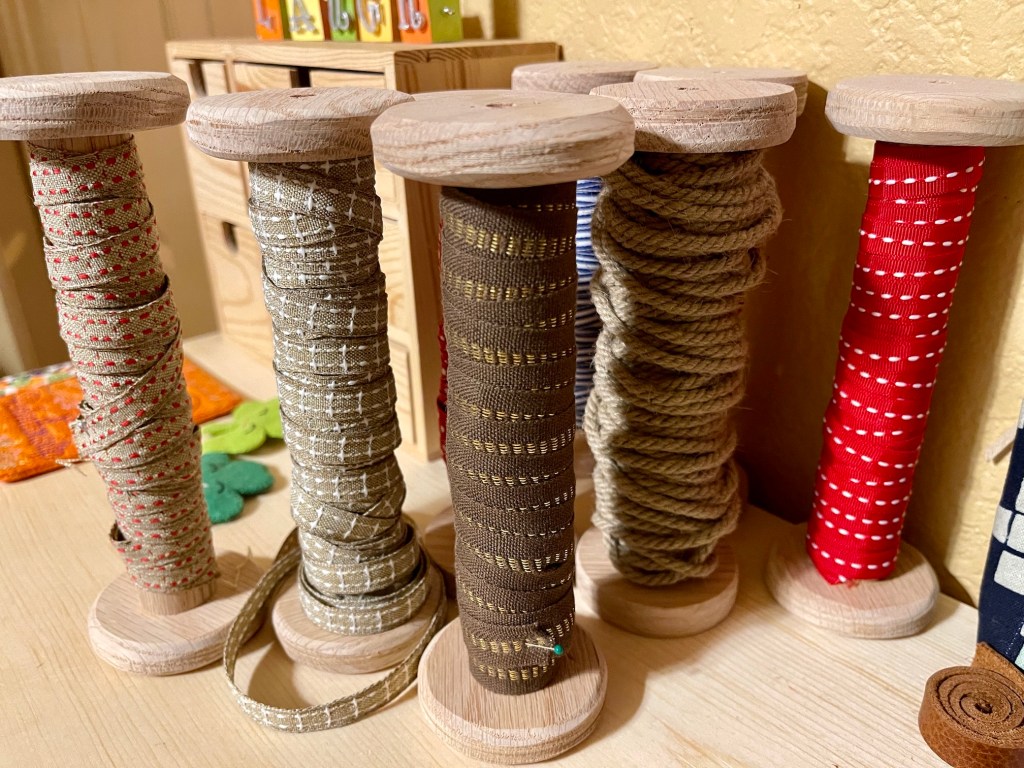
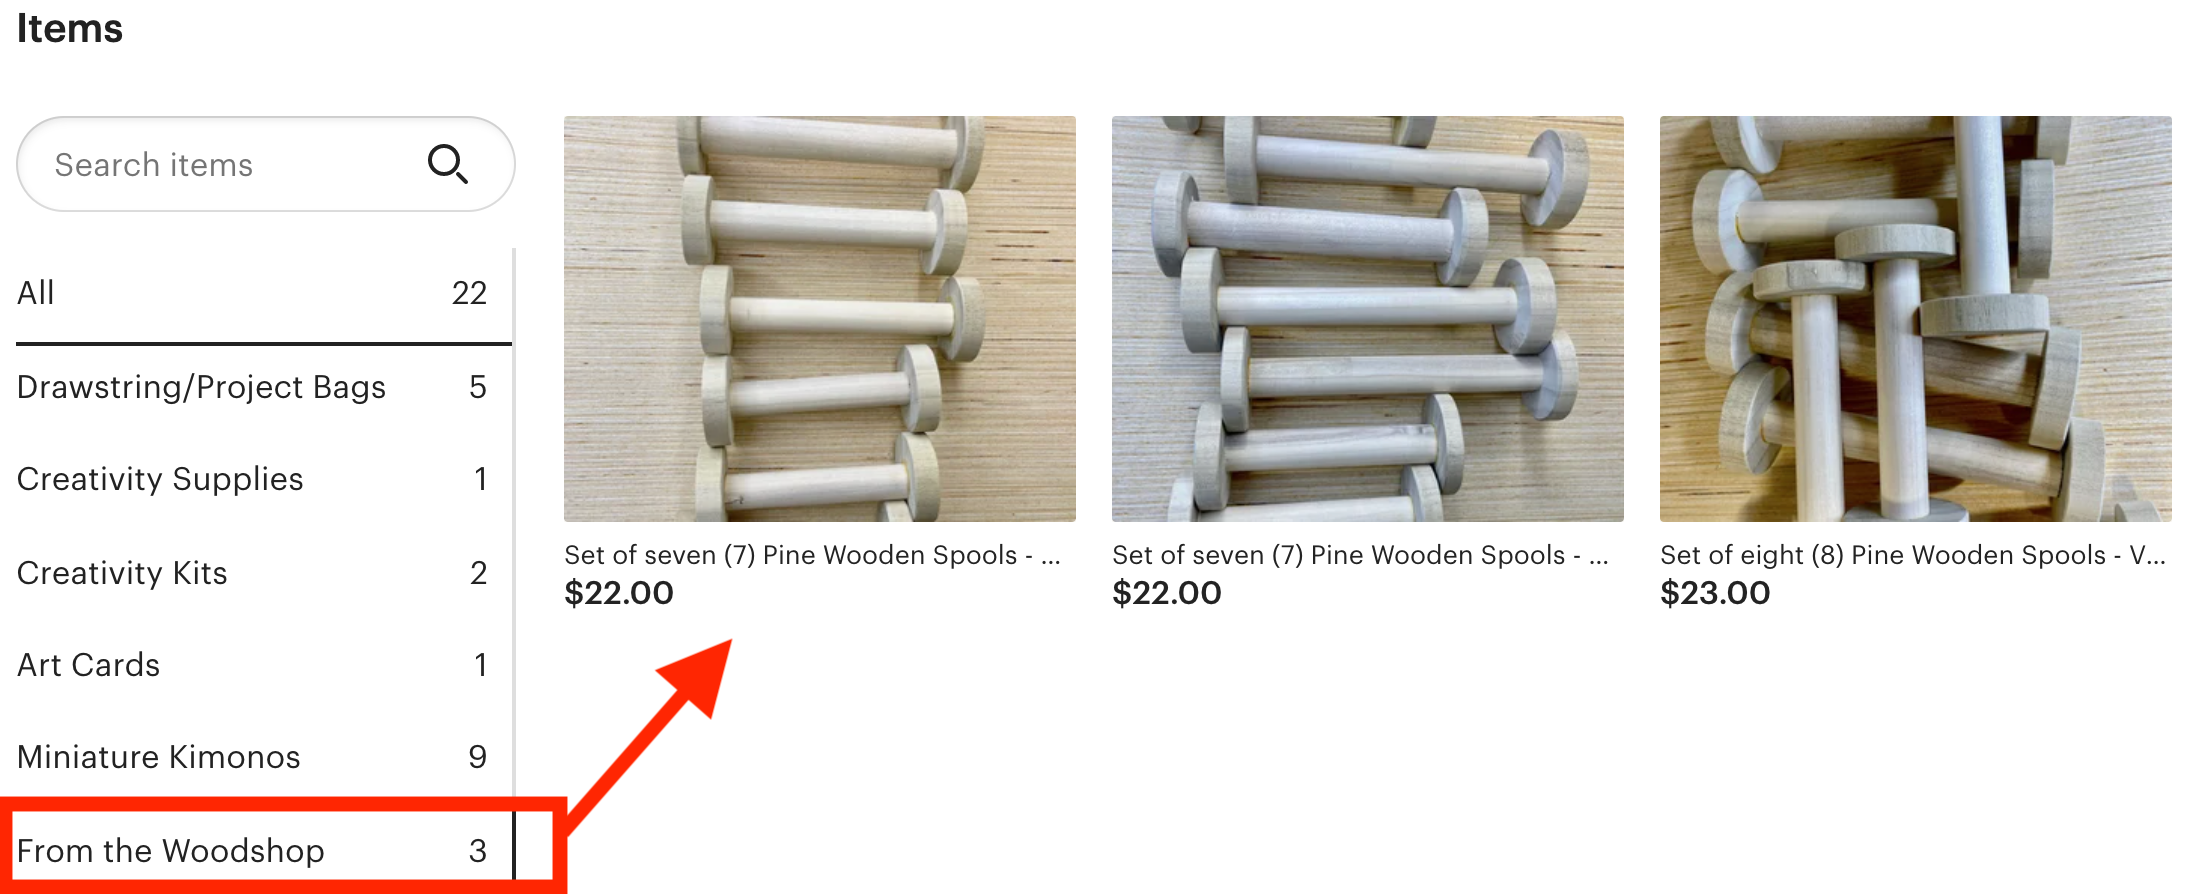
FROM THE WOODSHOP
My partner John made a couple items for my Etsy shop from his woodshop and we’ve sold two packages of them so far – Wooden Spools:
He even did a custom order when someone reached out and requested an inch longer set of spools. He’s going to make some other items for the Etsy shop someday and he has his own section – “From the Woodshop”:
CREATIVITY KITS
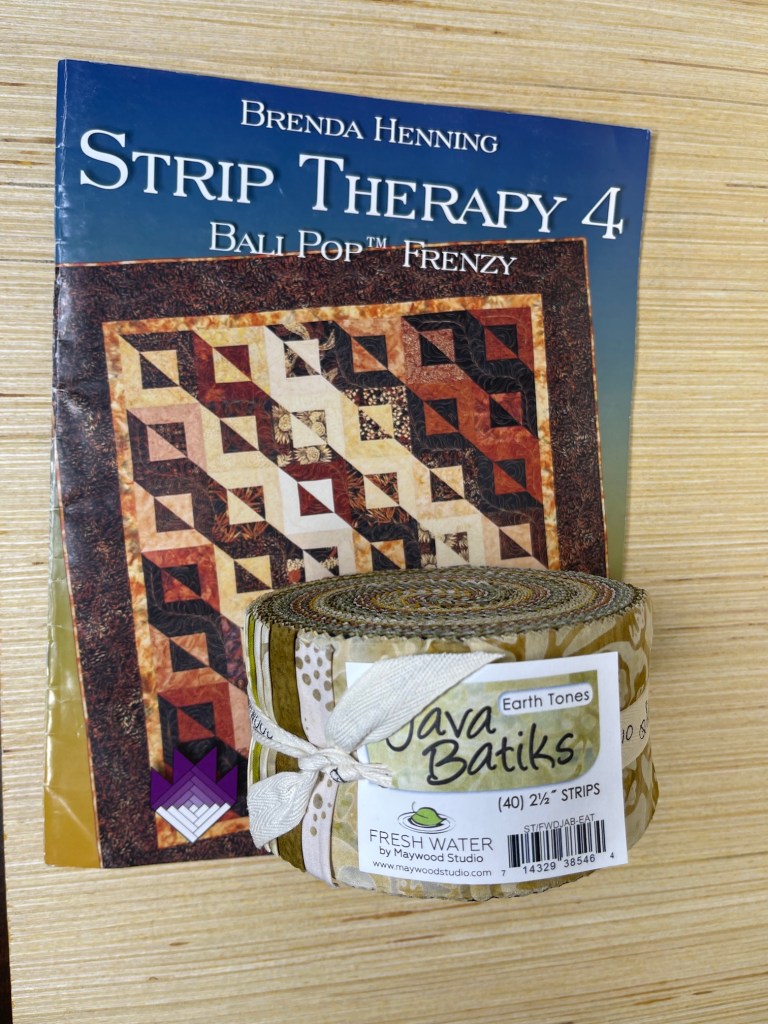
One of the fun things I came up for my shop was to sell “Creativity Kits” when I include the book (from my craft book collection) and the fabric (like a jelly roll or other pre-cut) to make something. I pulled “used” books from my crazy existing craft book collection and was able to package them with fabric at a reasonable price since it was a “used” book.
These sold pretty well and here are some examples:
The photos above are “raw” photos, and I did some clean up and photo editing for then Etsy listings…trying to look as professional as possible (or imaginarily professional – ha!).
There is one Creativity Kit I am surprised has not sold yet, I even have it packed up for shipping as I thought it would “fly off then shelf” – one with then book Scrap Republic and 2 pounds of a rainbow of colors of scraps from my personal scrap pile. Perhaps no one trusts my scrap pile – ha!
This is not a book I would part with because I want to make everything in it, but I had accidentally bought a second copy so I was able to part with one. I had trouble putting up the listing for this creativity kit because I kept setting aside the yummy looking package of scraps I put together to use for my own project. Finally I made myself list it as I have so many more scraps to play with in my stash!
I am sure it will sell eventually when the person it is meant for sees it.
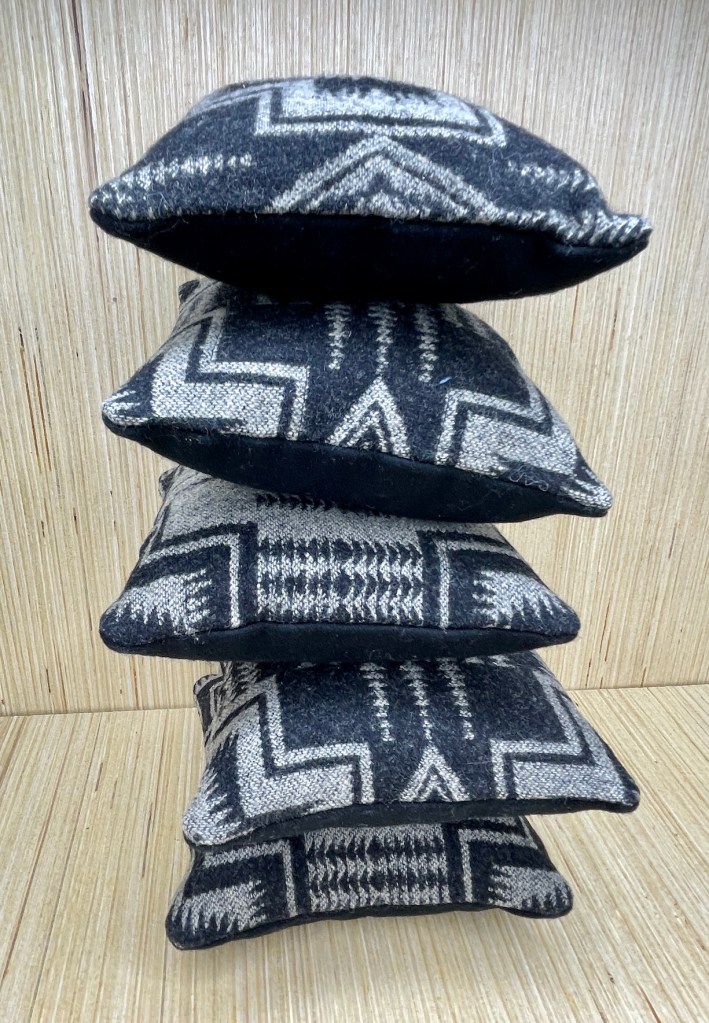
LITTLE PILLOWS
I’ve only made one set and it sold – I love little pillows!
I made the above set of 5 little pillows from recycled Pendleton Wool blanket scraps. I plan to make another set in the future. I don’t have anymore of the black and gray wool scraps but I do have some other Pendleton blanket wool scraps. It isn fun recycling!
When I had my first Etsy shop open, tierneycreates, I was selling a pillow I made from Pendleton Wool scraps and put the word “Pendleton” in the title of the listing. I was contacted by the legal department of the Pendleton Wool company for potential “copyright infringement”. I was totally freaked out as a new seller. The paralegal I dealt with at the company was very nice and provided me with education and of course allowed me to fix my error. I definitely remembered that lesson and when I listed these pillows I wrote for my Etsy listing:
Recycled Wool Little Pillow Set – Five (5) 5 1/2 inch x 5 1/2 inch x 2 inch decorative wool pillows
I love working with recycled materials. This set of 5 small pillows measuring 5 1/2 inches by 5 1/2 inches by 2 inches was made with recycled wool from a well known Oregon based wool manufacturing company. These little pillows would be perfect to decorate your bookshelf!
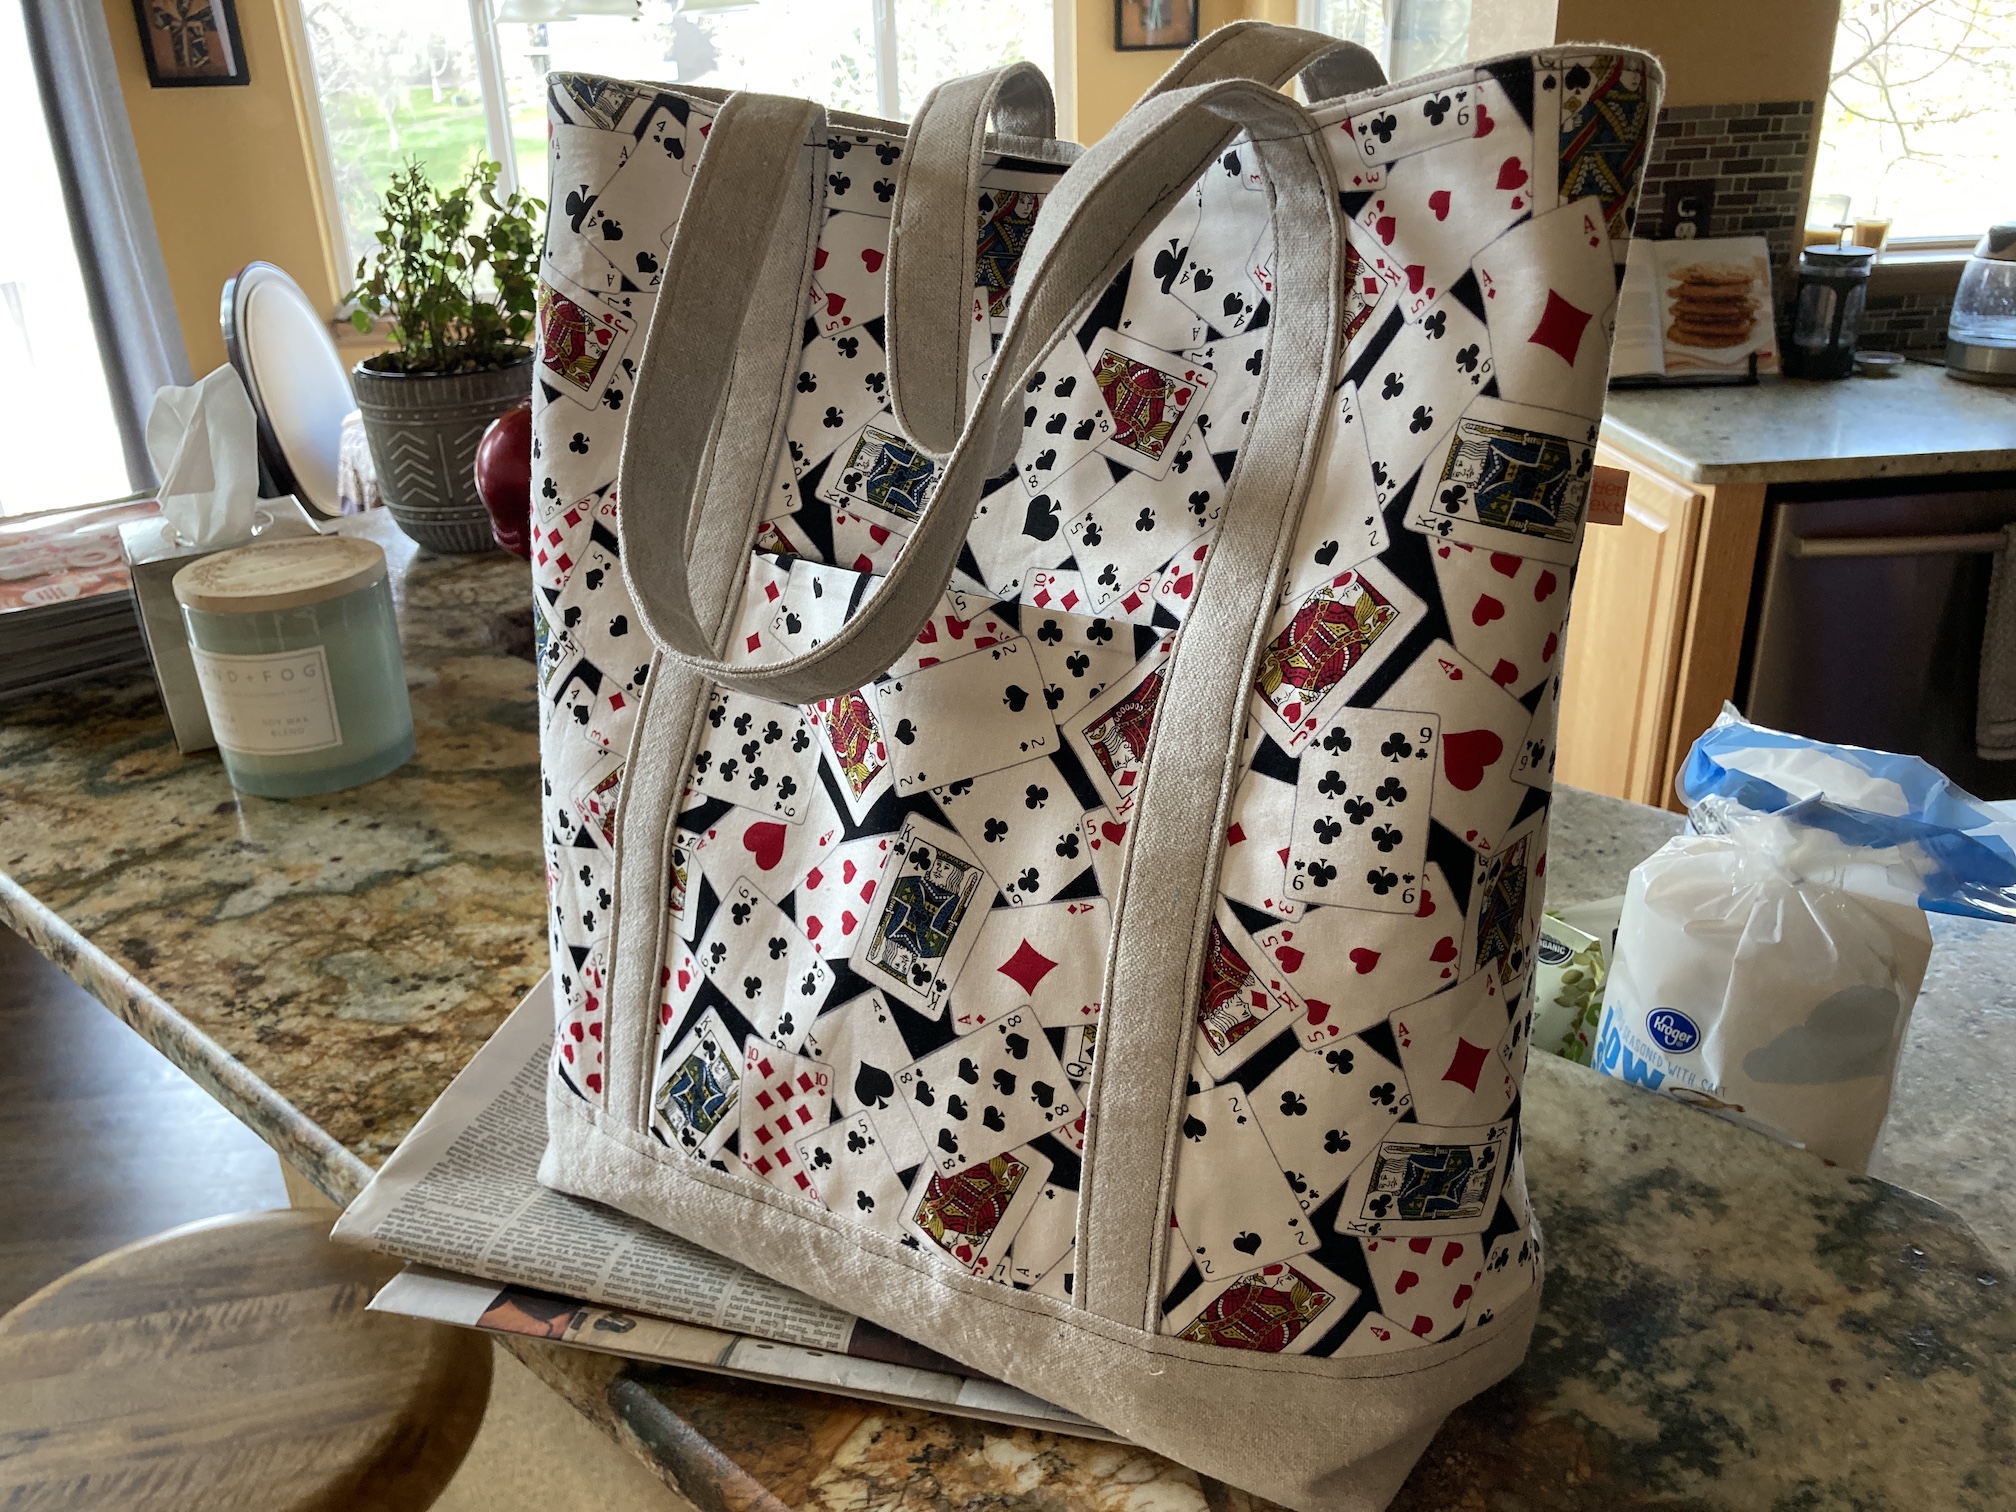
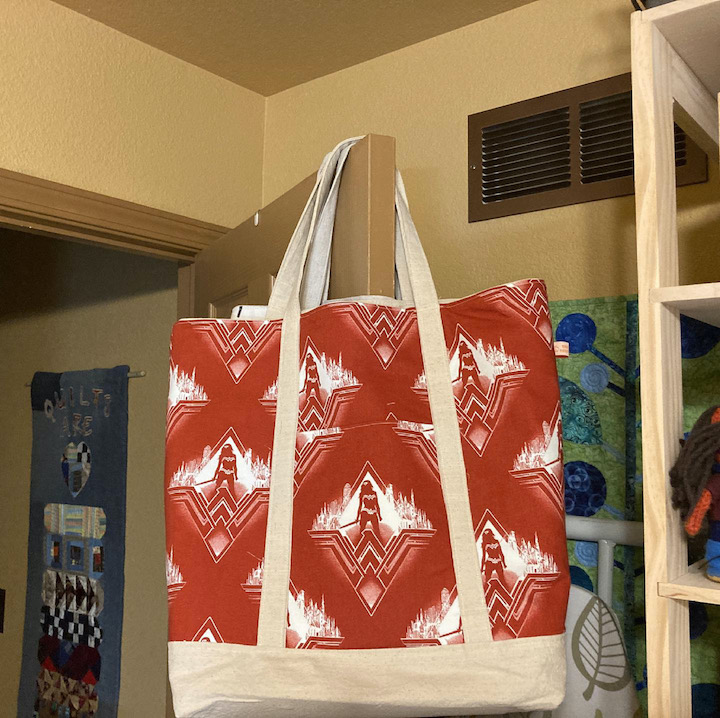
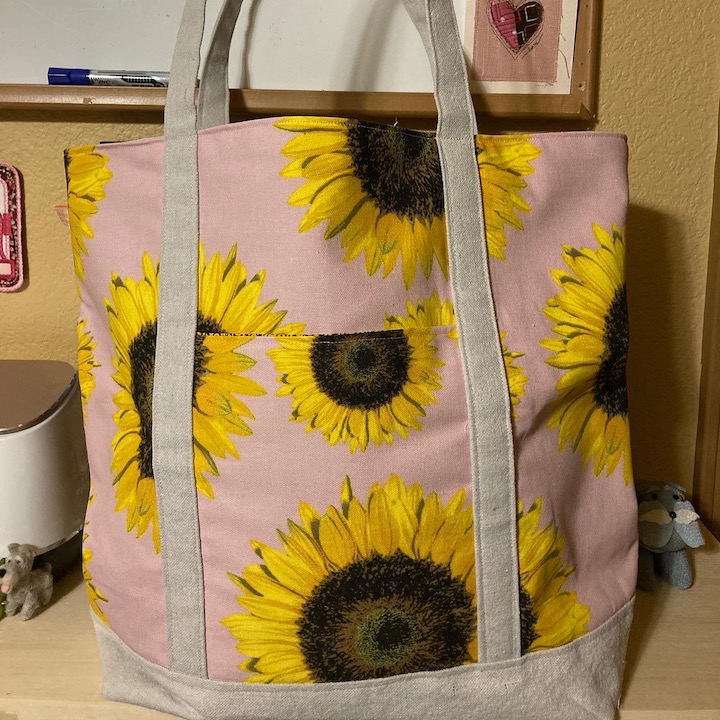
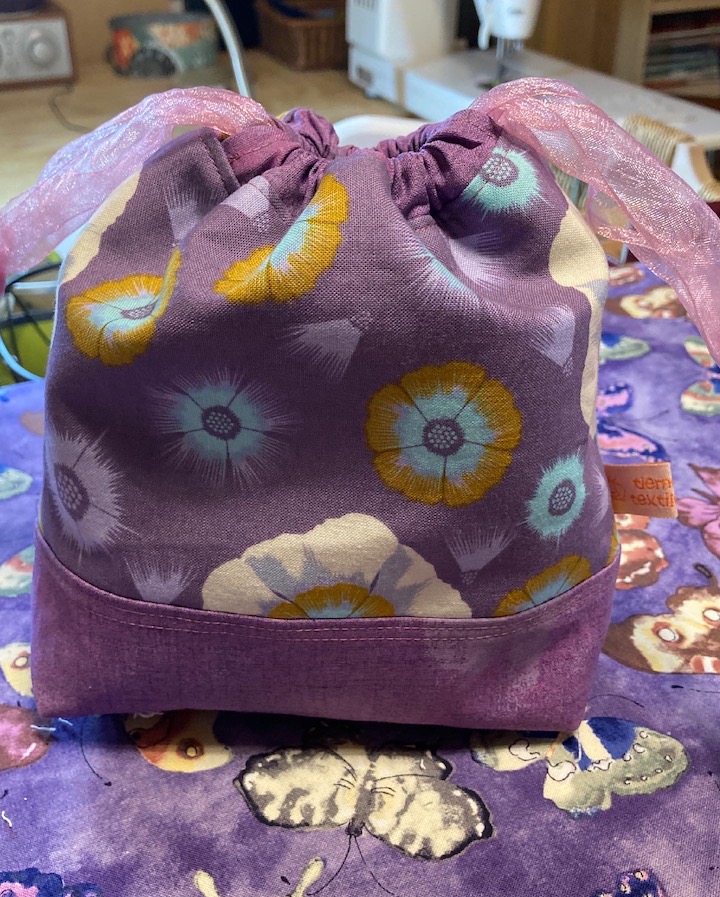
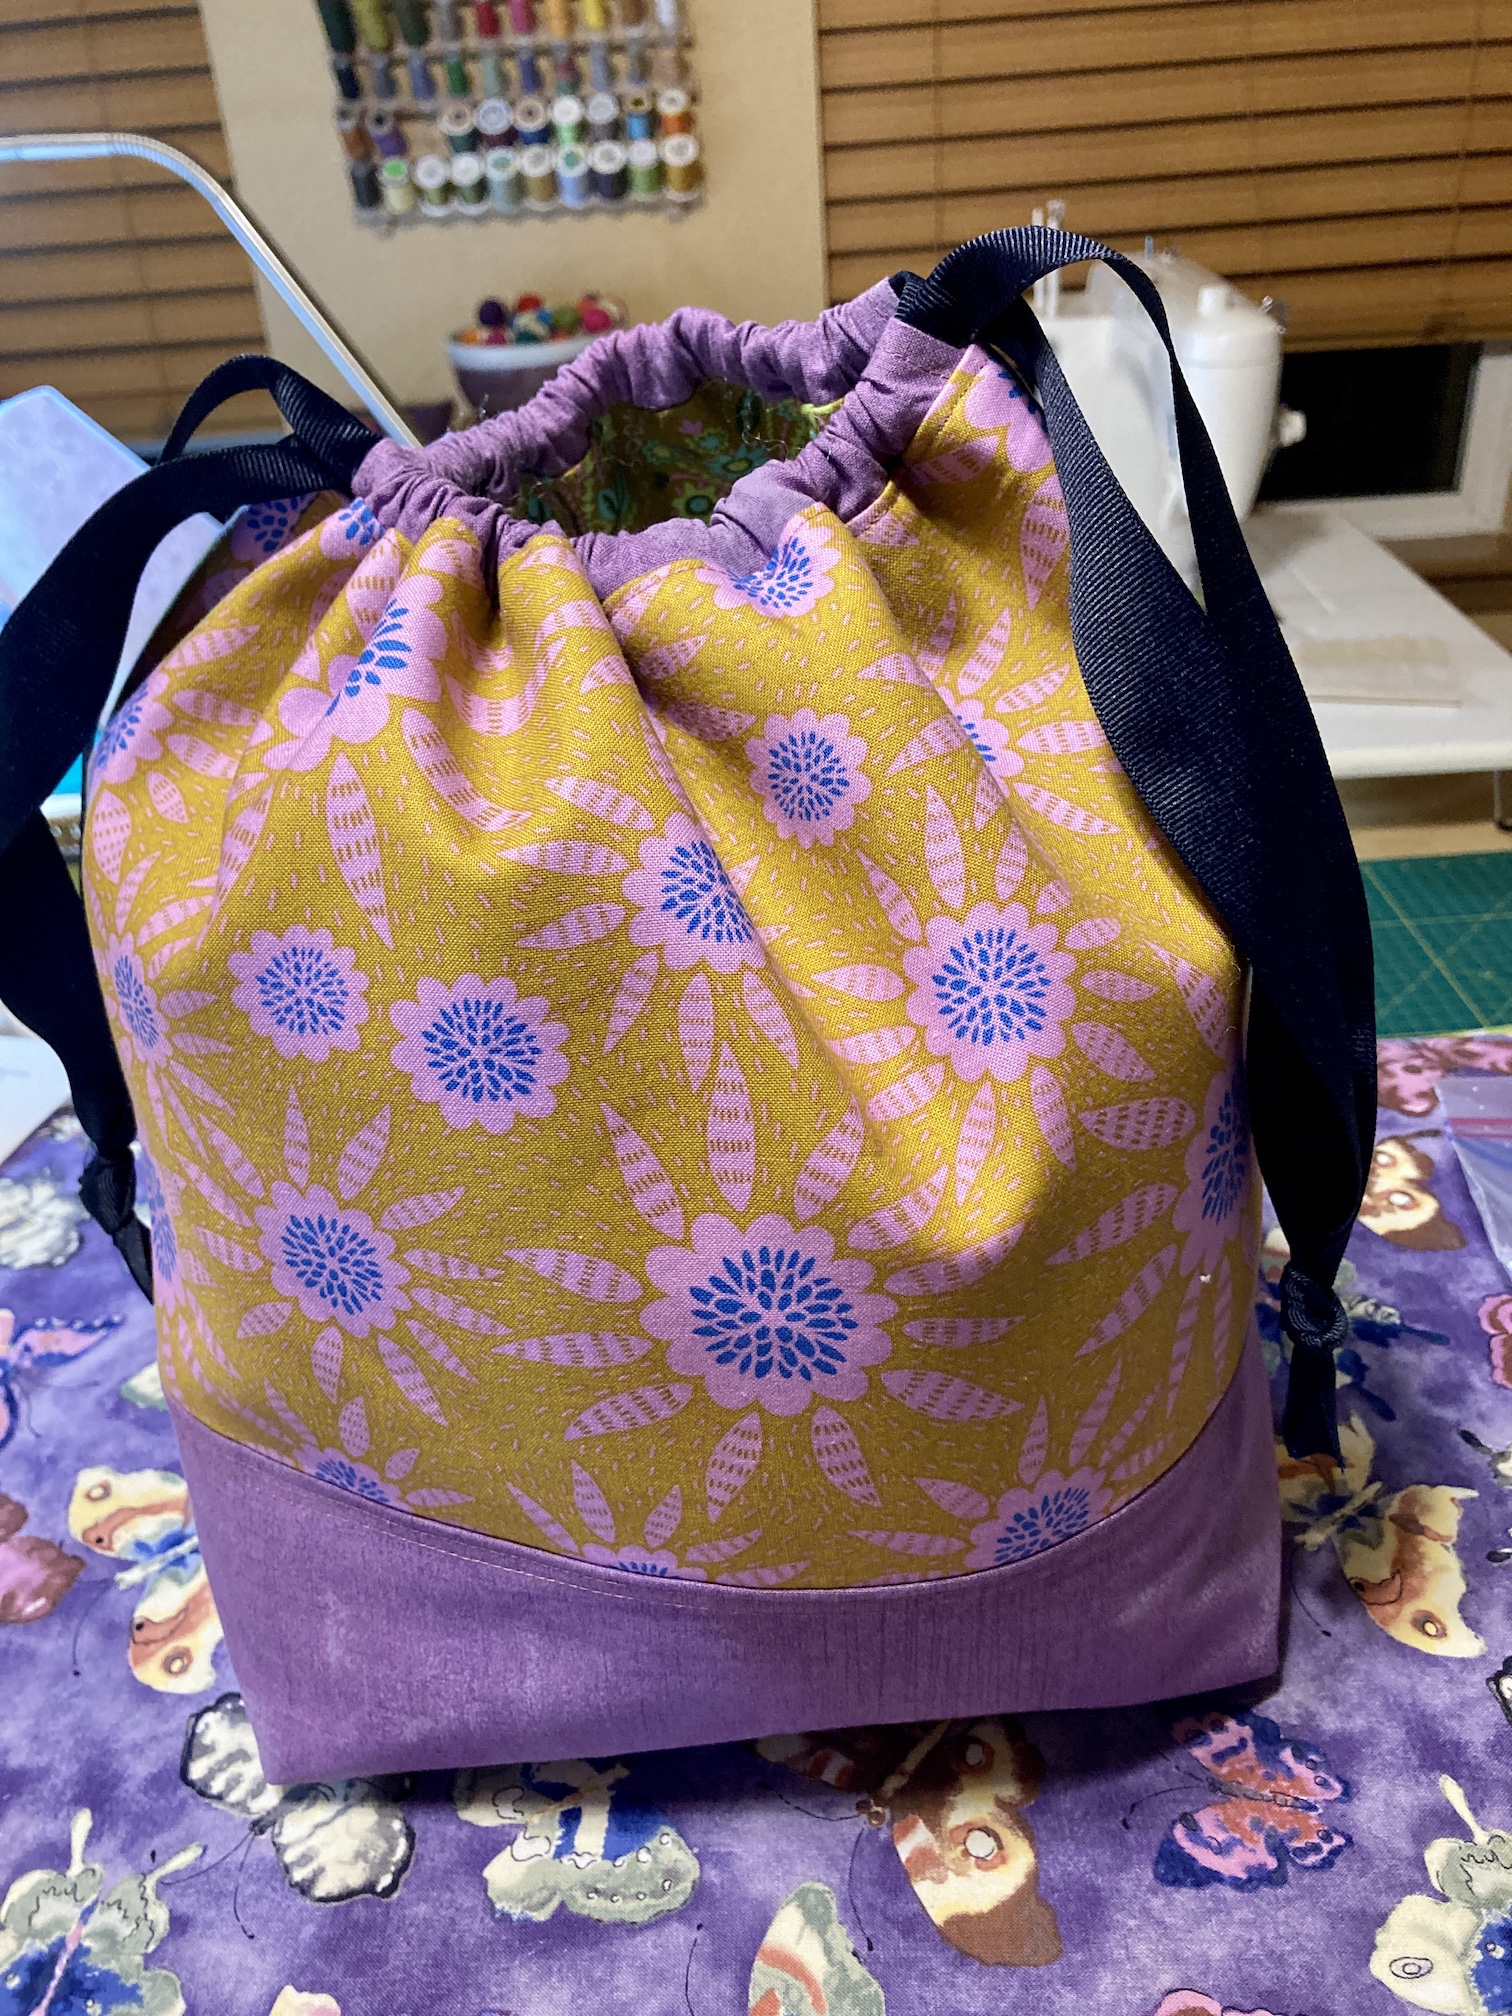
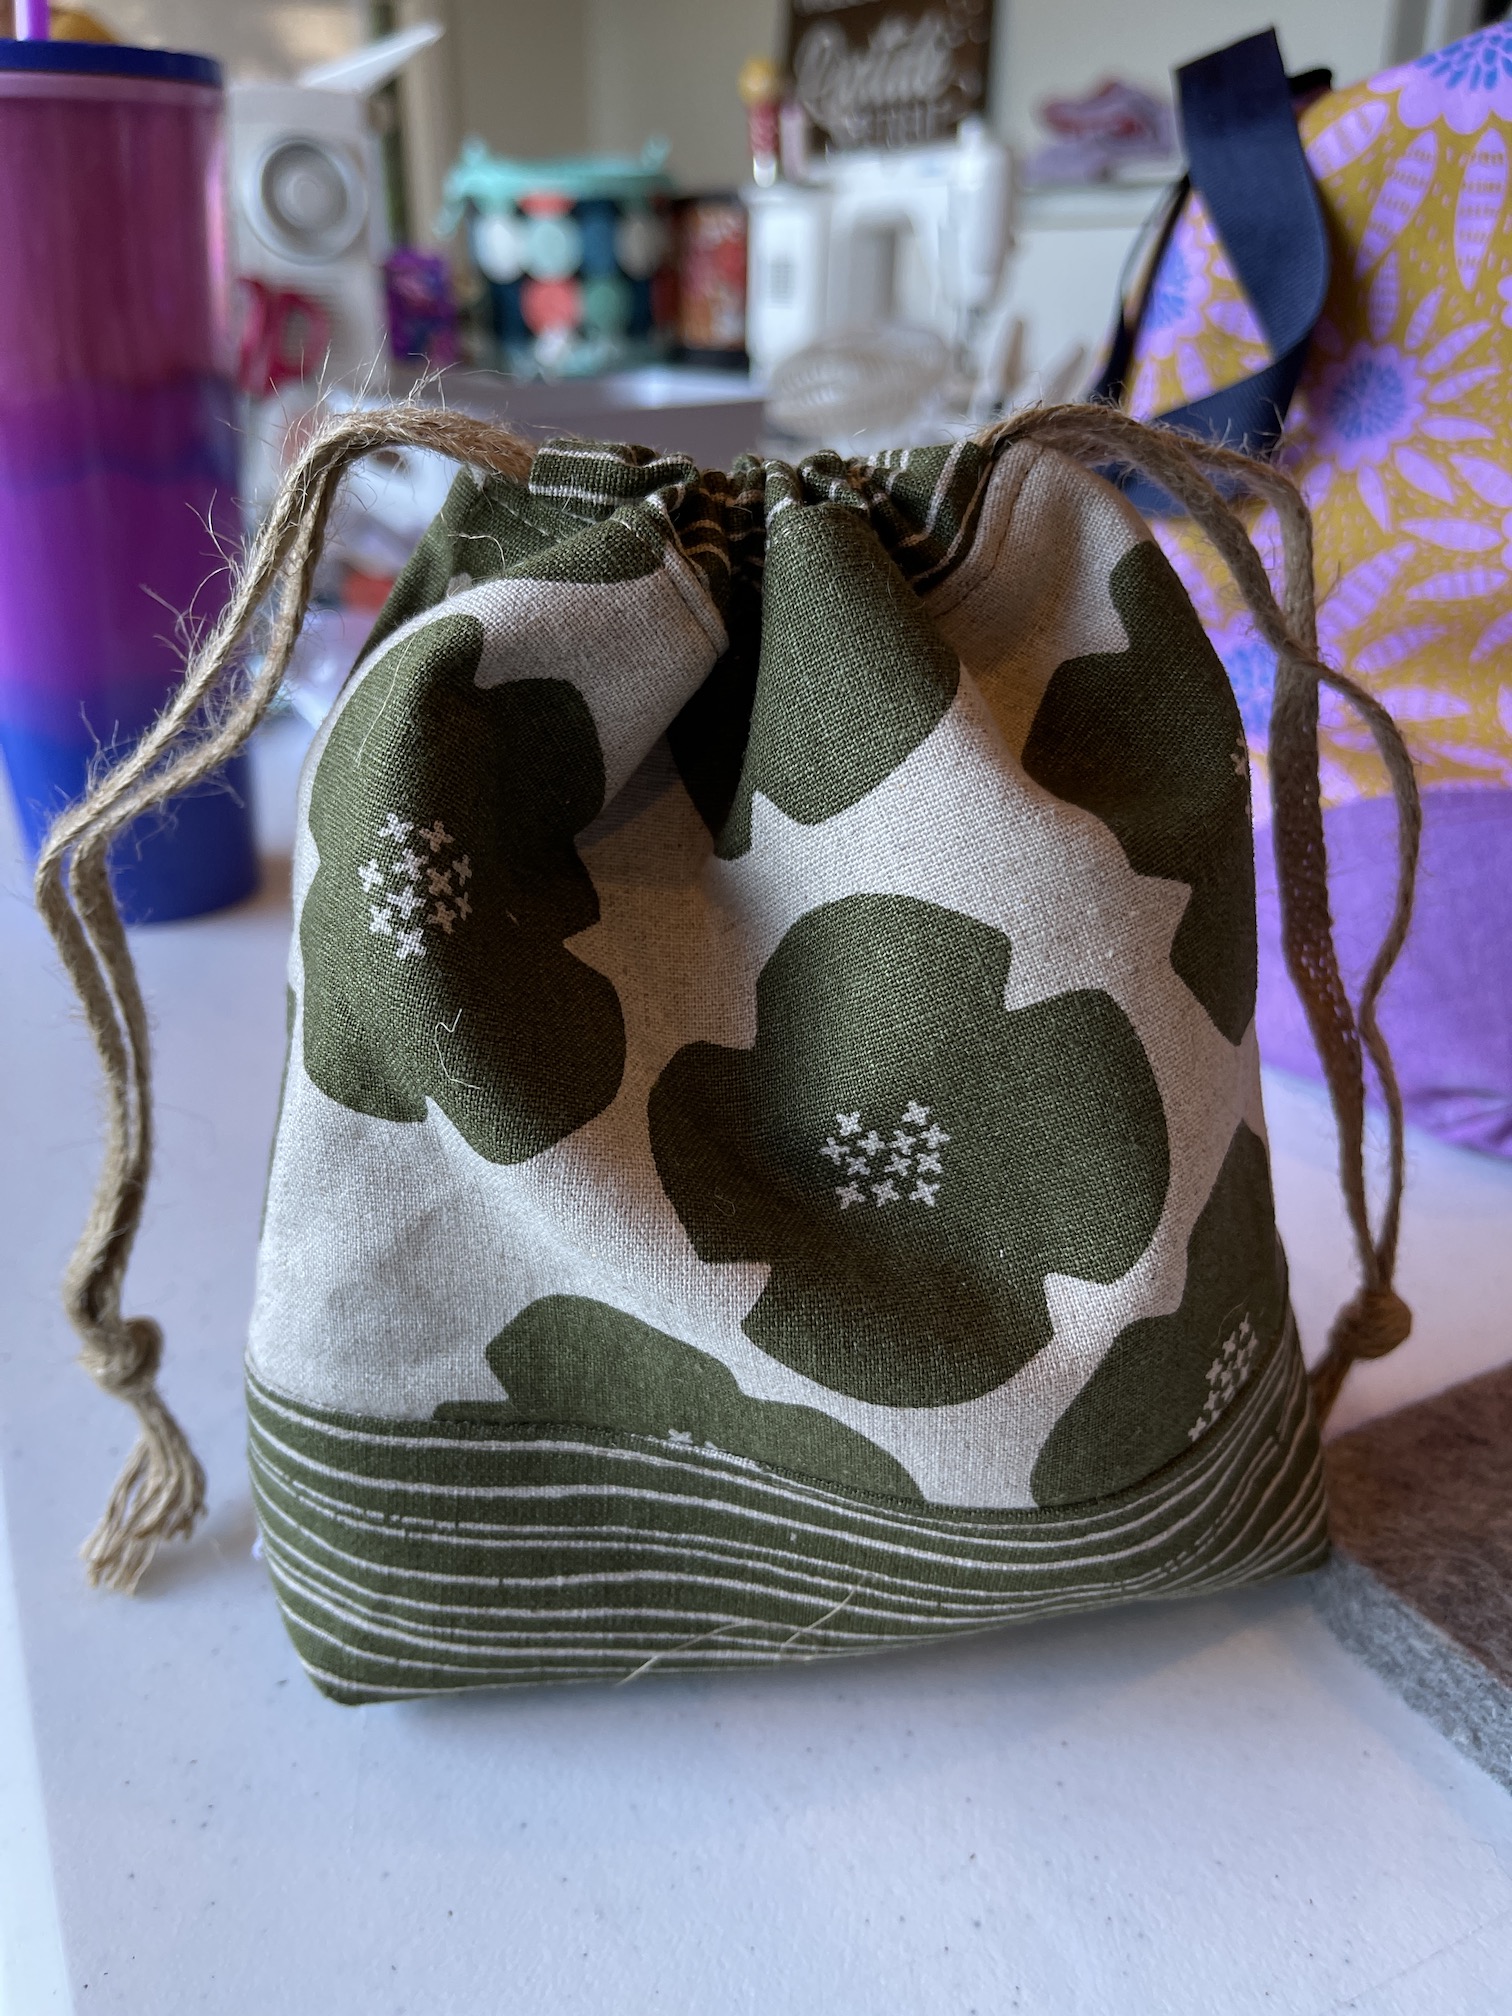
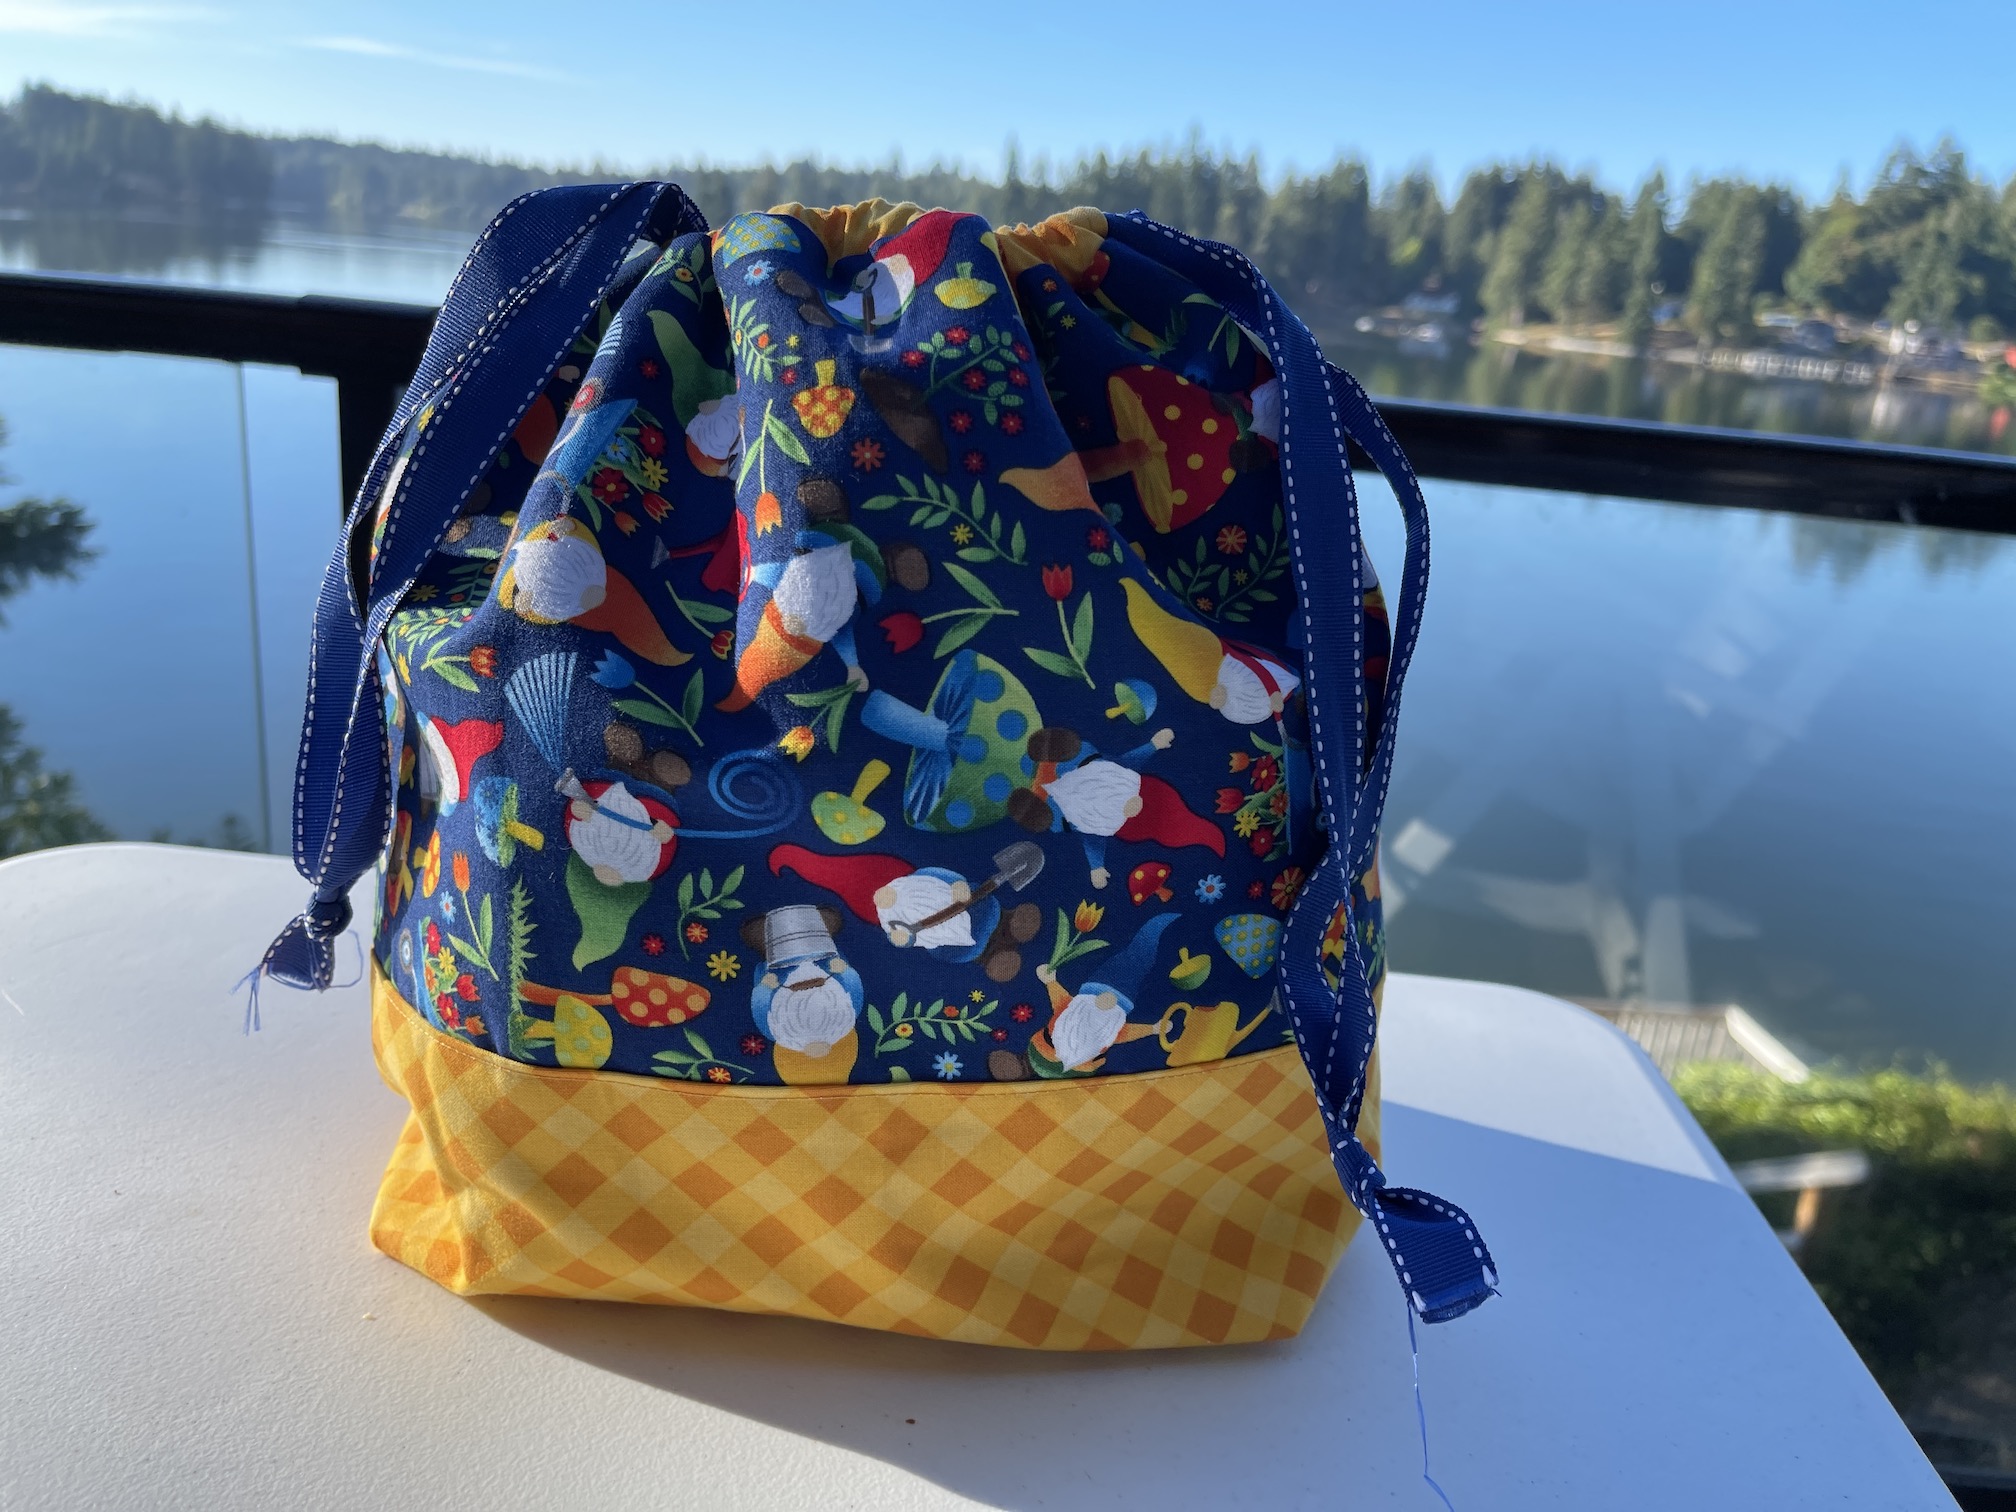
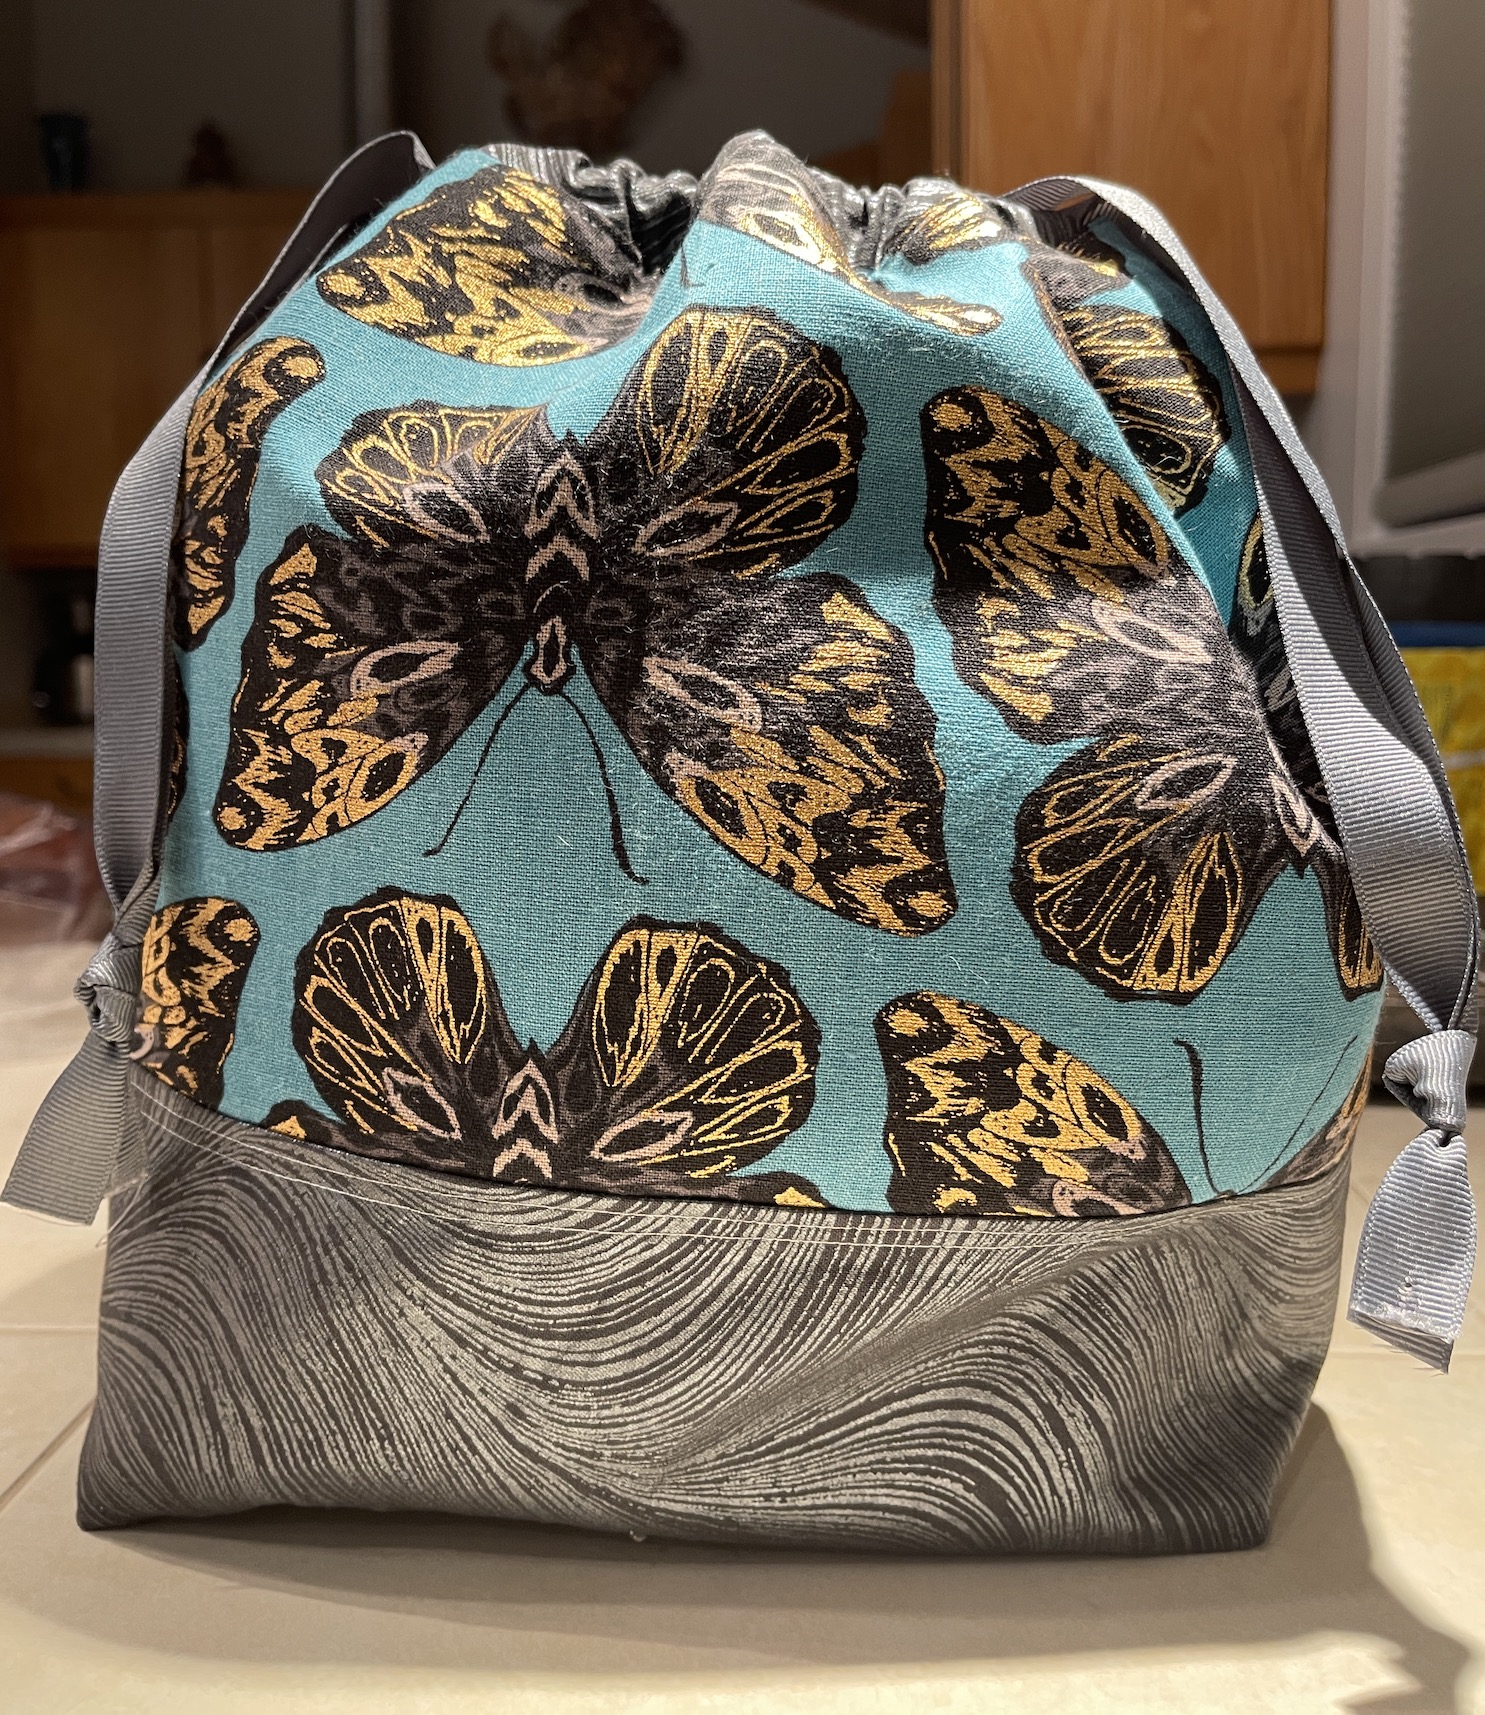
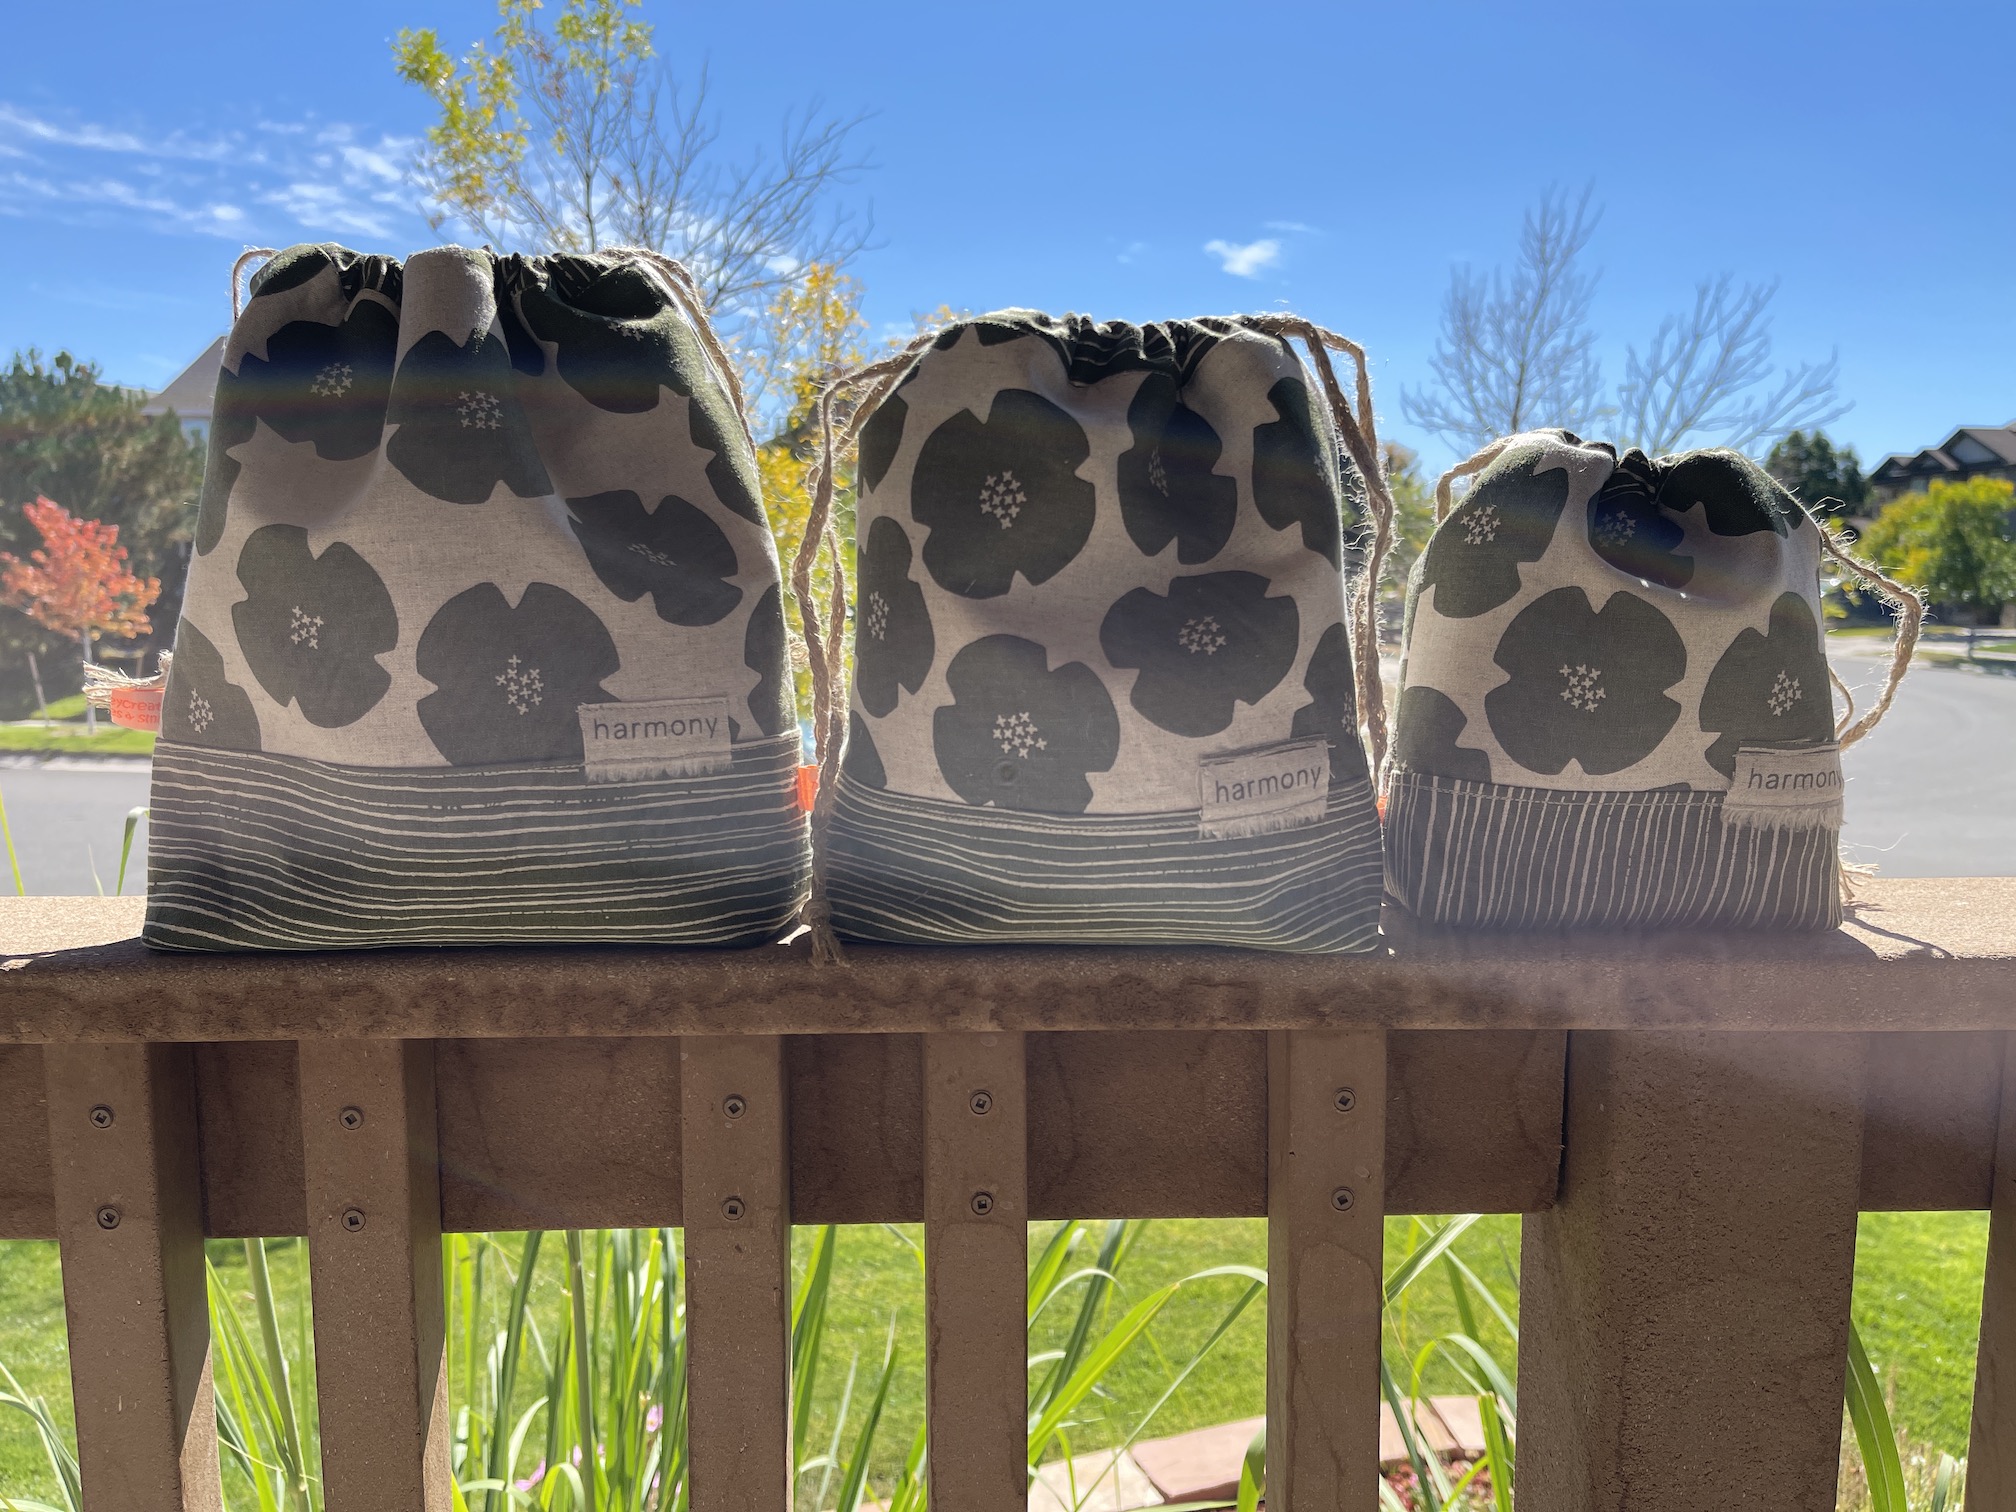
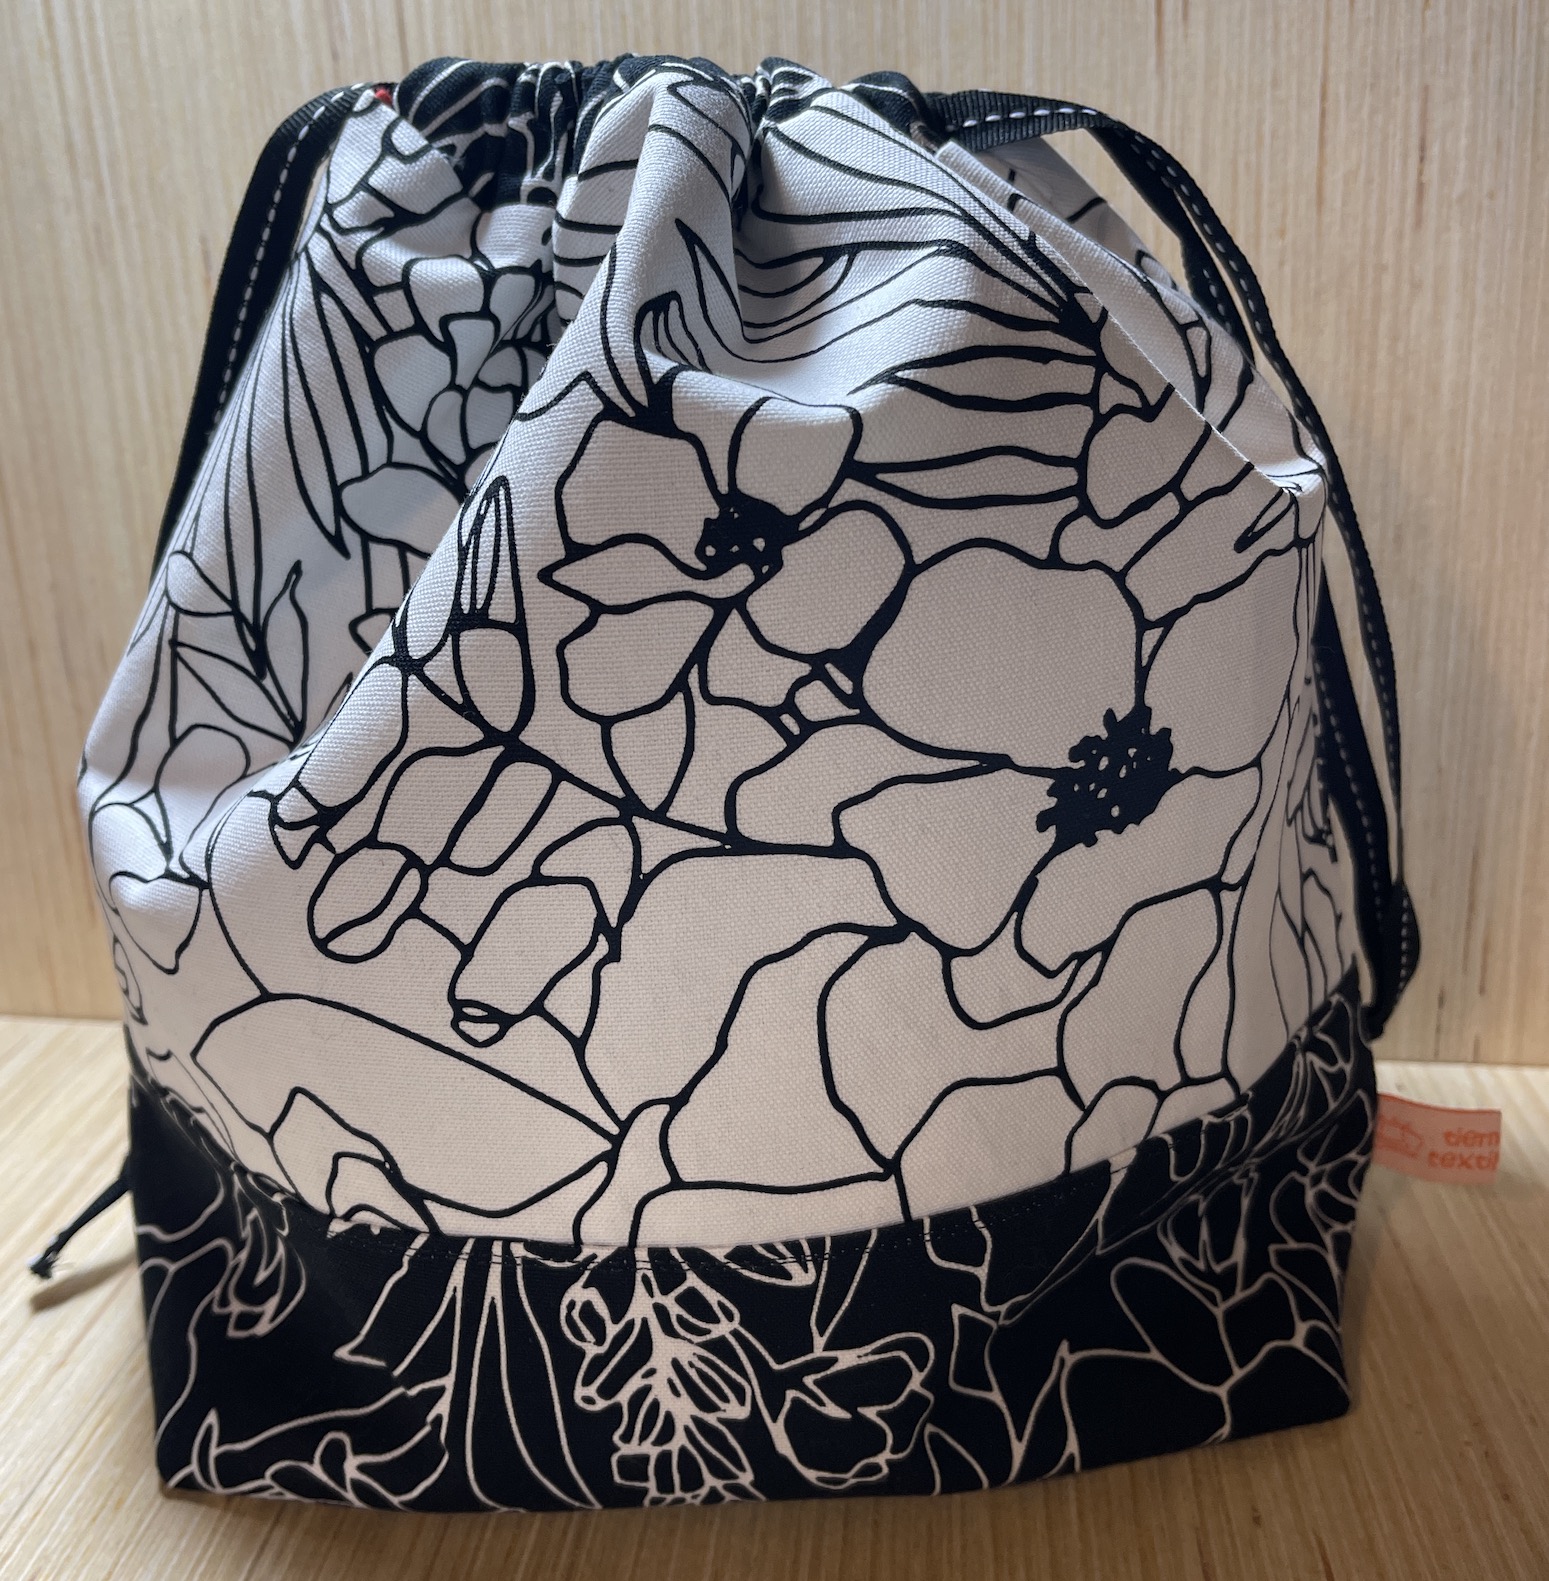
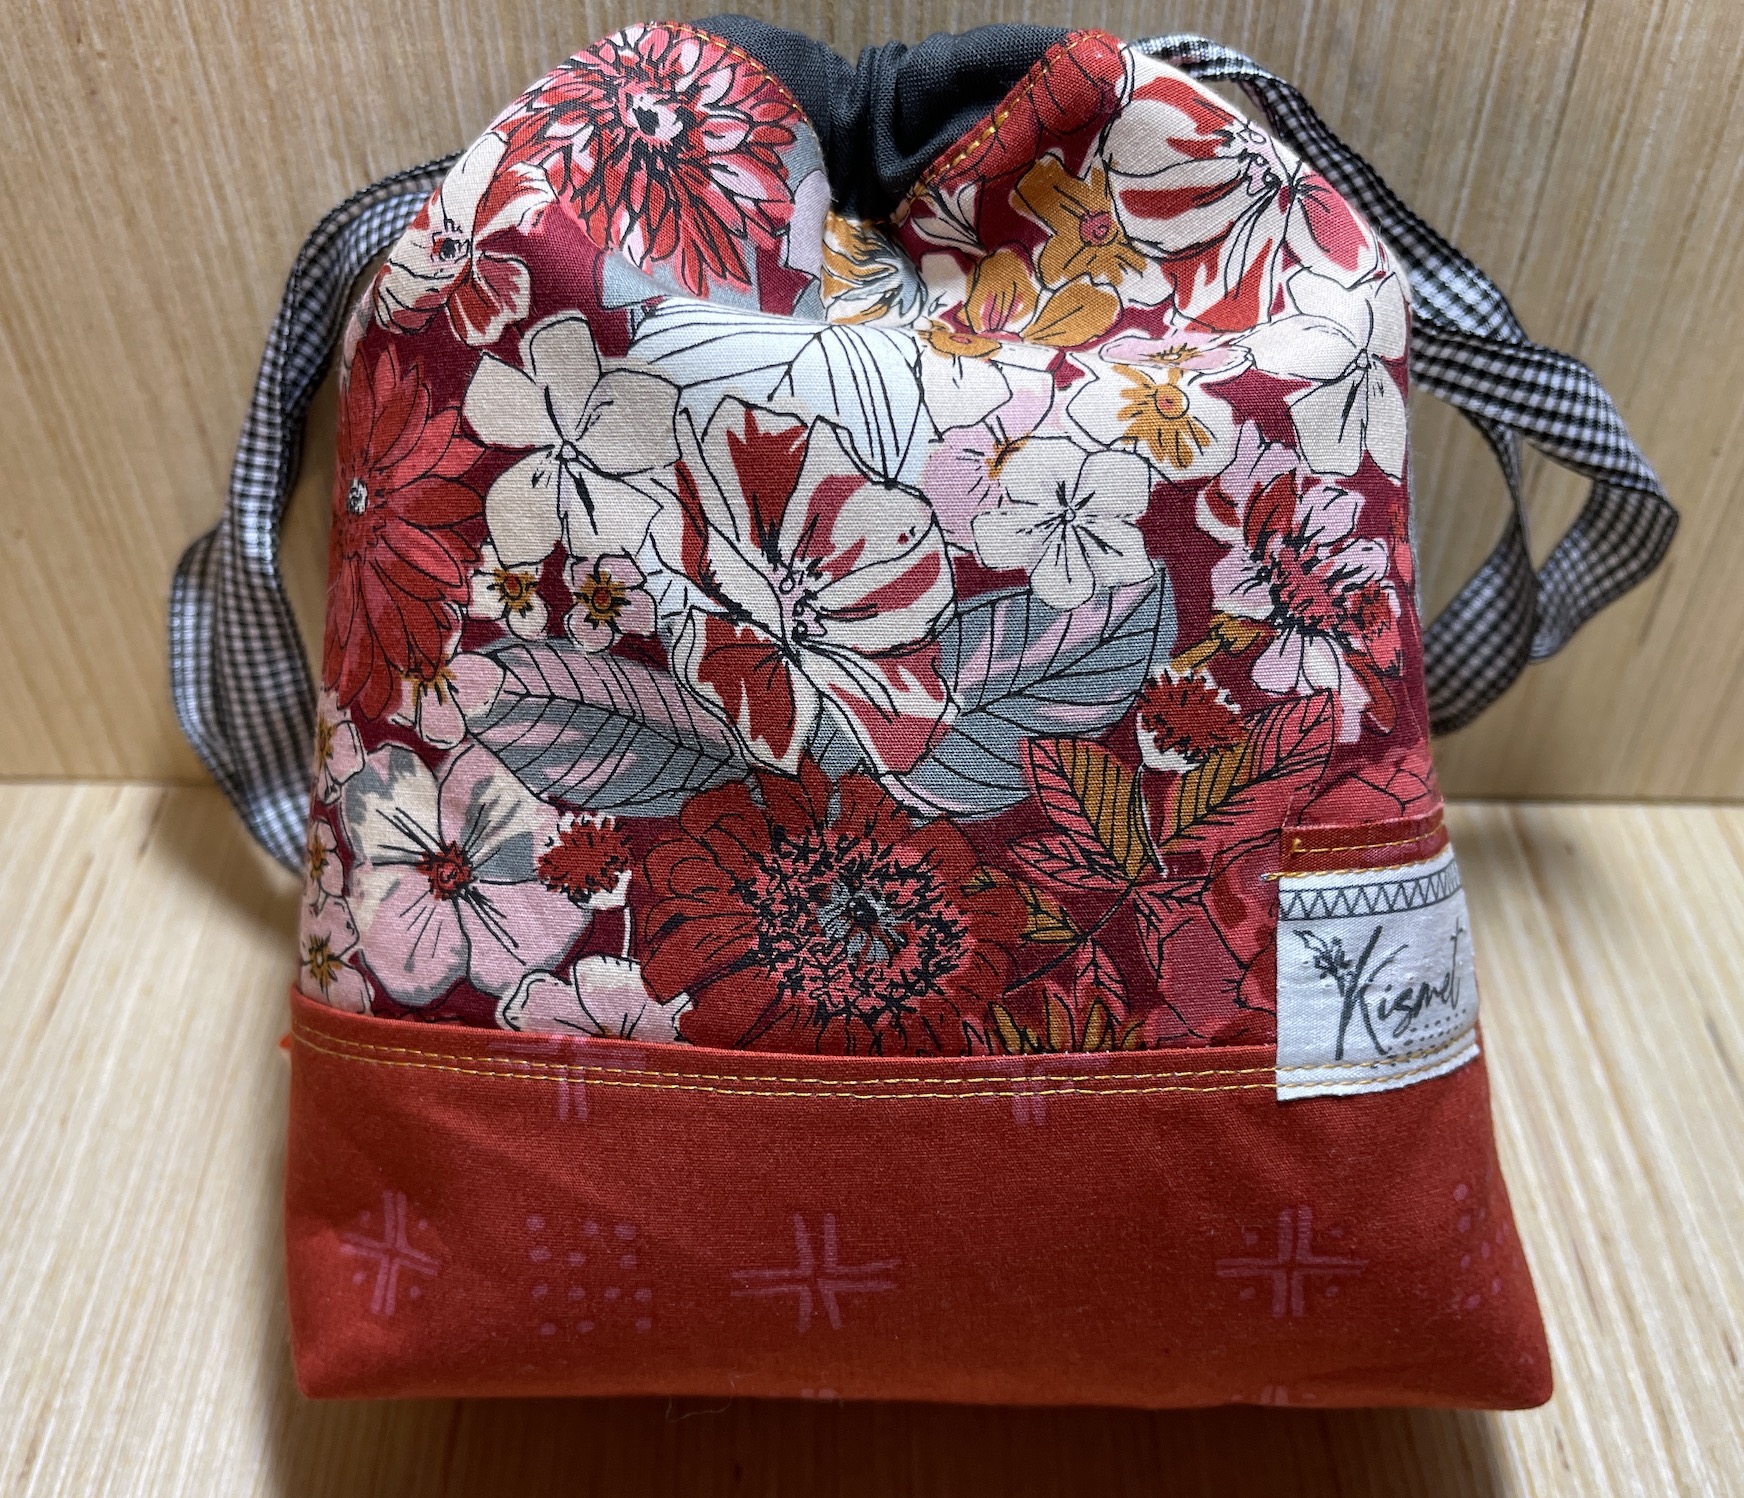
PROJECT BAGS/DRAWSTRING BAGS
My biggest seller was the project bags/drawstring bags I made.
I sold a couple sets of these:
As well as a couple other project/drawstring bags.
In addition to all the items shown above, I also sold a couple other items, including a set of fat quarters and one miniature kimono but I do not want to bore you with a complete listing of my sales.
I really appreciate all the customers who left reviews, and I’ve received 5 star reviews (huge smiles), which really helps since I am considered a “new seller” on Etsy with my new shop!
WHAT IS NEXT
I am pretty sure I am going to make some more project bags for the shop and I am working on a strategy of what to make and list next. One of my blogging buddies asked about messenger bags so I am thinking of those.
I noticed that many successful Etsy shops focus on like one thing but there are so many things I enjoy making, and I want to keep the shop a fun hobby, so I do not see myself narrowing to just one type of item.
I will share another update on my Textiles and Smiles Etsy shop if I come up with some fun new items in the future!
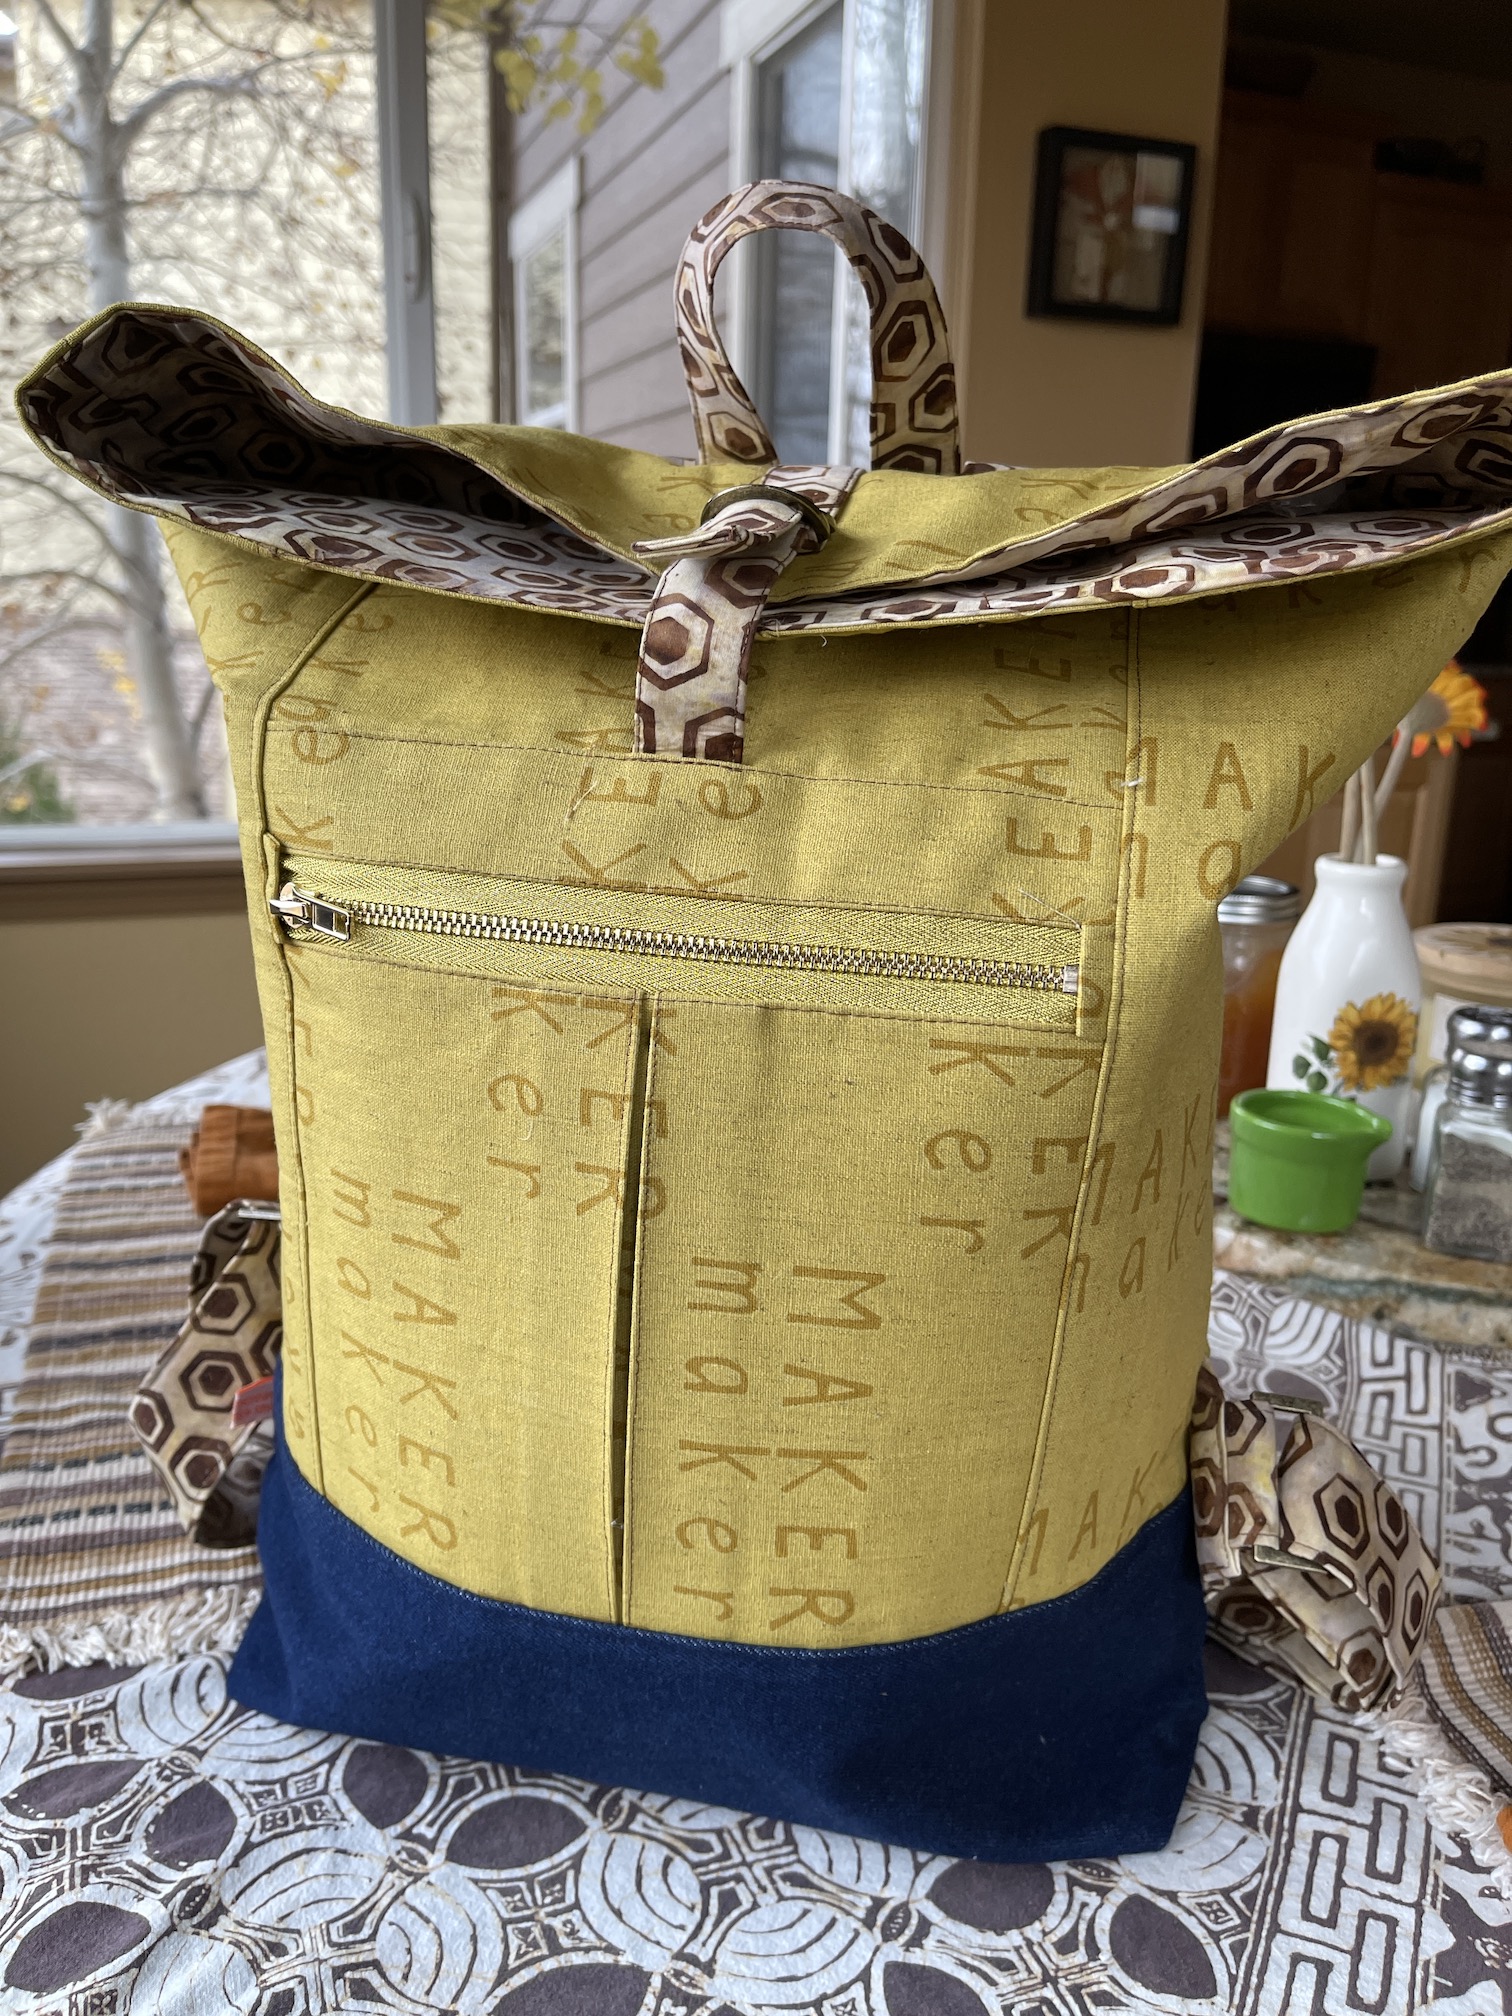
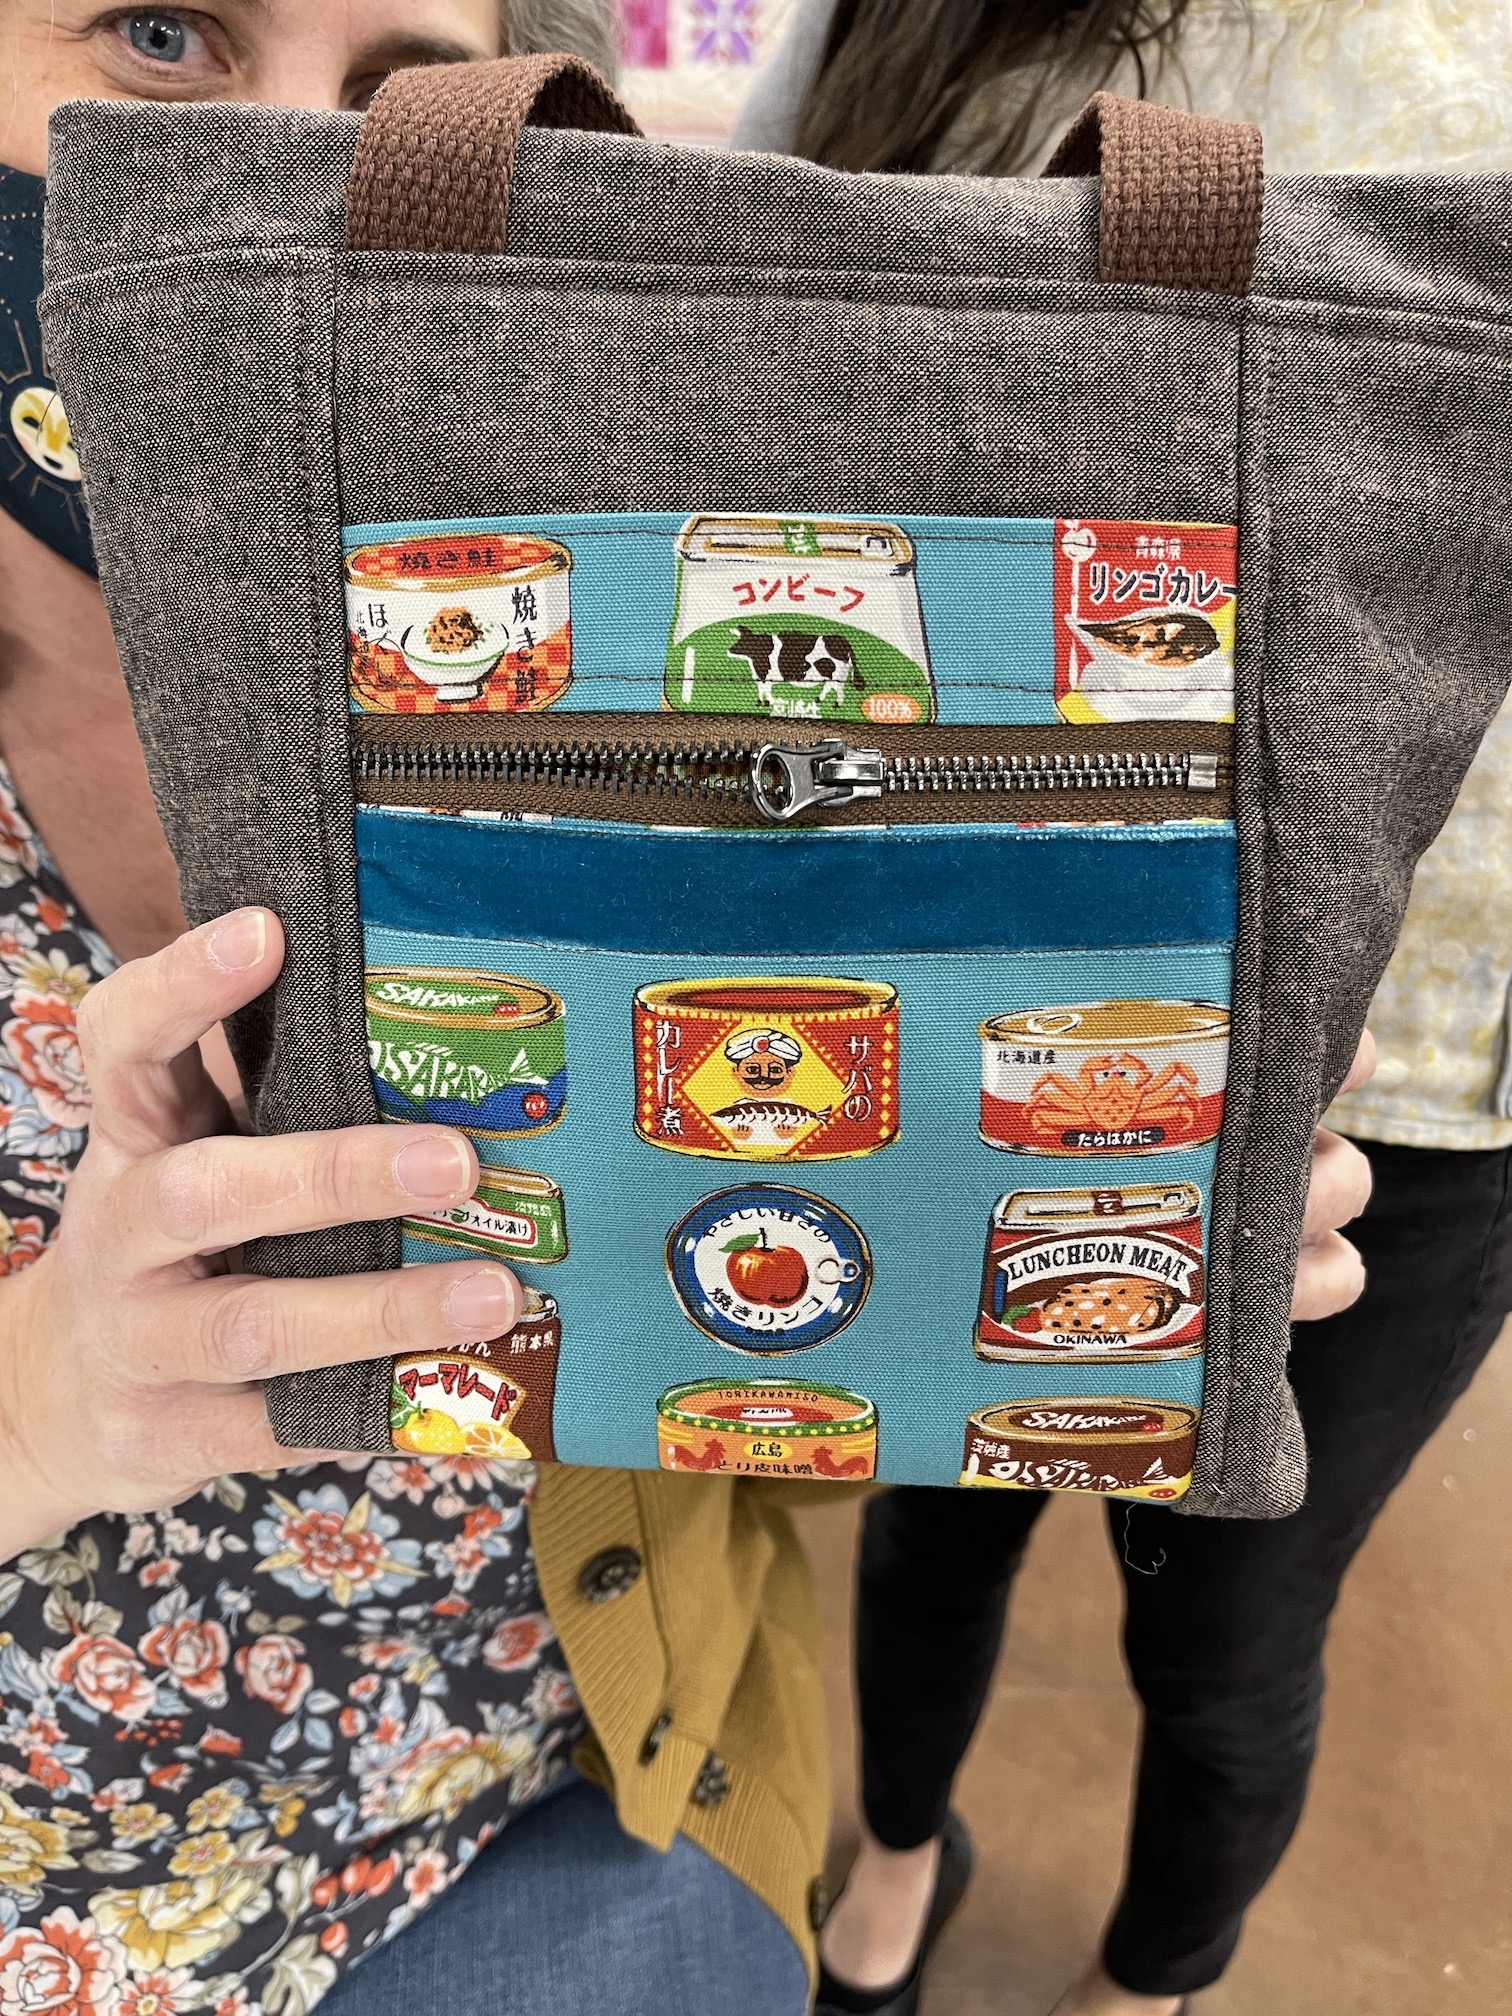
I posted the Firefly Tote on Instagram, and as standard etiquette I tagged the pattern designer – Anna Graham of Noodlehead when I credited her patter on my IG post. She has like 90,000 Instagram followers and I was pretty sure she wasn’t going to pay any attention to my tag.
Well next thing I know, she comments on my post and then the next day (I think, or perhaps later the same day), she adds it to her Instagram story!
In addition to tagging me, she also tagged the fabric designer Sarah Golden of that amazing “Maker” fabric that I love so much!
I was blown away on having such exposure as I’ve loved (and purchased) Noodlehead patterns for years; and she is a very well known pattern maker.
What an honor when the pattern designer likes your bag!
This time we worked on the Firefly Tote by Noodlehead. A month ago I shared photos of the quilt shop’s class sample of the tote:
Class sample photo 1Class sample photo 2
The pattern has instructions for two sizes – a smaller “project” size; and a larger “tote” size. I figured I would make the tote size.
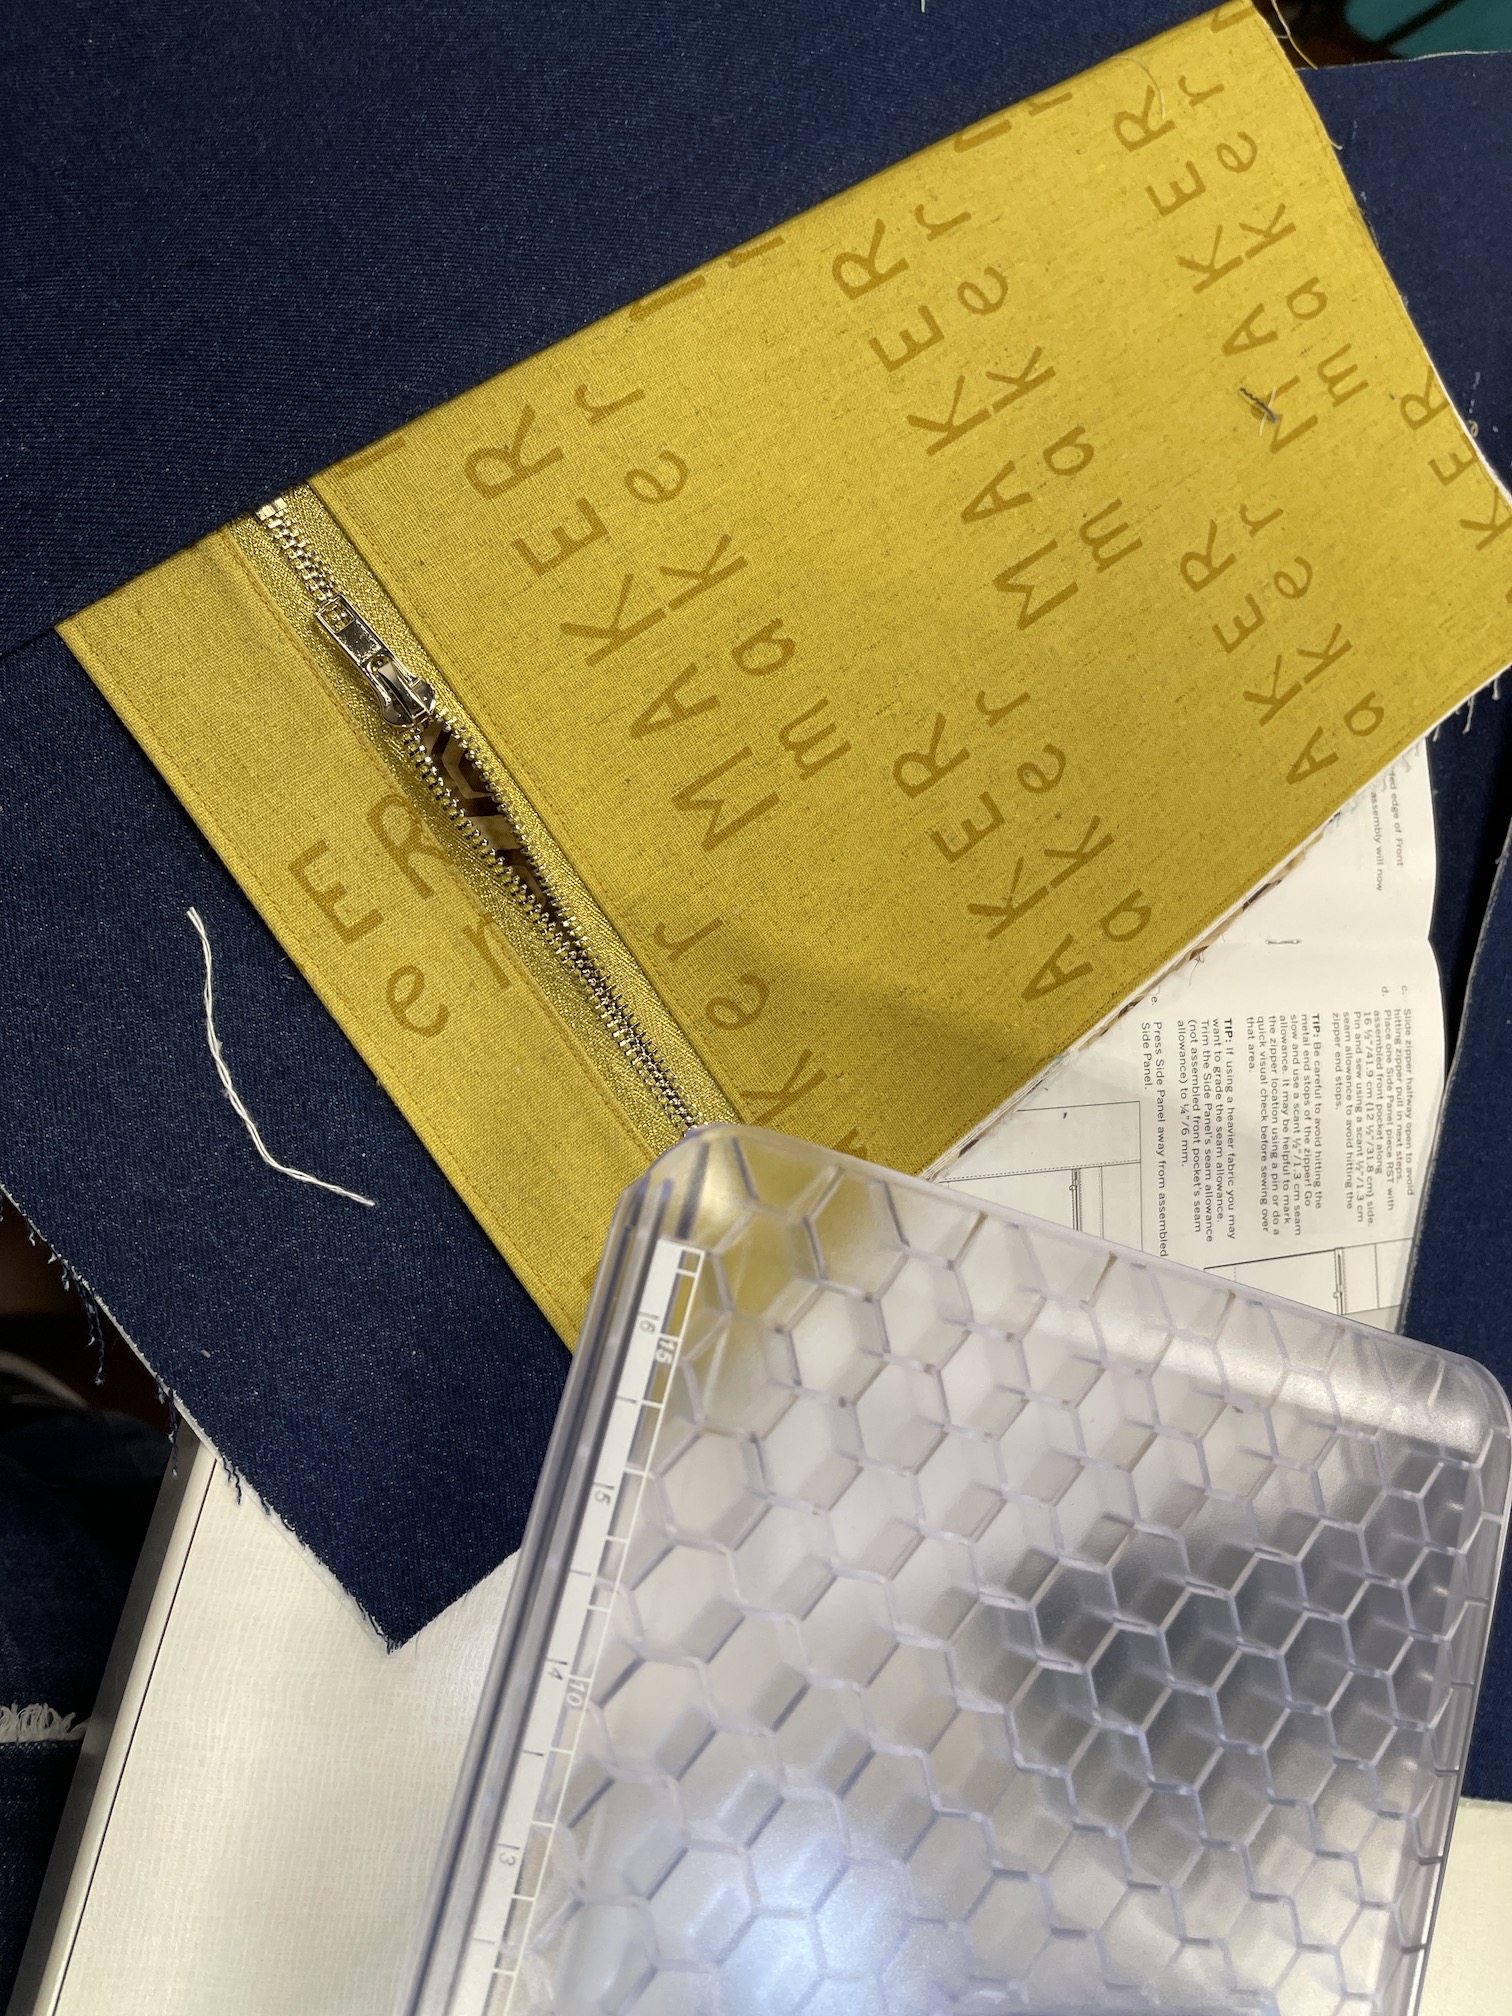
I decided to make it in the same fabrics as the Range backpack also by Noodlehead that I made in the previous class and here are photos in progress during the class last night:
My partially finished Firefly Tote
That was as far as I got (photo above) during class and I still need to make the lining and the drawstring topper. I found the “blingy” gold handles at the quilt shop and they go with the shiny gold zipper I used also in my coordinating backpack, also found at the quilt shop.
One class attendee got way farther than I did, and she was making the “project” size tote bag. Here is her nearly finished adorable project size bag being held up by our wonderful instructor:
Another student’s nearly finished project size Firefly Tote
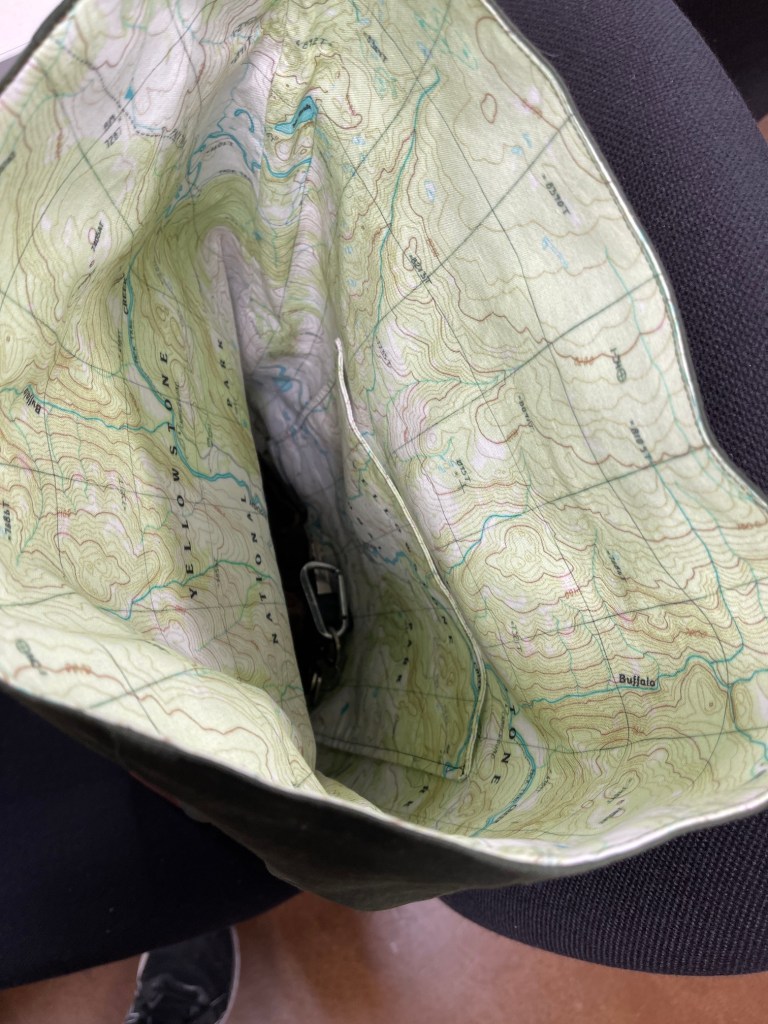
Another student in the class brought her finished Range backpack to class and it was so cool I had to photograph it – she has it lined with a custom Yellowstone map fabric she found on Spoonflower:
If you are just joining us, here is the Range backpack I finished a couple weeks ago from the class I took a month ago. As you can see my Firefly Tote will coordinate with it:
And speaking of backpacks, I am currently working on a commission project of a scrappy Tula Pink Range backpack for a gift for someone who is a Tula Pink aficionado. The family member who commissioned it as a surprise gift asked me to include lots of Tula Pink fabrics. I am trying my best but I have a limited range of her fabric lines (but lots of scraps!)
Lots of Tula Pink All Stars line fabric scraps in my stash
Here is my design wall in progress as I work on piecing together/creating my own “fabric” to start cutting the sections for the backpack:
This is just a little bit of the fabrics I am using, it will be super scrappy. I am going to first make “fabric” from the scraps and do some simple quilting on it to reinforce it before I start cutting sections for the backpack pieces. I will share a photo when it is done!
I have to set finishing my Firefly Tote from last night’s class aside for now as I need to get the backpack done and shipped so they can surprise their sister for Christmas!
Are you working on any last minute December projects?
Some great news: I was able update the art quilt RECYCLED HOPE III: WINDOWS OF CONVERSATION on my Portfolio page as: “OWNED BY PRIVATE COLLECTOR”!
A month ago I was contacted through my tierneycreates Inquirespage by an art consultant in Seattle, Washington who was interested in purchasing this piece for her client.
We worked out the details, I created an invoice and they purchased the piece!
So with this sale, I’ve now sold 11 of my art quilts over the past 5 years (and yes I would be very hungry if I’d tried to live off the sale of art quilts as that averages to 2.2 quilts sold per year – ha!).
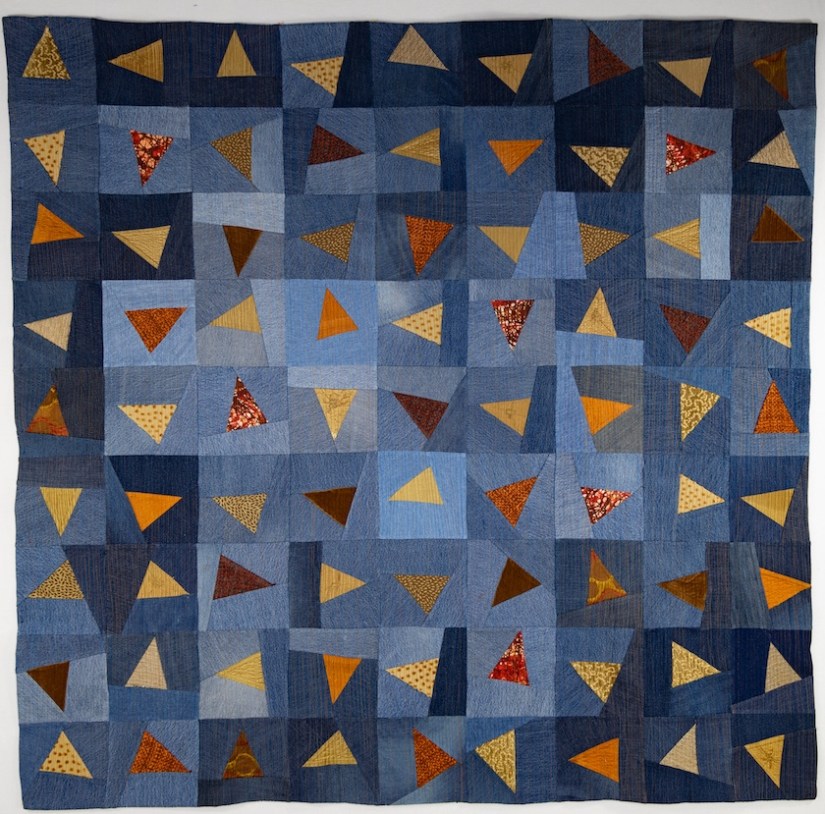
The City of Seattle owns four (4) of my art quilts which you can check out on my Portfoliopage:
COLOR STORY I: FLYING TRIANGLES
COLOR STORY II: SILK LANDSCAPE
COLOR STORY IV: COLOR CHANGE
COLOR STORY V: ABANDONED WATER STRUCTURE
And the rest of the seven (7) that have sold were purchased by private collectors:
WE WILL NOT BE DISCARDED (not in my Portfolio but you can see a post on it – We Will Not Be Discarded’s Debut; it sold at a show at Twig’s Gallery in Sisters Oregon in 2016)
There is one more on my Portfolio page that states “owned by private collector” – COLOR STORY VII: IT’SGETTING WARM IN HERE – was actually a gift to my sister, I did not sell it.
Writing this post is serving two purposes for me:
Providing me with an easy reference to see just how many I’ve sold; and
Encouraging me to get back to making art quilts as my portfolio or available art quilts is dwindling!
If you are a quilter, and you are trying to figure out what to you with your ridiculous collection of charm squares then I have a project for you (except I have not tried it yet myself).
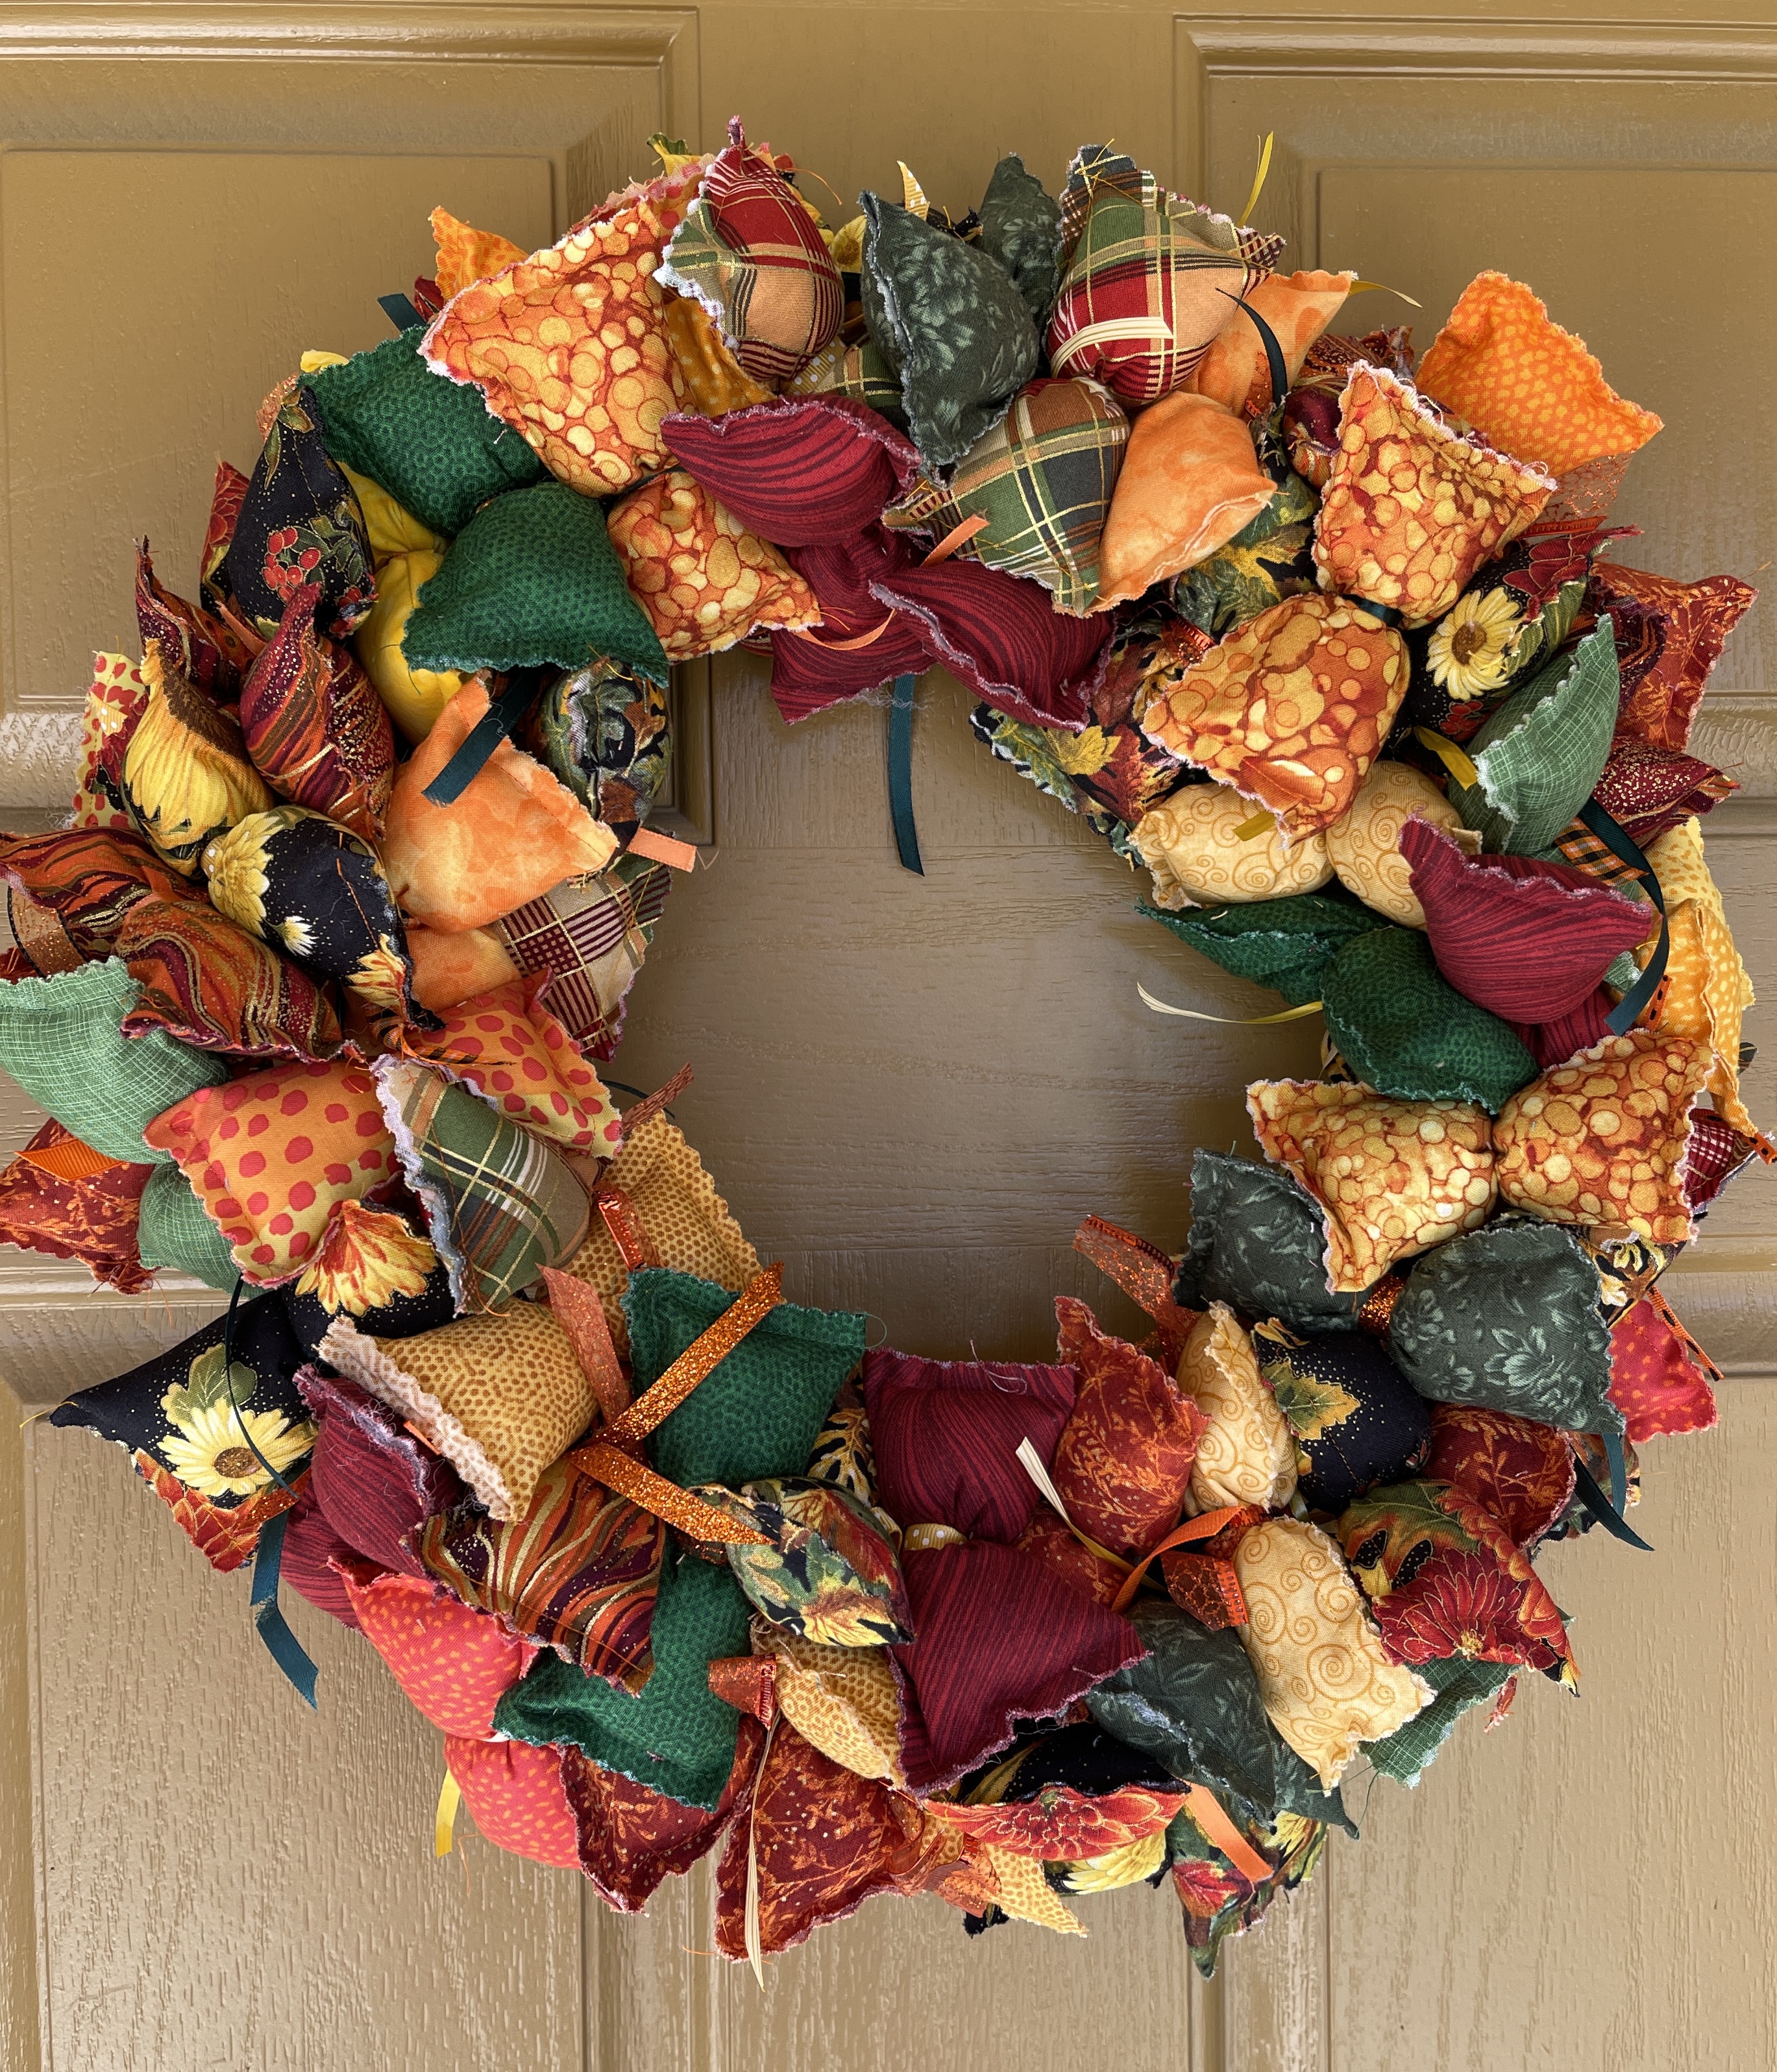
My friend Judy (the one who originally got me into quilting) came for a visit the other weekend and she brought me this amazing Autumn wreath that she made with 5 inch charm squares:
It looks very delicious in person, the photo does not quite capture it’s yumminess. I love how the stuffed little tubes feel. She made it all from fabric scraps from her scrap pile; and found the wreath frame at the “dollar store”.
I asked her for her instructions and here they are:
Cut 5” square with pinked rotary cutter. Fold square in half wrong sides together. See 2 sides. Stuff. Sew closed. Tie 12” piece of ribbon with knot to center. Now tie this to the wired wreath with or without tying around the little “pillow” again I found tying around the pillow a second time stabilizes it’s placement but it is not always necessary.
Now I have not made it myself yet. When I do make one I will do a post showing step by step how I created it. I’d like to make one with Christmas fabric scraps.
And in case you’ve never heard of the term “charm squares”, here is a description of them from Robert Kaufman Fabrics:
A classic 5″ square cut, as a pack, perfect for charm quilts, including a variety of colors and/or prints with which to play!
photo credit – Robert Kaufman fabrics
You can buy charm packs of precut 5″ in squares (of which I have way too many in my stash) or you can just make them.
Lately my blog has primarily focused on my recent travels and I’ve joked I should change the name from “tierneycreates” to “tierneytravels”. Well over the past 6 months I’ve been tierney-creating a lot (when not traveling!) working on a “secret quilt” for a Women of Color Quilting Network (WCQN) show that opens next year.
The name of the show is Black Pioneers: Legacy of the America West and it opens next spring at the The James Museum of Western & Wildlife Art in St. Petersburg, Florida. After a stint at The James Museum it will tour nationally (museums across the U.S. have already contacted the curator and head of the WCQN, Dr. Carolyn Mazloomi to request that the exhibit show at their museum).
Recently I put the final touches on my quilt for the show and sent it off to the curator to be professionally photographed for the book, etc.
We were provided with a list of Black Pioneers that contributed to the growth of the American West and my quilt is about one of those pioneers.
You’ll have to wait until Spring 2022 to find out more as the museum asked for no social media images of our quilts prior to the opening.
I am pretty excited about participating in this show; and this will be my third WCQN exhibit (see posts Visioning Human Rights in the New Millennium, Part I and “Giant Among the Sequoias” Returns Home). I’ve had the opportunity to participate in several other WCQN exhibits since Yours for Race and Country: Reflections on the Life of Colonel Charles Young (“Giant Among the Sequoias”) but I’ve had artist block when it comes to art quilts for a show over the past several years since my husband Terry died in December 2018.
I finally figured out what it was (beyond part of grieving) – I used to, in my previous home I shared with Terry for 14 years, work on art quilts in the giant design wall that spanned our small hallway of our home:
Working on “Giant Among the Sequoias” in Spring 2018
I loved creating textile art in that hallway and I would always have Terry down the hall watching TV, playing a computer game, or reading a book while I worked. Occasionally he would walk by on his way to the bathroom and give me an approving nod.
In my current home in the Denver metro area, I have a large design wall inside my lovely studio that my partner John put together but for me creating art quilts was about being in that hallway.
So I had to overcome that, and it was more difficult than I thought, to be able to work on the quilt for this show. I knew I did not want to pass up on any more WCQN exhibit opportunities (nor did I want to give up making art quilts) so I had to overcome this hurdle to my creativity.
All I can say is widowhood is a long road filled with potholes (some you think will kill you or at least break both your legs) and pits of muck getting you stuck.
Image credit: Firestone
But then ever so often the road smooths out and you can travel peacefully for a while. You can also learn to avoid some of the potholes and pull yourself quickly out of the muck when you slip in.
You keep learning that you are stronger than you think you are.
Glad I got unstuck from the muck to create this quilt. I will update you in the future on the creation of the quilt, the finished quilt, and more information about the show.