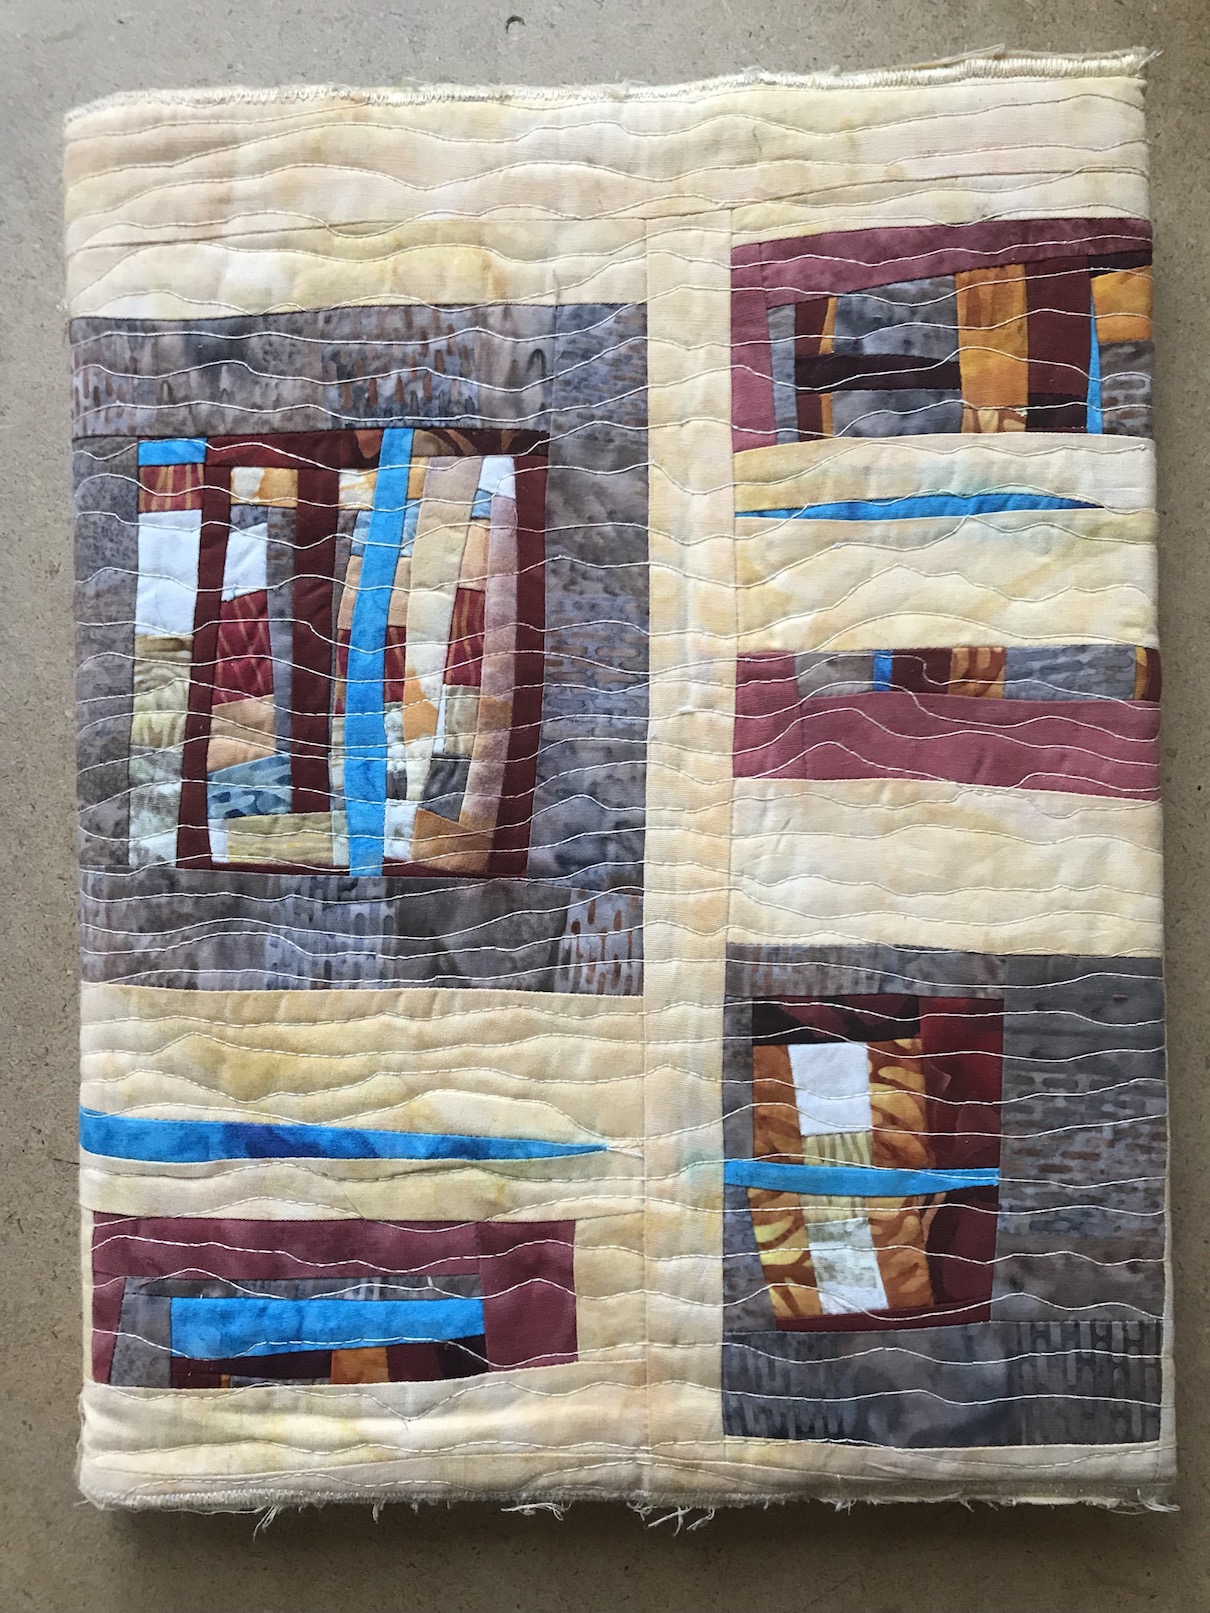
Pausing my series of posts about my September trip to the California Coast to share my conversion of a journal cover to a pillow.
I made this journal cover from fabric scraps in the first Journey to Art Quilting class I took with Jean Wells at the Stitchin’ Post in Sisters, Oregon, likely around 2013 or 2014.
We were working on improvisational quilting exercises; and I remember I added the turquoise in because Jean said your piece needs a “surprise”, something unexpected, and she called it “a poison”.
For some reason I just just feeling tired of this journal cover and no longer wanted to use the journal it covered, I wanted to fresh start for creative journaling. However I didn’t want to get rid of the piece.
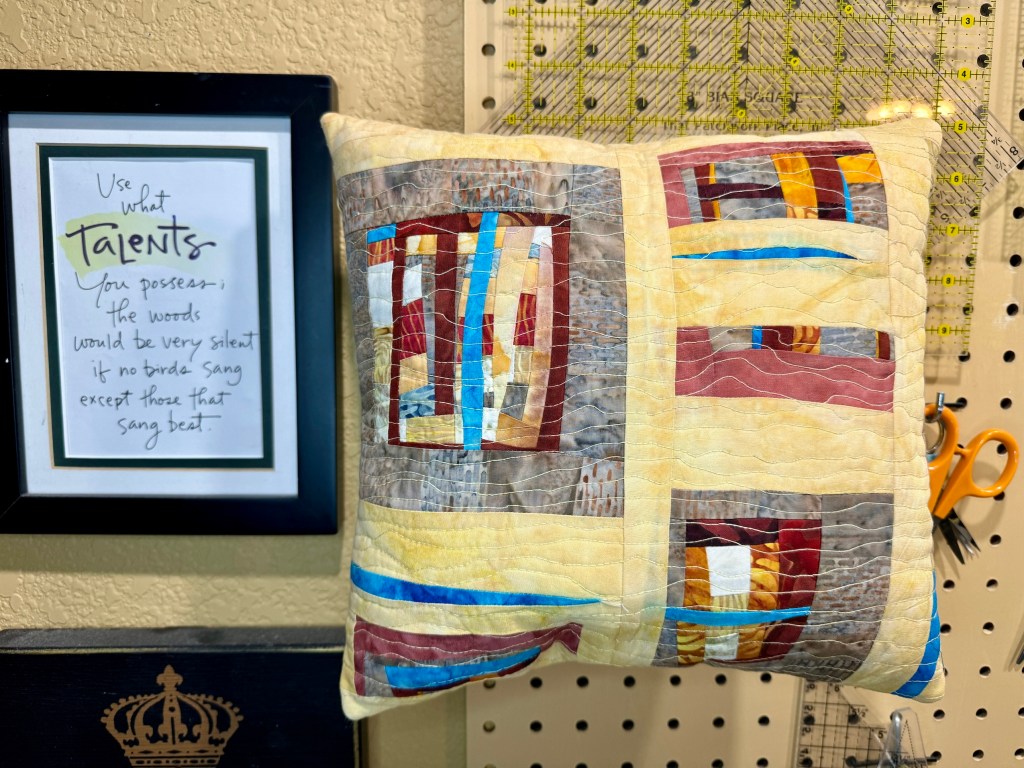
So I decided to make it into a pillow!
The class with Jean was very memorable, it was actually a workshop series where we met monthly (or it might have been bi-weekly). The piece which eventually because Abandoned Water Structure and was sold to the City of Seattle’s Portable Works Collection was started in this workshop:
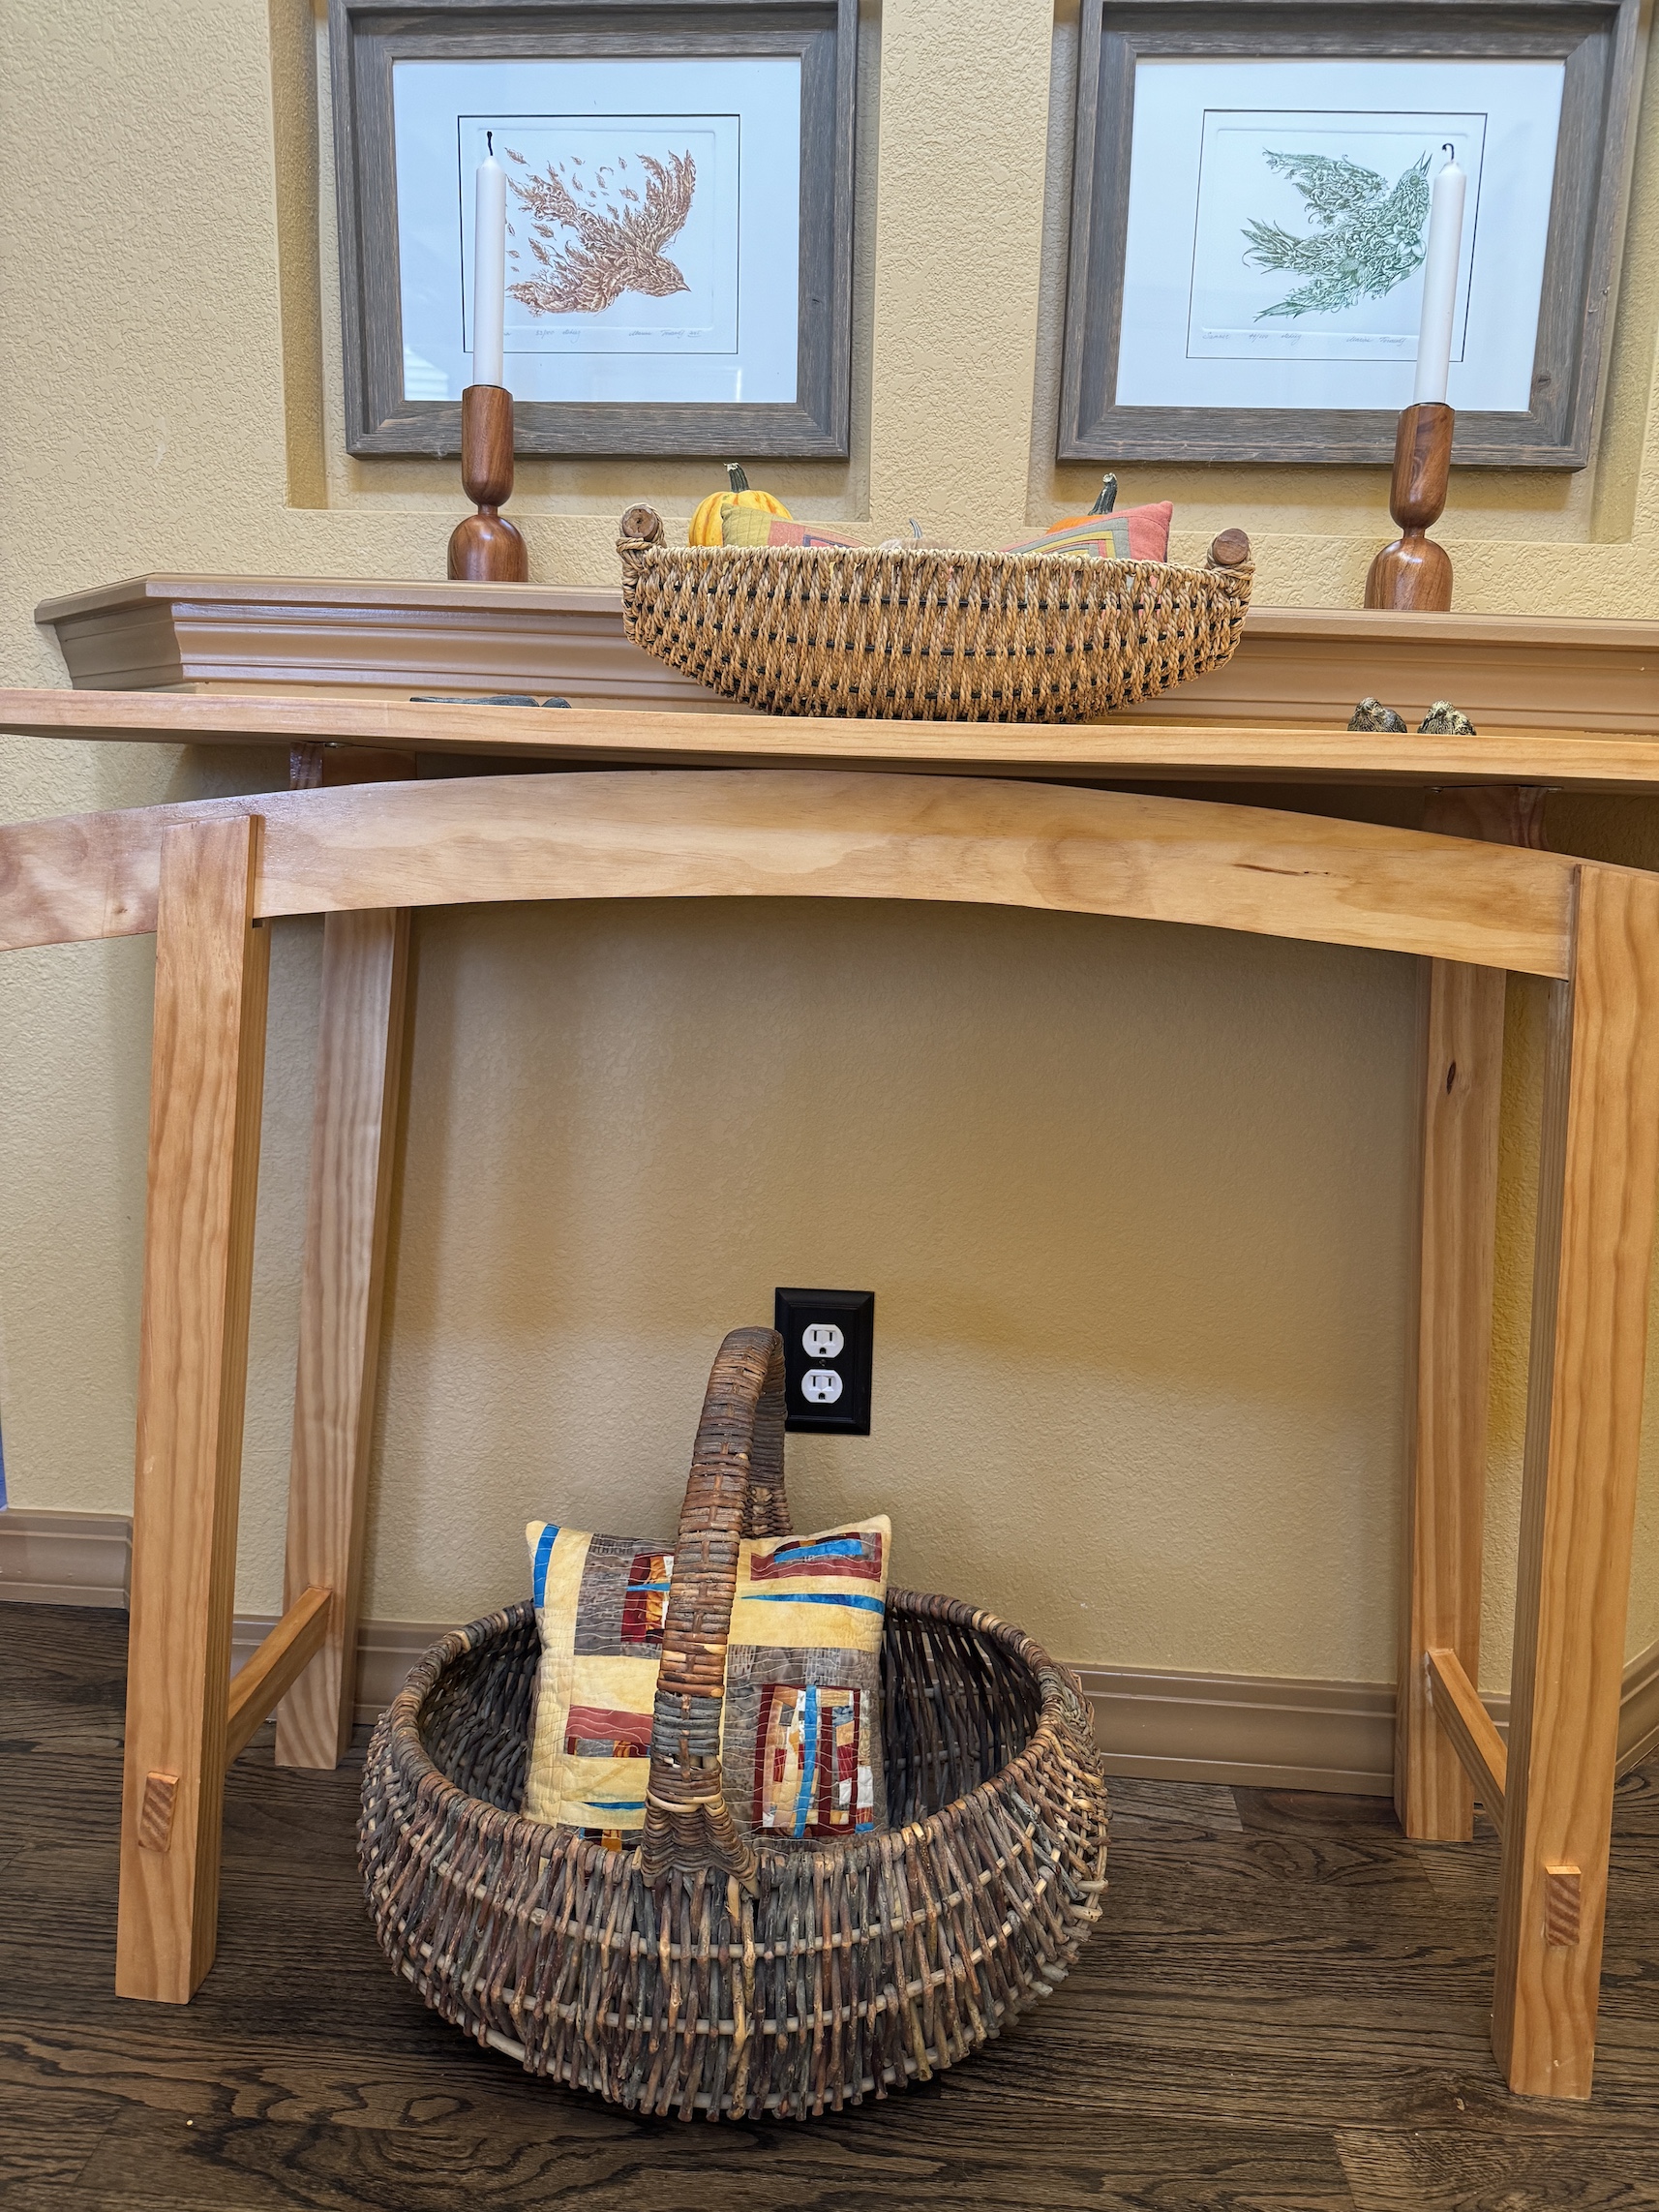
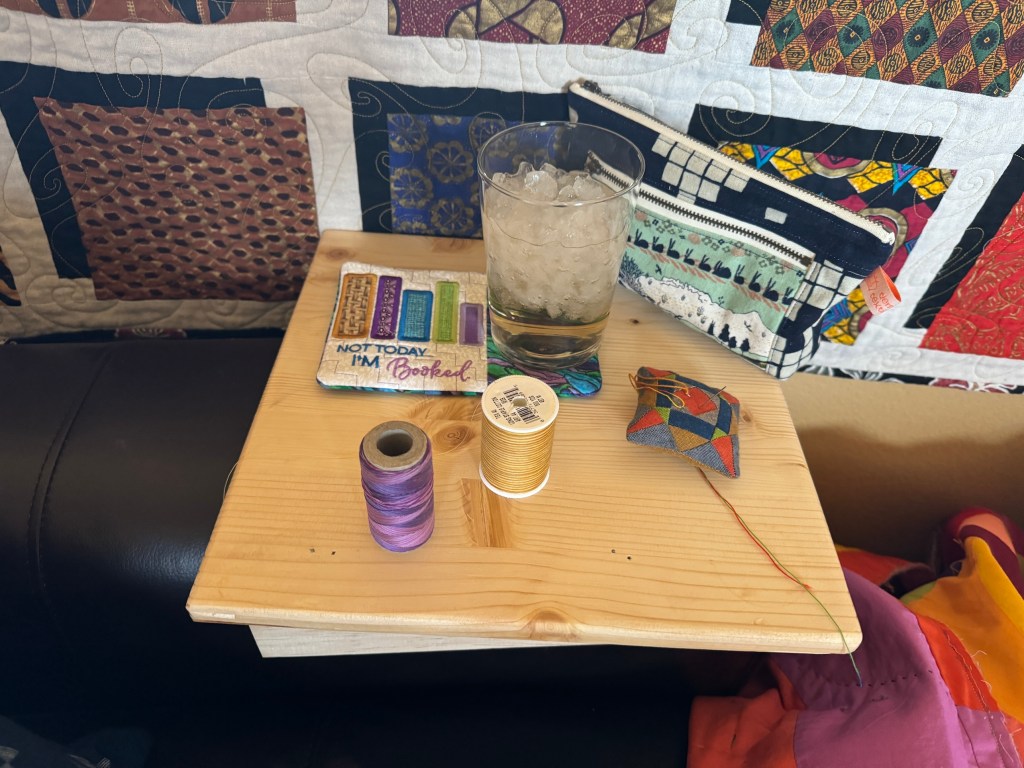
Oh and back to the pillow – for now I am keeping the pillow in the basket in the entry to our home in a basket under a table John built (see post From the Woodshop: Floating Top Hall Table).
Postscript
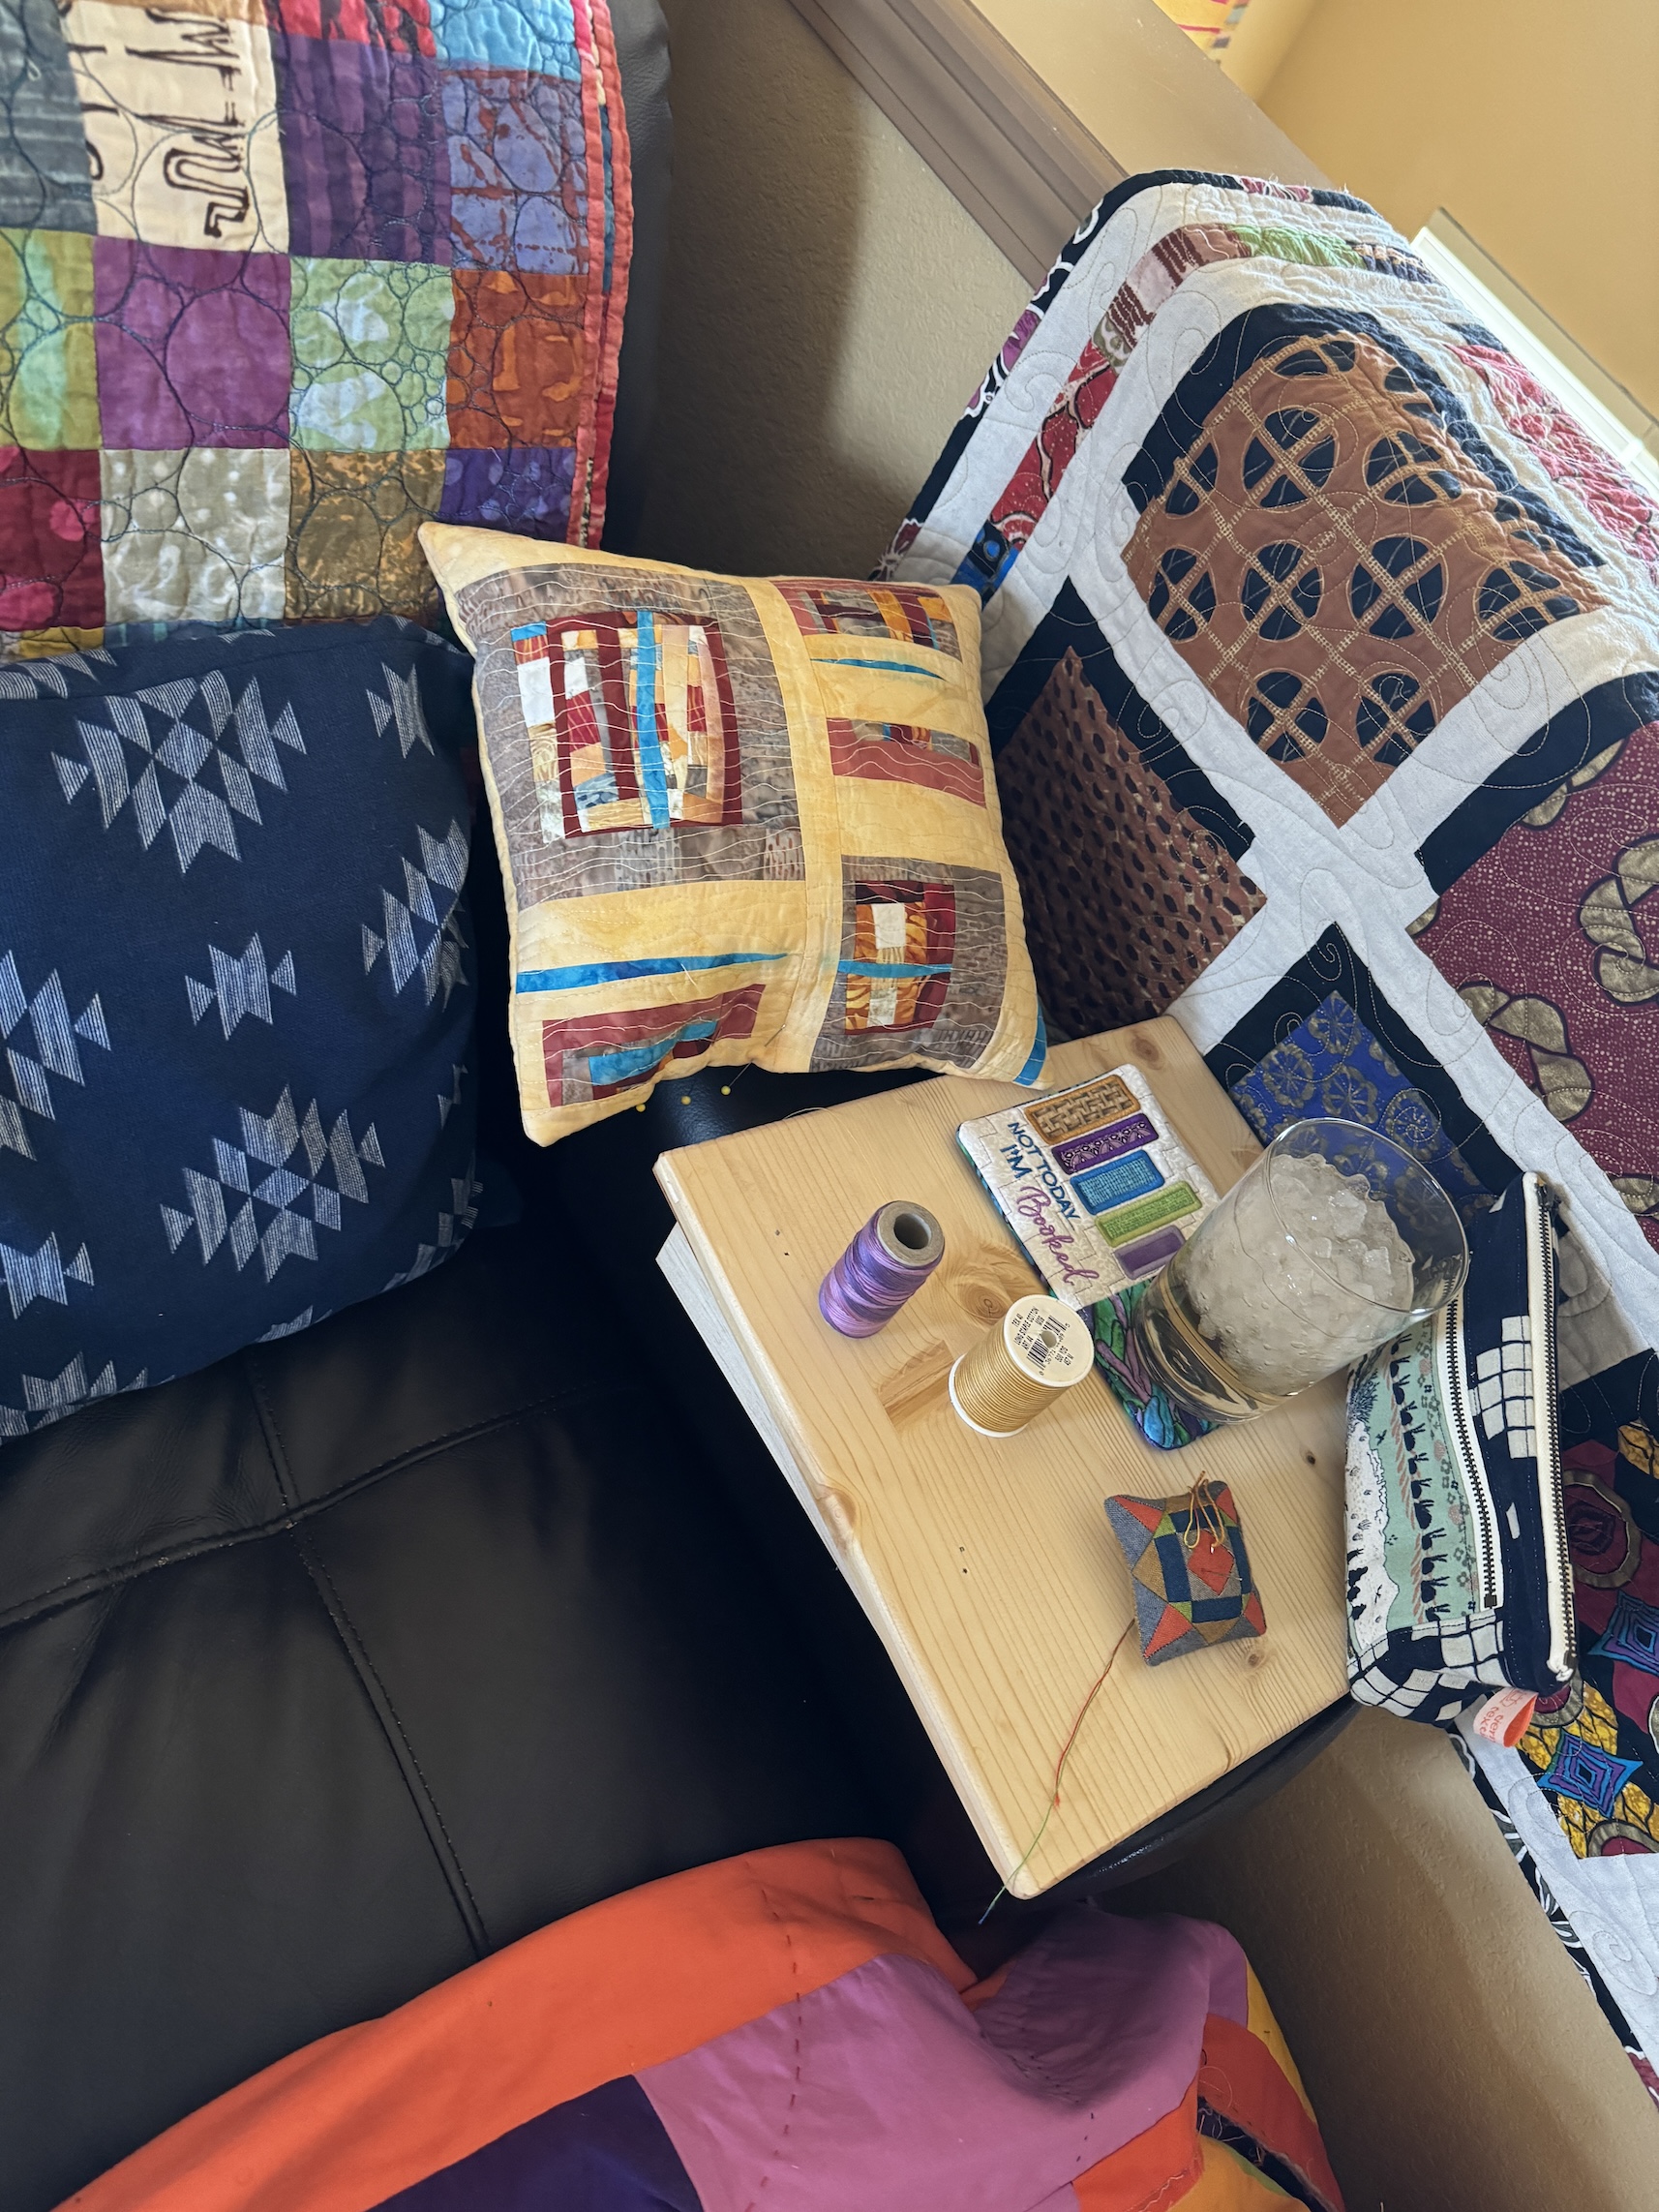
We had a chair at the top of the top floor stairs landing that I like to sit in and stitch. The other day John the Woodworker made me a little table to hang over on of the chair arms so I would have a table there.
It’s the 15th of the month and time for my monthly “ScrapHappy” post as part of the ScrapHappy group I belong. At the end of this post I have a link to the other blogs participating in this monthly event in case you’d like to check out their ScrapHappy posts.
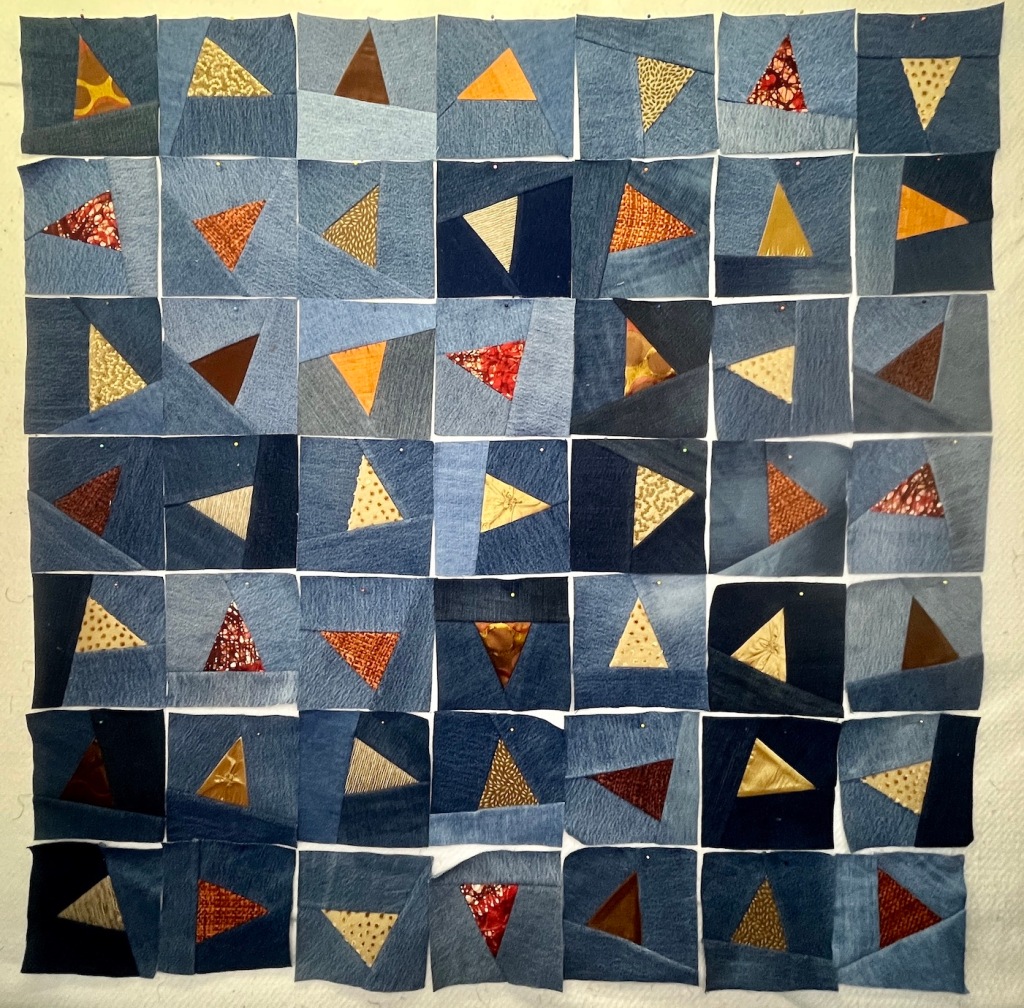
I’ve completed 51 blocks piecing recycled denim/jeans and home decor fabric scraps; and I put 49 of them in a 7 by 7 square so you could see a sample of a layout:
Yes I couldn’t decide which photo to use so I included all three!
I want the piece to be sort of large, and definitely square and I’ve decided to make a total of 81 blocks for a 9 by 9 square piece. I might hand quilt it, I haven’t decided but I am going to try some sample designs with scrap denim to see how the stitching would look.
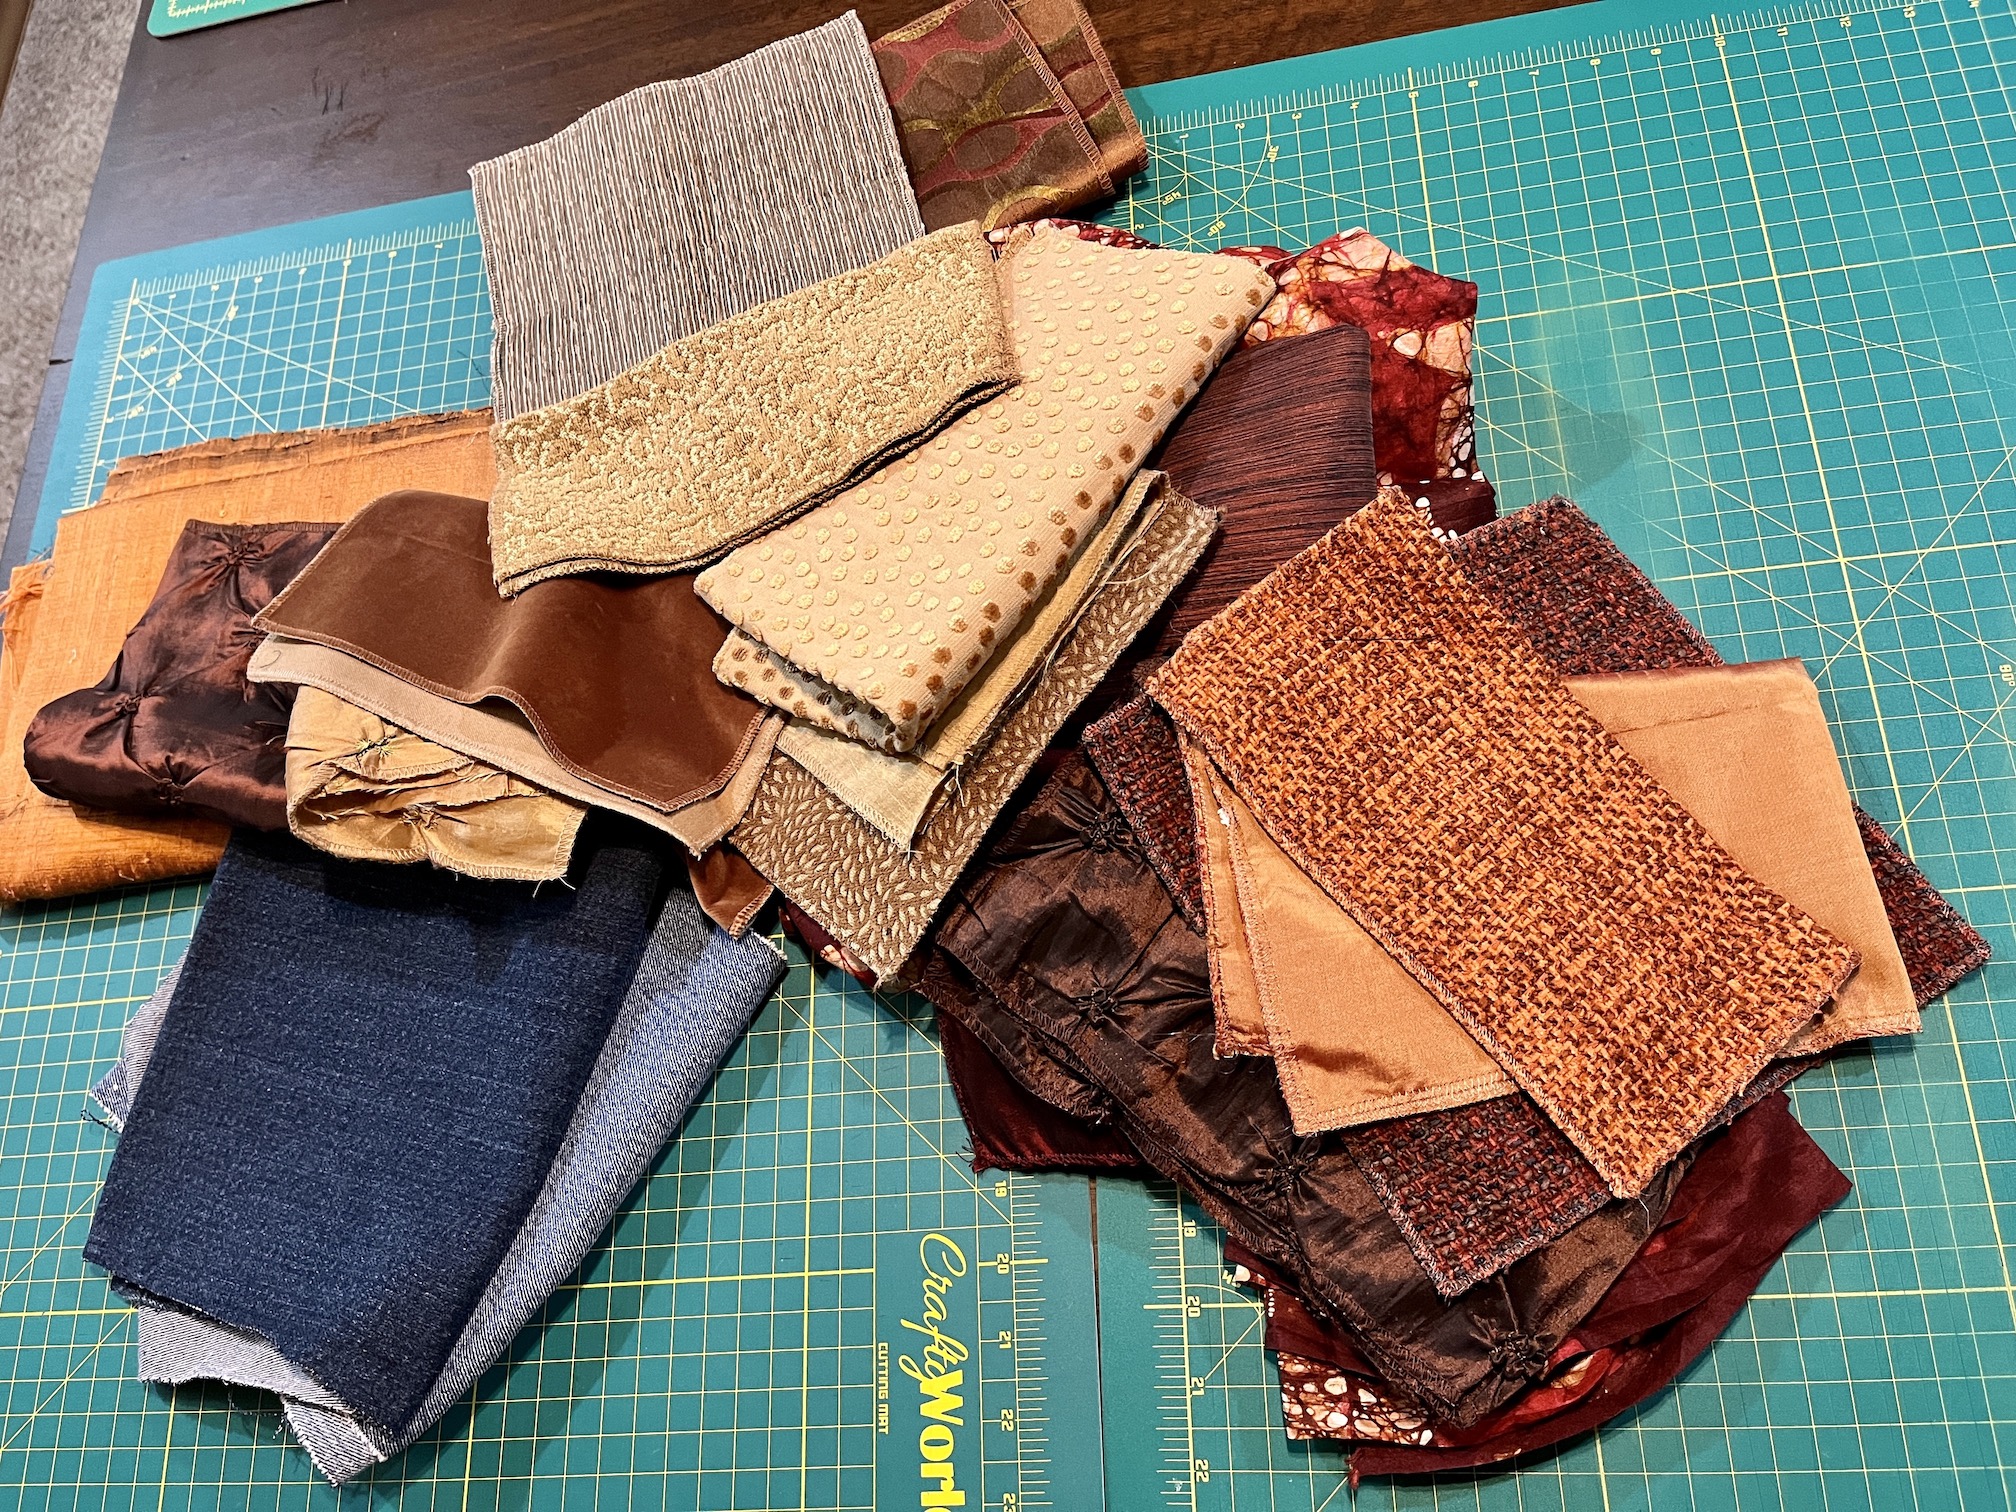
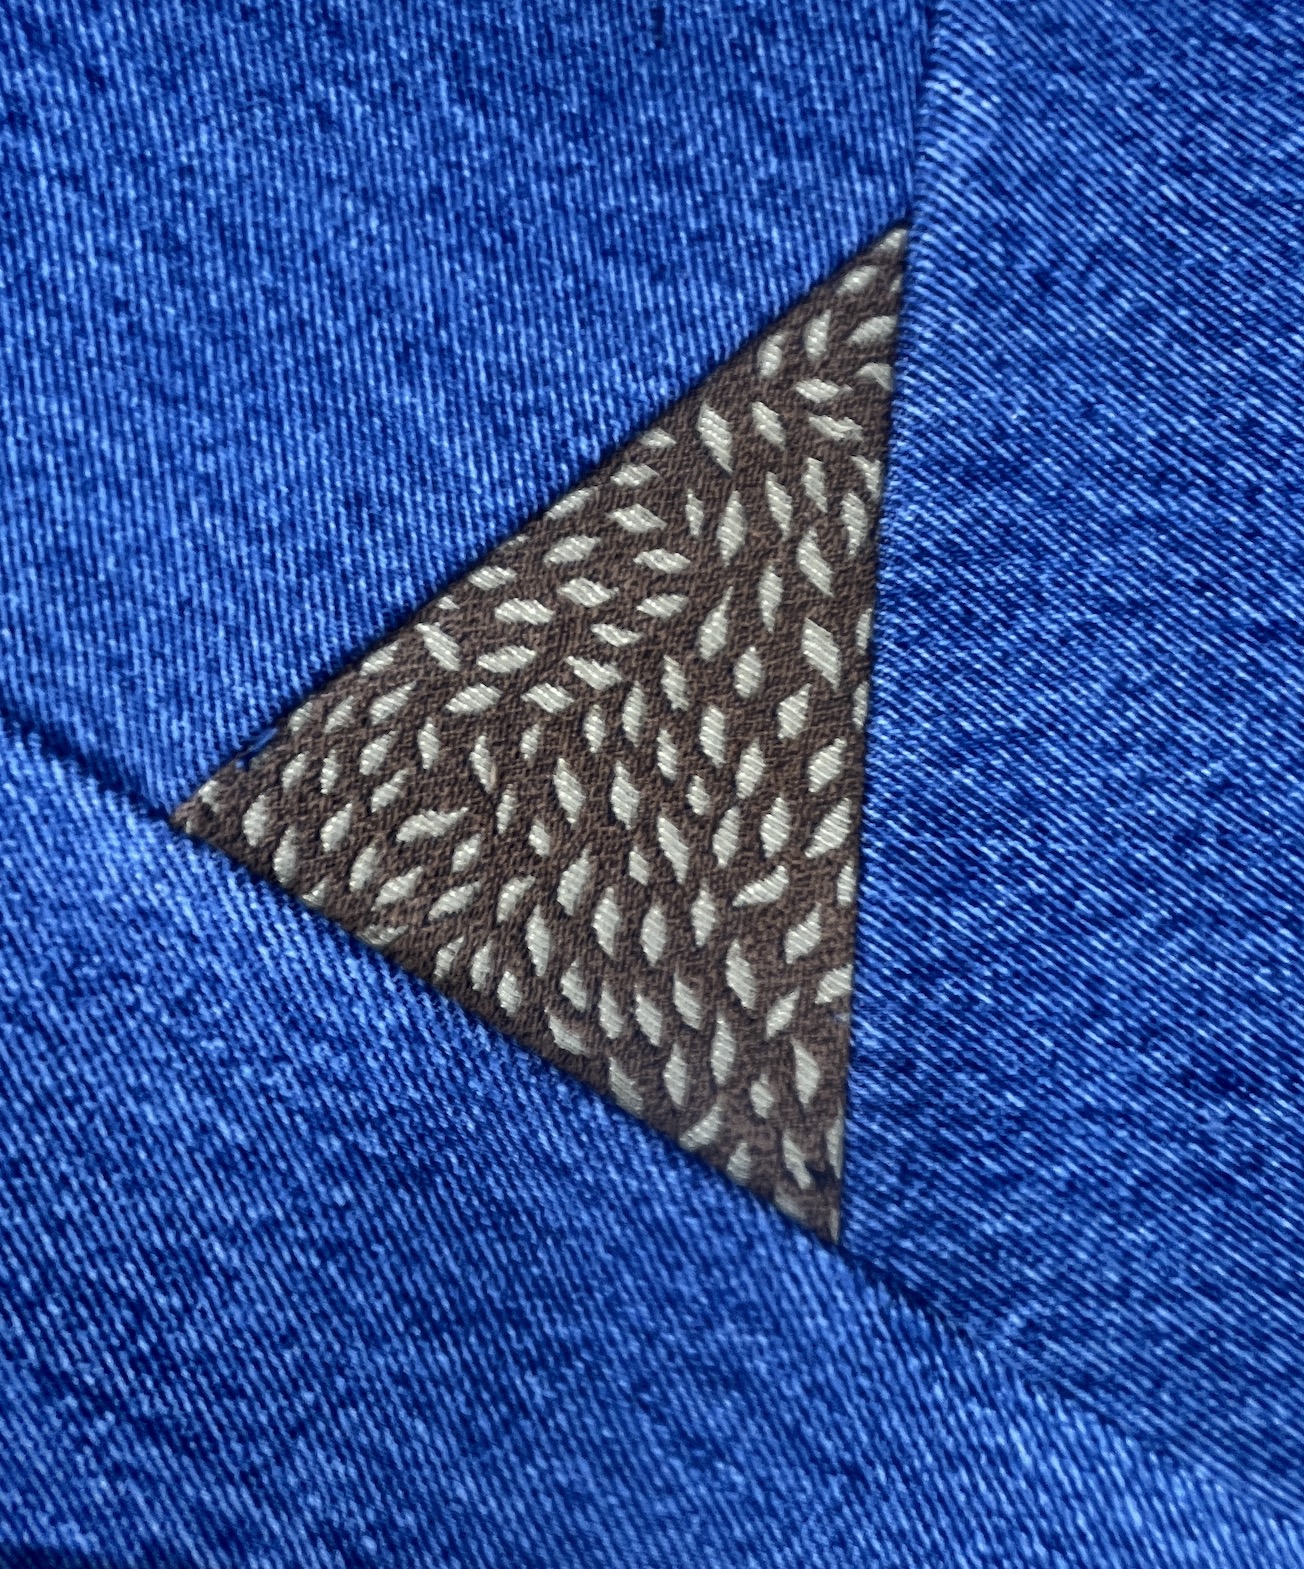
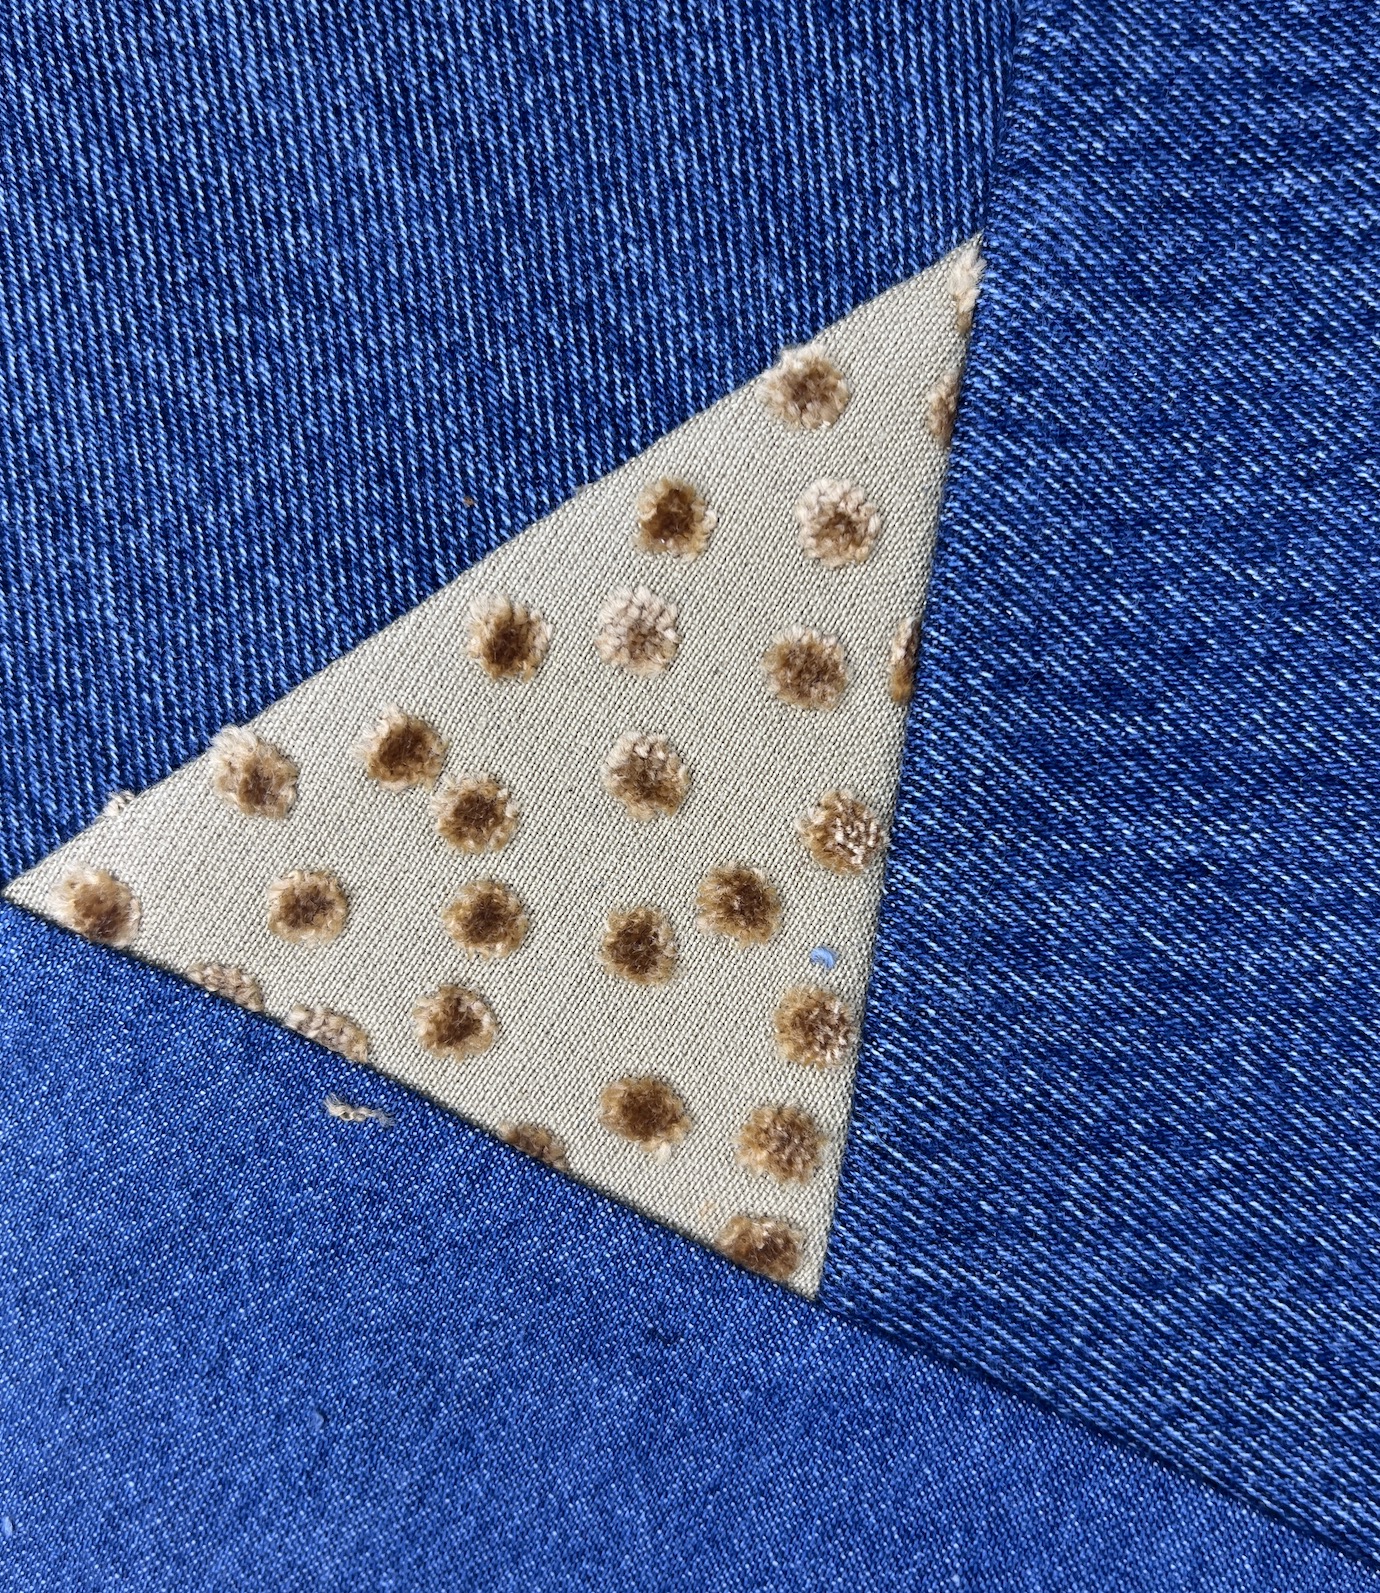
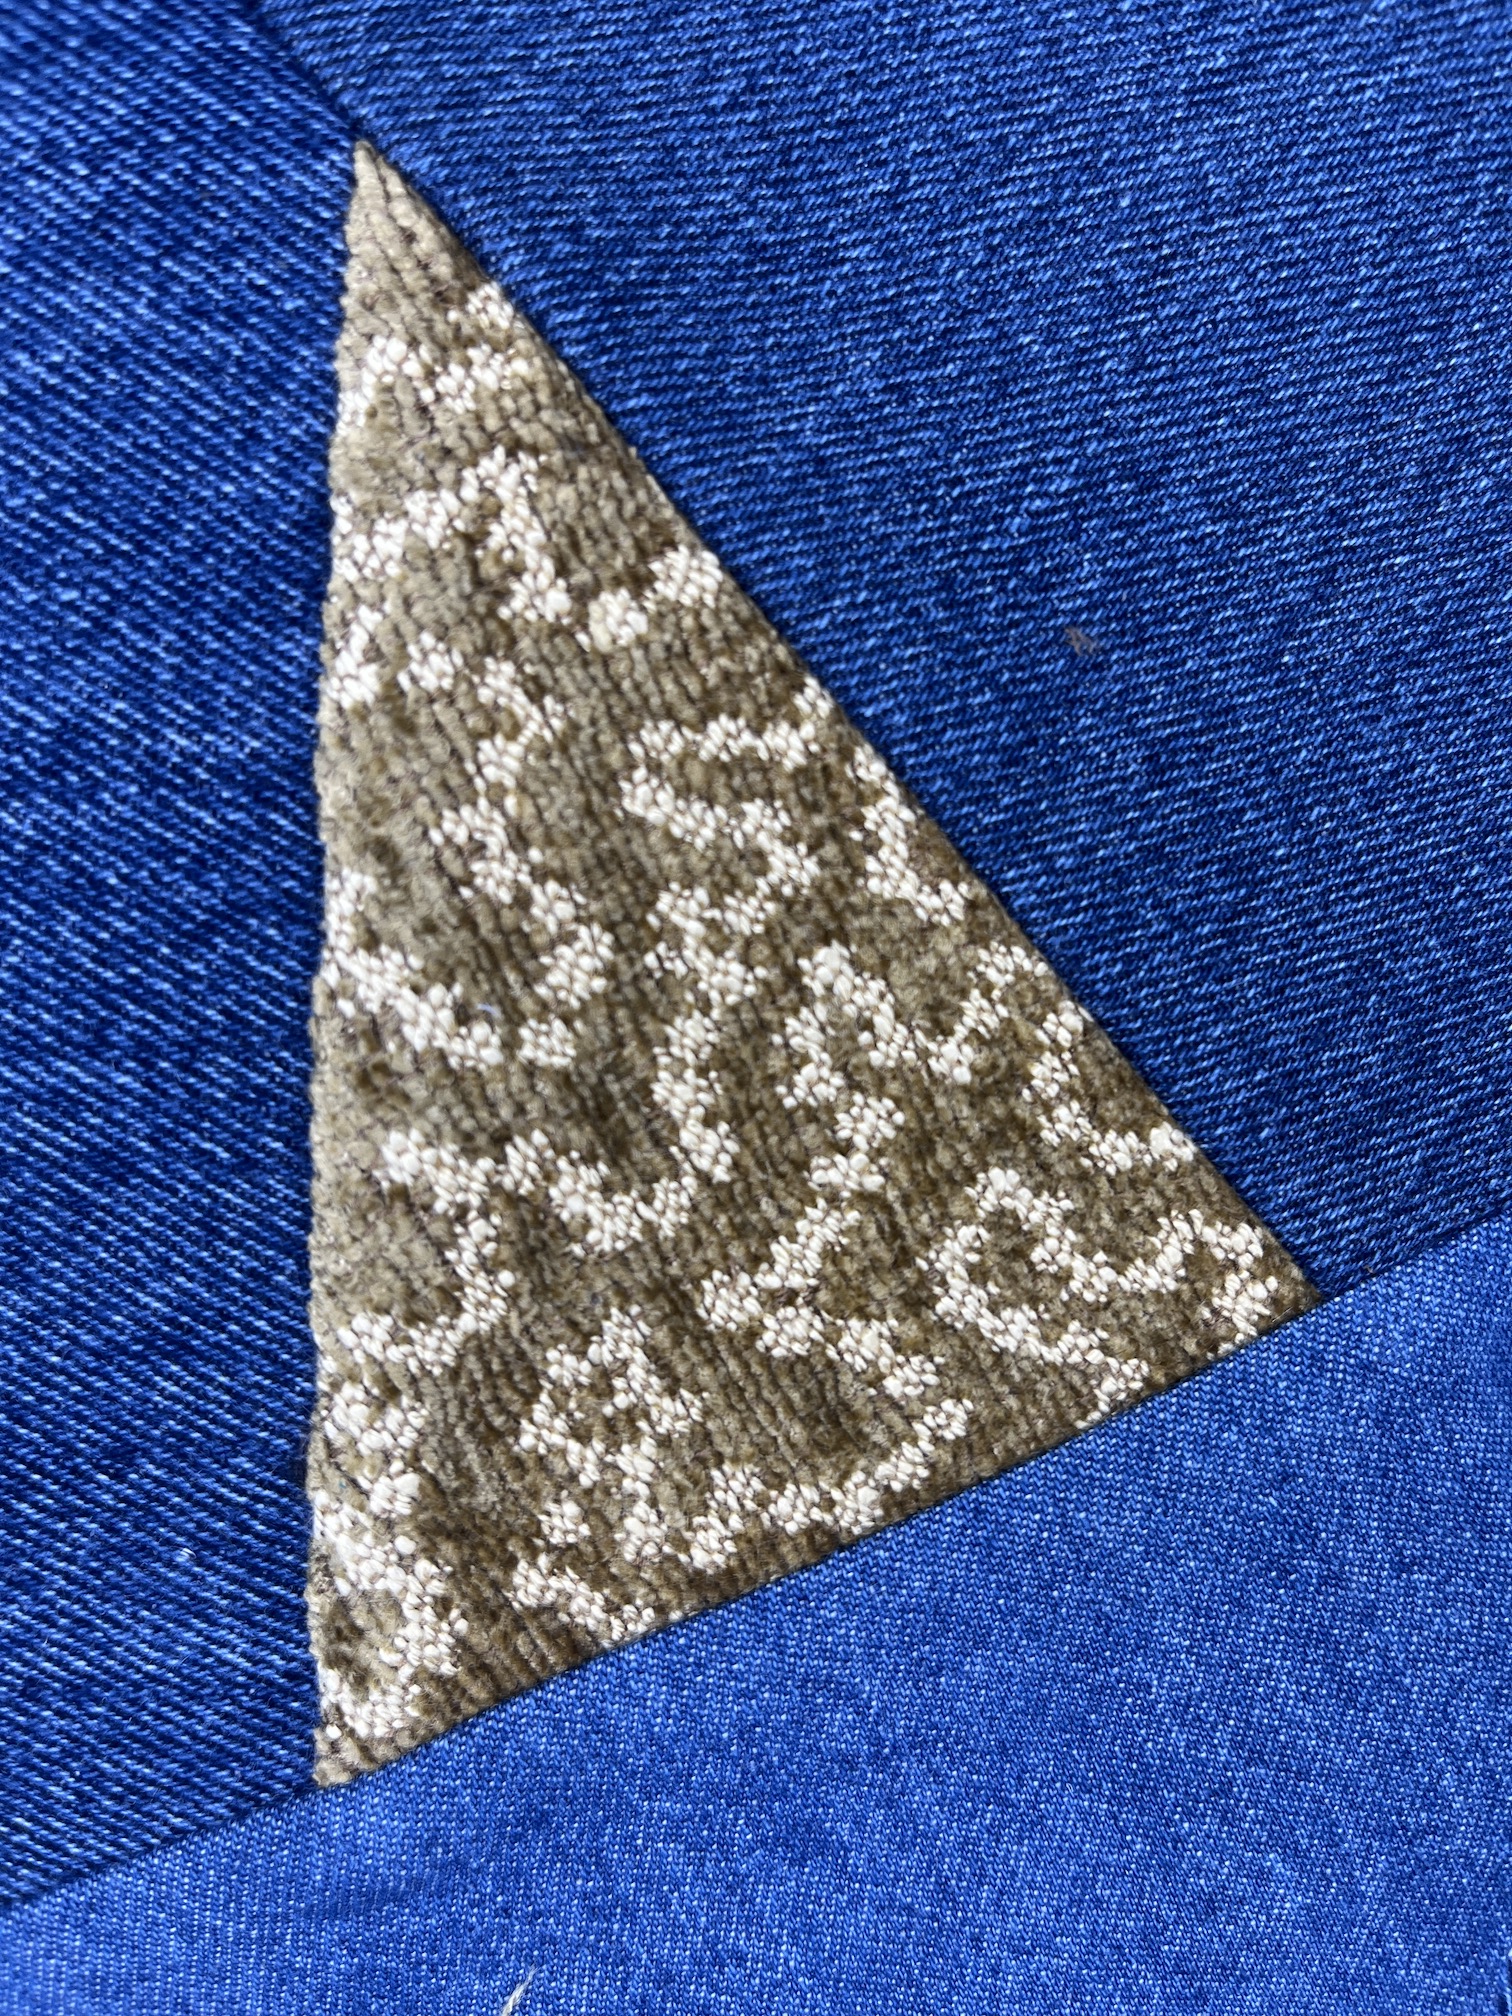
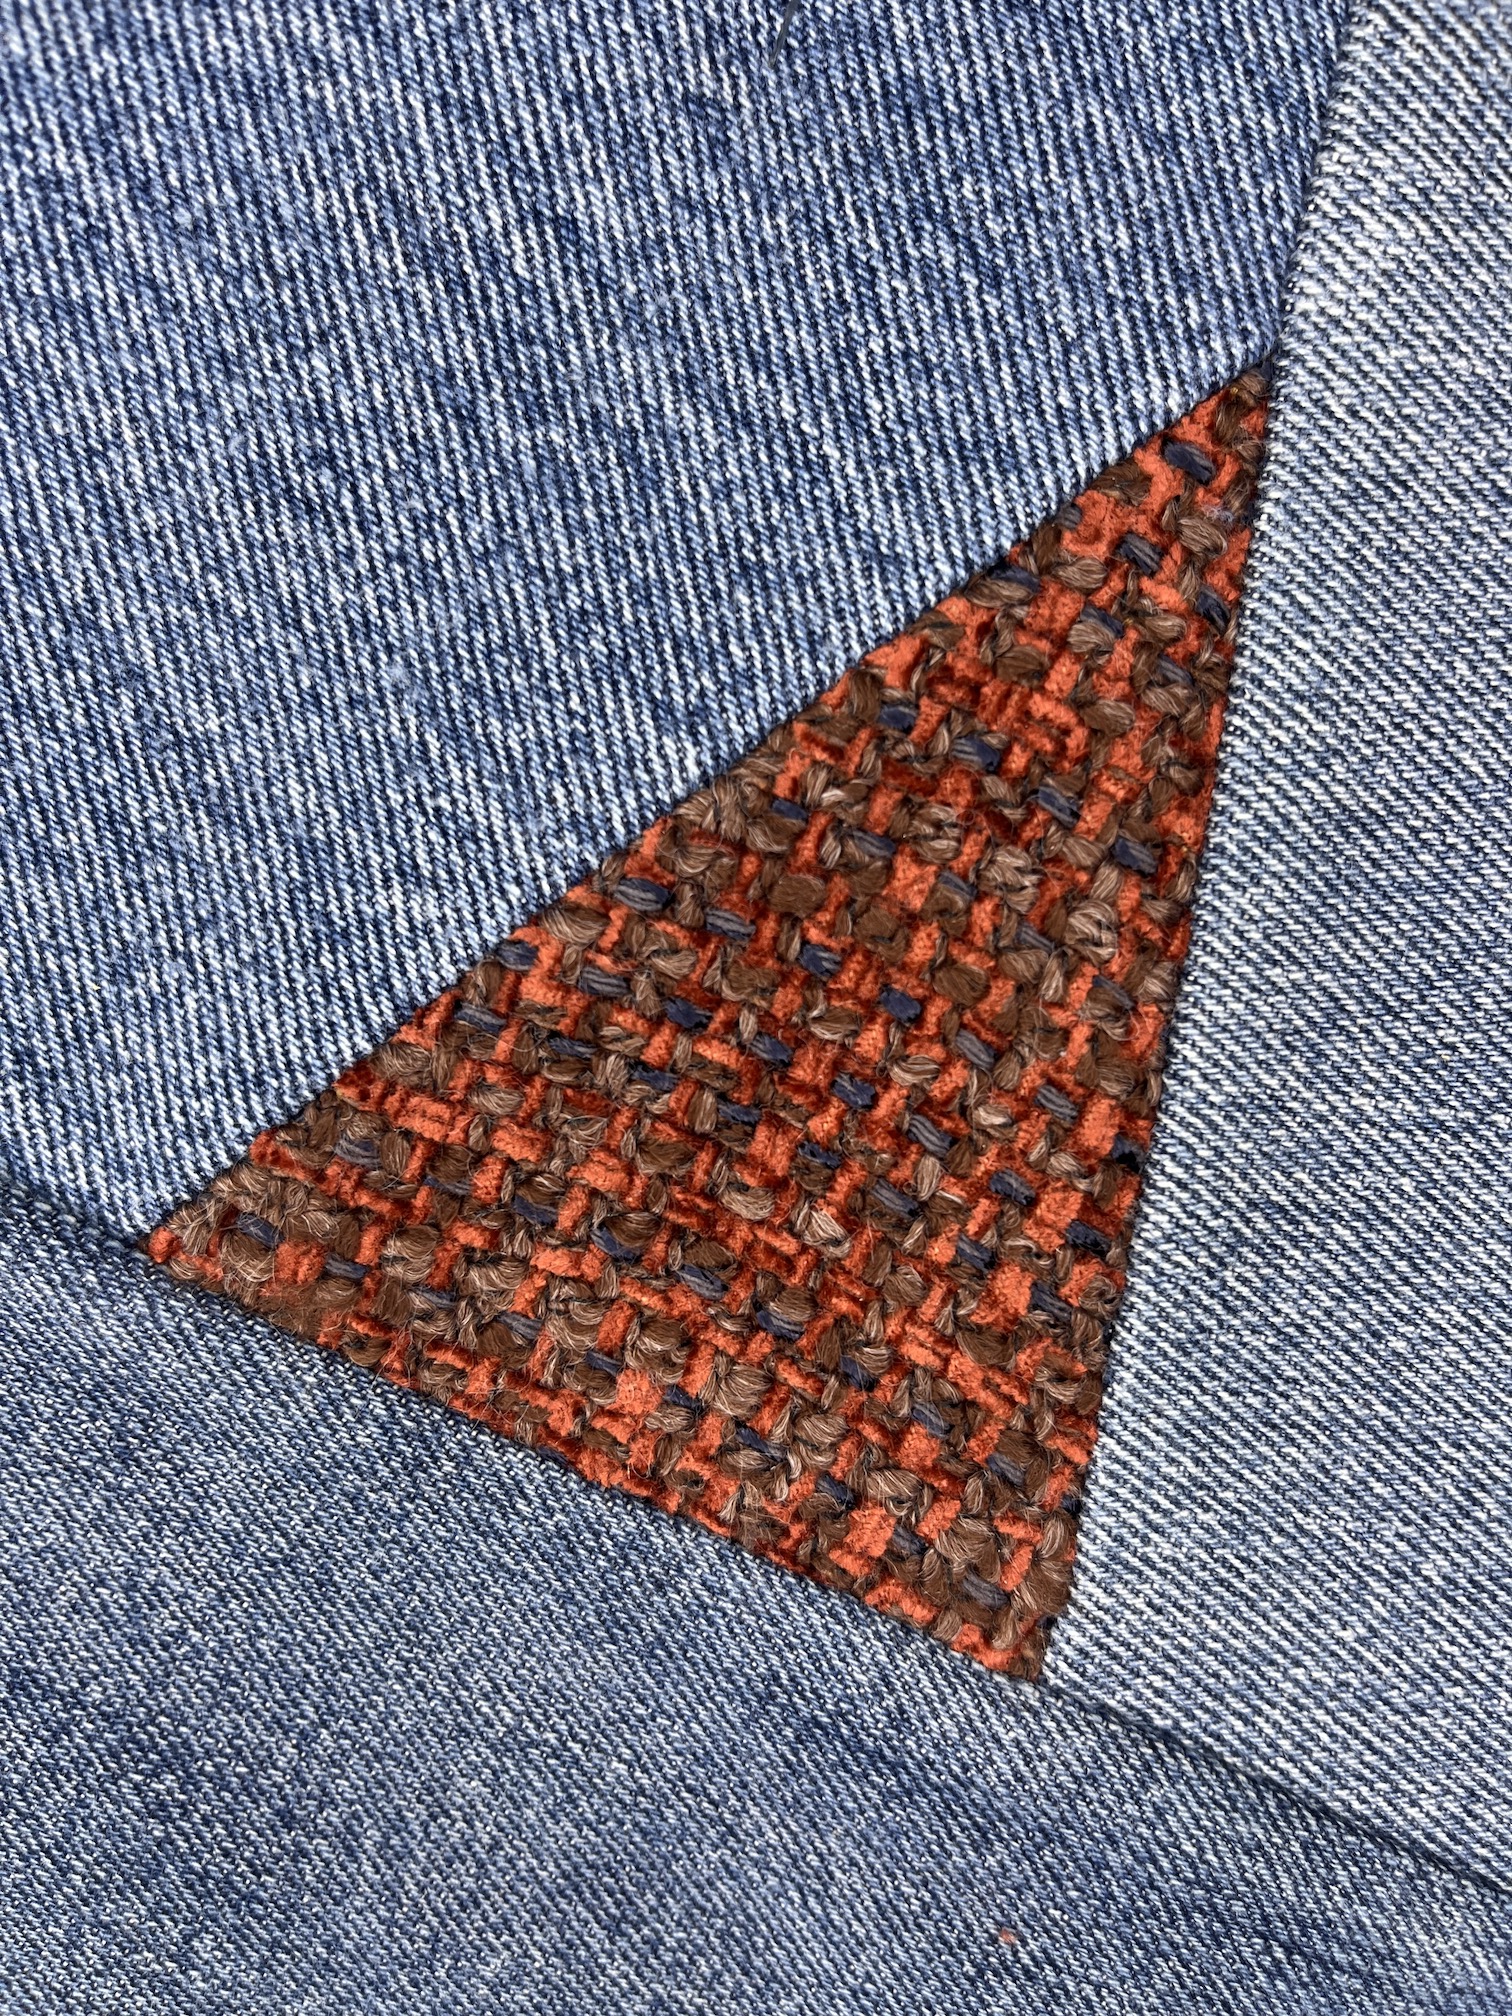
There is going to be lot texture in this quilt, primarily from the recycled home decorating fabric samples I used:
Here is a collection of close up blocks to show you the textures:
There are more fabrics I haven’t cut yet that I will be adding/using for the additional 30 blocks I need to make.
The layout you see on my design wall is not the final layout, just a sample layout. When I finish all the blocks and go to layout the quilt, I realized I need to pay attention to secondary patterns that I might want in the piece.
For example I noticed this secondary pattern, from how the blocks lay together, in one of the sections on the design wall and I like it:
I want to make sure the final layout has a lot of “movement” in it.
My tentative name for this piece is What Direction Do I Go?
It is a deeply personal piece, inspired by my first recycled fabric random triangle piece Flying Triangles (2012); but about my struggles for the past 5 years since becoming a widow, selling my beloved house, moving to Colorado (leaving all I knew there), starting the 2nd relationship in my life, quitting my job, trying to focus on textile art, etc. (Yes I like to lump a lot of life changes and drama into one time period, ha!).
It should prove to be an interesting Artist Statement on the piece when I am ready to write it (not until the piece is done of course).
And you thought it was just some recycled denim and home decor fabric sewn together (wink).
As promised, here are the bloggers that participate in the ScrapHappy monthly posting event, check out their blogs linked below for their ScrapHappy posts:
This post is not about starting a specific art quilt* (though I will share an art quilt I am in the progress of making), it about a little of the process I use to design a new art quilt.
*When I use the term “art quilt” I mean a quilt using an original design that you design/create; not based on an existing pattern (though a pattern could inspire it); and either improvisational or based on a specific idea/concept/photo that inspired the quilt.
What do you find successful when you are creating a design?
What is one thing you do that helps you focus and get rid of all the noise and clutter that come with color, design, prints, etc.?
There are so many complicated variables (in making an art quilt), how do you start?
I let her know I would answer her questions in a blog post in case anyone else finds my musing interesting and possible useful. (And at the end of this blog post I am going to invite you all to weigh in with your answers, so start thinking about them now as you read mine!)
What do you find successful when you are creating a design?
THE MEMORY QUILT
What I find successful in creating a design is to sit down and write out my general concept and what I want to accomplish with this quilt. For example on the memory quilt I made my friend I wanted to 1) make a quilt from as many of her mother’s favorite clothes that I could; 2) make something that feels like it is a hug from her late mother; 3) try and use some of the more challenging fabrics in the design.
In writing out my general concept, I consulted some traditional quilting books for ideas. I did not want to make it “improvisational” with a lot of little pieces placed randomly (or in a format such as a free form log cabin). I wanted it to have some defined structure.
During my research (looking through my collection of quilting books) I found a pattern that had hearts appliquéd over plaid (via four patches) squares. I thought – “yes that is it!” – the hearts could represent love from her late mother; and the plaid design (four patches) was doable with the challenging fabrics I needed to work with (like velour, a polyester scarf, etc.).
MY CURRENT ART QUILT IN PROGRESS
Recently I’ve started a new art quilt for a special show I am hoping to get into. It would be my first international show. I’ve been invited to submit a quilt for it but it has to be acceptable for the exhibit in order to make it into it. That’s all the details I’ll provide on the reason for the quilt for now, but more to come in the future.
My art journal where I sketch out ideas, I made a cover for it to make it special
Ideas about the quilt are not just focused on how the finished quilt might look. They are also about what I’d like a viewer of the quilt to see, experience, think about, etc. What feelings and thoughts so I want to evoke when someone looks at the quilt? What do I want the quilt to say (or try to say). What is the theme of the art quilt, what is it about. I might also start to write a draft Artist Statement for the quilt to really get me thinking what I want the quilt to “say”. See my little “side bar” below for more discussion on this concept.
*** SIDE BAR ***
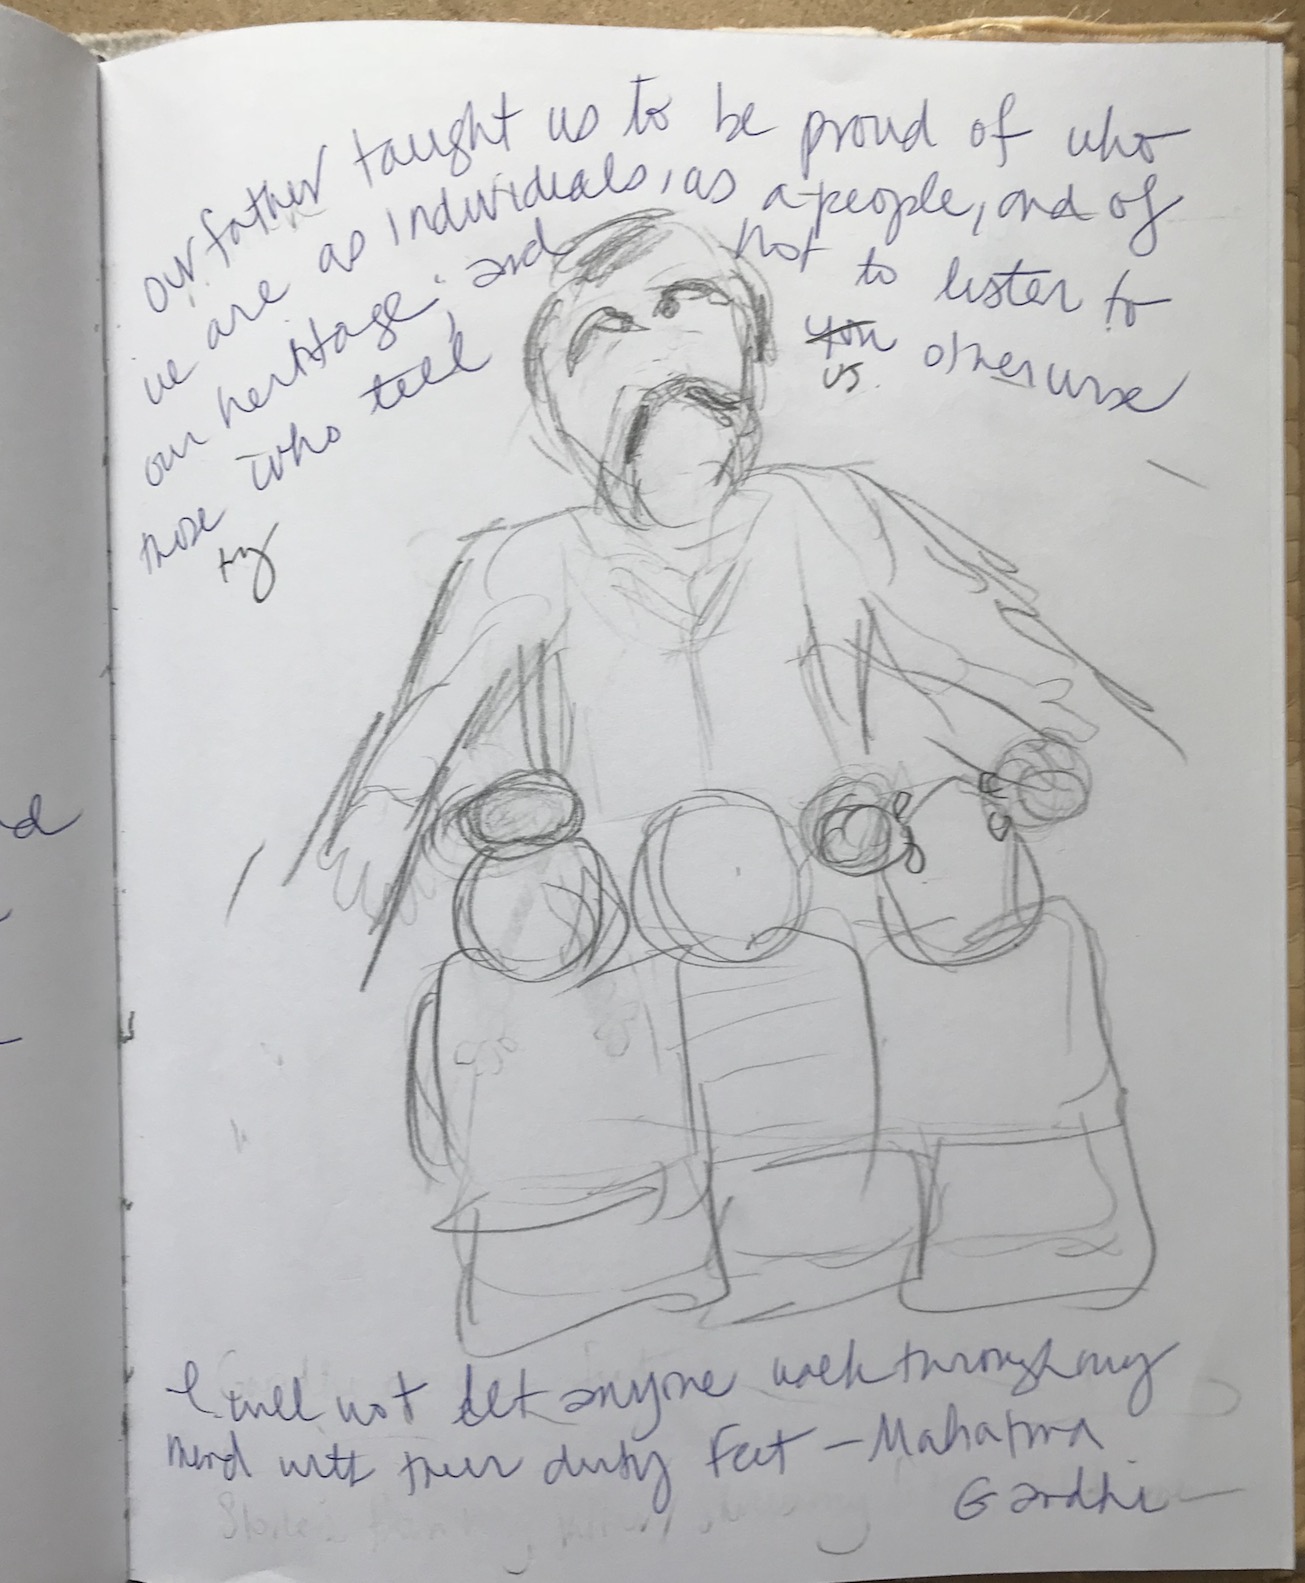
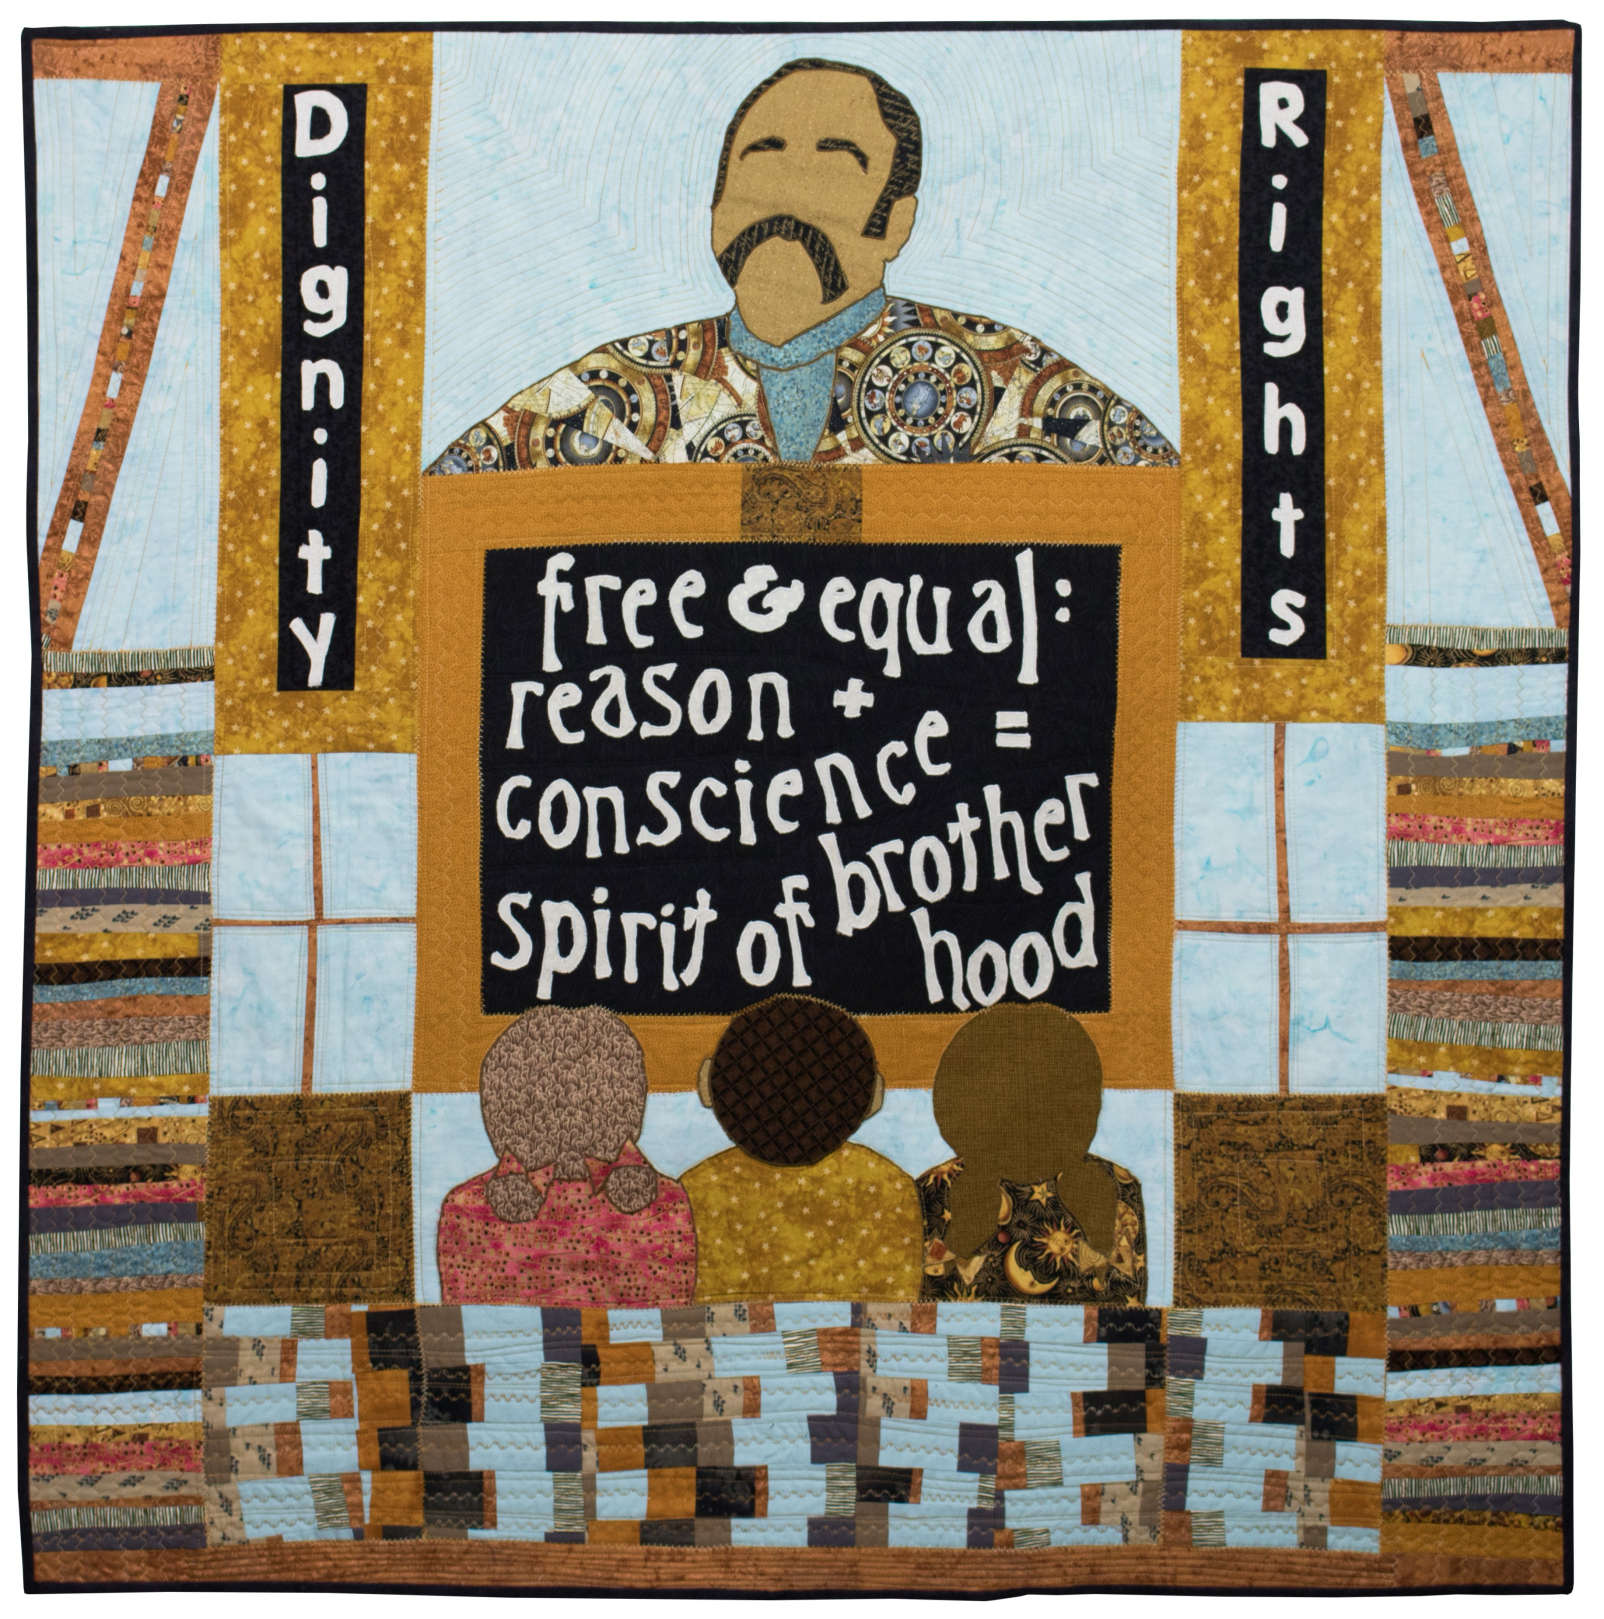
For example, all of quilts I’ve made for the Women of Color Quilting Network (WCQN) shows that I’ve been in had specific themes so I had a starting point. I knew what the quilt needed to in general “be about”and from there I had to narrow it down to what I wanted to share about that topic. Example below with the quilt I did for the WCQN show “Visioning Human Rights in the New Millennium: Quilting the World’s Conscience“ which was inspired by the U.N. Universal Declaration of Human Rights. I was assigned (actually I got to select which Article from the Declaration I wanted to use) Article I: All human beings are born free and equal in dignity and rights. They are endowed with reason and conscience and should act towards one another in a spirit of brotherhood.”
So that was my starting point. I knew what I needed to portray in the quilt, I just had to figure out how to get there.
Here is an early sketch from my journal as I was working on the quilt:
And here is the completed quilt:
I am not sure how to put in to words how I got from the sketch to the completed quilt but it was through trial and error, and lots of experimentation. But I knew I wanted it to be a classroom with a person who looked like my father in the 1970s teaching because he was the one who taught my two siblings and myself the values in Article I. Also I come from a long line of teachers and I wanted to honor education/teaching.
If you know what you want to accomplish with the art quilt, then it helps you have a clearer vision.
Okay that the end of the side bar, so back to the current art quilt in progress….
This time the quilt was inspired by a collection of machine embroidered blocks a friend gave me years ago along with coordinating 10 inch x 10 inch sections of coordinating fabric; as well as a group of fabric printed “trees” I designed and printed years ago in a fabric ink printing class.
What I want to accomplish with this quilt I am still working out. I am thinking through whether I want it to be a deeply personal piece about grief based on the somber colors of the quilt and the tree images, or it if I want it to be more uplifting (or some blend of both).
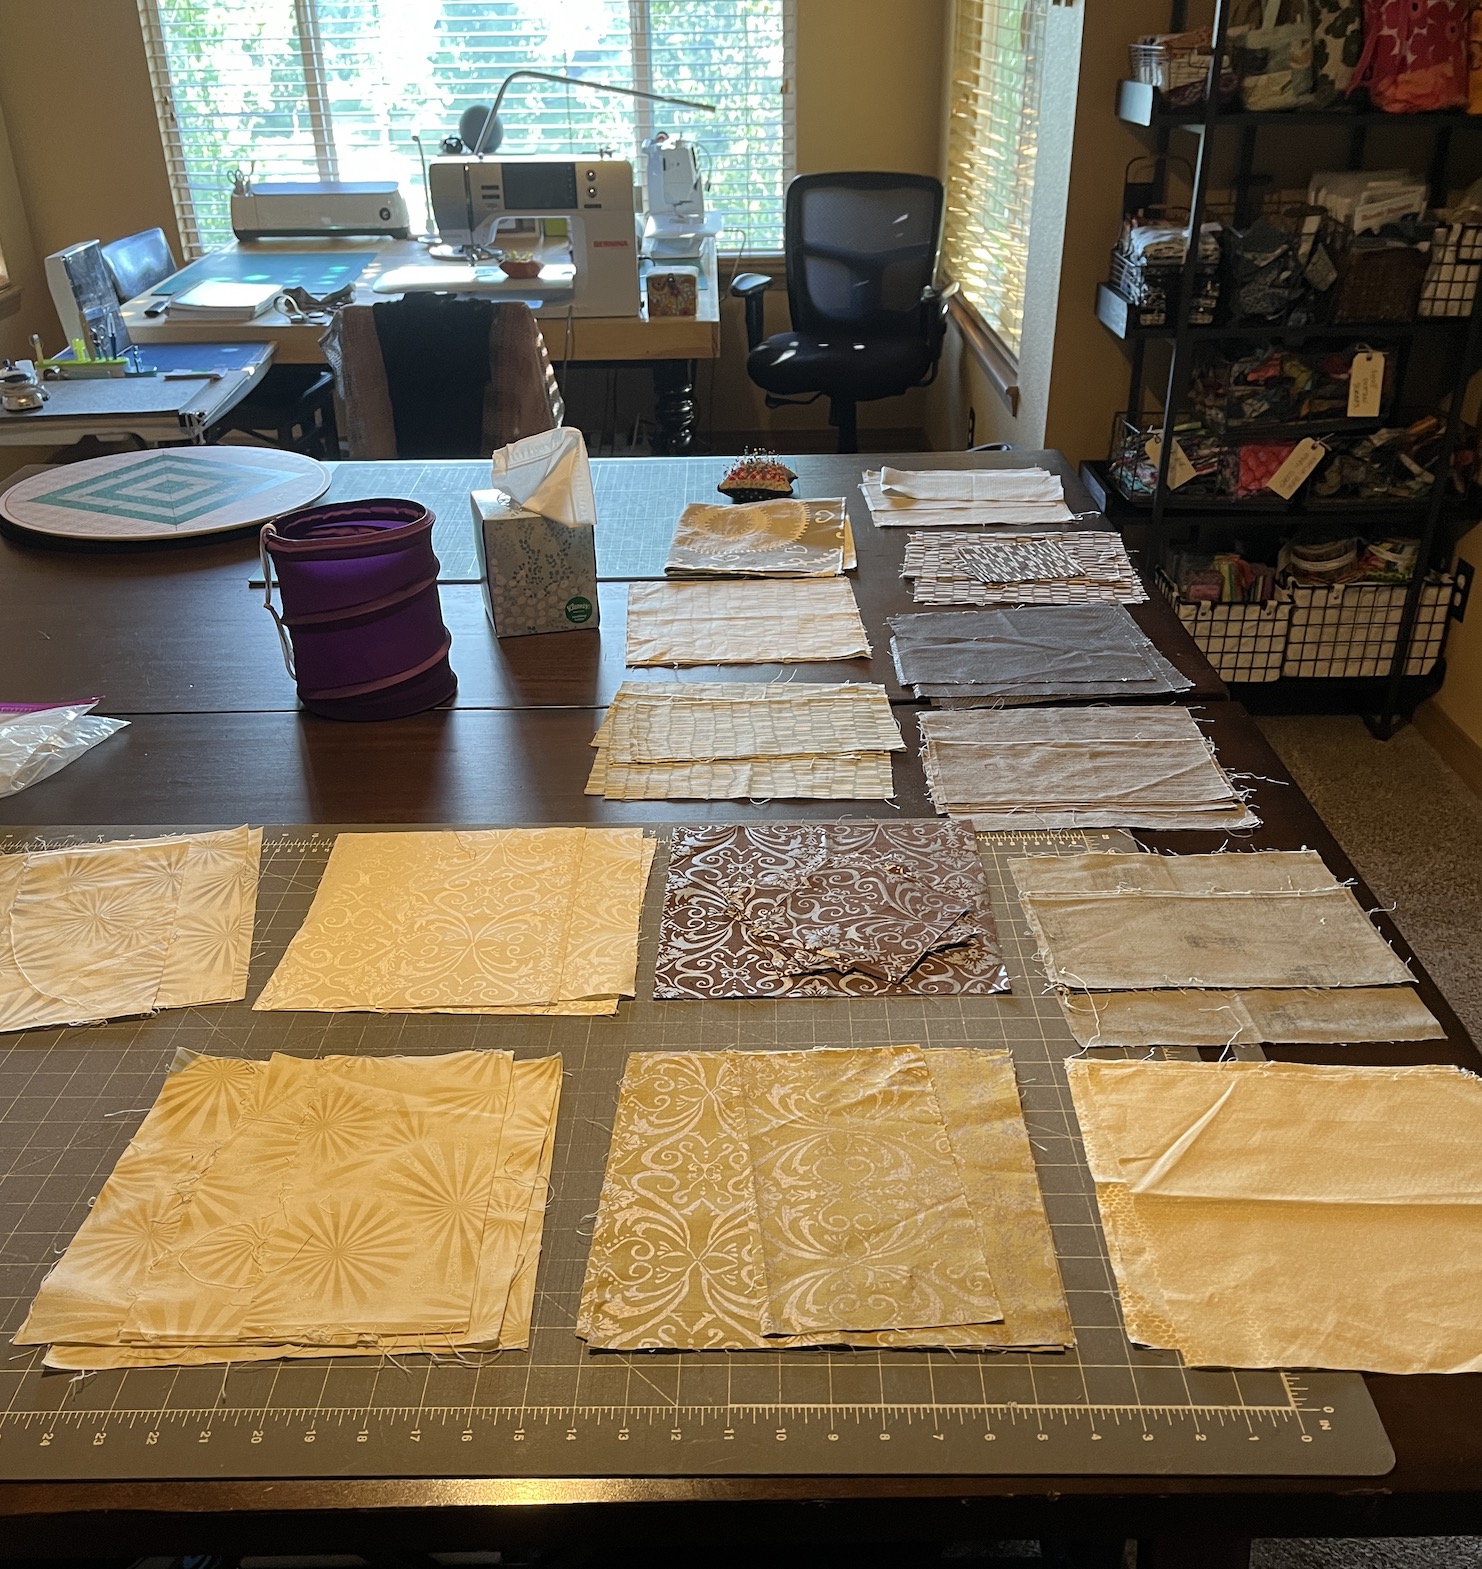
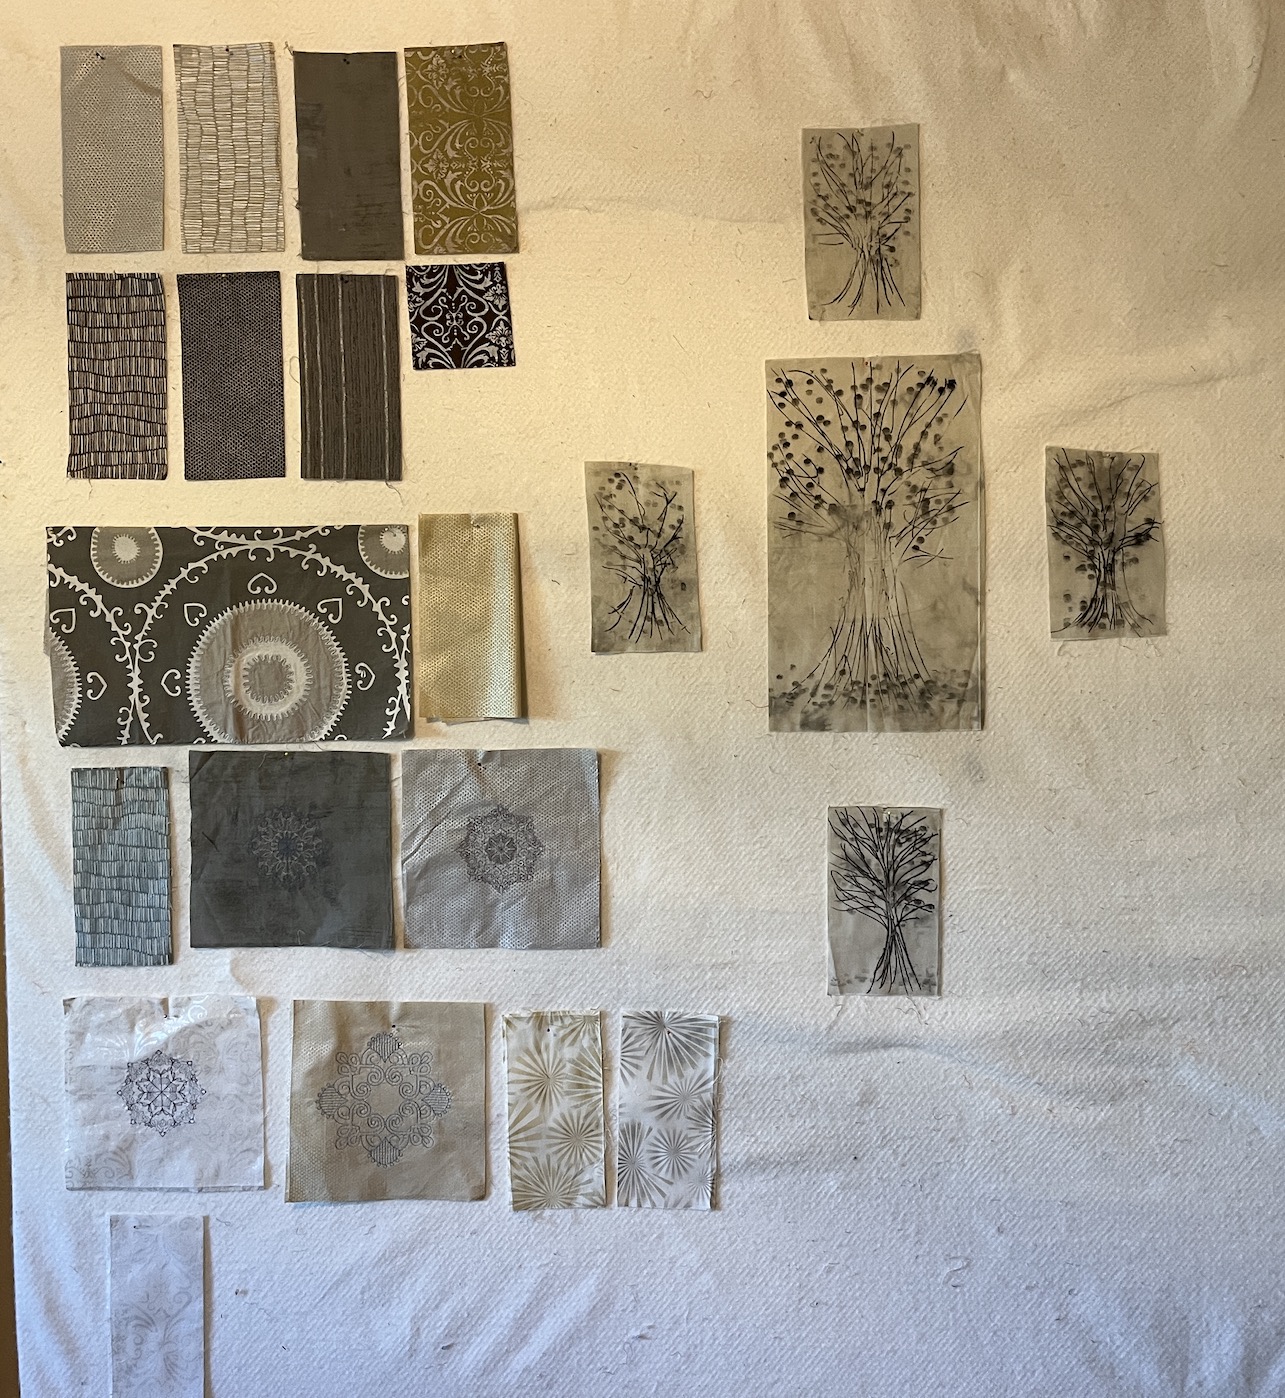
After I came up with my initial concept/idea/layout, I laid out all the fabrics I’d selected for the piece on my cutting table in my studio:
All the fabrics I am considering laid out on the table
Then I put up a sample of each fabric and the special blocks (the embroidered blocks and the printed trees) up on my studio’s design wall:
One of each laid out on the design wall
Having the fabrics up on the wall helped me think about addition and subtraction (what I need to add to the design as far as fabrics, and what I need to take away) and I decided not to use the gold tinged fabrics in my design. I decided to just stick with muted grays, browns and taupes.
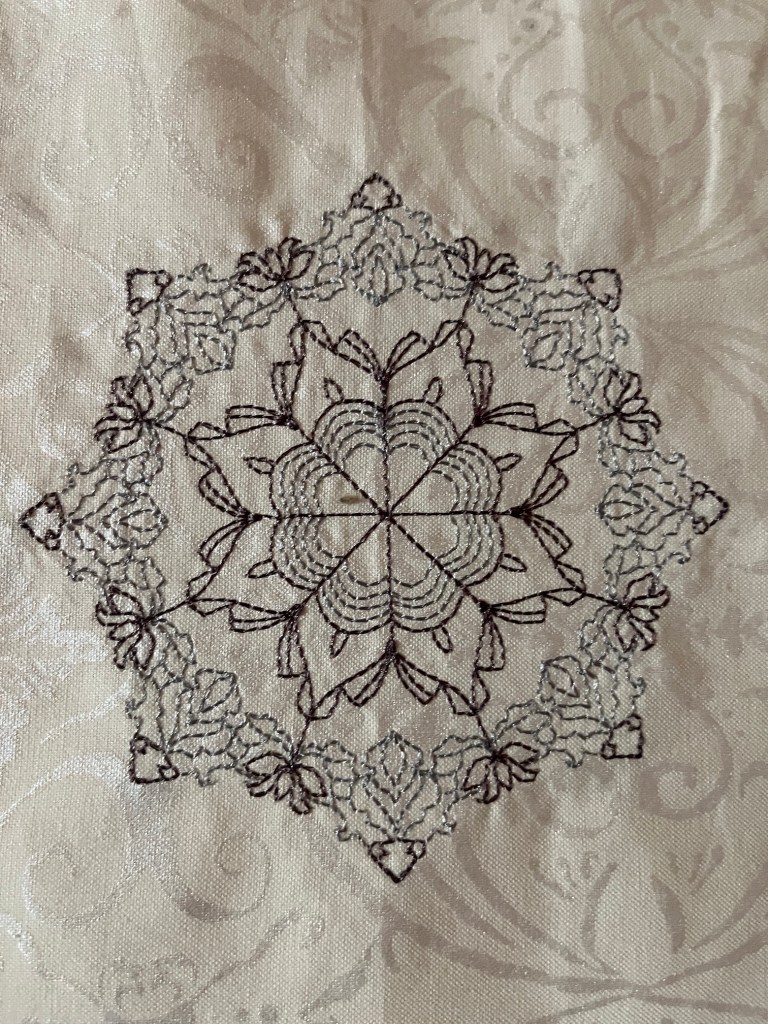
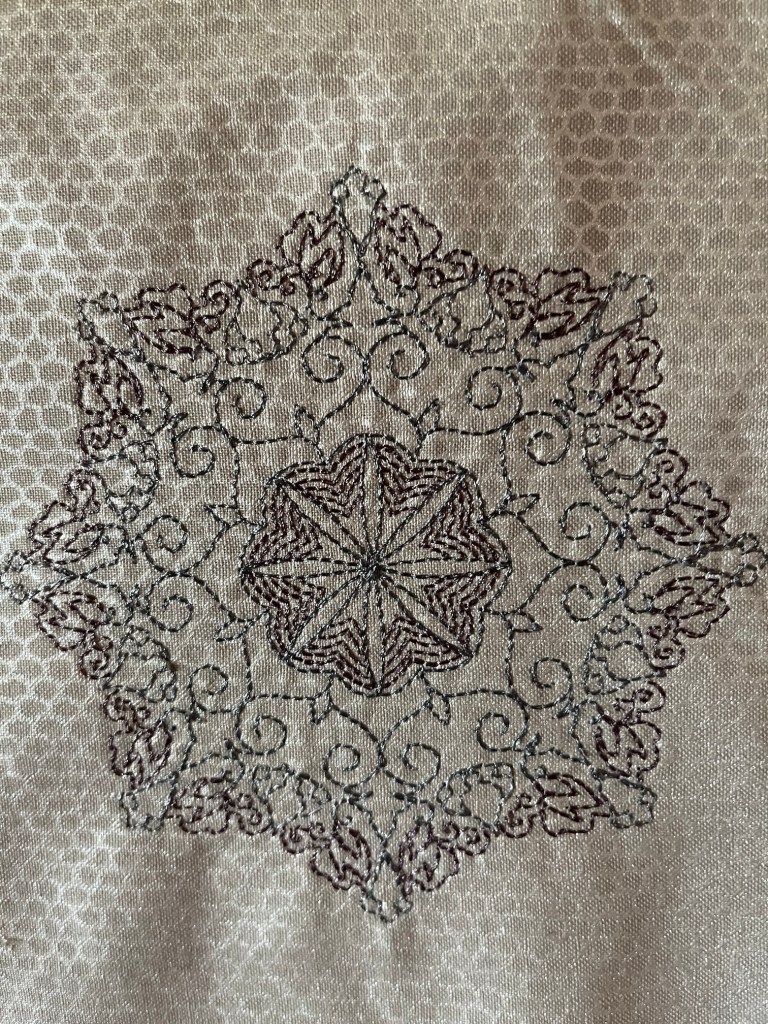
Here is a close up of some of the embroidered blocks I am using in the piece, one of the printed trees, and an example of the cool fabric my friend gave me:
If these fabrics looks familiar (and you’ve been following my blog a long time) I first shared them back in 2018 in a post called What’s Simmering on the Design Wall. But I abandoned the project as something else caught my attention (I guess I let it “simmer” too long and the inspiration evaporated away!).
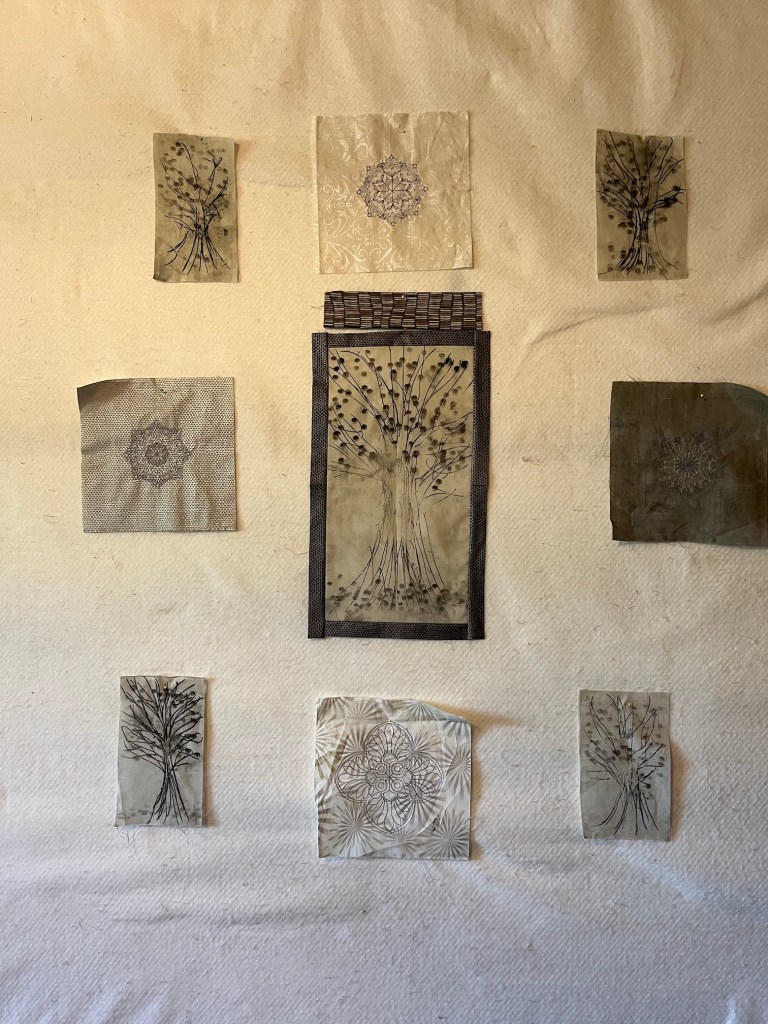
Here I am with the quilt design right now – I am thinking of a medallion quilt layout…
Okay time to move on to the next question…
What is one thing you do that helps you focus and get rid of all the noise and clutter that come with color, design, prints, etc.?
Writing down my ideas on in my art journal, that is the number one thing that helps me focus. If my ideas change as I play with the fabrics on the design wall or the table I have them laid out upon, then I write down my new ideas.
As far as eliminating “the noise and clutter”, for me that is reduced by having a clear concept of what I want to accomplish (see “SIDE BAR” above).
I usually select a color palette early on in designing a piece. I’ve noticed that I am attracted towards “Southwest” and “Desert” type colors – rusts, beiges, greens, sky blues, etc. and I have repeated that palette in several art quilts. I read somewhere that if artists select a palette that they usually work from it can become a signature of their work.
Here is an example of an early art quilt I did called Central Oregon is Central to Me which uses that palette:
And then you can see I repeated this palette years later in a quilt I made for the WCQN show Yours for Race and Country: Reflections on the Life of Colonel Charles Young”. The name of this piece is Giant Among the Sequoias.
Color is very powerful and I’ve read a couple books about select coloring in the design of quilts. Two that I highly recommend were written by one of my teachers when I lived in Central Oregon – Jean Wells Keenan: Intuitive Color and Design and Journey to Inspired Art Quilting.
It was actually in her Journey to Inspired Art Quilting Workshop series that I took at the Stitchin’ Post in Sister, Oregon that I began the quilt Color Story V: Abandoned Water Structure, which was the first of my art quilts purchased by the City of Seattle for their Portable Works Collection (the City of Seattle now owns 4 of my art quilts made from recycled silks which they rotate through their municipal offices).
I might be rambling at this point, but I want to take a moment to share two additional major things that have helped me “get rid of all the noise”: 1) reading books about art quilting; and 2) taking classes with experienced art quilters (ongoing workshops are especially helpful – a series of classes with the same instructor helps you build upon concepts learned). You can also find a mentor and that can come from joining either a local or national art quilting group.
You cannot become an art quilter on your own (well maybe you can but I couldn’t) – you need mentors and teachers and it is very helpful to learn some formal art quilting concepts and techniques so you have them in your “tool bag”.
I know I need to take some more in person classes in the future. For now I just read art quilting journals, watch YouTube videos, and read books. So many awesome books have been written by some very talented art quilters!
Now on to the last question.
There are so many complicated variables (in making an art quilt), how do you start?
See above (smile).
So those were my answers to the three questions:
What do you find successful when you are creating a design?
What is one thing you do that helps you focus and get rid of all the noise and clutter that come with color, design, prints, etc.?
There are so many complicated variables (in making an art quilt), how do you start?
I INVITE YOU TO SHARE YOUR ANSWERS AND FEEL FREE TO RAMBLE AS I DID 😉
I’ve decided to name the freeform log cabin scrappy quilt I’ve created from my friend Dana’s scraps (see post What’s on the…Design Carpet) – “Seattle Scrappy”.
The name was inspired by the scraps coming from the Seattle area and that it is gray and in Winter it is fairly gray in the Seattle area.
Above you can see my current progress on the piece. I am nearly done with the top, I just need to frame the whole thing in rows of dark framed blocks.
This was my original concept – a center dark shape, created by freeform log cabin blocks with dark gray outside borders:
Then I would add lighter gray bordered freeform log cabin blocks around these blocks to float the center shape. However, as the black and white image I took of the quilt, the concept got a little muddled:
But you can still sort of see the concept and make out a darker shape floating in the lights blocks (I hope!)
I am hoping adding in a border all around of dark gray framed blocks will help my center pop a little more. A quilting friend said the piece looks like an aerial view of a city – I hadn’t thought of that!
More to come on “Seattle Scrappy” and I am currently trying to decide when I finish it, whether to:
Have it professionally quilted (a.k.a. “quilting by check”)
Do you remember the free large table I got from a community for sale board? Well I put risers (to make it “counter height”) on it and turned it into a large cutting and project table in my temporary studio (until I move to the new house in progress of being built some time in April):
I then snugged my sewing machine against the table to create a yummy temporary “Creation-Station” (patent pending? can I market that!??!):
Now I can comfortably watch the telly (well Netflix, ha!) while I sew.
I also added some quilts about the house. As I mentioned in a previous post, the house became sort of minimalist (and kind of sterile) when we staged it for the real estate sale photos that a professional photography came and took for the future real estate listing.
Since have delayed putting the house on the market until mid/late March, I was getting weary of living in basically a “model home”.
So I pulled out some of the quilts I had stored away and put them up on the wall with Command Strips!
And I placed an old quilt at the end of the bed where Mike my dog hangs out in my temporary studio while I sew:
My partner and I were working on buying a house together and he is selling his house. So my quilting studio got packed up and my former studio became a staged bedroom for the realtor house listing photo shoot.
Then I went to a mini quilt retreat a couple weeks ago and created freeform log cabin blocks from a friend’s scraps. Upon returning home I laid them out on the “design carpet” in my bedroom since I no longer had a design wall, much less a studio:
So nearly two weeks ago, my partner and I decided to buy a new house, that is in the process of being built, and will not be ready until the end of April. So we cannot put his house on the market for a couple months – until we get closer to when our new house will close, otherwise we could end up between homes!
Since the house I currently live in was not going on the market for a couple of months, I negotiated that I set up a modified version of a studio that can be easily returned to a staged bedroom for house showing.
Around the same time of this decision, I discovered listed on our community website a free large table being offered.
With new large (free) table in hand, I have a makeshift studio:
And to go with my makeshift studio, I made a makeshift design wall:
On Superbowl Sunday (last Sunday), I had a “Stitching Bowl” and worked on getting the center of the piece sewn together:
I am pretty happy with my makeshift studio and will share more photos of the piece as it evolves.
By the way, Mike my Miniature Schnauzer is enjoying hanging out on the bed (from the staging) in my makeshift studio while I sew!
It’s been a while since I’ve added anything to my series of posts: “What’s on the Design Wall”, about my current project up on my design wall.
However as my tierneycreates Beastie shared in the post Guest Blogger: What the heck is going on here? , my studio is packed up and turned back into a bedroom for staging the house I currently live in for sale.
Not having a design wall up on the wall has not stopped me – I’ve discovered: The Design Carpet (patent pending, ha!).
But let’s back-up a moment, and tell you how this piece began and got to this point…
I brought a couple hand work projects from my basket of hand work (see post Inside the Basket ) and had EVERY INTENTION of only working on my hand work projects.
But…
My dear quilting friend Dana brought an extra sewing machine (one her her Berninas, and I love Berninas) and a BAG OF GRAY FABRIC SCRAPS for me to play with – oh no!
As you saw in the “From the Basket” post, I did work on my English Paper Piecing rosettes, but after a while I put them aside and STARTING PLAYING WITH THE GRAY SCRAPS! (I could not resist the temptation to play with fabric scraps)
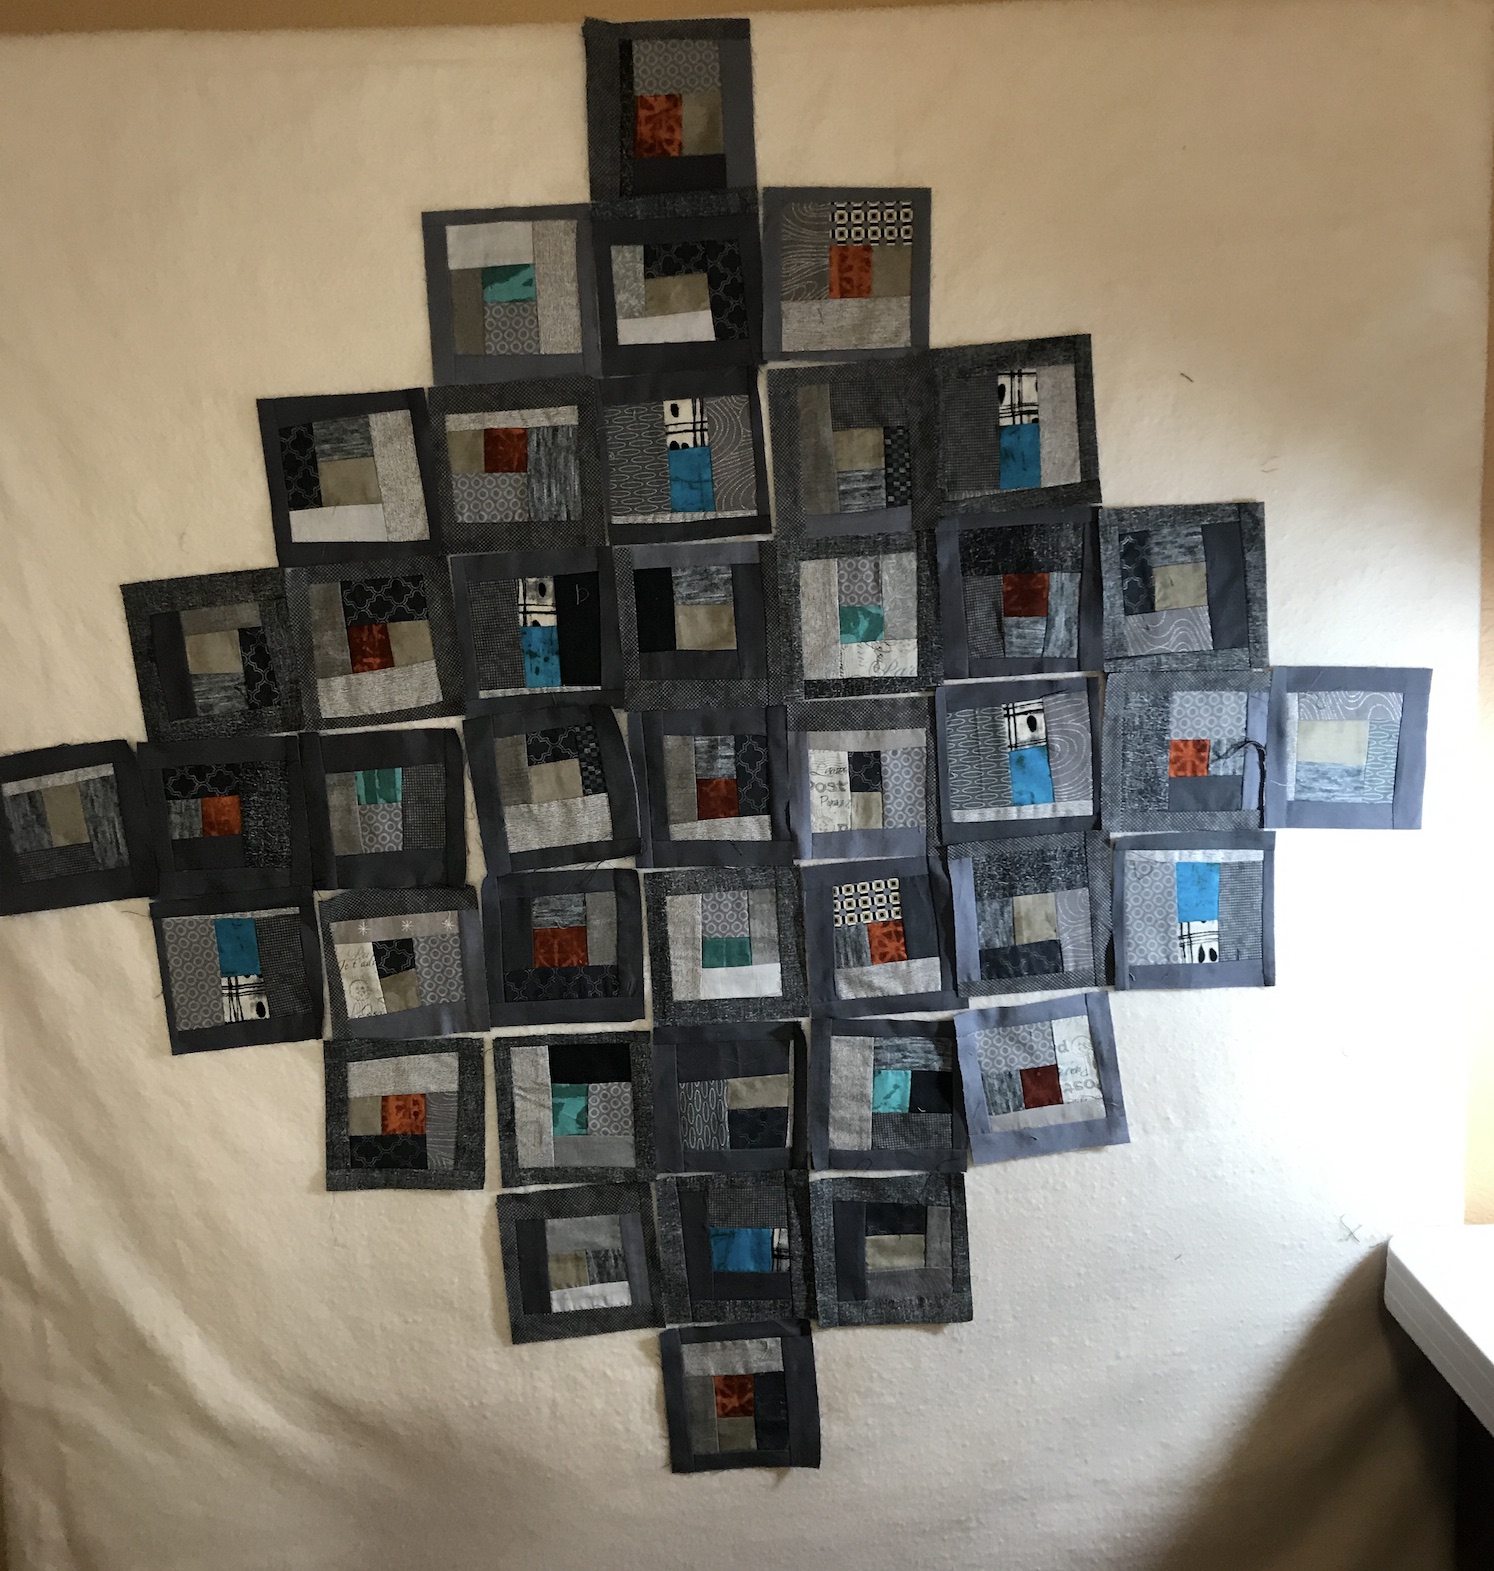
Before you know it, as I shared on @tierneycreates on Instagram, I began creating freeform pieced/improvisationally pieced log cabin blocks (also known as “log jamming”):
And before I knew it, I had a pile of 138 blocks I made!
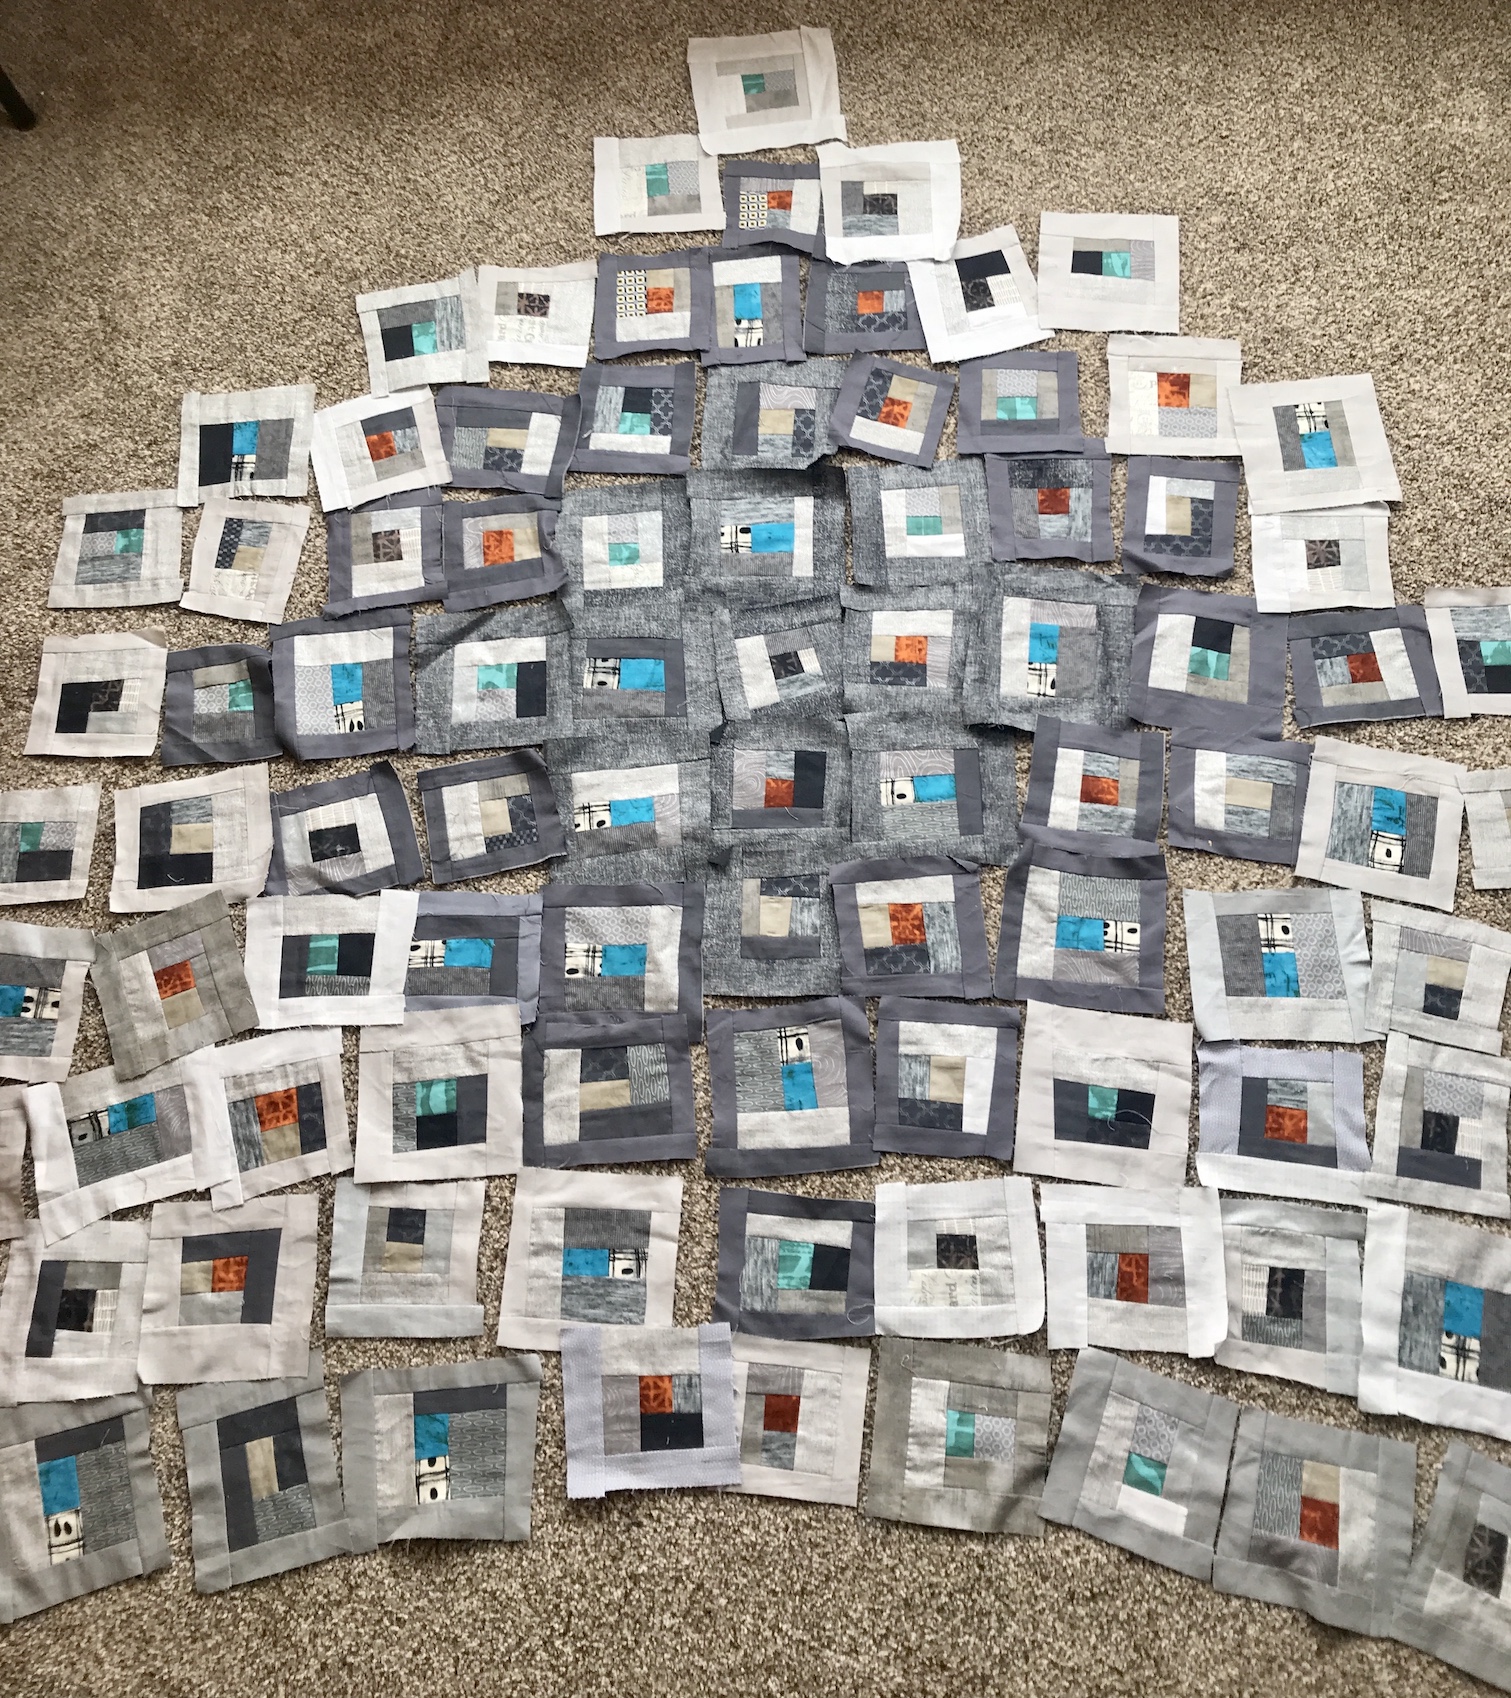
Once I got home, I could not wait to play with them and see what interesting pattern I could make with the dark gray and light gray framed blocks, So I decided to use the “Design Carpet”:
I began with creating a pattern with the dark gray framed blocks:
Then I worked on framing them with the light gray blocks:
I like the effect with the dark gray floating in the lighter gray blocks.
Since I took these photos, I’ve made additional progress and pulled out my sewing machine from the storage room (where you hide everything when staging a house for sale)!
Let me make a bit more progress on the piece and I will share in a future post!
Postscript
Let me know if you think I can patent the concept of the “Design Carpet” and make millions on my late-night infomercial selling “Design Carpets” and quit my day job and just sew all day!
“You can own your own Design Carpet for 5 easy payments of $99.99!
But wait, there’s more:
Buy one Design Carpet and get a second one for only $99.99 plus shipping and handling.”
This post is a continuation of my ongoing series “What’son the Design Wall”, featuring my latest project up on either the small design wall in my studio or the large design wall my hallway.
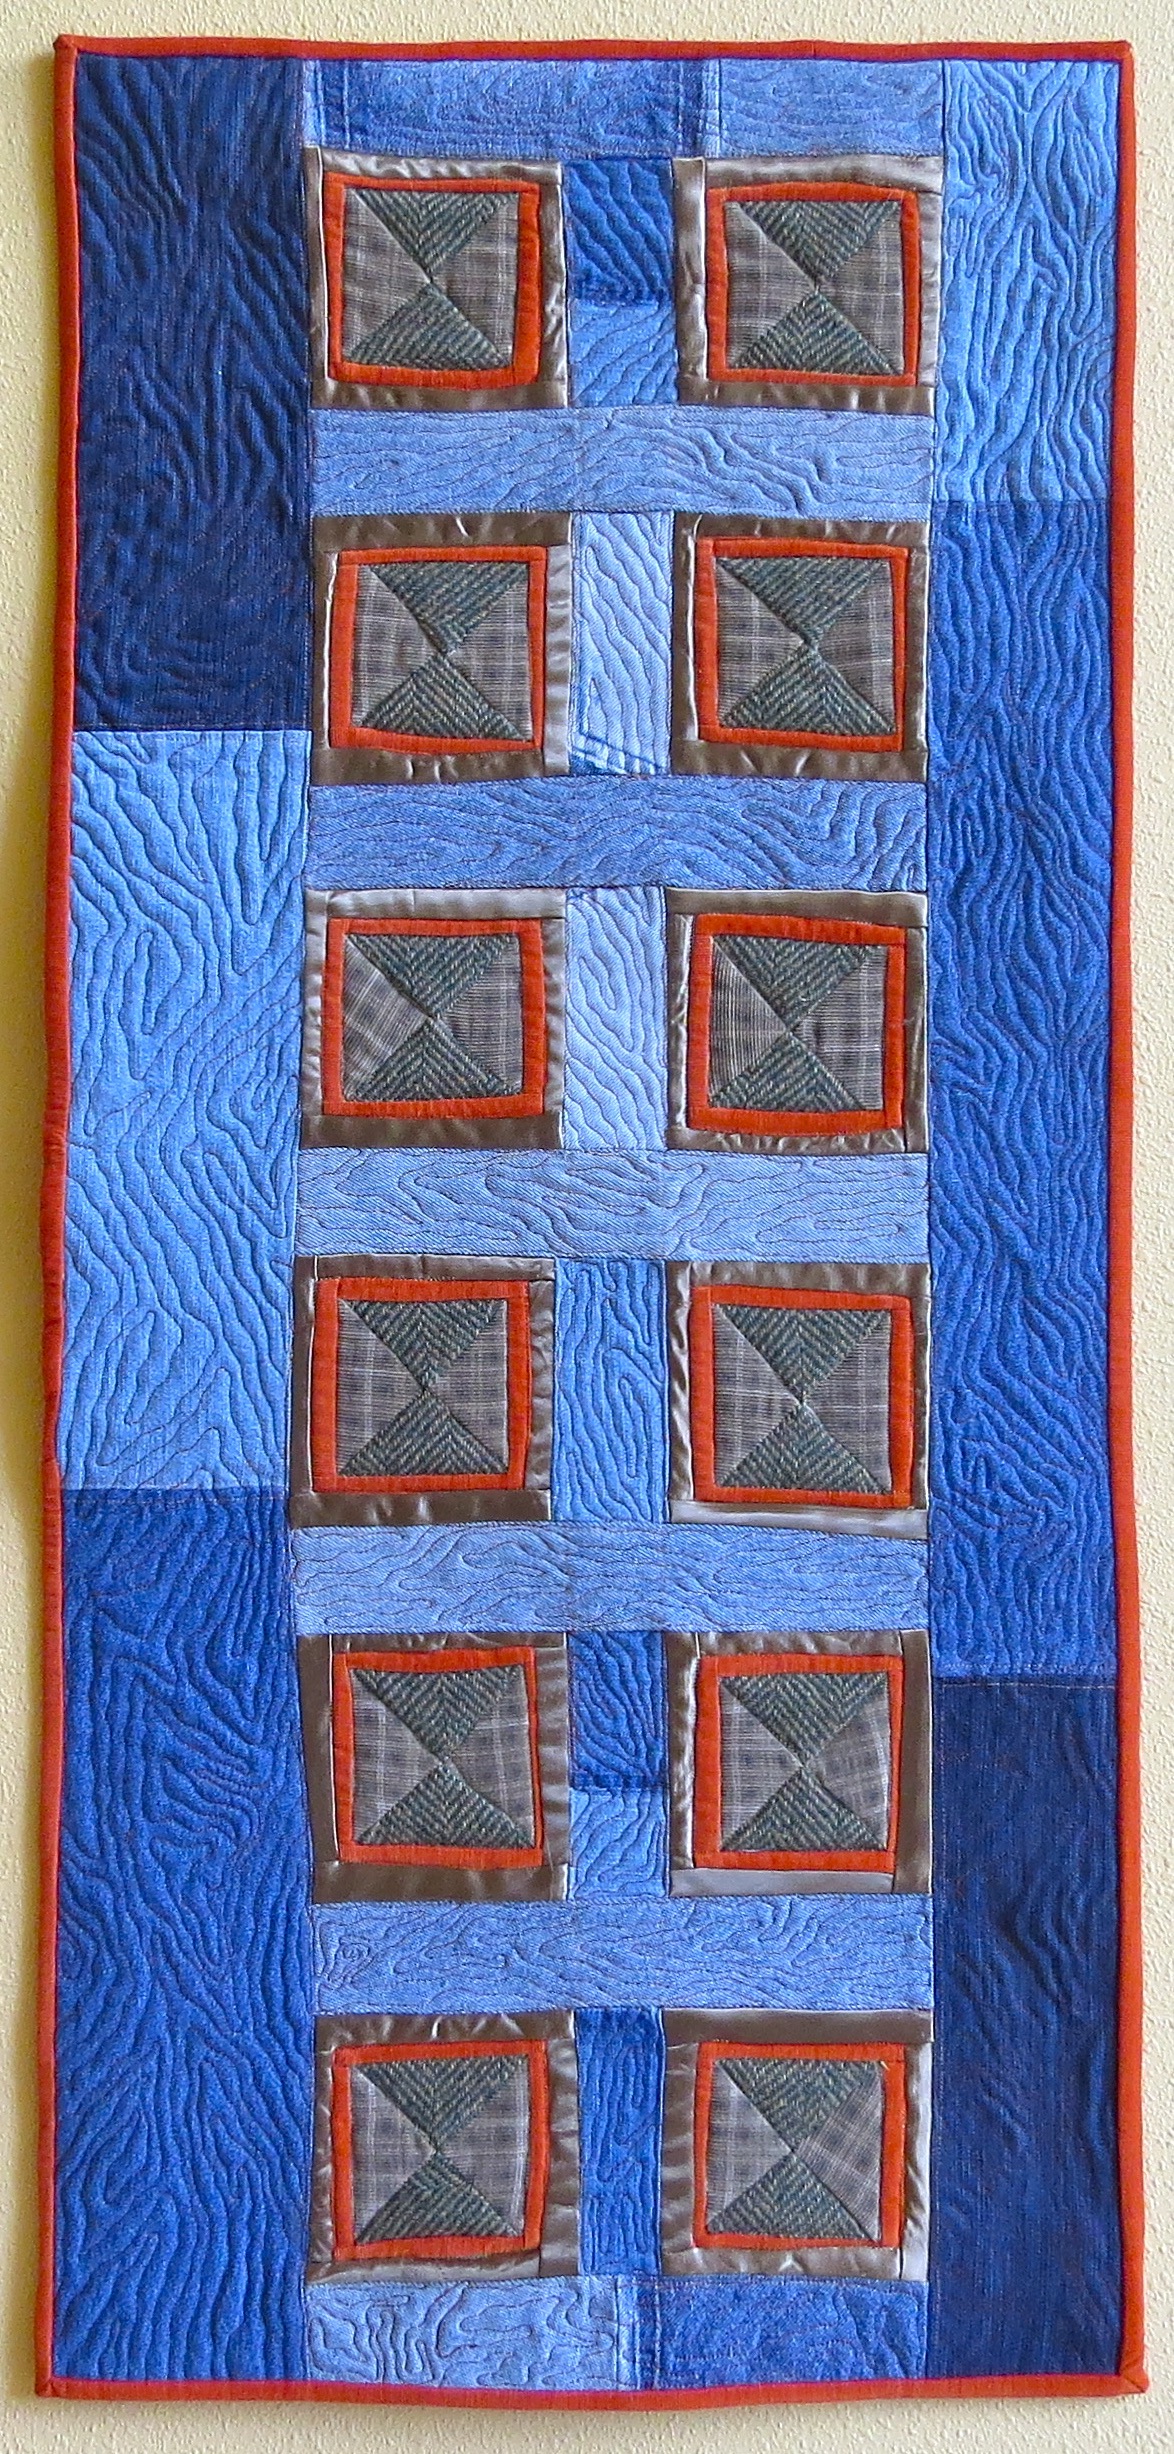
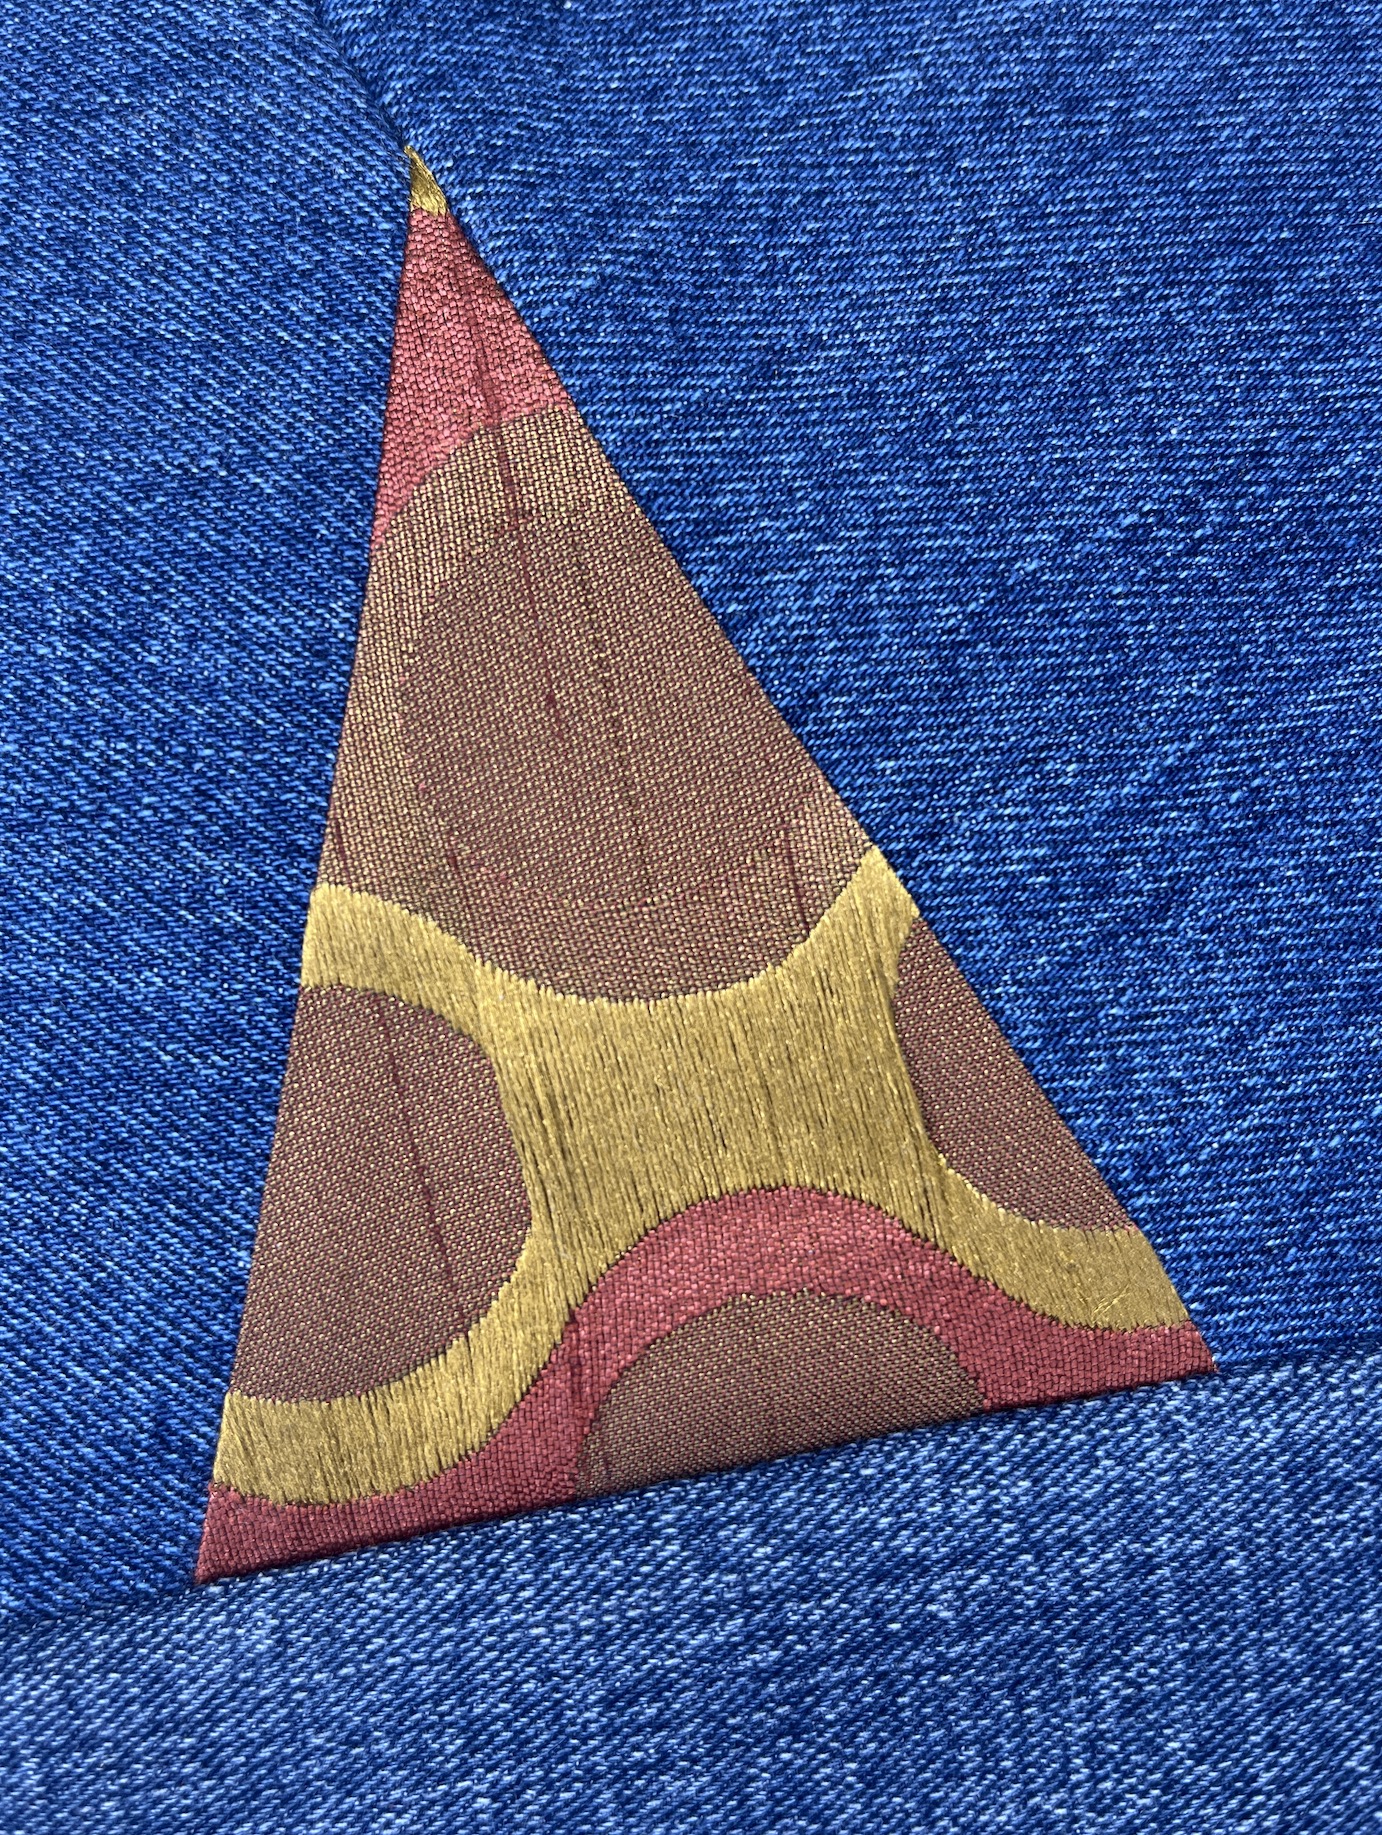
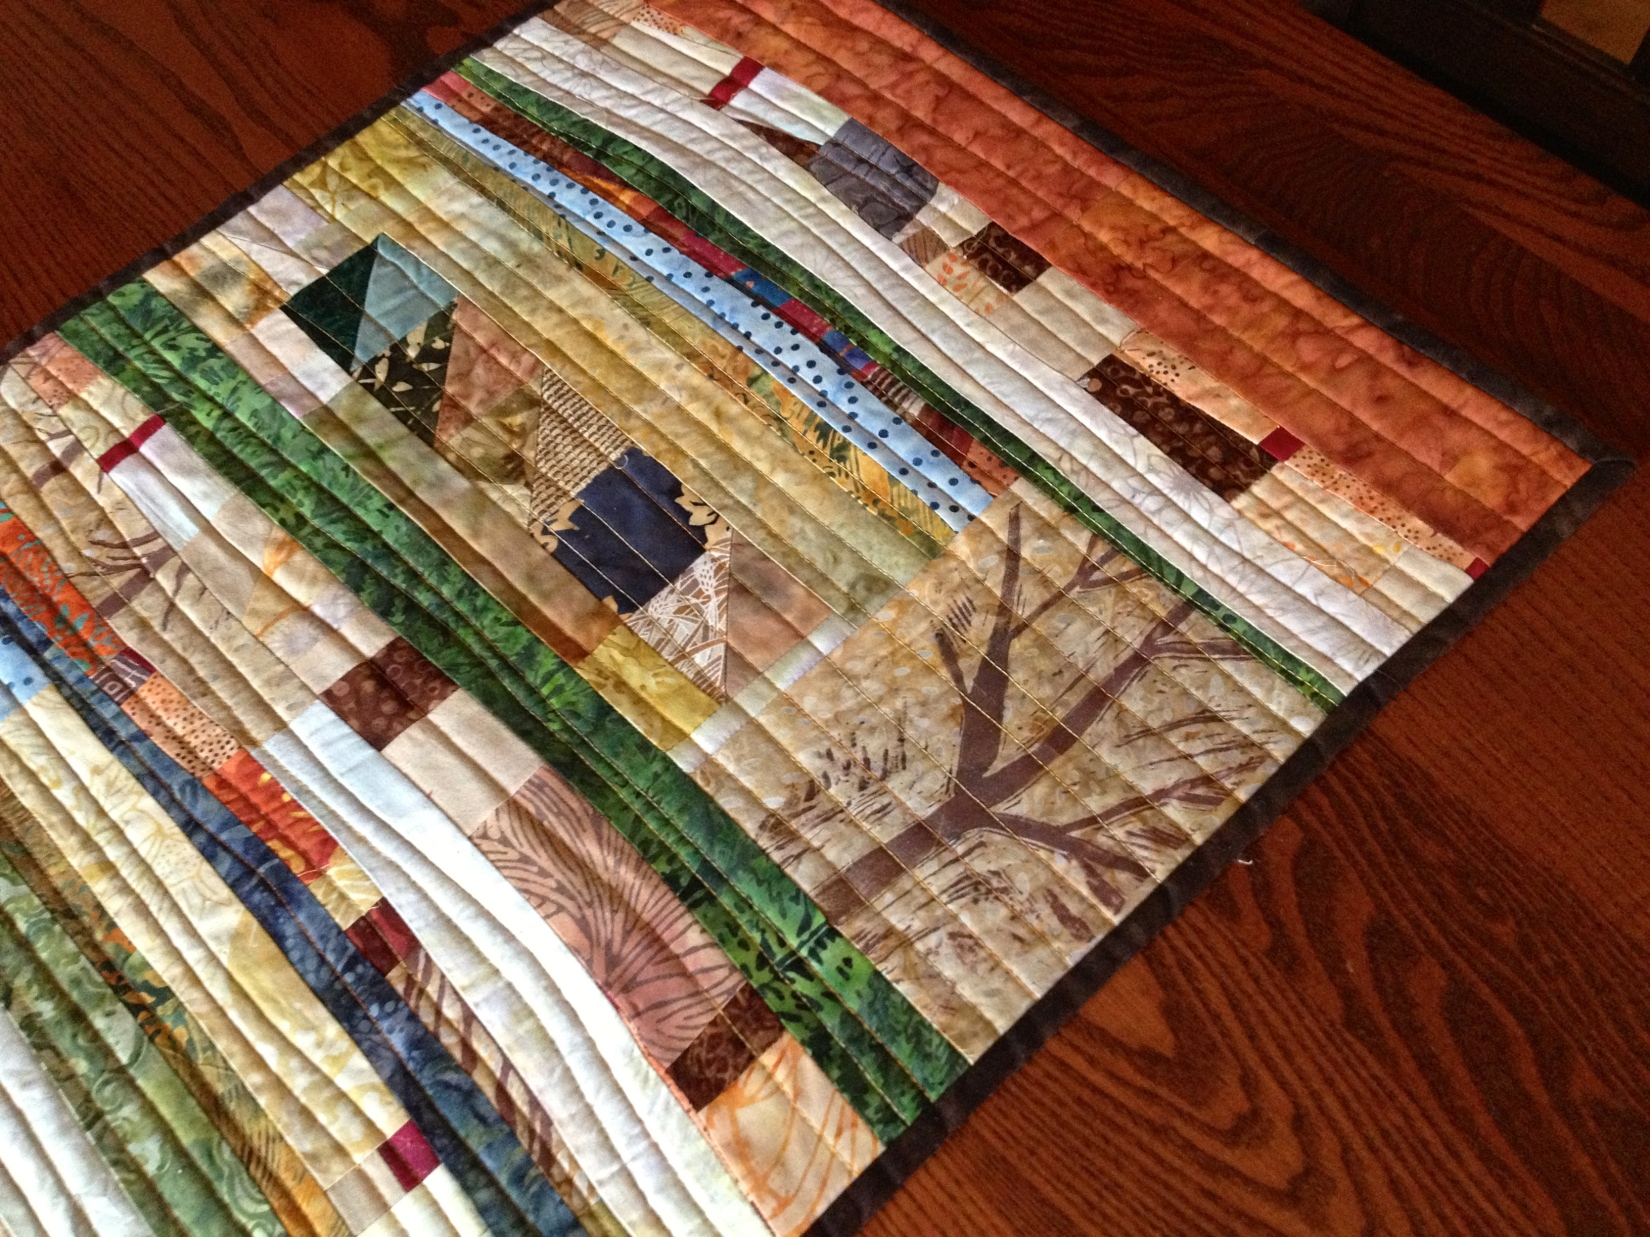
I am working on my fourth improvisational piece from a group of recycled clothing and home decor titled: RecycledWindows of Conversation. This piece will become part of my improvisational art quilt series: Recycled DenimStories.
Here is Recycled Windows of Conversation in progress on my small design wall in my studio:
Recycled Windows of Conversation (2017) – in progress
This art quilt will measure approximately 18″ x 40″, the same size as these two other quilts in the Recycled Denim Stories series, The Recycled Road and Recycled Door:
The Recycled Road (2017) by Tierney Davis Hogan
Recycled Door (2017) by Tierney Davis Hogan, quilted by Guadalupe Designs, photographed by Marion Shimoda
You might ask why did I name the piece in progress, Recycled Windows of Conversation?
The “Recycled” part of the name is to tie it to the two other 18″ x 40″ pieces from the same recycled materials shown above; and the “Conversations” part of the name is to tie to Additional Conversations, a piece I recently finished the quilt top (but have not quilted yet):
Recycled Windows of Conversation is made from the leftover blocks (and additional blocks) from Additional Conversations (which is still laying on my larger hallway design wall awaiting quilting).
In case you are new to my blog and have not followed the development of these previous art quilts, here’s a list of the recycled materials used in these pieces:
Old jeans
Curtain (valence scarf)
Tweed jumper
Old sweat pants
Corduroy Shirt
Gold home decorating fabric scraps (given to me by an interior decorator from her sample collection)
The world’s ugliest orange corduroy pants
Denim duvet cover (used in Additional Conversations only)
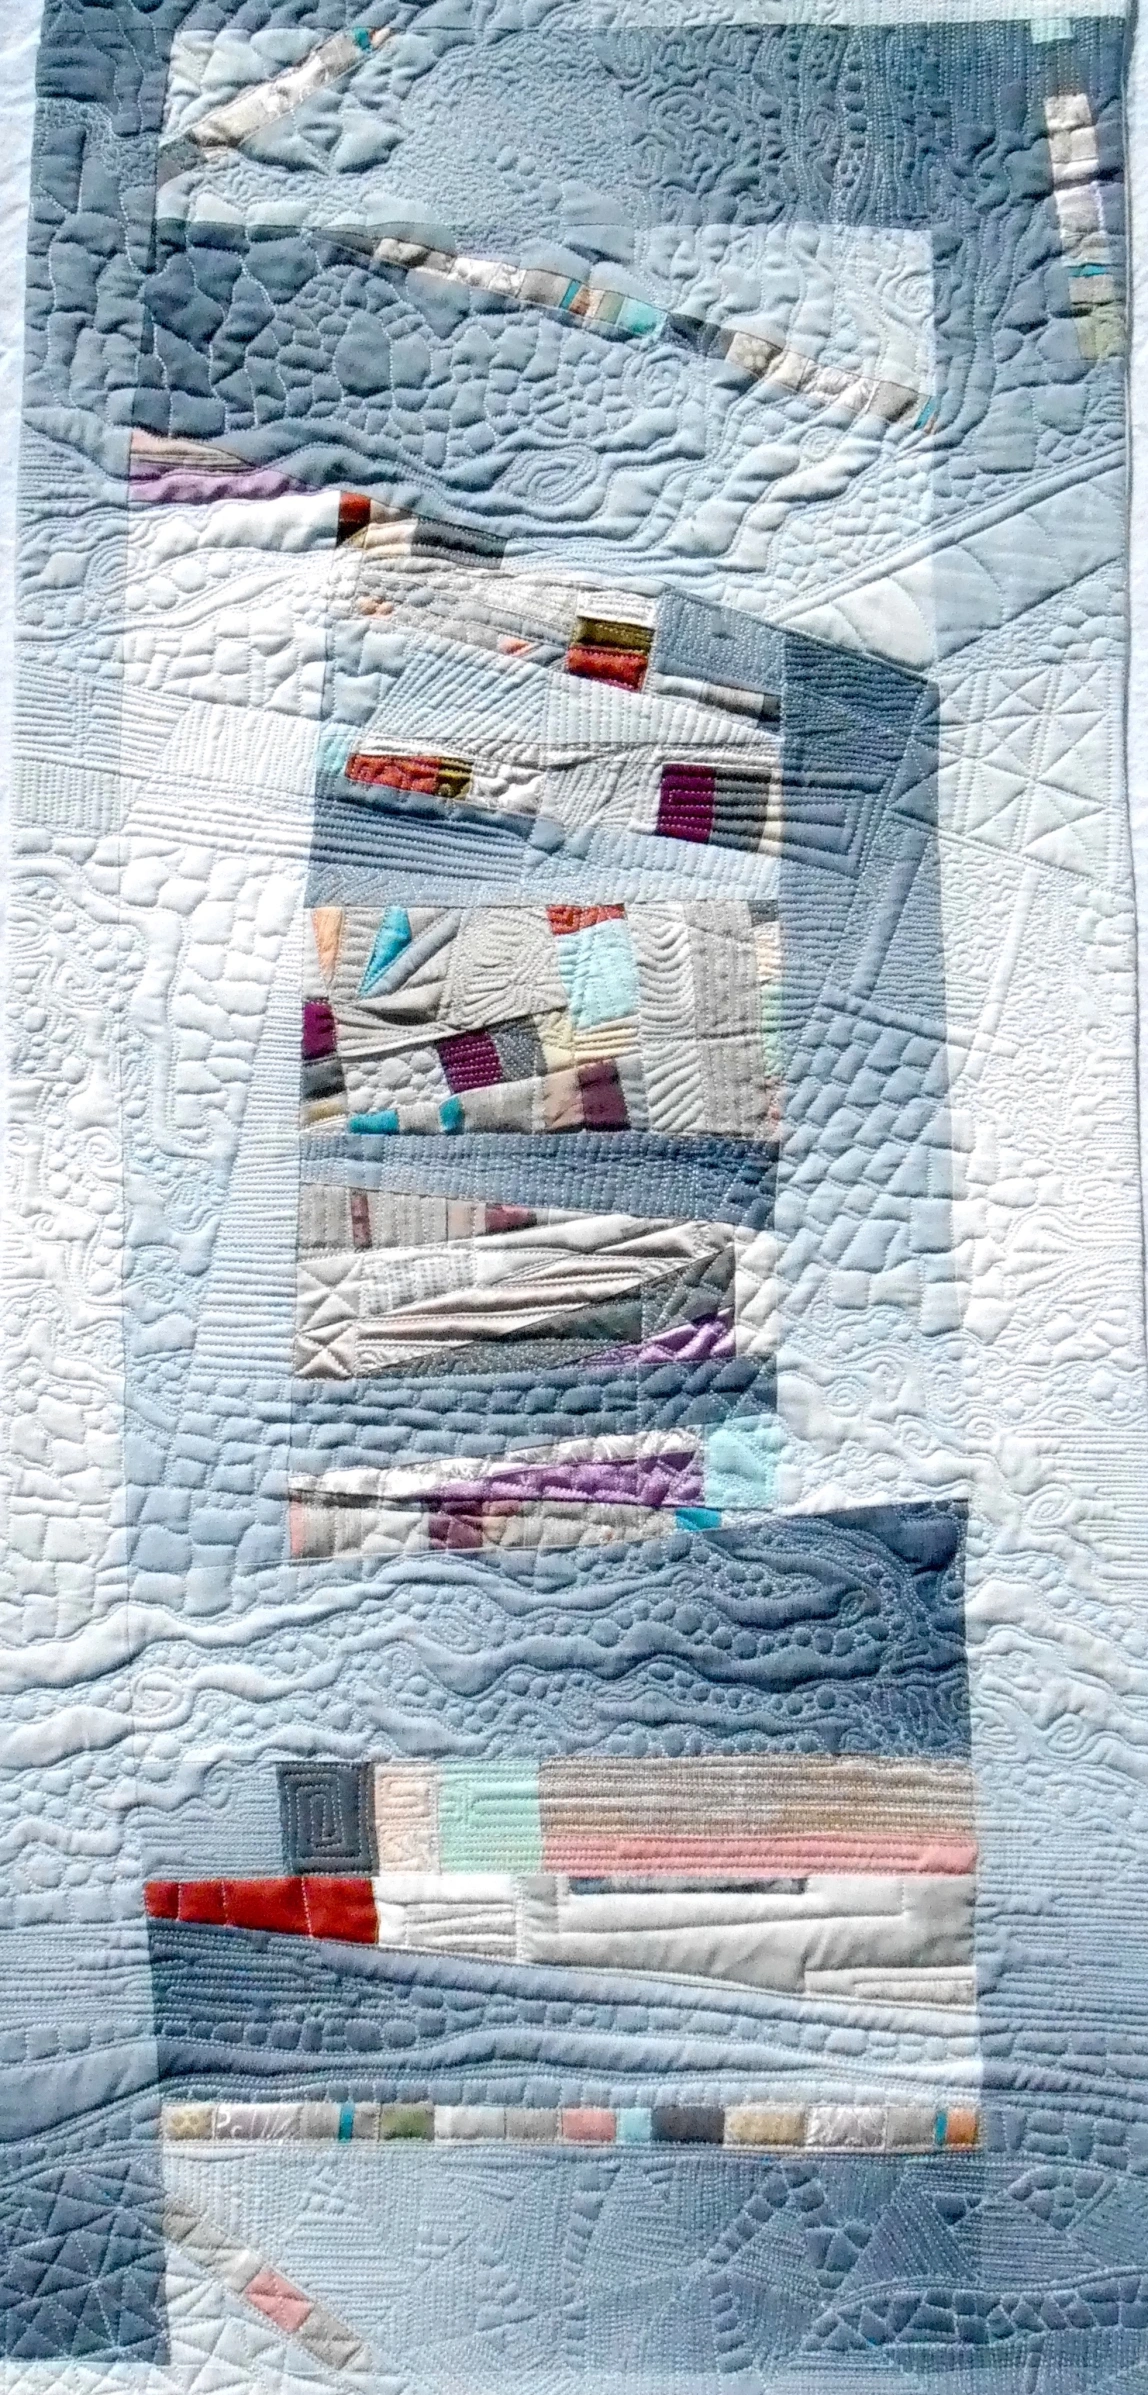
I plan to quilt Recycled Windows of Conversation by machine and I have selected my thread colors – gold, blue and orange:
Here is the piecing hanging out on the iron board, awaiting quilting:
In case you are wondering, I have only a tiny pile of scraps left over from these four quilts. I might challenge myself and try to eek out a small piece to make it five total.
I continue to work on having a cohesive body of work when it comes to my delusional journey towards becoming an art quilter!
Postscript
A quilting friend recently remodeled her studio area in her vintage home (circa early 1900s) and asked for help organizing her fabric in the reconfigured back room (that used to be where meat was stored in the early 1900s.
Here is a photo of an alcove with newly added shelves that I found especially pleasing during my time over her house yesterday helping her organize fabric:
Her fabric used to be crammed into a dark back storage room – now it is easier to access!
I could not decide whether to title this post “Spiritual Quilting”, “Quilting for the Spirit”, “Soul Quilting”, or “Quilting for the Soul” related to sharing highlights of Sherri Lynn Wood’s presentation at the QTM 2017.
Sherri Lynn Wood, author of The Improv Handbook for Modern Quilters: A Guide to Creating, Quilting, and Living Courageously (2015) is not only an improvisational quilter but is also a former Divinity School student who I feel now practices a Ministry of Healing through Textile Arts.
You might be familiar with Sherri Lynn Wood if you follow her blog, dainty time.net and/or if belong to her Facebook group The Improv HandbookFor Modern Quilters. Here is Sherri at QTM 2017 in front of one of her iconic pieces; as well as her signing copies of her Improv Handbook:
Here is another one of her iconic improvisational quilts:
You might also be familiar with the Artist in Residence (AIR) residency she had a Recologyin San Francisco where she and a group of other artists were given free reign of materials from a city’s dump to create art for a Modern Art exhibit of recycled art. Ms. Wood presented an excellent presentation on her Recology Residency and the amazing pieces of textile art she made from discarded items. Ms. Wood stated she even found a sewing machine, sewing supplies, thread, materials for batting, etc. in the city dump to use to create her art!
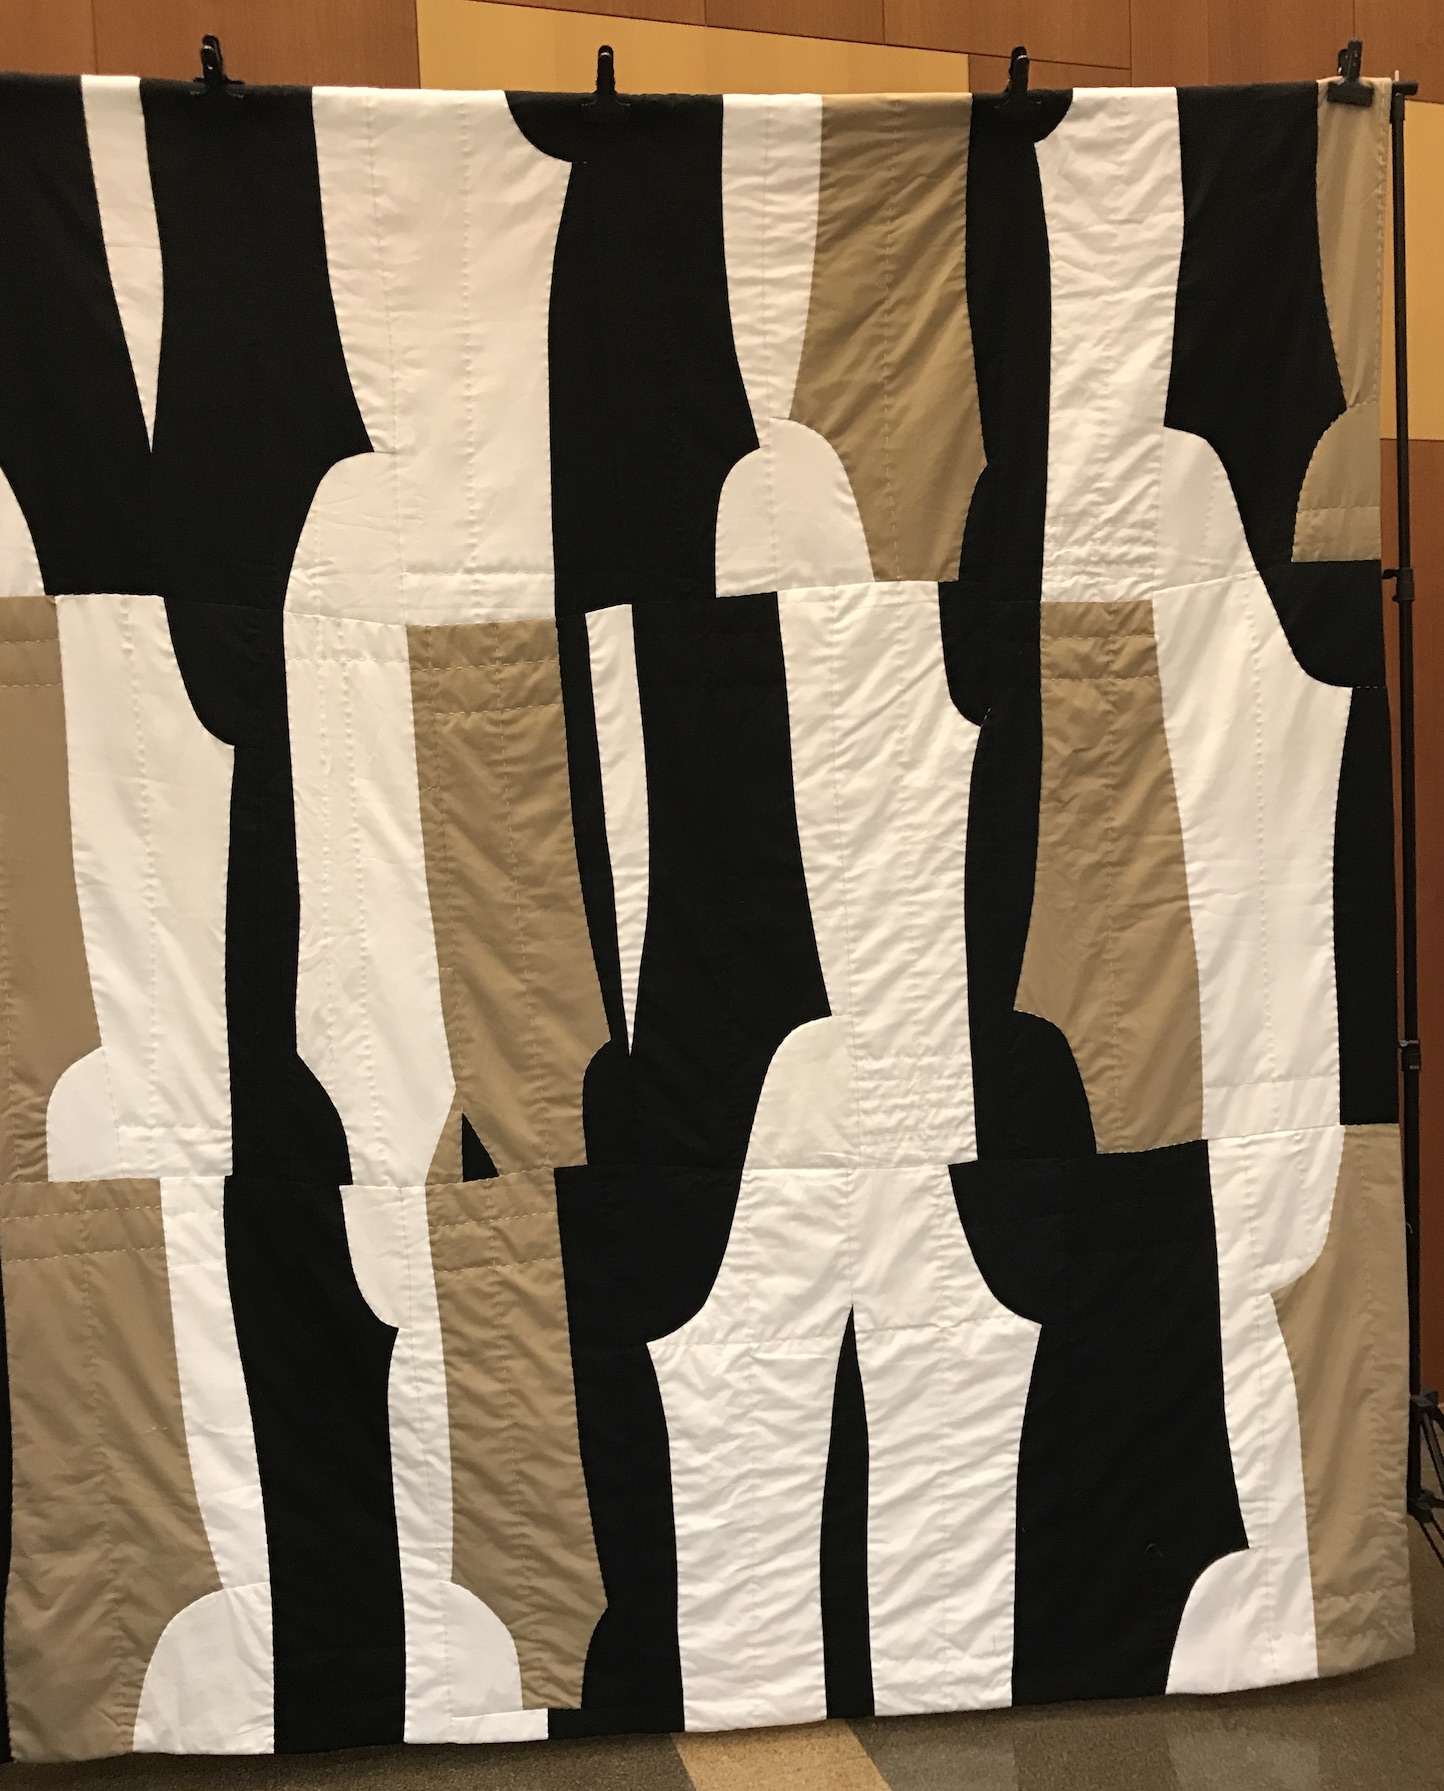
Below is an example of one of those pieces she had on display at QTM – a quilt made from discarded military uniform pants, using the length and lines of the pants as part of her quilt design.
What you might not know about Sherri Lynn Wood, is that she has what I would consider a “Quilting Ministry” and part of that ministry is her Passage Quiltingprogram where she helps individuals deal with grief and loss through creating a quilt (even if they have never quilted before) made from clothes of the deceased.
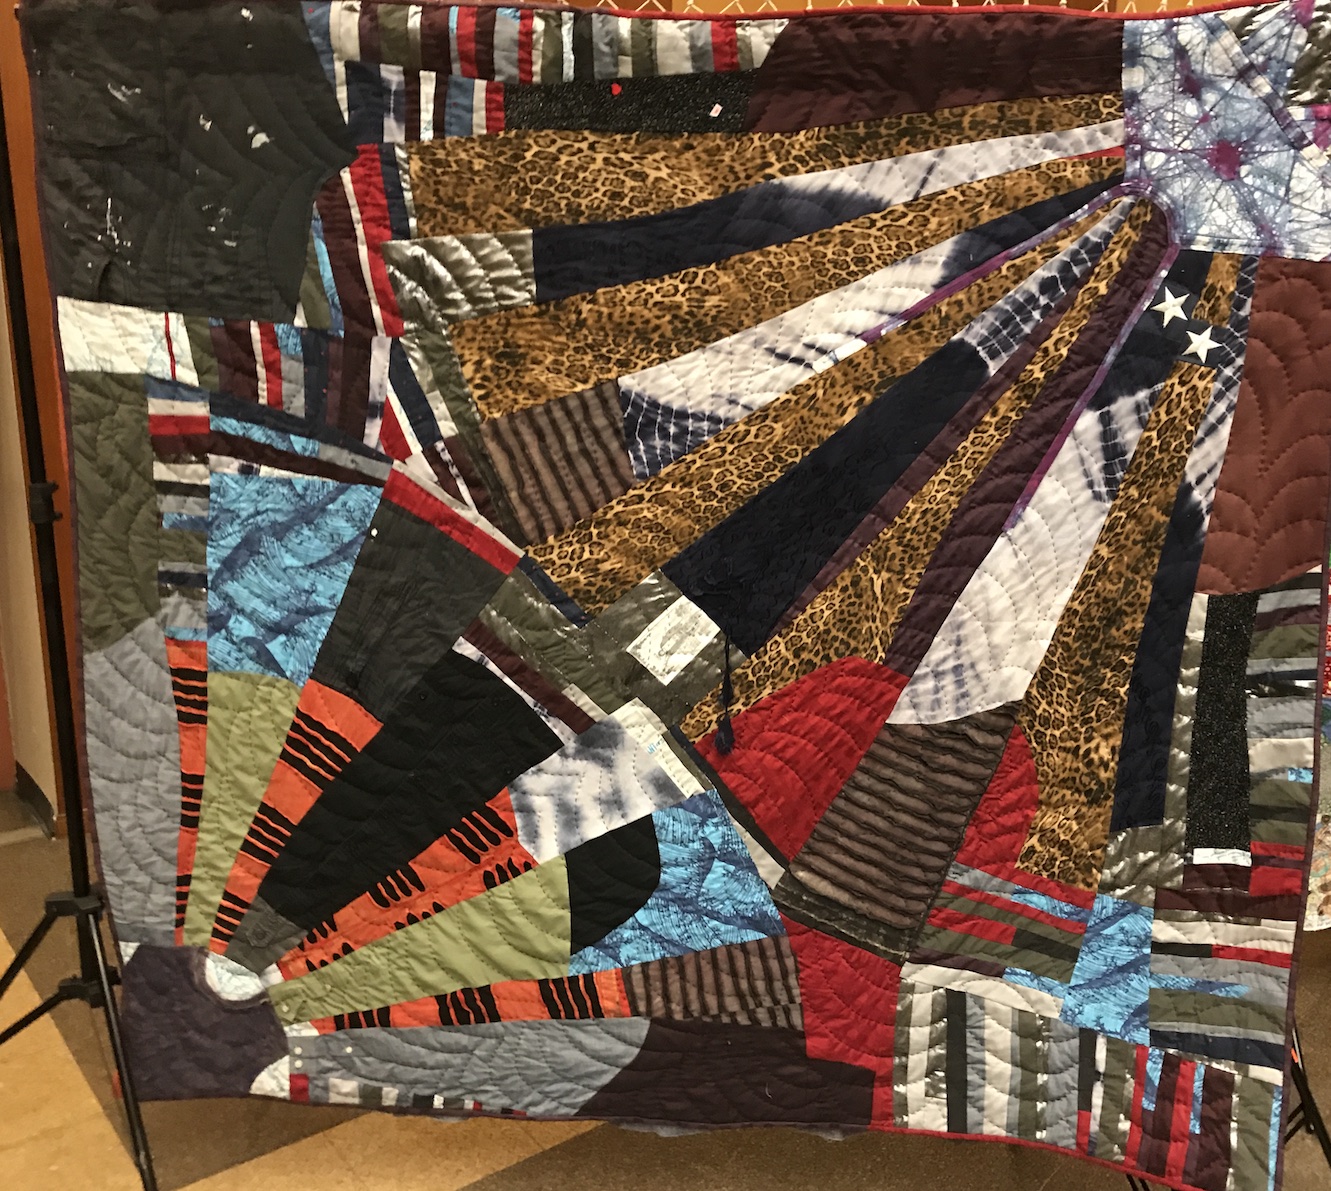
Ms. Wood shared this heart wrenching, amazing and beautiful story of a young woman who lost her fiancé due to a sudden tragedy. A short time after that loss, Ms. Wood helped this woman to make a Passage Quilt from her fiancé’s favorite clothing. It was an incredibly difficult process but the woman stated it had a tremendous impact on having her work through her grief. Ms. Wood had on display at QTM one of the Passage Quilts:
She also has a project where she works with individuals and families who have lost a loved one in combat/while serving in the military to sew a coffin onto a remembrance quilt as part of their healing process. She shared several powerful stories and images of families who lost their military family members sewing together as part of their healing. Below is one of these quilts:
She also works with communities to create community quilts where anyone no matter what level of sewing skill can participate.
The general themes of her presentation were:
Building community through craft
Honoring the earth through working with recycled materials; and by creating art from the discarded
Healing and grief work through tactile textile experiences
I was already a “super-fan” of Sherri Lynn Wood before meeting her and I have read Improv Handbook for Modern Quilters: A Guide to Creating, Quilting, and Living Courageously from cover to cover. I was deeply touched by Ms. Wood’s presentation (tears filled my eyes at times) – my spirit and my soul felt stirred and moved by her stories and images.
This is the reason for the title to this post – “Spiritual Quilting”. I am not referring to religious or a specific faith-based quilting. I am thinking of quilting, fabric, textiles, as a medium for hope, healing and community. For me, these are part of the foundation of spirituality.
Postscript
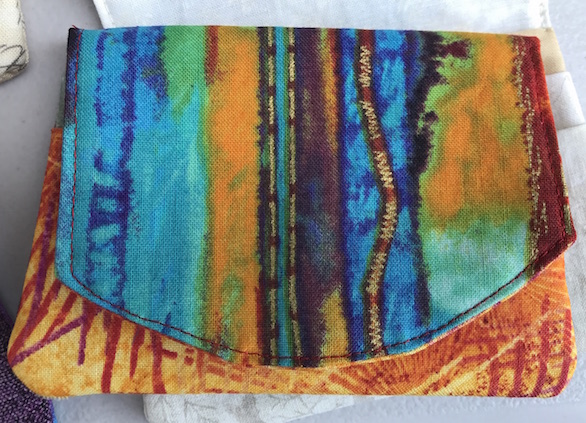
I did have my “fan-girl” moment and upon arriving at the QTM conference center in the morning and spotting Sherri Lynn Wood setting up her quilts for display, I thanked her for her wonderful book, the inspiration, and gave her a little wallet I had made from scraps specifically for her:
Speaking of “fan-girl” moments for me at QTM 2017, I got a chance to meet in person Dr. Carolyn L. Mazloomi, founder of the Women of Color Quilting Network (WCQN) . I of course made her a special little wallet too, just tiny tokens for great women who inspire me! Her little wallet was inspired by her incredible Black & White art quilts!
More on that in my next post and at some point I will share my experience going on a behind the scenes tour of the Antonio Ratti Textile Center at the Metropolitan Museum of Art; seeing one of my blogging buddies pieces at QTM 2017 (Mary P. of Zippy Quilts!) and meeting a fellow blogging buddy of Mary’s at the event; and more (I have a lot to share but I not mapped out the organization of this series of posts, ha!)
(Plus I will share a valuable lesson of how you should not try to cram too much into one weekend…I am currently recovering from a wicked cold!)
Yes, this blog is called “tierneycreates” and Tierney should probably discuss…well…doing some creating…instead of her random rambles about her Minimalism Journey (Part II of her ramble will continue in the next post).
I am participating in Sherri Lynn Wood’s (author of The Improv Handbook for Modern Quilters) recycled quilt challenge: Make Do Quilt Challenge – #makedoquilt. You can read about this challenge on Sherri Lynn’s blog – dainty time.net; or you can read a wonderful post by Kris R. about this challenge and “the skinny on trashing textiles” on one of the wonderful blogs I follow, Coloring Outside the Lines:
The Made Do Quilt Challenge asks you make a quilt out of recycled textiles using one of the “Scores” that Sherri Lynn Wood discusses in her book The Improv Handbook for Modern Quilters (for more about this book, see my postCreative Inspiration: Books I Own).
In her book, she helps guide the quilter, new to improvisational piecing, by providing “scores” to suggest the creation of an improv quilt. Ms. Wood likens these score to “musical scores” and shares the following:
In creating a musical score, a composer is making a record of how the music is to be performed. Yet each performance of the score will be unique. – Sherri Lynn Wood
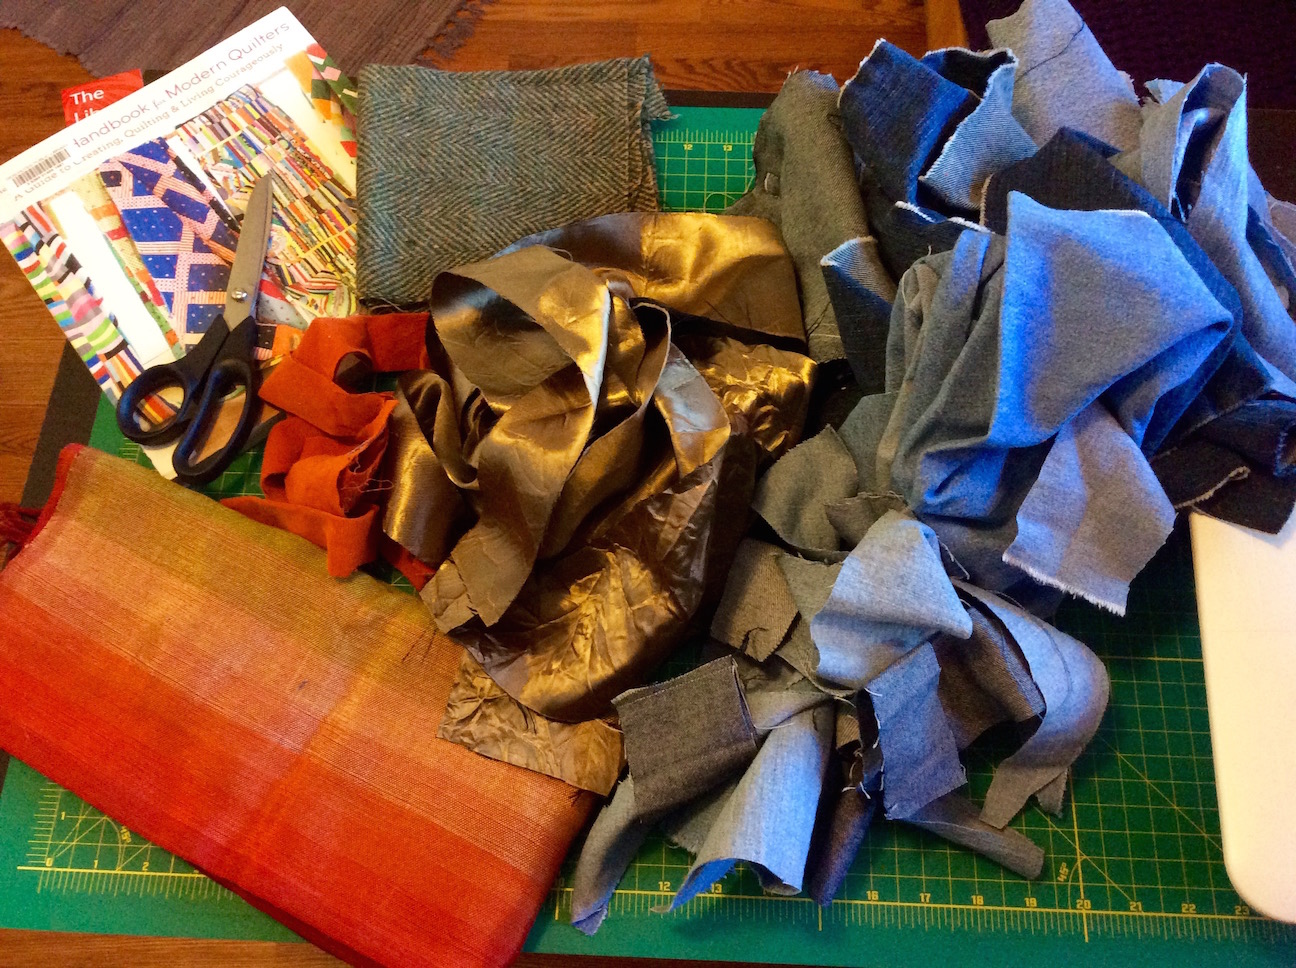
For my challenge quilt, I am using the “Score” called Floating Squares. The score suggests to limit yourself to three fabrics (two used in small amounts and one used to “float” the improv squares). I am using 5 fabrics but treating four of the fabrics as pairs as they are loosely (very loosely) in the sort of same color way.
My fabrics are:
A recycled table runner from a thrift shop that is in stripped orange, greens, reds and purples.
Recycled orange corduroy pants (I only have a tiny bit left and it is the companion fabric to the #1 fabric above)
A recycled tweed jumper
Gold-ish recycled home decor fabric scraps (this is the companion fabric paired with the tweed in #3 – yes of course brown tweed and deep gold lame-ish fabric are in the same color way – ha!)
I began with cutting up squares with scissors (Sherri Lynn Wood is all about ruler free design) and ended up with these squares on my design wall:
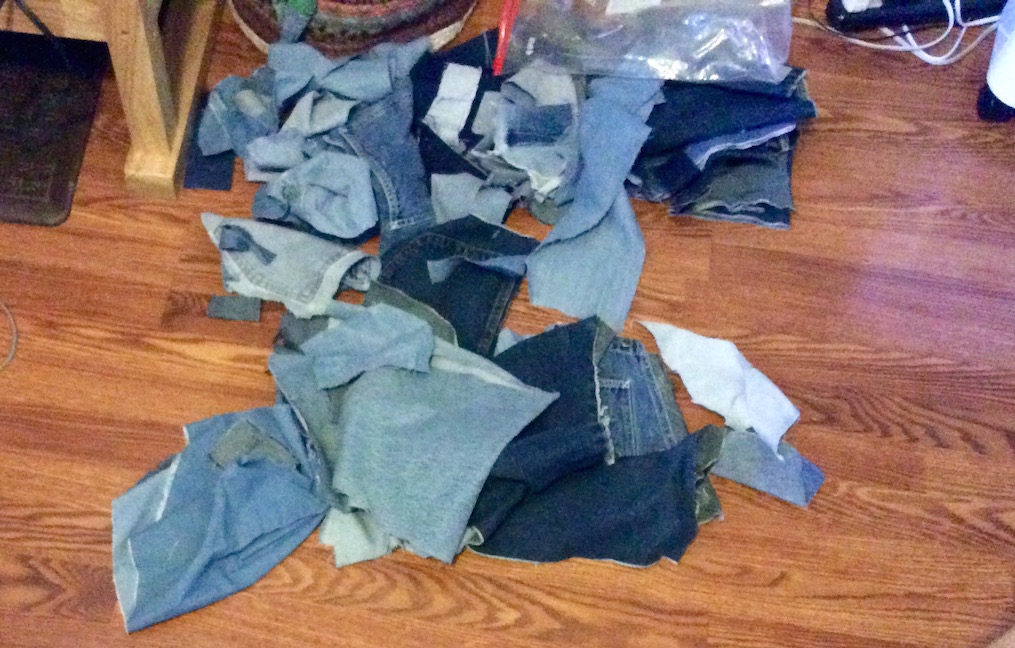
Here is my “pile-o-denim” scraps on the floor to float my squares in:
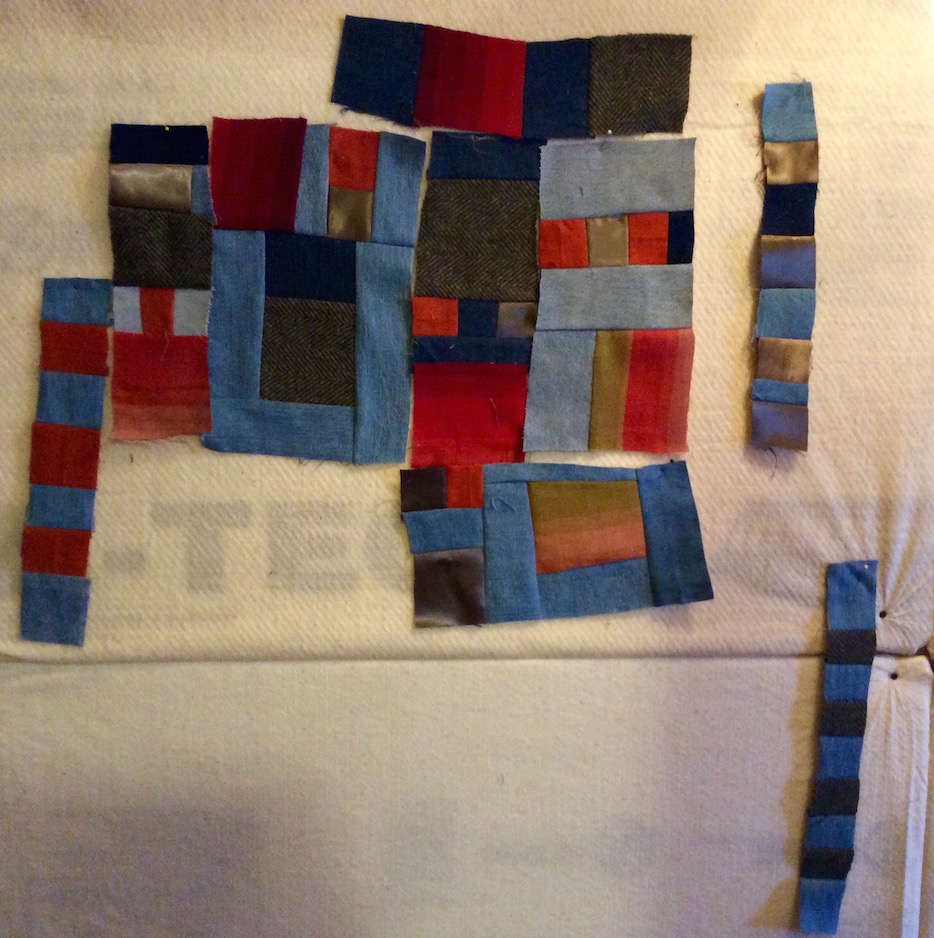
And here is where I am with the piece so far:
I am very interested to see how it comes out. I am just making sections and when I feel I am ready, I will figure out the layout (the initial layout you see above may have nothing to do with the final piece).
So that is my current Tierney-creating!
POSTSCRIPT
Sassy the Highly Opinionated Miniature Schnauzer has taken a short hiatus from her SchnauzerSnips blog page but she will return soon with her story of “The Herd” (recently we babysat two other schnauzers for 5 days).
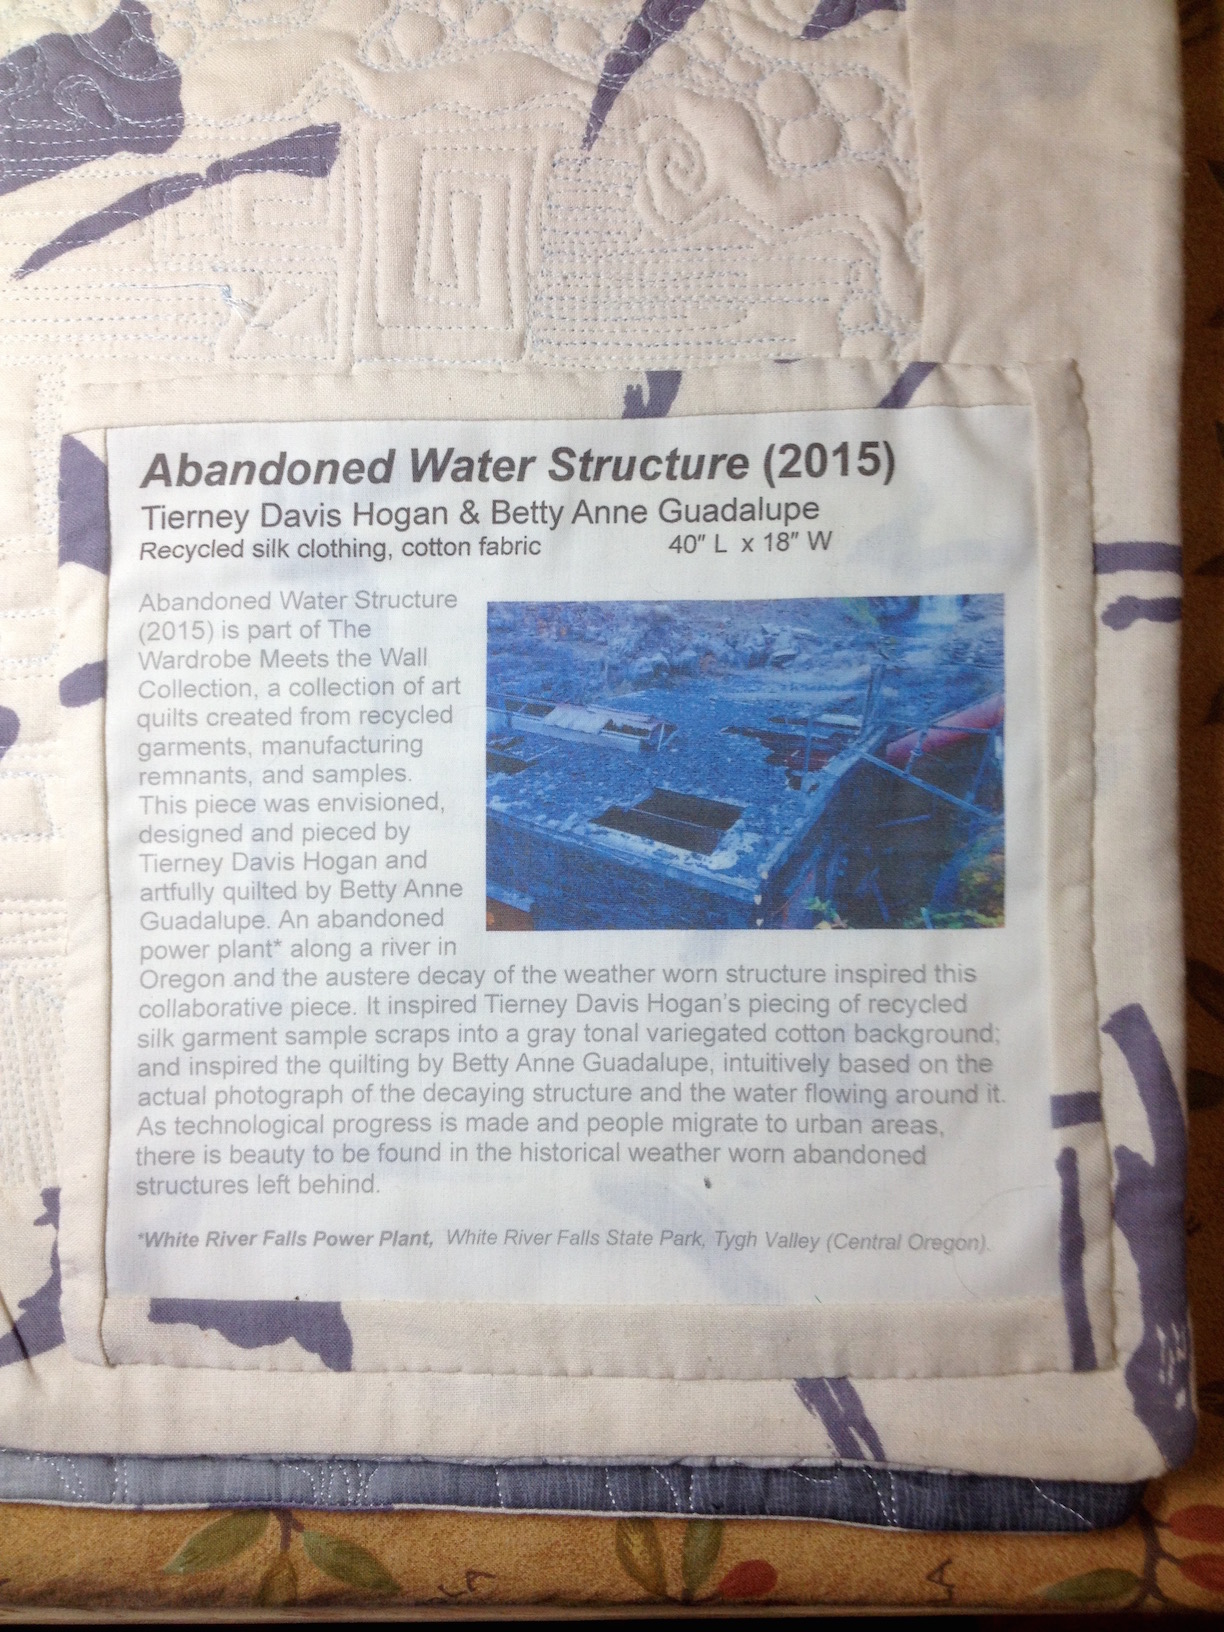
In my post,Seattle Public Utilities’ Portable Works Collection, I shared my elation of the piece Abandoned Water Structure (designed and pieced by myself and quilted by Guadalupe Designs) being purchased by the City of Seattle for its Seattle Public Utilities Portable Art Collection. Yesterday I mailed it off the framer in Seattle and I wanted to share the custom label I made for the back of the piece – I included the photo of the structure that inspired my creation of the piece:
I of course have more random rambles, but I am trying not to make my posts too long (so you do not fall asleep while reading!). More next time!
Feature image photo credit: Charles Novaes, free images.com


 On Superbowl Sunday (last Sunday), I had a “Stitching Bowl” and worked on getting the center of the piece sewn together:


 But let’s back-up a moment, and tell you how this piece began and got to this point…
 As you saw in the “From the Basket” post, I did work on my English Paper Piecing rosettes, but after a while I put them aside and STARTING PLAYING WITH THE GRAY SCRAPS! (I could not resist the temptation to play with fabric scraps)
 And before I knew it, I had a pile of 138 blocks I made!
 Once I got home, I could not wait to play with them and see what interesting pattern I could make with the dark gray and light gray framed blocks, So I decided to use the “Design Carpet”:
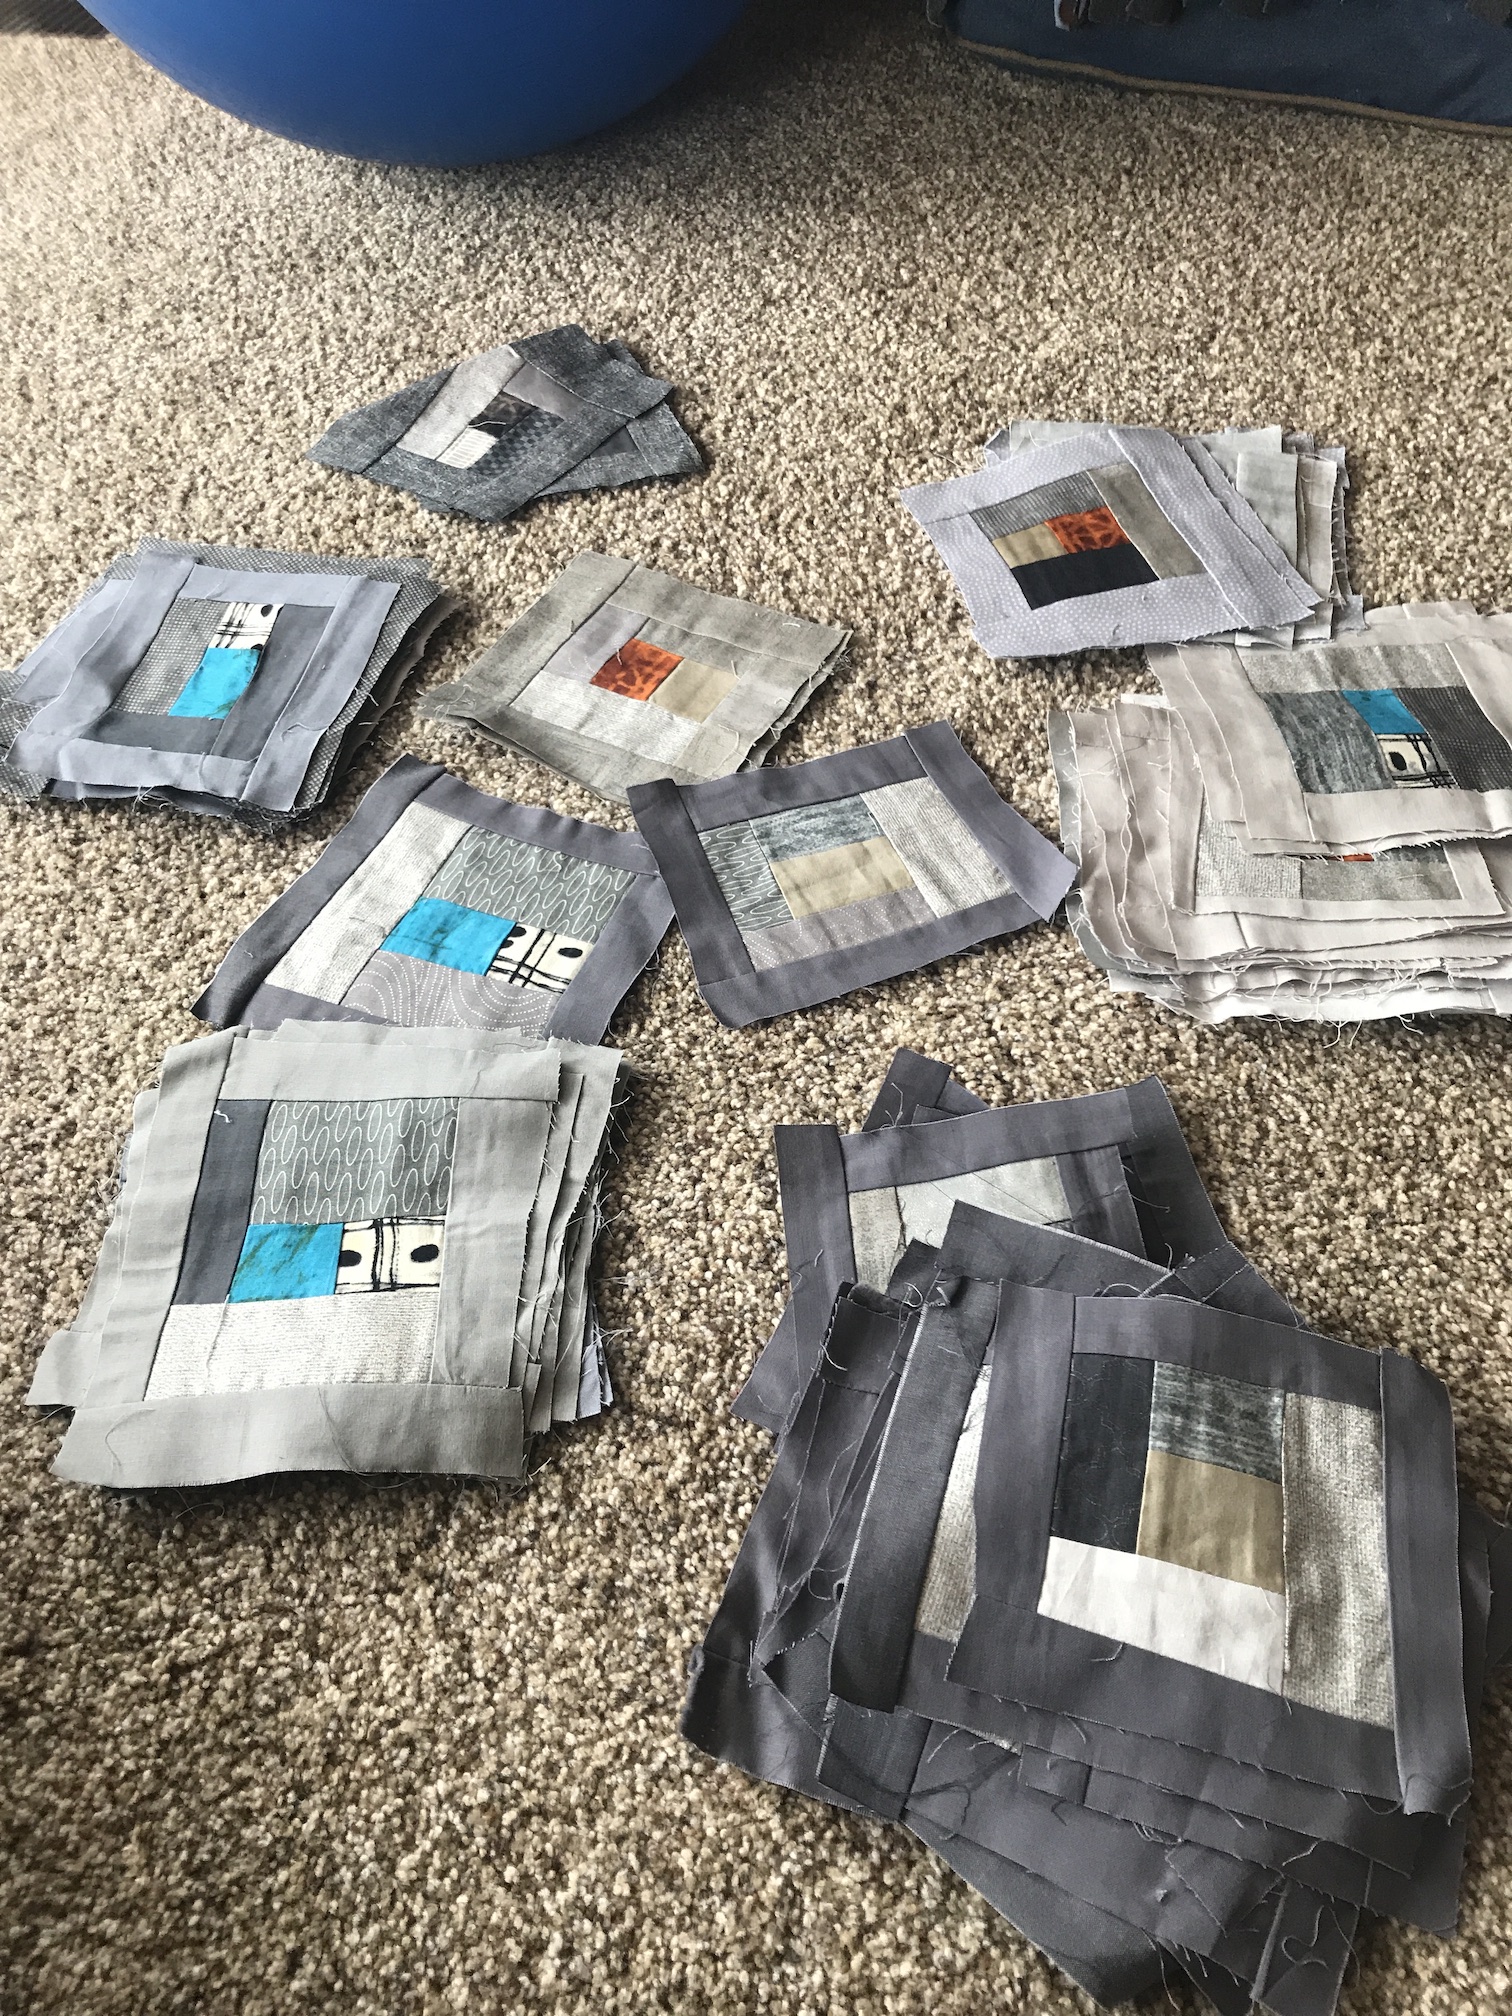 I began with creating a pattern with the dark gray framed blocks:
 Then I worked on framing them with the light gray blocks: