
This morning’s post is a follow up “What’s on the Design Wall…a “Hot Mess”?”
Yesterday I worked to turn the “hot mess” and former unfinished object (UFO) into something resembling a quilt top. I’ve named the quilt “Cozy Cobblestones” as the fabric is the Northcott Stonehenge Cobblestones line.
I promised better photos, however I was unable to keep my promise. Still struggling with the narrowness of my hallway, I had to take entire layout photos at an angle. Alas, this is one of the “cons” of having a design wall in a narrow hallway!
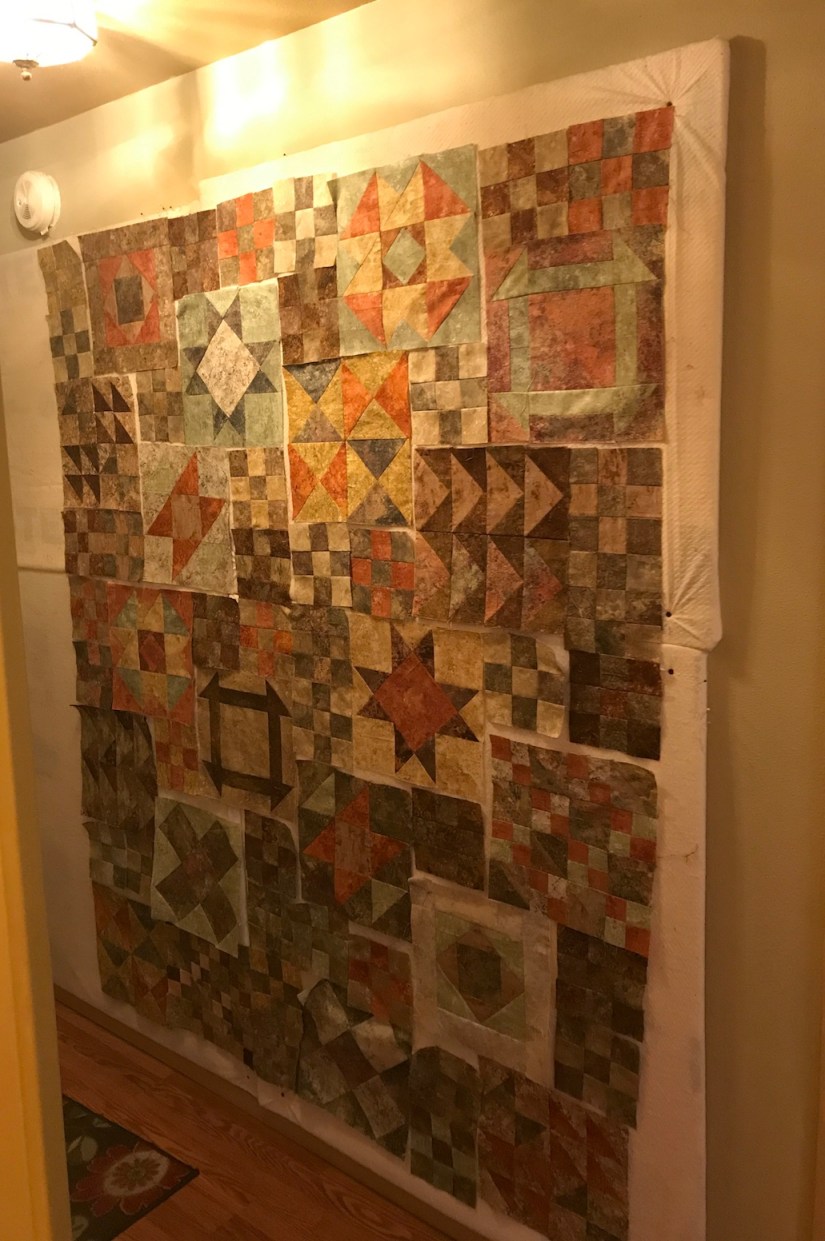
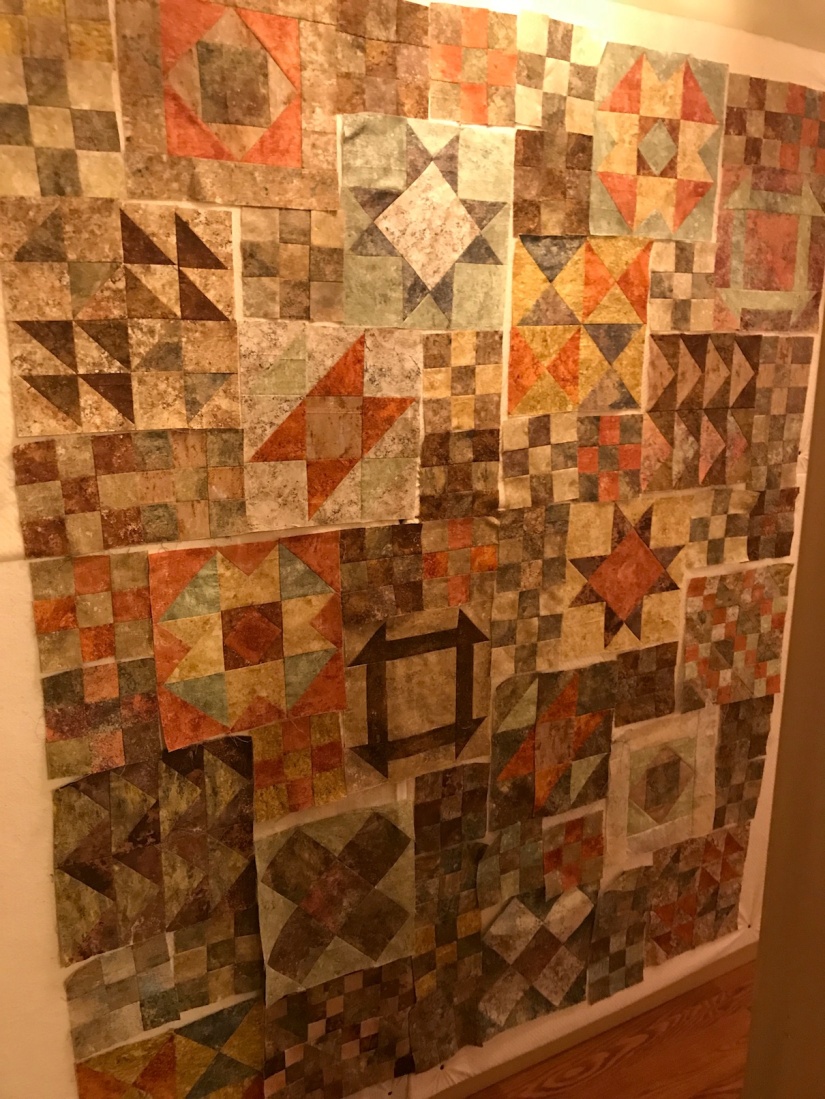
Here is one “head on” photo taken by smooshing myself against the opposite wall:

You are probably wincing at the lighting on the photos. Once I sew the blocks together, I am going to take the quilt outside for a proper photo!
I am likely going to “float” the quilt top in additional Stonehenge fabric (I think I have enough yardage to put a “float” border around it). Here is the fabric I might use (it is my only choice unless I go out and try to find some more):

Next to a section of the blocks layout:

I might use the same fabric for the binding too as I am trying to use what I have in my stash. A contrasting binding might be nice but I would have to purchase it new (and I am taking a hiatus from buying fabric right now).
Speaking of my “stash”, I put the scraps and the two remaining fat quarters that I did not use up, in a future “Challenge Bag” (see post Basket of Challenges):
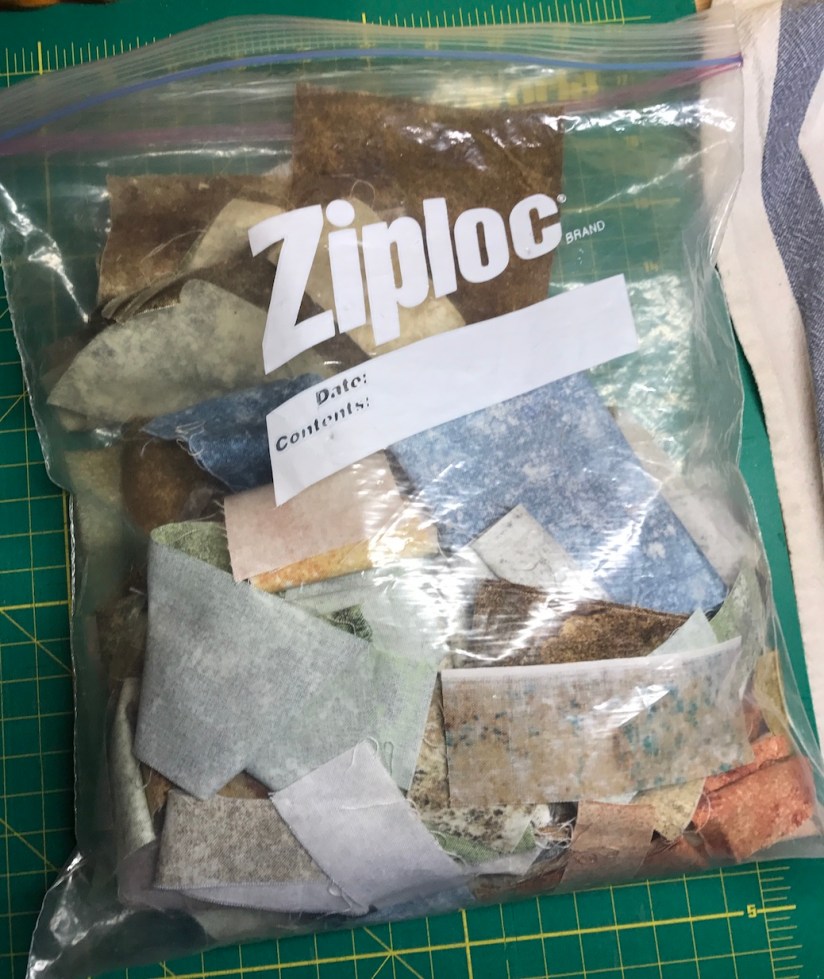
Inside the scrap bag you will see the blue scraps that I loved (from another Stonehenge line that a quilting friend donated) but could not work into the piece. We’ll see what I make in the future with this small bag of scraps.
The remaining scraps are fairly small as I worked hard to harvest any piece I could turn into a 2.5″ x 2.5″ block:
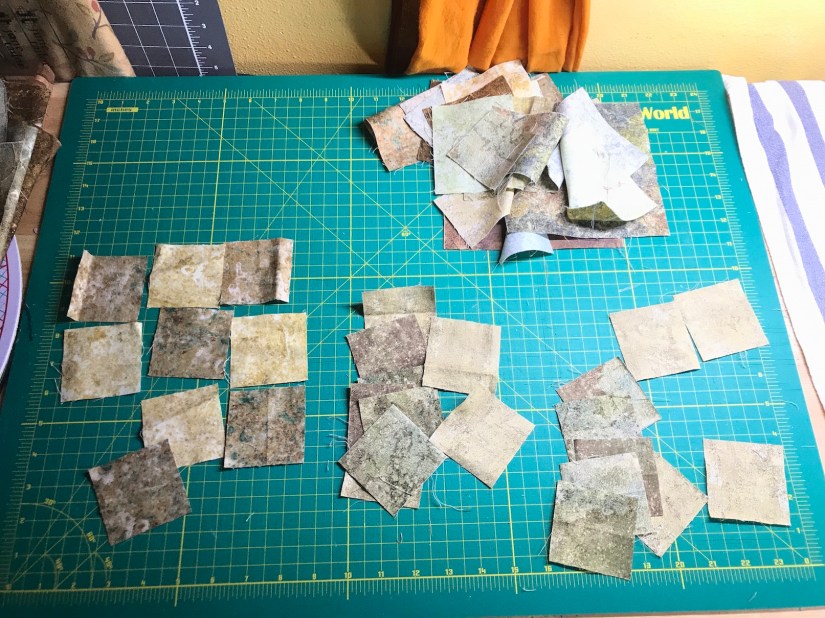
Quilters reading this may wince, but I did not have enough length of any of the scraps from piecing the original 12″ blocks to make the 6′ nine-patch blocks using the quick “strip-piecing” method. Instead I had to cut out individual 2.5″ x 2.5″ pieces and sew them together to make 42 6-inch nine-patch blocks! I did “chain-piece” the heck out the pieces after a while became a nine-patch block factory!
It was definitely an old school traditional piecing!
I am feeling pleased with my progress on the “UFOs” in this photo, this quilt top is the #4 in the photo below:
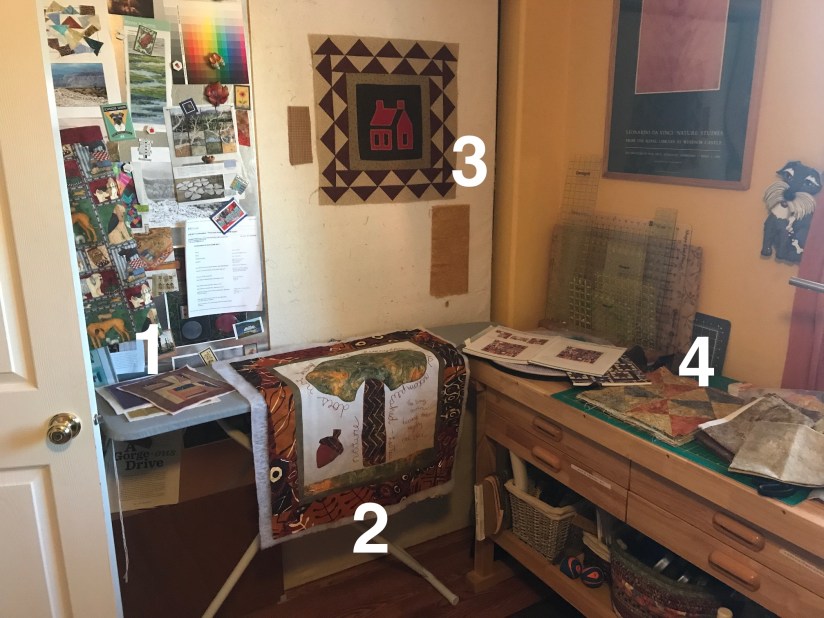
Once I get it all sewn together, I guess I need to work on the only remaining “UFO” – #3 (Medallion quilt) – but I am not feeling inspiration on that one yet!
Postscript
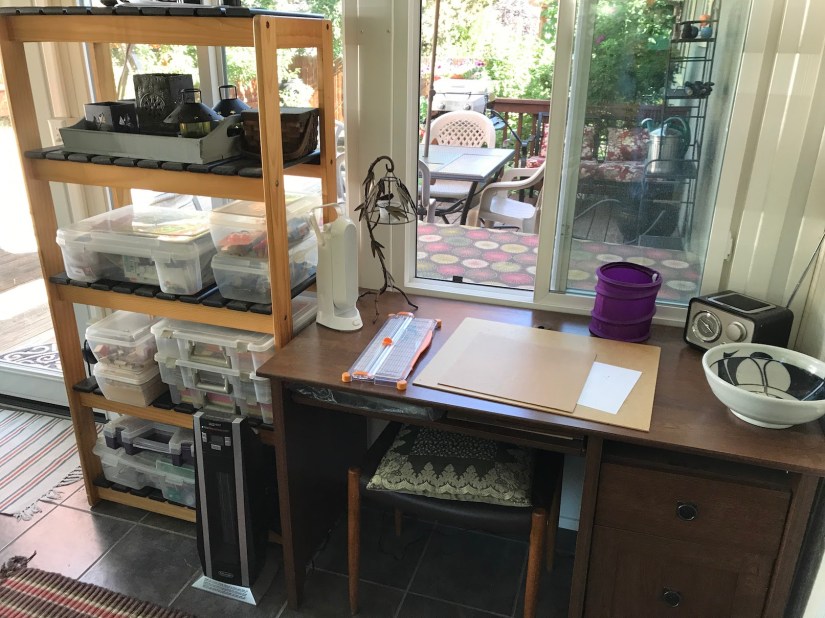
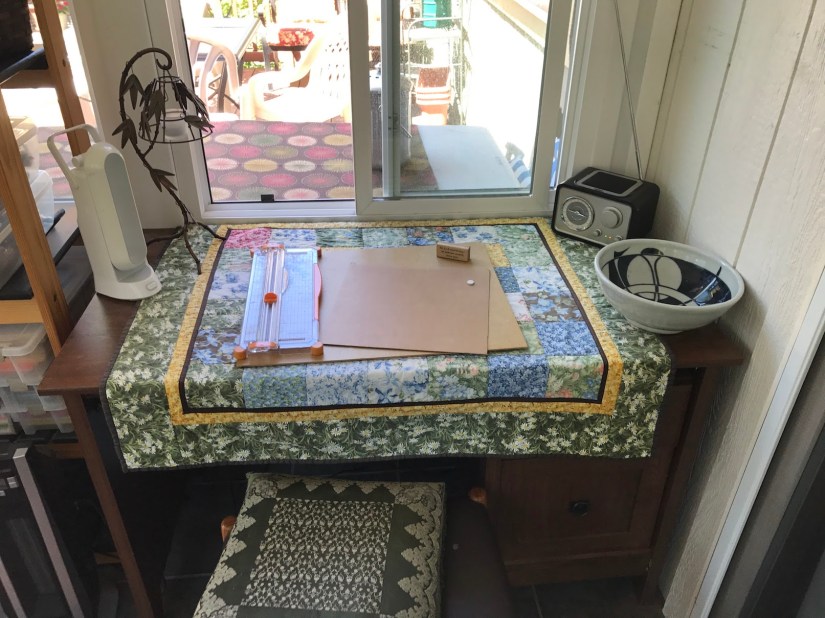
In addition to a push to complete my unfinished projects, I’ve recently experimented with a couple paper-crafting/card making projects in the paper-crafting/beading area I set up in my sunroom:
Here are the two cards I made:

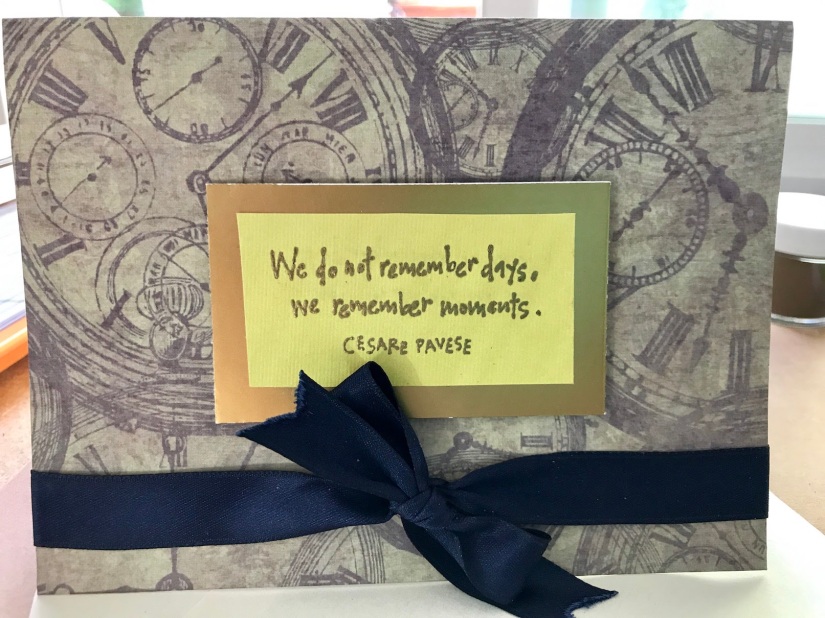
I am not sure if the recipients of these cards actually liked them, but I had fun making them. I listened to a classical radio station on my new(ish) thrift shop radio and found card making very meditative.
Card making was actually my first official crafting hobby that I did with others.
My work colleague got me started in the late 1990s. I think it opened my mind to starting quilting, which I learned shortly after. I still have many of my card making supplies from the late 1990s and early 2000s. I donated about 1/2 of those supplies to charity organizations but I still have some wonderful supplies to make more handmade cards (whether people want them or not – ha!)

Very good. 🙂 As to the 9-patches, I don’t do strip-piecing for them, or most things. I do cut individual pieces. I think the control is better for piecing accuracy, and it really doesn’t take up much more time.
LikeLiked by 1 person
Ah! I do notice a difference in accuracy, I feel like my nine patches were the most accurate I have ever done AND after a while it was very meditative to just chain piece them as a little production factory. I would cut a bunch then chain, then cut a bunch. Thanks for mentioning that in regards to accuracy – I see your point 🙂
LikeLiked by 1 person
I see I am in good company; I don’t do much strip piecing either–both for Melanie’s reason and because I don’t think it really saves much time. Also work with scraps involves cutting smaller pieces.
I love the design that is emerging.
LikeLiked by 2 people
Ah I thought everyone would cringe that I was not strip piecing, but now I see not everyone is so into the strip piecing technique! As I mentioned in response to Melanie’s comment – I agree – it felt so much for accurate and it was not bad at all 🙂
LikeLike
I like to have many methods, techniques, approaches, etc. to choose from— I too cut individual pieces for the same reasons- better accuracy and working with small scraps. No wincing here!
The theme of cobblestones and the stone like colors of the fabrics and a border that floats the pieced top led me to wondering this: what about using that fabric to make “grout” between blocks or sections of blocks? This could be sashing or a narrow strip around the blocks or sections….Then if you had enough, a bit around the outside edge too. Just vicariously enjoying your design process—-
LikeLiked by 1 person
I like the idea of the grout and I did that on another “tile floor themed quilt” I made but I am not that inspired to do all that cutting for the grout 🙂 I just want to sew it all together at this point, ha, and move onto the next UFO. But I will mull over that grout idea a little longer before I start sewing them together, thanks! 🙂
LikeLike
You do beautiful work!
LikeLiked by 1 person
Thanks so much 🙂
LikeLiked by 1 person
I really like your choice of border fabric. Looking forward to seeing more of it. Your cards are lovely and I’m sure the person(s) that received them loved them.
LikeLiked by 1 person
Thanks so much 🙂
LikeLiked by 1 person
I love what you are doing with those muddy (not in a bad way) colors. The quilt is beautiful, especially with the Stonehenge fabrics and the subtle earthy colors. Thanks for smooshing yourself against the wall for the photos for us!
LikeLiked by 1 person
Thanks Martha and once it is sewn together and I can take it outside – I can take a non-smooshing photo 🙂
LikeLike
Beautiful block-work, Tierney. I think the blocks will look great with the Stonehenge border, and I admire how resourcefully and carefully you treat your materials. The knitter’s stash is a kind of equivalent to the challenge bag (maybe one *big* challenge bag, lol), but I love the idea of sorting remnants after a project to make sure they all get a good home, eventually. Lovely card-crafting, too! Looking forward to seeing more. 🙂
LikeLiked by 1 person
Why thank you, I appreciate all your thoughtful comments! I cannot wait to show you all what it really looks like with a real non hallway photo – ha!
I love my new card crafting station and I hope it leads to ,more cards and eventually returning to some beading! I do my knitting (well making the same hat pattern over and over again) in the living room at my living room craft station. I told my husband if it were up to me, the whole house would just be a crafting center – ha!
LikeLiked by 1 person
Ha! Living in a crafting center sounds like a dream-house to me. 🙂 You’re so multi-talented! ❤
LikeLiked by 1 person
Oooh, this is going to look great! I love the pebbly hues and textures of your fabric in this one, and – ta daaaaah! – another UFO bites the dust! 😀
LikeLiked by 1 person
Thank you! I think once I get it assembled and can get a real photograph it will look even cooler in photographs! My sad hallway photos are not doing is justice 🙂
LikeLiked by 1 person
Another amazing quilt in the making! Love all the colors.
Love the card making station and the open airy feel of your chosen workspace. I’m sure the card recipients did love and enjoy the very creative cards!
LikeLiked by 1 person
Thanks so much I really appreciate your comments! 🙂
LikeLiked by 1 person
Lol, I feel your pain. Photographing art projects is almost always challenging for me. There are very few places in my home that I can declare photo,friendly. Btw, I think the view from the left gives the best angle. :o) The backing you have seems very appropriate for your quilt and the binding. I definitely would not use a contrasting fabric. Way to go on nailing the UFO CHALLENGE! You are making wonderful progress. I wish I could say the same. Looking forward to seeing what you make with your challenge bag.
LikeLiked by 1 person
Thank you! Okay I will kept the left in mind next time I am trying to do my narrow-hallway photography! Yes it was my own made up UFO challenge and once I finish this series, I am going to set out another series. My eventual goal is not to have old moldy projects hanging around. As far as the challenge bag – it will have to get in line with the other challenge bags – ha! I want to start playing with some now (I gaze at them longingly) but MUST STAY FOCUSED 🙂
LikeLiked by 1 person
Beautiful! And…I would say the card recipients loved those cards. Works of art! Very thoughtful.
LikeLiked by 1 person
Thank you 🙂
LikeLiked by 1 person
I like the potential border fabric you already have! (Not that you shouldn’t buy more fabric…)
LikeLiked by 1 person
Thank you! I want to buy endless fabric but then I don’t want to have to be buried (you know when I am like 100) with fabric – ha!
LikeLike