Studio, What's on the Design Wall

What’s on the Design Wall: Backlog

Not all quilters are like me: saddled with a backlog of projects. I know quilters who (they are freaks!) work on ONE project at time, seeing it through completion, and not starting another project until their current project is complete.

My mind does not work that way. I am basically that golden retriever in the movie Up, who says “Squirrel!“when I see a new project to start. I am easily distracted and I tell myself I will get back to the current/previous project eventually.

I was having a bit of creative block on designing a new art quilt and I realize I need to work through my project backlog. So here it is sitting up the cutting table, festering:


IMG_1252

In this pile under the cutting table, I discovered 120+ 6.5 inch log jam blocks (scrappy pieced log cabin style blocks) that I had pieced earlier this year. With the assistance of Terry the Quilting Husband, I got them sewn together and now they are on the Design Wall awaiting assembly of the rows.

IMG_1251

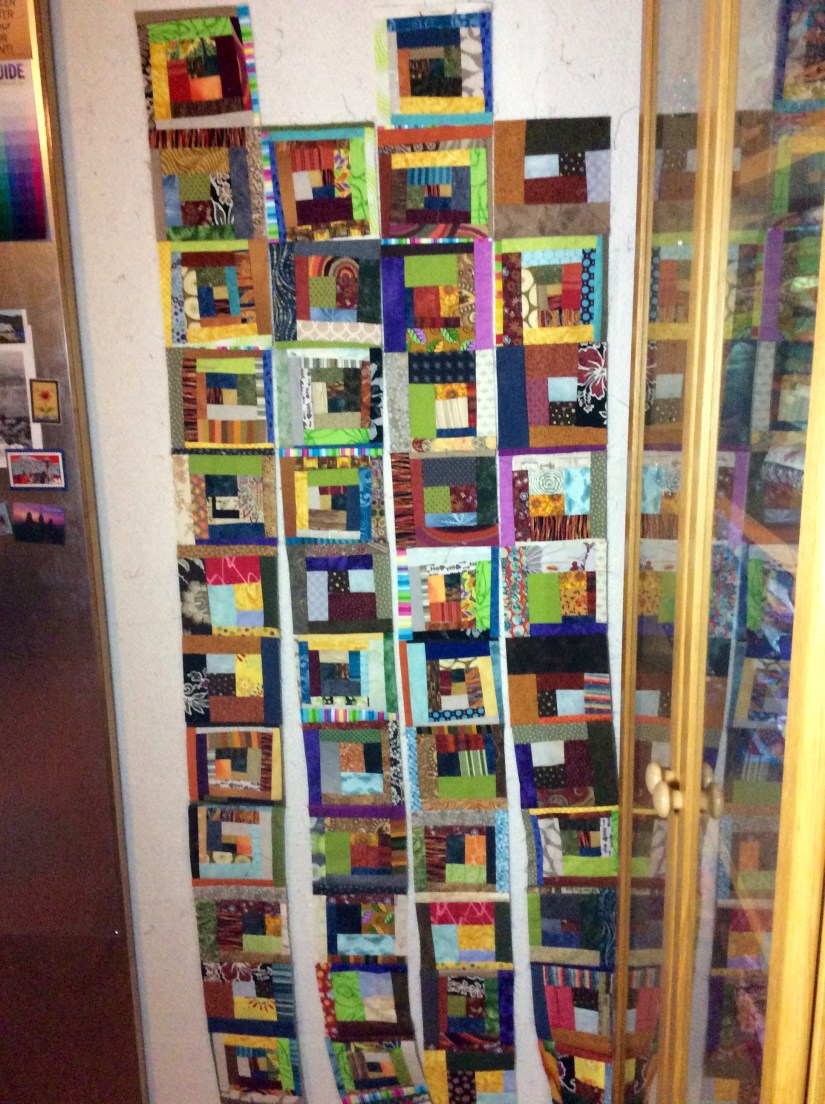
I have a total of 10 rows with 12 blocks in each row. I am hoping that by floating the pieced blocks in a solid color border, I can make it a twin, full or queen size quilt top. I will post a photo when the top is complete (before it journeys to the long-arm quilter).

“Never put off till tomorrow what may be done day after tomorrow just as well.” – Mark Twain

Fabric Scraps Obsession

It’s a Keeper!

Check out Sassy the Highly Opinionated Miniature Schnauzer’s latest musings on the Schnauzer Snips page; and check out the latest updates on the Textile Adventures page. 

UPDATE

A little update to the post What’s on the Design Wall: “Log Jamming”:

Terry, the “Quilting Husband” really got into making “log jam” style free form log cabin blocks. He ended up making over 100+ 6.5 inch x 6.5 inch blocks. We set them in 10 x 10 rows to create a quilt top. Betty Anne Guadalupe of Guadalupe Designs professionally quilted the top.

Log Jam by Terry (2015). Quilted by Betty Anne Guadalupe.

The plan was to list it on the tierneycreates Etsy Shop but I fell in love with it and decided – IT’S A KEEPER!  So now it is displayed on our dining room wall.

I have pieced many 6.5 inch by 6.5 inch log jam blocks myself (they are a fun and meditative way to use up fabric scraps) and I am thinking of making a Queen size (yikes) quilt with them for sale at the 2016 Sisters Outdoor Quilt Show.  First I will have to see how many I have done and then do some math (yikes, again) to figure out how many I will need (hint: 100 blocks only made a lap size quilt…).

POSTSCRIPT

I am not sure how it happened, but my previous post Because Nice Matters, was my 100th blog post! I remember when I started the tierneycreates blog in October 2013, I did not imagine getting to my 100th post (I was just happy to be at 5 posts!). It has been so fun so far connecting with other bloggers and I so appreciate my readers and followers! 

Fabric Scraps Obsession, Studio

Collaborative “Jamming”

I taught “The Quilting Husband”, Terry a couple months ago how to make log jam blocks. If you would like to know more about log jam blocks and “log jamming”, see these posts:

Terry, loaded with a box of color coordinated scraps I pre-selected, made endless 6 1/2 inch log jam blocks (120+) and put a dent in my scraps (a small dent but any dent is appreciated!).

Then he took a 100 of the 6 1/2 inch block and created a 10 x 10 quilt. It was a collaborative process as he completed ten – 10 block rows, and I did the final sewing of the ten rows together to make the quilt top. Terry, The Quilting Husband, is not much for matching seams to sew rows together, but that is okay – look at how much he accomplished!

Now I am working on putting the back of the quilt together so it can go to the long-arm quilter!

Then comes the decision – keep it or list it on the Etsy site for sale. We will likely list it for sale…we’ll see…

Colorful Jam by tierneycreates and terrycreates!
Creative Inspiration, Fabric Scraps Obsession

Creative Inspiration: Organization?!?!?

Continuing my series of posts on sources of Creative Inspiration…

HOW ORGANIZING MY SCRAPS GOT ME INSPIRED

Sounds like a testimonial, right?

“At first my life was empty of direction and meaning and then I organized my fabric scraps and suddenly everything was much much much better!” – Anonymous Scrap Hoarder

Not exactly. However organizing my fabric scraps last evening did inspire my creativity!

I love fabric scraps and I have quite a collection. I have several blog posts about my love of scraps. My fabric scraps were getting out of control and were in two fairly large boxes. I enjoy the “hunt” for the right fabric scraps when creating a scrappy quilt, but found I grew irritated with not being able to easily find the colors I want.

So I decided to organize my fabric scraps in two ways, to give me flexibility of how I create with fabric scraps:

  1. By color
  2. All thrown in a box (random)

This new system allows me to create fabric scrap pieces (quilts, pillows, wallhanging, table runners, etc.) based on my “creative mood”. I might want to work on a piece that it focused on oranges, yellows and reds; or I might want to work on a piece that is very scrappy and more random. Now I have two options!

I am interested in working on some pieces in the future that are more monochromatic but with fabric of different patterns and textures in the same general color. Having fabric scraps organized by color will make this design process easier.

As I was organizing my fabric scraps I got very excited as ideas for new pieces ran wildly through my head!

So…

Sometimes I want to create from these containers…

IMG_0679

And sometimes I want to create from this box…

IMG_0684

Happy Crafting!

Studio, What's on the Design Wall

What’s on the Design Wall: Pre-cuts Wrangling

Pre-cuts Wrangling!?!?! What does she mean? Has she been sniffing her fabric glue sticks (normally used for appliqué, not as recreational substances)?

“Pre-cuts” = Those addicting beautifully coordinated collections of pre-cut fabrics in common sizes such as 2 1/1 inch strips, 2 1/2 inch squares, 5 inch squares (aka “charm squares”), 10 inch squares, fat quarter (18 x 22 inch sections of fabric) bundles, and various other tempting configuations.

Wrangling = “To tend or round up” (Dictionary.com)

I have a lot of precuts, more than I need. Likely more than any human needs. I appear to use them to decorate my crafting studio.

Decided to do something crazy – actually USE them instead of just decorate with them!

In my post What’s on the Design Wall: Rediscovering my Charms I discuss delving into my charm pack (5 inch squares) collections and using them to make quilts and wallhangings. Taking a break from charm packs, I have moved to a smaller size of pre-cut – the 2 1/1 inch square pack. I wrangled up my collection of 2 1/2 square pre-cut packs and selected several colorful Rowan/Westminster Fabric packs to create a series of “16 patch” blocks to turn into a quilt. I pieced the 16 patch blocks into a scrappy “postage stamp” style quilt.

I provide some very general simple directions for wrangling your 2 1/2 inch pre-cut packs into a scrappy quilt below the photos.

 2 1/2 Pre-Cut Quick Quilt (Wrangle & Design As You Go)

  1. Wrangle a couple packs of 2 1/2 squares (approximately 42 squares in each pre-cut pack) – I think I used 2 or 3 to start
  2. Chain piece non matching pairs of the squares – you will end up with a series of 2 patches
  3. Chain piece the pairs (2 patches) to another set of pairs (2 patches) – you will end up with a series of 4 patches
  4. Chain piece the 4 patches to another 4 patch – you will end up with a series of 8 patches
  5. Chain piece the 8 patches to another 8 patch and finally you will have a series of 16 patch blocks
  6. You can be careful and match your seams, and press between each patch construction or throw caution to the wind and not press until you complete the 16 patch
  7. Sew the 16 patch blocks into rows and then the rows together in to a quilt top
  8. Wrangle and Design As You Go – you might discover you need another 2 1/2 pack to get the size of quilt you want or you might have to save some 8 patches and use them on the side or bottom of the quilt to even out the rows. I used my design wall to decide what block “mathematical configuration” to use. I started with 4 x 7 (4 blocks in a row, 7 rows) but that seemed too narrow. I finally decided on a 5 x 6 quilt (5 blocks in a row, 6 rows of 5 blocks) and will take the row of blocks off the bottom of the design wall, add a couple more and add 1 additional block to each row.


If you are a new quilter or a future quilter and are unfamiliar with how to “chain piece”, check out numerous free online instruction videos available on YouTube or other sources.