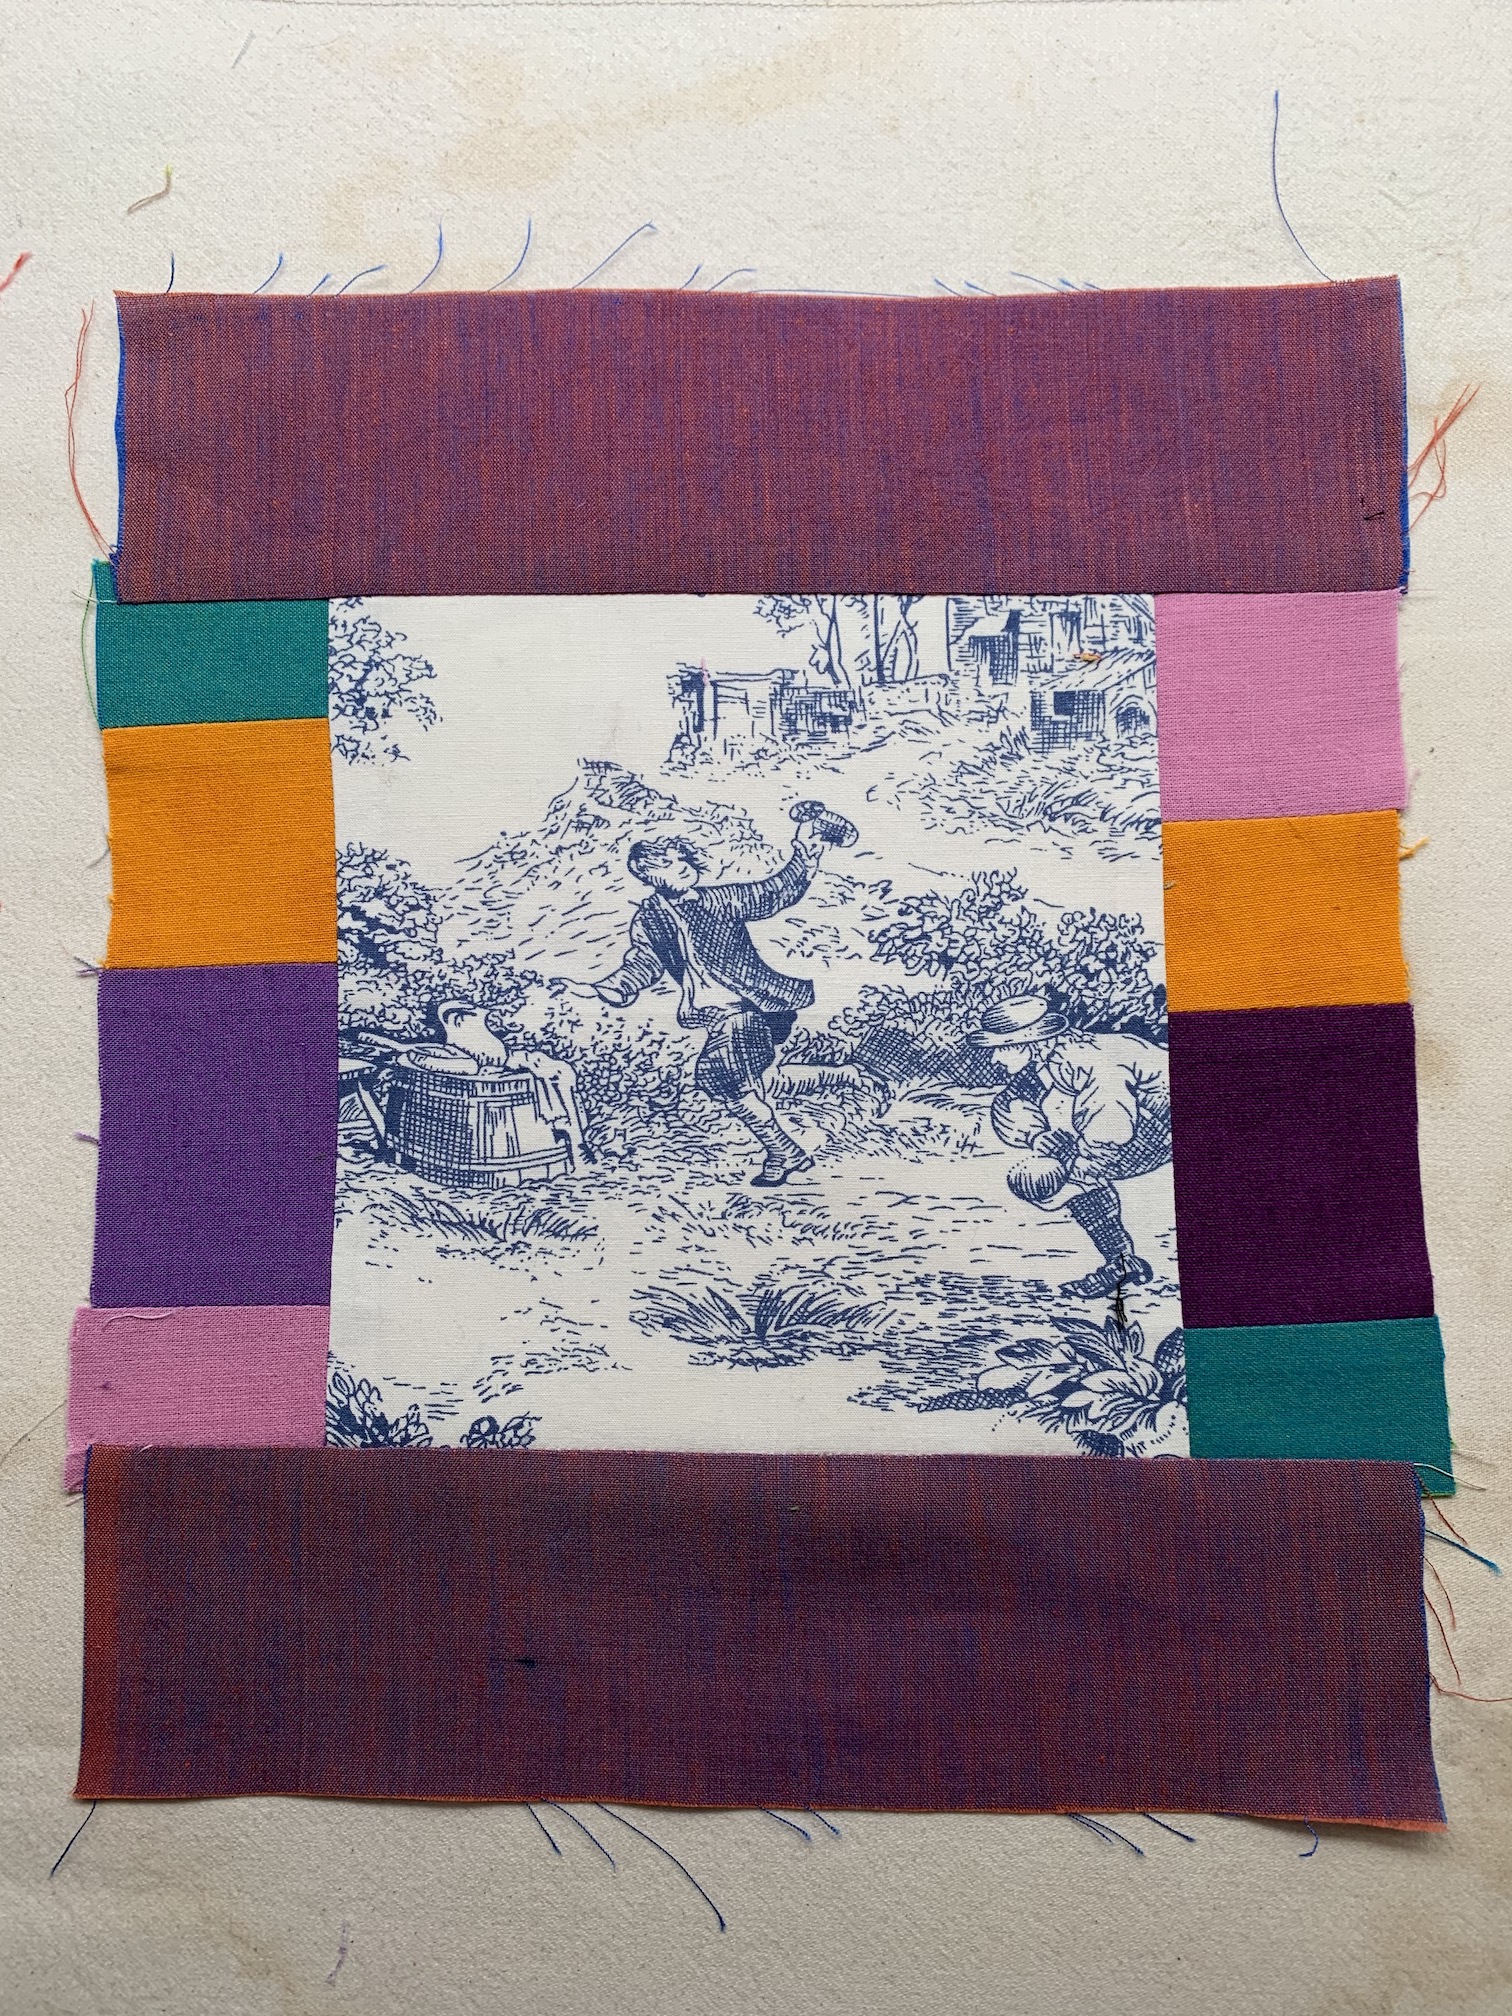
My friend the quilt artist, quilt book author, and quilting teacher, Wendy Hill (@wendyquilter) was generous enough to send me a package of good mail the other week.
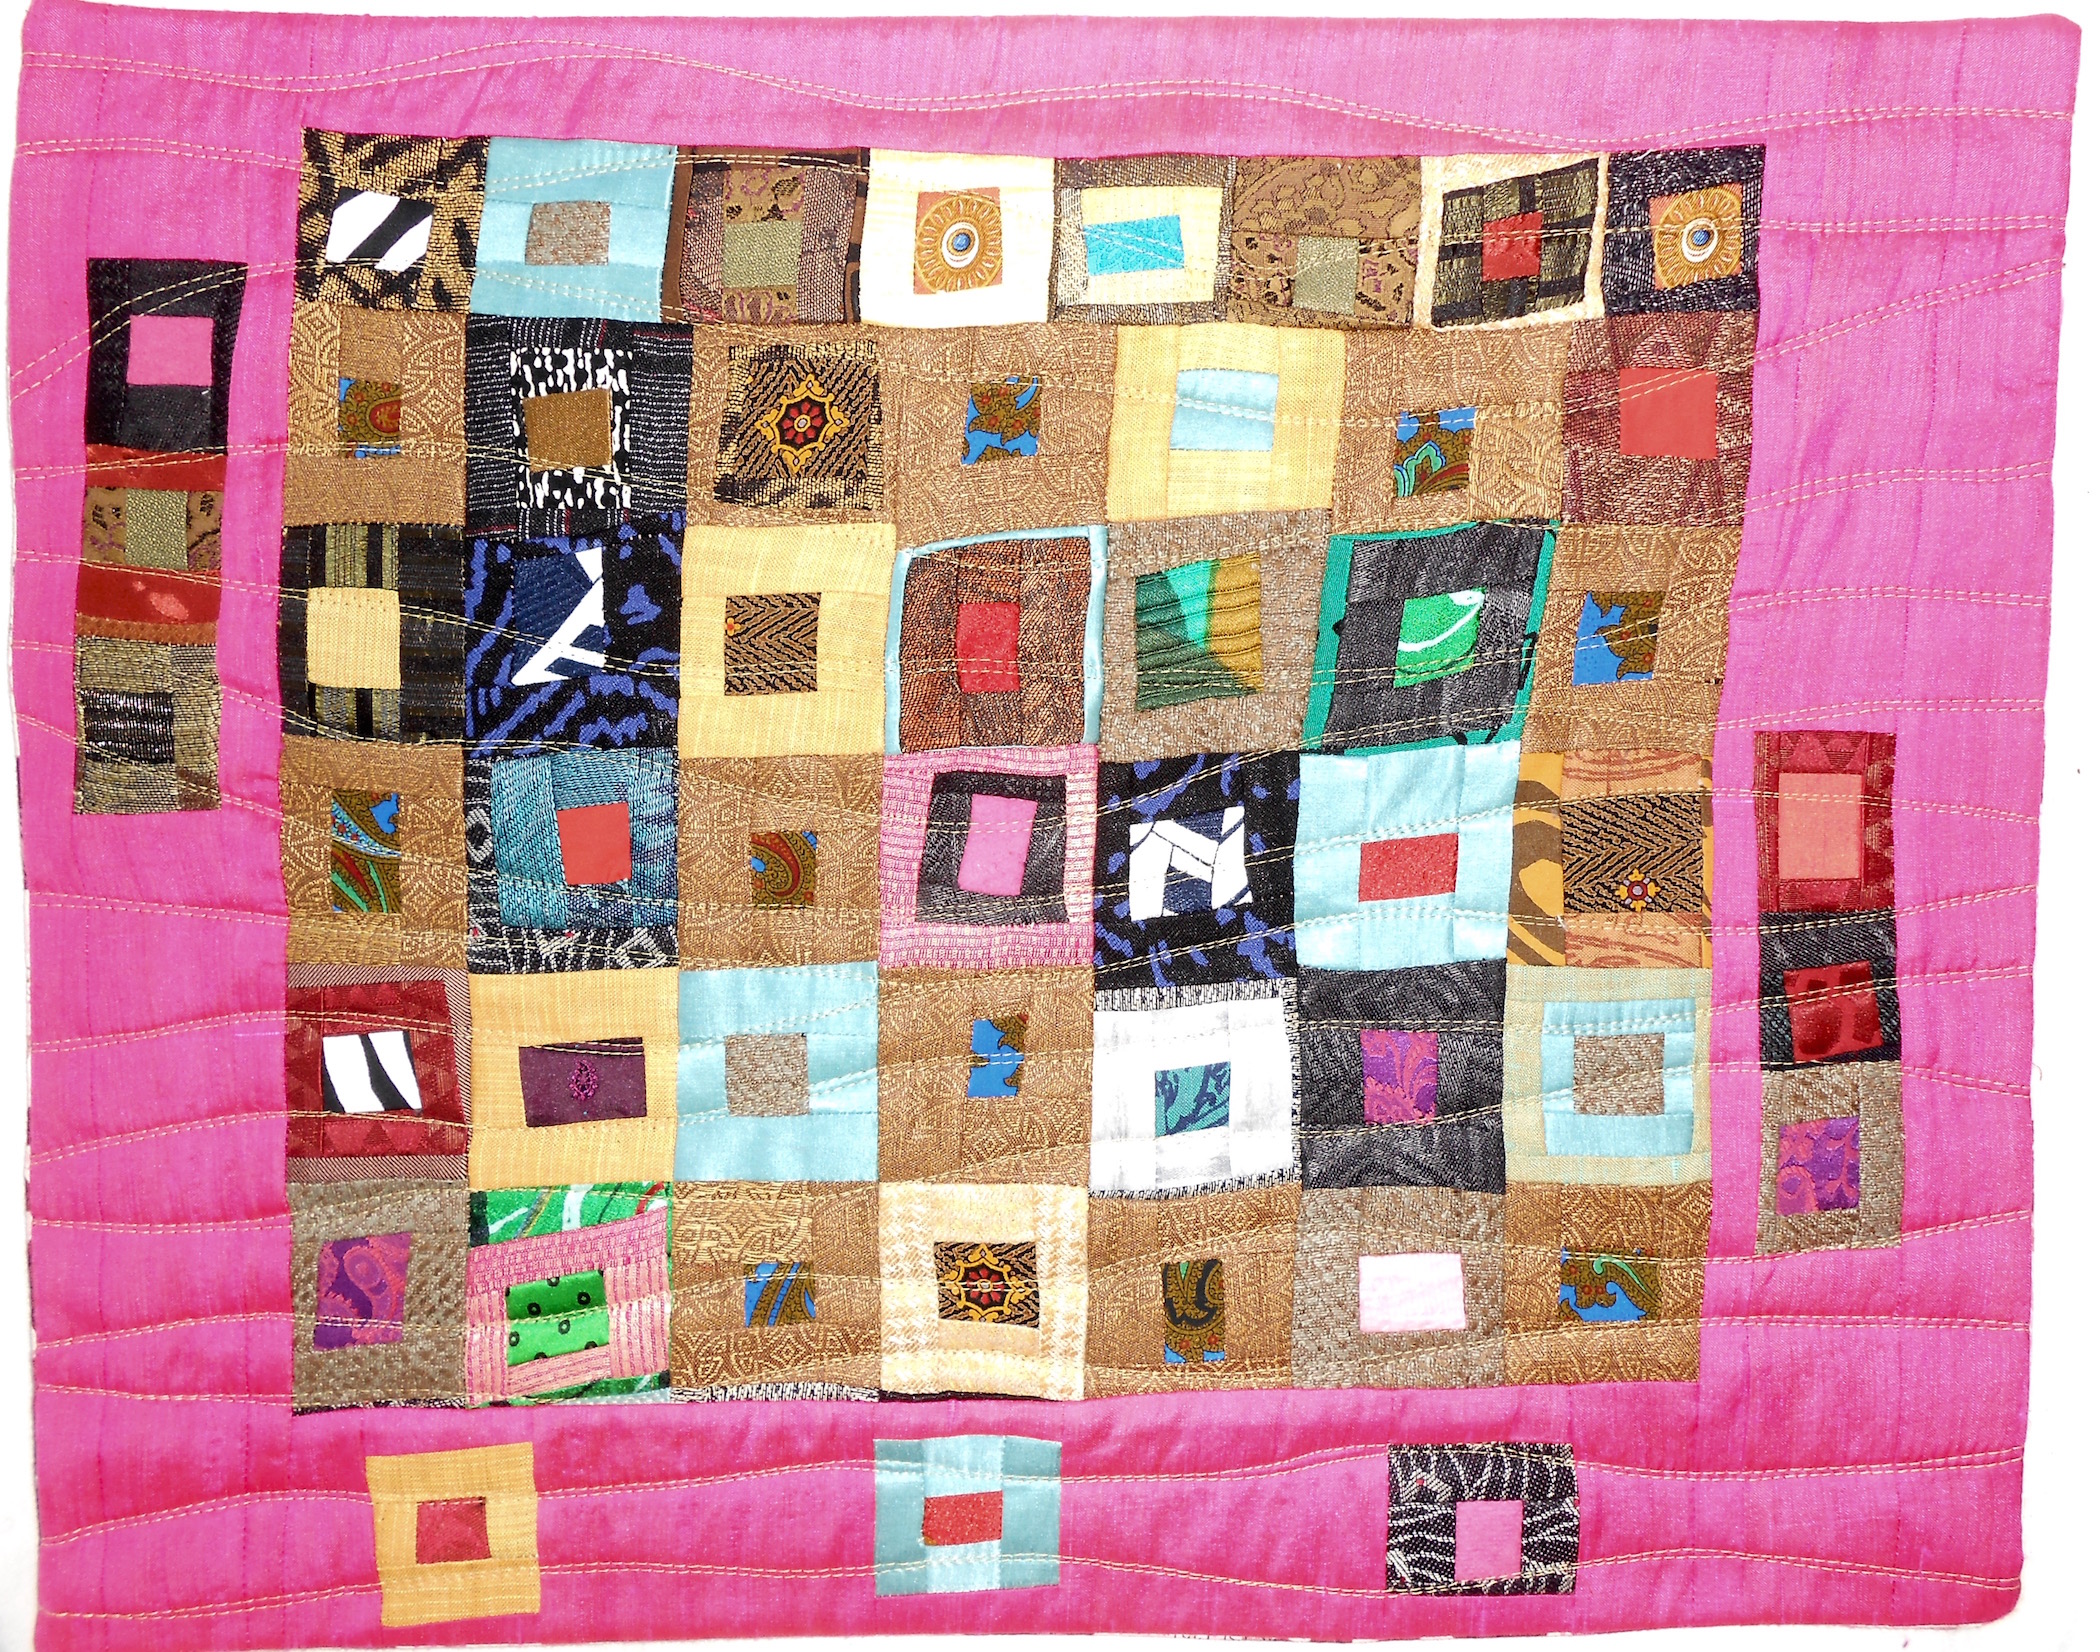
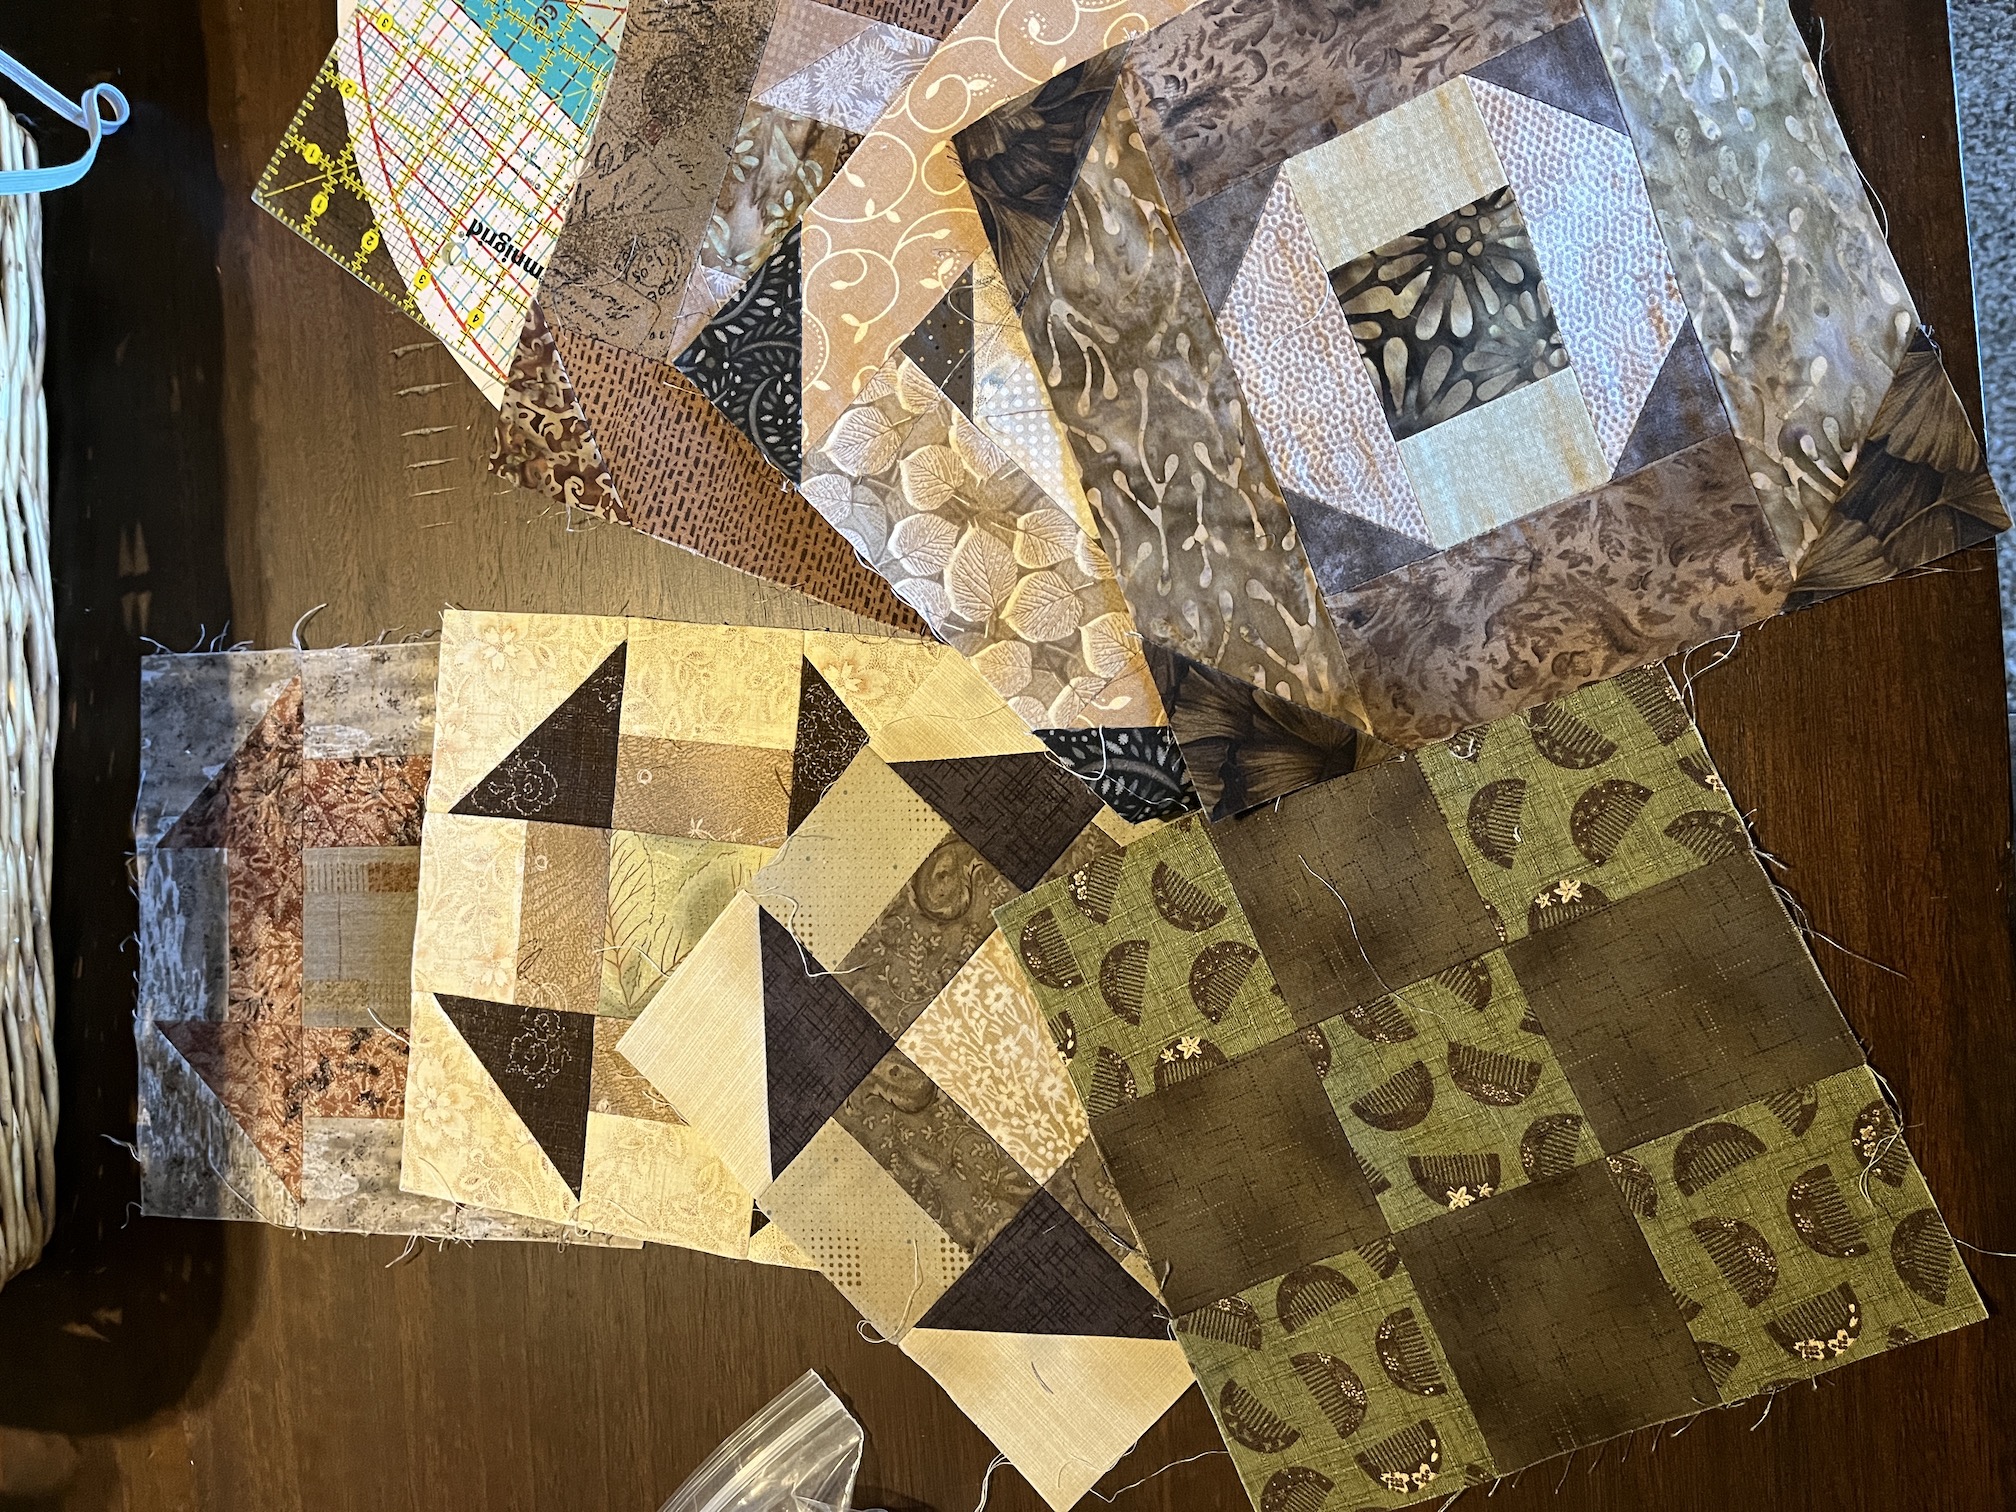
Inside the package were fabric scraps (small and large to very large) and completed blocks from when she was fascinated with making “Taupe” quilts.
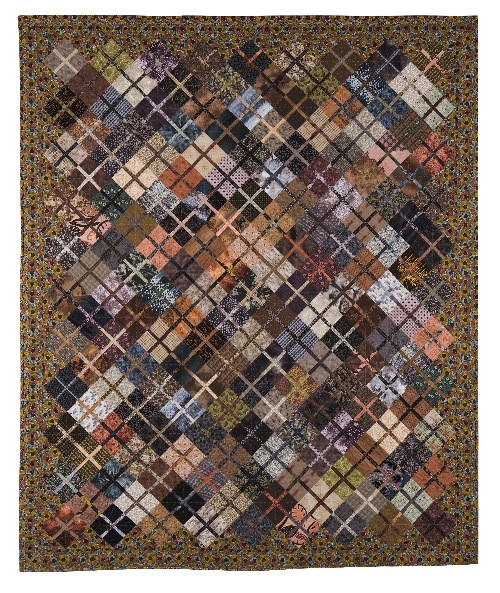
She had an article in the July/August 2007 publication Quilters Newsletter Magazine which discussed Taupe quilts and featured her amazing Taupe quilt – Isotaupe.
Here is an image of it from her website (she now uses Instagram as her primary social media) Wendy Hill Quilt Artist:
image credit: wendyhill.net
This image does not do it justice, it is amazing in person; and I first saw either this quilt or another Taupe quilt of Wendy’s at an art quilting show when I lived in Central Oregon. It was before I knew Wendy as a friend, she was an amazing local artist and quilt book author.
I got to know Wendy through running in to her at the Stitchin’ Post in Sisters, Oregon. I believe it was at the annual Pajama Sale (see this old post of mine for information about the annual Stitchin’ Post Pajama Sale where you would get huge discounts on fabric if you showed up in the PJs before 8:00 am – Pajama Sale and Finished Pieces, a lot of great memories of attending that each year…), when I was working on my first Taupe quilt and Wendy consulted on fabrics and admired my blocks in progress (I cannot find a picture of that quilt which I gave as a gift to someone long time ago…)
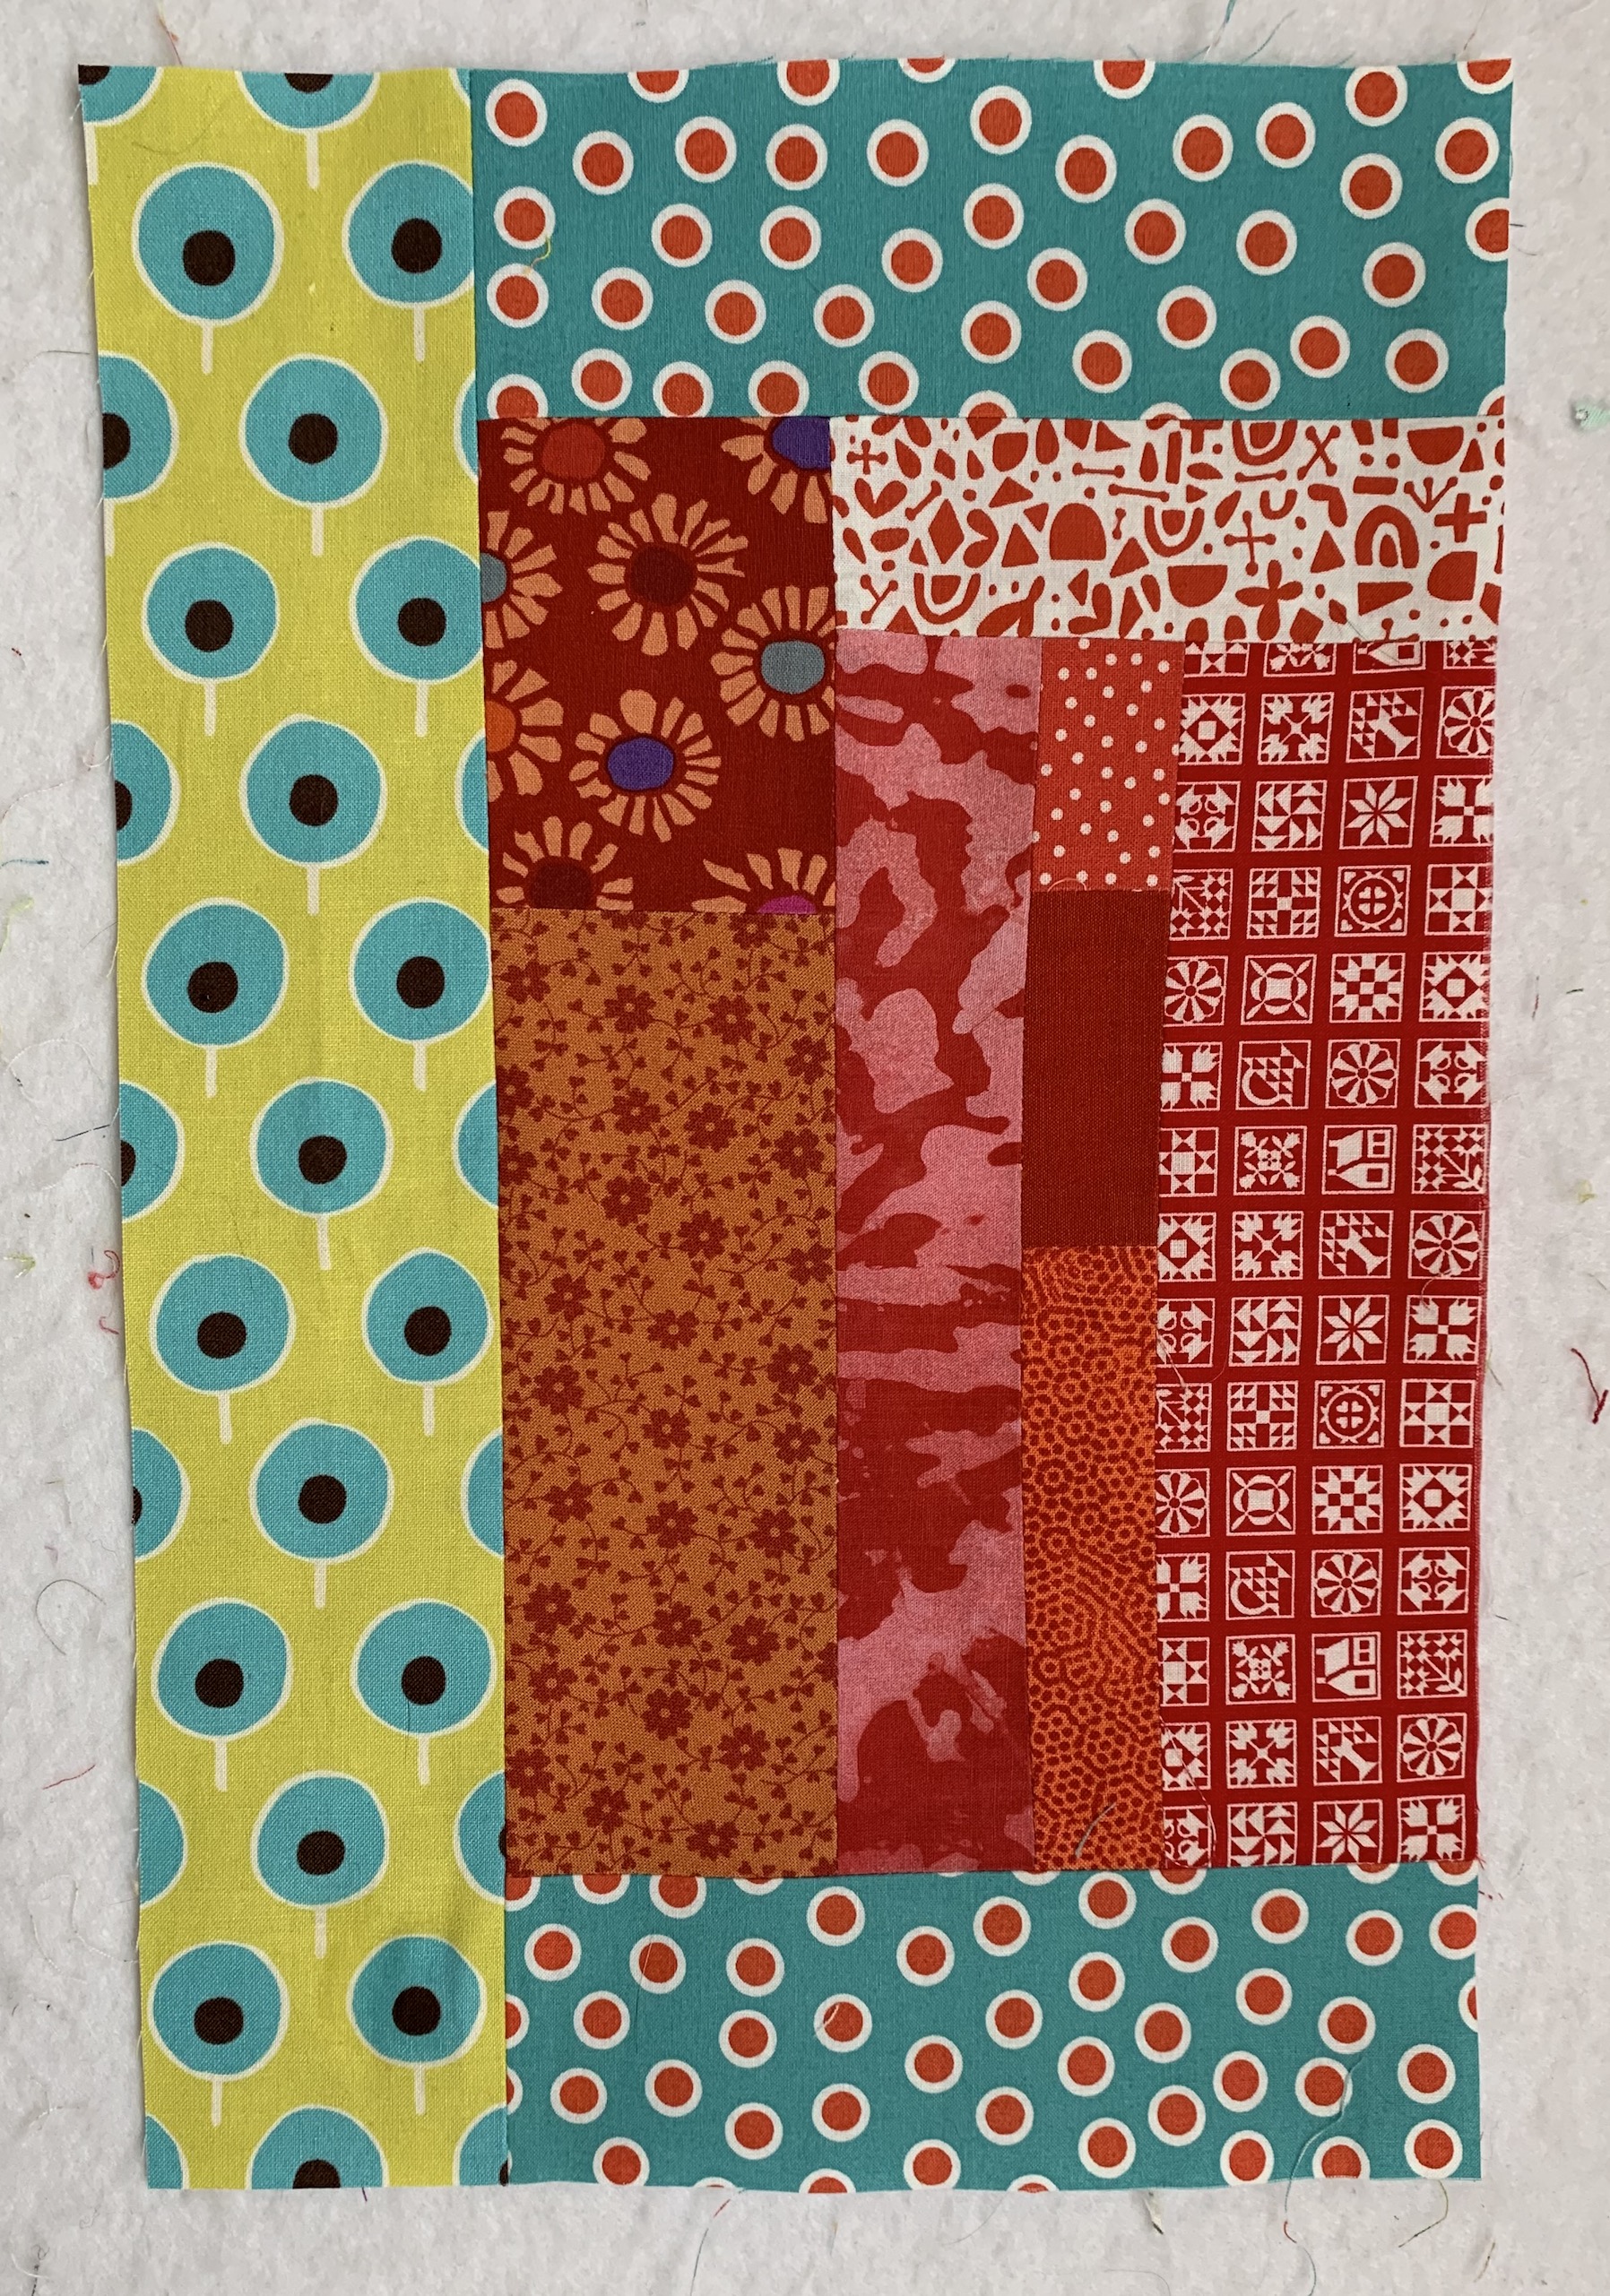
So Wendy knew of my love for Taupe quilts and how much I was blown away with her Taupe quilts; and recently she was Spring Cleaning and sent me the lovely package of Taupe fabrics and blocks from quilts in progress that she decided not to complete.
Example of some of the blocks she sent:
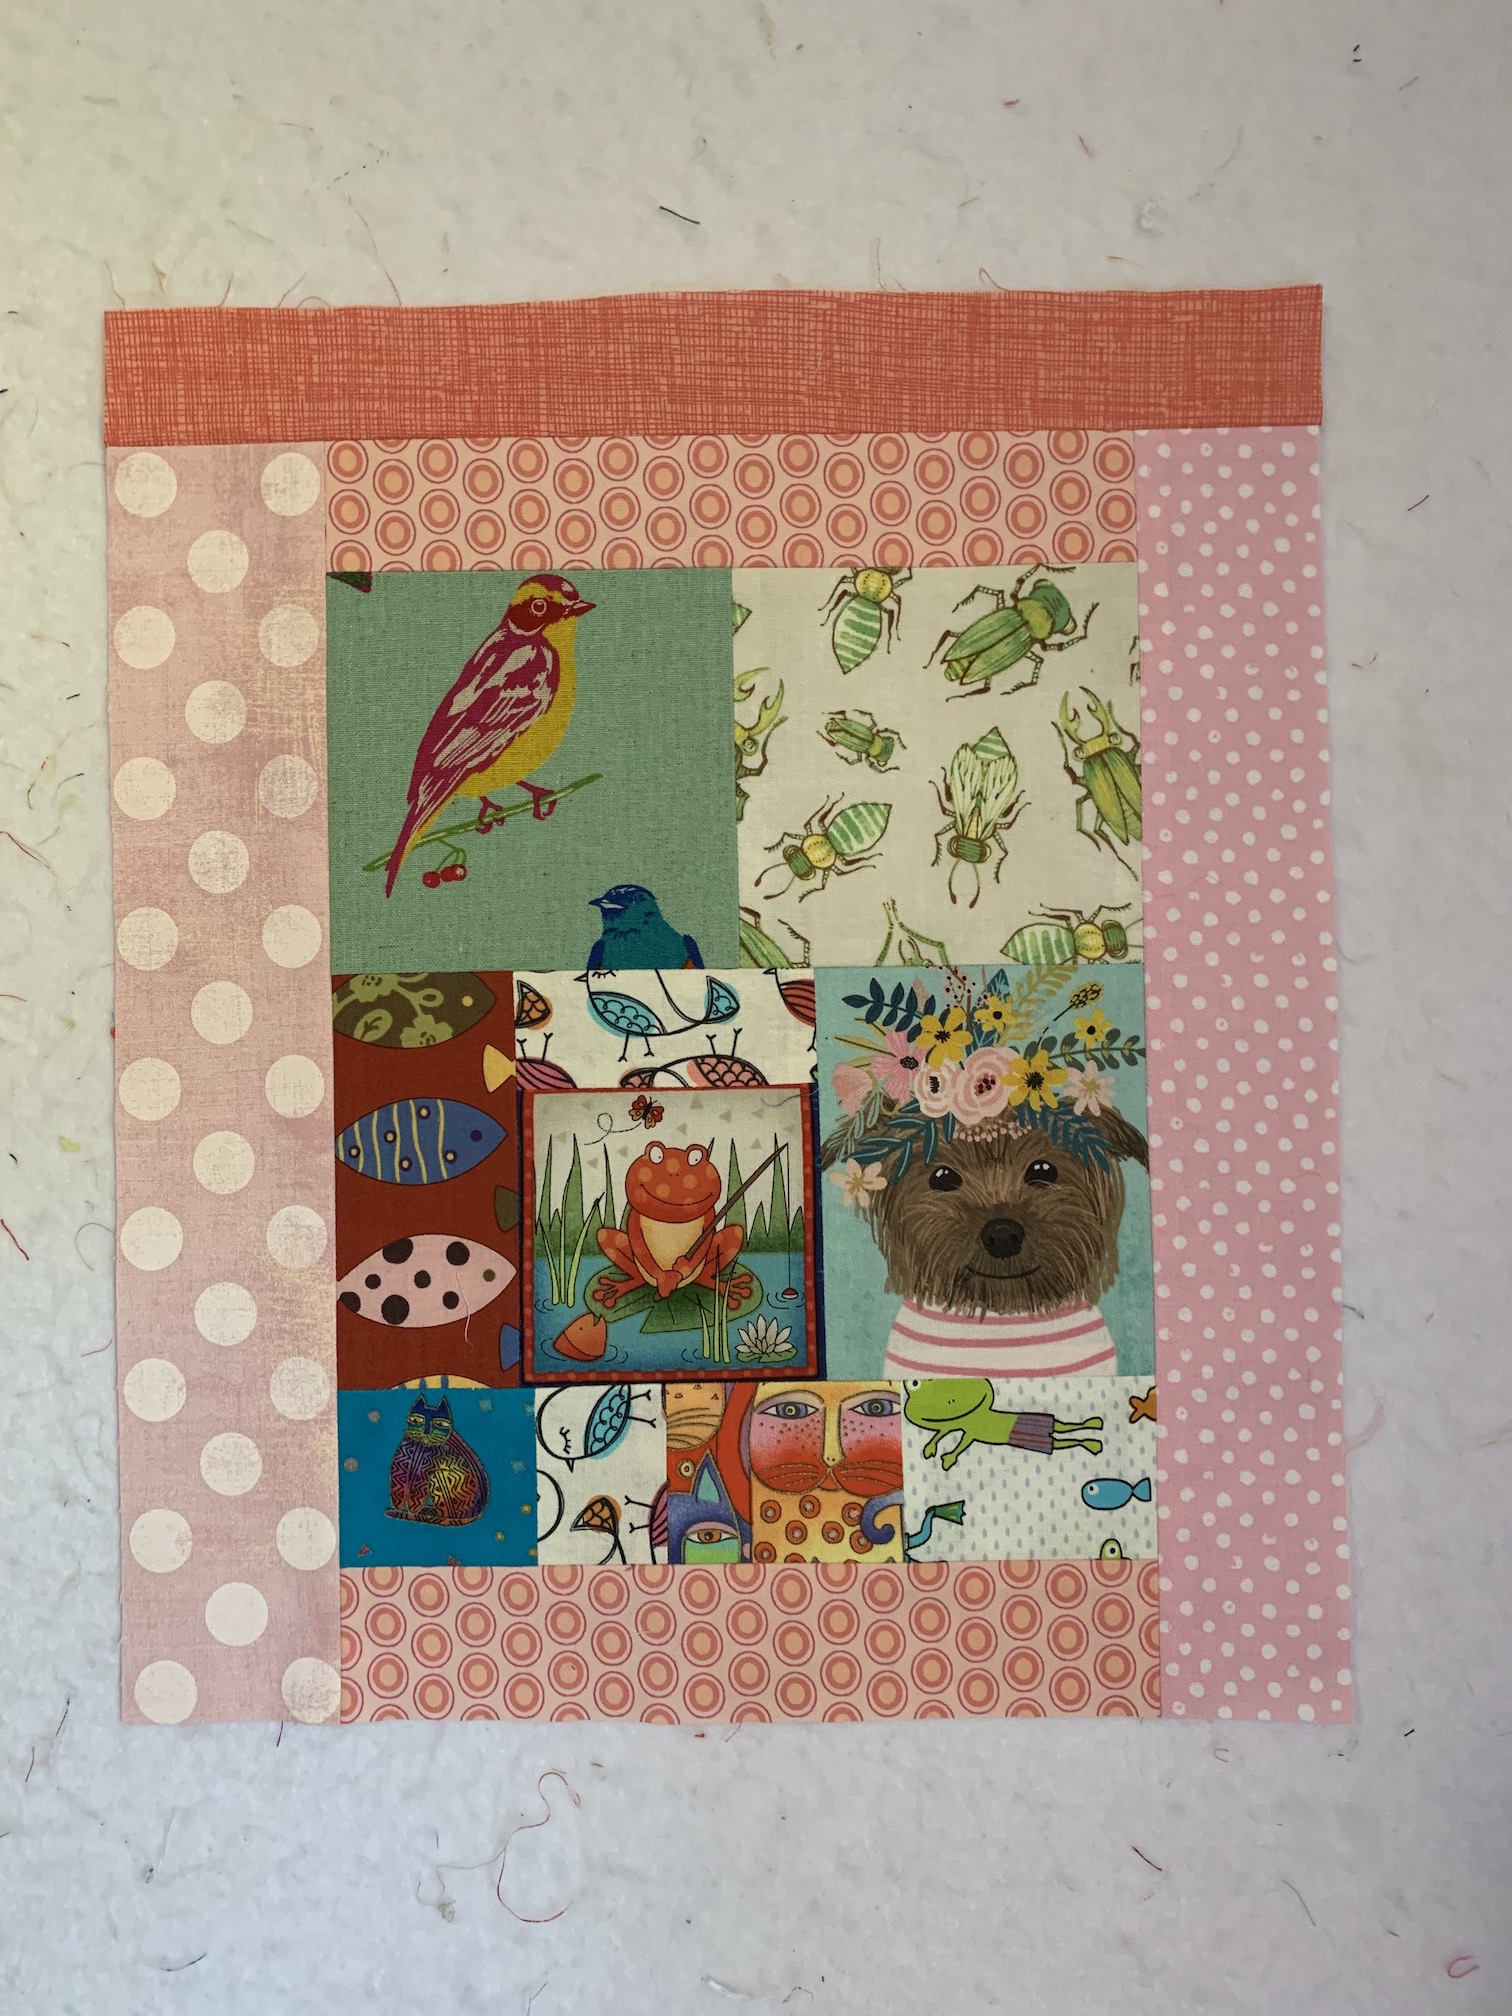
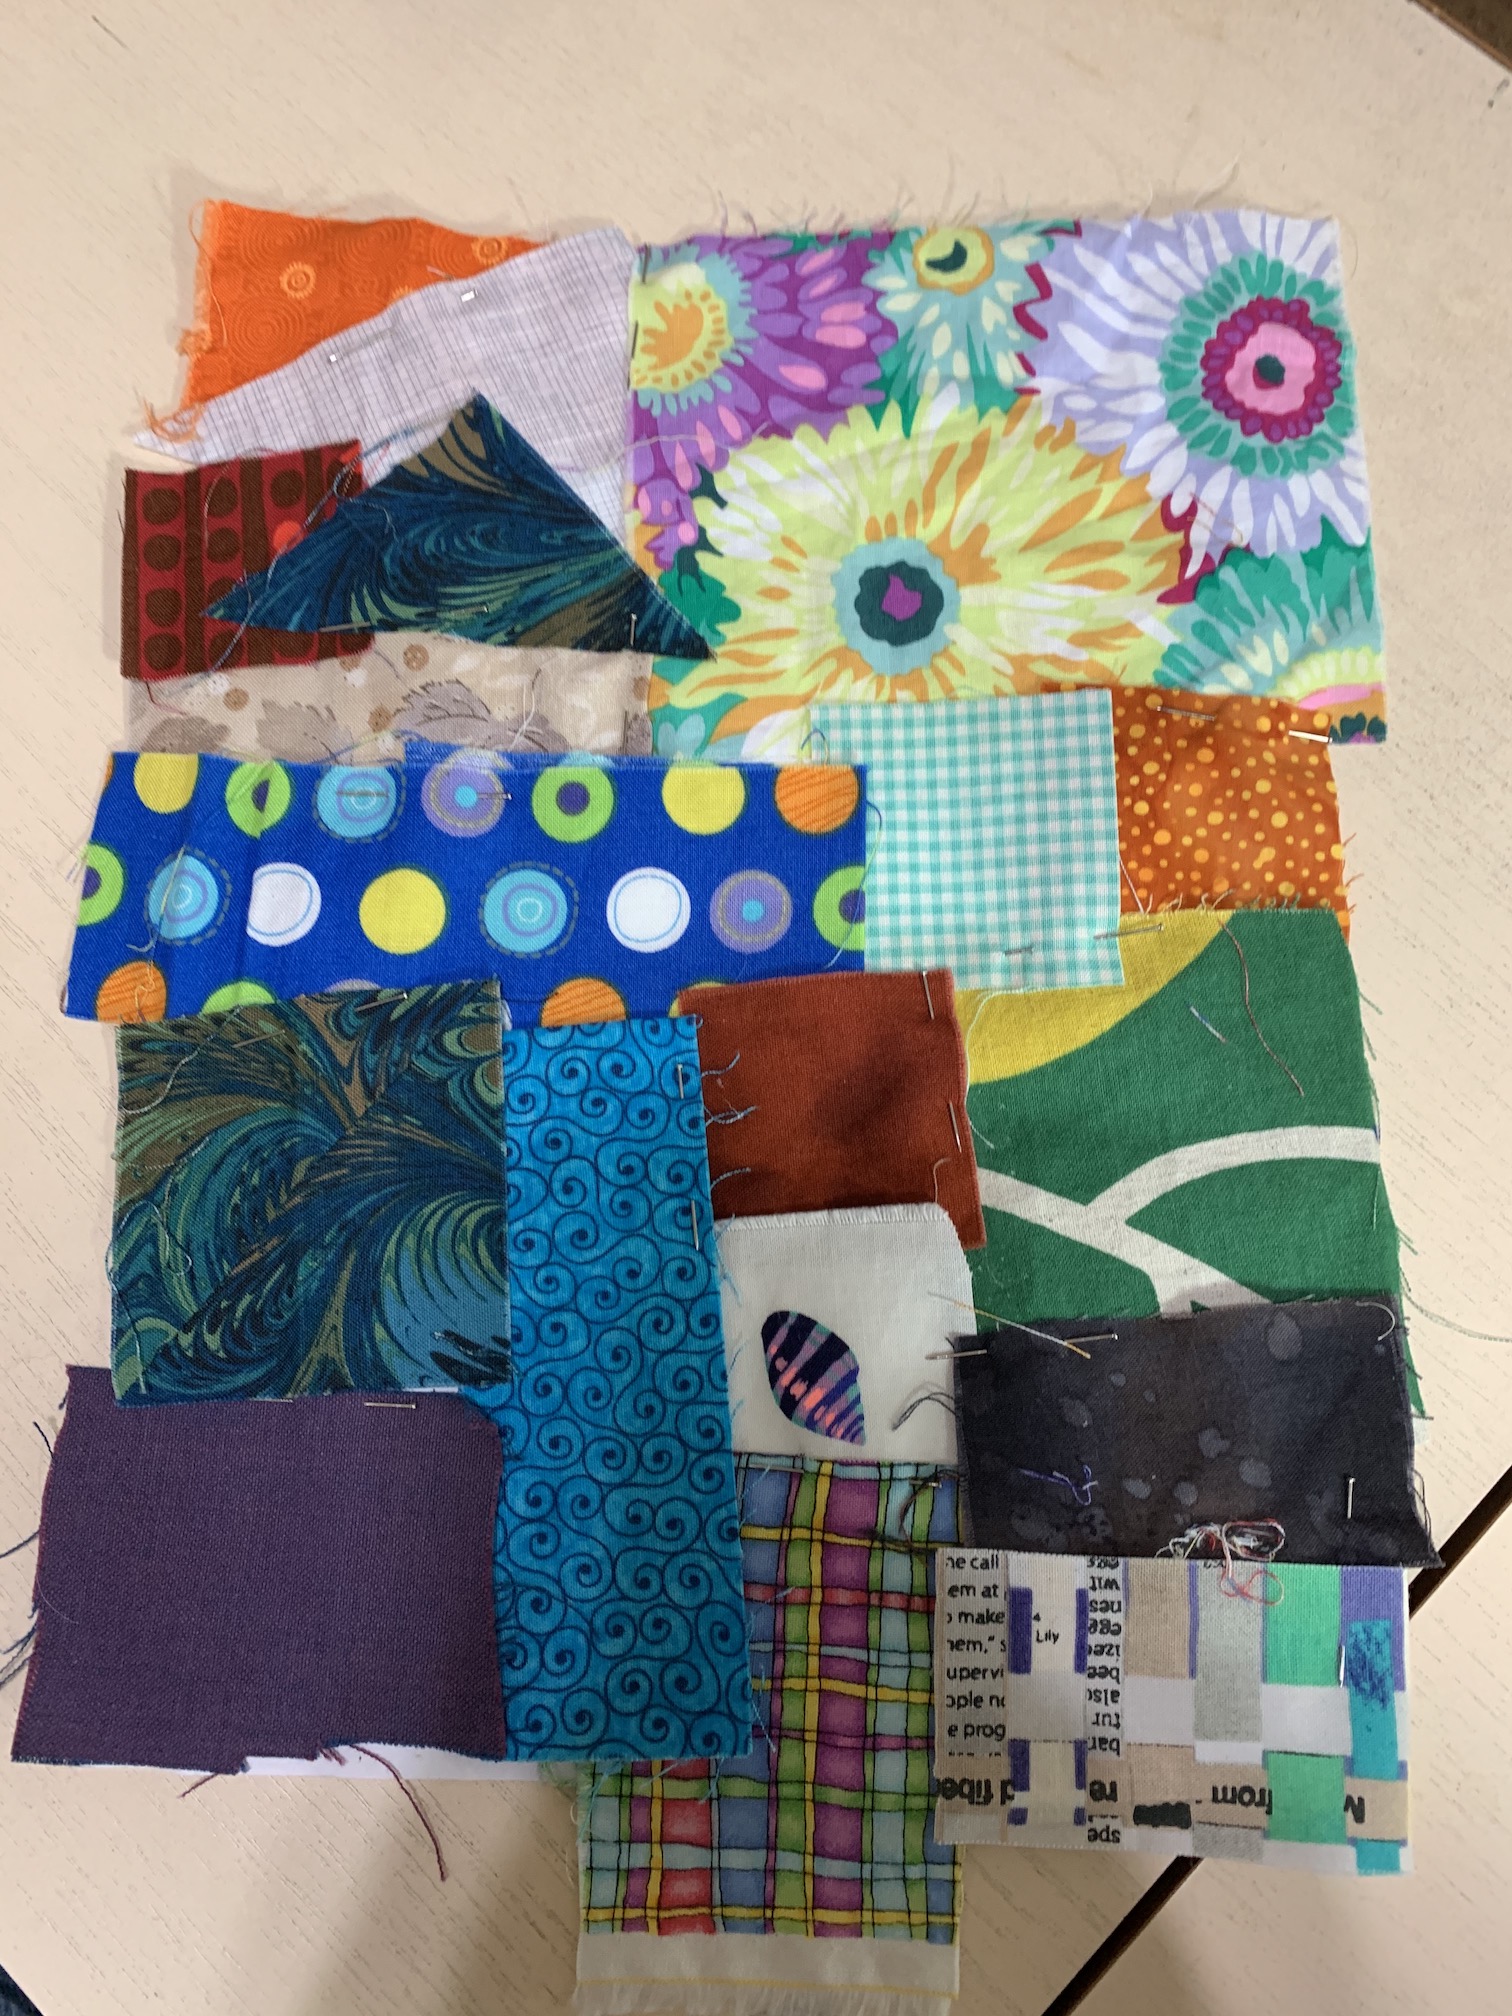
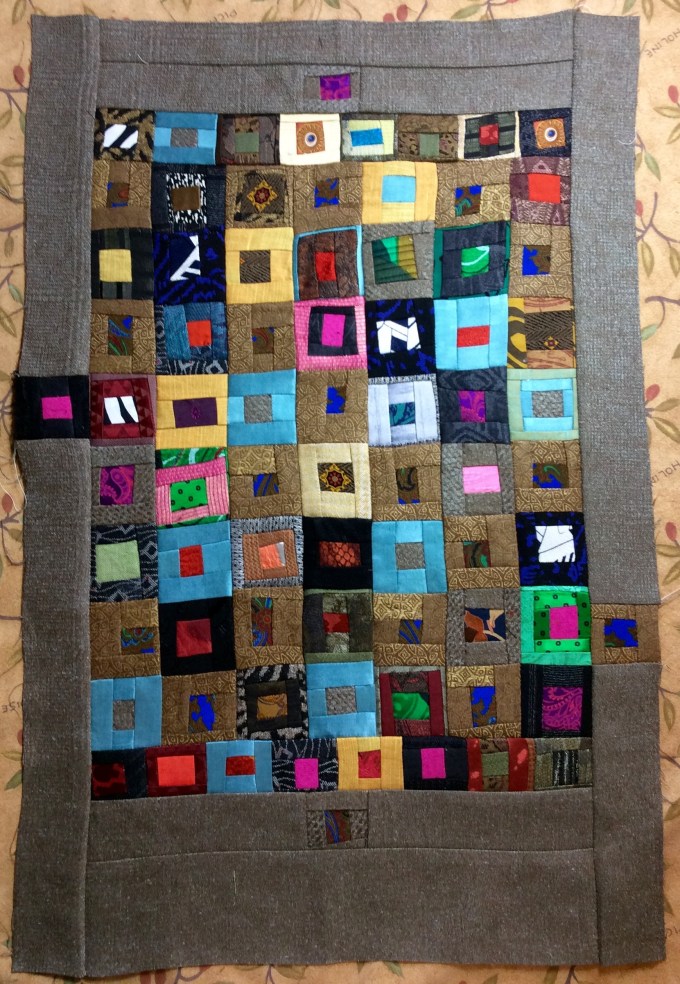
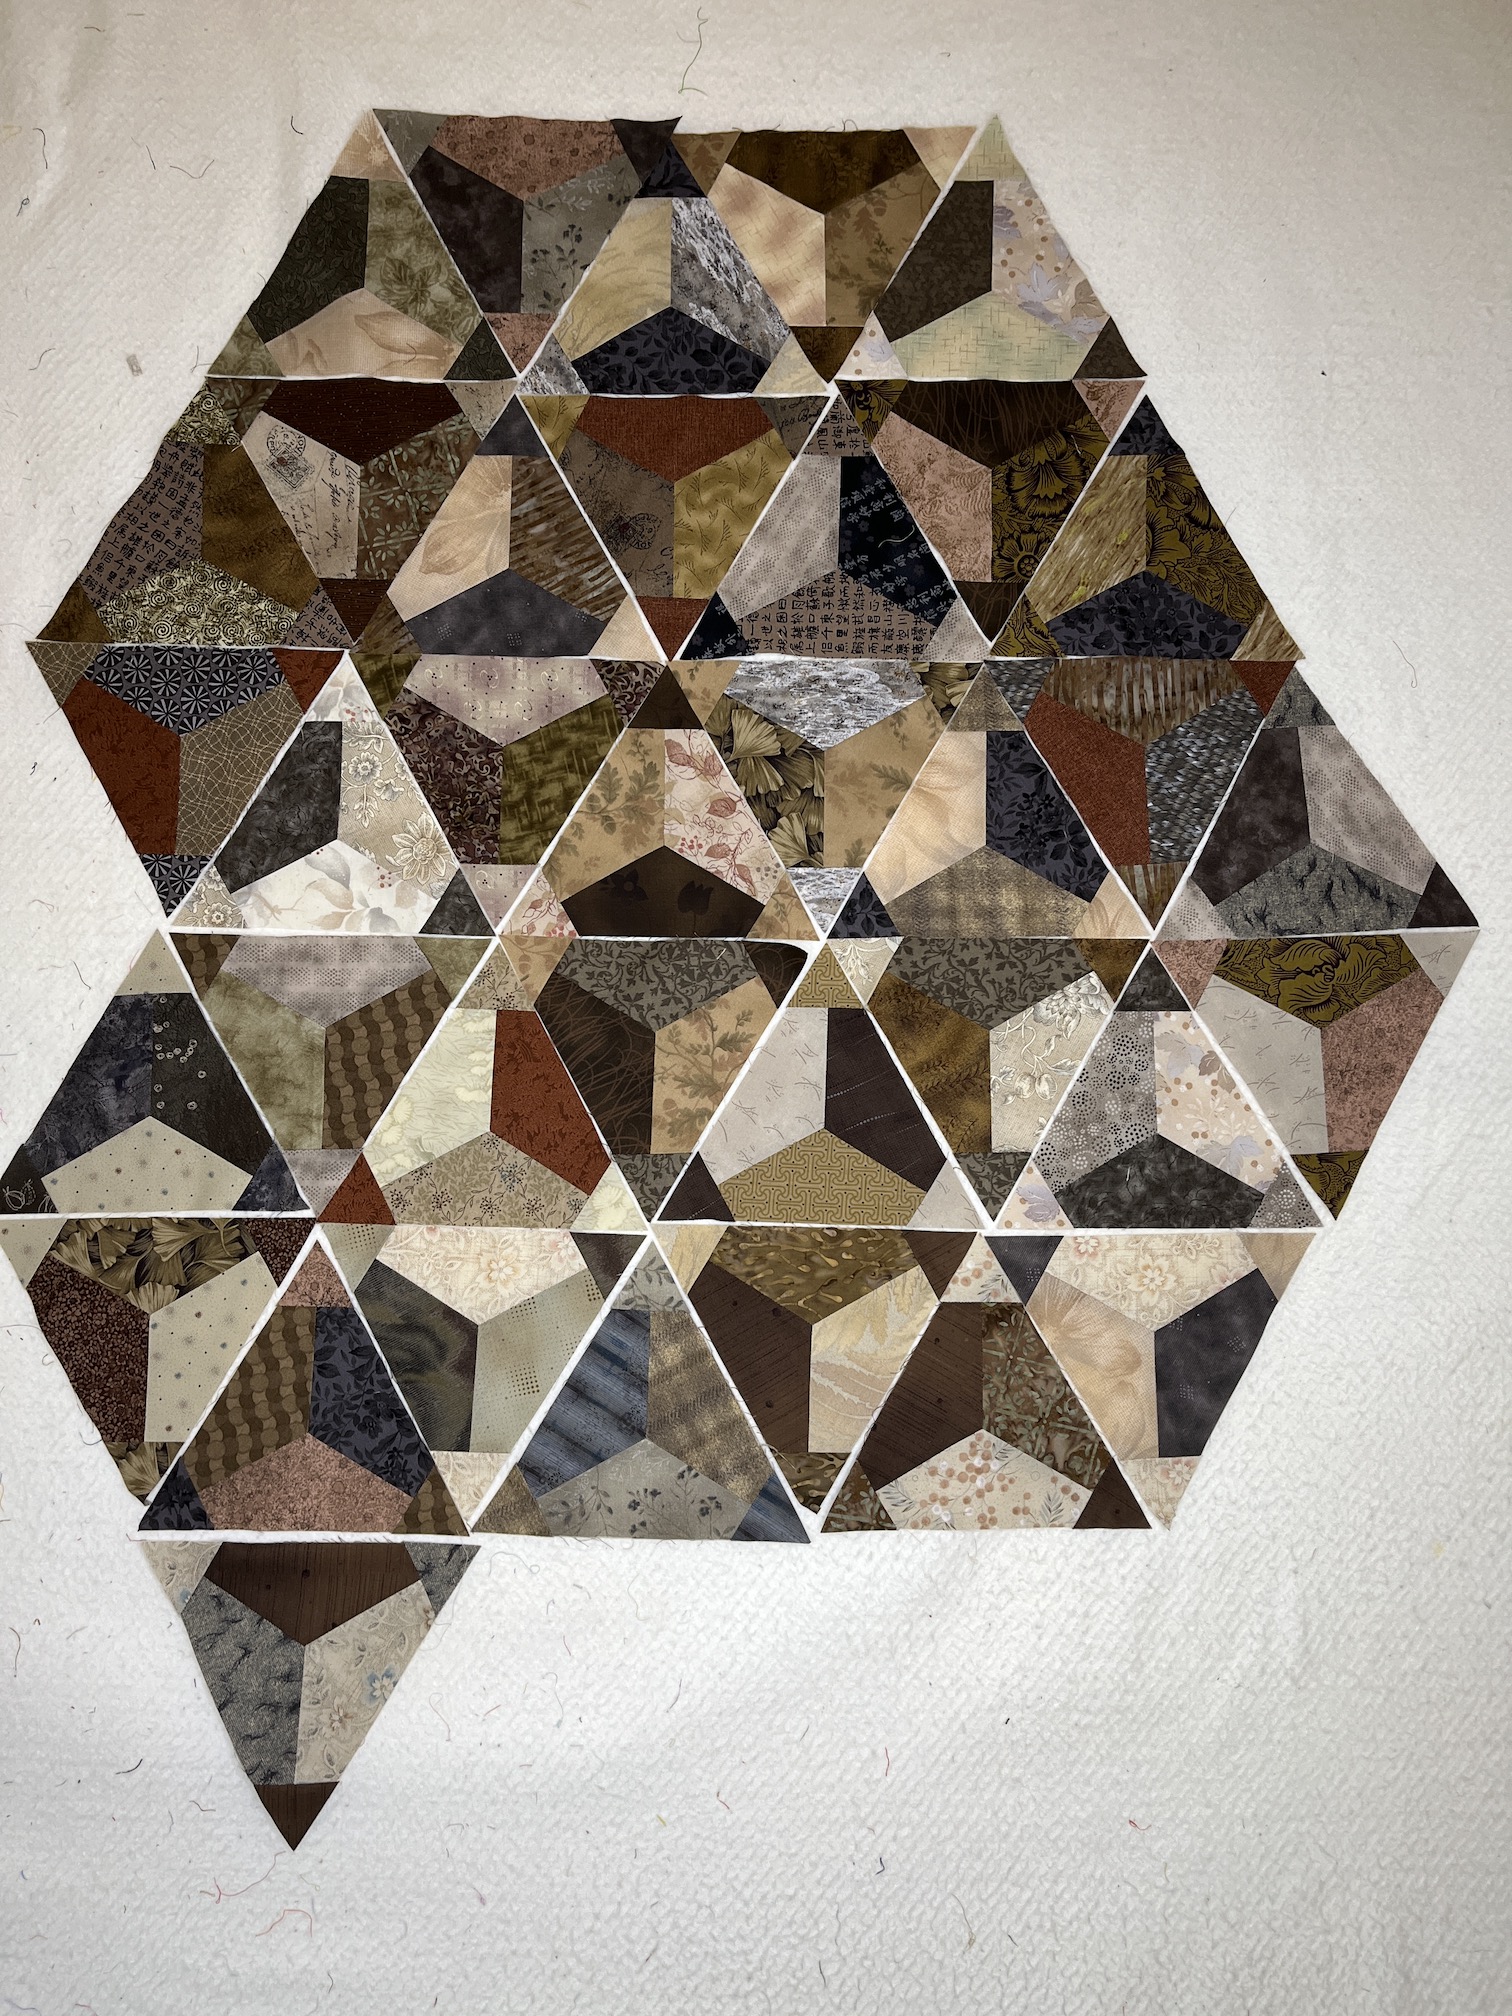
Included in the package was also this pile of blocks:
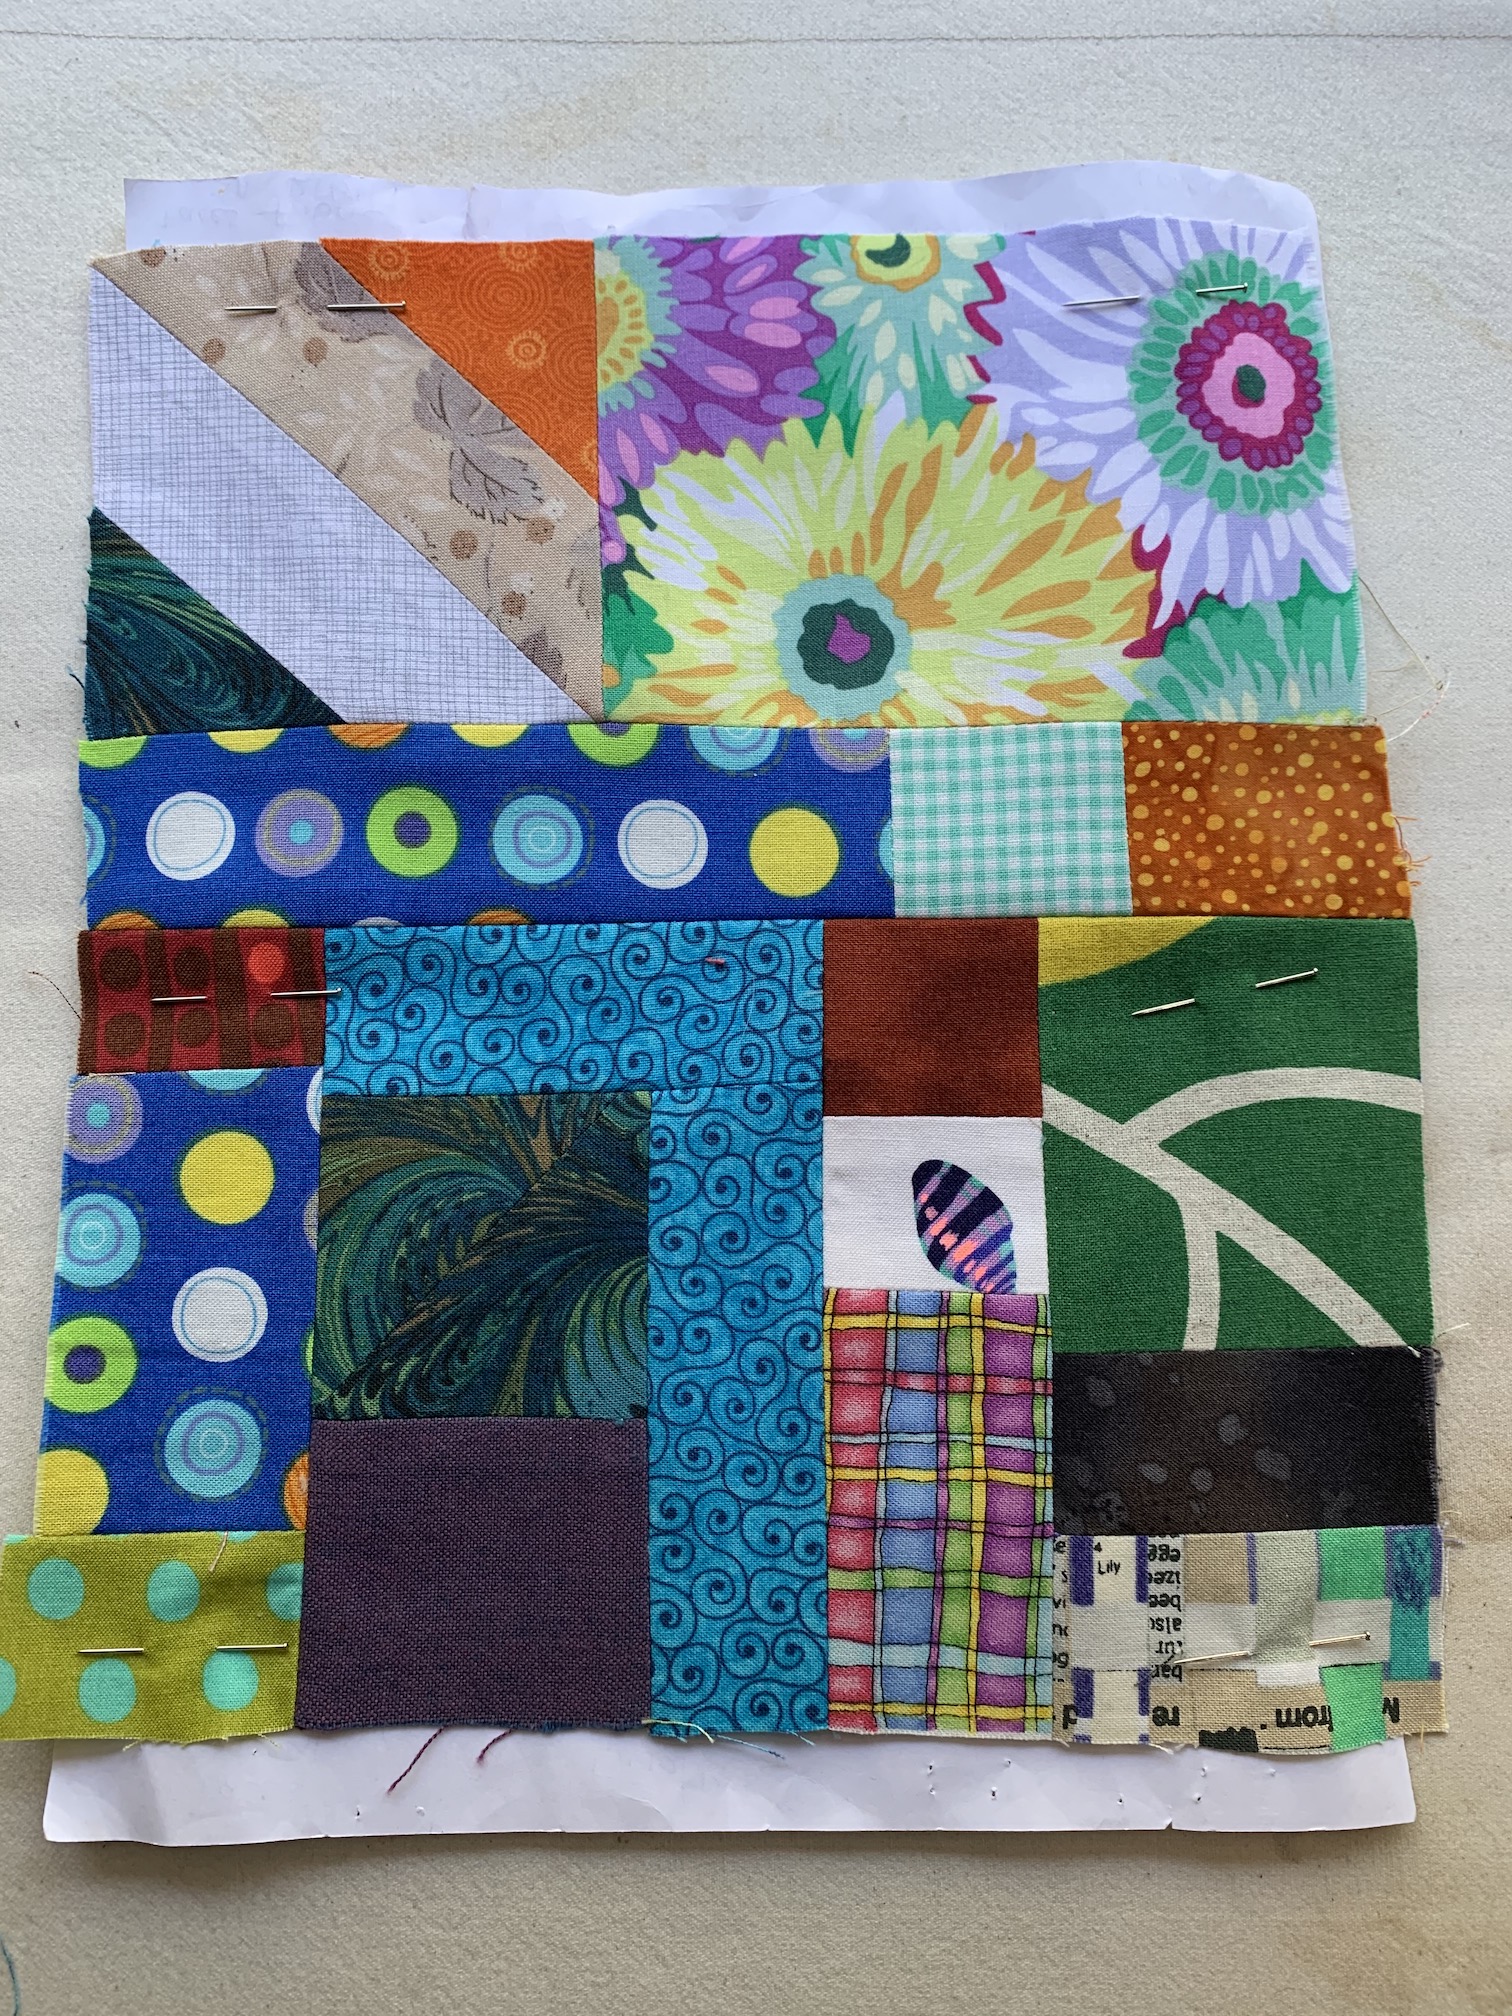
I wasn’t sure of what pattern these blocks were supposed to be until I laid them out on my design wall:
Wow! The picture I took does not do these blocks justice as they are in a collection of amazing Taupe fabrics.
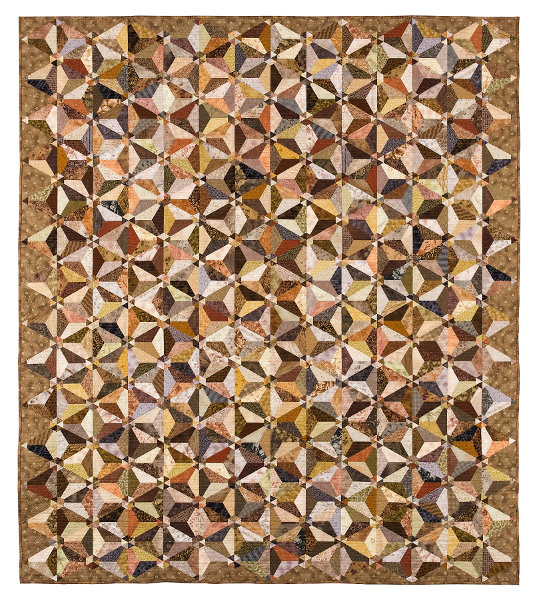
I knew I wanted to finish this quilt and I thought I could disassemble one of the blocks to create a pattern. Then I discovered from Wendy that this was a quilt she designed called SuperSymmetry and it was published in the October 2010 edition of The Quilt Life.
Here is a picture of the quilt SuperSymmetry from Wendy’s gallery page on her website wendyhill.net:
image credit: wendyhill.net
Isn’t it breathtaking?
I think I have enough Taupe scraps to finish the quilt as well as some Taupe in my collection such as these Japanese Taupe fabrics in my stash:
HOWEVER I am supposed to be focusing on working on my Tula Pink’s City Sampler 100 Modern Quilt Blocks quilt (see post And then there were 88), but I’ve become very distracted by the contents of the package Wendy sent me!
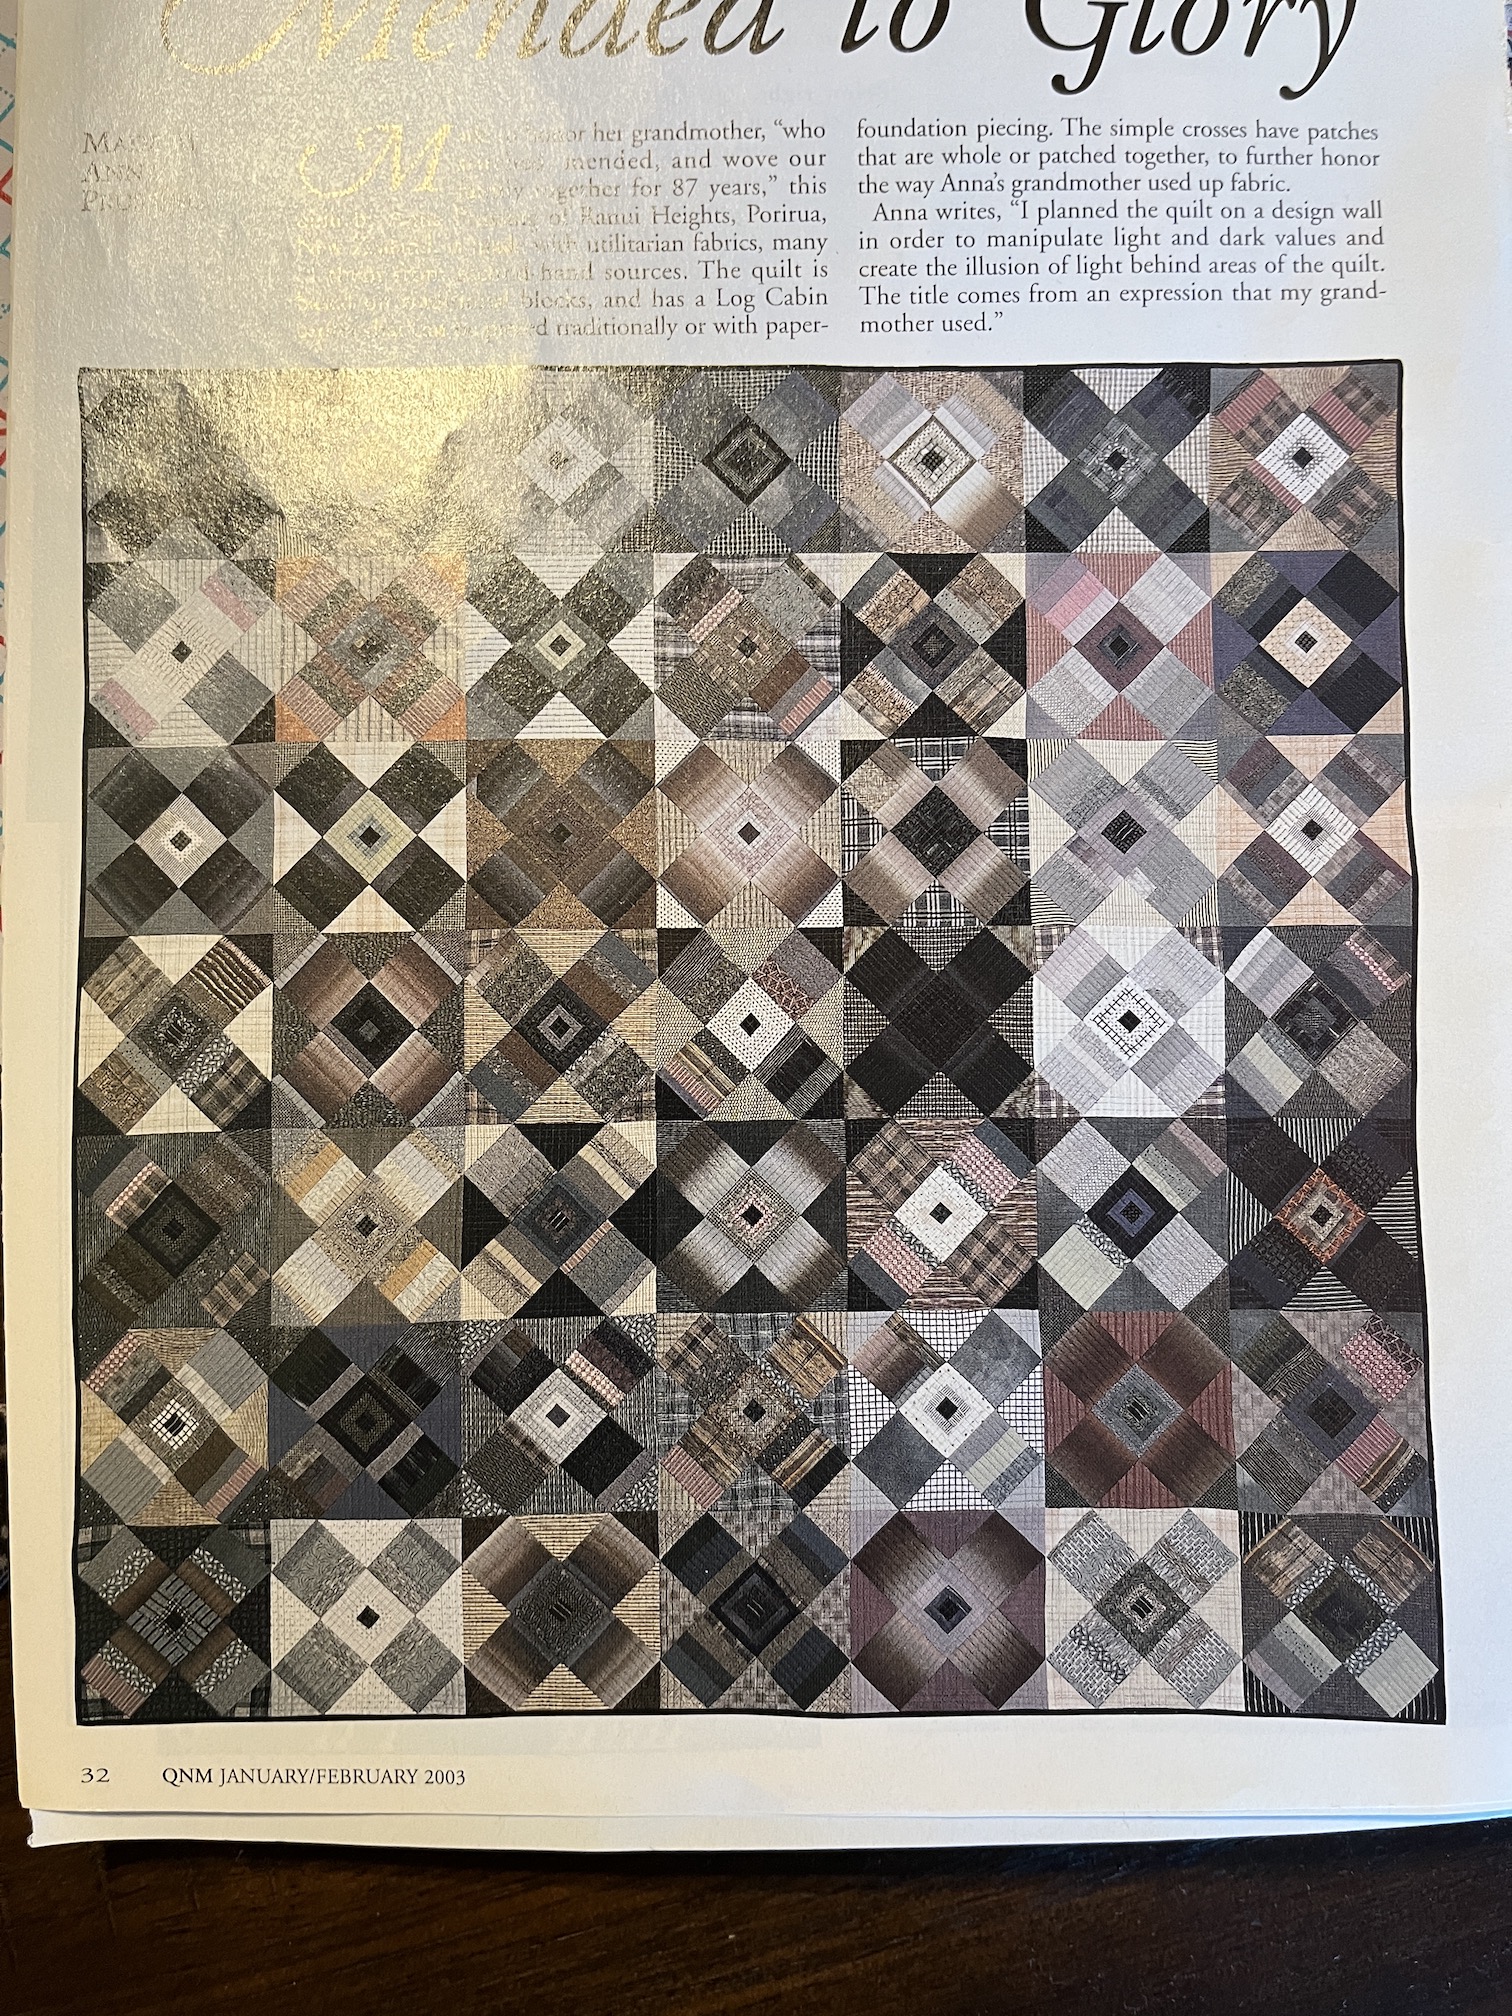
I also came across this pattern recently, which would look wonderful with Taupe fabrics, in the January/February 2003 issue of Quilters Newsletter Magazine I picked up at a thrift store for 50 cents:
But I made myself put the contents of the package Wendy sent me away, so I can get back to finishing the quilt I am working on.
You know us creative types, we can be subject to easily distractible “squirrel’ moments like the dog Dug in the movie Up:
“I have just met you, and I love you” – one of my all-time favorite movies lines, as well as one of my all-time favorite animated movie!
I must focus on my current project.
I must focus on my current project.
I must focus on my current project.
SQUIRREL!
Postscript
If you would like to learn more about “Taupe” as a color/concept, here overview of Taupe, from Colorpsychology.org:
Taupe is considered to be intermediate shade between dark brown and gray, which shares similar attributes of both colors. However, taupe does not describe a single color, rather, it is used to describe a vast range of colors from dark tan to brownish gray. Taupe is a neutral hue — neutrals are created by combining complementary colors (colors that are opposite each other on the color wheel) which results in desaturated brownish colors or mutes — likewise, taupe hues are achieved by mixing together umber and white pigment.
The word, taupe, originates from the French word, taupe, and the Latin word, Talpa, which translates to “mole,” as it was primarily used to describe moleskin. Notably, variations of taupe have appeared on the Pantone Color Trend Reports over the years. Recently, ‘Warm Taupe’ was featured on the Fall 2016 color palette. Taupe provides the perfect backdrop to complement and offset brighter colors.
A couple posts ago I shared the craft exchange that @Mildy Granola and I did – drawstring bag for hand knitted socks, in this post The Exchange! .
Well my friend Wendy and I call this “Good Mail“.
Good Mail is when you get something very fun in the mail, like a handmade item or some type of fun treat. Through out the pandemic, Wendy and I have exchanged Good Mail.
THE GOOD MAIL DELIVERED TO MY HOUSE
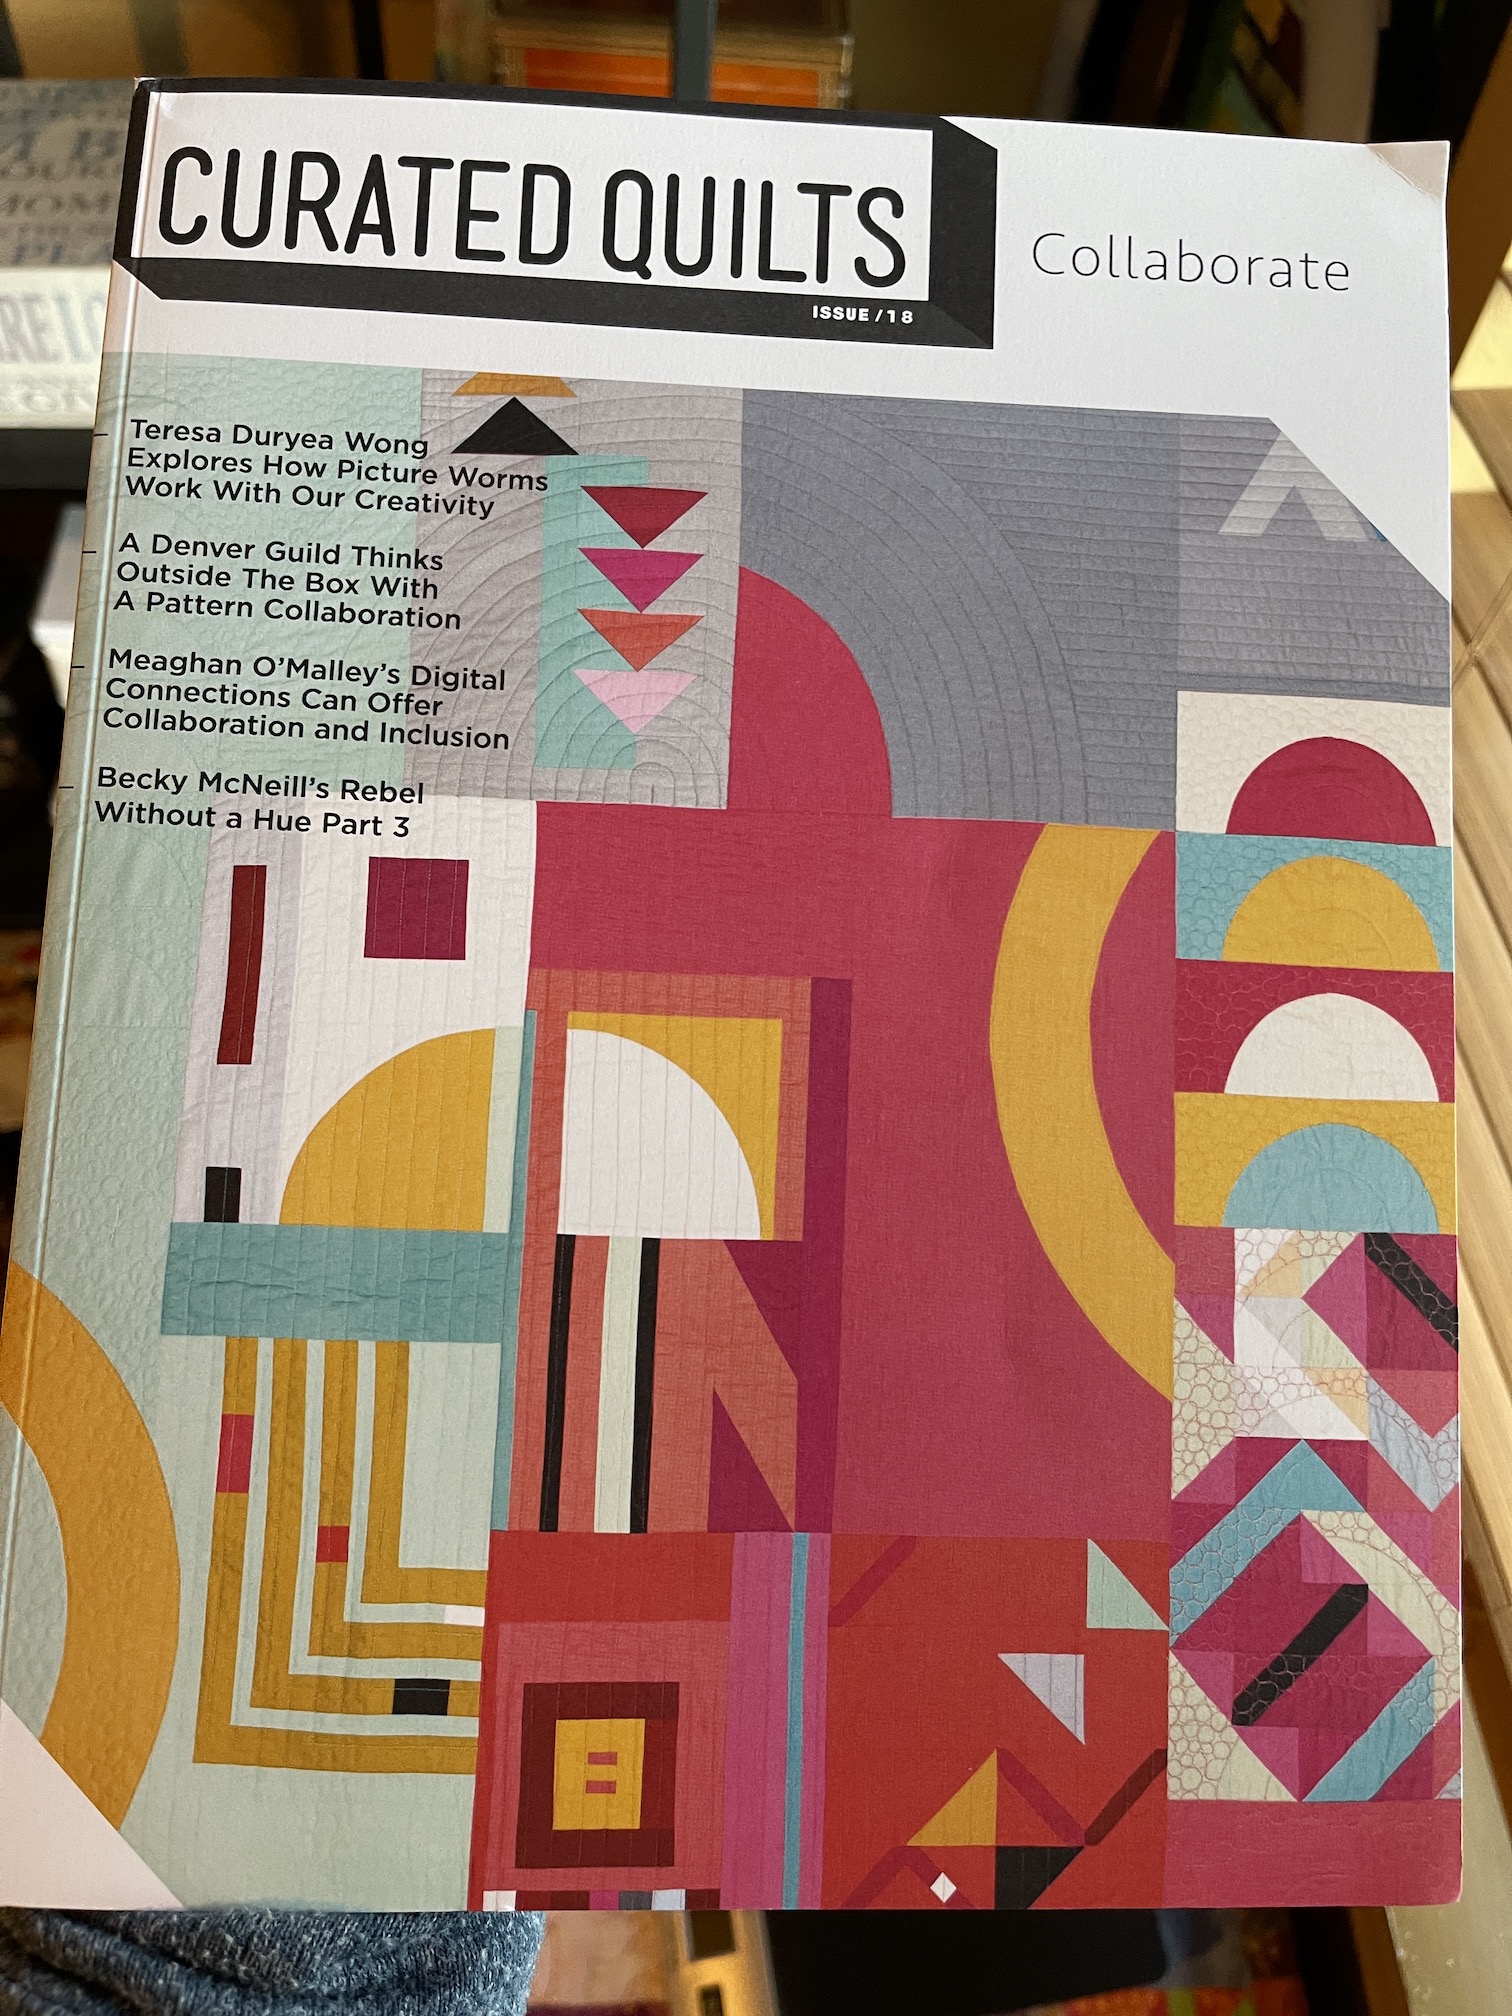
For this round of Good Mail Wendy sent me an issue of the amazing periodical Curated Quilts and a beautiful Chinese New Year artist postcard for the Year of the Tiger.
What made this issue of Curated Quilts so special is that it featured the story of Wendy’s Quarantine Quilt Collaboration.
If you are just joining us, Wendy did a series of five (5) guest blog posts sharing the amazing story of how deep in the early days of the COVID pandemic quilt she made during quarantine with the four (4) rambunctious boys next door (aka “The Boys”) ages 2 – 8.
Could you imagine (and perhaps you can) being quarantined with your four young children ages 2 – 8 for months on end? Wendy provided an amazing distraction/project for the boys and likely made their parents lives a little saner.
Here are the links to those 5 posts if you’d like to read the full story (or re-read):
In the Curated Quilts (the theme of the issue is “Collaborate”) article Wendy provides a nice summary of the whole experience and shares the best of the photos (including my favorite – the one with the whole family and the finished quilt). It was such an amazing and selfless gift she gave to this family my eyes get a little teary when I think about it.
THE GOOD MAIL DELIVERED TO WENDY’S HOUSE
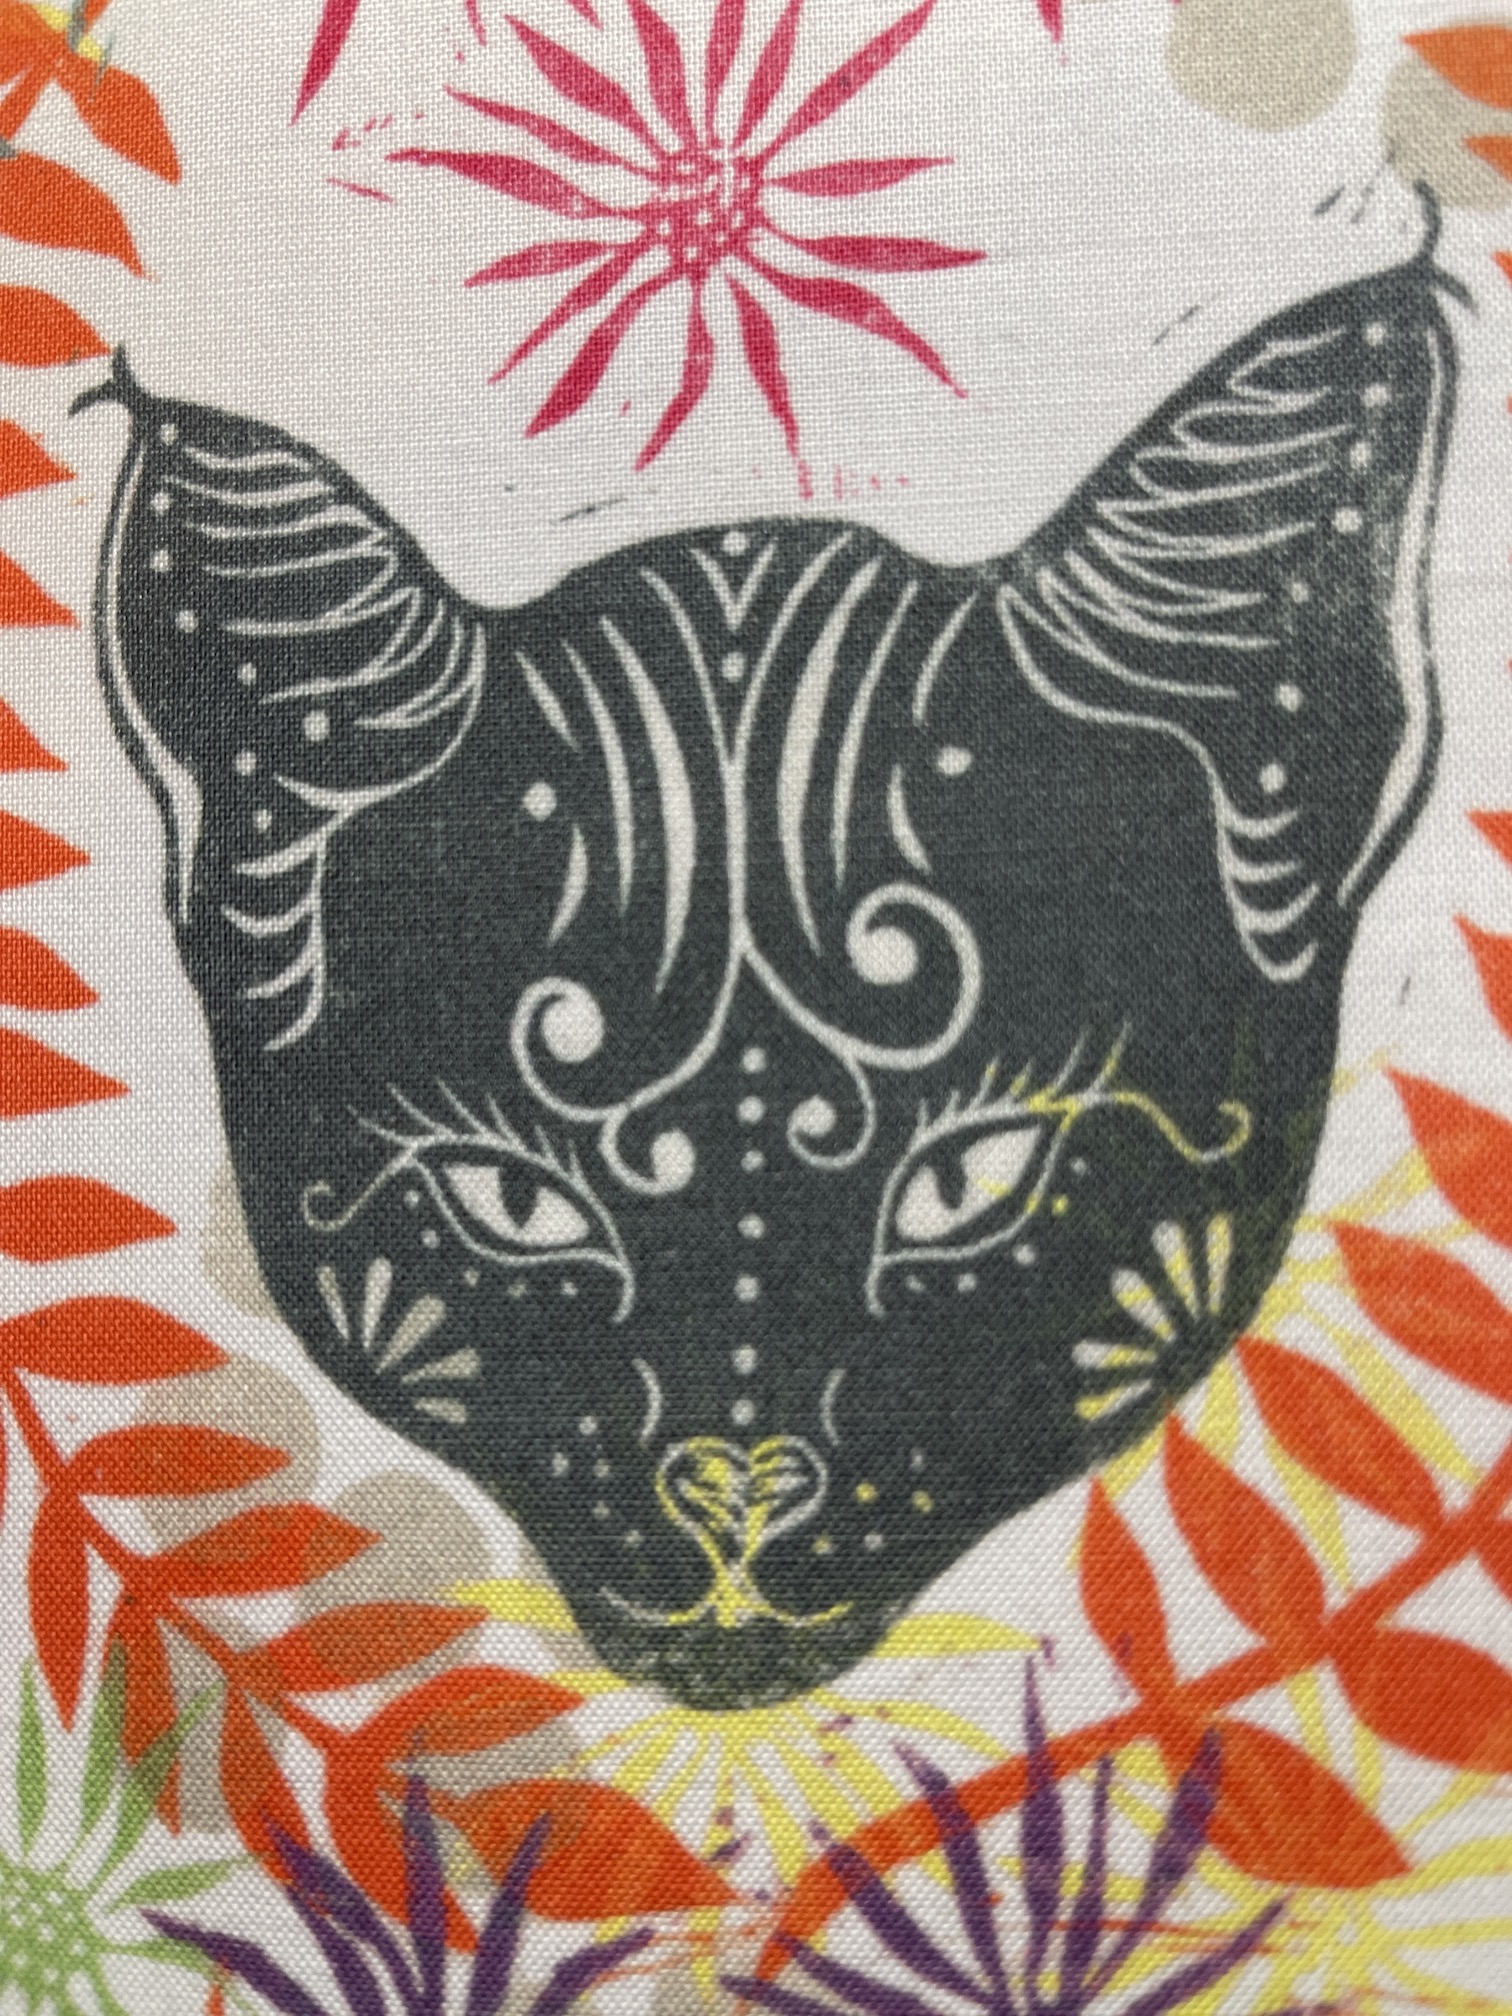
And what did I send Wendy for her Good Mail? Well she loves cats, and has a couple darling cats at home, so I made her a project bag with this fabric:
It was some cool fabric I found in my stash, I did not know where I got it from. When I posted the bag on Instagram, someone mentioned it is from a Valori Wells fabric line. Since I only had a little more than a fat quarter’s worth of fabric, I must have picked it up from a scrap bag I bought at the Stitchin’ Post when I lived in Central Oregon.
Here is the completed bag:
I included the rest of the fabric for Wendy inside the bag in case she wanted to make something with the fabric, as well as some other goodies (couldn’t just send her an empty bag!)
She has hung her bag with some other previous Good Mail from me (the tote bag I made her):
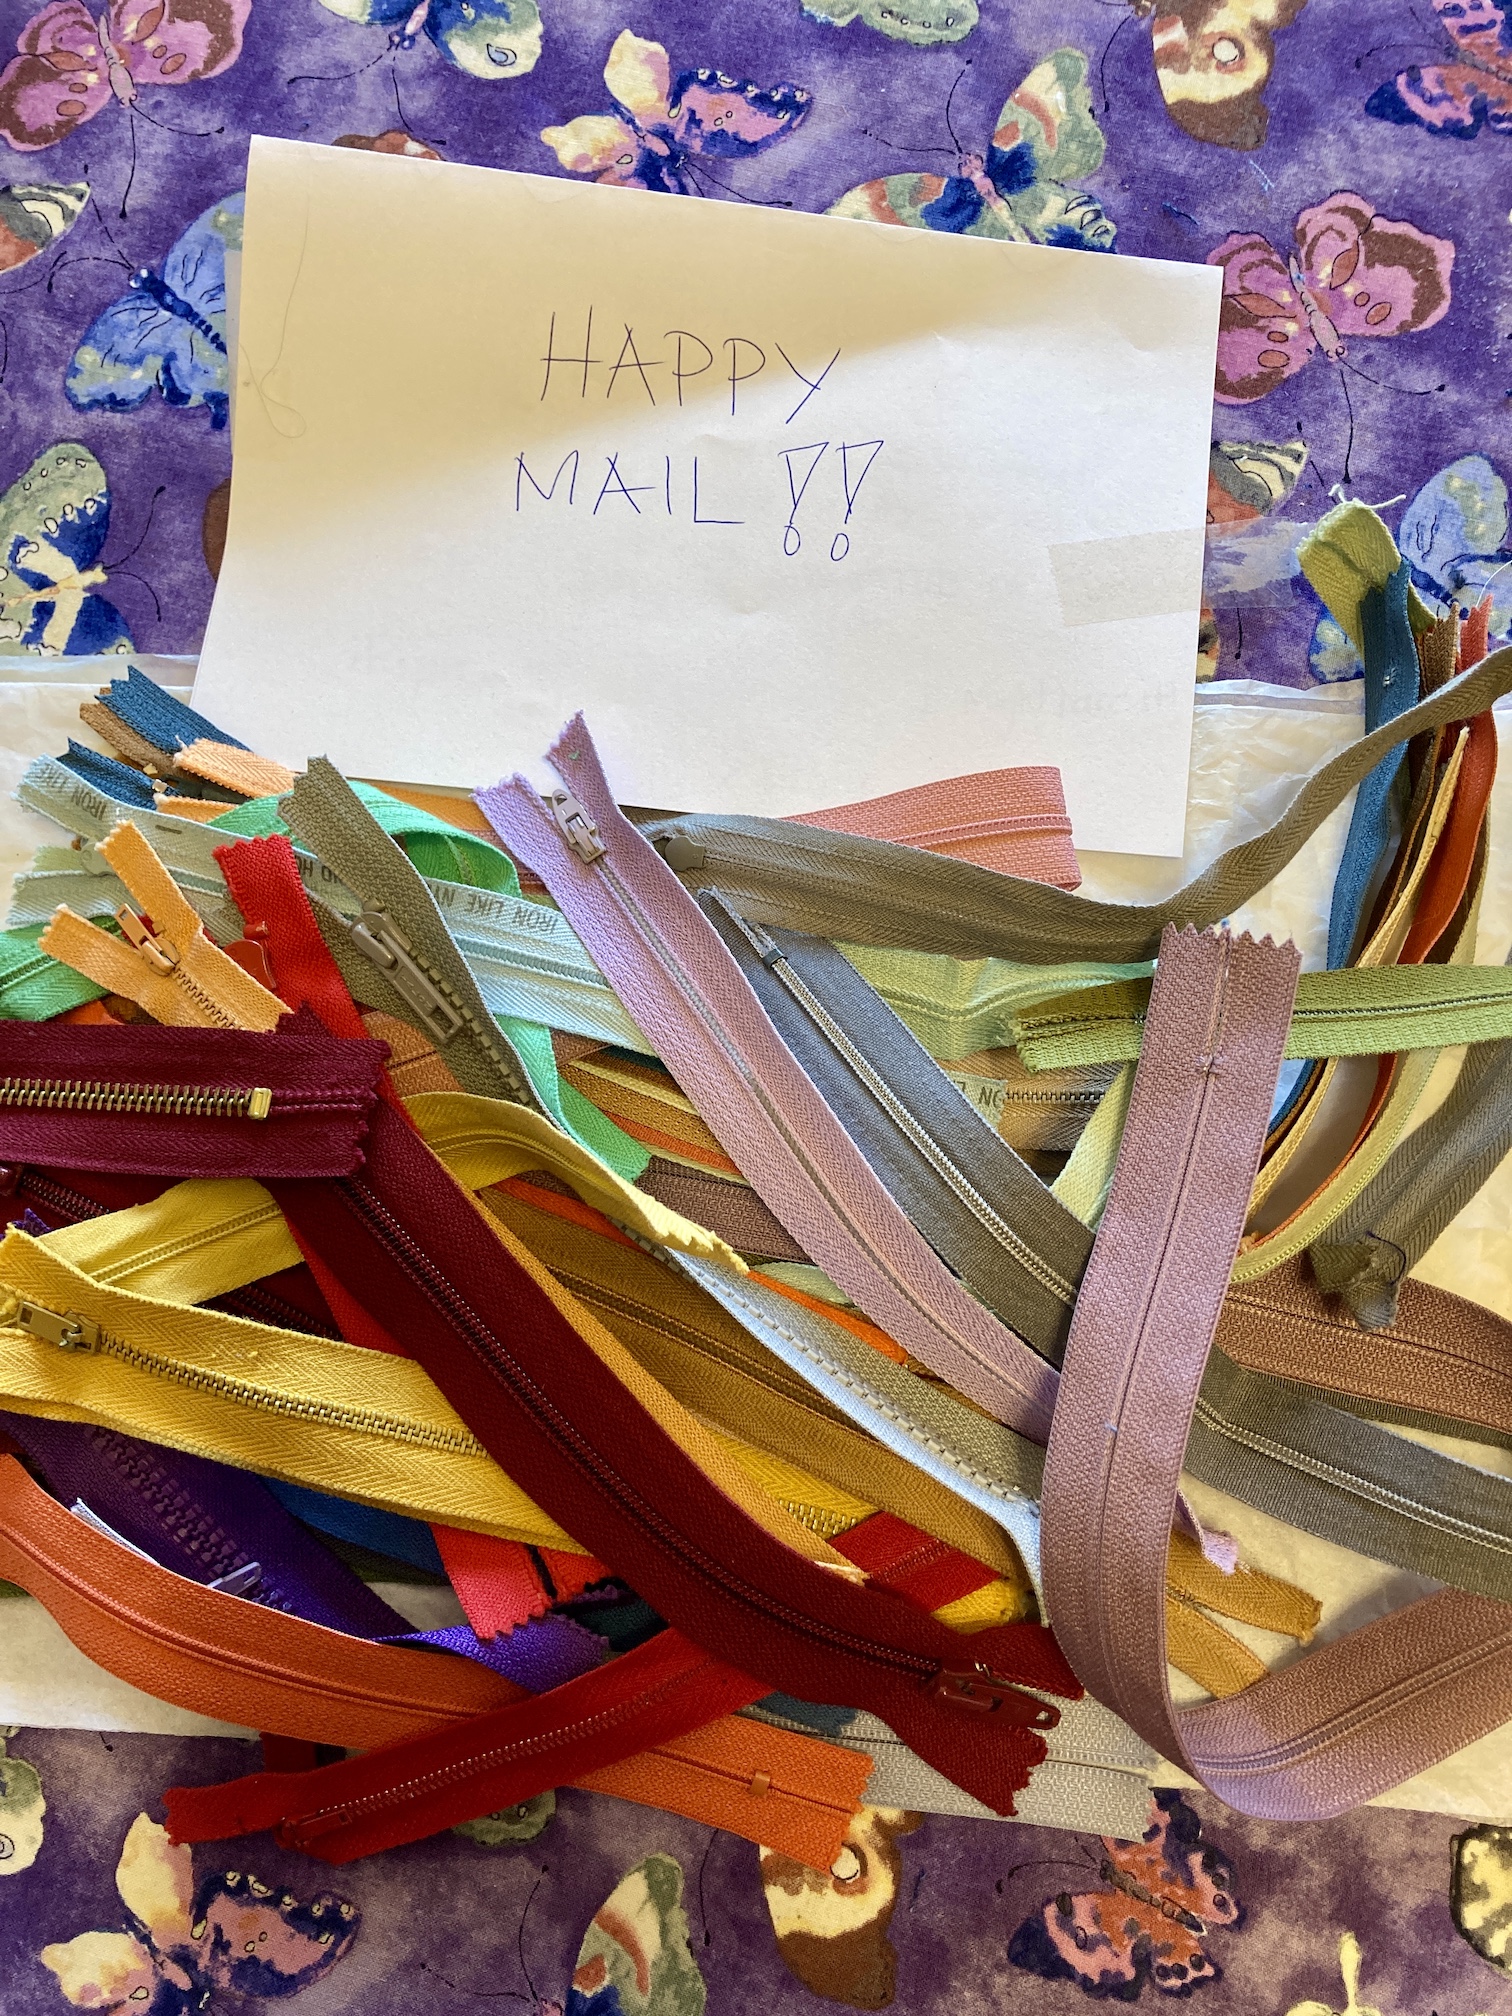
After reading my posts (Misadventures in Bag Making and If at first you don’t succeed…) my wonderful friend Wendy Hill (IG – @wendyquilter) offered to send me some of her HUGE collection of zippers to support my future adventures (or misadventures, ha!) in bag making. I of course took her up on her offer!
So a couple of weeks some “GOOD MAIL” arrived – a bag of zippers in various sizes from Wendy!
So how did Wendy come to have all these zippers in her stash and what had she done with all these zippers in the past? Well she was kind enough send photos and a summary of the story so I could share with you in this post.
“Zipper Mania” by Wendy Hill (edited by tierneycreates)
Around 2007 I wanted to make things with zipper but they too expensive to even buy used at a thrift store considering how many I needed.
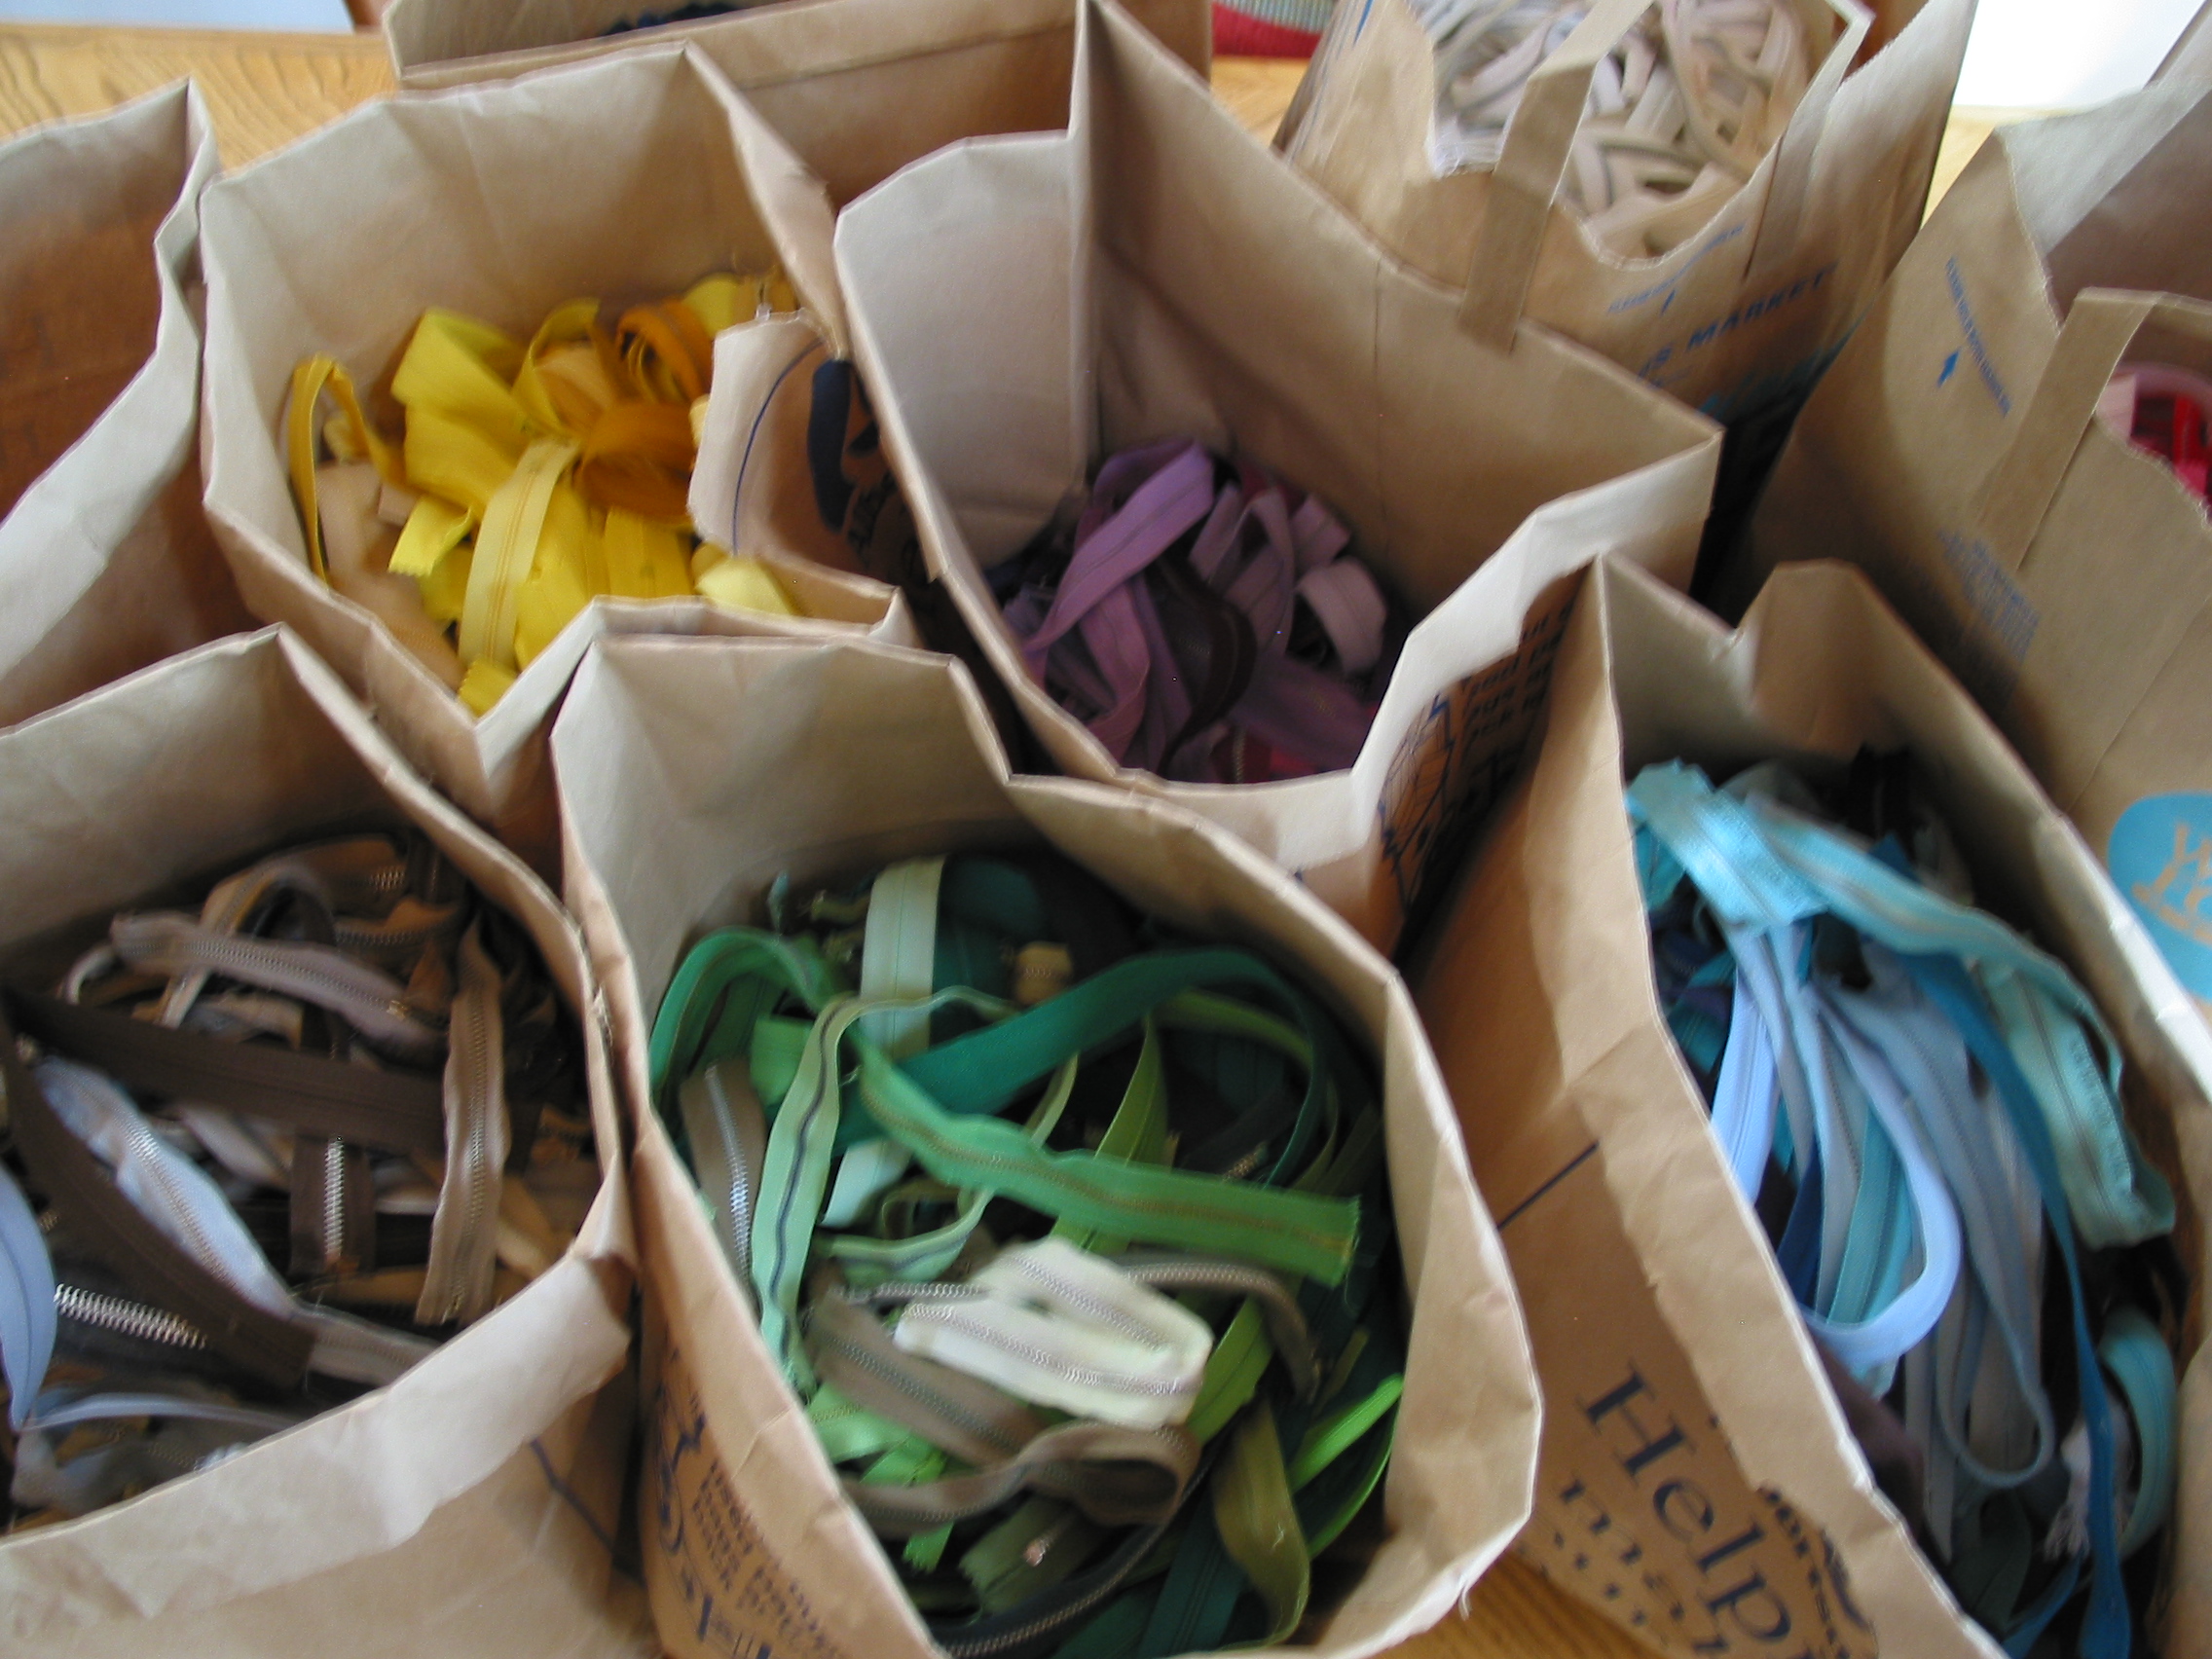
So I put out a request for zippers in the Ruralite Magazine (Western USA, Midstate Electric Co-op) and many zippers arrived to my home!
The smallest package I received: 1 zipper
And I received many zippers in the mail which I sorted by color into bags – it looked like a spice bazaar!
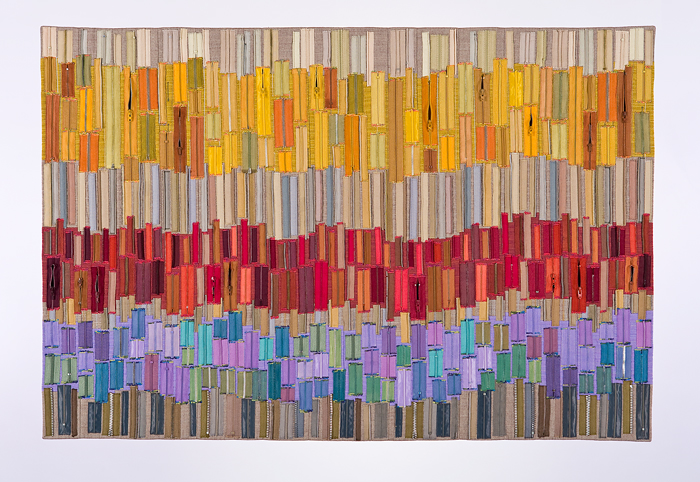
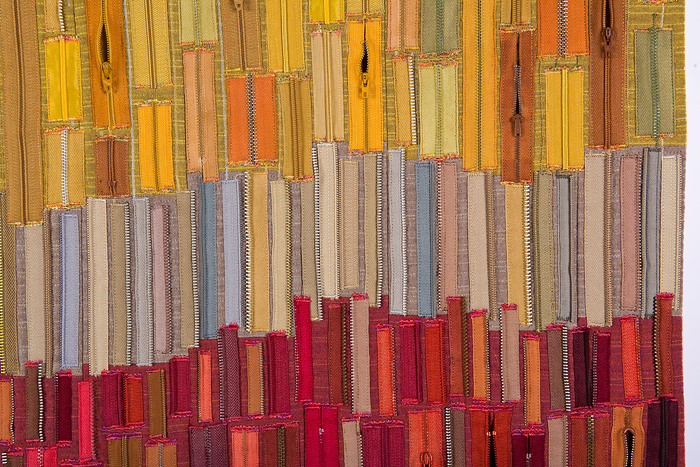
I thought of all these zippers as a “material” for my art projects. Here is what I made below.
String piecing using flat zippers
“Autumn Textures” is my favorite. It has been in exhibits.
I did make several quilts with flat zippers between 2008 and 2011)
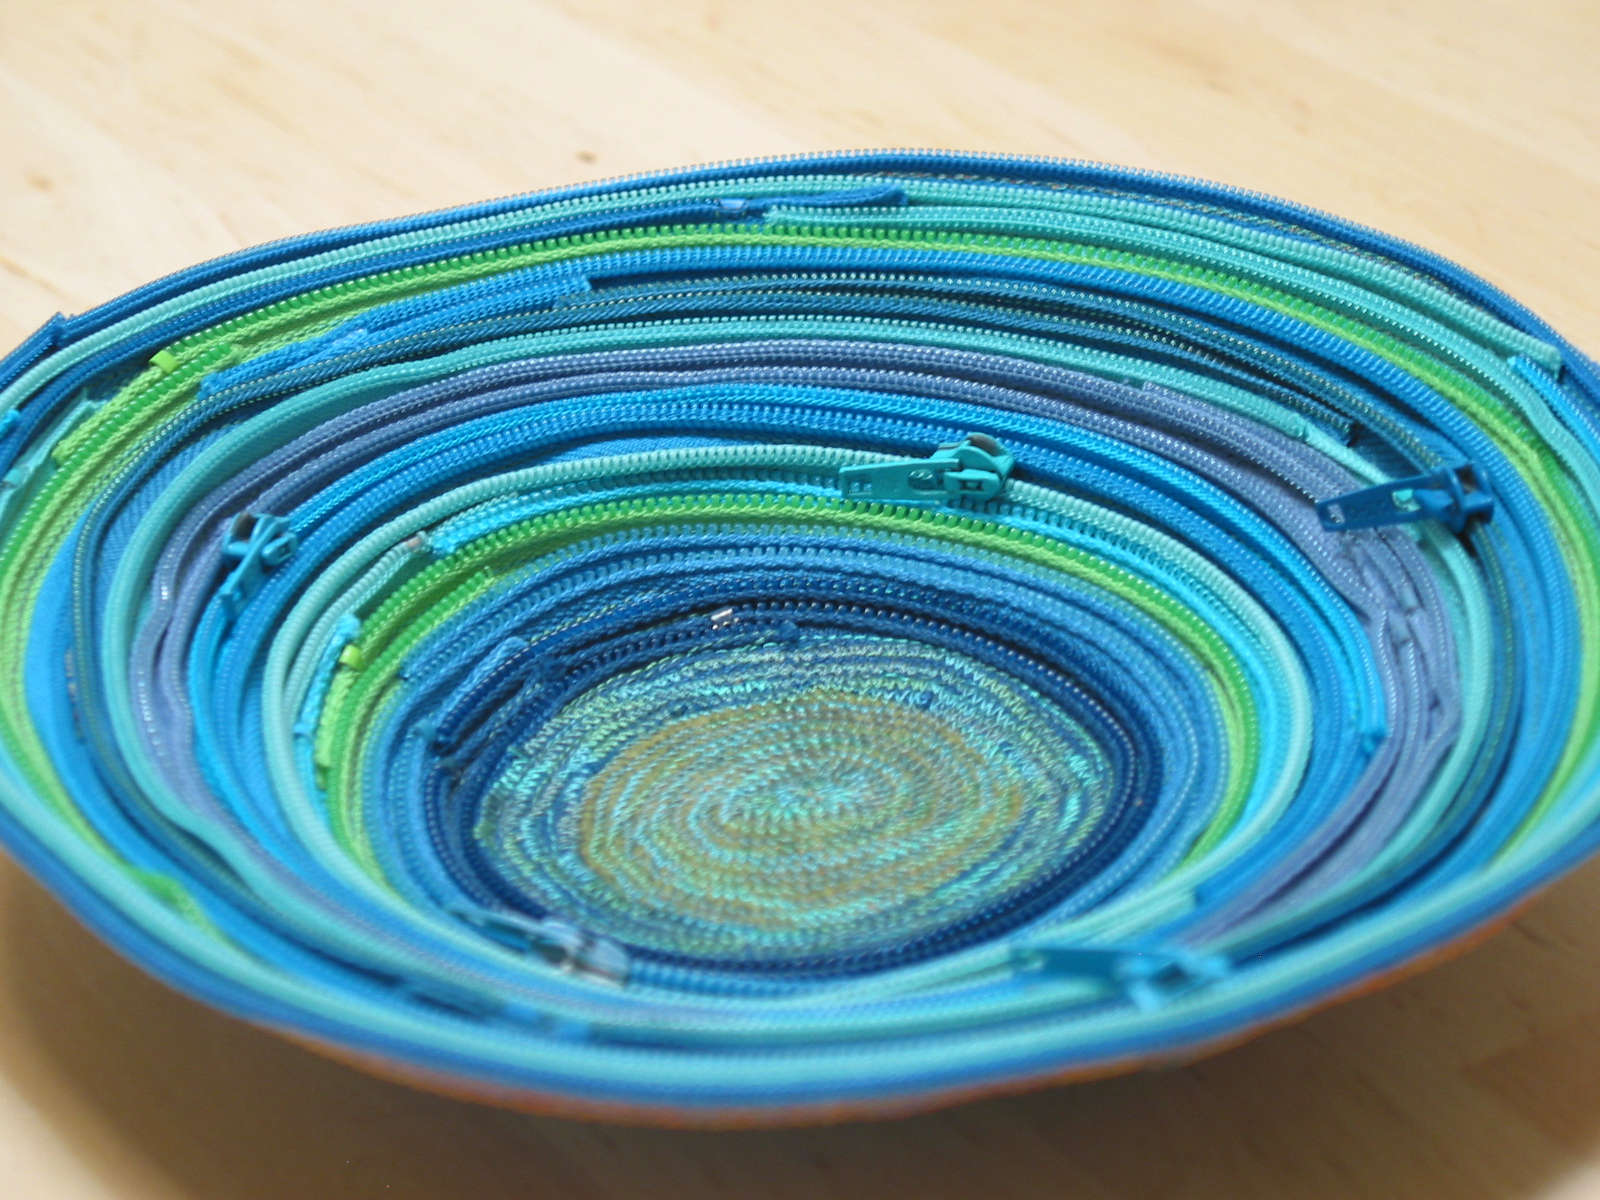
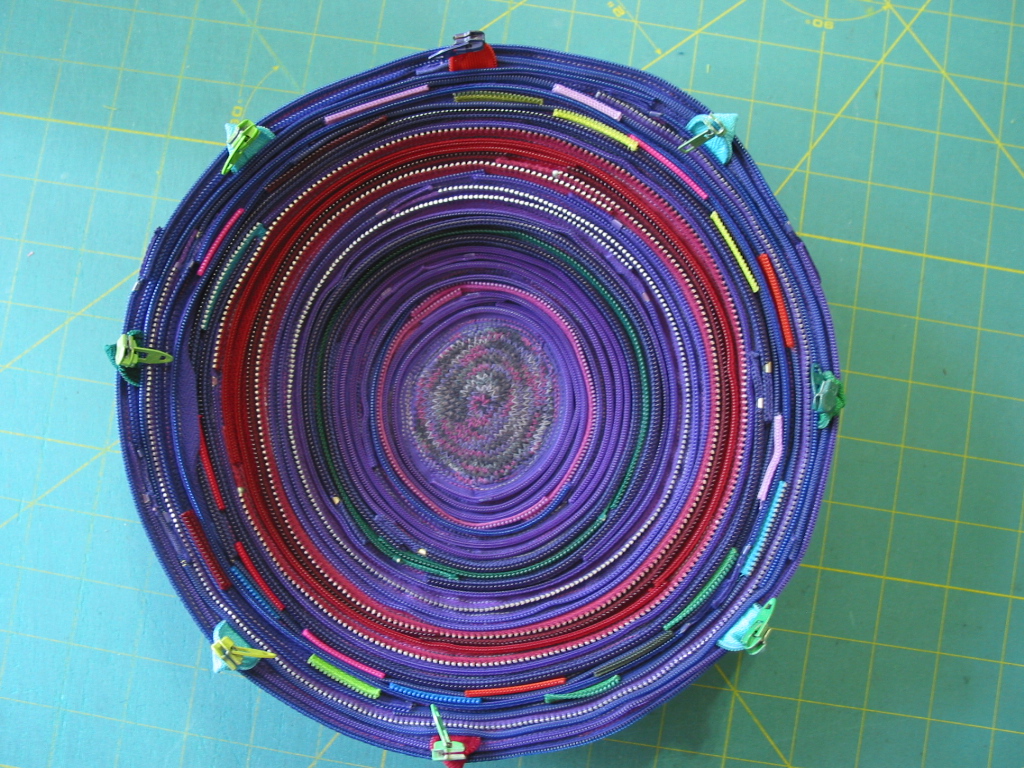
Coiled Bowls using half zippers
In the photos below are two different bowls- left zip pulls in as decorative elements)
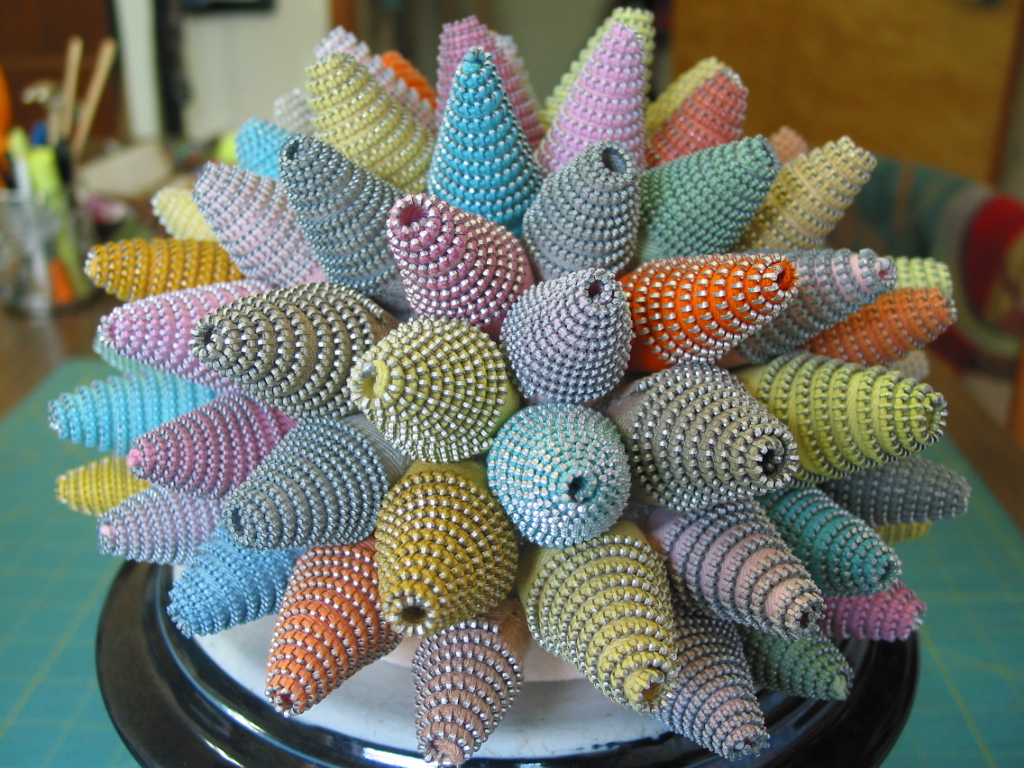
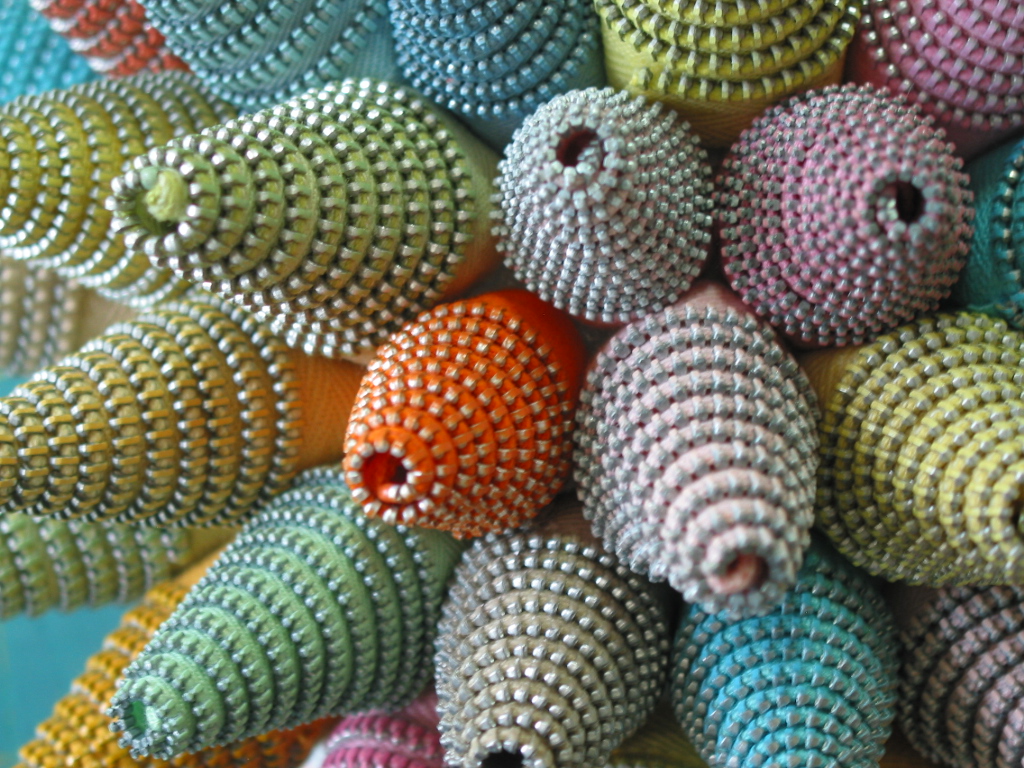
3D Art – Zipper Cones – Sea Anemones
I have more zipper ideas— but I have not followed up on them in a long time.
Postscript
Thanks to Wendy for sharing her story and art related to her donated zipper collection. And thanks to Wendy for sharing some of her collection with me. I am pretty sure there will be some “GOOD MAIL” in her future when I send her a little something I’ve made with one or two of the zippers she sent me.
Next post I will show you the project I just finished using one of the zippers she sent me – another bag – this time a different pattern by s.o.t.a.k. handmade.
My friend Wendy Hill (yes Wendy of the Quarantine Quilts series of posts where she made a quilt with the 4 rambunctious boys next door ages 4 – 8 as a diversion for them during the height of the pandemic) has been “KonMari-ing” her house. Using Marie Kondo’s methods she’s been going through her home organizing and letting go of that which does not give her joy.
I’ve recently benefited from her “KonMari-fication” (totally made up word, not endorsed by Marie Kondo, ha) when I received in the mail a project challenge.
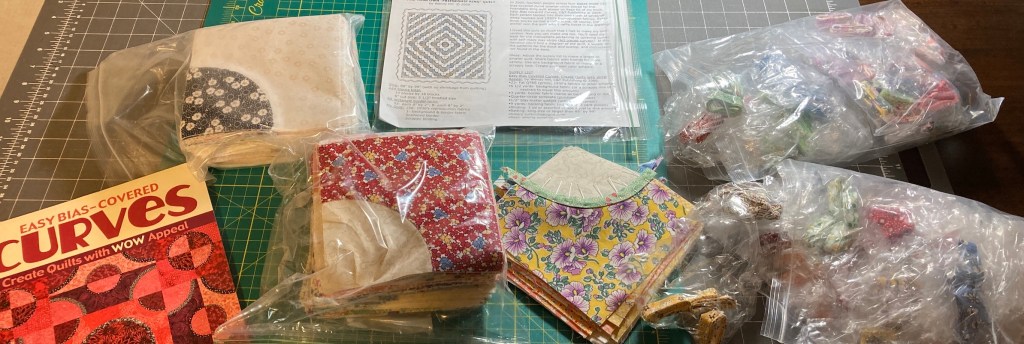
goodies in the mail!
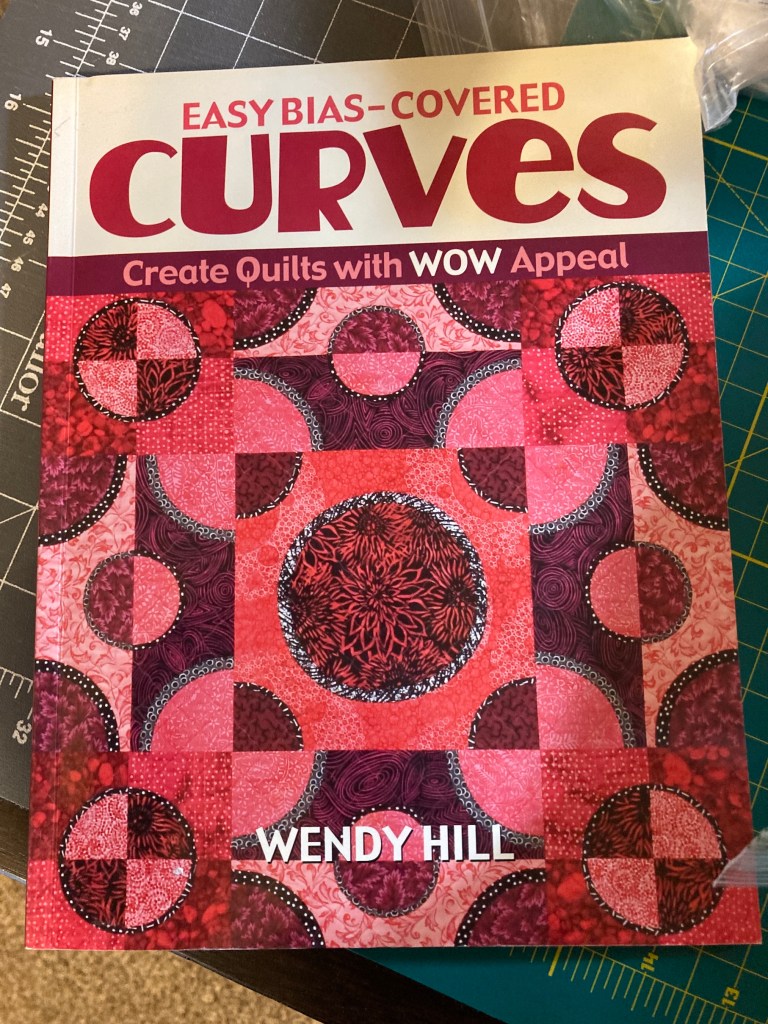
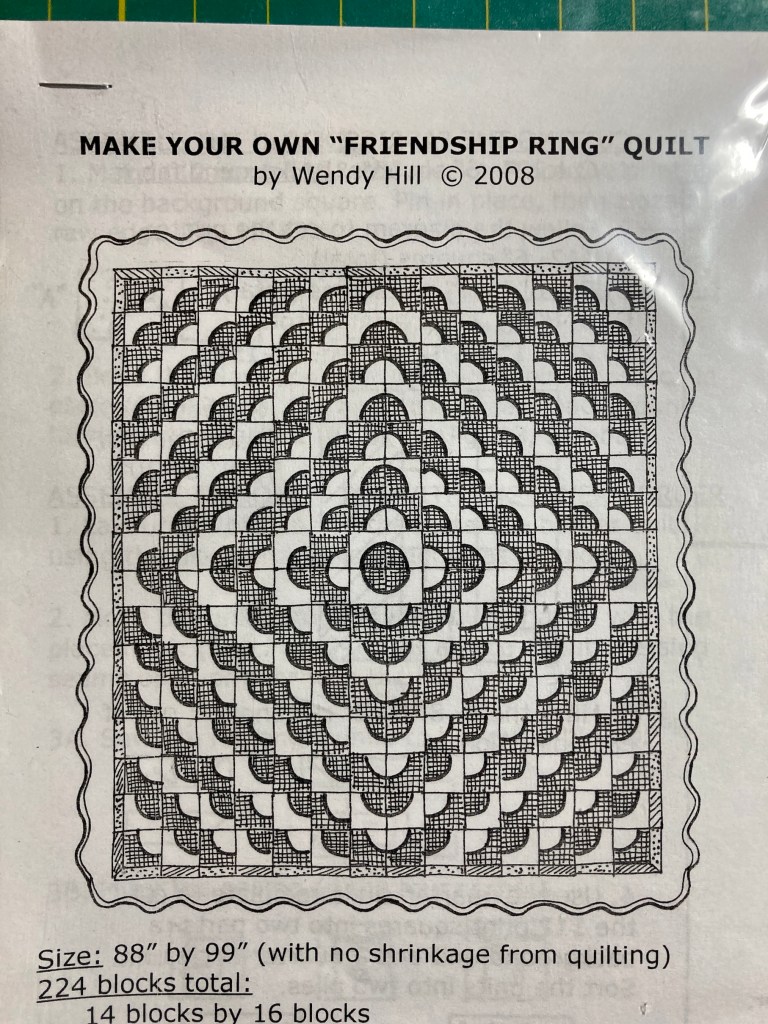
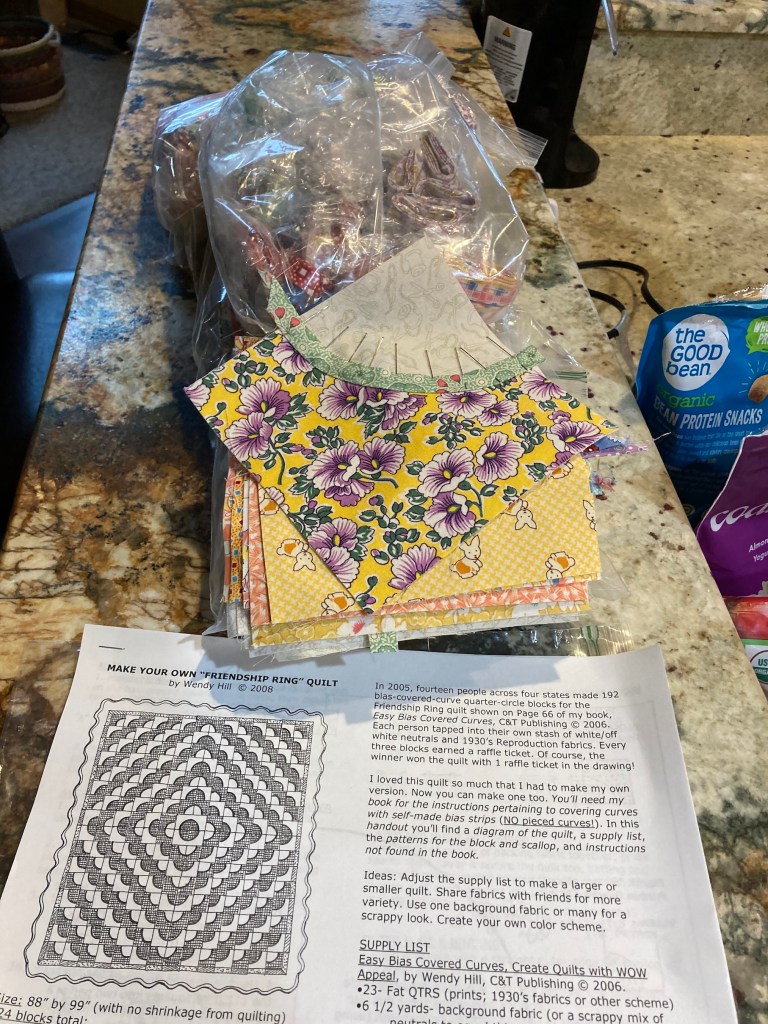
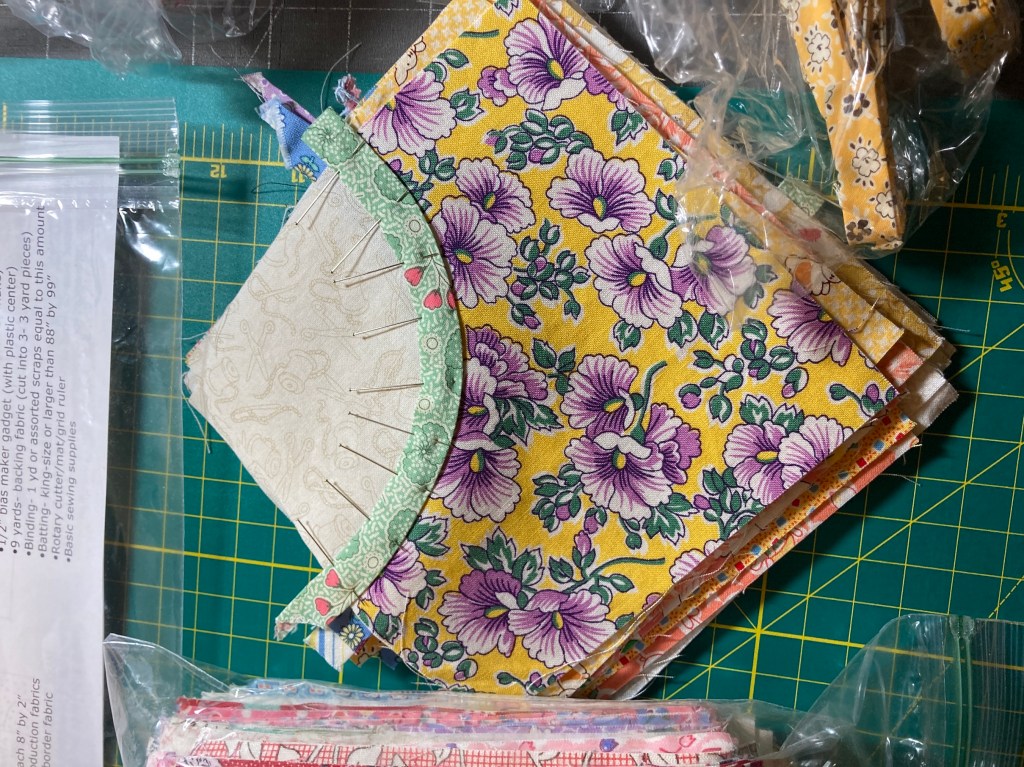
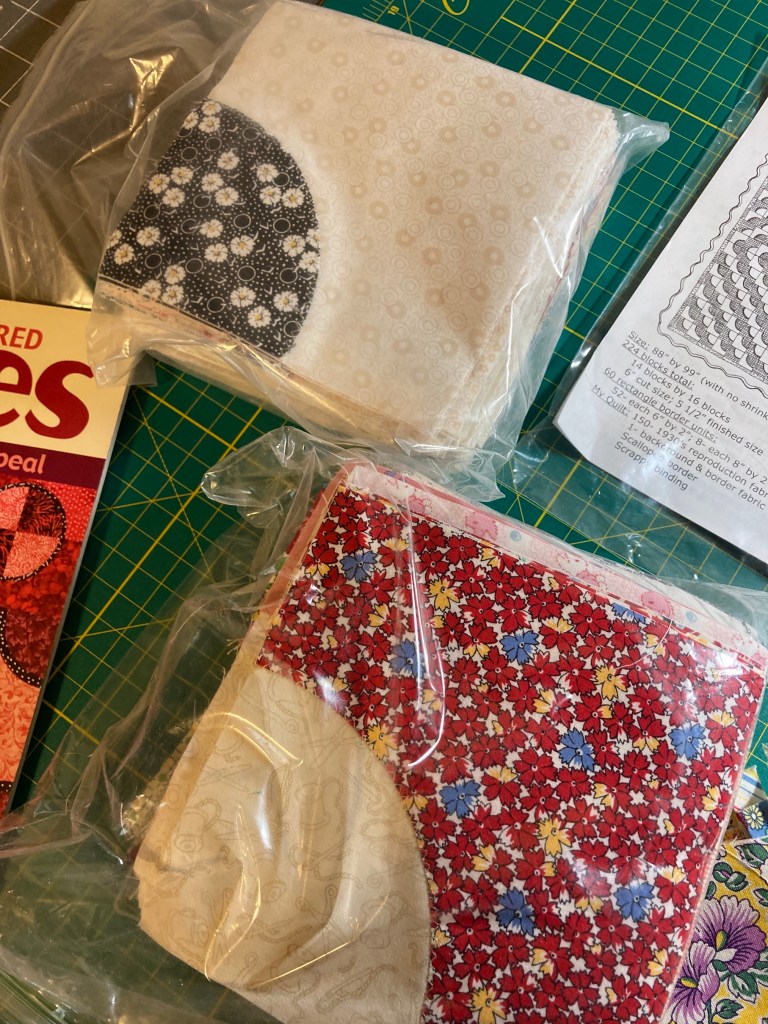
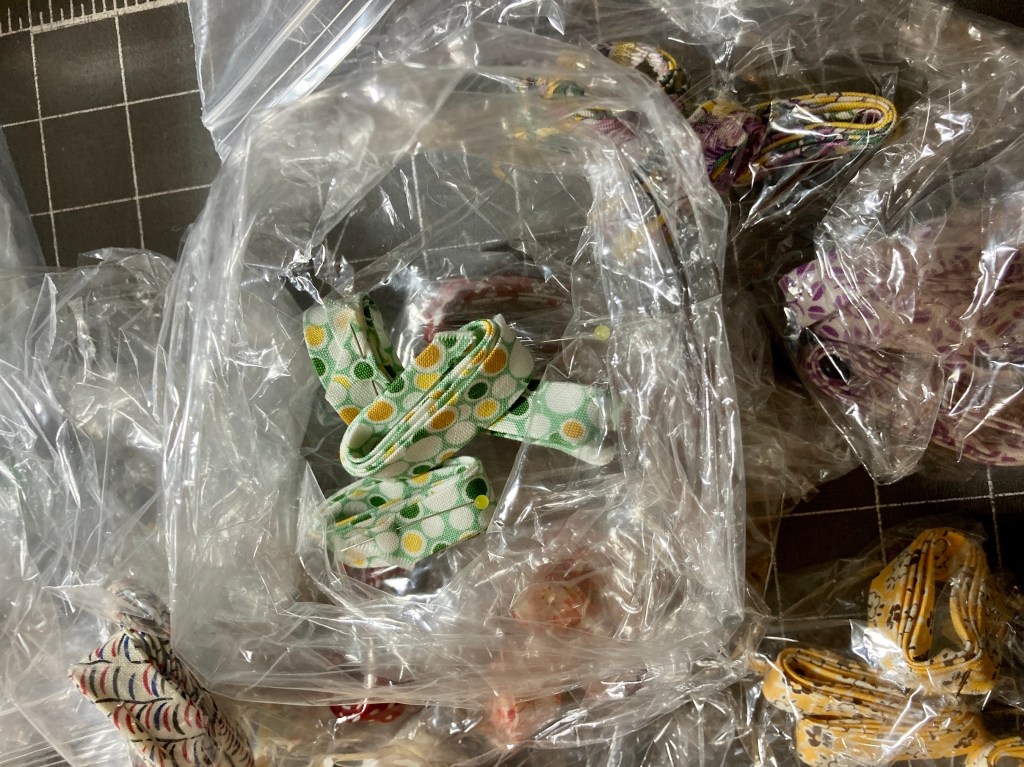
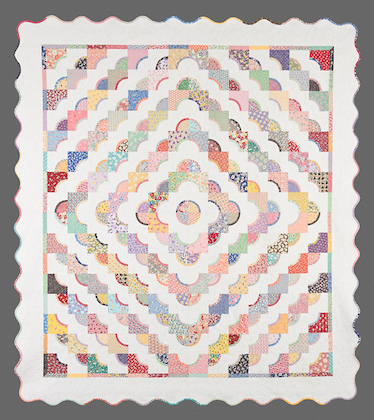
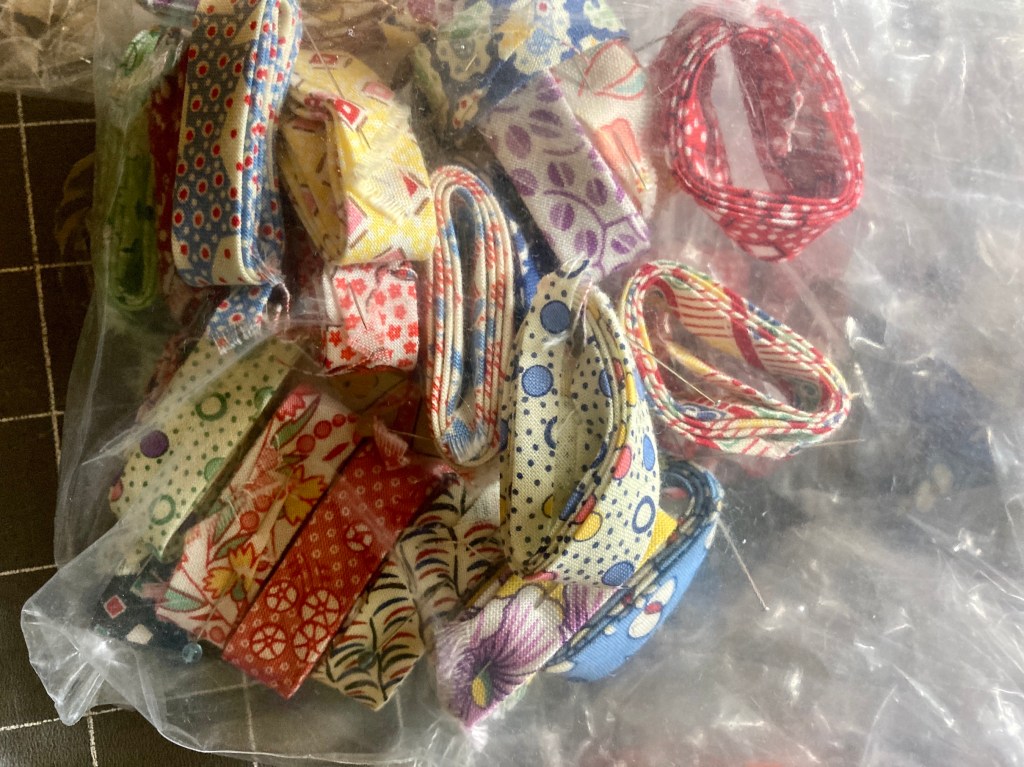
She sent me the pattern she wrote and all the material (pre-cut including bias tape) to make a quilt called Friendship Ringfrom her book Easy Bias-Covered Curves (Wendy Hill, 2006).
When I mean all the fabrics, I mean ALL THE FABRICS, to include pre-sewn blocks and examples of how to attached the bias tape…and the already created bias tape!
I was overwhelmed by her generosity. She decided she was not interested in making another one of these quilts (one had been made as a sample for the book), so it was just taking up space in her home (and not bringing her joy).
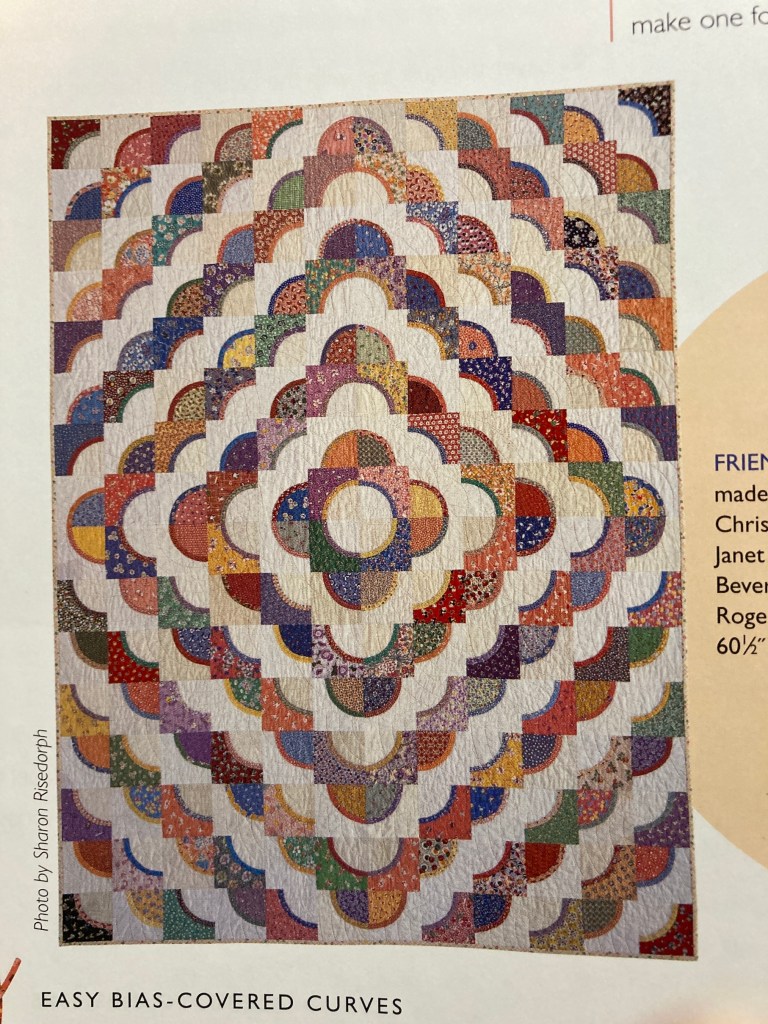
Here is what, in a perfect world (of me perfectly putting it together as instructed), the quilt will look like when done (thanks Wendy Hill for the photo):
photo credit: Wendy Hill
I already have a copy of her book Easy Bias-Covered Curves to help me with the technical aspects of assembling this quilt and finishing up the bias covered curves with all the pre-made bias tape she sent me:
The fabrics are lovely, they are a collection of 1930s type of prints collected by Wendy and donated by her friends who collected these types of fabrics.
So I’ve excitedly added this project to my project queue! I will of course blog about its progress when I start working on it. Thanks so much to Wendy for her generosity and for trusting me with carrying this project forward!
Let me close this post with my favorite Marie Kondo quote which I’ve referenced in previous posts in my old life (before my husband passed) such as The Space in Which We Live; and now in current life in which I had to let go of a lot from my wonderful old life to make space for this new reality and existence.
The space in which we live should be for the person we are becoming now, not for the person we were in the past.
– Marie Kondo, The Life-Changing Magic of Tidying Up: The Japanese Art of Decluttering and Organizing
All good things must come to an end as they say, and here is the 5th and final installment of the guest blog post series by my talented friend Wendy Hill on the awesome quilt she made during quarantine with the four rambunctious boys next door (aka “The Boys”) ages 2 – 8.
Thanks for reading this series along with me (I was so excited to receive each installment via e-mail and read it myself for the first time while posting it!)
And if you are just joining us, see these posts for Parts I, II, III and IV of the story by Wendy Hill:
You can follow Wendy Hill on Instagram @wendyquilter
Quarantine Quilt Project: Life in the Time of Coronavirus
Part V: The Big Giveaway
I’m eager to show off the Quarantine Quilt and The Big Giveaway where “The Boys” and their parents see the quilt for the first time.
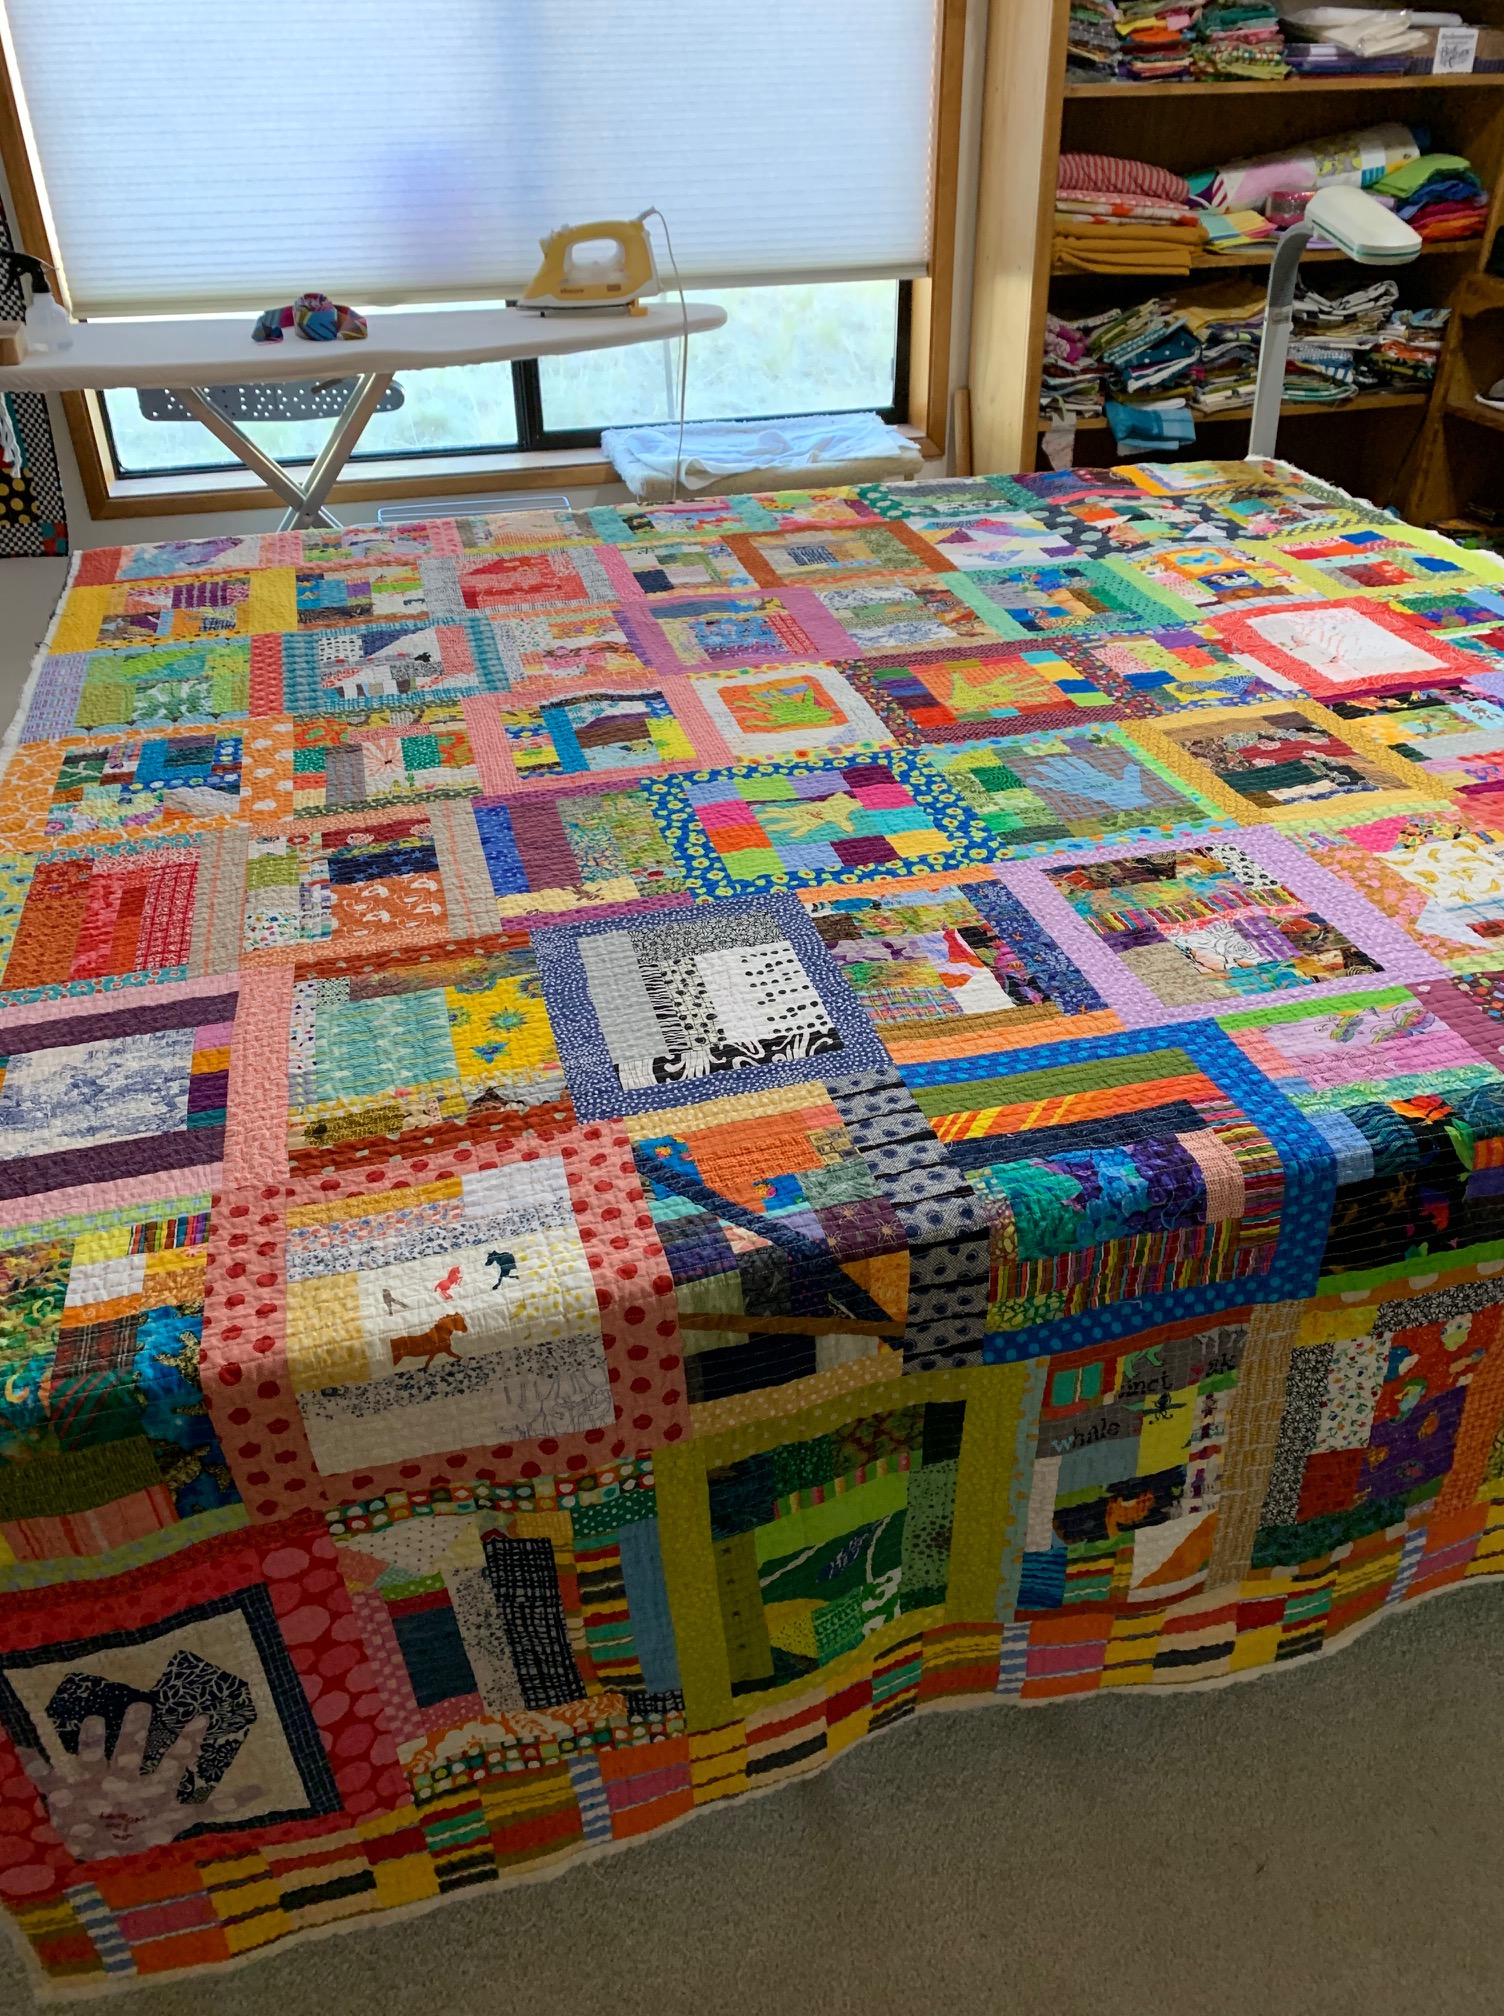
Here are the full view photographs of the front and the back. (The quilt, with no sleeve, wiggled a bit being clamped to a bar for the photos.)
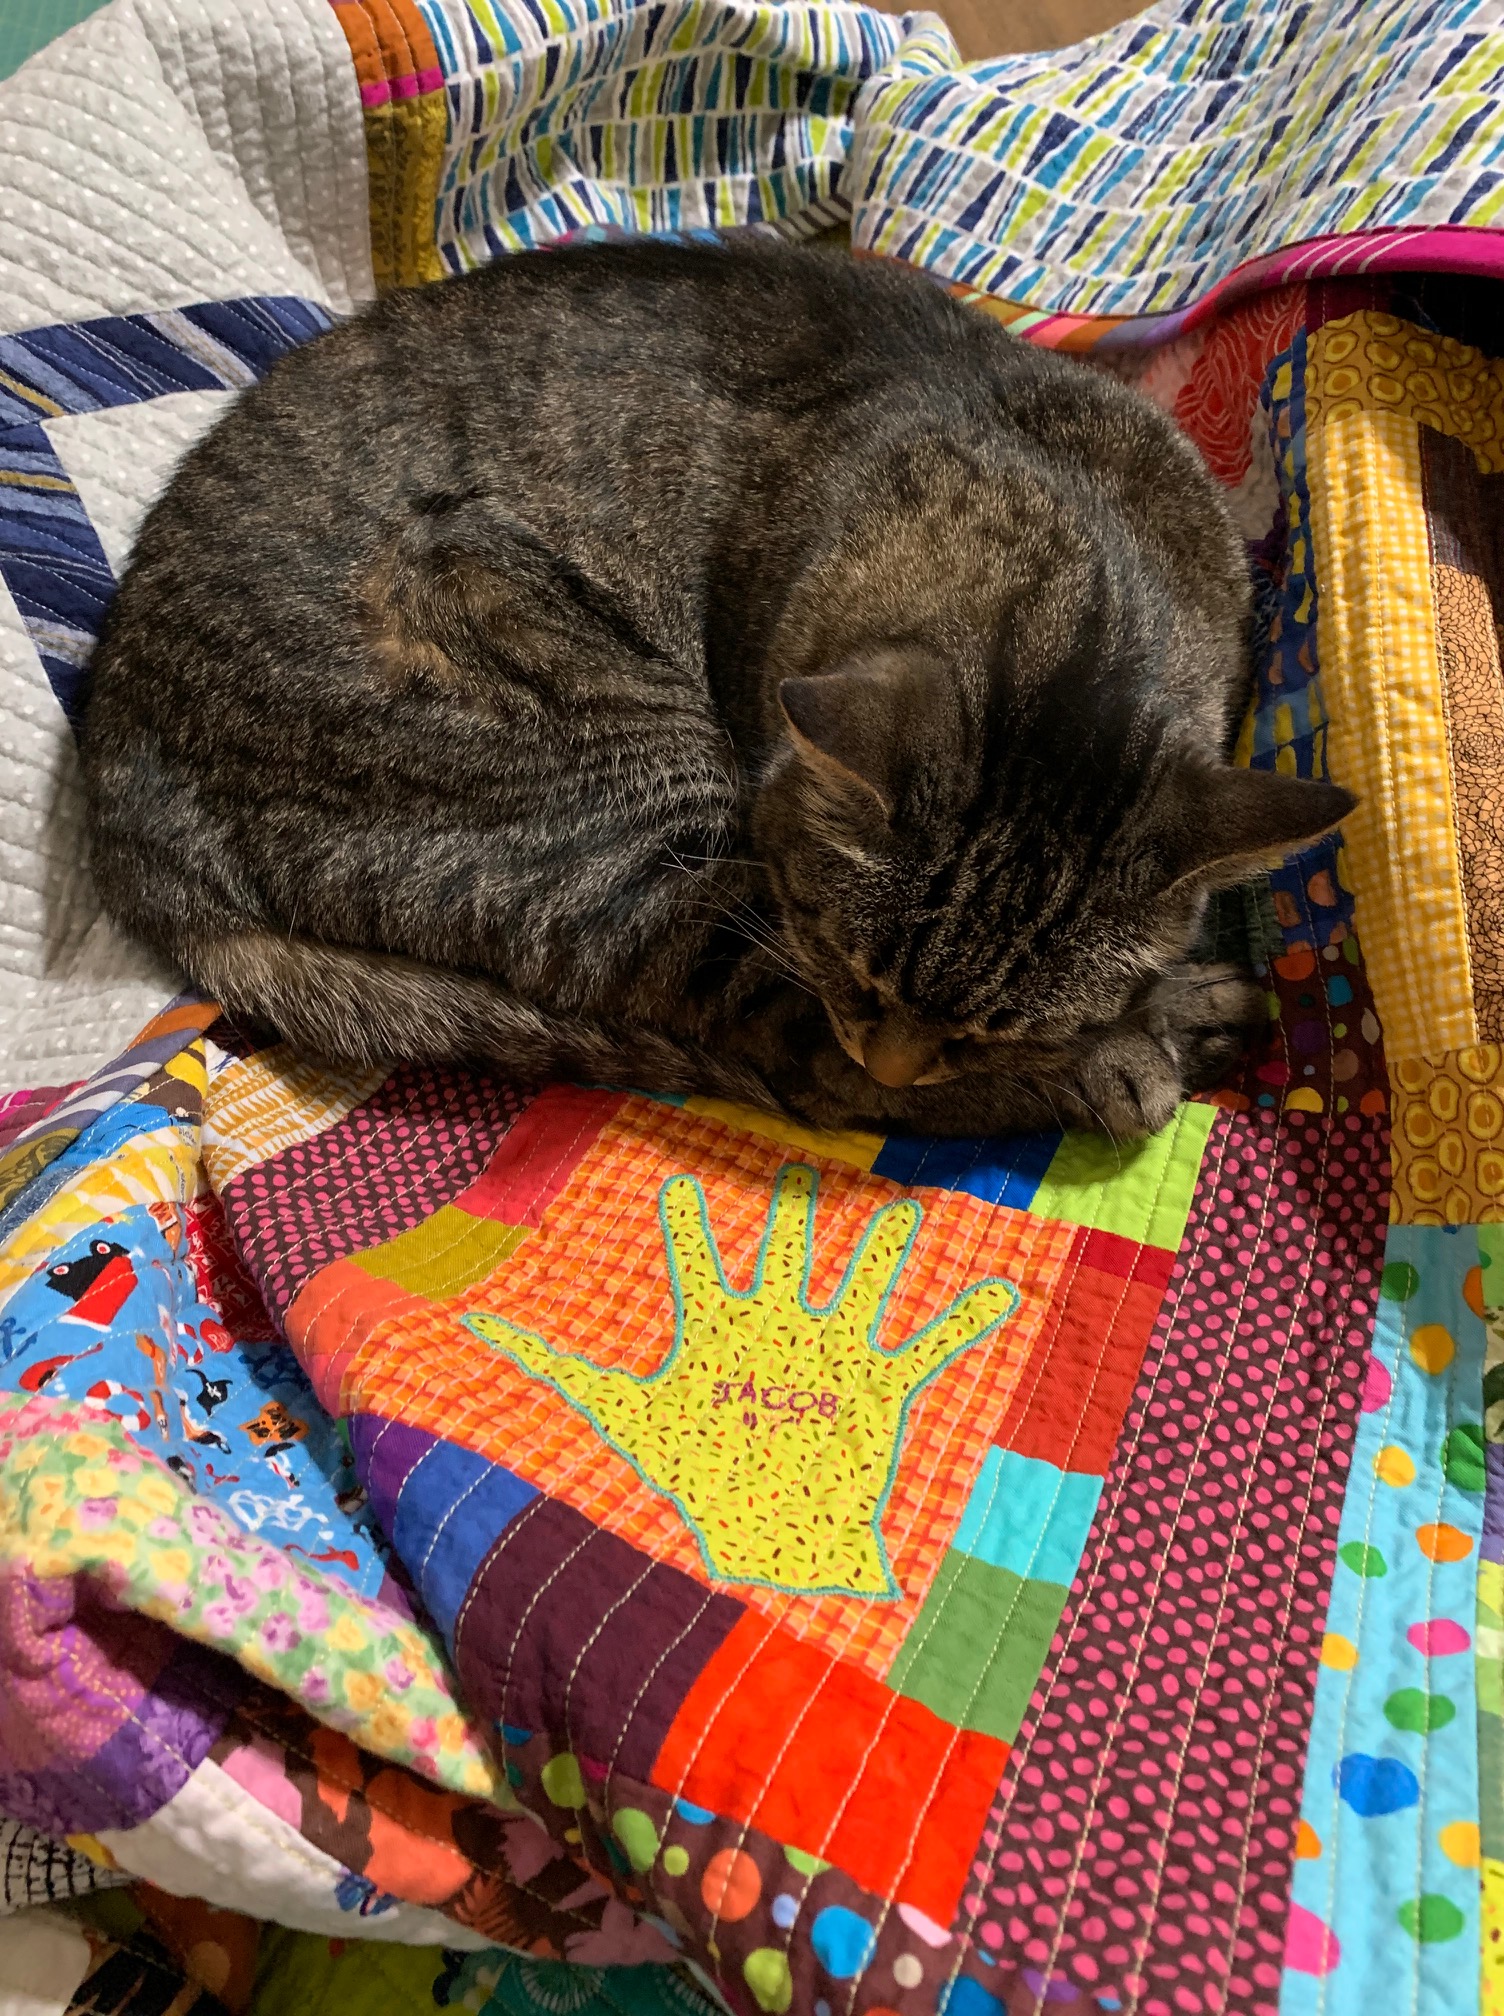
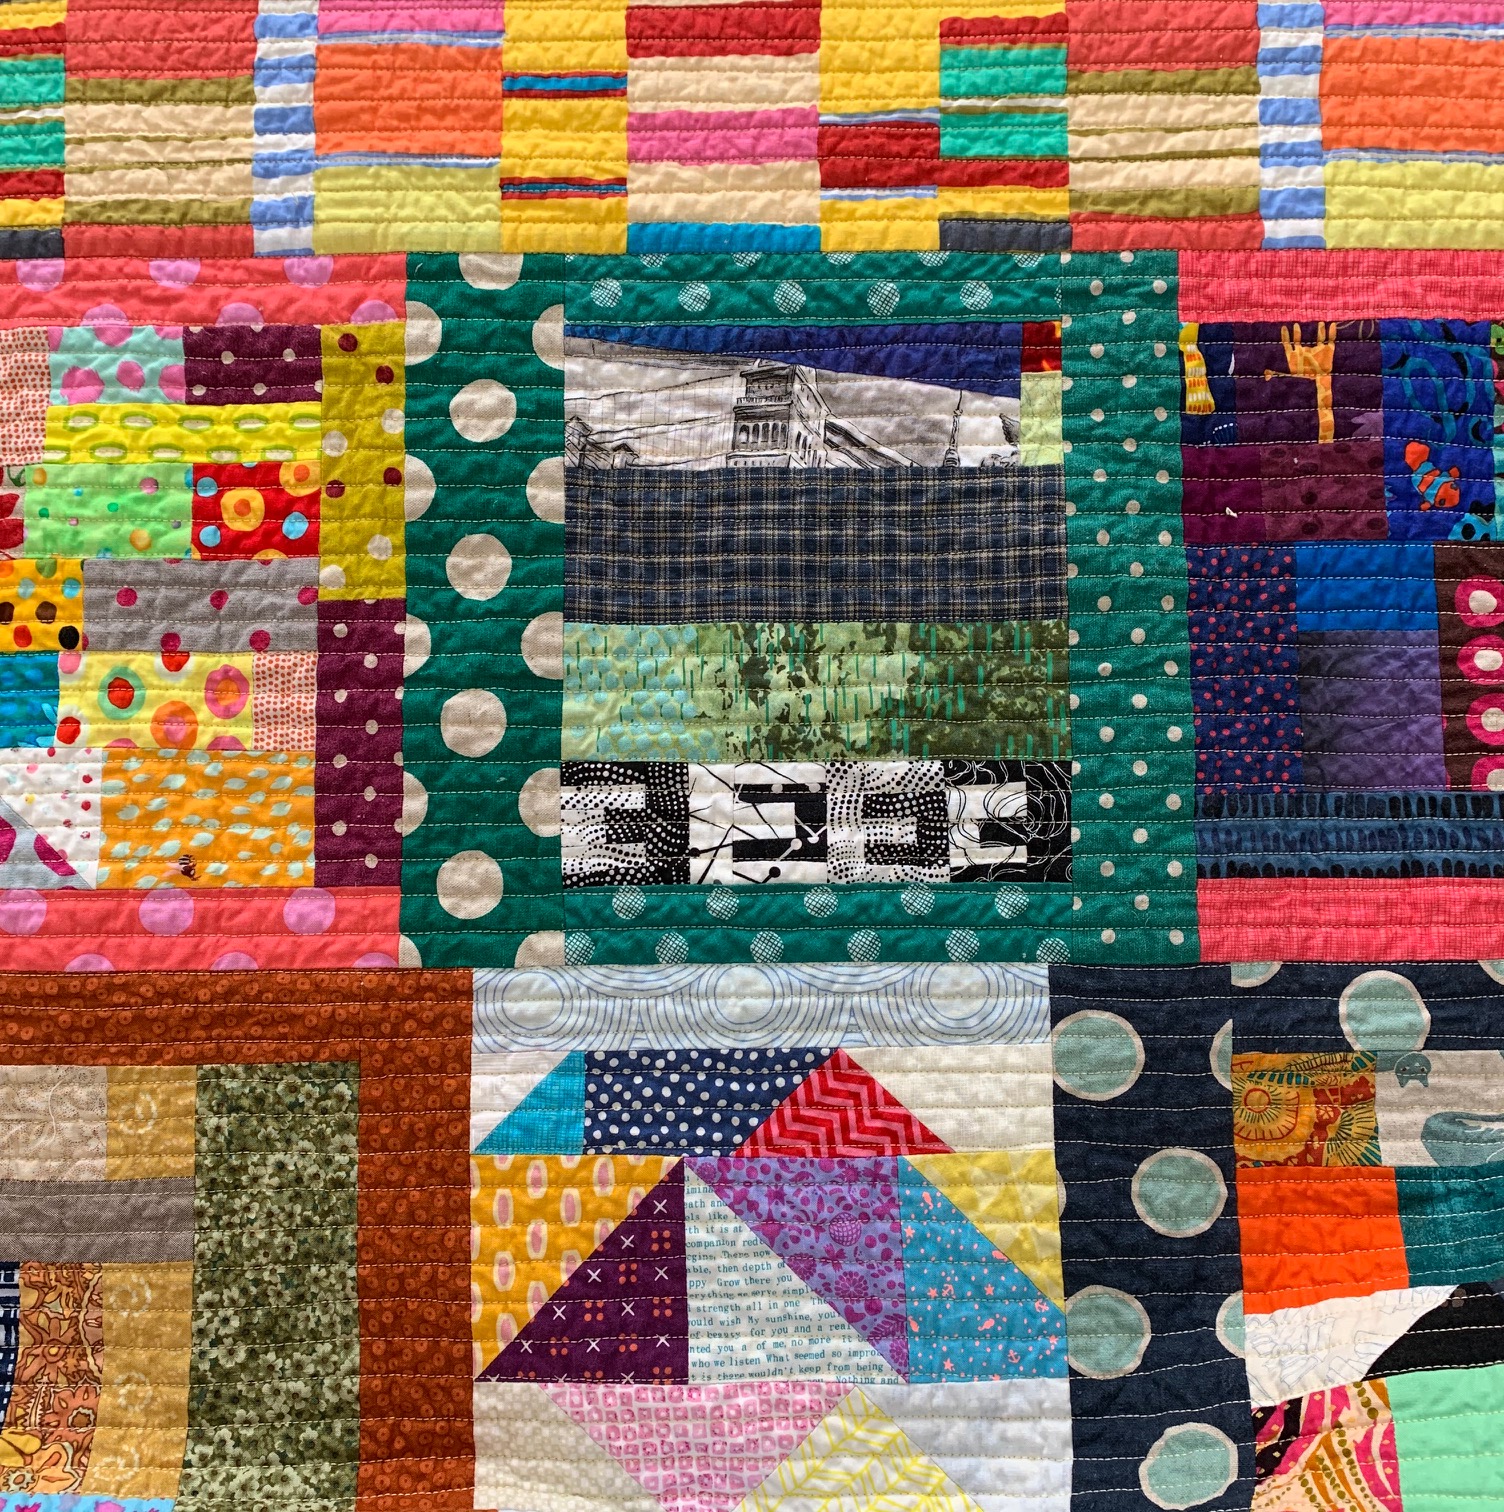
At home, I took some detail photographs. Of course, the cats found the quilt in no time….The Quarantine Quilt is officially cat approved!!
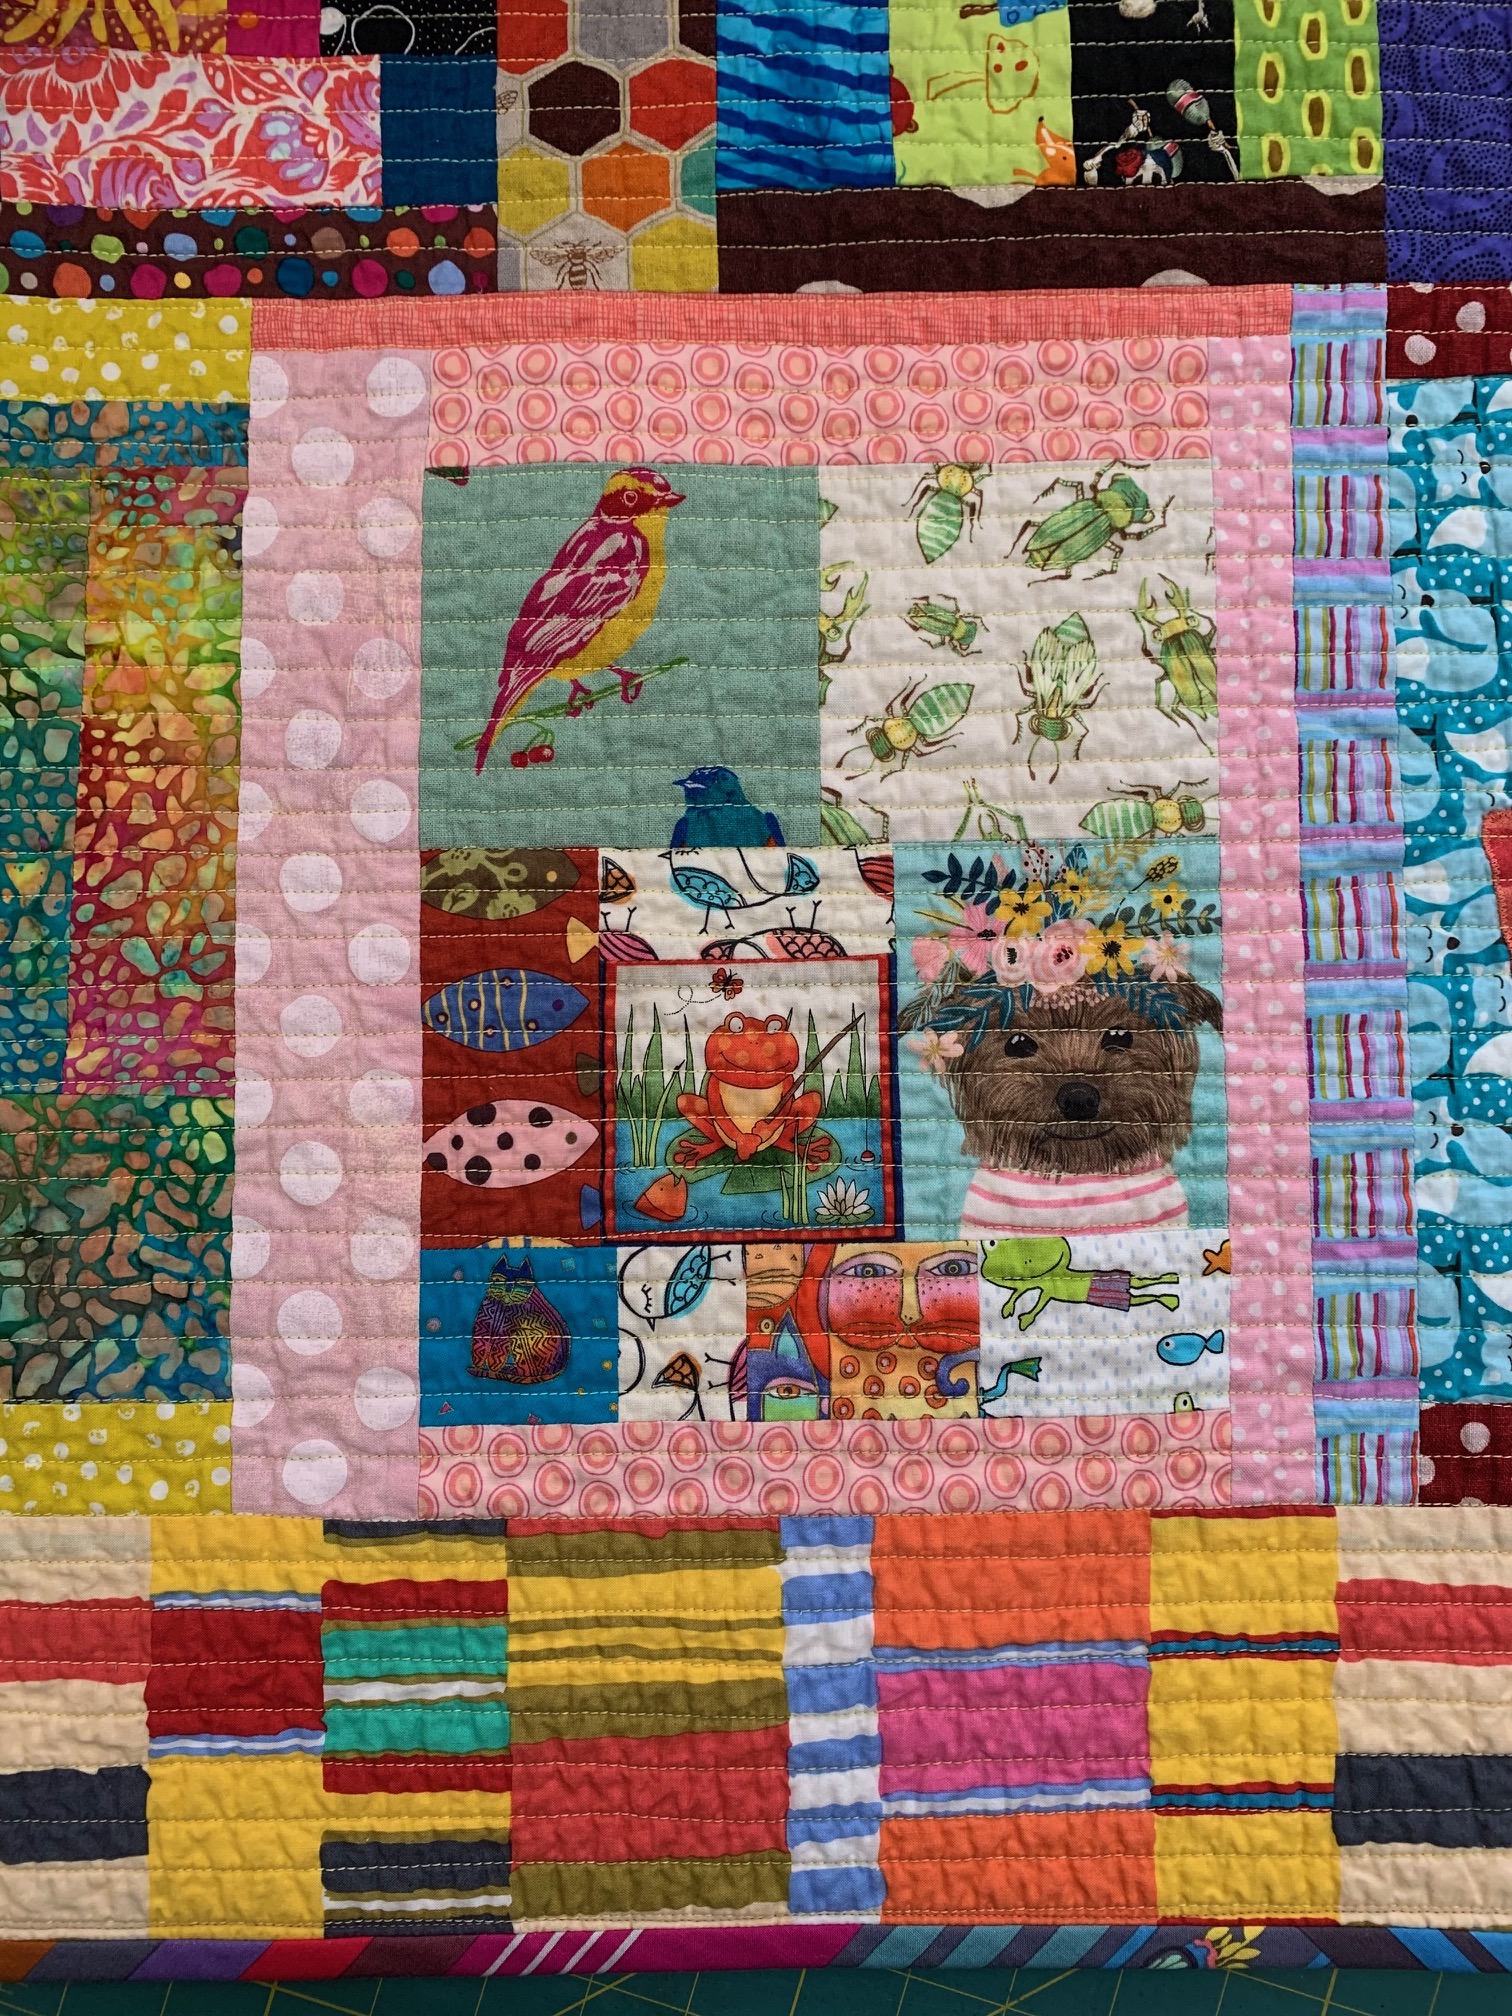
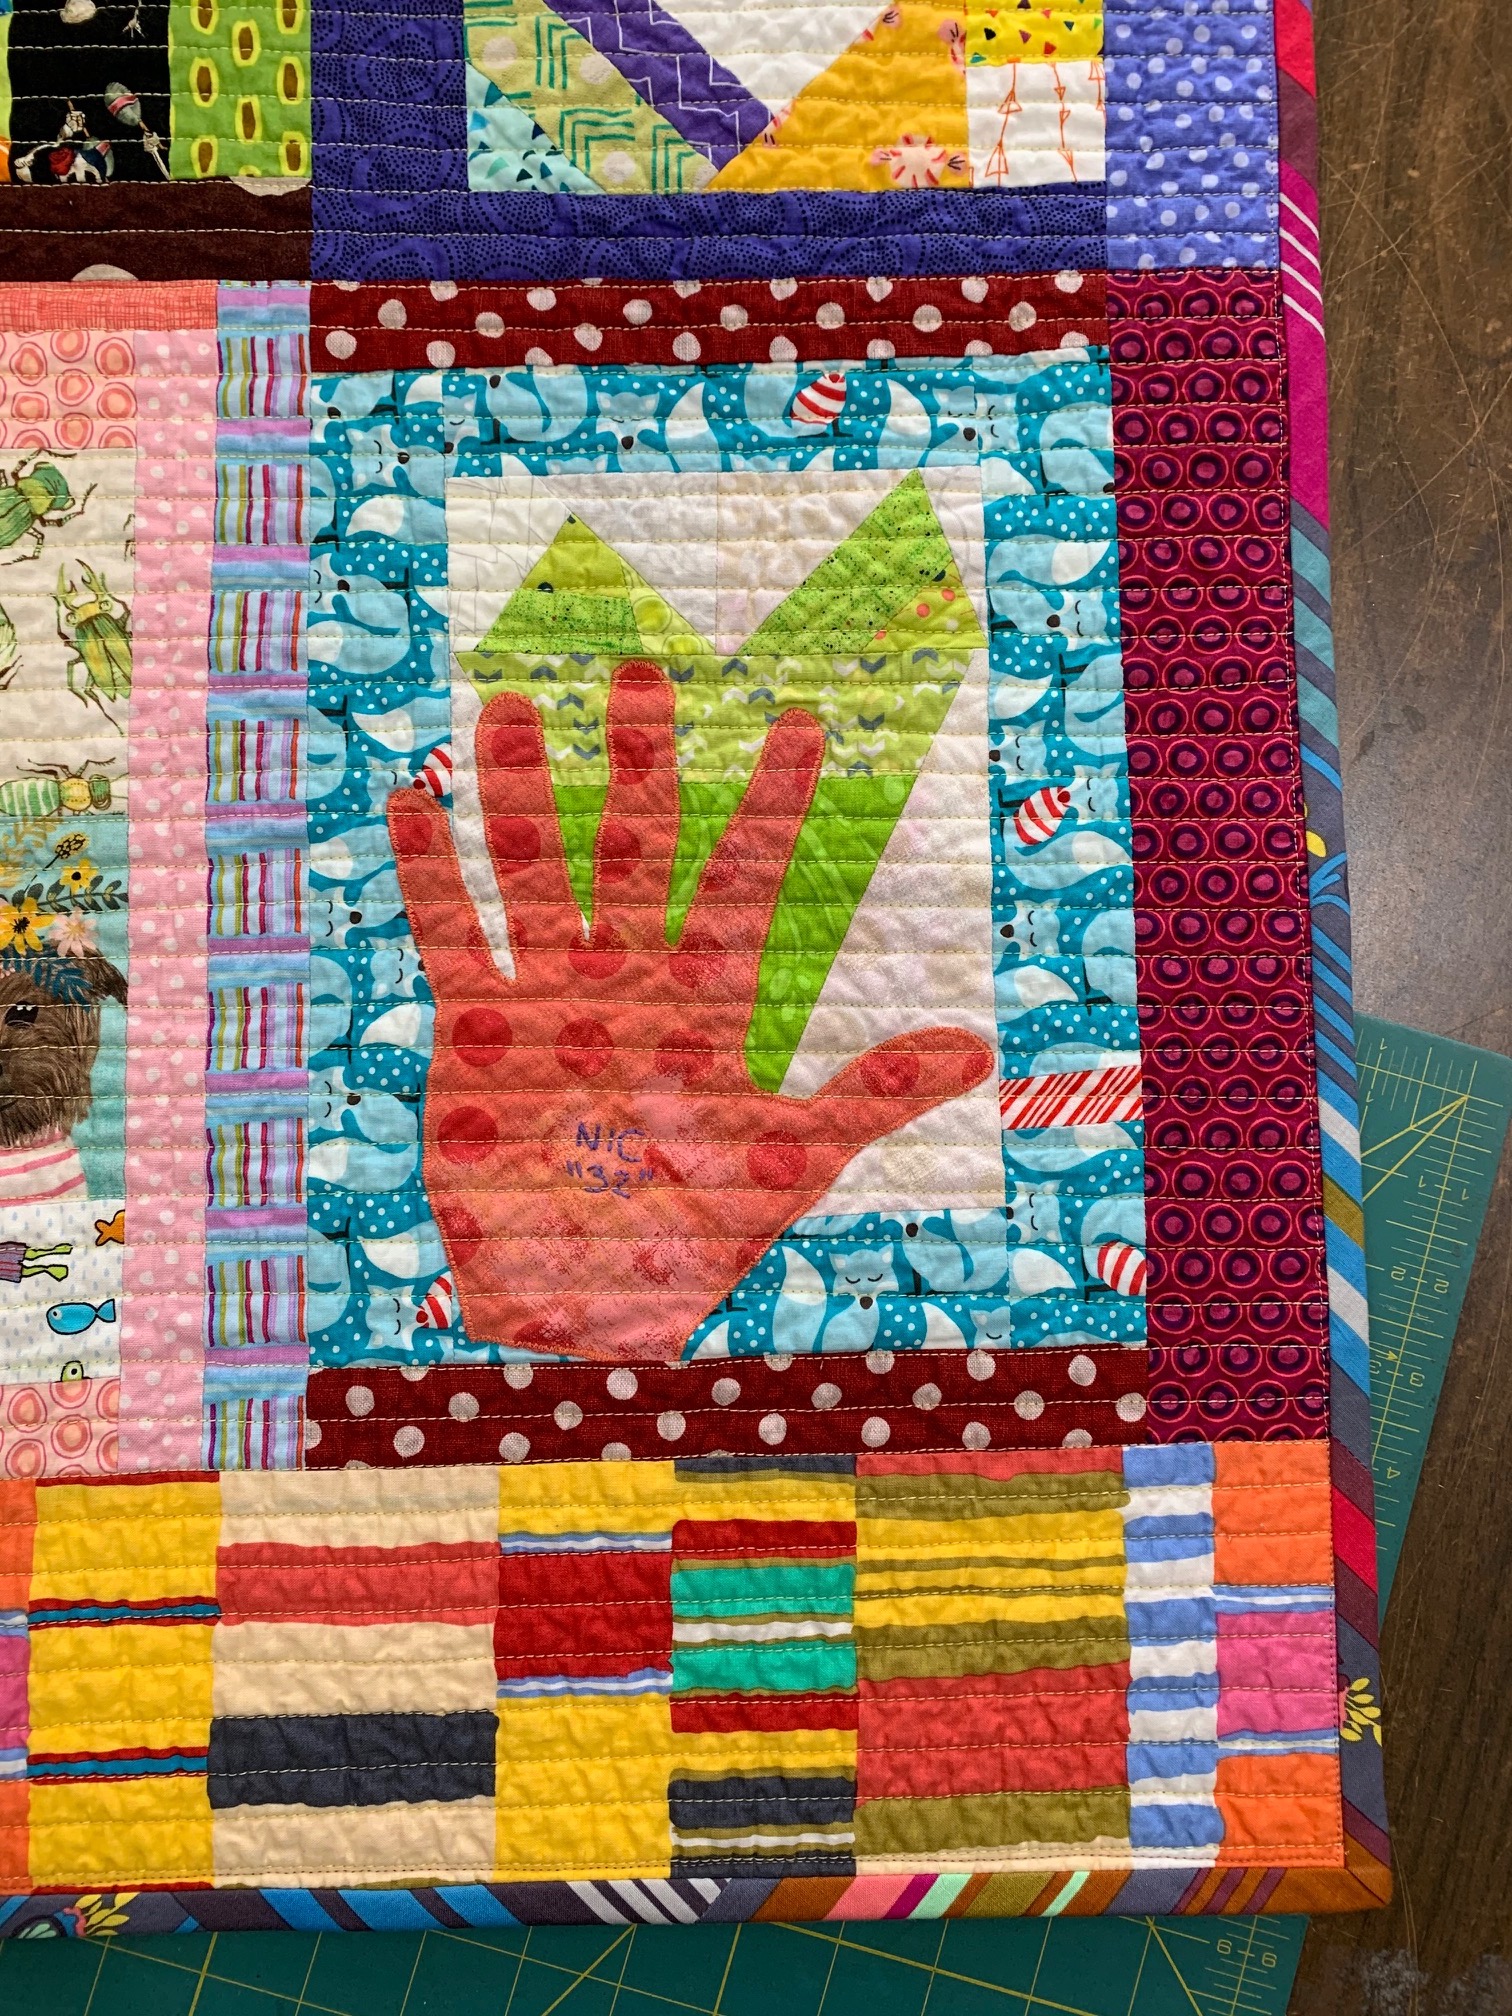
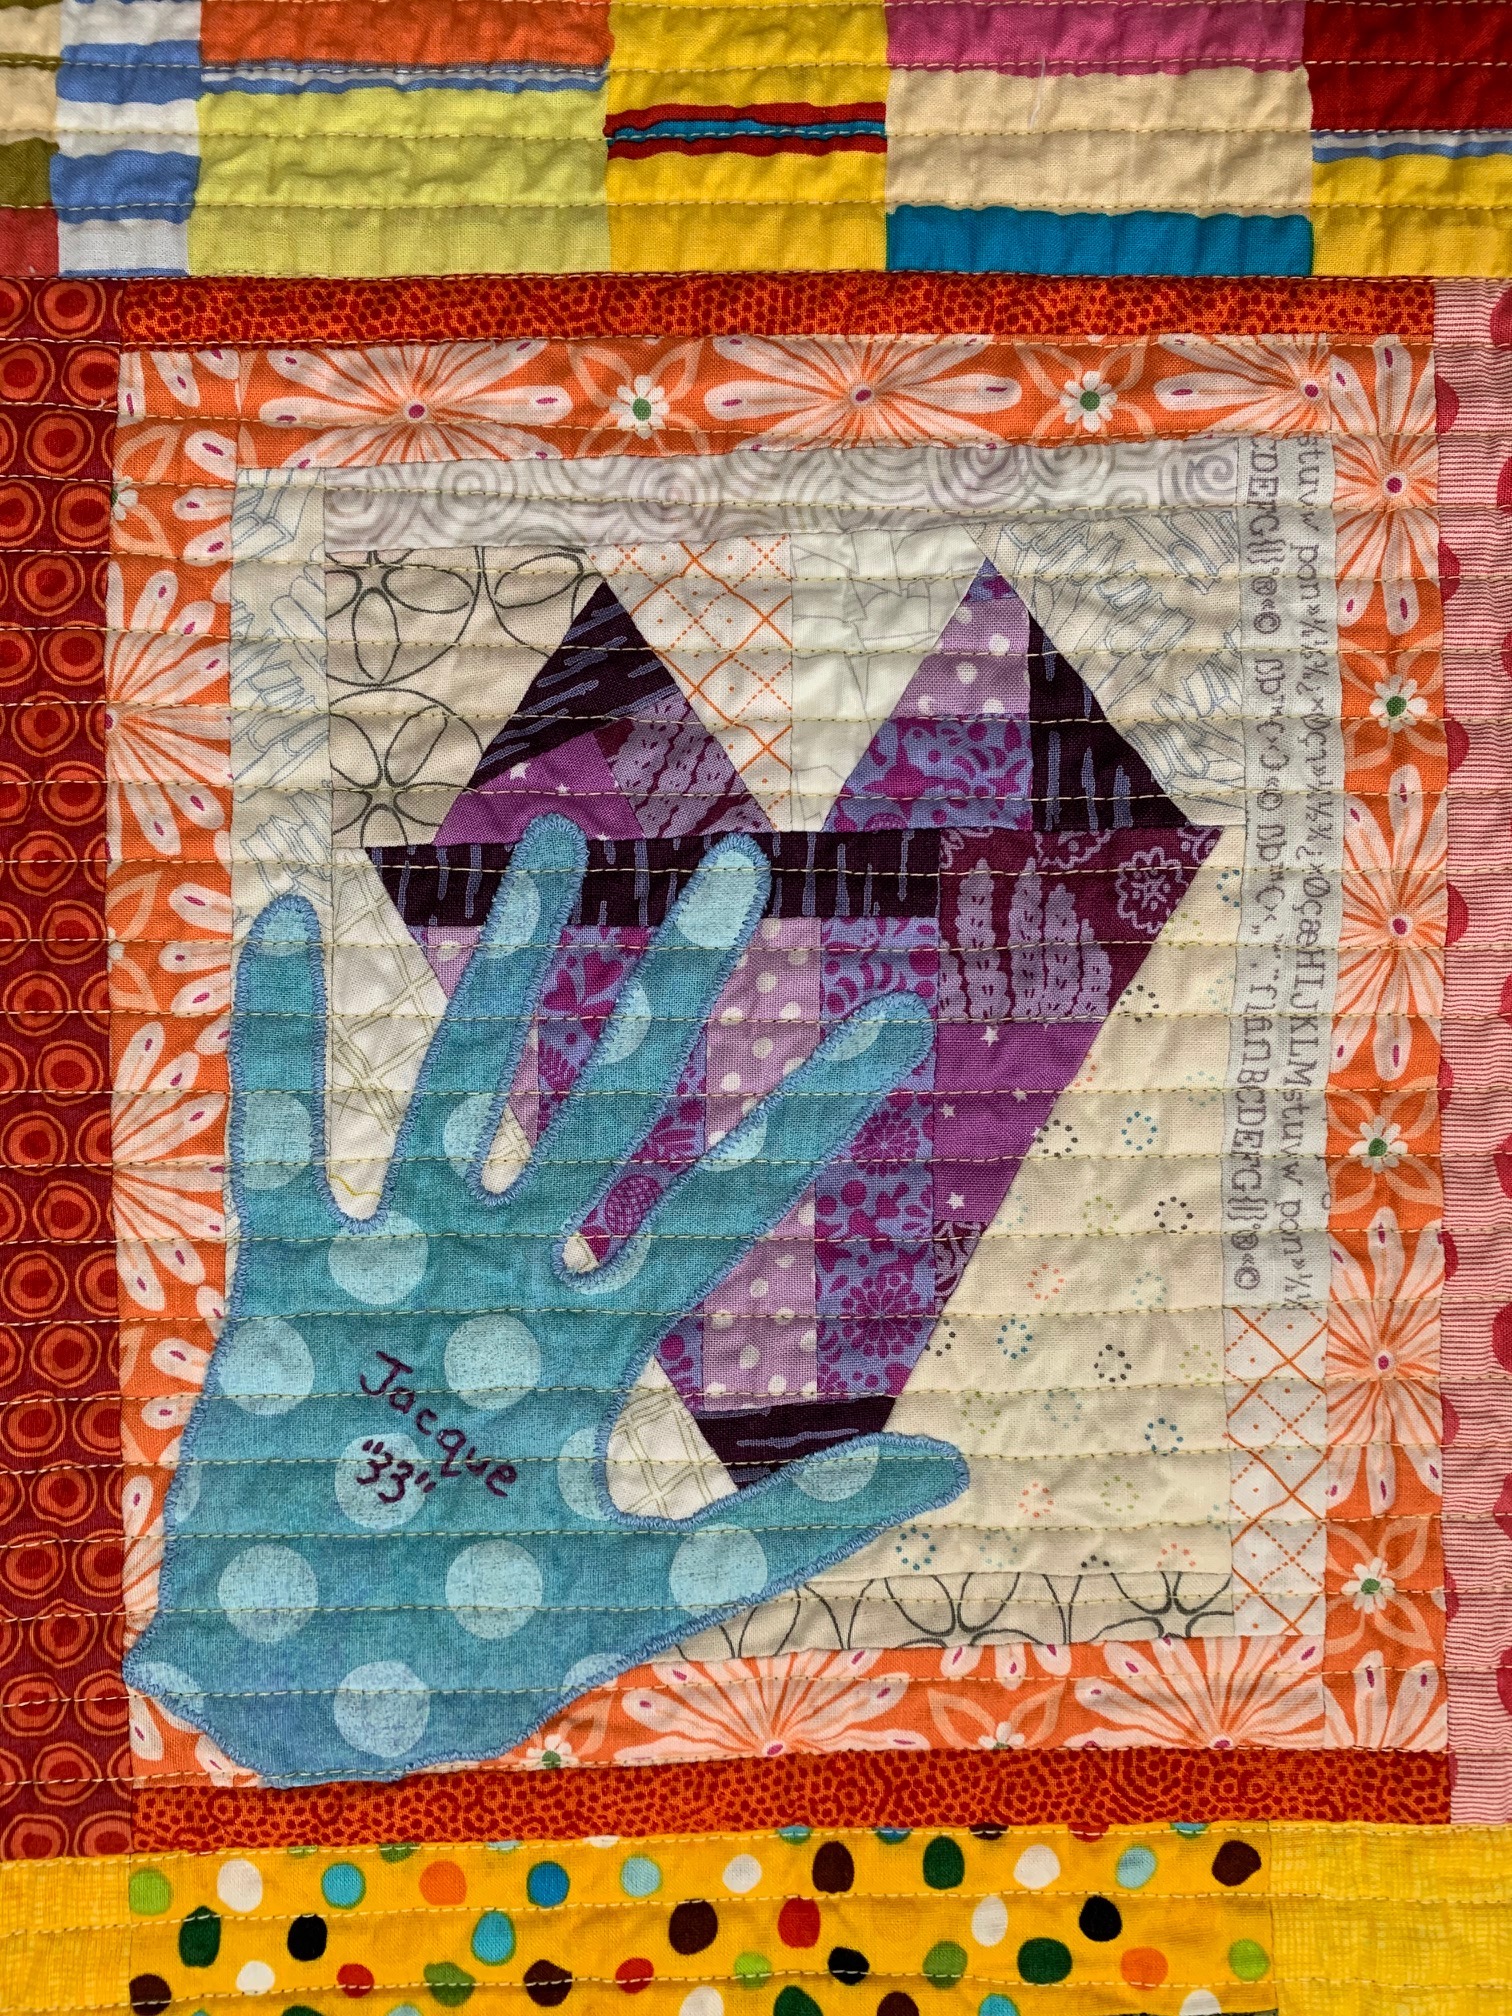
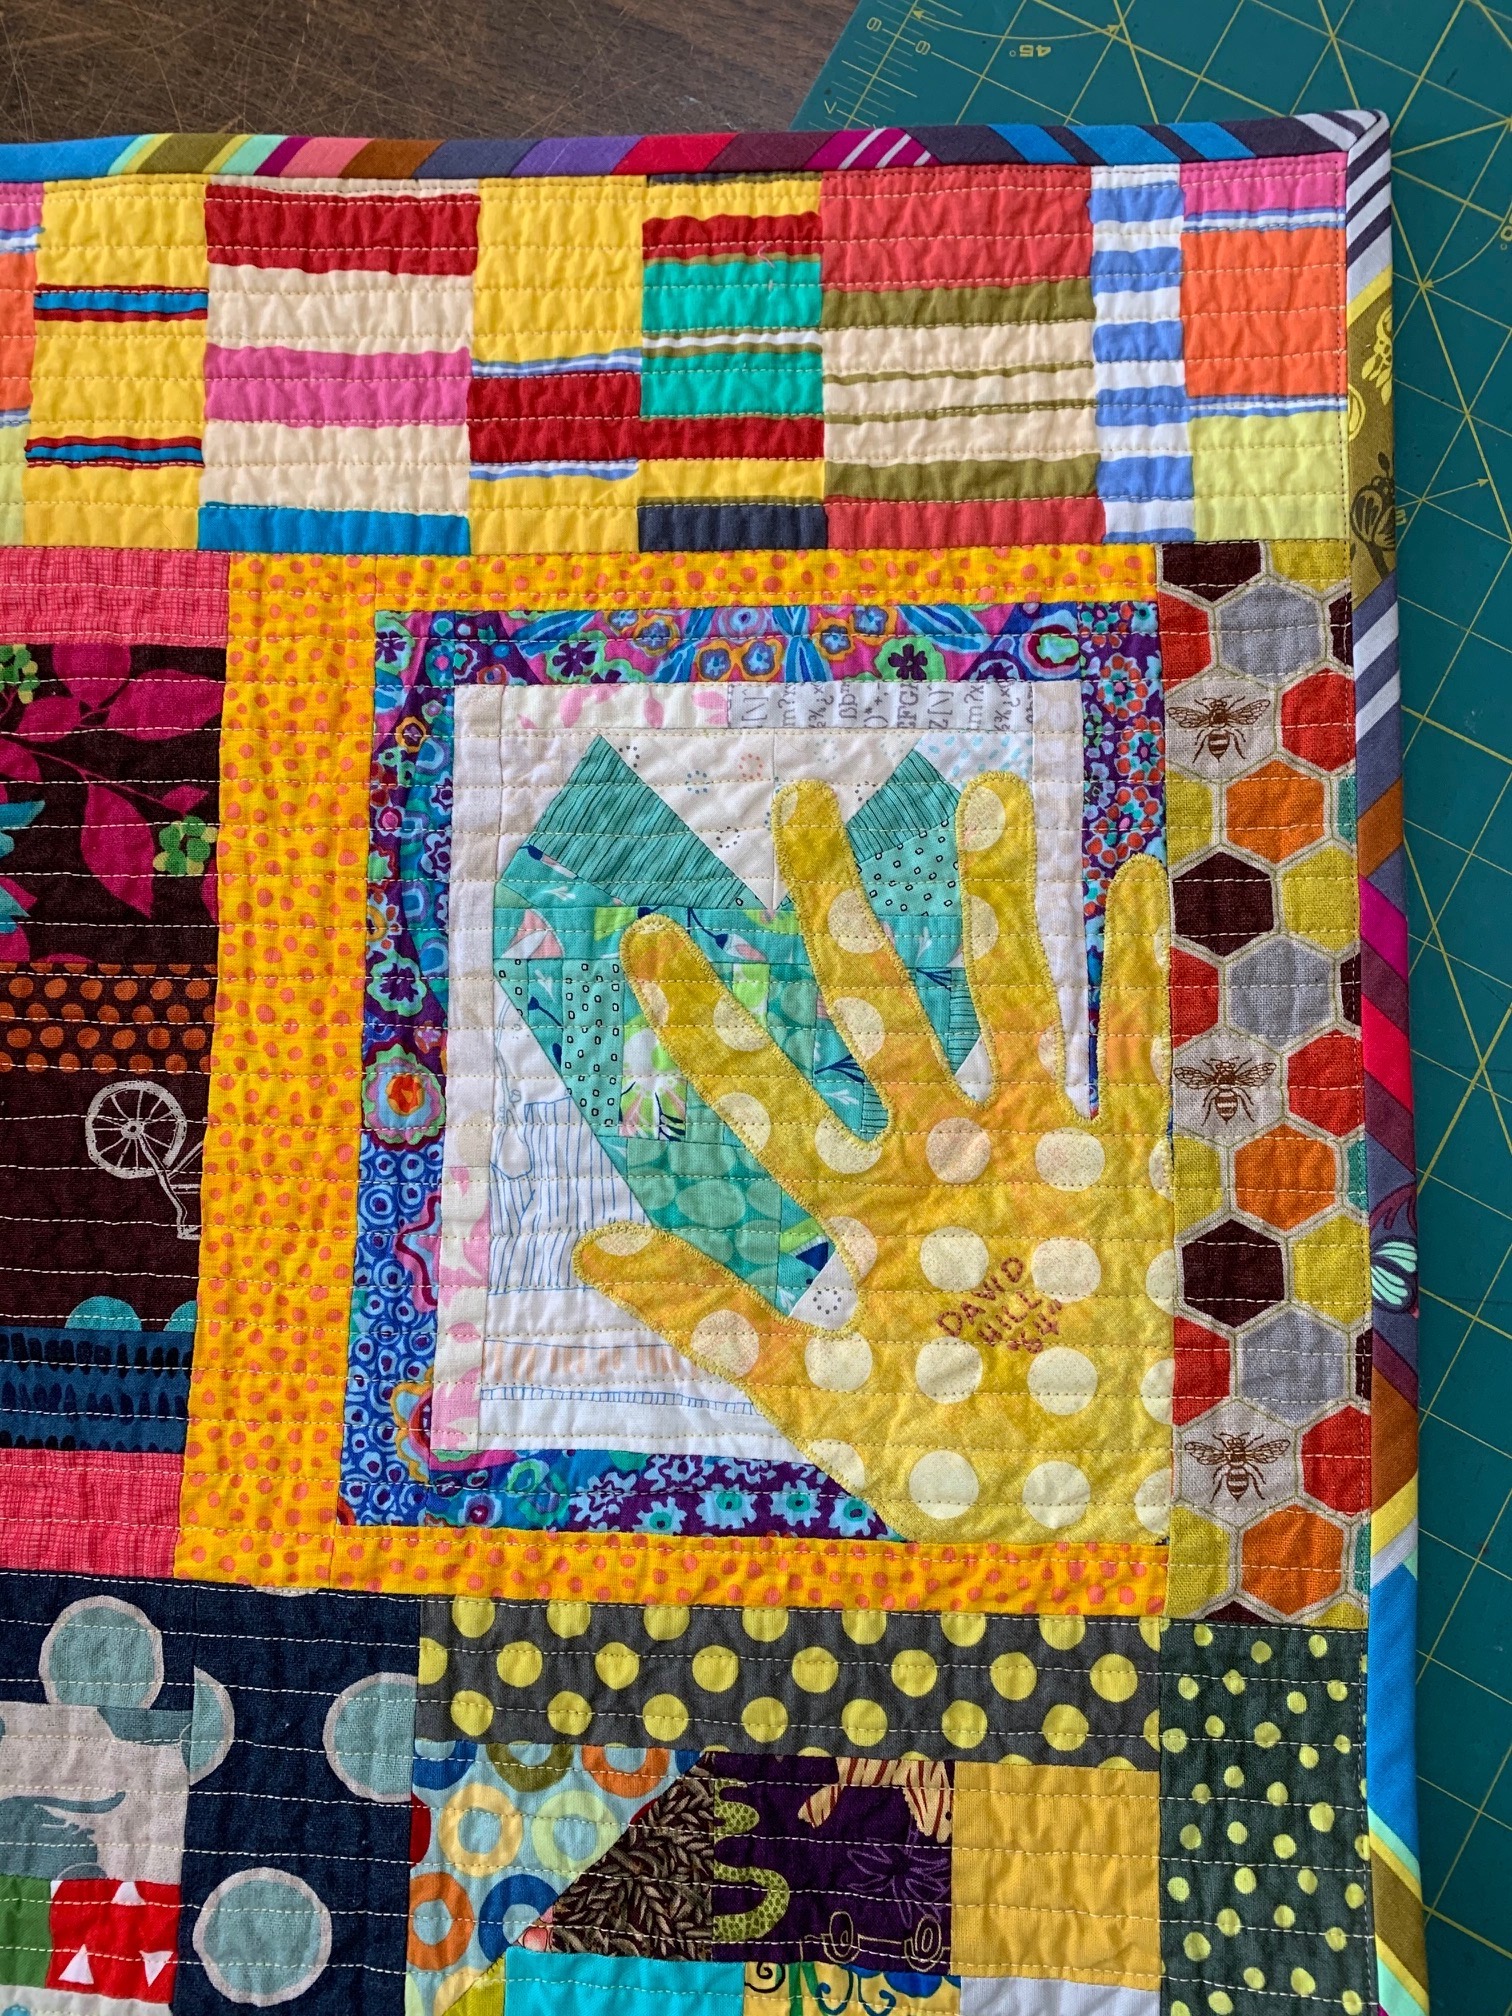
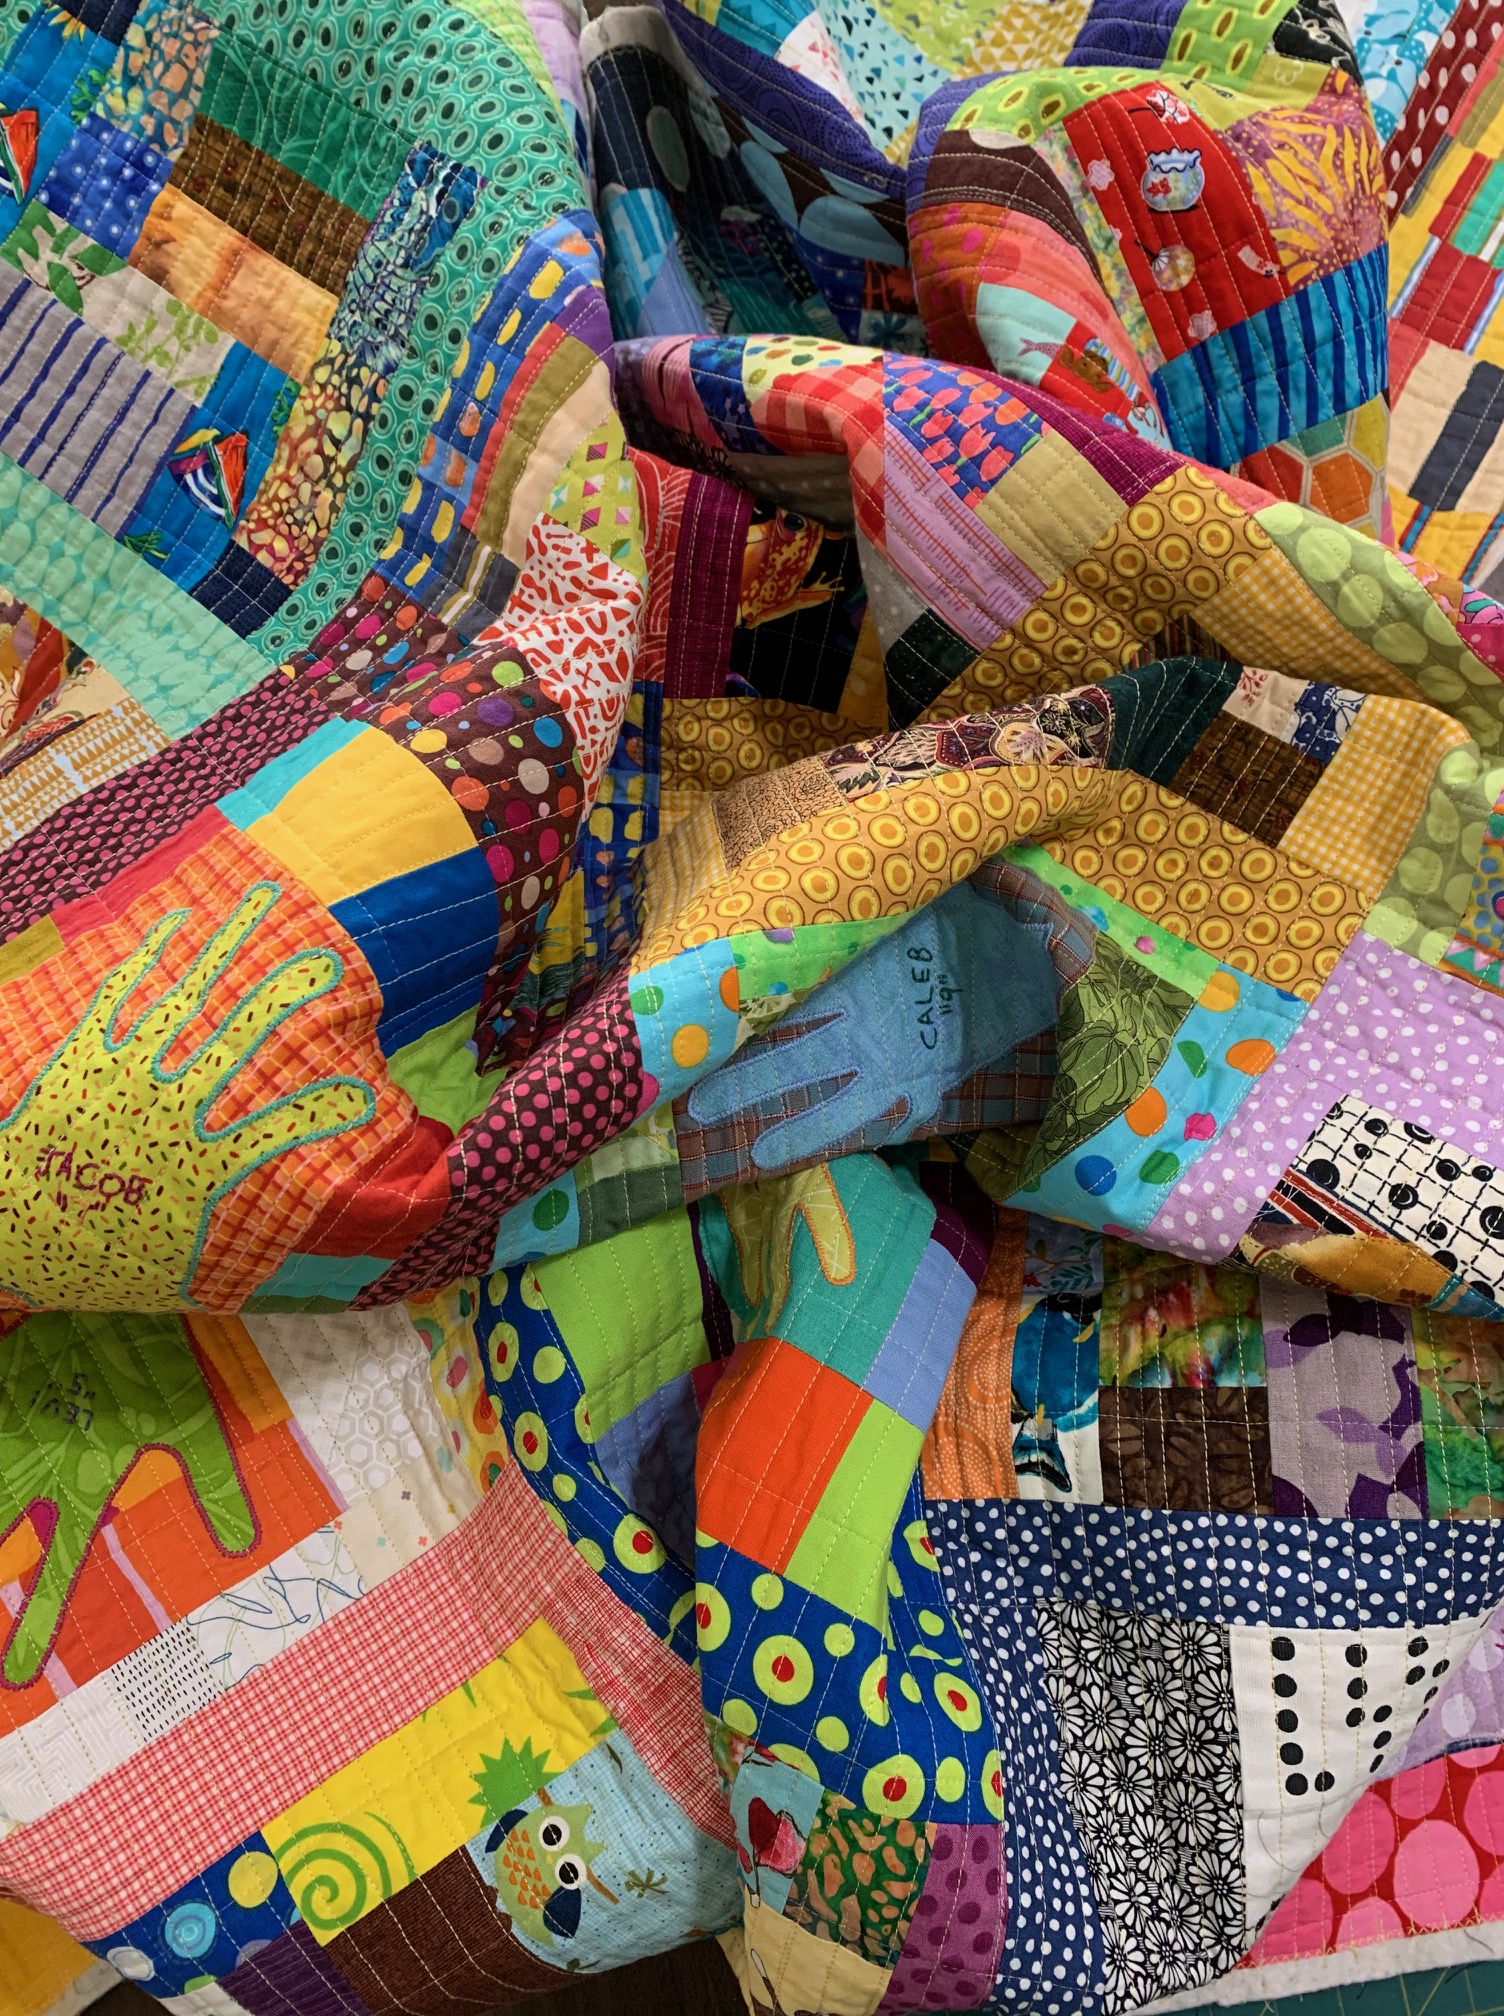
Let’s start with the appliquéd hand blocks. I put The Boys’ hands in the middle, with the adults’ hands on the four corners. It’s symbolic on purpose: the adults are looking after the kids.
Here are a few more detail photographs of the quilt front:
The quilt back is fun too, with the assortment of found fabrics and leftovers. A friend sent me her found robot boy yardage for the center; she thought it perfect for The Boys.
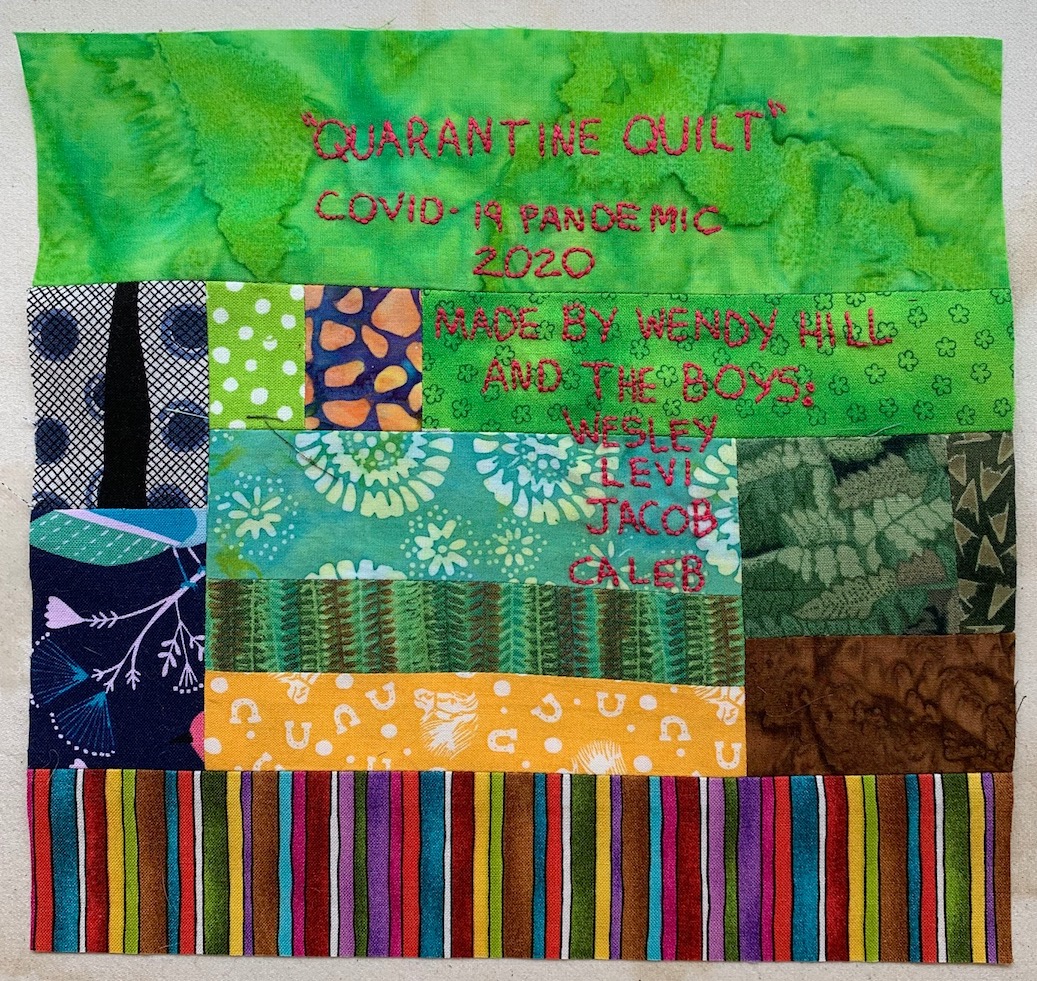
I’m so pleased I took the time to embroider the labels. These labels will last as long as the quilt.
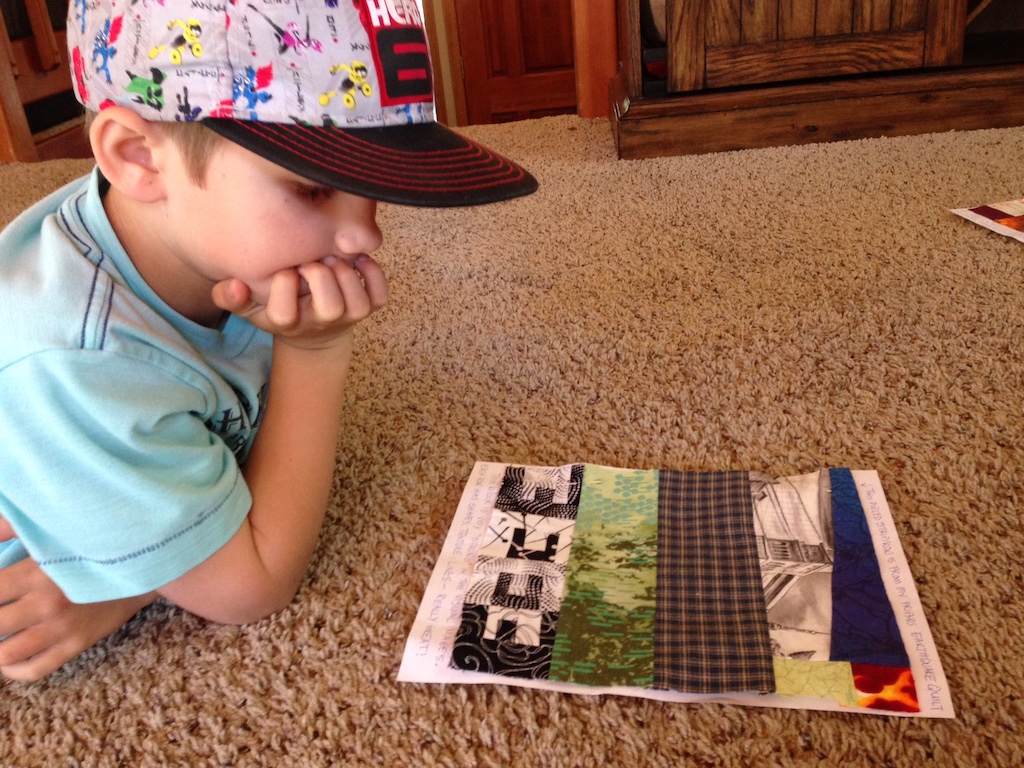
It had been a long time since “The Boys” had seen the blocks, and I wondered what they would remember about their creations. But the 3 older boys wasted no time in finding their hand and favorite blocks.
One of “The Boys” found his favorite block, saying it was the weirdest block ever. I told him I’d never seen anything like it and in fact, it was ‘genius’. He had a big grin.
Another favorite of The Boys was this block. I think it’s graphic and moody, in a good way.
Finally the day for the Big Giveaway came. David and I spread out several sheets on our back deck. As we watched the kids scramble around the quilt (while staying 10’ apart), some of us burst into tears while the rest became teary. This project was definitely a good thing.
In the beginning, we were two neighbors who banded together when the state government ordered a month-long lockdown. At first, we joined forces to add something special to the daily life of “The Boys”, whose routines had changed suddenly with the Pandemic.
Then we started helping each other out. We even celebrated shared birthdays in the open yard between our houses. “The Boys” were growing up in front of our eyes, going from ages 2-8 to ages 2-9. We became closer while we had to live separately.
I can’t help but feel there is a larger story here during this Pandemic. There must be a patchwork of stories unfolding all over the United States and the World, as we find ways to connect and help each other out.
Here is the 4th installment of the guest blog post series by my talented friend Wendy Hill on the awesome quilt she made during quarantine with the four rambunctious boys next door (aka “The Boys”) ages 2 – 8. Wendy has a background in teaching (and quilt book writing) and in this post she provides details on her process of basting, quilting and binding one GIGANTIC Quarantine Quilt!
If you are just joining us, see these posts for Parts I, II and III of the story by Wendy:
Quarantine Quilt Project: Life in the Time of Coronavirus
Part IV: Basting, Quilting & Binding The Gigantic Quilt
If you’ve been following along, you know that my collaboration with The Boys next door led to a gigantic quilt top measuring 82” by 104”, and a quilt back 84” by 106”. Time to baste and quilt this monster-sized quilt!!
Basting
Basting is a two-step process for me: spray baste first with Odif 505 Temporary Adhesive followed by stitching a large grid with water soluble thread by Superior (Vanish Lite). This foolproof method lets me quilt without any problems.
But first, I have to clear the sewing room. After ironing the batting to smooth out any creases, I tape the batting to the floor to hold it in place.
We had to navigate the crowded hallway for a day or two, but the cats loved exploring this new-to-them space.
With the quilt back centered on the batting, the window open, the ceiling fan on low, and paper around the edge to catch any over spray, I’m ready to baste.
I can baste any size quilt with my “assistant”: a swim noodle. (My assistant never complains but getting up off the floor is another story!)
Roll up half the quilt onto the swim noodle. Spray a light coat from side to side, covering about 15” from the rolled up quilt towards you. Unroll the quilt over the sprayed area, smoothing as you go. Here is a photo of a different quilt ready to spray, unroll, and smooth.
Repeat to spray baste both halves of the quilt. Trim the excess batting along the fabric edge. Allow to dry for a few hours or overnight before turning over and taping the quilt to the floor.
With the quilt front centered on the batting, repeat the steps above to spray baste. Allow to dry.
With both ends of the quilt rolled up to the middle, I stitched lines about 3”-4” apart with the water soluble thread, from the middle to the edge. Repeat with the other half. Re-roll the quilt in the other direction, stitching perpendicular lines about 3”-4” apart.
A bonus benefit is the way these stitching lines change how the quilt handles, making it easier to do the actual quilting lines.
Tips for Using Any Spray Baste
Ventilate the room.
Cover up to prevent overspray on unwanted places.
Hold the can at least 12” away from the surface.
Keep the can moving from side to side- do not soak the batting.
After the layers are basted, allow time for the spray baste to dry & set.
It will evaporate out, especially in dry climates. Another reason for stitching a water soluble thread grid is to buy time before you start quilting.
Quilting
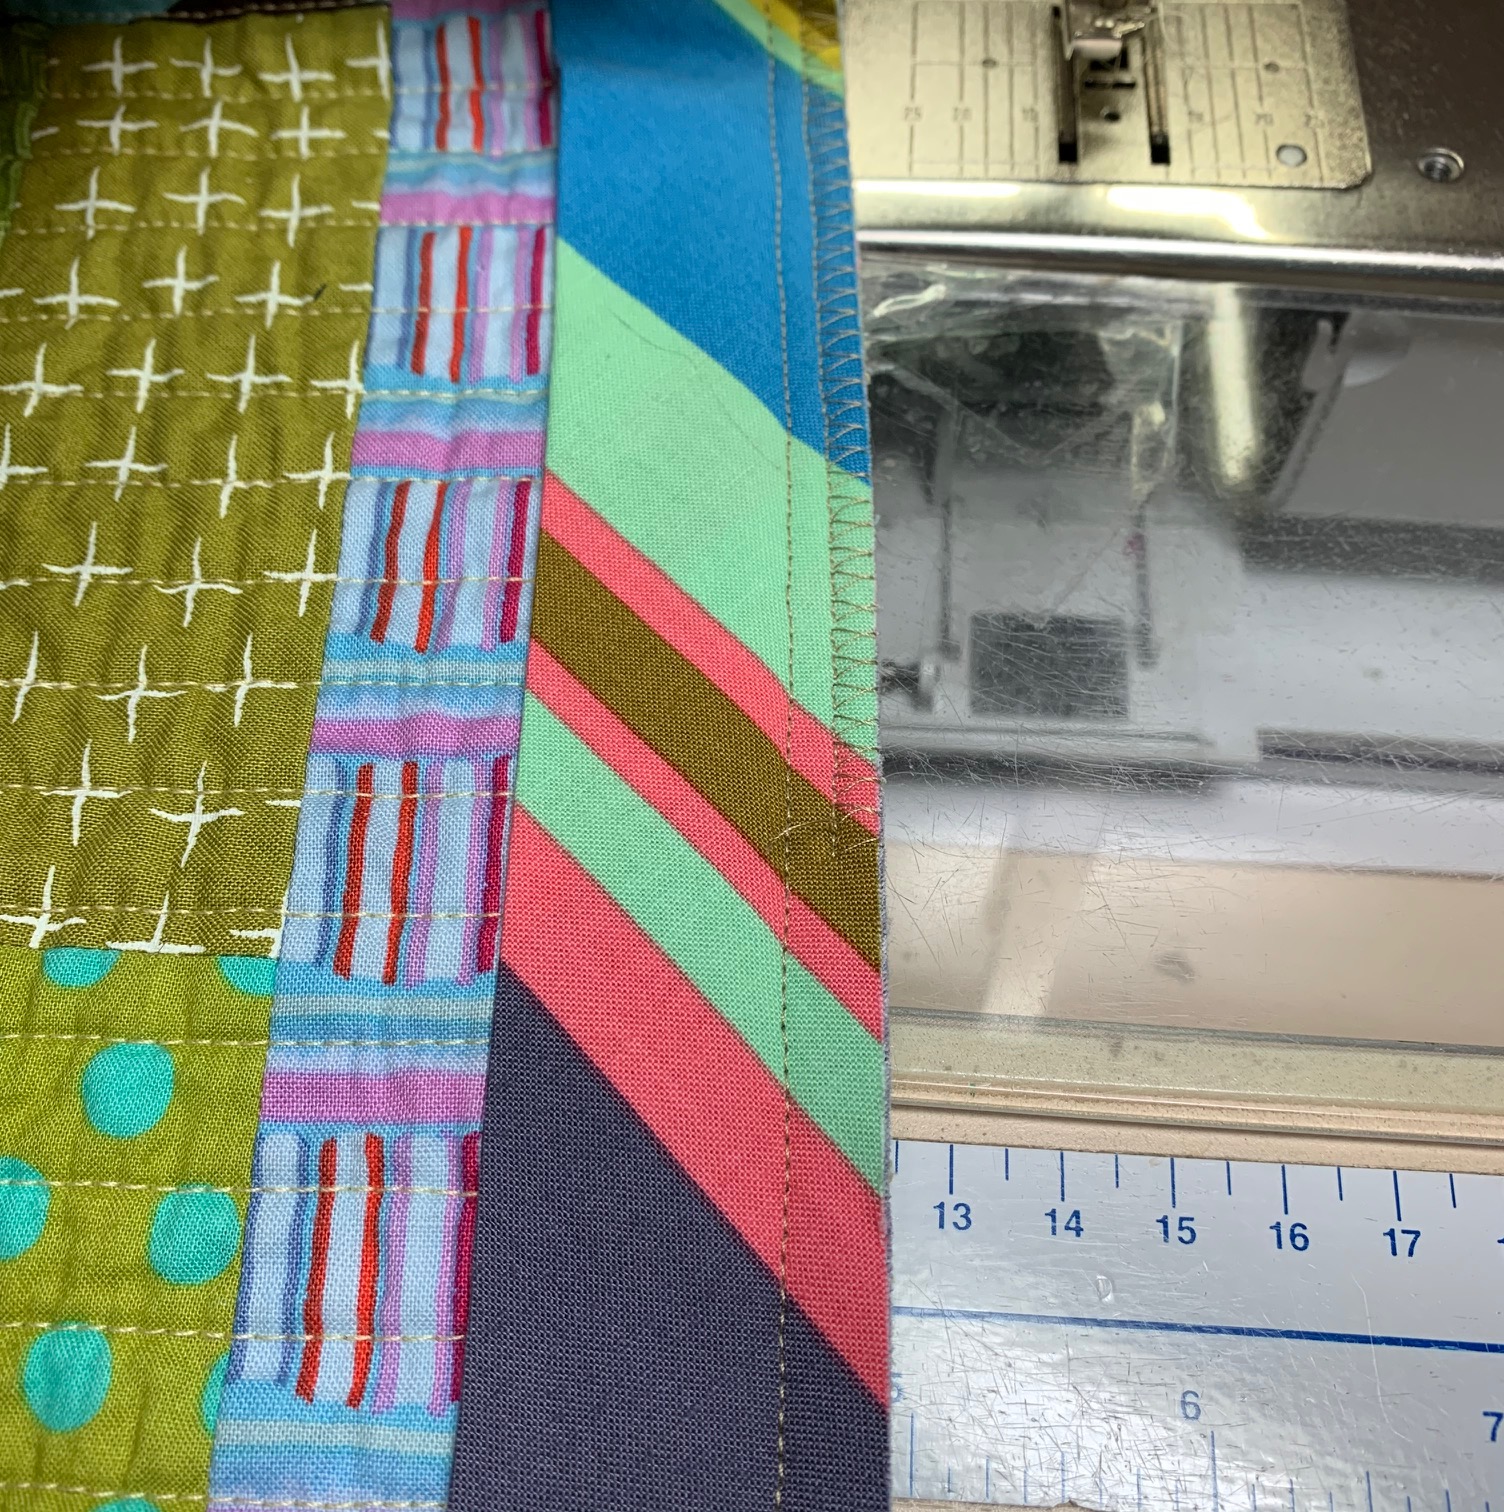
I like using roughly parallel quilting lines, but with a quilt this size, this will be the easiest thing for me to do on my home sewing machine.
But first, thread choices. I selected Aurifil 50 wt cotton for the front (yellow) and back (blue).
With the quilt rolled up from both ends to the middle, I started stitching the roughly parallel lines, using the pressor foot as a guide. Ignore the water soluble thread lines.
I accordion folded the quilt in my lap, but with big quilts, you can get some drag from the rolled up quilt coming out behind the sewing machine. When you start to feel some drag, accordion fold the quilt behind the sewing machine, which will reduce or eliminate the dead weight.
Keep quilting! The lines are actually unequal distances apart and not perfectly straight, but I like this look on a scrappy quilt.
I used the seam lines between the rows to “square up” my parallel lines.
In the last couple of inches before the seam line, I start my course correction strategy. I start stitching parallel to the seam line, so that the next row/section starts over with an accurate straight line. The stitching lines can get way off line without some kind of course correction fix.
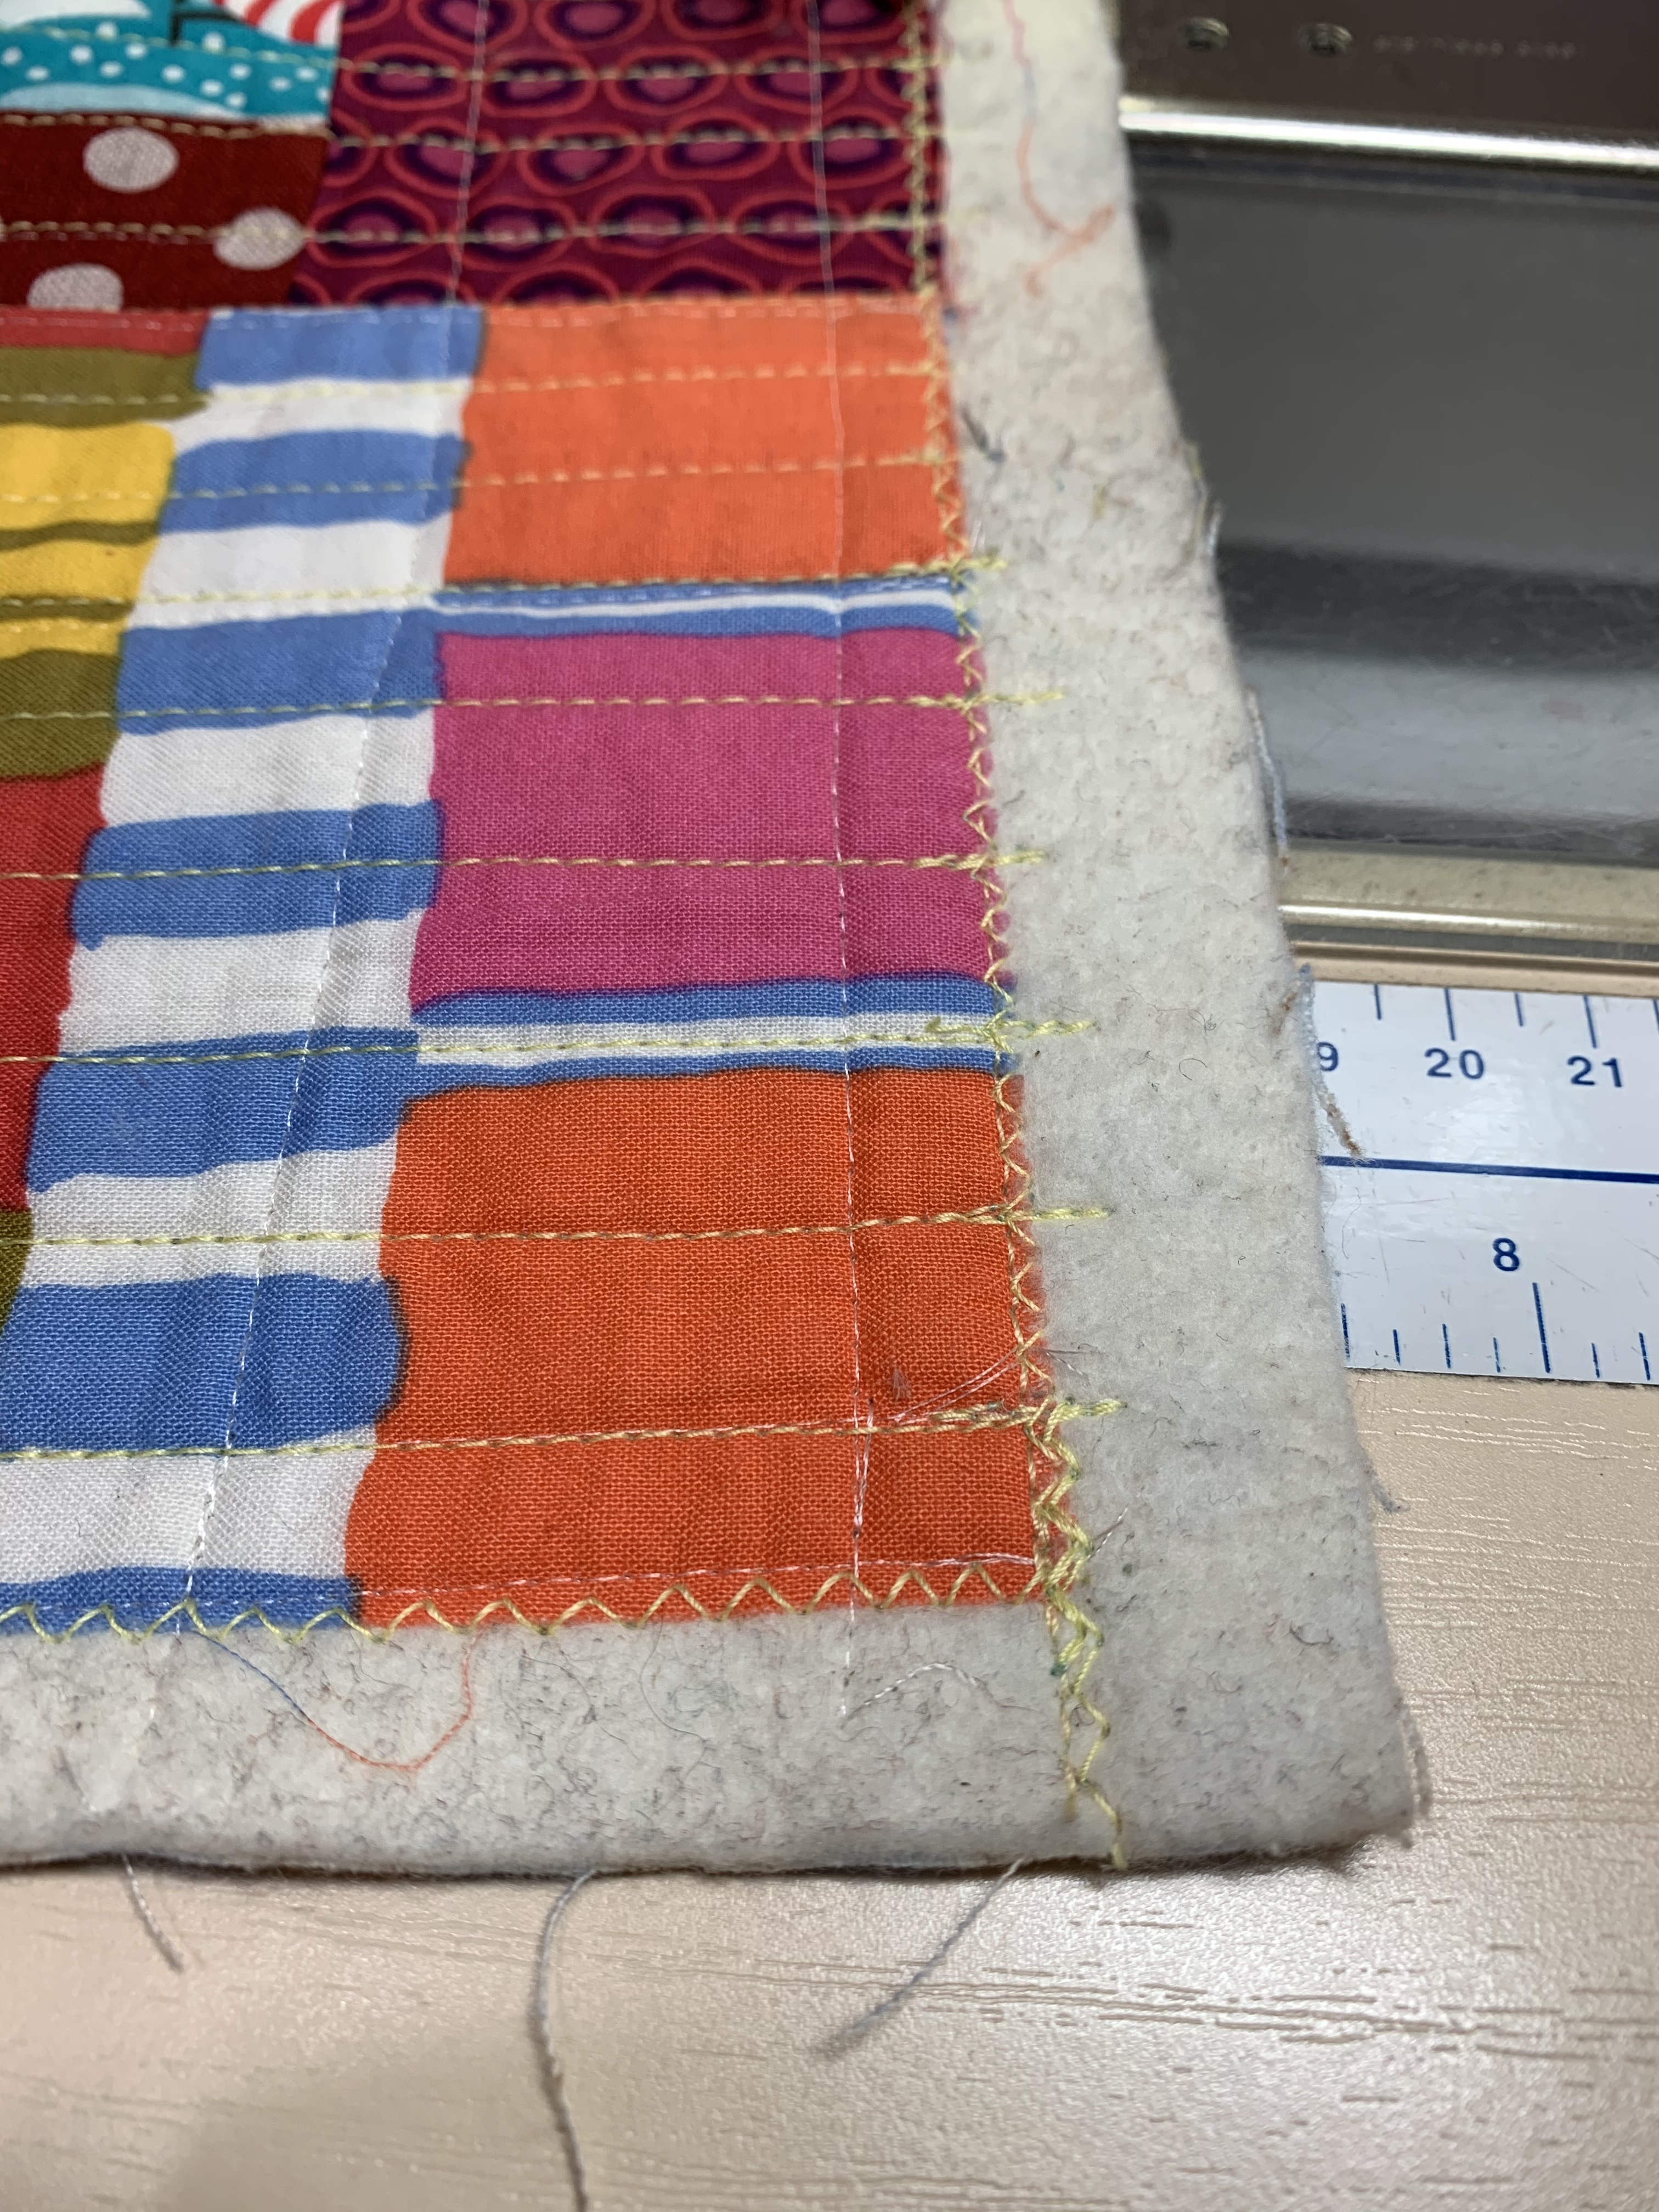
Celebration! The very last line of stitching!! I zigzagged the edges and trimmed the batting before tossing the quilt into the washer and dryer. I like to let the quilt shrink at this stage, before sewing on the binding.
Remove the quilt from the dryer while still slightly damp and allow to air dry the rest of the way.
Binding
I’m always searching for alternative techniques. I invented a way to machine topstitch binding that is easy and looks great. For quilts that will be loved, used, and washed & dried, this method is also makes for a sturdy binding.
I started with a double French fold binding. A 3/8” seam allowance gives me the wide binding I like so much. I flattened the seam allowance with my faux serge stitch (or zigzag works too) to get a flatter looking binding.
After folding over and pinning (or clipping) the binding in place, I hand sewed the mitered corners, about 1” in each direction from the corner.
Next, I basted along the very edge of the binding, from the back of the quilt. This big stitch goes fast.
Flip over. From the front, you can see the basting thread: this shows you exactly where the fold is on the other side.
I machine topstitched the binding from the front, by stitching just to the right of the basting line. (You can stitch anywhere between the basting line and the ditch of the binding seam.)
I removed the basting thread and checked the back to make sure the stitching line is along the edge of the binding. Finished!!!
Perhaps your enthusiastic comments encouraged Wendy Hill to immediately put together the third installment of her guest blog post series about the awesome quilt she made during quarantine with the four rambunctious boys next door (aka “The Boys”) ages 2 – 8.
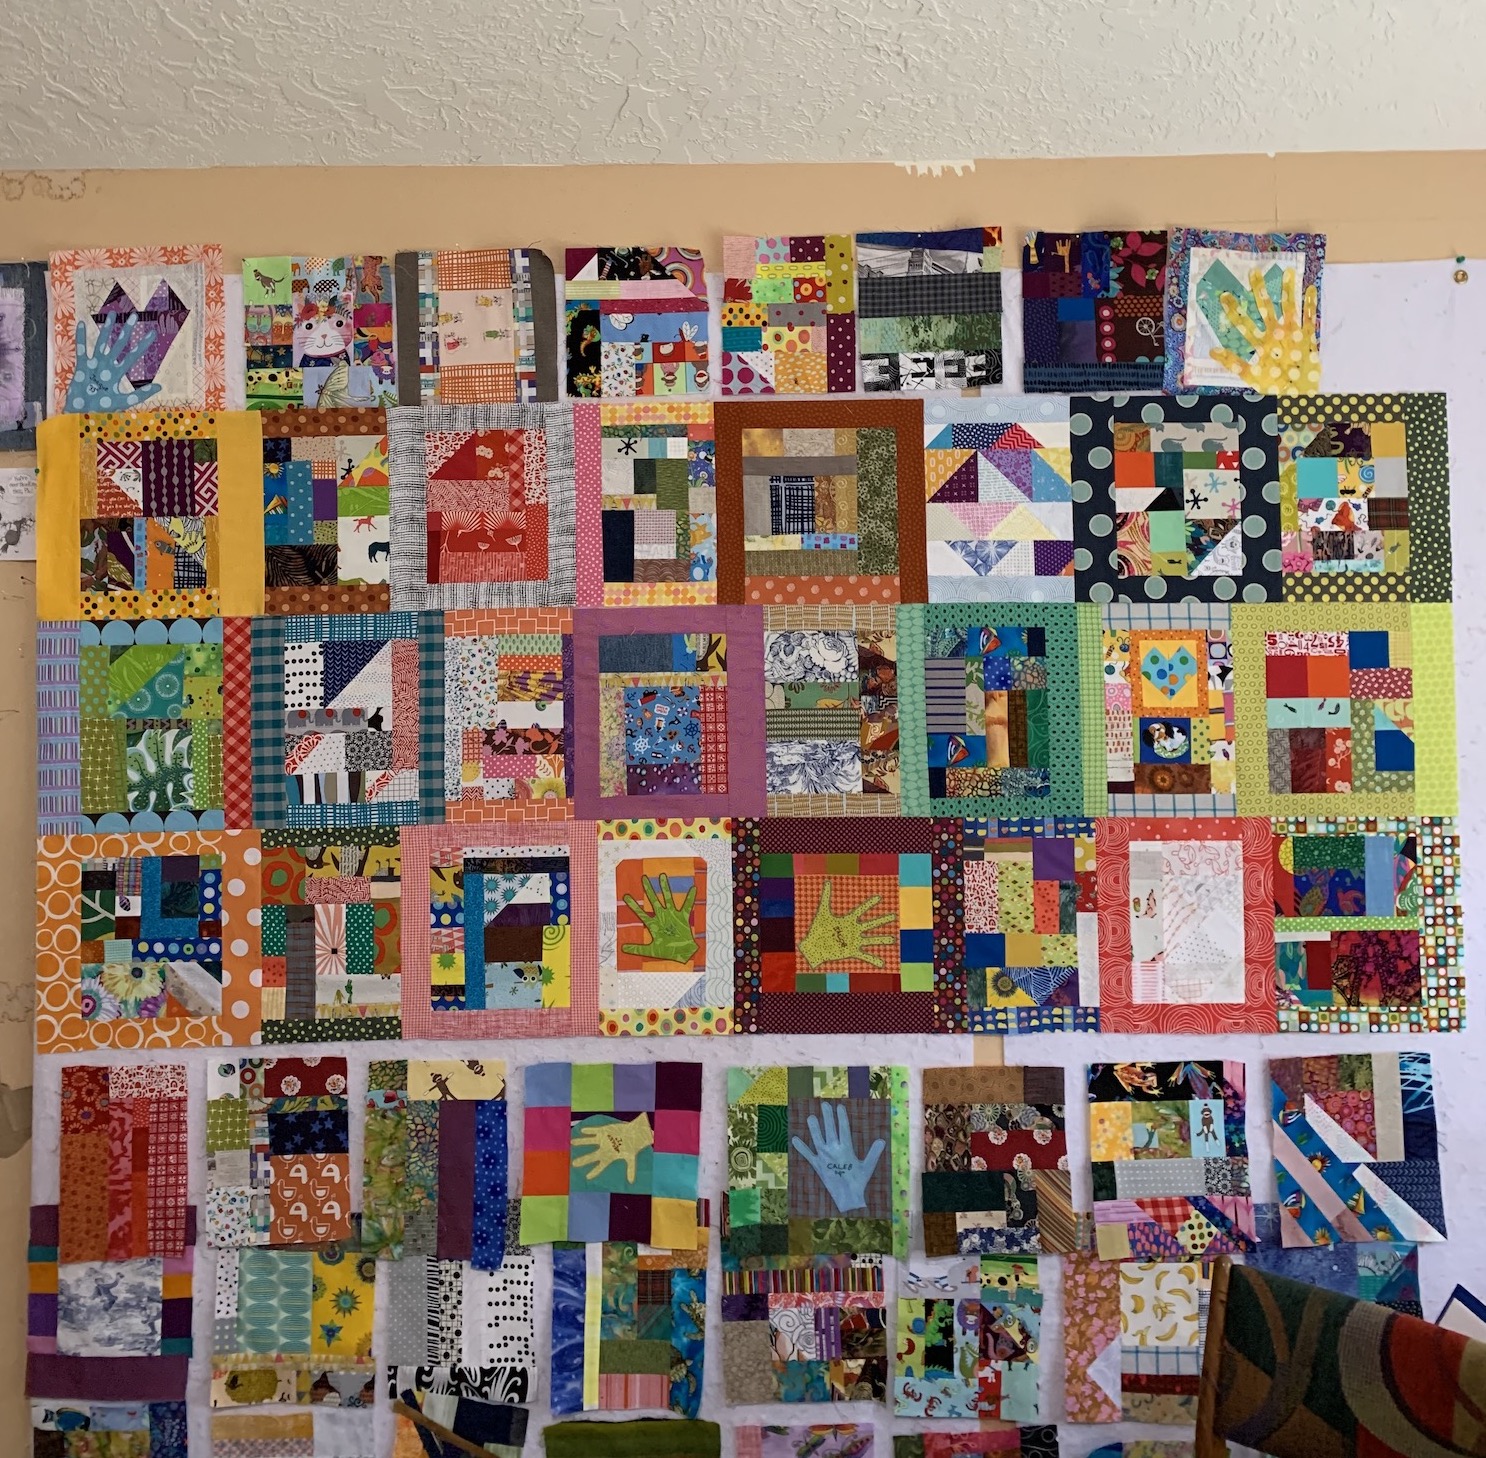
I am so happy to now share her third installment! (And now you get to see the quilt laid out with all the blocks created by “The Boys”.)
If you are just joining us, see these posts for Part I and Part II of the story:
Quarantine Quilt Project: Life in the Time of Coronavirus
Part III: Magic! Turning 65 Blocks of All Sizes Into a Quilt Top! And Leftovers Into a Quilt Back!
On a lark, my neighbors and I added playing with fabric to make quilt blocks. We had no idea where this project would take us or how our families would connect over time.
Please consider launching your own “quarantine quilt” project with kids or adults who would enjoy such a project. Collaborate through “snail mail” if your people are not in the neighborhood. I believe everyone can capture the free spirit seen in The Boys’ quilt blocks.
Quilt Top
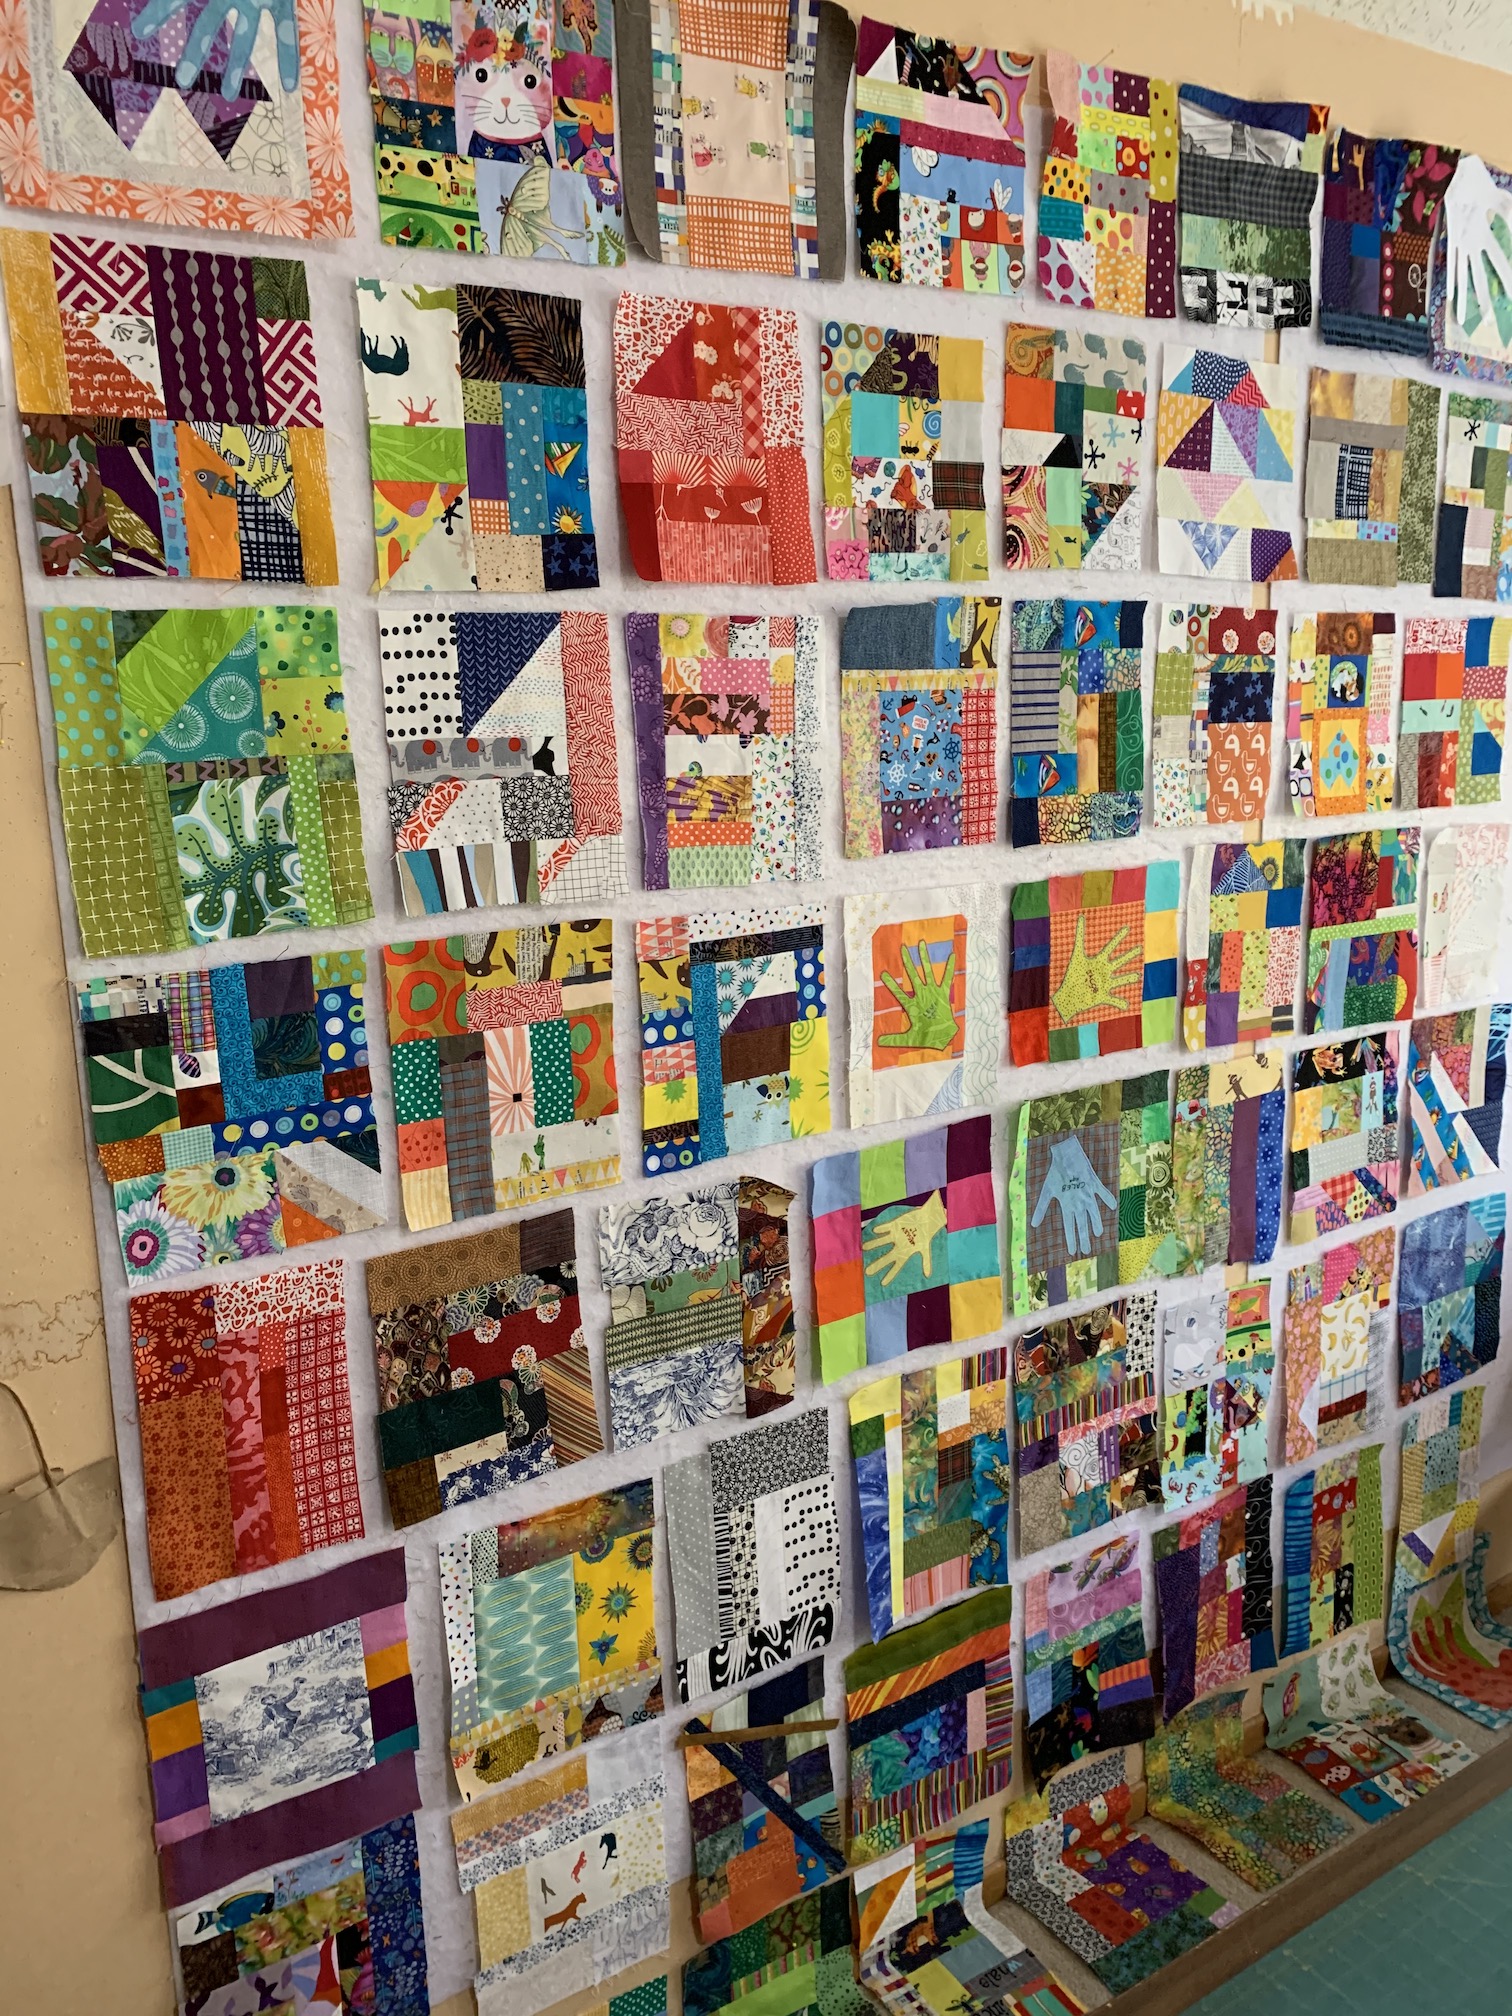
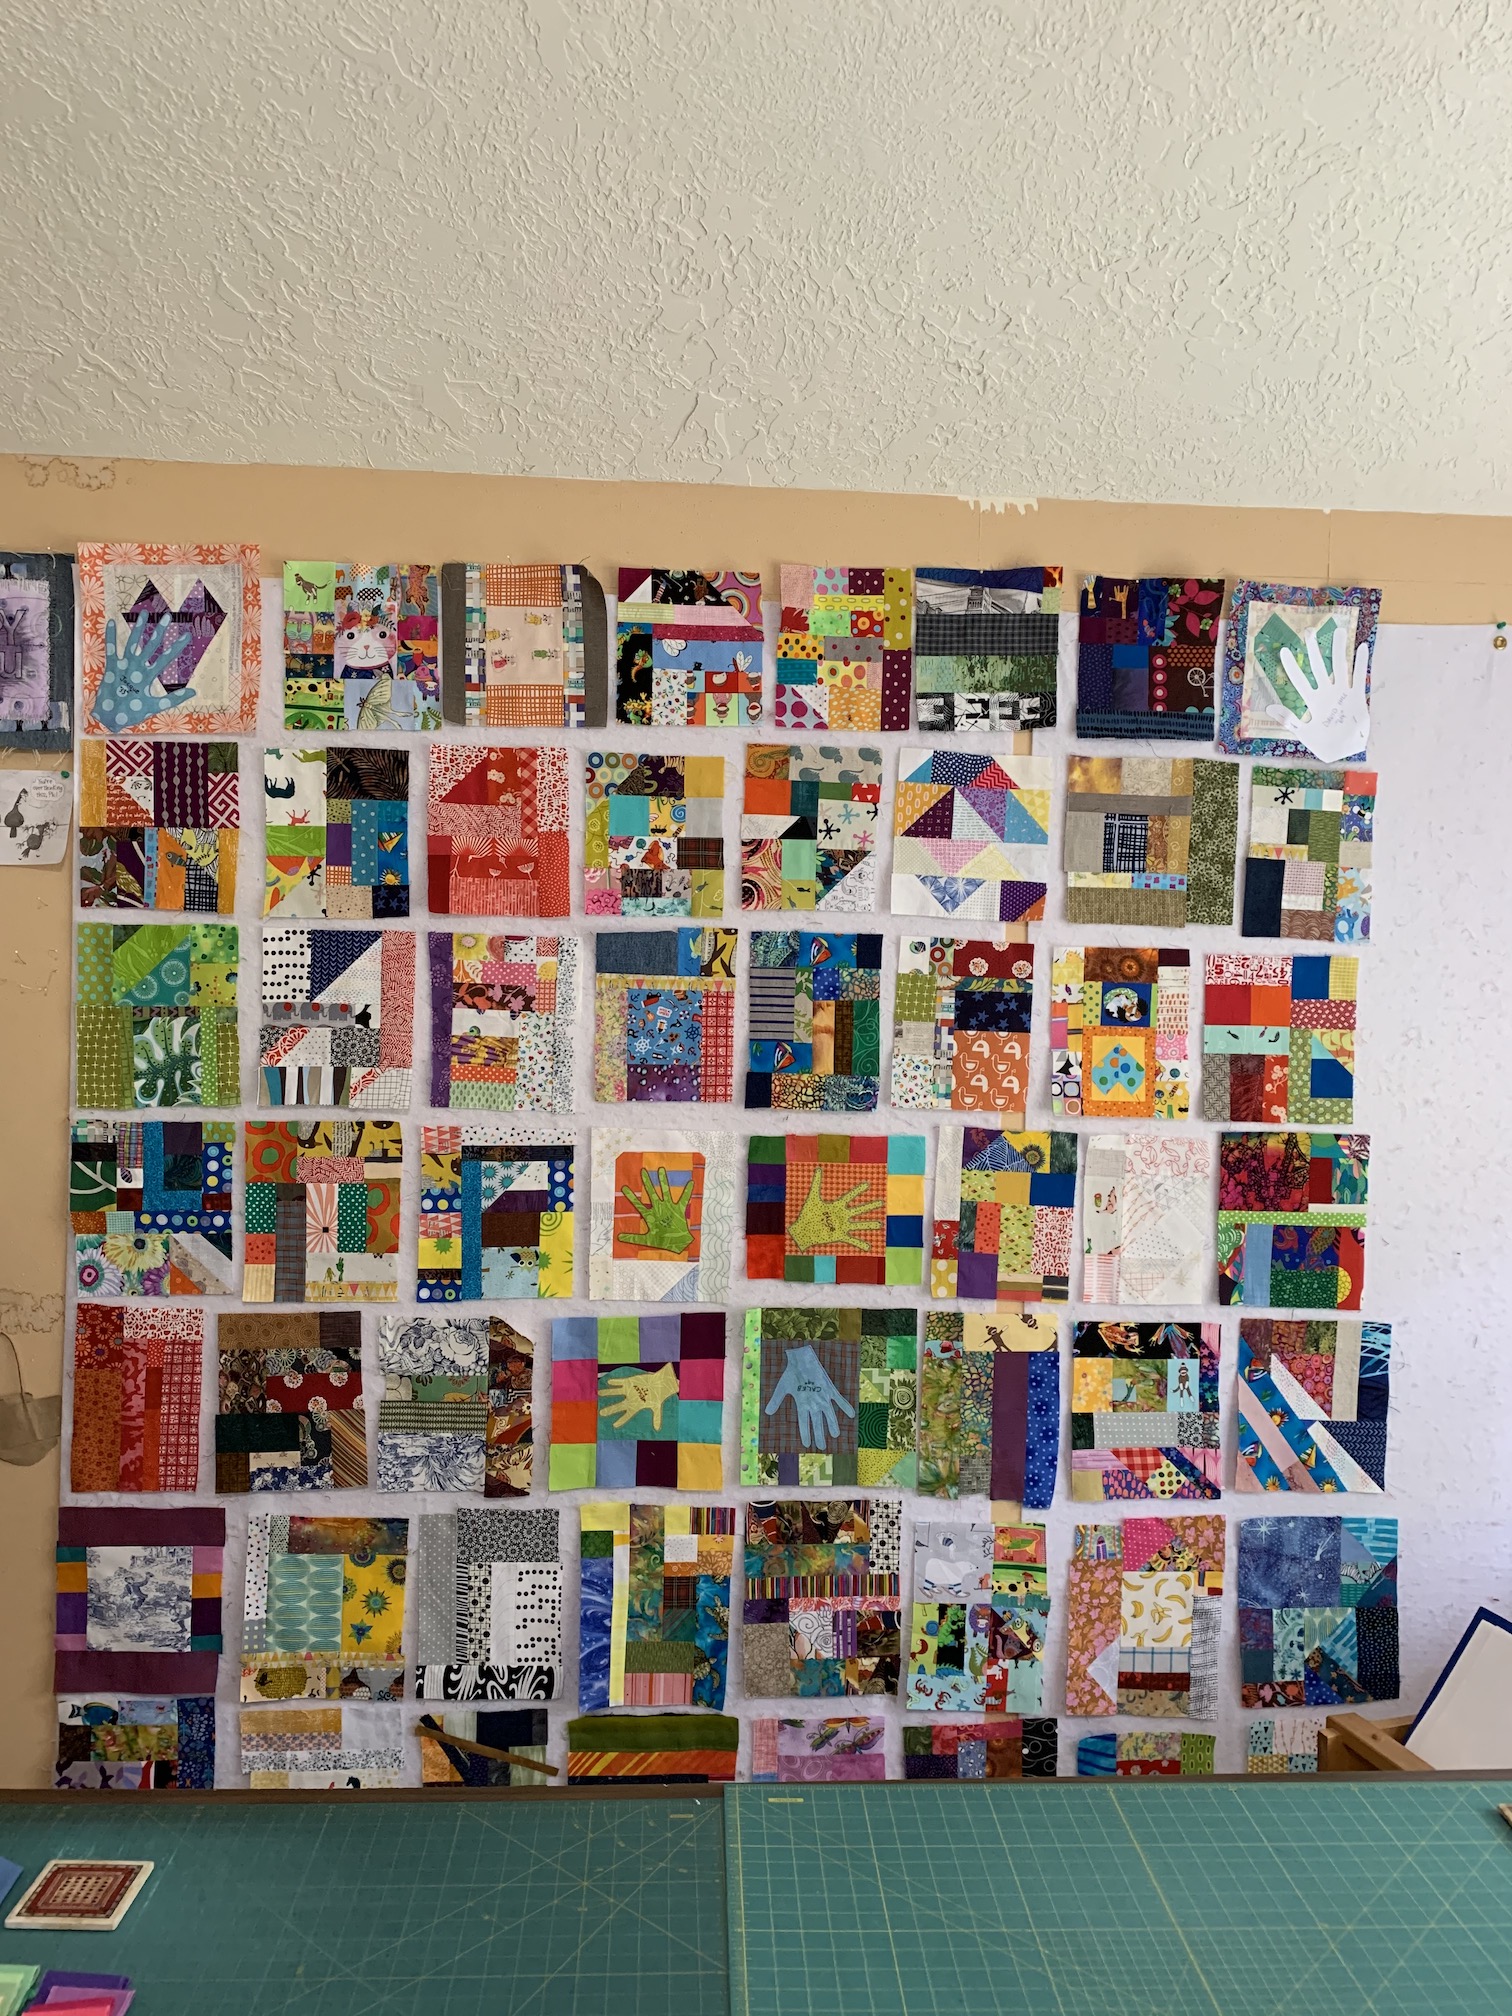
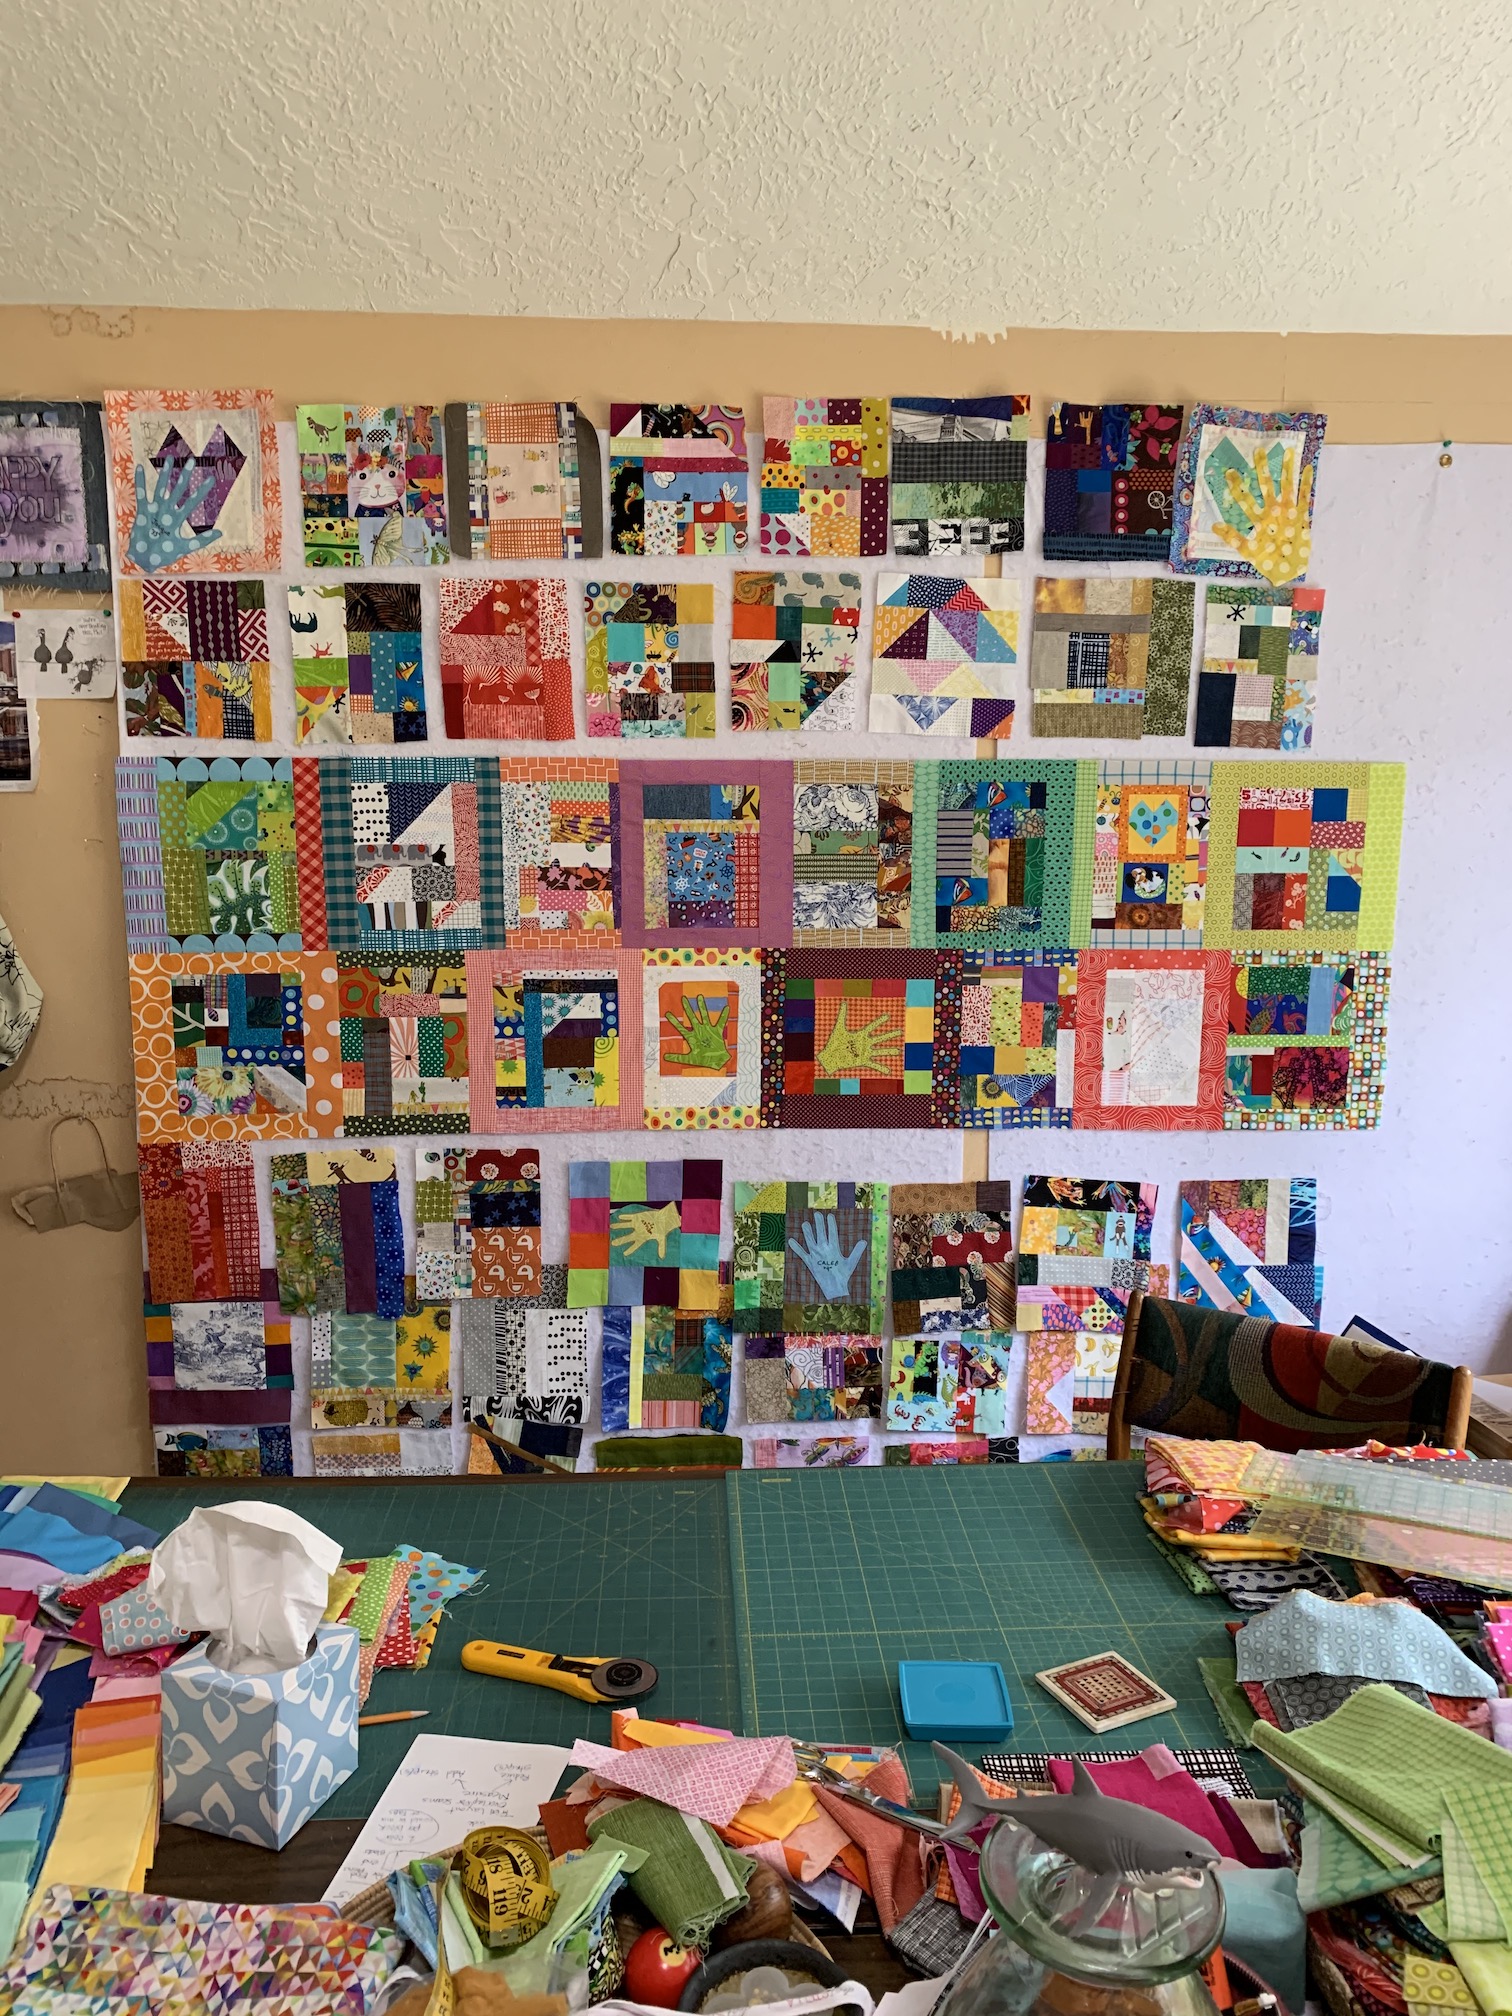
Since I refused to do anything more than trim (or square-up) the precious blocks, I had to find another way to unify 65 blocks of all sizes. I sorted the blocks by height, the first bit of “magic”, to layout 8 rows of 8 blocks, saving the extra block for the quilt back.
With the row height consistent, I planned to frame the blocks, adding “filler” fabrics if needed, to adjust the row width. I looked to my assortment of “dots” and “cross hatched” fabrics, many of which had already been cut into.
I started with the widest row as the standard width, which happened to be Row #4. Next I assembled Row #3, working my way up to Row #1. Of course, the quilt needed a border at the top (and bottom), because the quilt can’t be too big, right?
I alternated “A” and “B” blocks in each row as part of my plan to frame the blocks, add fillers, and create a border on the two long sides. A plan helps me keep my sanity but also gives me freedom to go off the path. It’s a paradox!
“A” blocks are framed on all four sides. I used the same fabrics or similar color scheme:
“B” blocks are only framed top and bottom.
The border on the long sides is created block-by-block, using a 2 3/4” width of fabric on the outside edges of the first and last blocks in each row. This creates a visual border without using one long strip of fabric. (The width of this border strip could be anything to make the border wider or narrower.)
For “A” blocks, the outside edge/border strip (one of four strips framing the block) is cut to this specific width.
For “B” blocks, the outside edge/border strip is also cut to this specific width, making a total of 3 strips framing the block (instead of only top & bottom).
At this point, you might wonder how the rows come out the same width? This second bit of magic is in way to adjust the row width. Assemble the row in two sections. Layout the two pieces on a design wall or other surface.
If the sections are too wide, overlap the raw edges between the two sections, until the width is correct. Sew the seam, trimming excess fabric to account for the seam allowance.
If the two sections are too short and leave a gap, add a “filler” strip to one of the two sections, and continue as described above.
For these two rows, I chose bright filler fabrics: look for the bright green plaid in the first photo, and bright red plaid in the second photo. The “fillers” just add to the fun (chaos)!
Everyone encounters surprises, obstacles or let’s be honest, mistakes. How a quilter deals with these events are what counts and as quilters know, these are often “opportunities” to do something unexpectedly great.
I accidentally trimmed or “squared-up” two blocks, making them the wrong height. “Fillers” to the rescue once again, as I just added another strip to the top edges.
When I cut a fabric on the bias, I often reinforce the edge with a narrow strip of fusible interfacing. This way, there are no worries about the edge stretching.
Before assembling Rows 5-8 and the border, I stood back and saw the two orange fabrics screaming at me. I couldn’t shut out the visual noise (ha ha) so I swapped one of the oranges out for another color. Peace was restored.
Quilt Back
While “The Boys” used my saved scraps to create fun, exciting, weird and wonderful blocks, I did my best to put together a quilt back also using leftovers, larger scraps, and found fabrics in the closet.
As the back evolved, I took a few photos, showing how the fabrics shifted around, got deleted, or sometimes, added back in. Not shown in the photos is a late stage addition; look for it in the finished quilt photos in the final guest post.
Labels
I used the extra block made by “The Boys”, and another leftover pieced heart block, to create two labels. When I searched the internet for the best fabric pen, my first reference said “don’t use a pen, embroider the label”. I agreed.
As I came closer to finishing the quilt, I had the growing feeling that this quilt was so much bigger then me or my neighbors or The Boys.
We’ve known in theory that we could have another global pandemic, but the reality is so — well— real. The enormity of the pandemic is hard to grasp, even now.
Yet in the face of adversity, we find many examples of people, all over the world, reaching out to help and support each other. The Quarantine Quilt is one of these examples.
Wendy’s next guest blog post: Quilting and Binding The Gigantic Quilt
Well the tierneycreates Beastie would tease me that I am just using Guest Bloggers to keep up on new posts but I am very excited to share Wendy Hill’s second guest blog post on the awesome quilt she made during quarantine with the four rambunctious boys next door (aka “The Boys”) ages 2 – 8.
Quarantine Quilt Project: Life in the Time of Coronavirus
Part II: “The Boys” Make 61 Blocks!
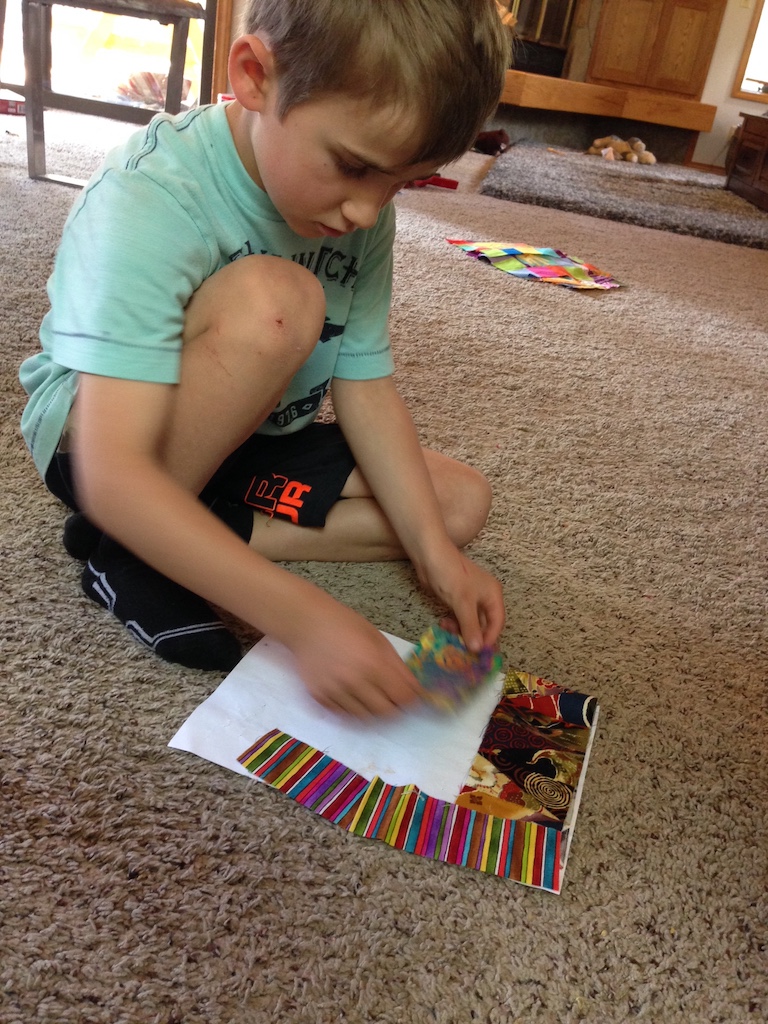
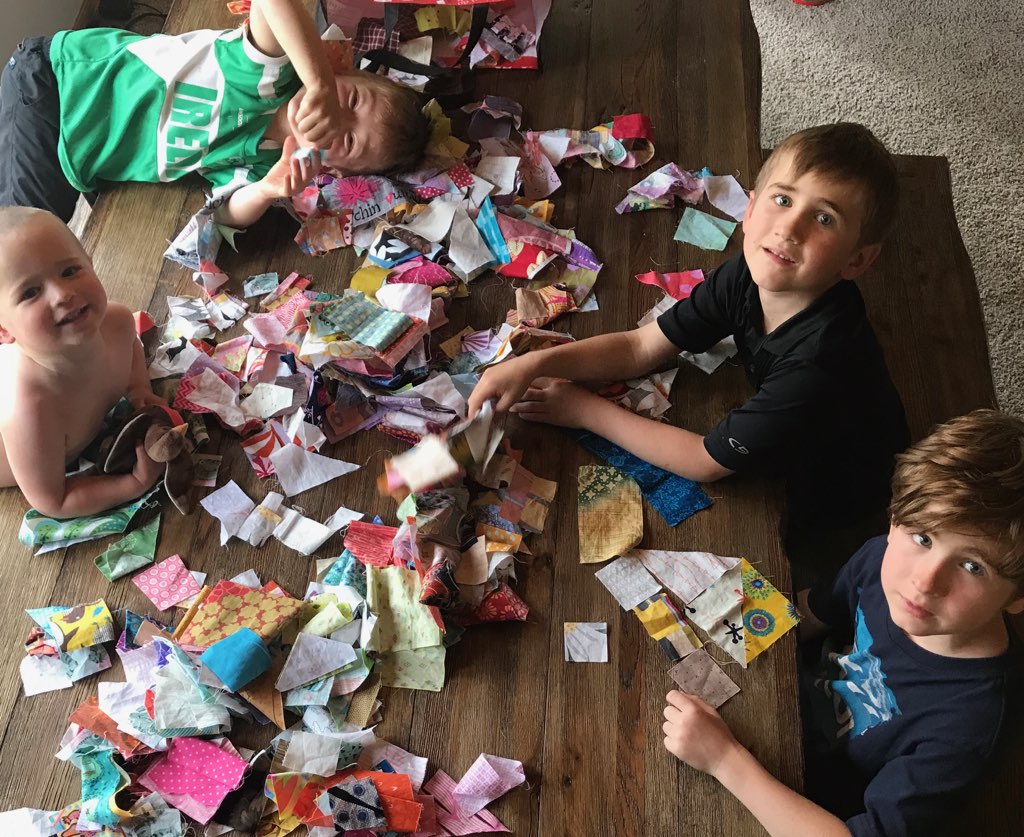
My story about two neighbors who band together (during the pandemic lockdown) left off with “The Boys” arranging fabric scraps on printer paper. We agreed to two blocks per day and soon we had a routine. “The Boys” dropped off their fabric arrangements in the morning, and I dropped off their finished blocks before dinner.
I gave simple instructions: fill a piece of 8 1/2” by 11” paper with fabric scraps. Overlaps of fabric were okay but no gaps.
One day the mother of “The Boys” tucked a note inside the bag:
This is such a fun thing for our family and it’s always a race to the door when they hear your knock.
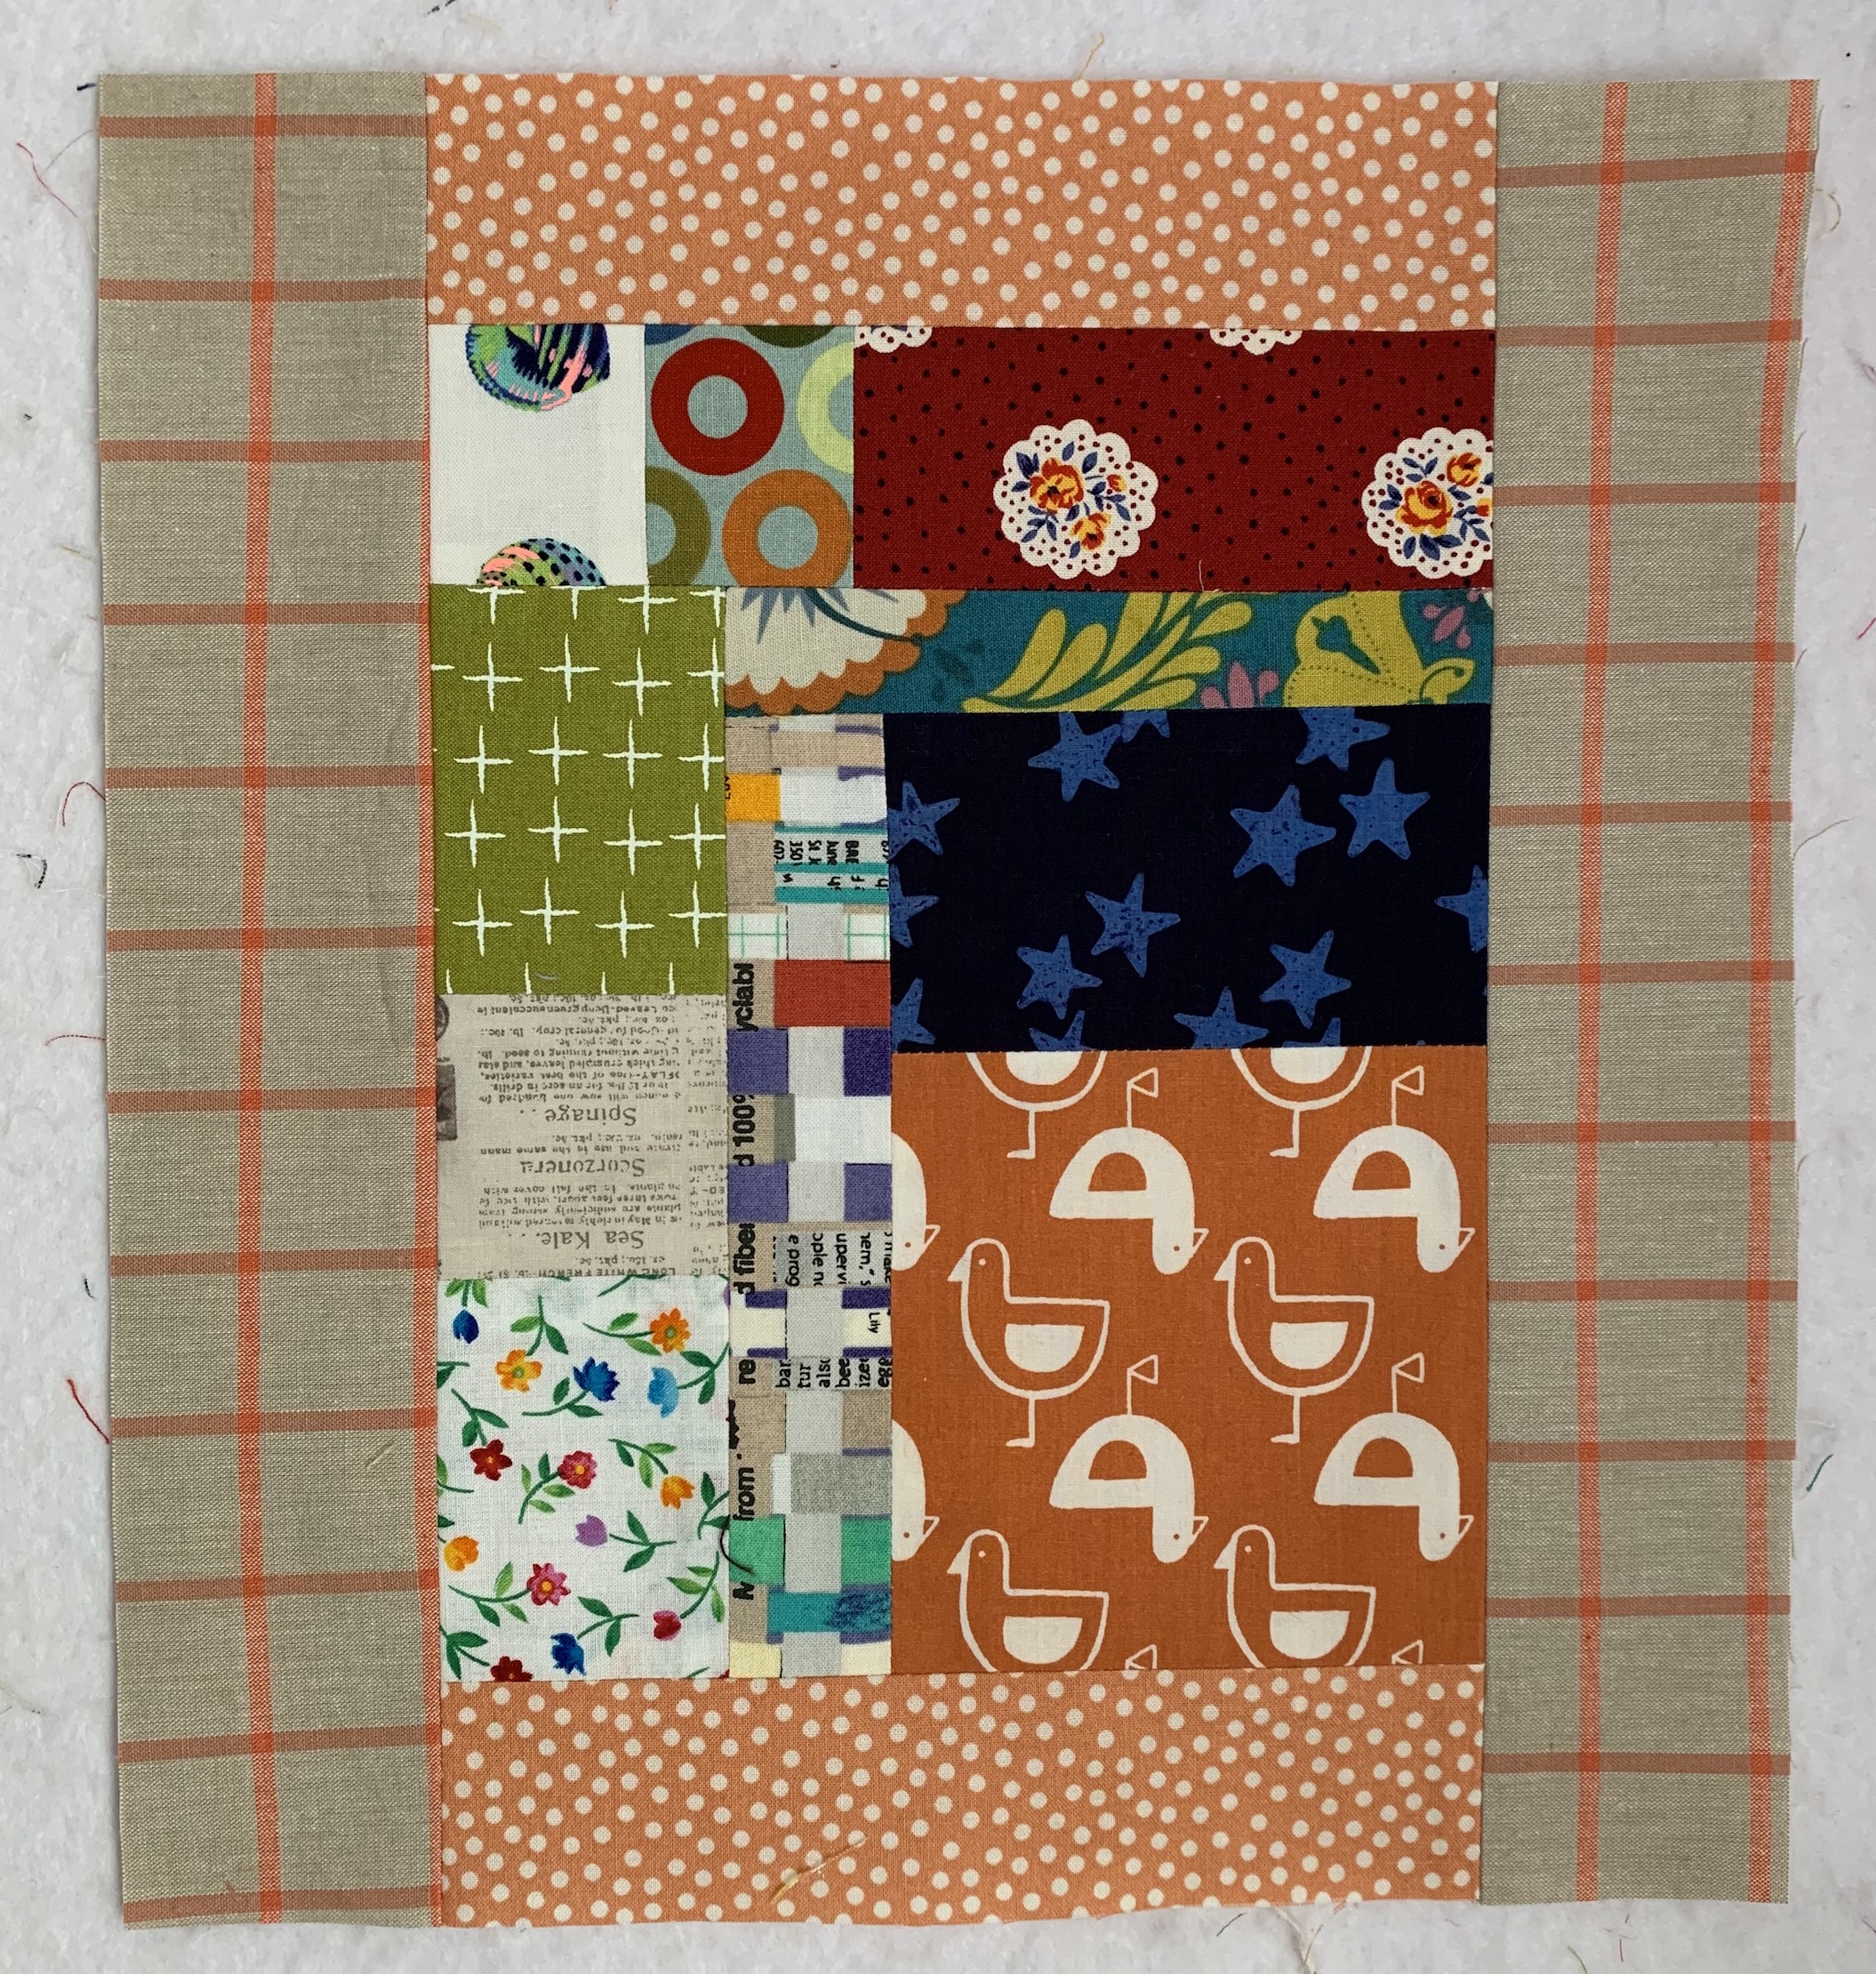
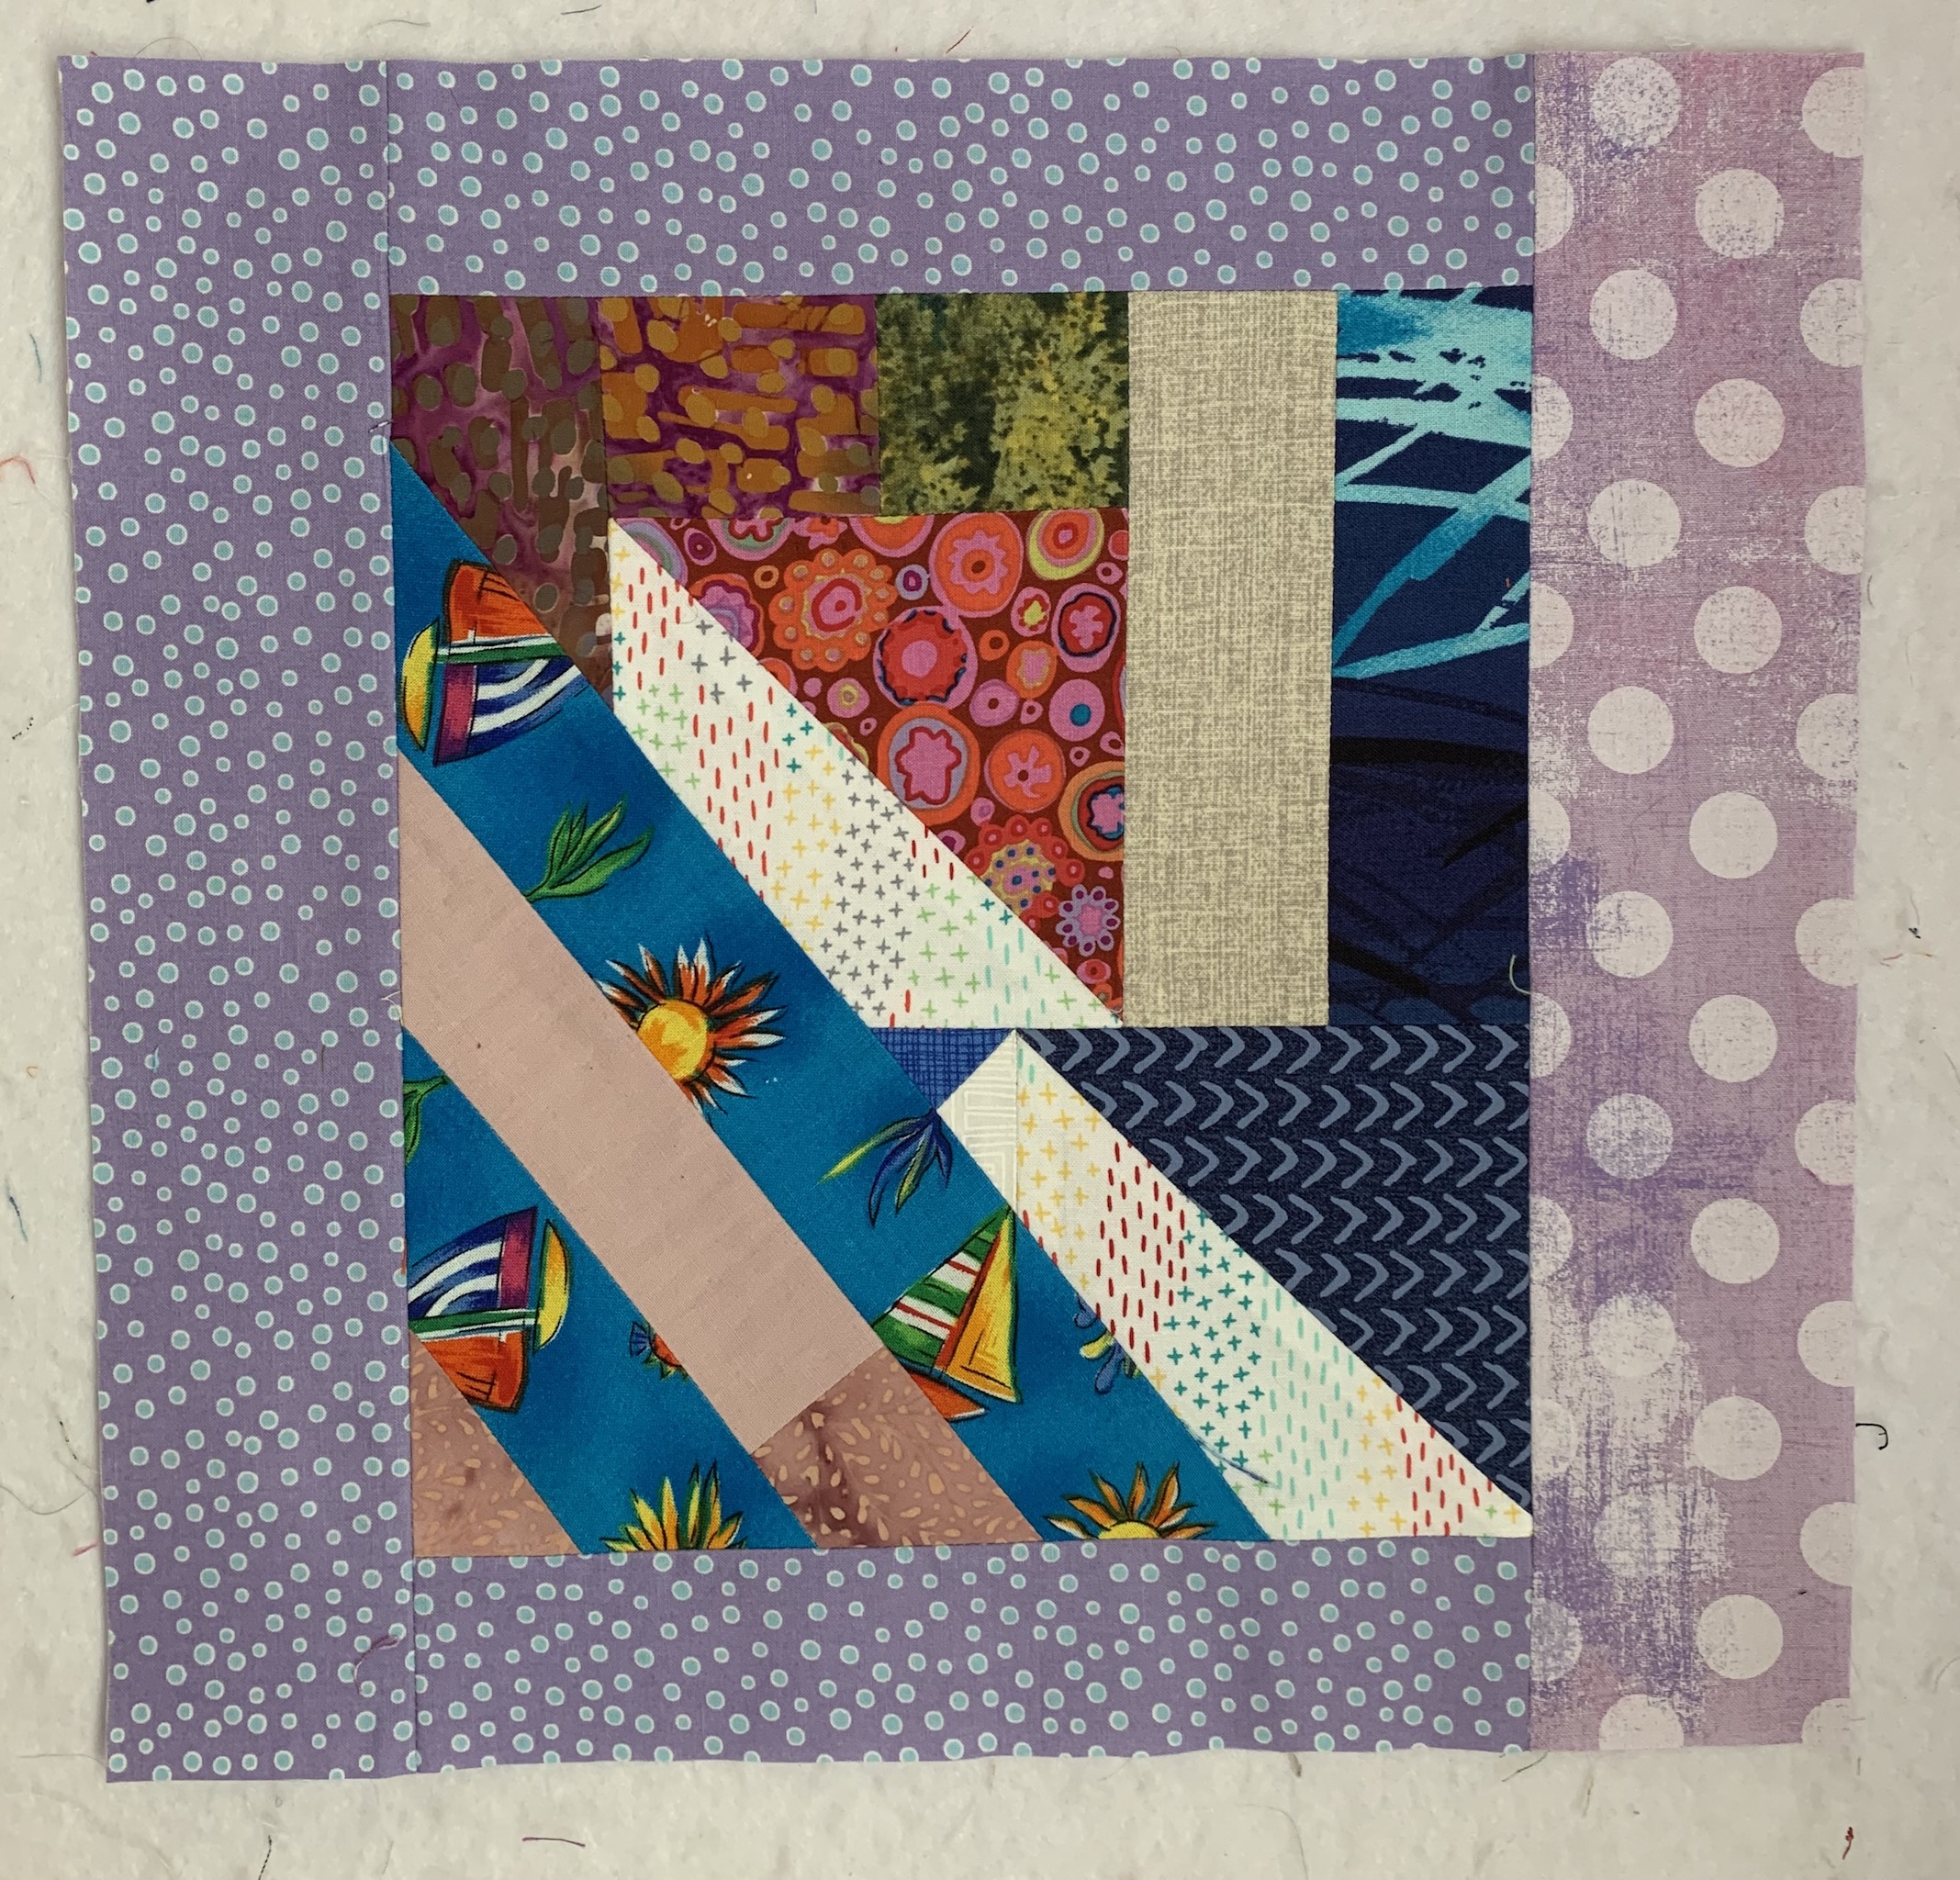
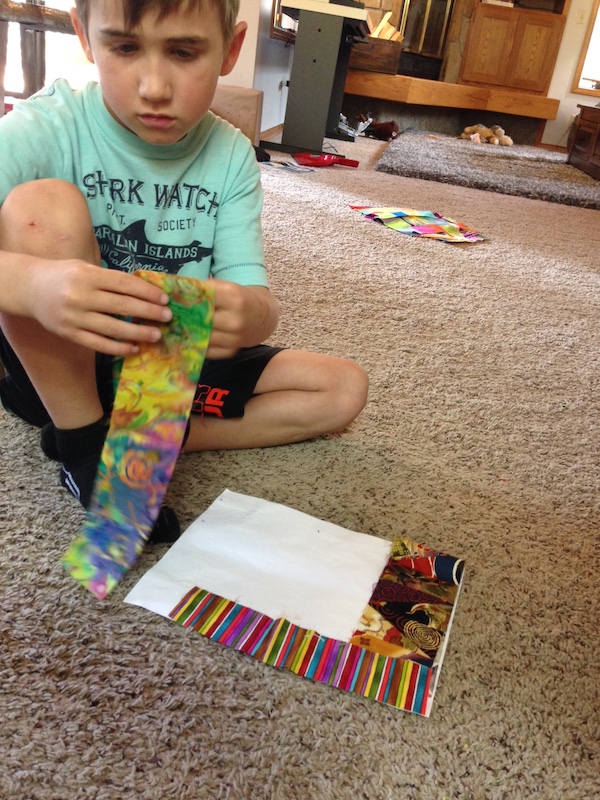
Some arrangements were easy to sew together. I could sew pieces into smaller units, then assemble the units into a block.
Other arrangements required me to be inventive. Sometimes the seam allowances created gaps, so I had to add fabrics. I added a solid pink to this block. I looked for fabrics that would “go” with fabrics in the arrangement.
Other times I did my best to duplicate the block, always trying to keep the original intent of “The Boys” who arranged the fabrics.
I kept adding more scraps of all sorts to their Big Bag of Fabrics. “The Boys” took time to create just the right assortment of fabrics on their page.
“The Boys” sampled everything! Just like with “quilters” everywhere, their fabric choices reflected their explorations and mood. I was always excited to see what The Boys would drop off next.
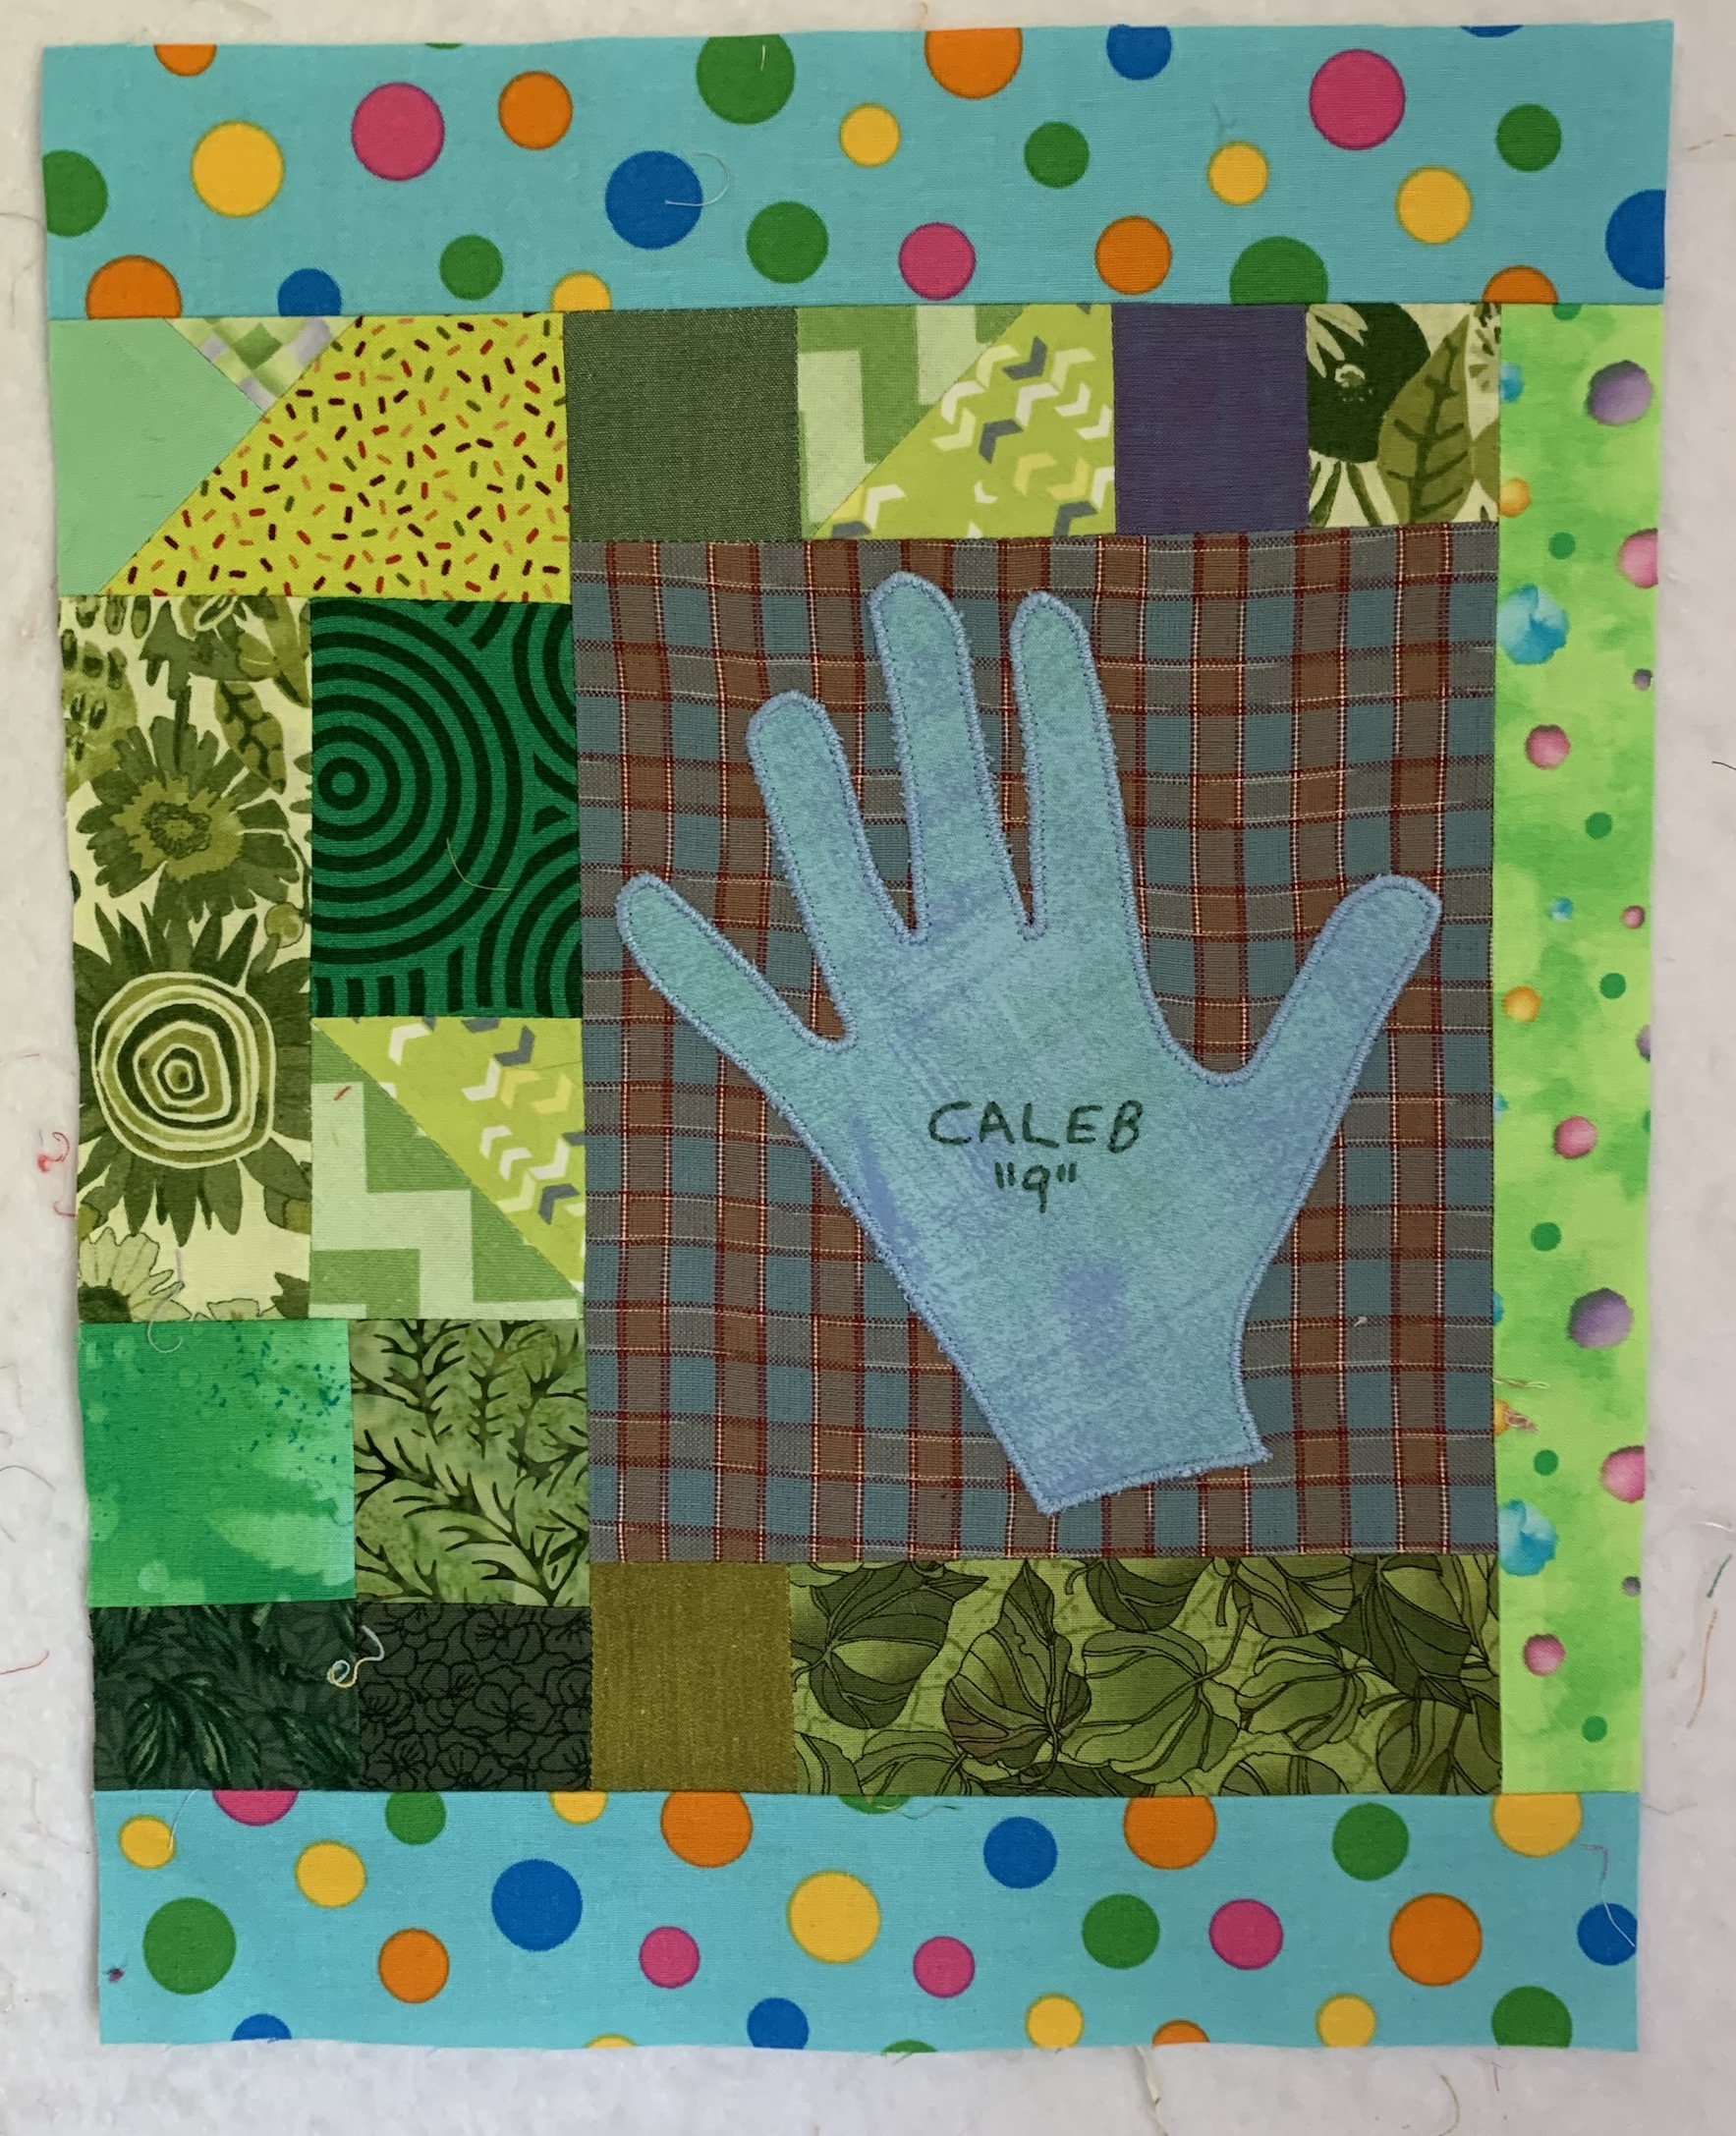
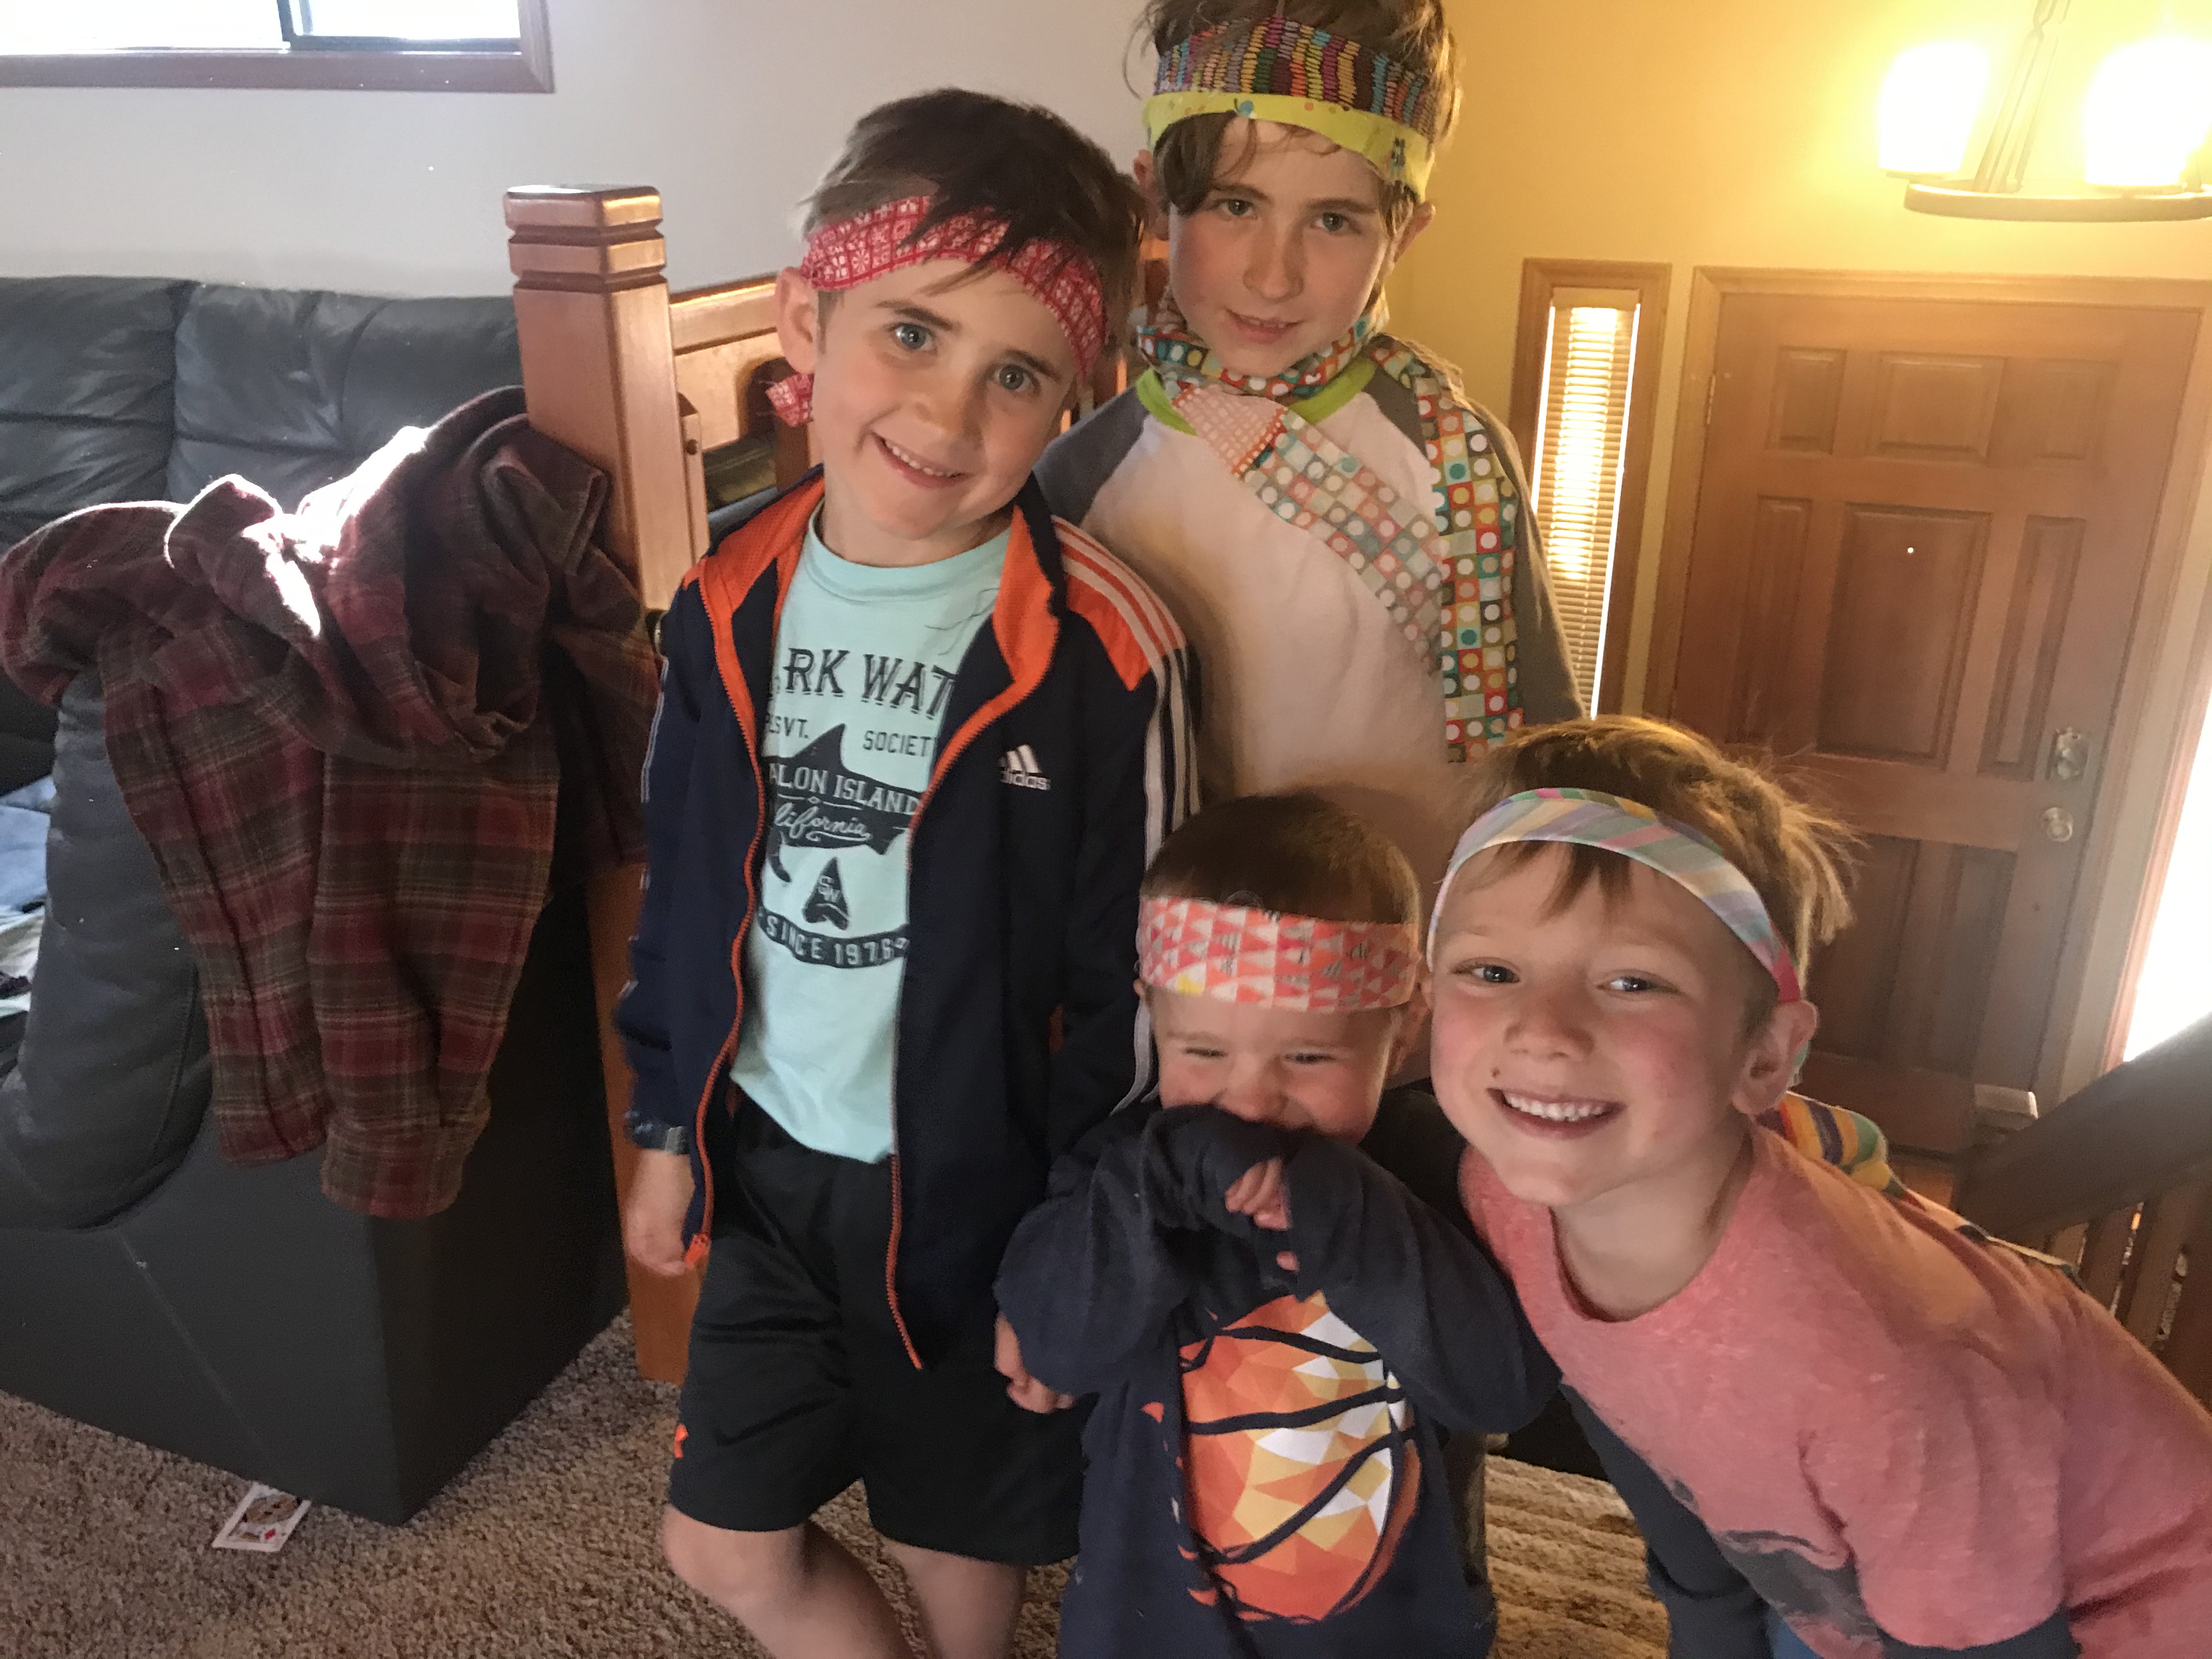
Then this happened: The Hand Blocks! I surprised “The Boys” with machine appliquéd fabric hands (from outlines of their hands taken by their parents). I embroidered their name and age on each hand.
“The Boys” filled the page around their hands with their fabric choices, which I sewed into blocks. I received another written note:
These hands were such a fun idea! The kids were amazed you could do that!
You know how it is. One thing leads to another, and now I thought the adults had to have appliquéd and embroidered fabric hand blocks too. I placed the hands on 4 pieced heart blocks leftover from 2018, which somehow seemed perfect!
The funny thing is that we became closer while we had to live separately during the lockdown. We helped each other out and we even celebrated birthdays out in the yard.
Caleb turned 9 years old around the time my husband David turned 64. We shared chocolate almond cake and sang a joyous round of Happy Birthday together! Yes, we kept our physical distance for safety, but we remained socially connected.
Wendy’s Next Blog Post: Magic! Turning 65 Blocks of All Sizes Into a Quilt Top!
I am so excited! My tremendously talented friend Wendy Hill has agreed to do a series of guest blog posts about a wonderful quilt project she’s been working on with children in her neighborhood during the quarantine/”COVID-times”. Over the past several months, she’s shared with me updates on this amazing project and I invited her to share with my tierneycreates blog readers. I hope the story of this project makes you smile as much as it made me smile.
Wendy Hill is a fiber artist and teacher who has written several art quilting books to include most recently Creative Quilt Challenges, cowritten with Pat Pease. She has a website Wendy Hill Quilt Artist and you can follow her current work and musings on Instagram @wendyquilter.
Quarantine Quilt Project: Life in the Time of Coronavirus
Part I: Once Upon A Time
This is the story of two neighbors who banded together when the state government ordered a lock down because of the first Global Pandemic in over 100 years.
The big wide world was suddenly narrowed down to one house each for the four young boys next door and for us, a retired couple.
We live on a quiet cul-de-sac of a street, in a woodsy area, and now our respective worlds are turned upside down.
“The Boys”, ages 2-8 years, explored the area around their house after finishing ‘school’.
With no fences and the houses close together, “The Boys” inevitably spilled over into our yard.
One day, it seemed, to them, a good idea to fill our birdbaths with dirt and make mud. “The Boys” cleaned up the mess and later dropped off an apology.
“Can you ever forgive us?” the note read.
There was nothing to forgive! “The Boys” were going stir crazy.
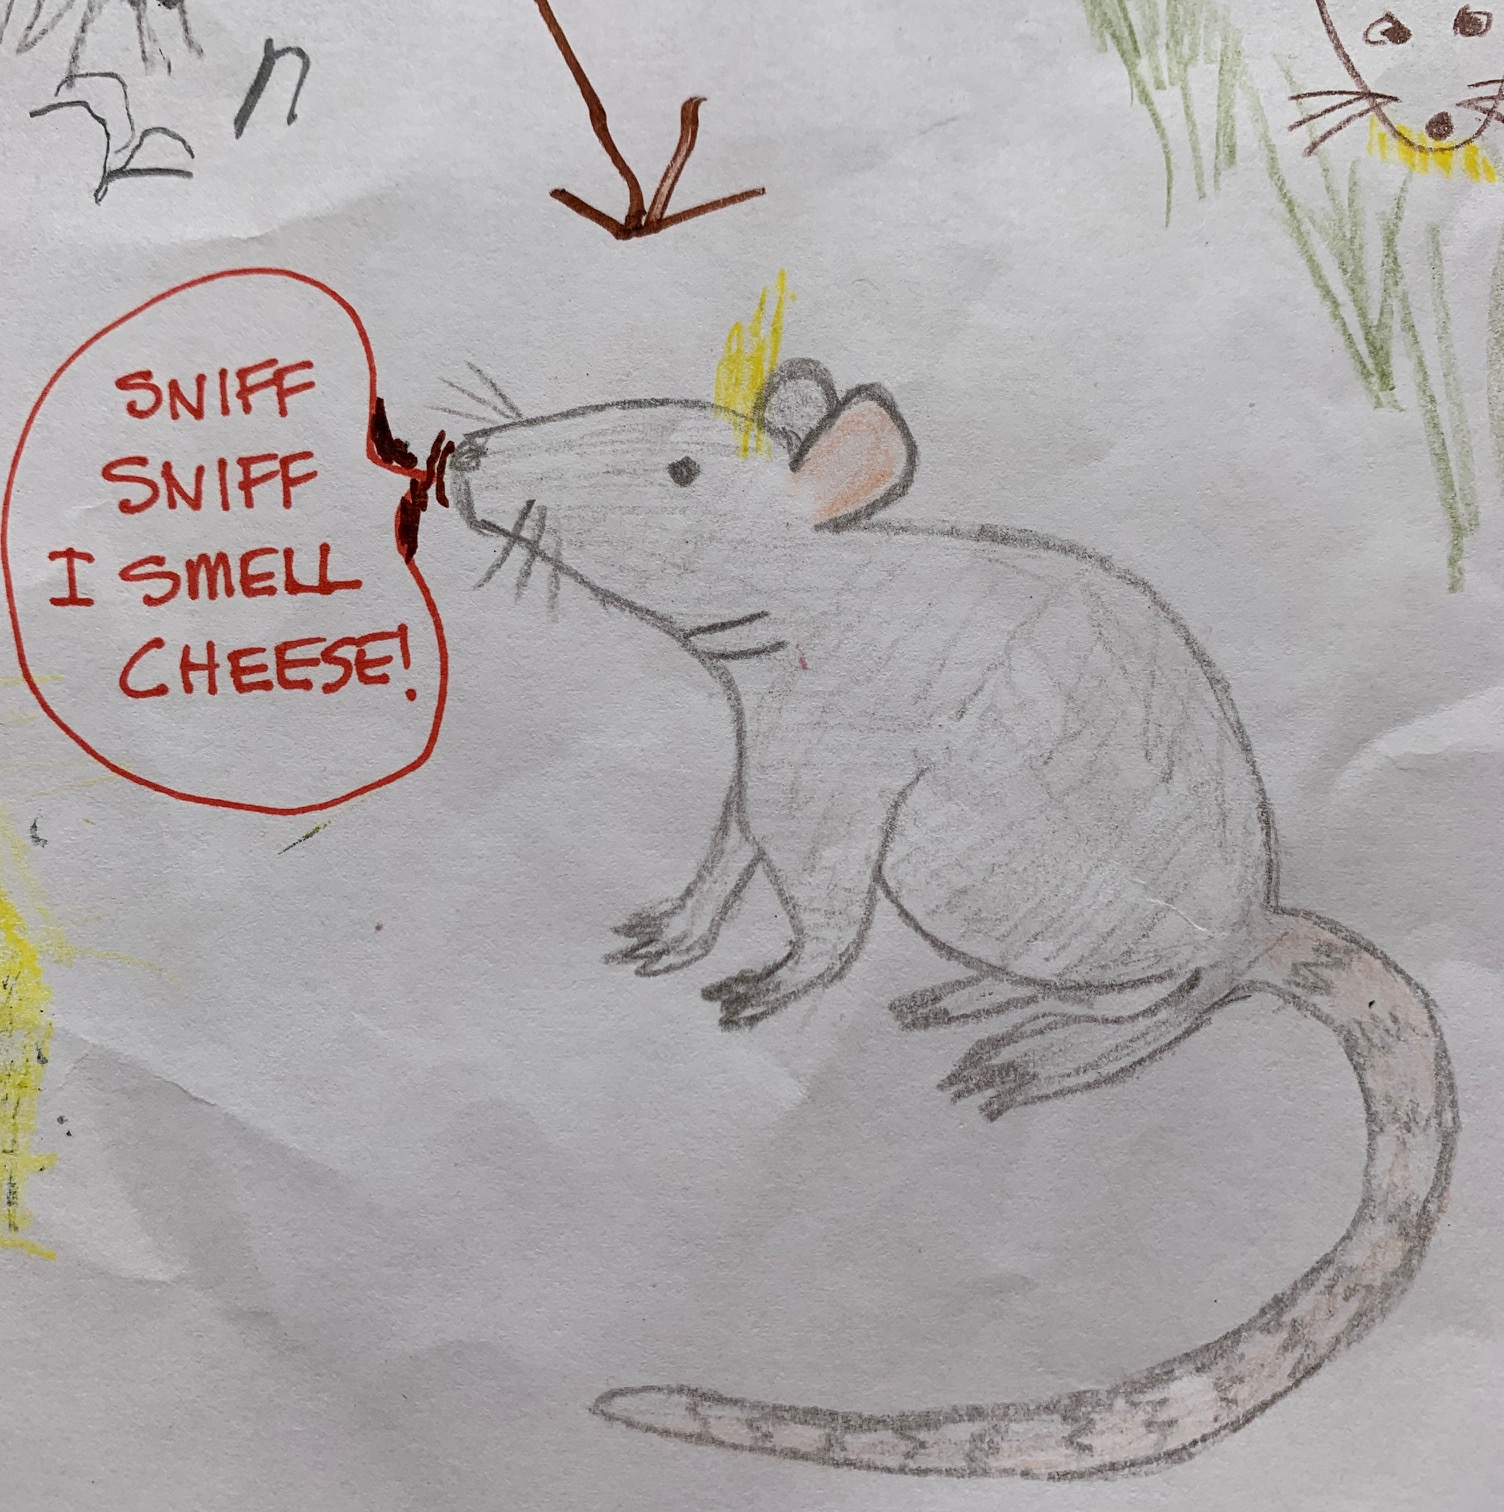
I sent an invitation to participate in “An Exchange”. I started with a drawing of a mouse, which looked a lot like a rat, and invited “The Boys” to add to the drawing. This drawing, plus two others, went back & forth until we had finished artworks.
Life during the pandemic meant one day blending into to the next, without much definition. But now, we waited to hear the patter of footsteps followed by the chime of the doorbell.
Likewise, I could hear “The Boys” squeal with delight when I rang their doorbell. It was exciting to open the door and see what The Boys left on the porch.
One day, I sent over a note which read “I have a bit of a crazy idea….”. I sent over a Big Bag of Fabric Scraps with instructions to fill up blank 8 1/2” by 11” pages with fabric pieces. Overlaps of fabric were okay but no gaps. I explained I’d sew the fabrics together to make “quilt blocks”.
If “The Boys” had fun, we could keep it up until we had enough to make something.
The mom replied “This sounds like a great idea!” and we were off.
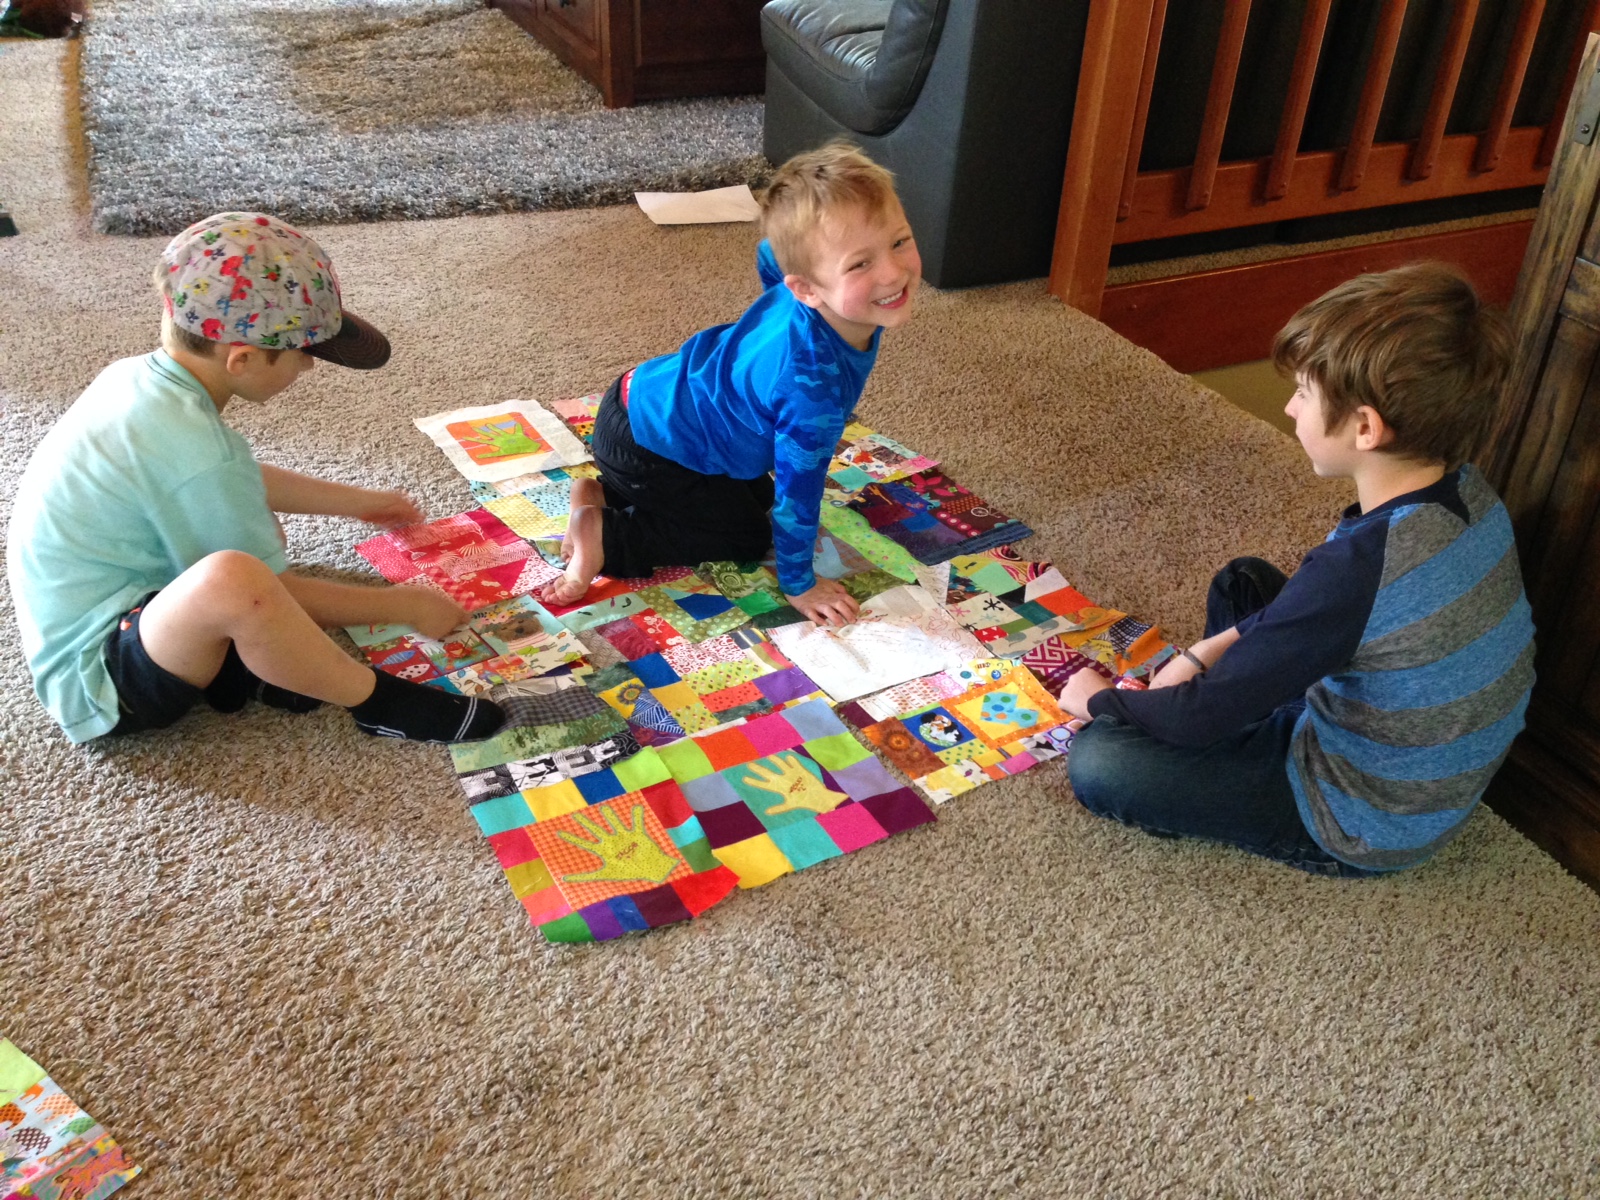
The Boys had fun playing with color & texture, and they enjoyed seeing their fabric arrangements get transformed into blocks. As the number of blocks grew, they played with layouts on their floor. We agreed to make enough blocks for a quilt.
We were all building new pandemic memories and they would have a cuddly family quilt. Win-Win-Win!
Wendy’s Next Guest Blog Post: The Boys Make 61 Blocks!
Good Morning! I realized I forgot to follow up on my post from 11/9/16: Free Webinar: CREATIVE QUILT CHALLENGES and provide to those of you who did not get to attend, the link to the presentation and handouts.
My friends Pat Pease and Wendy Hill provided a wonderful presentation based on their book, Creative Quilt Challenges, published earlier this year, that will spark your creative art quilting fire. If you are not a quilter you might find something interesting it in it also. In a future post I am going to talk about how non-quilting related books and resources inspire my ideas for art quilt design.
Photo credit: Amazon.com
Ah, I am starting to ramble without providing you the link, so here you go:
In addition to the video of the slideshow and presentation and the class handout, the link above also provides the answers from the Webinar Q&A.
Postscript
Today I begin a 5-day holiday break from my pay-the-bills-job (two of those days are courtesy of my employer, one is a vacation day and two are the weekend!). I am so excited I am not sure what to do with myself…oh wait, I should probably start working on my backlog of projects…
Ohio Shifted (2016) has returned from its road trip to the Pacific International Quilt Festival (PIQF).
Wendy Hill and Pat Pease, authors of Creative Quilt Challenges(C&T Publishing, 2016) invited me to participate in their Shape Shifting Challenge, an exhibit-within-an-exhibit at PIQF – October 13-16, 2016, in Santa Clara, California.
Here is the piece which has now returned home and will become part of The Wardrobe Meets the Wall Collection:
Ohio Shifted (2016) – Designed, pieced and quilted by Tierney Davis Hogan
When Wendy Hill returned my piece to me, she also gave me a copy of the PIQF 2016 brochure and the placard that had my Artist Statement and an image of what the piece looked like before I “shape shifted” it!
Here is a photo of what the piece looked like before it’s makeover:
It was not bad in its original form, it just seemed very boring.
If you would like to read about the road trip adventures of Wendy Hill and Pat Pease on their road trip from Central Oregon to Santa Clara California and their PIQF experience, check out Wendy Hill’s blog at: Wendy Hill’s Blog (wendyhill.net).
Here is the description of their Special Exhibit in the 2017 PIQF Supplement: Creative Quilt Challenges – Wendy Hill & Pat Pease
Pat and Wendy have been working together for 8 years exploring color and design through a series of self-designed challenges. These quilts show their differences and similarities in personal style and fabric choices. View in-process photographic displays of their work, and also a group challenge from quilters from the USA and Canada. Their 2013 exhibit at PIQF led to their new 2016 book Creative Quilt Challenges (C&T Publishing). You’;; want to Take the Challenge Too!
Continuing my series of posts about what is on my design wall with a visit to the studio of quilt & fiber artist, designer, teacher, book author, and all around “Renaissance Woman”, Wendy Hill (and the piece of fiber art that came from that visit).
Thread-a-Bowls
I spent Monday 8/29/16 with Wendy Hill (wendyhill.net) , textile artist and author of quilting and fiber art books such as Creative Quilt Challenges (with Pat Pease), Easy Biased Curves, Two-for-One Foundation Piecing, On the Surface, and Fast Fun & Easy Incredible Thread-A-Bowls.
Wendy is a wonderful teacher and while I was visiting, she gave me an impromptu class on making a thread web/thread bowl from her book Fast Fun & Easy Incredible Thread-A-Bowls (2005).
Photo credit: Amazon.com
The amazing thing about the thread-a-bowls (and thread-a-vases, etc.) are that they use scraps of thread and snippets of fabric scraps. I never thought about recycling thread snips! A lot of thread as made it into my trash over the years of sewing that could have become – FIBER ART!
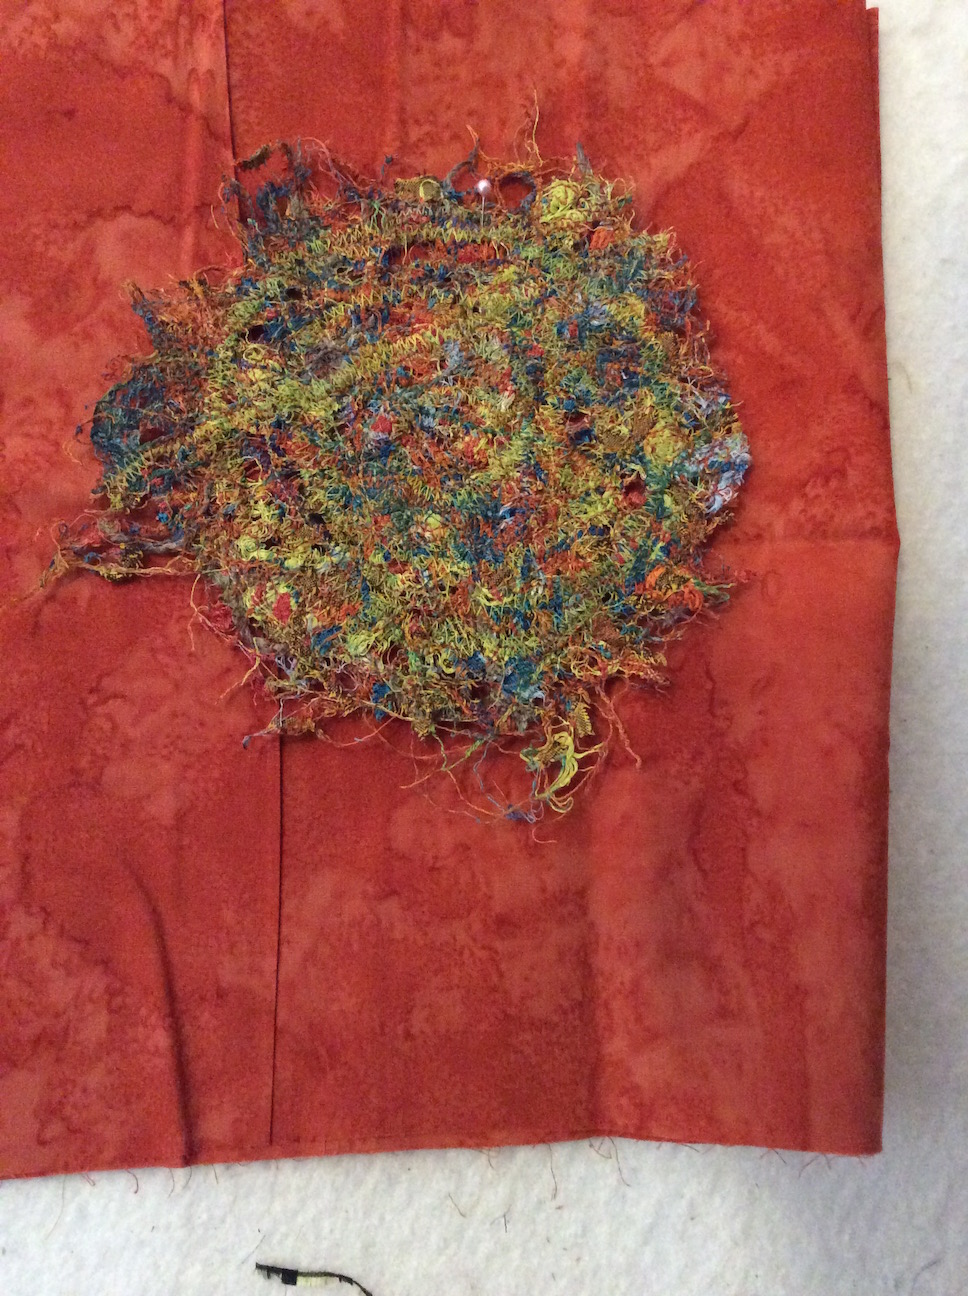
Here are photos from creating my first “thread web” and shaping it into a bowl:
I took the bowl home with me while it was still wet from rinsing out the Solvy (Sulky brand) water-soluble stabilizer; and draped over a form to dry into a bowl shape.
Thread-a-Future Art Piece
After the bowl dried, I was not pleased with how I had shaped it. It was too shallow and misshapen. I did however like the concept and the look of all those fibers interlaced (I had scraps of thread, tiny snips of scrap shot cotton, and scraps of yarn), so I re-wet the piece and flattened it to dry again.
I ended up with this version of the piece, which I have on my design wall and I am playing with floating it in some type of orange background and making a small art quilt that I will likely put in some type of frame.
Here it is with a Moda Grunge fabric line, deep-reddish orange:
and here is it with a deep orange batik:
I cannot wait to play with making my next “thread web”. I have a little Solvy thanks to Wendy to play with at home as well as I have copy of her book Fast Fun & Easy Incredible Thread-A-Bowls to read through and learn more about making these webs.
POSTSCRIPT
Wendy Hill’s home was the home of a true artist – even her light switch covers were artistic and handmade! I was fascinated by them and I wish I had photographed every one (every light switch and outlet cover was artistically covered), but here is a sampling:
Of course every cozy artist’s home needs a furry creature or two to keep the creative person company!
Kitty in a box!
POST POSTSCRIPT
Here is a little visual treat if I have not made you tired of photos from the 2016 Sisters Outdoor Quilt Show (SOQS):
A very talented Central Oregon art quilter, Kristen Shields (kristinshieldsart.com), has a wonderful blog (she is a very good photographer!). A recent post on her blog has great photos from this year’s show; and includes additional photos from the show (of incredible quilts) that were not in the links in my July 2016 series of posts about SOQS – Sisters Outdoor Quilt Show 2016
I was invited by Wendy Hill and Pat Pease, authors of Creative Quilt Challenges(C&T Publishing, 2016) to participate in their invitational exhibit: Shape Shifting.
Creative Quilt Challenges is a Special Exhibit at the Pacific International Quilt Festival (PIQF) , October 13-16, in Santa Clara, California. Shape Shifting will be an exhibit within their Creative Challenges exhibit. Please be sure to stop by Pat Pease and Wendy Hill’s exhibit at PIQF if you are attending and tell my friends “hello”!
For my piece in this invitational exhibit, I had decided to actually do some “shape shifting” and transform an existing art quilt piece that I was not too sure about, into something that actually made me smile.
SHAPE SHIFTING
I began with this existing piece, Ohio, which I last discussed in the post Update: Ohio
Something about the piece was displeasing to me and the piece felt kind of “blah”. So I removed the borders using with some very careful seam ripping (the piece is made of recycled silks; and then sliced apart a couple sections of the piece.
Then I played around with a border of BRIGHT fuchsia-pink raw silk that a friend picked up from a thrift shop and shared with me:
The selvage of the bright fuchsia raw silk had the name “FOUWAH, HONG KONG”. Some “googling” revealed this piece was likely a vintage fabric from Fou Wah Fabrics of Hong Kong:
Here is the final design of the piece, which I am tentatively naming: Ohio Shifted (I will have to create quite the Artist Statement on this piece to explain to the viewer where I got the name from…I might rethink the name…we’ll see…)
I selected this fabric for the back of the piece:
The piece is now ready for quilting. I am going to “put my big girl panties on” and quilt this art quilt myself. I need to be able to give it to Wendy and Pat by September 15th and I need to keep challenging myself to go to places (my own art quilting) that I do not want to go, so I can grow.
Initially I was going to go buy some bright fuchsia thread to quilt it with but I have selected a soft gold thread (the one on the left) that mirrors the colors in some of the blocks. I might also another another thread color, still deciding.
(Note – I did do a 1/8 an inch stitch around the edge of the piece using a 2.0 stitch length to stop the raw silk from fraying any further than the edges).
I am going to practice what I want to do as far as quilting on the quilt on a scrap silk “quilt sandwich” before I quilt on my actual piece. A couple of months ago I did quilt an entire art quilt myself for a piece for another invitational exhibit that I will post about in the future.
POSTSCRIPT
In March, I did participate in a Blog Tour to celebrate the release of the art quilting book, Creative Quilt Challenges by Pat Pease and Wendy Hill.
If you would like to read my post for my part of the blog tour, where I discuss working with “unlikely materials” (recycled silks, denim, wool) in making quilts please see the link below:
Welcome to Day 4 of the Blog Tour in support of Pat Pease & Wendy Hill’s new book Creative Quilt Challenges (C&T Publishing, 2016).
If you are just joining the tour today on my blog, you can see the full list of the 10 participating blogs on this tour at the C&T Publishing blog post: Creative Quilt Challenges Blog Tour Kickoff.
At the end of this post I will pose a discussion question, please post a comment to automatically enter a drawing for a copy of Creative Quilt Challenges. The random winner will be selected and notified around 04/07/16.
CHALLENGE #3 – UNLIKELY MATERIALS
In Creative Challenges, Pat Pease and Wendy Hill invite readers to flex their quilt-making creative muscles by experimenting with different “Challenges”. In Challenge #3 – Unlikely Materials, Pat and Wendy invite readers to stretch their creative muscles by working with materials other than traditional quilting cottons!
Transitioning from Cotton Material to “Unlikely Materials”
Four years ago, I would have looked at you as if you were insane if you suggested I use anything other than high quality quilting cottons, purchased from a quilt shop, for my quilt-making. Then in 2012 my friend and mentor, Betty Anne Guadalupe of Guadalupe Designs invited me to work on a collaborative project involving making art quilts out of recycled silks and linen samples from garment manufacturing. These samples had been saved from the trash heap by someone working for an Italian silk manufacturer in the 1990s and stored away since then.
At first I was terrified of working with anything but cotton for quilting. Cotton is so crisp and stable. Silk is slippery, delicate, and…well…terrifying!
One of the first skills I learned when working with silk was how to back delicate silks with interfacing. The best interfacing I have used for backing silk is “French-Fuse“. I learned about French-Fuse from Betty Anne, who learned about it from another art quilter, Grace. This interfacing provides much needed stability to delicate silks and makes them easier to rotary cut and to piece.
Here is one of the early pieces I made with recycled silks – Silk Landscape:
Silk Landscape (2012). Designed and pieced by Tierney Davis Hogan. Quilted by Betty Anne Guadalupe. Photography by Jeremy Koons.
The Wardrobe Meets the Wall
Betty Anne and I both became hooked on using the recycled silks and linens to create art quilts. We formed a collaboration which eventually became The Wardrobe Meets the Wall: A collection of art quilts created from recycled garments, manufacturing remnants, and samples.
We have a blog, The Wardrobe Meets the Wall (we are working on evolving this into a a website, “Art Quilts by Guadalupe & Hogan”). See our page The Collection if you would like to see a samples of art quilts all made with “Unlikely Materials”.
Our collection includes quilts made from mens ties, recycled silk and linen samples, scrap wool from clothing or blanket manufacturing, recycled denim, and general recycled clothing.
Once You Start Experimenting with Unlikely Materials, You Might Get Hooked!
Betty Anne already had many years experience working with “Unlikely Materials” and before I knew it, she had me experimenting with using recycled wools and denims to create art quilts.
Here is my first experiment with working with recycled wools (from wool mens suiting manufacturing scraps and wool blanket manufacturing scraps) and denims (recycled jeans) – He Dresses Up, He Dresses Down:
He Dresses Up, He Dresses Down (2014). Designed and pieced by Tierney Davis Hogan. Quilted by Betty Anne Guadalupe
Basically – if you can sew with it, we will now try and make an art quilt with it. There are so many unlikely materials we have yet to try out. We enjoy recycling.
I was intrigued that in the Creative Quilt Challenge book, Pat Pease makes an adventurous art quilt with “hair canvas interfacing“. I bow my head to that level of creativity with “unlikely materials”!
(Disclaimer: We still love and support our local quilt shops and still make many quilts with traditional cottons. There are so many beautiful fabric collections to choose from and our new fabric stashes mysteriously continue to grow despite our obsession with recycled materials.)
Tips for Working with Unlikely Materials
I will not deny it – working with “unlikely materials” for the first time is scary. Here are some tips I have learned over the past 4 years. I am still learning and growing in my knowledge and comfort with using “unlikely materials”.
Do not be afraid to experiment and play: You do not have to create a great work of quilting art your first time working with a new “unlikely material”. I played with silk for a while before piecing it into an art quilt.
Check your sewing machine manufacturer’s website for tips on working with various materials and fibers.
Search for YouTube videos on working with a particular fabric and sewing tips on handling that type of fabric in your machine.
Network with other crafters that have experience working with a particular textile you are interested in trying. For example if you know a seamstress who has worked a lot with silk, you could ask her/him for tips.
Determine if a fabric/material needs to be interfaced in order to stabilize it for sewing. As I mentioned earlier, French-Fuse (which can be purchased at sites such as Annie’s Craft Store) is wonderful for backing delicate silks. It makes them so much easier to cut and piece. There are also YouTube videos on using French-Fuse.
If you are using heavy weight materials such as denim and some wools, consider pressing open your seams, and using 1/2 inch seams (like in making garments) as opposed to 1/4 inch seams. A trick that my mentor Betty Anne taught me is to run a tiny (1/8″ inch or less) seam along the front of the seams (front of your piece) to hold down the pressed down seams. This will be helpful if you have your piece professionally long-arm quilted so that the thick seams do not flip and catch the needle when being quilted.
If at first you don’t succeed, don’t give up! I have had several “unlikely materials” piecing/sewing disasters (bad words were said, not suitable for repeating). Some disasters were so bad I had to put them in the trash, I could not even recycle them into another project. Speaking of recycling a disaster into another project, see the post A Very Successful Rescue! about a piece made with recycled silk that was destined for the trash but was recycled by another quilter into a wonderful piece!
Warning – your other quilter friends who only enjoy using cottons, may at first give you a lukewarm response on your pieces made with “unlikely materials”. Do not be discouraged – art is a private and personal thing and you cannot control others reactions. (I love the saying: “It’s not my business what others think of me”…or my art!). I am sure I have quilter friends who thought at first I had lost my mind working with recycled silks and linens. As you grow in your experience with working with “unlikely materials”, your confidence will grow as will your adventurous spirit.
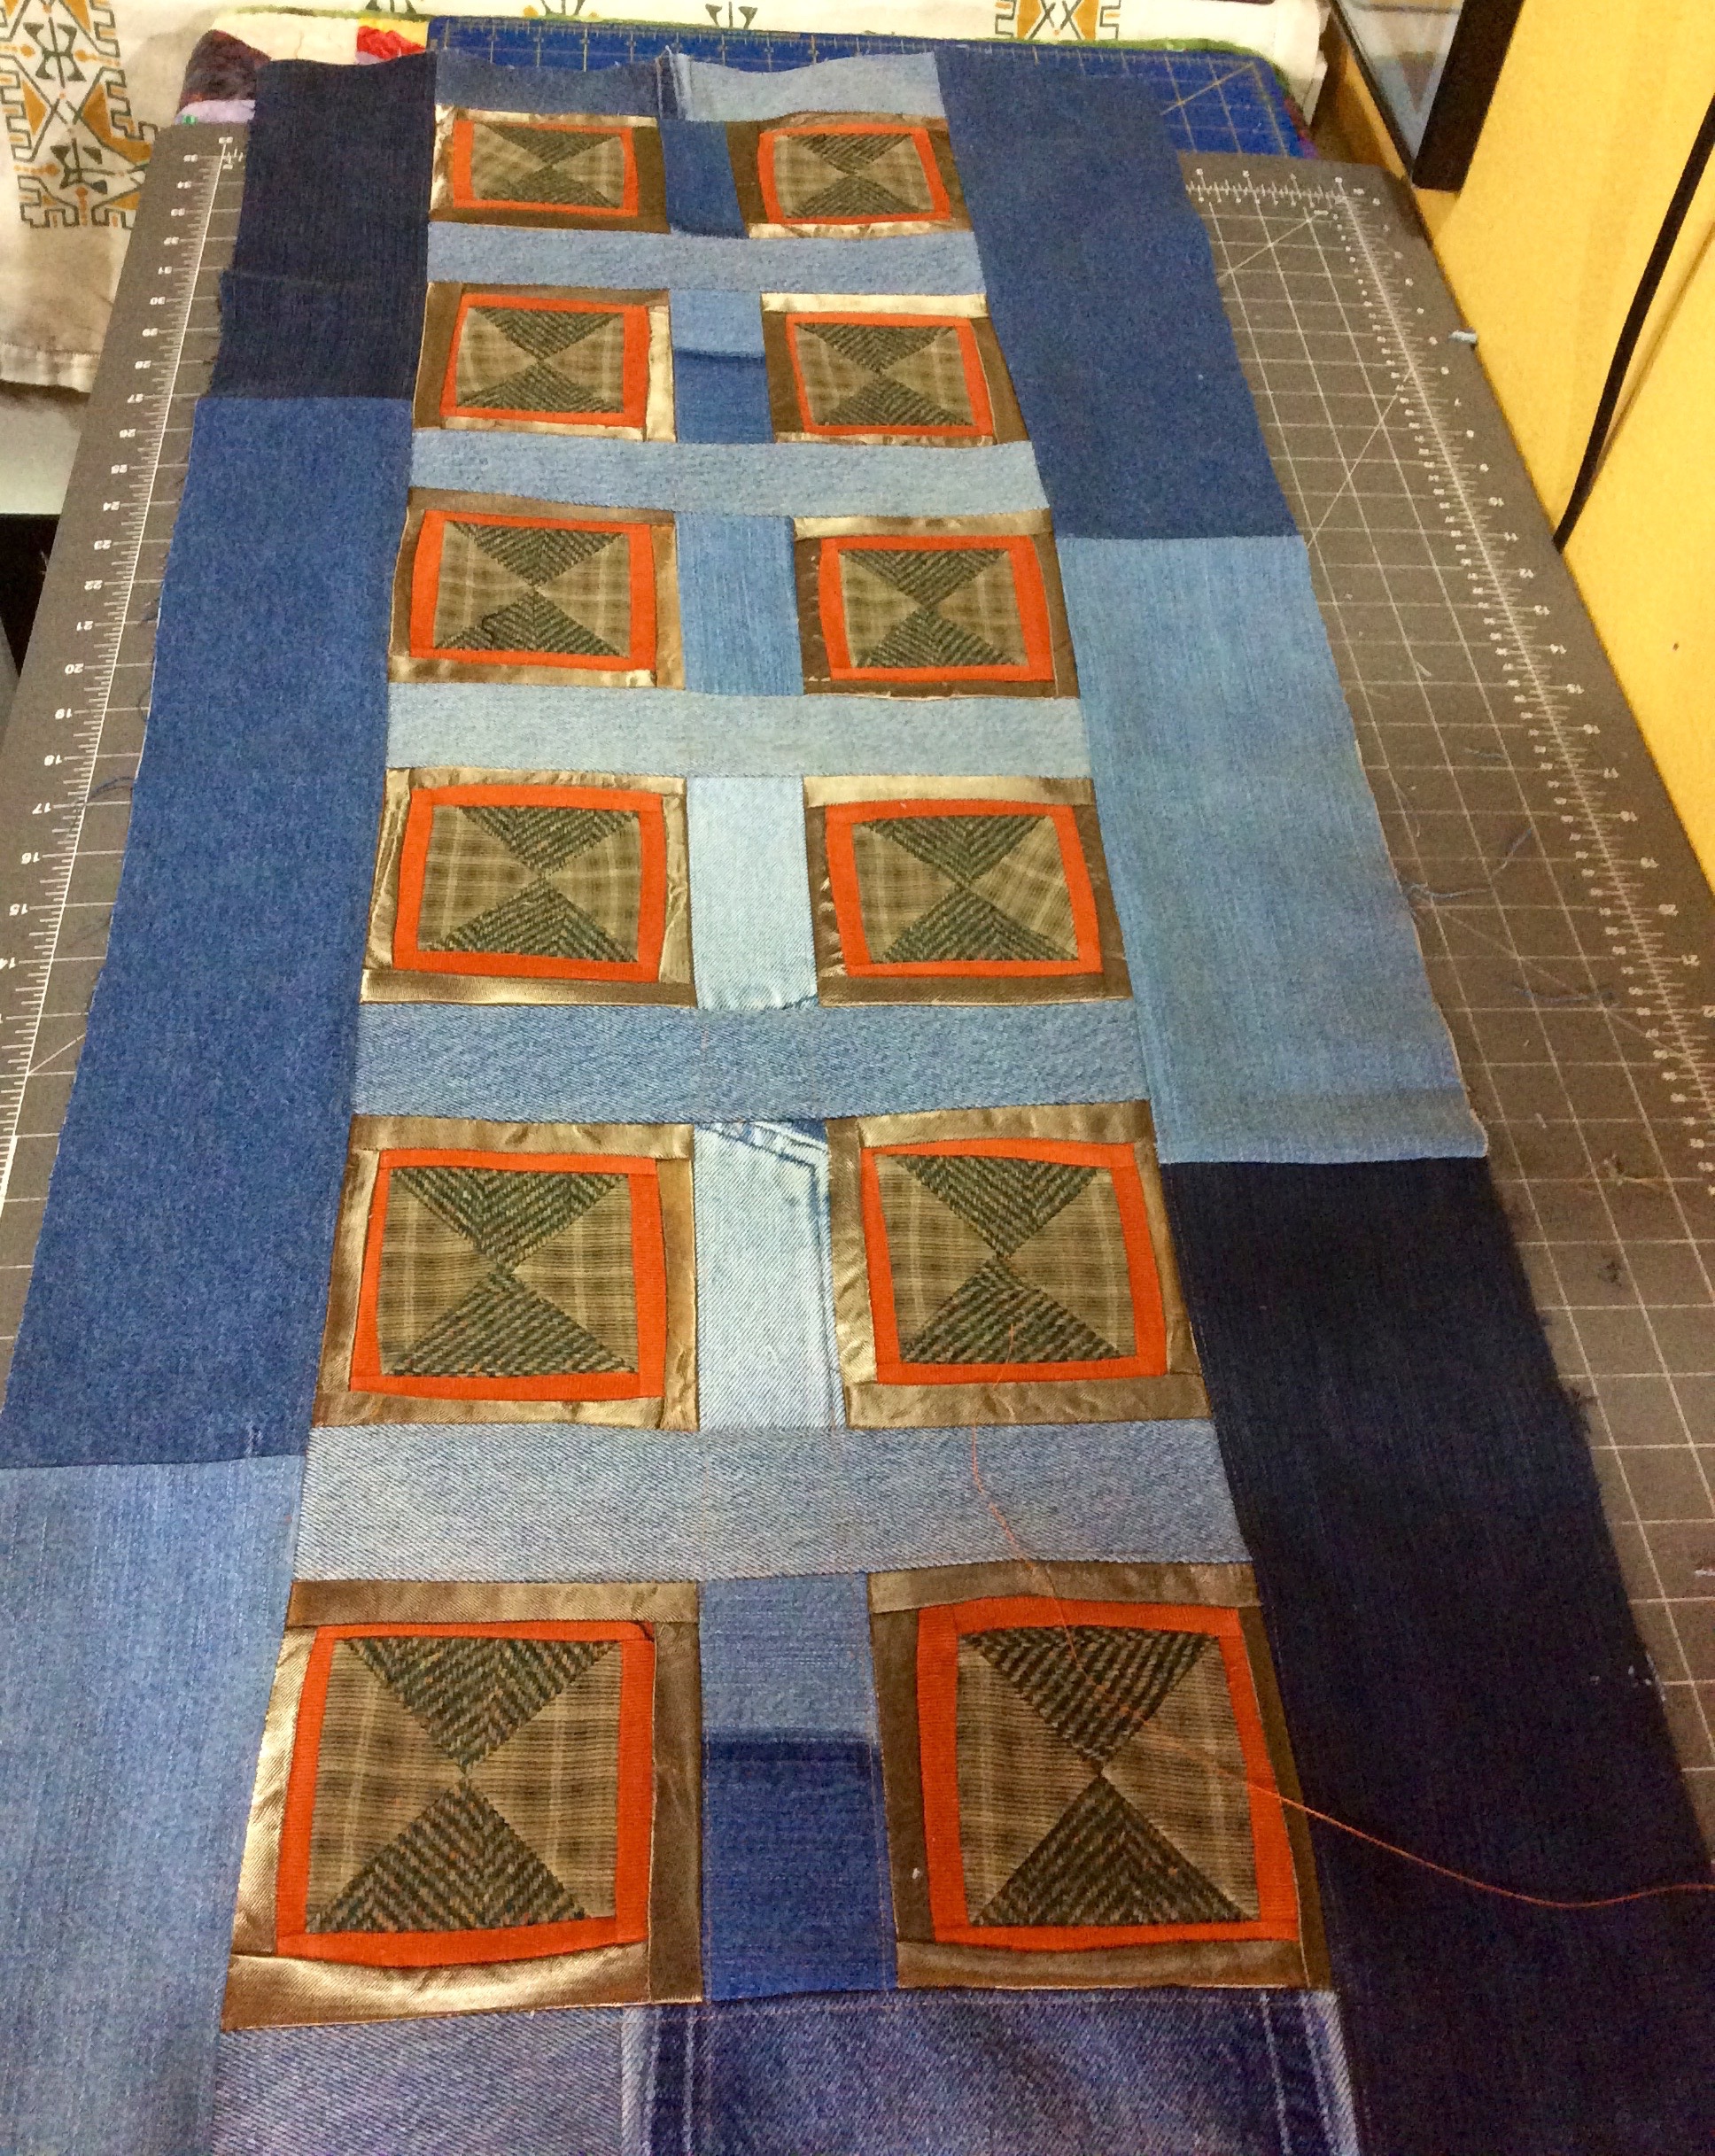
Working on My Latest Piece with Unlikely Materials
The timing of this blog tour post is great, as I am currently working on a new piece for a group exhibit I am participating in, called “Doors” for the local SAQA (Studio Art Quilt Associates) group I belong.
Designing the piece: Selecting the “Unlikely Materials”
I decided to use a photo of a door for inspiration, and located a wonderful collection of unique door photos on an Australian door and window manufacturer’s website Brisbane Timber .
I wanted to created a semi-realistic version of one of their doors, using recycled textiles (“unlikely materials”) and name the piece Recycled Door.
Here are the materials I selected:
Recycled Corduroy Shirt
Recycled Corduroy Pants
Recycled Tweed Wool Jumper
Bag of Recycled Jeans
Shiny Gold Home Decor Fabric
(List clockwise from top)
Recycled Corduroy Shirt
Recycled Corduroy Pants
Recycled Tweed Jumper
Unusual shiny gold home decor fabric (this fabric was given to me by the very talented art quilter, Dianne Browning, who primarily uses the unlikely materials of home decor fabrics and decorator samples in her art – you can check out her incredible art at her website Art Quilts by Dianne Browning)
Recycled Denim (from my bag of recycled jean sections)
The Piece in Progress
Below is a photo of Recycled Door in progress. If you like, for fun, you can go to the Australian door and window manufacturer’s website Brisbane Timber and see if you can figure out which door inspired this piece.
(The thread at the lower right hand of the piece is orange thread – I think it needs to be quilted with orange thread to repeat the strong orange accent in the piece.)
Are You Ready to Experiment or Have You Already Experimented?
Now it is time for you to weigh in on your experience with using “Unlikely Materials” or whether you are interested in experimenting with “Unlikely Materials” in the future in your quilting projects.
Please comment below and all comments will be automatically entered into a drawing for a copy of Creative Quilt Challenges.
The random winner will be selected and notified around 04/07/16.
The Creative Quilt Challenges Blog Tour continues tomorrow, Friday April 1, at BOLT Fabric Boutique, boltneighborhood.com. Thanks for joining me on the blog tour today!
“When you are scared but still do it anyway, that’s BRAVE.” – Neil Gaiman
Tomorrow the tierneycreates blog is a stop on the “Blog Tour” for Pat Pease and Wendy Hill’s new book Creative Quilt Challenges (2016).
When I join the tour on 3/31/16, I will discuss Challenge #3: Unlikely Materials from this wonderful book.
The Blog Tour opened on Monday 3/28/16 and here are the other “blog tour stops” posts to date (if you would like to read them prior to the tierneycreates Blog Tour stop tomorrow 3/31/16).
Always listening to audiobooks and podcasts while going on walks or crafting, I wanted to share some interesting recent listens.
GOOD LISTENS
I constantly listen to audiobooks and podcasts and wanted to share my recent favorites.
Audiobooks
I am fortunate to have a wonderful public library system and use the free Overdrive app to download audiobooks to my phone. Check out my older posts under the category “Audiobook Recommendations” if you would like to see my previous recommendations. Here are my recent favorites:
H is for Hawk by Helen Macdonald – I understand why this book has received all sorts of accolades. An introverted female British historian loses her beloved father and deals with her grief through training a Goshawk. The author reads the audiobook (I always love this) and weaves the story of her journey through her grief with the history of falconry, the experience of training a hawk, and the story of T.H. White – a falconer who wrote The Once and Future King and The Sword In the Stone (King Arthur/Camelot stories). It was an amazing listen – engaging, interesting, and profound in its beautiful exploration of loss, grief and recovery.
Think Like a Freak by Steven D. Levitt and Stephen J. Dubner – this book by the same duo of Economists who wrote Freakanomics was highly entertaining and eye opening. It was read by one of the authors Stephen J. Dubner. It was a “Malcolm Gladwell” type of book blending sociology, economics and psychology. Economics is not as boring as it sounds when discussed by these authors!
Podcasts
Ah, the magic of free podcasts! I usually download them from iTunes; and for some podcasts you can listen for free on various websites such as NPR.org. Here are my current favorite podcasts:
TED Radio Hour – This podcast is more than listening to a TED Talk. Each week an engaging topic is presented and discussed by weaving together snippets from related TED talks and interviews with TED talk presenters, experts, and everyday people’s perspectives. Very engaging podcast that always ends too quickly! I never tire of watching TED talks or listening to this podcast featuring excerpts.
The Moth Podcast – Incredible podcast featuring live storytelling. When I listen to The Moth Radio Hour while walking, sometimes I stop and pause to reflect, laugh out loud, or wipe away a tear. Powerful and engaging story telling. Thanks to my friend Pam for introducing me many years ago to “The Moth”.
The Minimalists Podcast – I love these guys. My friend in Austria introduced me to their website/blog theminimalists.com and I have been hooked! You may realize from my earlier posts that I am working on scaling back my life and focusing on experiences over things. I am very inspired by these two young thirty something guys who realized at an early age that living a meaningful life with less stuff is one of the keys to happiness. A lot of the stuff they discuss I already know but I enjoy the reinforcement.
Postscript
In addition to podcasts, I am current listening to TWO audiobooks at once (I put them both on hold from the library and they both became available at the same time for a 21 day lending period):
SuperBetter by Jane McGonigal
Good Gut by Justin Sonnenburg
I am enjoying both of them so far and just alternate my listenings!


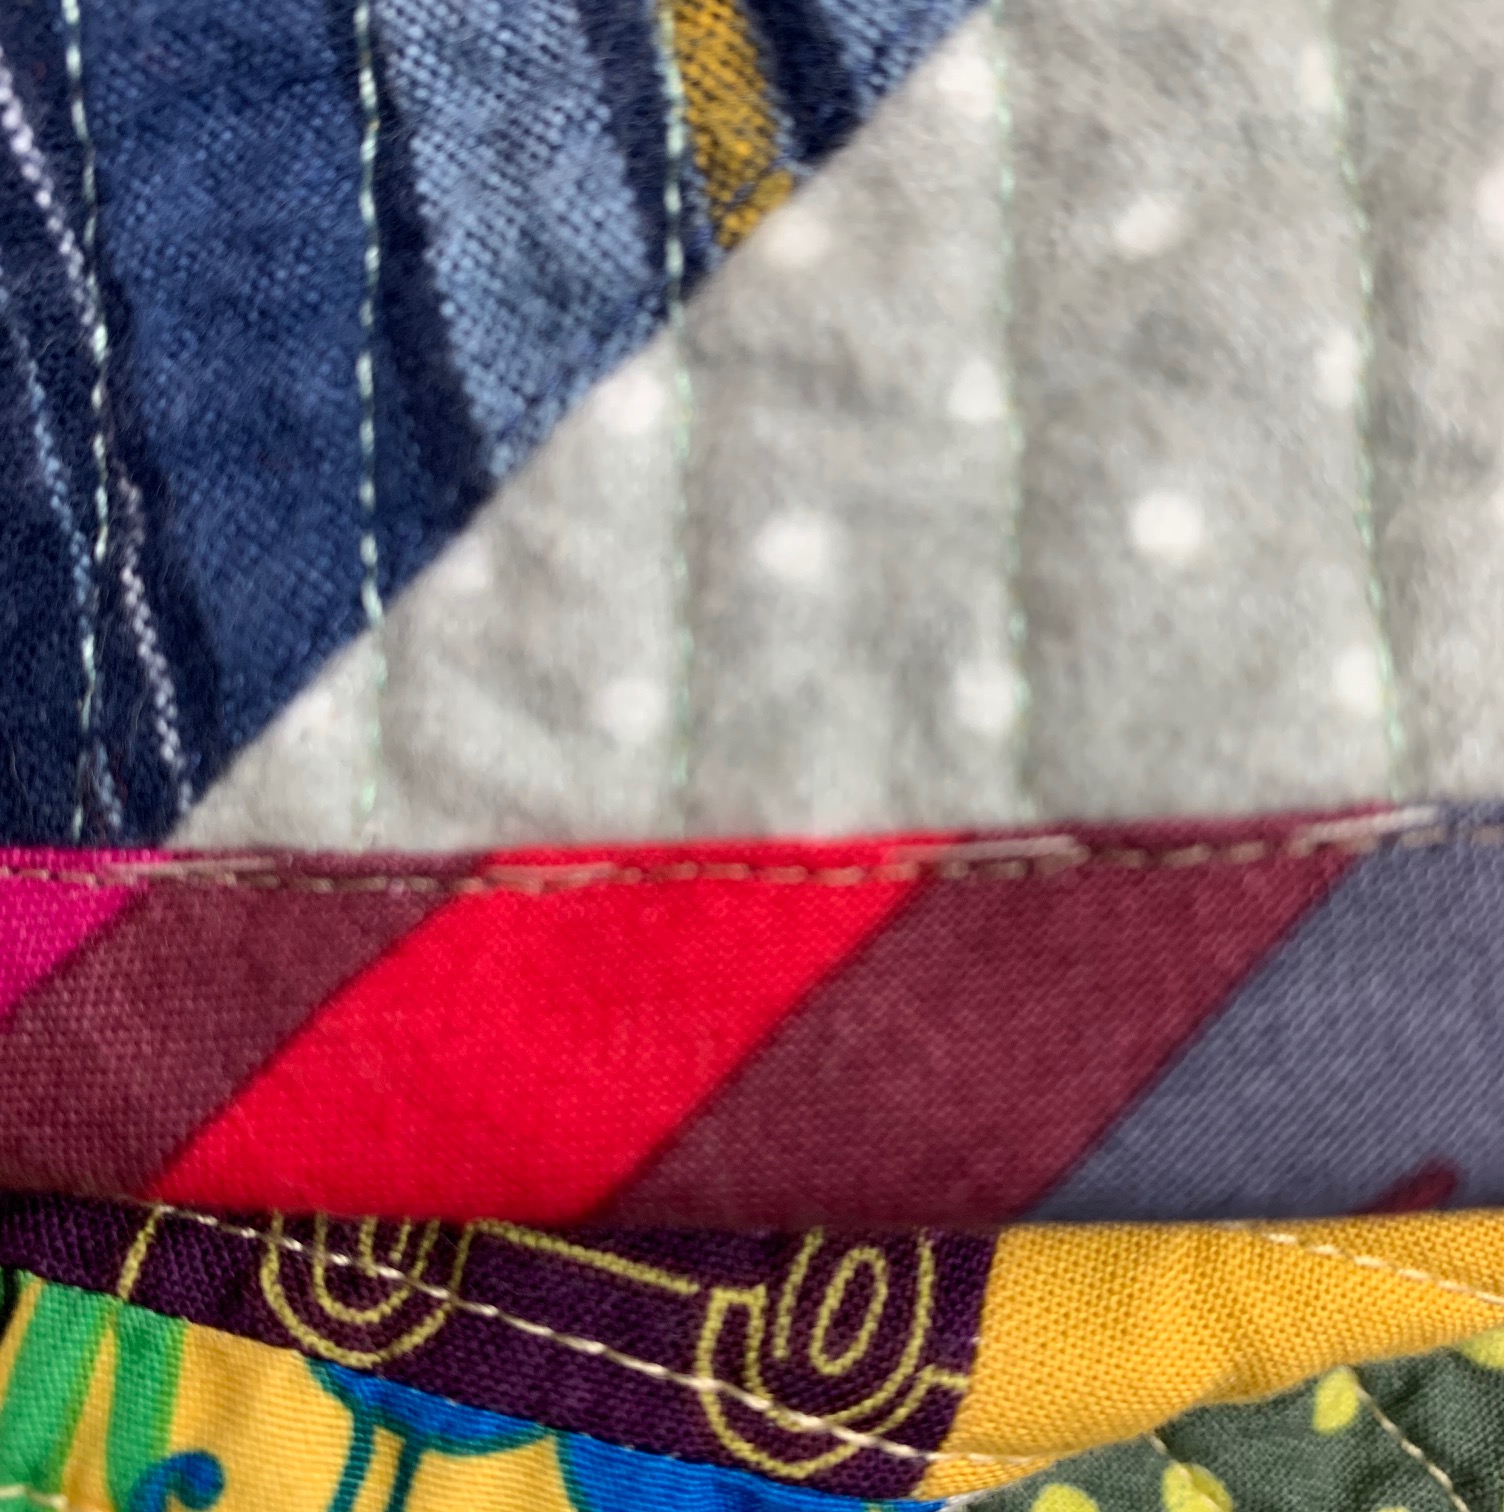
 At home, I took some detail photographs. Of course, the cats found the quilt in no time….The Quarantine Quilt is officially cat approved!!
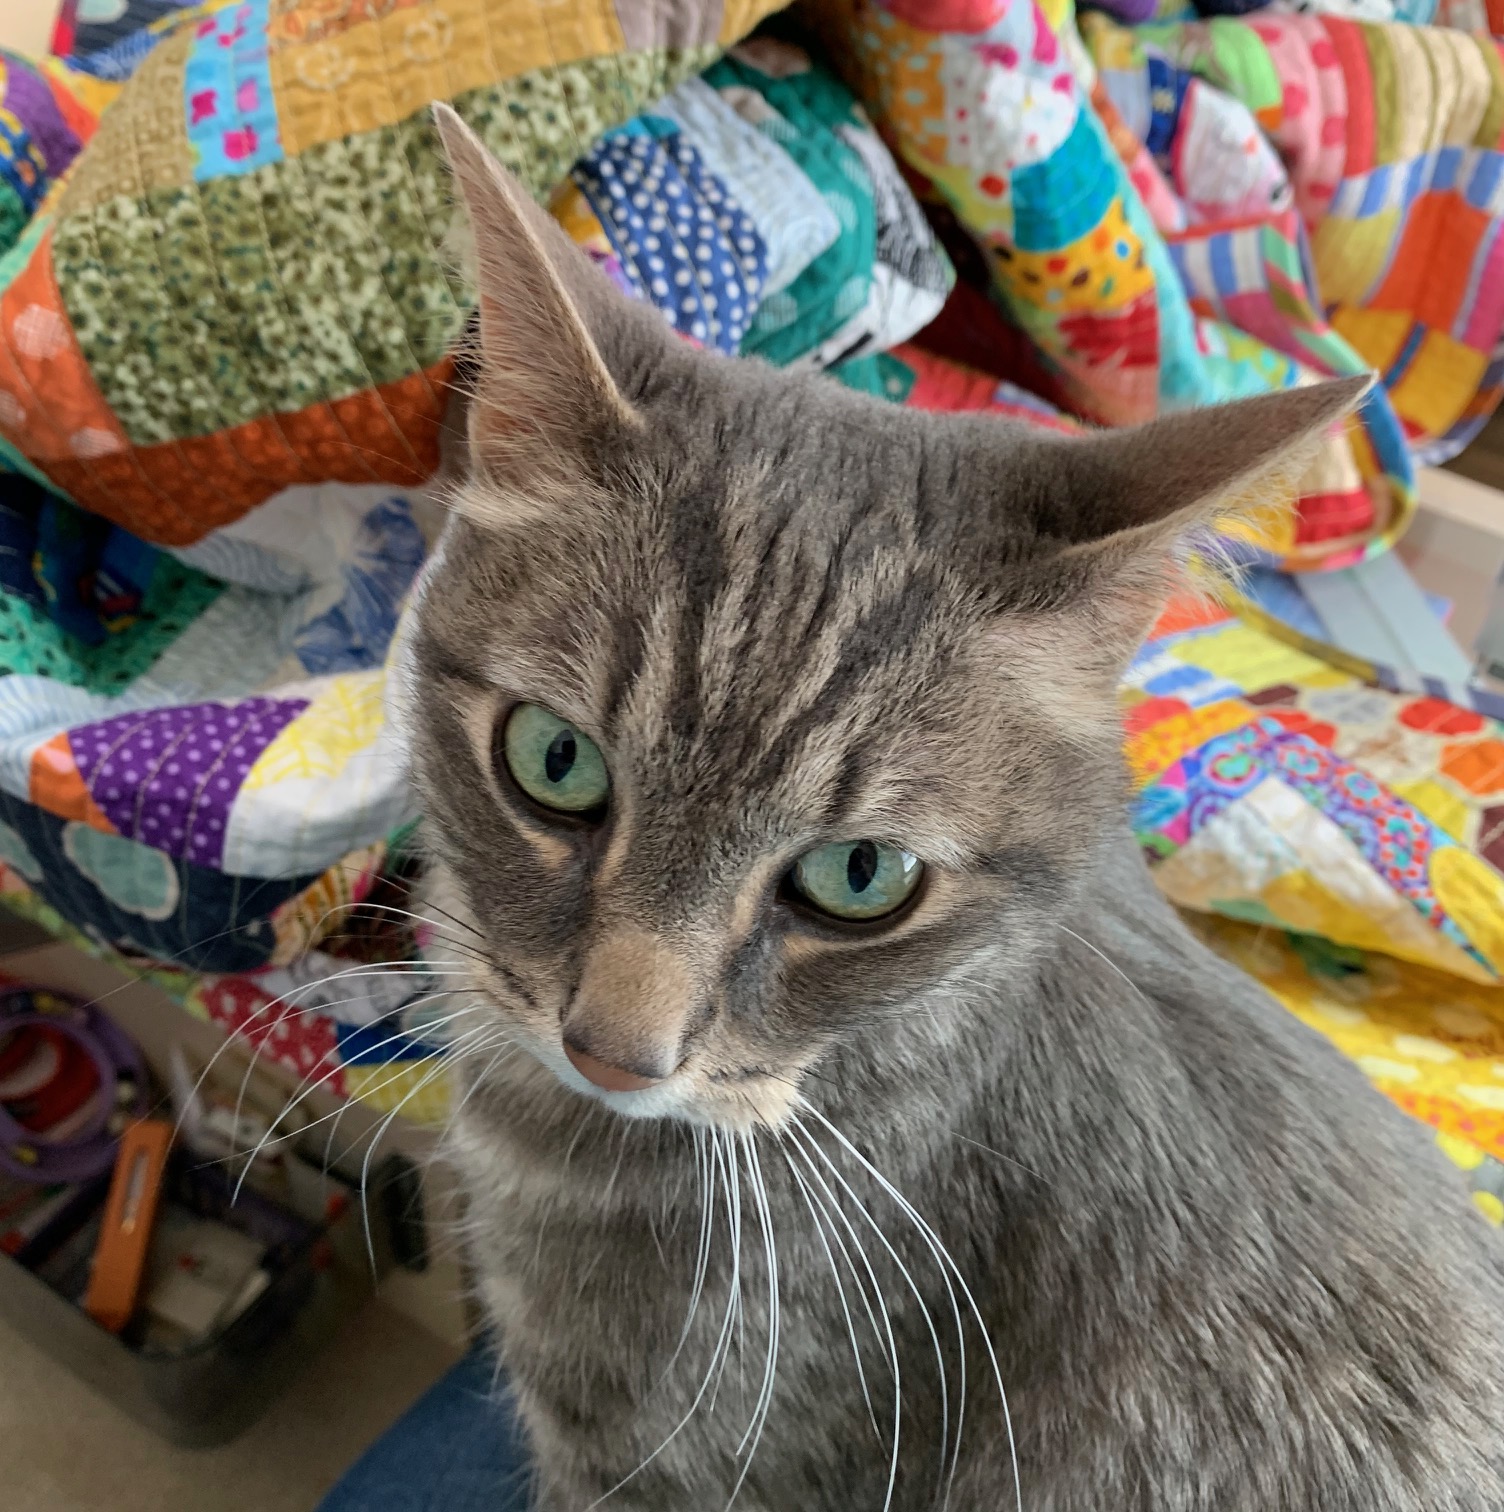
 Let’s start with the appliquéd hand blocks. I put The Boys’ hands in the middle, with the adults’ hands on the four corners. It’s symbolic on purpose: the adults are looking after the kids.
 Here are a few more detail photographs of the quilt front:
 The quilt back is fun too, with the assortment of found fabrics and leftovers. A friend sent me her found robot boy yardage for the center; she thought it perfect for The Boys.
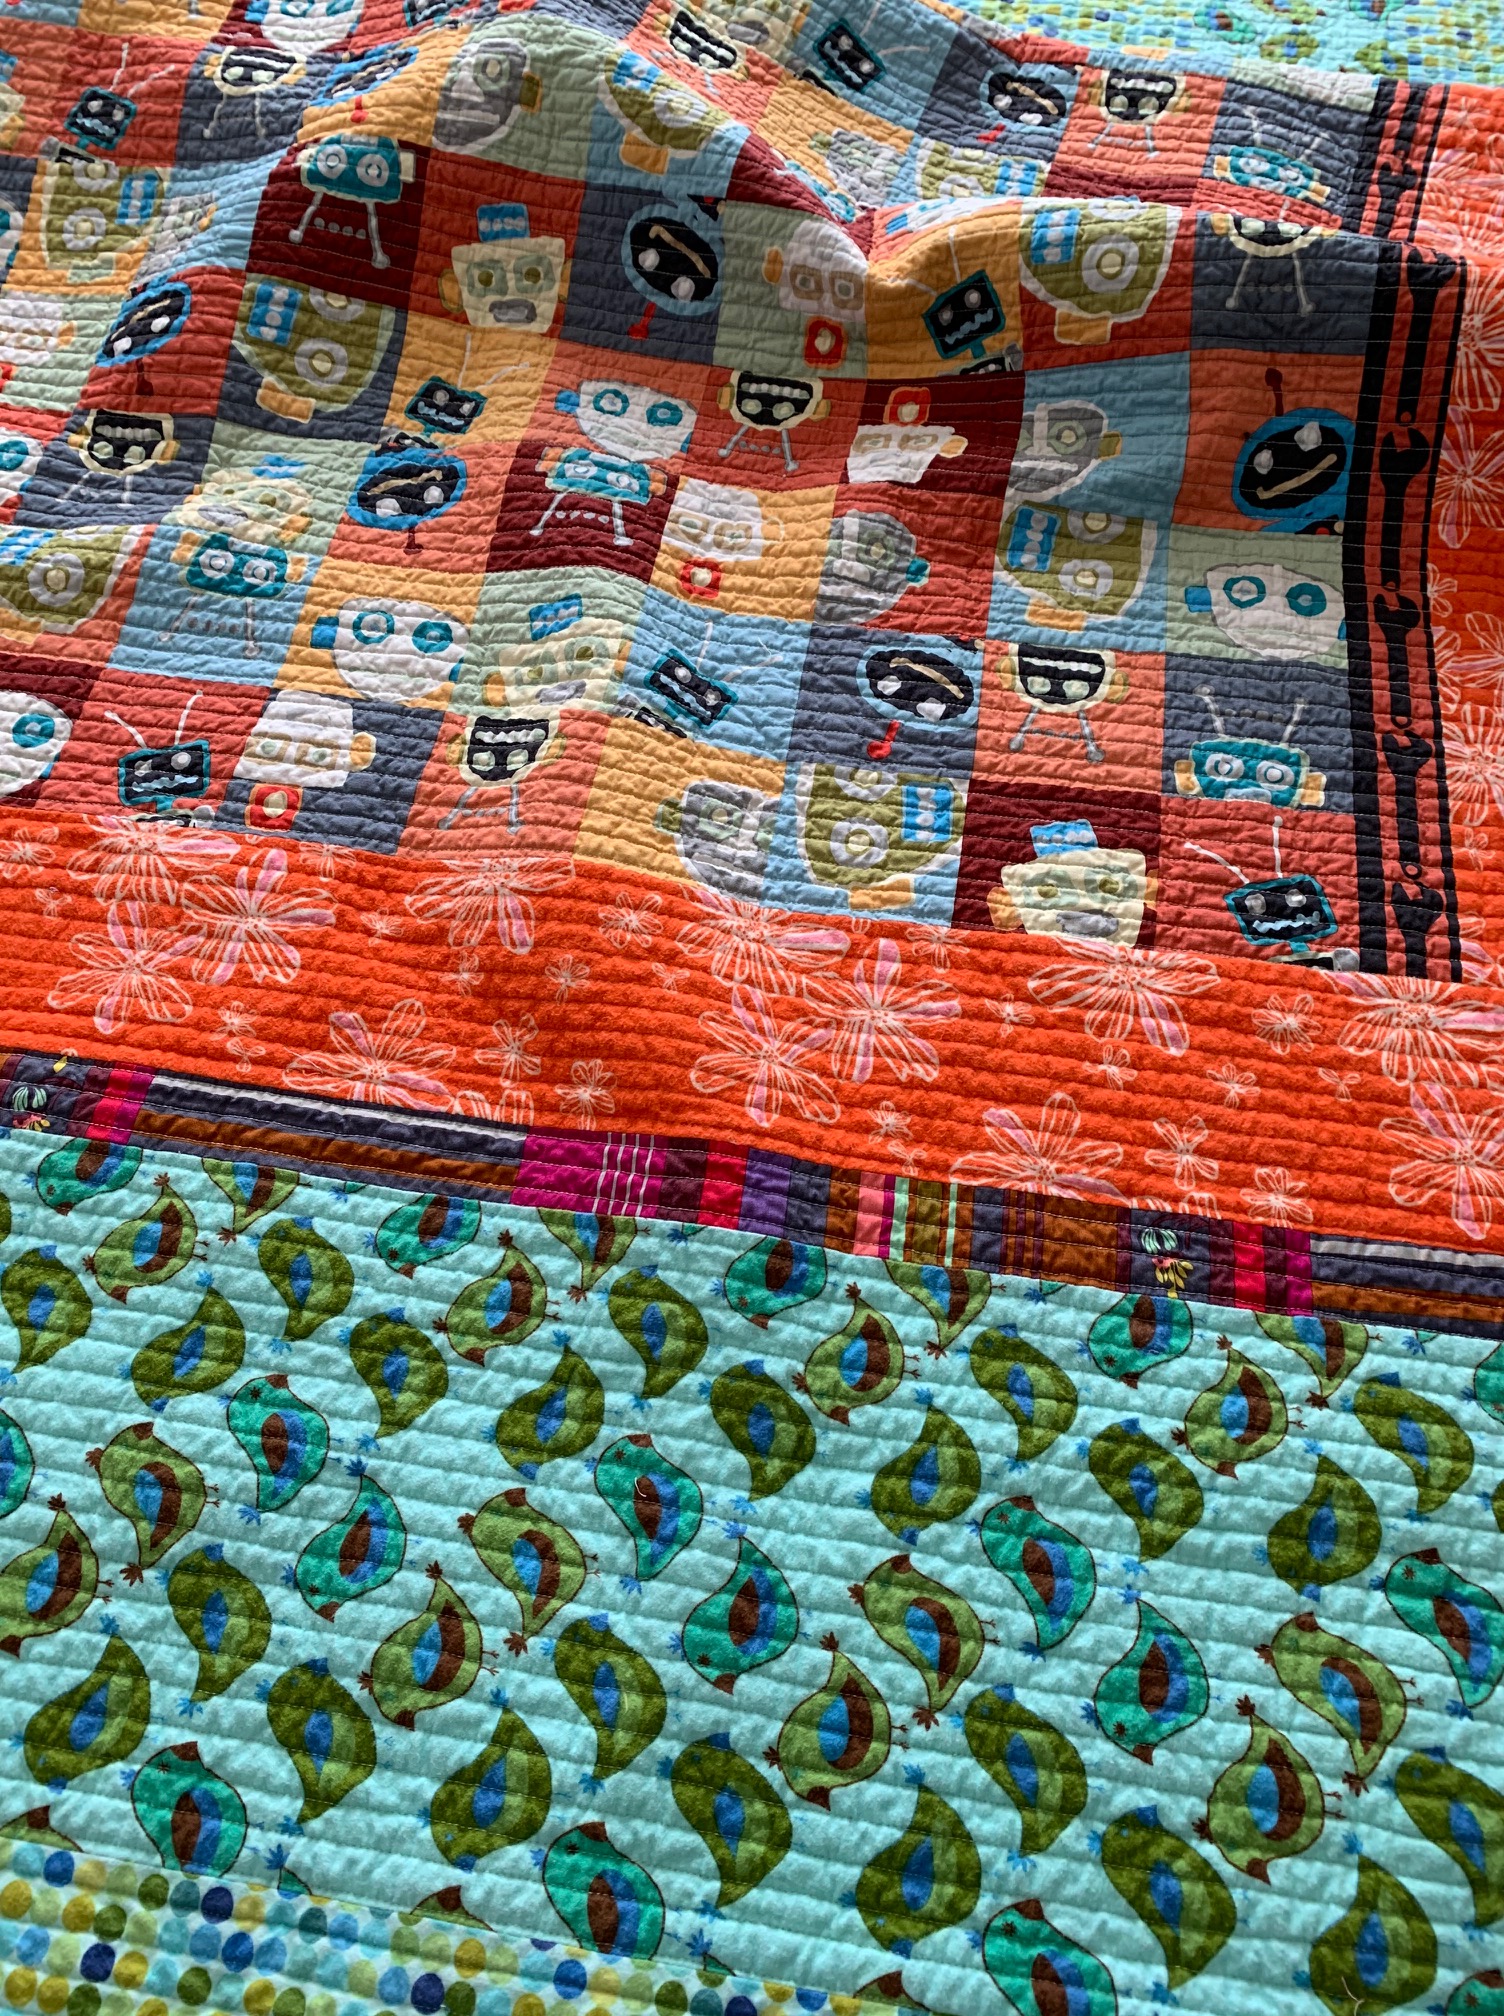

 I’m so pleased I took the time to embroider the labels. These labels will last as long as the quilt.

 It had been a long time since “The Boys” had seen the blocks, and I wondered what they would remember about their creations. But the 3 older boys wasted no time in finding their hand and favorite blocks.
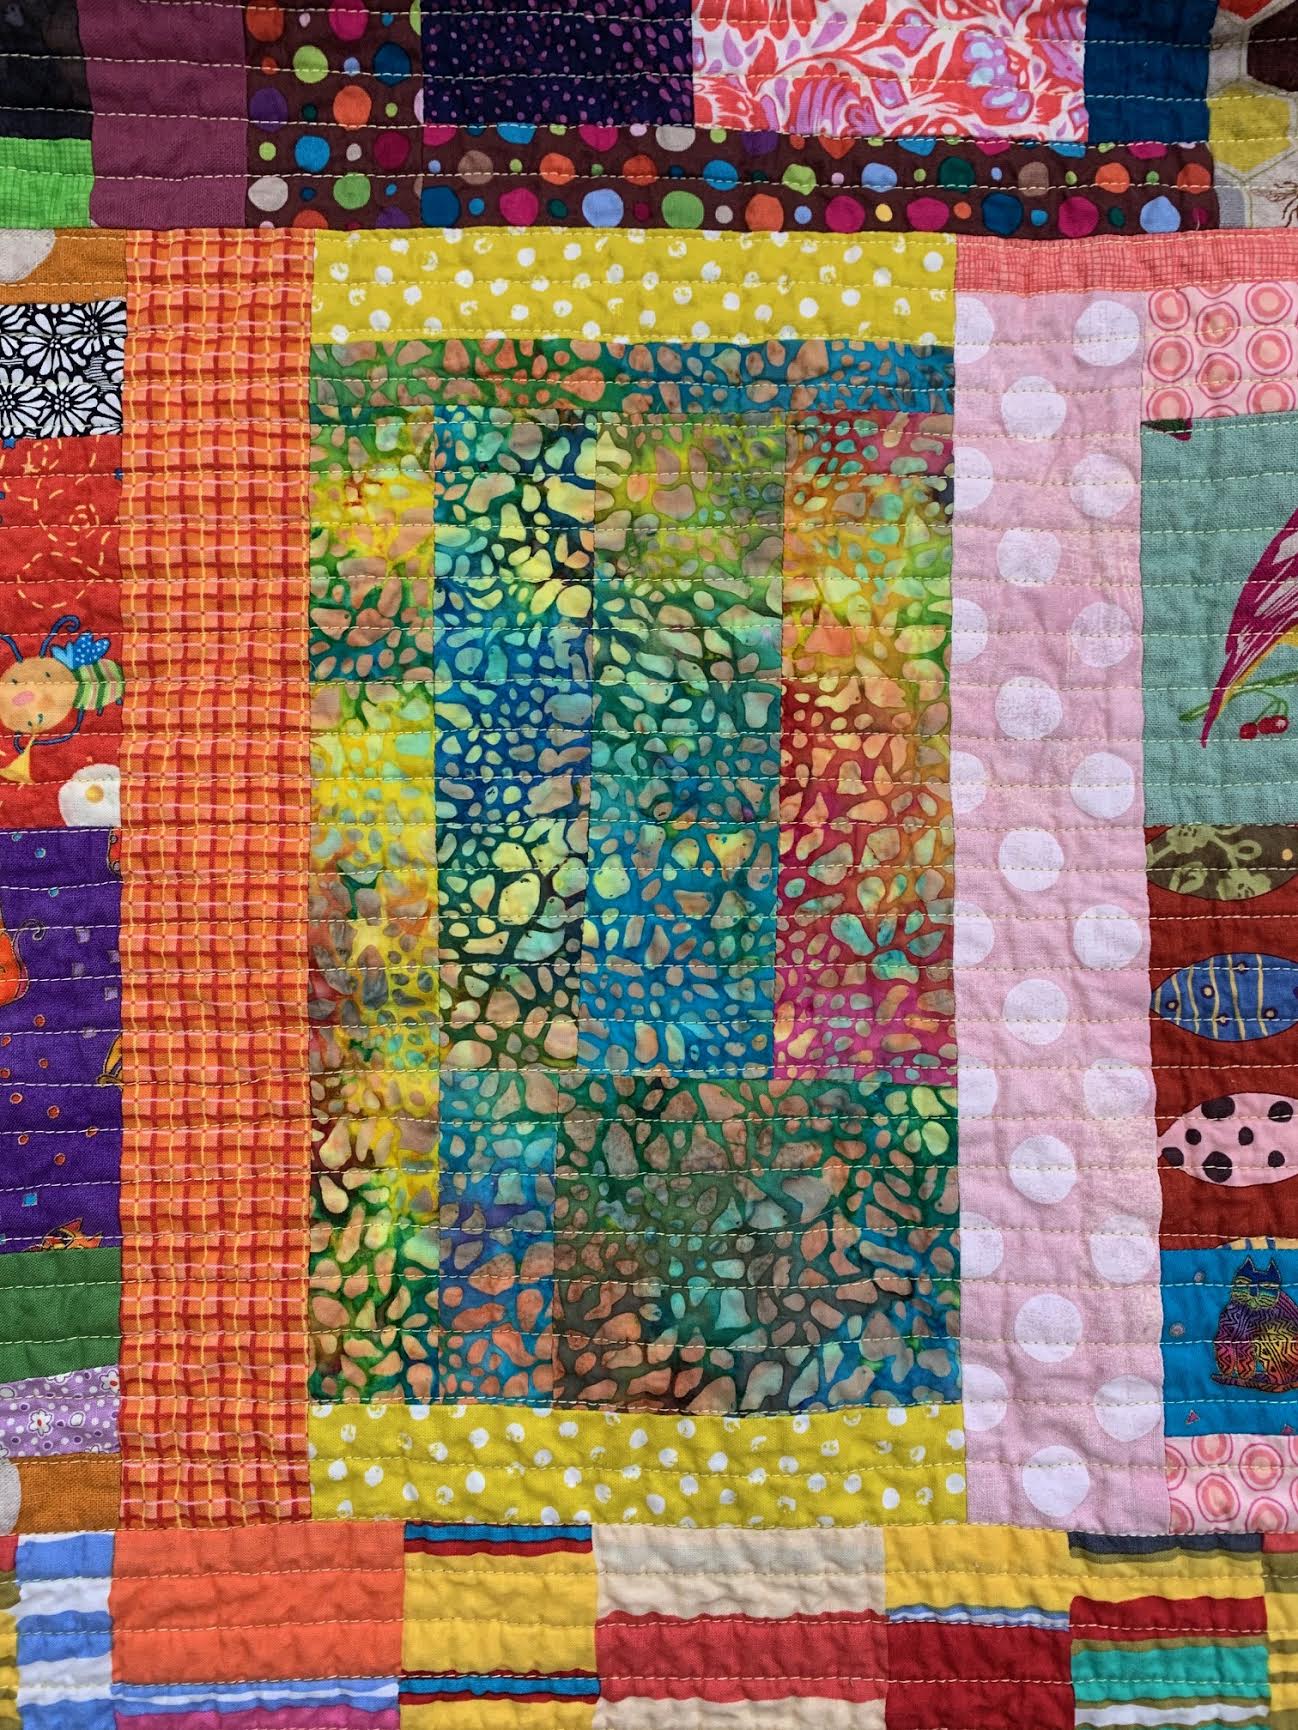 Another favorite of The Boys was this block. I think it’s graphic and moody, in a good way.
 Finally the day for the Big Giveaway came. David and I spread out several sheets on our back deck. As we watched the kids scramble around the quilt (while staying 10’ apart), some of us burst into tears while the rest became teary. This project was definitely a good thing.
 In the beginning, we were two neighbors who banded together when the state government ordered a month-long lockdown. At first, we joined forces to add something special to the daily life of “The Boys”, whose routines had changed suddenly with the Pandemic.
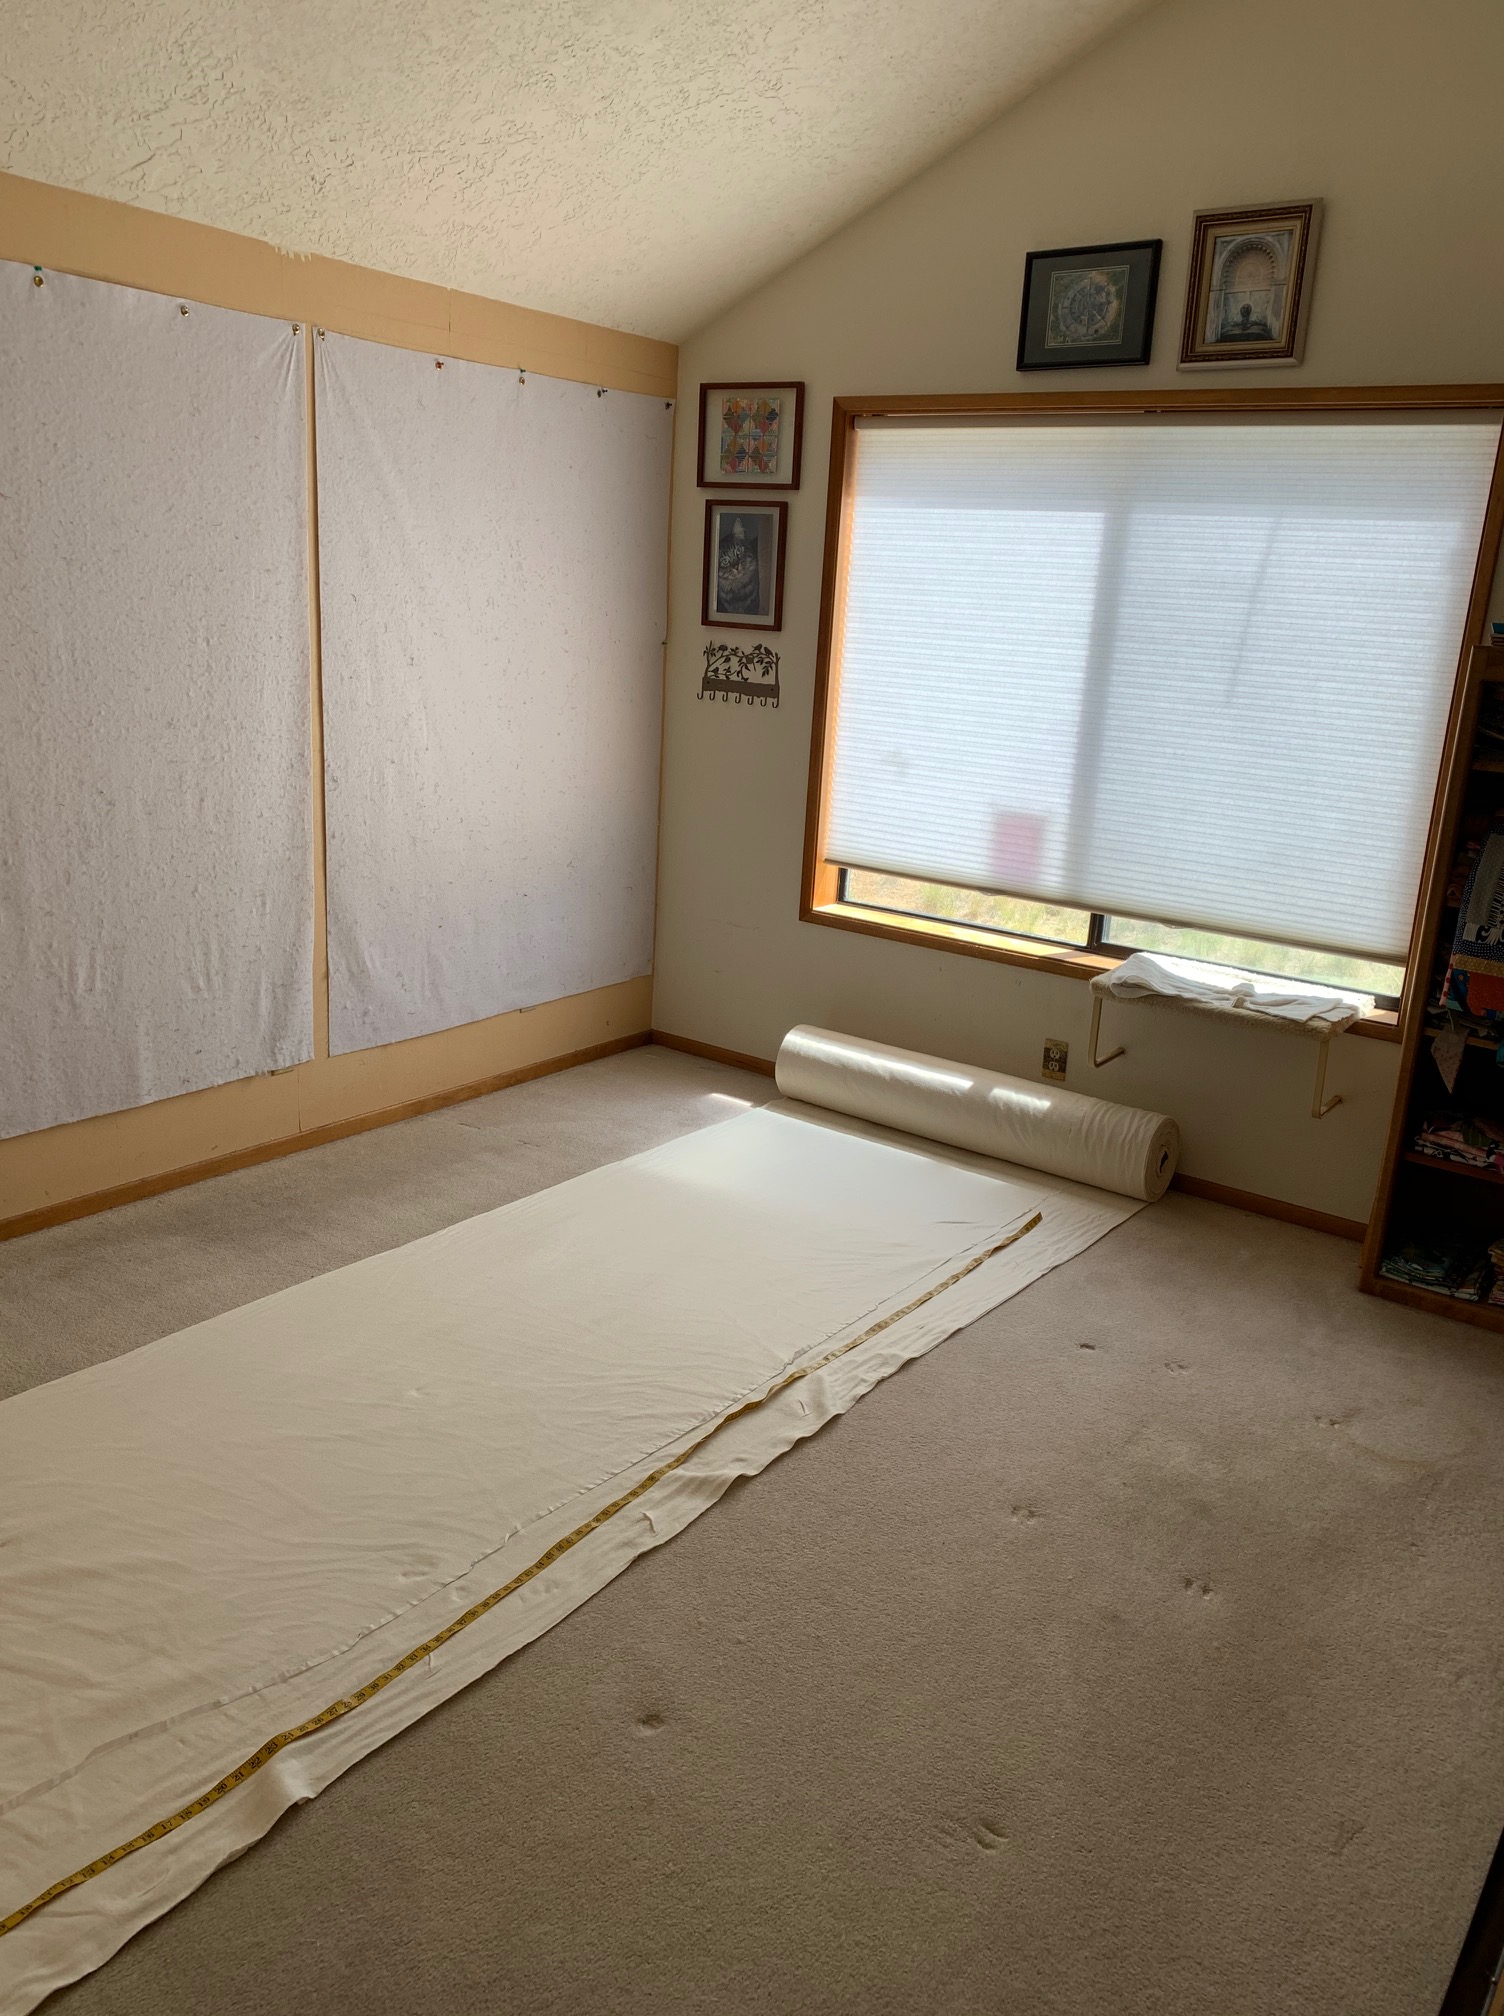
 We had to navigate the crowded hallway for a day or two, but the cats loved exploring this new-to-them space.
 With the quilt back centered on the batting, the window open, the ceiling fan on low, and paper around the edge to catch any over spray, I’m ready to baste.
 I can baste any size quilt with my “assistant”: a swim noodle. (My assistant never complains but getting up off the floor is another story!)
 Repeat to spray baste both halves of the quilt. Trim the excess batting along the fabric edge. Allow to dry for a few hours or overnight before turning over and taping the quilt to the floor.
 With both ends of the quilt rolled up to the middle, I stitched lines about 3”-4” apart with the water soluble thread, from the middle to the edge. Repeat with the other half. Re-roll the quilt in the other direction, stitching perpendicular lines about 3”-4” apart.


 With the quilt rolled up from both ends to the middle, I started stitching the roughly parallel lines, using the pressor foot as a guide. Ignore the water soluble thread lines.
 Keep quilting! The lines are actually unequal distances apart and not perfectly straight, but I like this look on a scrappy quilt.
 I used the seam lines between the rows to “square up” my parallel lines.
 Celebration! The very last line of stitching!! I zigzagged the edges and trimmed the batting before tossing the quilt into the washer and dryer. I like to let the quilt shrink at this stage, before sewing on the binding.
 Remove the quilt from the dryer while still slightly damp and allow to air dry the rest of the way.


 After folding over and pinning (or clipping) the binding in place, I hand sewed the mitered corners, about 1” in each direction from the corner.
 Flip over. From the front, you can see the basting thread: this shows you exactly where the fold is on the other side.
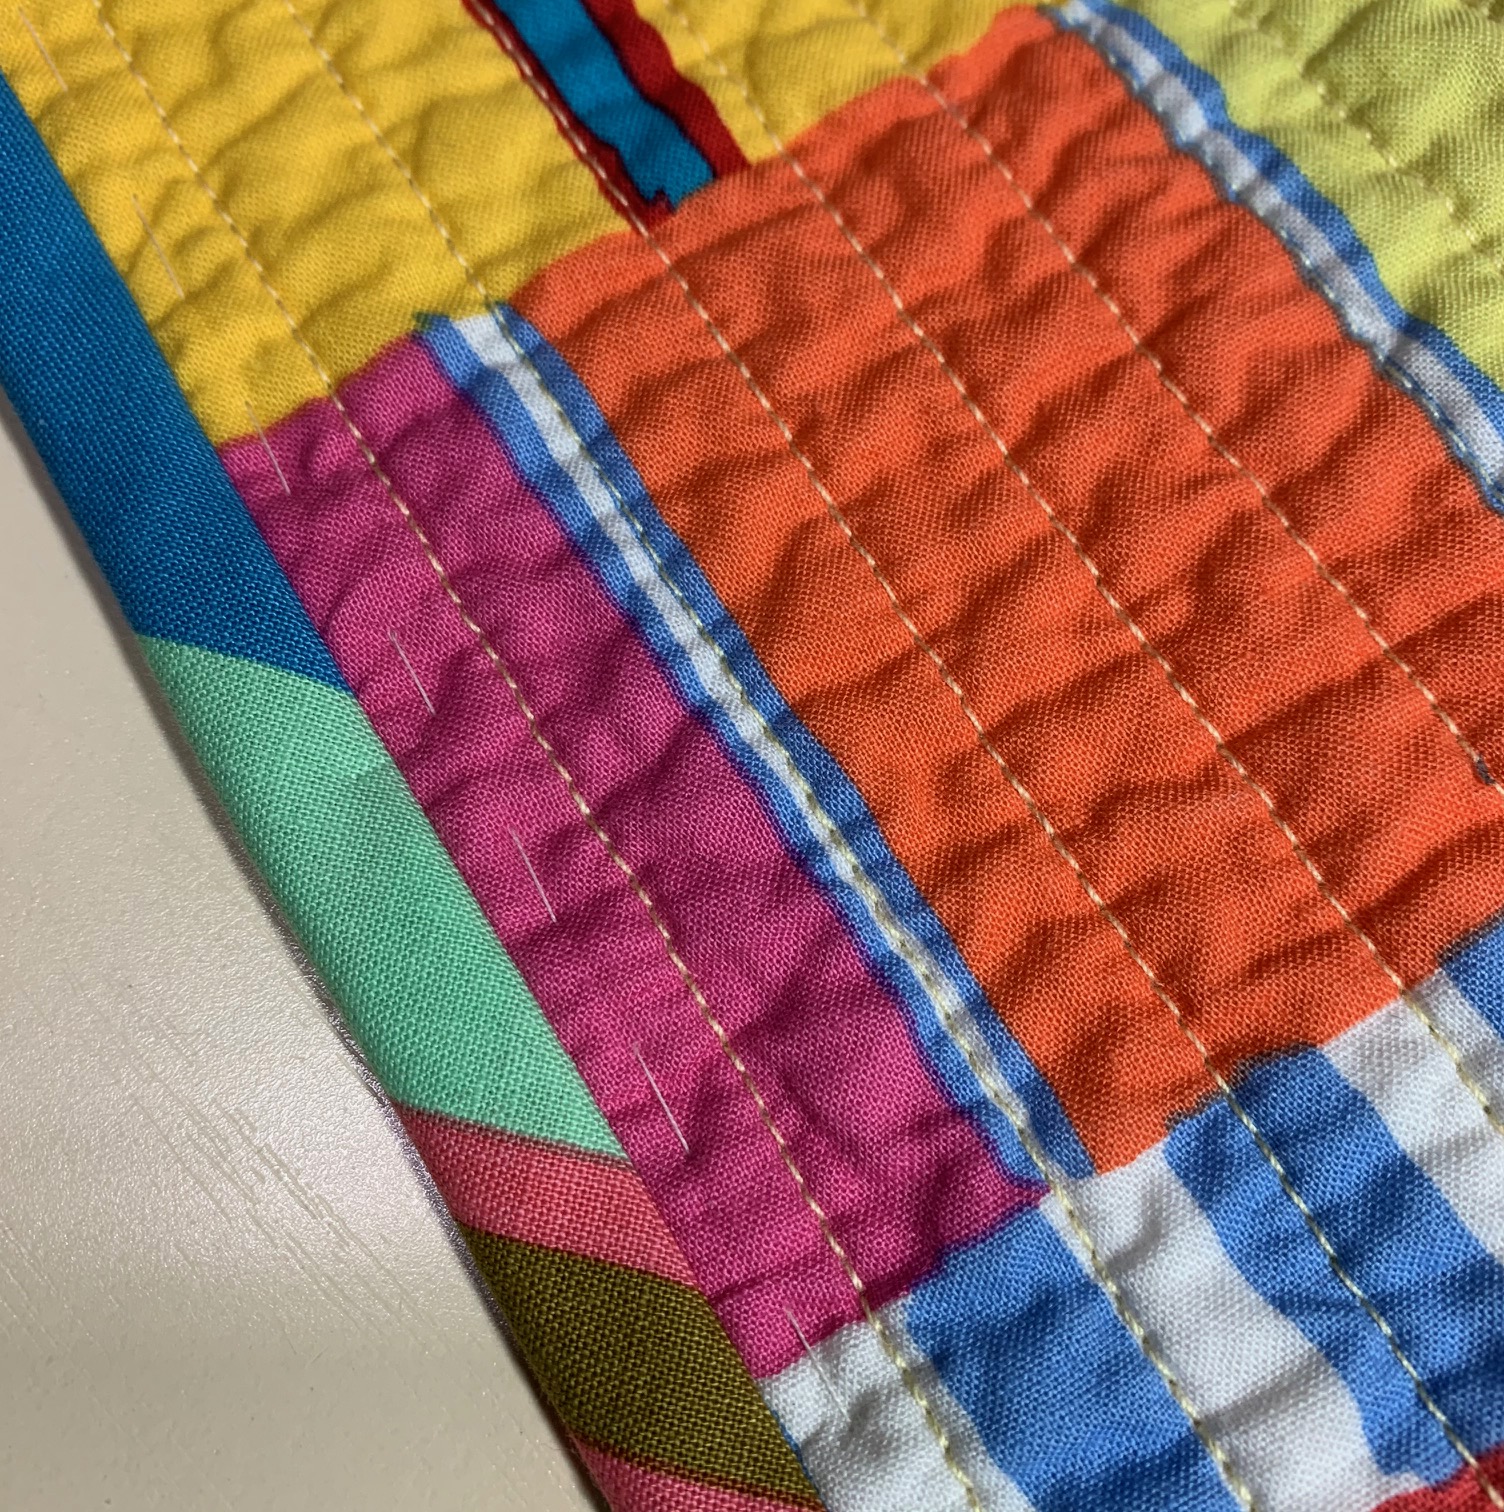 I machine topstitched the binding from the front, by stitching just to the right of the basting line. (You can stitch anywhere between the basting line and the ditch of the binding seam.)
 I removed the basting thread and checked the back to make sure the stitching line is along the edge of the binding. Finished!!!