Author: tierneycreates: a fusion of textiles and smiles
Quilter, crafter, obsessive tea drinker and lover of all furry creatures (especially dogs and cats) - join me on my tierneycreates blog as I share stories from "A Crafter's Life".
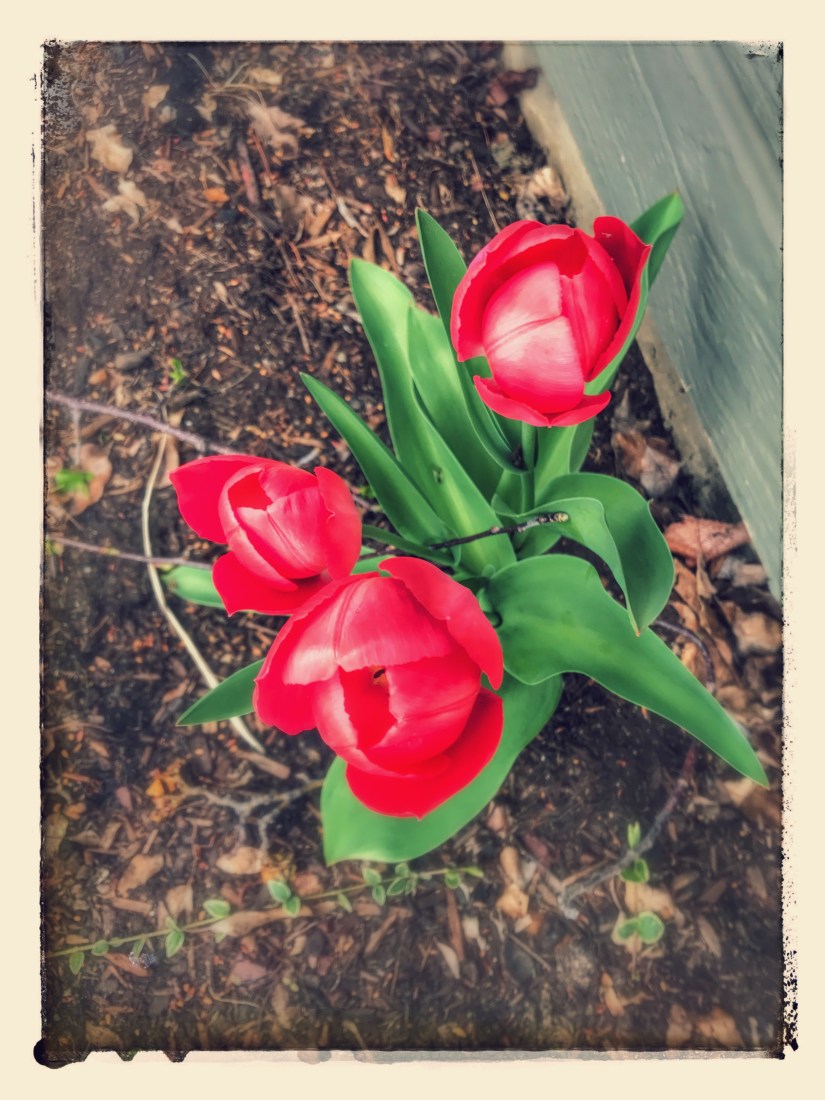
Terry the Quilting Husband (TTQH) and I just returned from an “Oregon Roadtrip”. I took this week off from work for a part “staycation” and a part explore a little more of the state of Oregon. We did a quick jaunt to Portland, Oregon and then went to the Wooden Shoe Tulip Fest in Woodburn, Oregon.
On the Road
TTQH did the driving and I got to sightsee on the road trip and work on my English Paper Piecing (EPP). I am still working on my first series/stash of hexagons (hexies) last discussed in my 02/05/17 post, Adventures in English Paper Piecing (Part II).
I am so glad I got into EPP, it is a great traveling project and very addicting. In a future post I will reveal just how many little hexies I have completed. Here is my lap during the road trip:
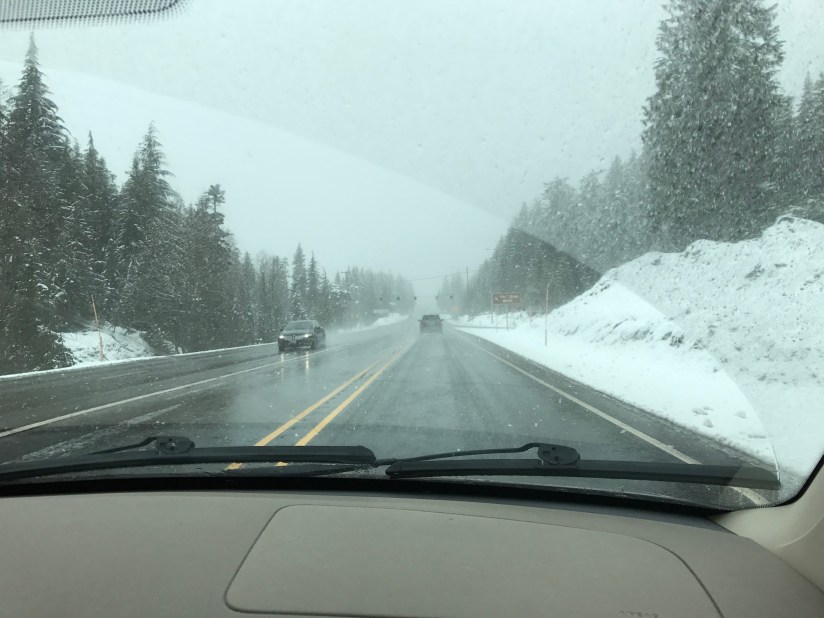
I have my coat on my lap. Why? Because of what you will see in the two images below: driving through the mountain passes (Mt. Hood area and Santiam Pass) there was snow. The photos below are from our drive back to Central Oregon, encountering snow in the Santiam Pass:
This is the price you pay when you live in the Cascade Mountain range region. Central Oregon itself is at 3500 – 3600+ feet, and when you drive through the mountain range areas to get out of Central Oregon, you are going to see some snow in the higher elevations even into late May and possibly June (Santiam Pass is at 4800 feet elevation). In the late Fall and Winter there is major snow and I will not drive to Portland from November to March. But if you like Winter sports, this place is a dream.
When we got out of the mountain passes, the weather was fine.
An interesting fact: According to Wikipedia, there are 318 mountain passes in the state of Oregon (List of mountain passes in Oregon). Some passes are above 7000 feet elevation! When you drive around Central Oregon, all you can see is mountains, mountains, mountains!
Craft Book Heaven (and Overload)
While in Portland, Oregon we spent an afternoon in Powell’s Books: The World’s Largest Independent Bookstore. Their book inventory exceeds 2 million volumes and I cannot begin to describe how large a bookstore it is – there are many levels and sections, assigned different colors. There is a map to the store and you can definitely lose someone in the store if you are not browsing together (thank goodness for cellphones!)
Their craft book section is mind-blowing and I spent an hour in there browsing while TTQH spent who knows how long in the Military History book section.
I could have spent days in this section, ha!
After my browsing, I took at stack of books to the coffee shop inside the bookstore and nested there with my cup of tea until TTQH joined me. I did not buy the all the books in my stack (because I did not need them, but they were fun to look at).
I did buy one book:
Photo credit: Amazon.com
TTQH left Powell’s with a military history book that had been on his radar for a while.
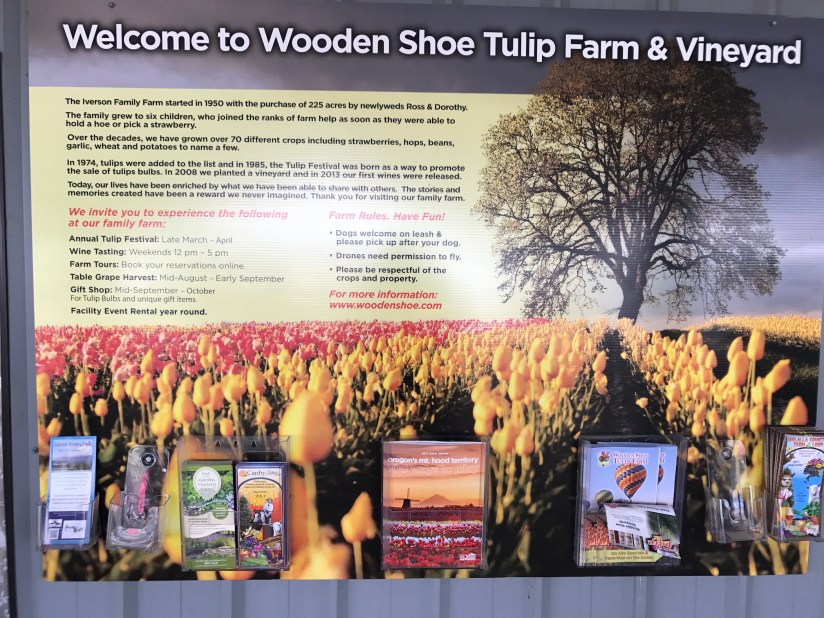
Tulip Festival & Tasty Meal
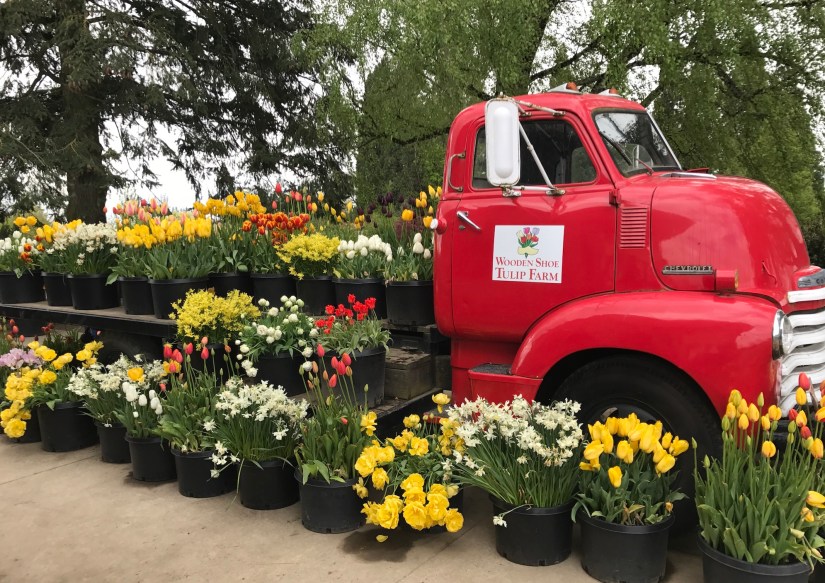
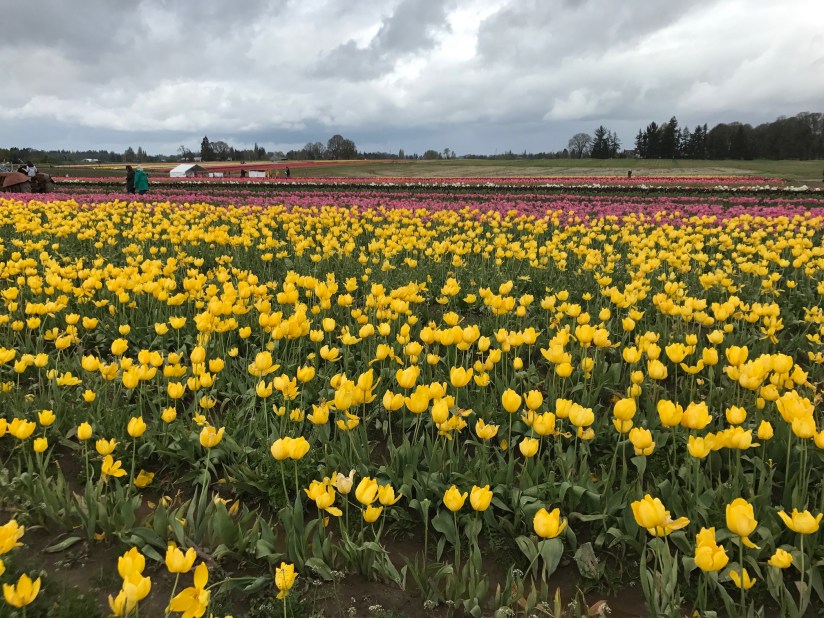
After our Portland visit, we headed to Woodburn, Oregon to stop at an outlet shopping area that TTQH likes to buy his favorite sneakers (Converse). While at the outlet mall, someone handed us a flyer on the Wooden Shoe Tulip Fest in Woodburn, Oregon. We decided, spur of the moment, to head there next.
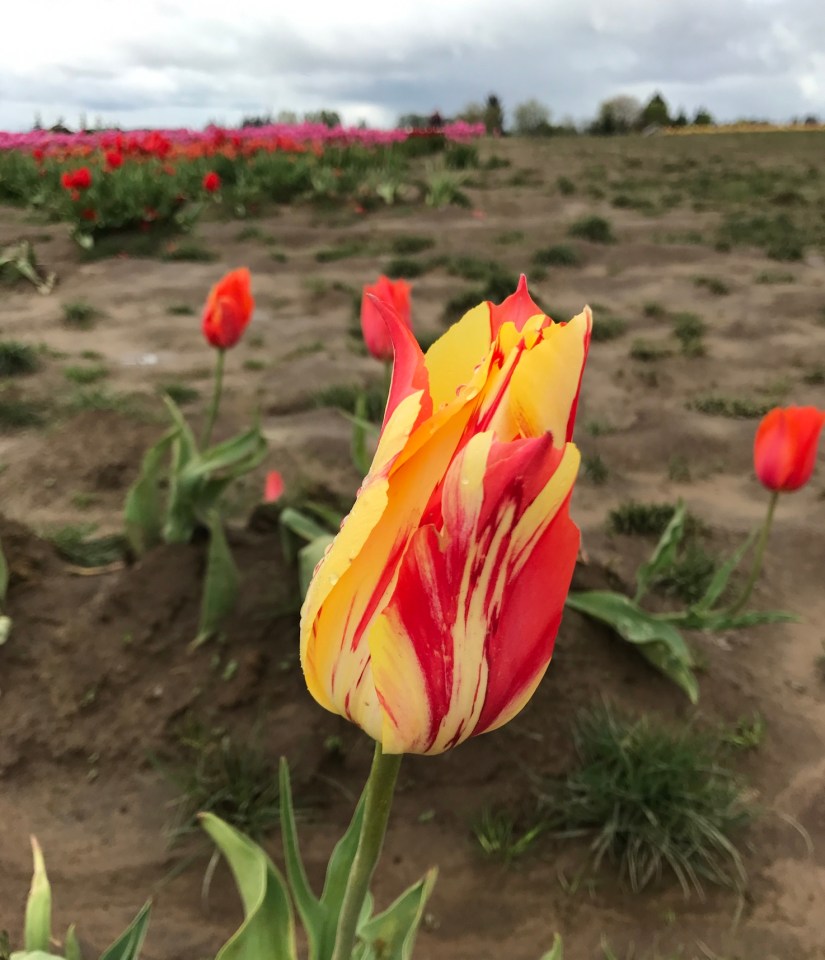
This was my first tulip festival. I took a ridiculous amount of photos and here are some of my favorites:
The photo above, which I also used as a feature photo for this post, is my absolute favorite. This tulip variety was also my favorite of all the spectacular tulips we saw at the fest. I have many photos of individual tulips – I went a little overboard in taking photos, caught up in the moment of visual splendor overload!
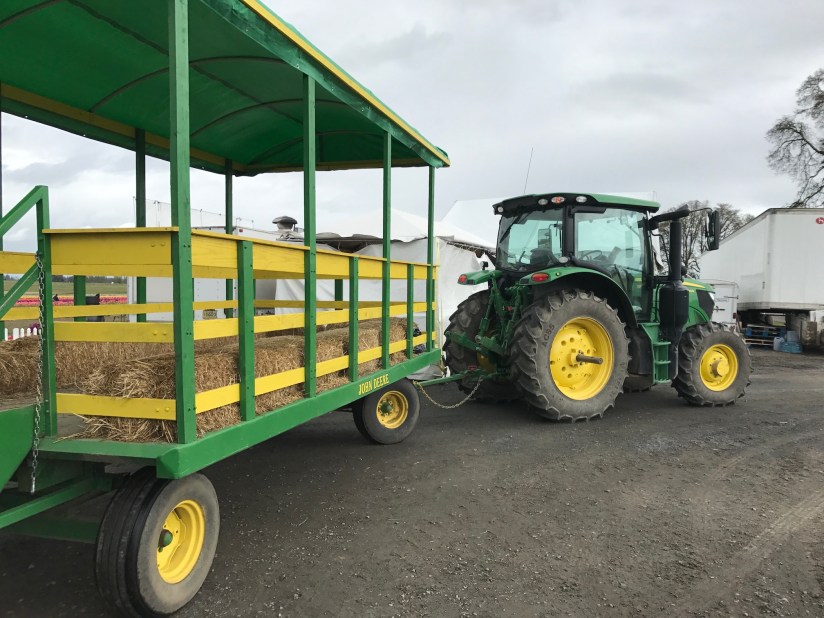
While at the Tulip Fest, we went on a hayride around the festival and walked all the tulip fields (to be honest, after a couple hours we were burned out on tulips – ha!)
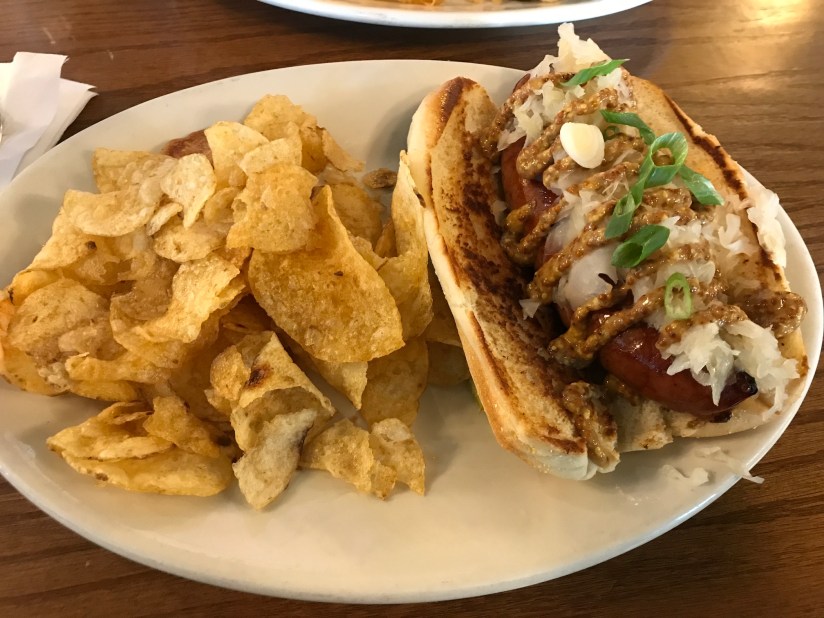
After the tulip festival, we went to eat at the Glockenspiel Restaurant in Mt. Angel, Oregon. It was mentioned in the Tulip Fest flyer and I had recently heard of it in the latest edition of Via Magazine (the AAA Travel Magazine for auto club members).
The Glockenspiel Restaurant is a German food eatery, which has a working glockenspiel mounted on it’s exterior which performs at various times during the day. We missed the most recent performance but I did find a YouTube video of what it looks like:
Or should the post title be: “For Lovers of Yarn”? Either way, here is a post for people who love yarn and/or knit, crochet, spin, weave or other fiber arts involving yarn.
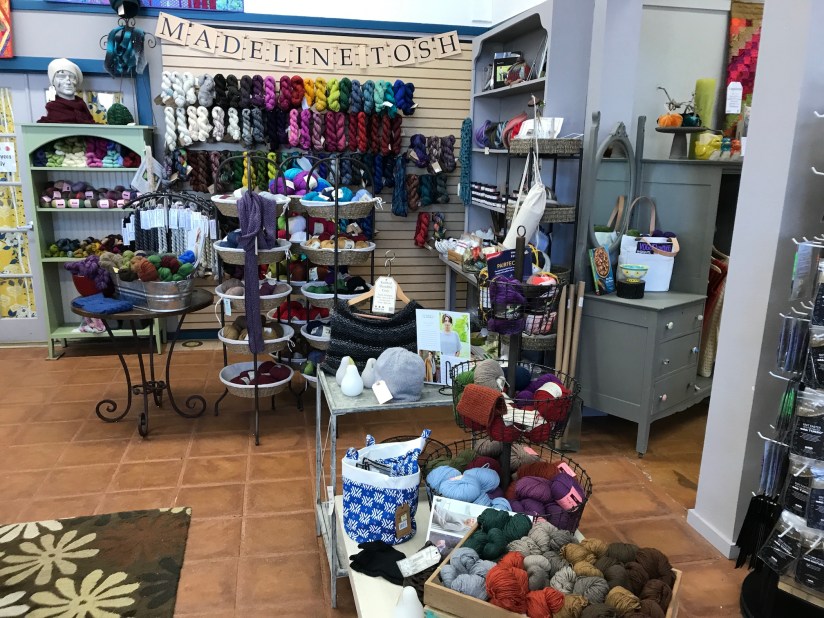
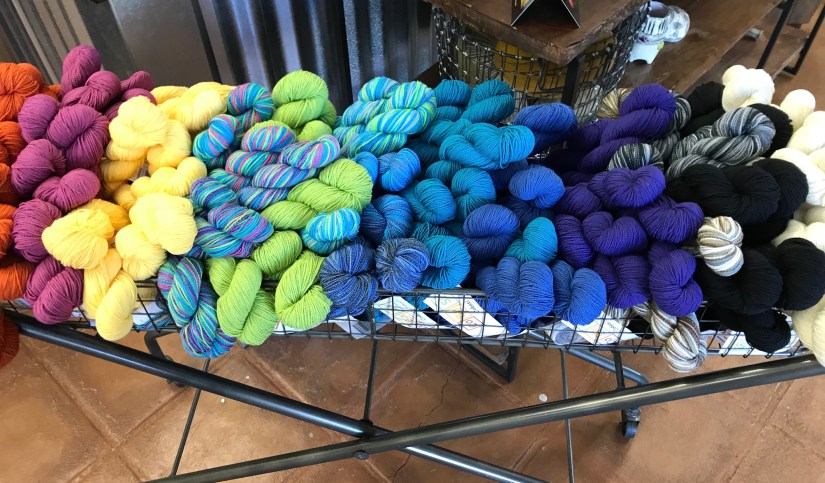
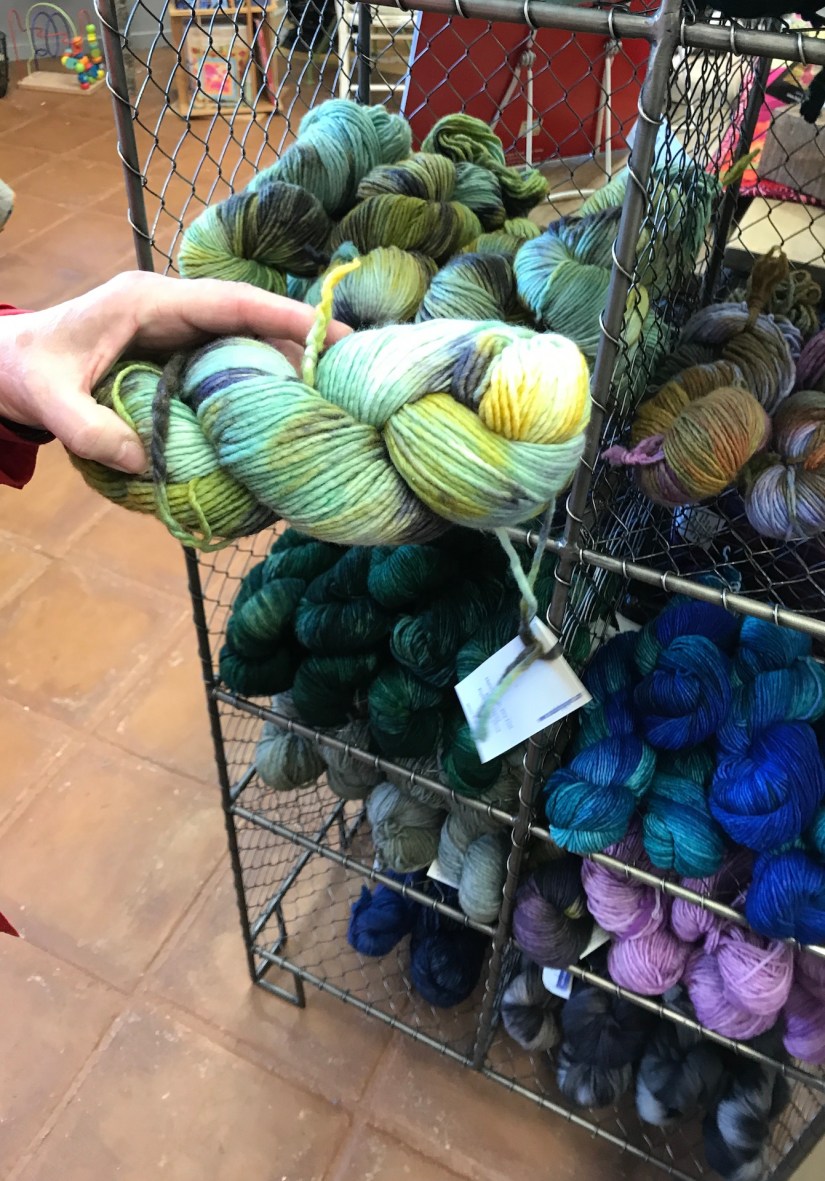
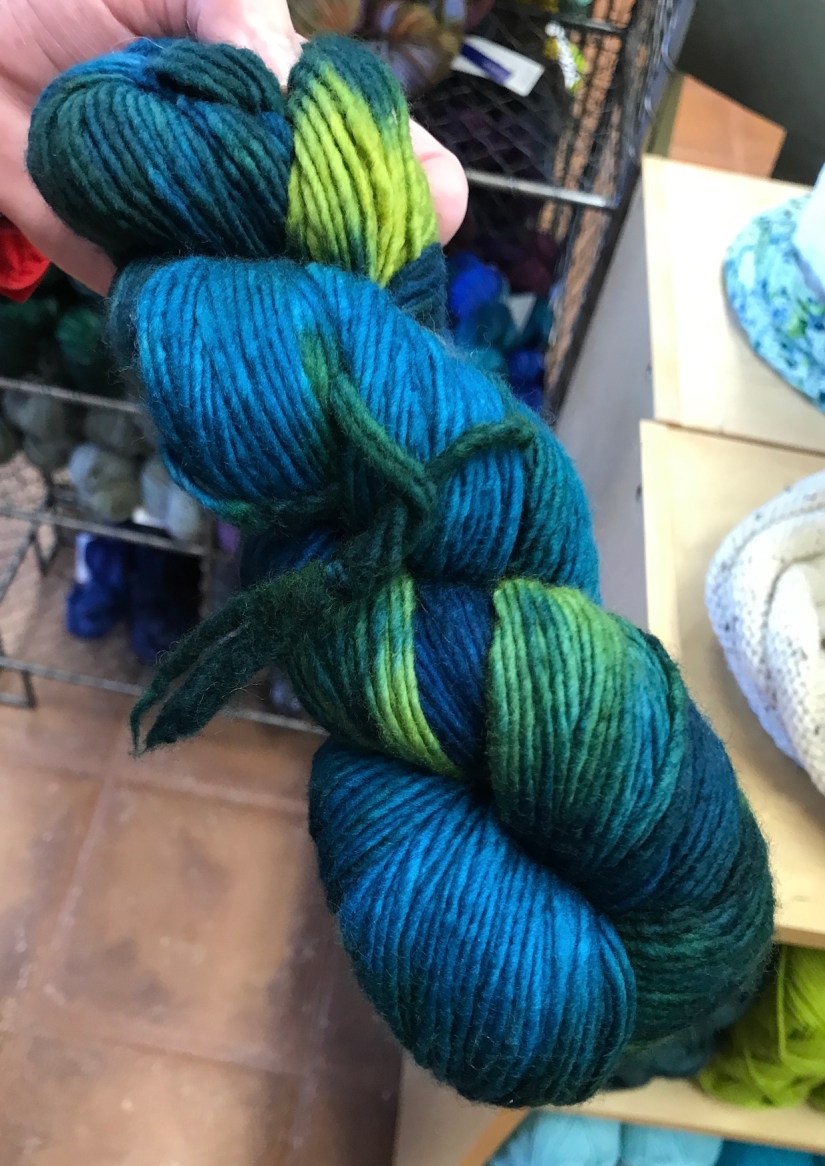
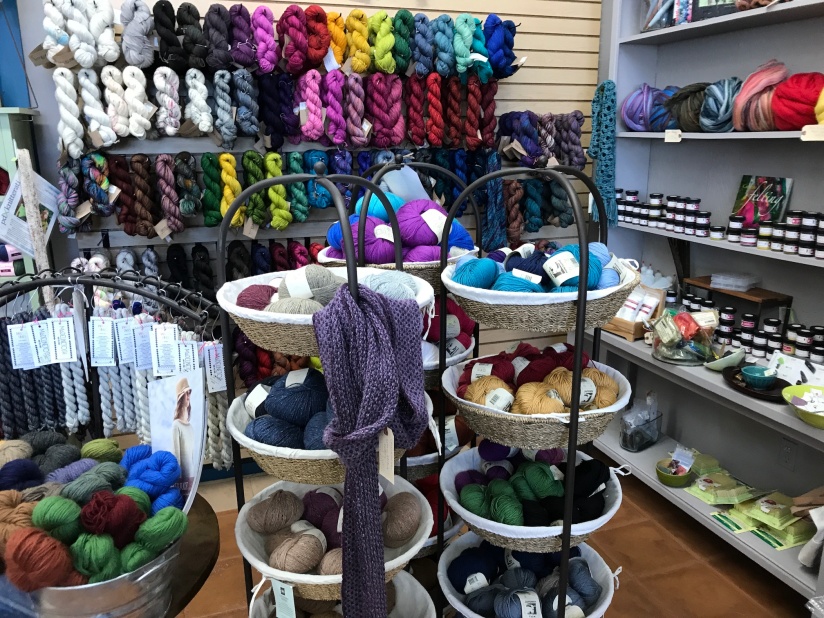
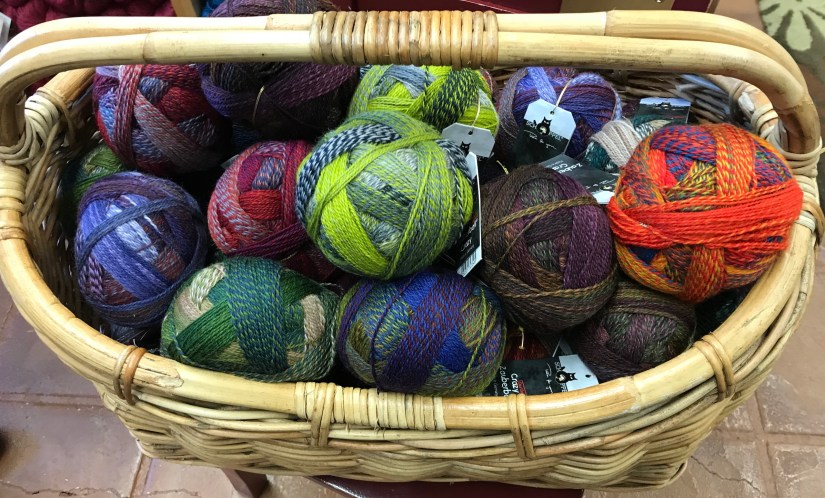
Last Thursday I was at the Stitchin’ Post in Sisters Oregon for our monthly art quilter group meeting. Before the meeting, I wandered around the shop “ooh-ing and ahh-ing” at all the treats for purchases (fabric, yarn, notions, art, books, etc.). The yarn department/section seemed exceptionally lovely this visit (I think they re-organized the shop), so I took photos to share with my yarn-loving readers!
Yarn Department, Stitchin’ Post
My friend Pat was kind enough to be the hand model in several of the photos.
If you are every in Central Oregon and you are a quilter, knitter, crocheter, or any type of fiber arts crafter I highly recommended a visit to this shop!
Before I get to the update on my quilt, Happy Ending, I wanted to recommend a blog if you are an antique sewing machine aficionado: Vintage Sewing Machines.
Elena, a couture tailor, shares photos and stories about her incredible vintage sewing machine collection; and a lot of educational information about the workings of sewing machines. Reading her blog I have gained a huge appreciation for the beauty and mystery of vintage sewing machines!
This post is a follow up to a quilt discussed in my What’s on the Design Wall series of posts, Happy Ending.
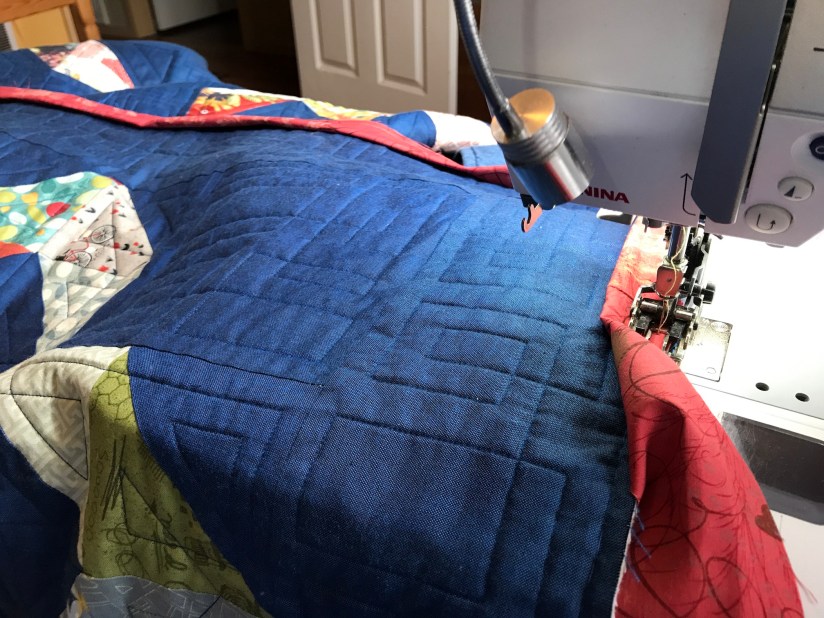
In my post A Happy Ending for “Happy Ending”, I shared that I received my Happy Ending quilt in the mail from the long-arm quilter, Cindy Anderson, of A Quilter’s Corner with Cindy Anderson (inastitchquilting.com), and it was time to put on the binding and finish up the quilt.
Slogging through the binding
How do you feel about binding a quilt? I am torn. On one hand, it is exciting because the quilt is nearly done; and I enjoy snuggling under the quilt as I sew down the binding. On the other hand, I find it tedious and irritating and want it to be quickly done.
My desire to have my binding quickly done was evidenced in my early quilts which had sloppily sewn binding. If these quilts were still in my possession, over the years I have either replaced the binding completely or unstitched the hand sewing on the binding and restitched the bindings.
It seems like there are so many steps to binding a quilt:
Creating the binding
Sewing the binding strips to the quilt
Selecting the thread to hand stitch the binding down
Stitching the binding down
After stitching enough 2.5 ” strips together to encompass the entire perimeter of the quilt, it all begins with sewing down the binding:
Here is the quilt with the binding sewn onto it, waiting to be hand stitched down (now comes the opportunity for major procrastination to set in):
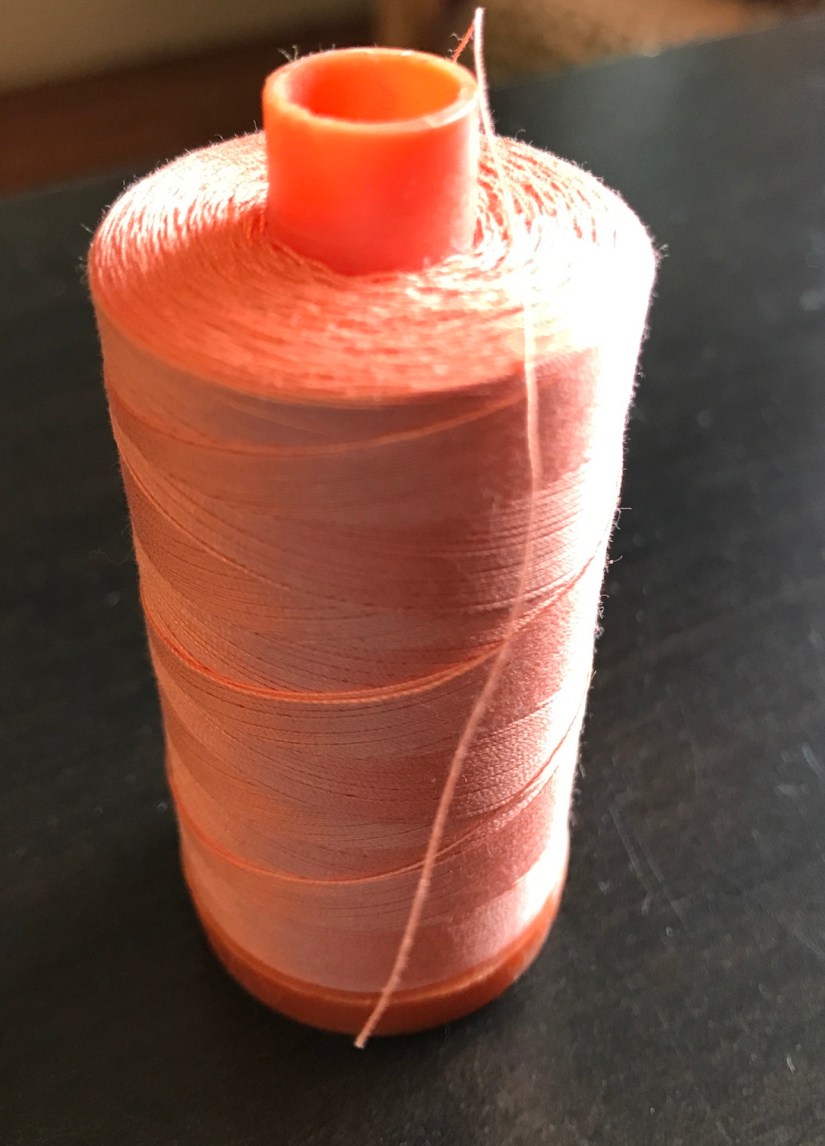
The thread I selected for hand stitching the binding to the back of the quilt (I usually select a lighter thread that will blend):
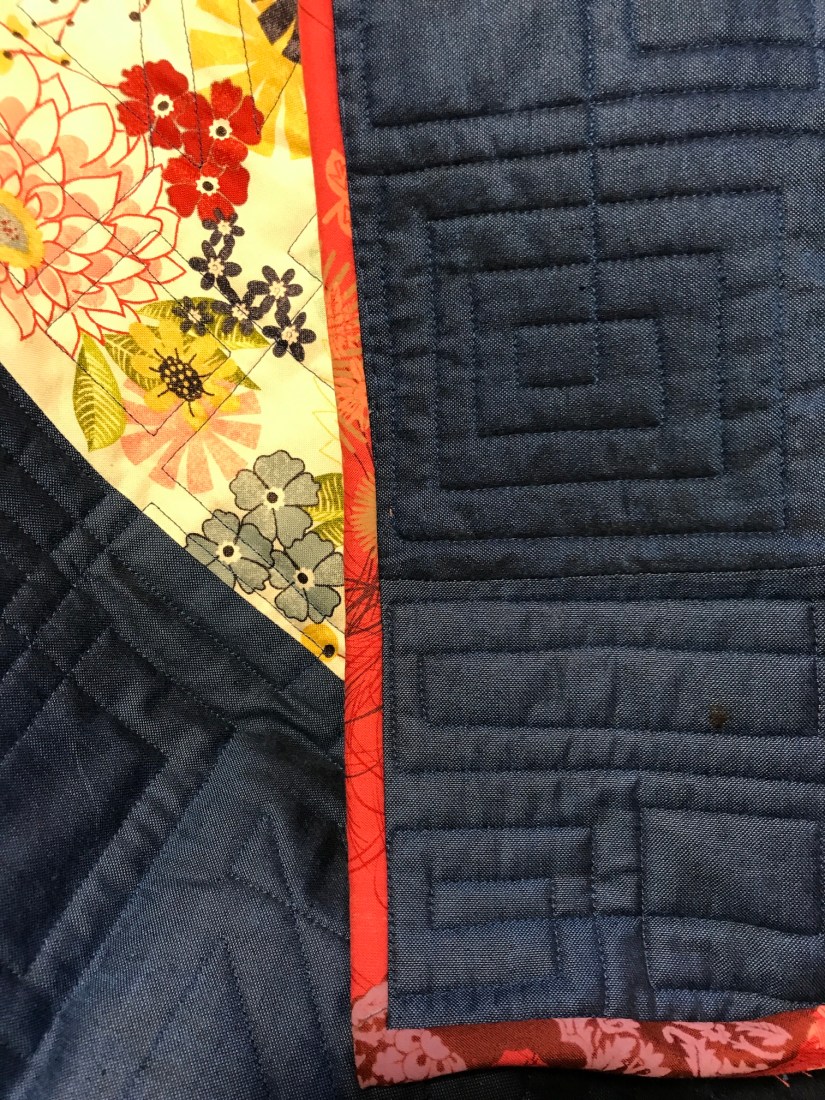
Finally the hand stitching is done and the quilt is complete:
It’s done, it’s finally done! (The Reveal)
Terry the Quilting Husband holding up the quilt for its quick photo shoot:
I want to put it on the bed, but our miniature schnauzer Mike thinks there are “snakes in the bed” and has to scratch and spin before laying down. So for now I will keep it on the back of the sofa and put it on the bed on special occasions:
In my 08/25/16 post, Artist Statements, I shared my struggle with writing Artist Statements for art quilts. In my more recent (03/30/17) post, What’s on My Lap, I again mentioned my struggle with writing Artist Statements, and Mary ofZippy Quiltsshared the following:
I could not turn down a suggestion for a blog post!
In my first post in August 2016 on Artist Statements I only whined about having to write an Artist Statement and then shared my completed statement for a piece that was being shown at the 2016 Pacific International Quilt Festival (PIQF).
This time I thought I would do something more than whining!
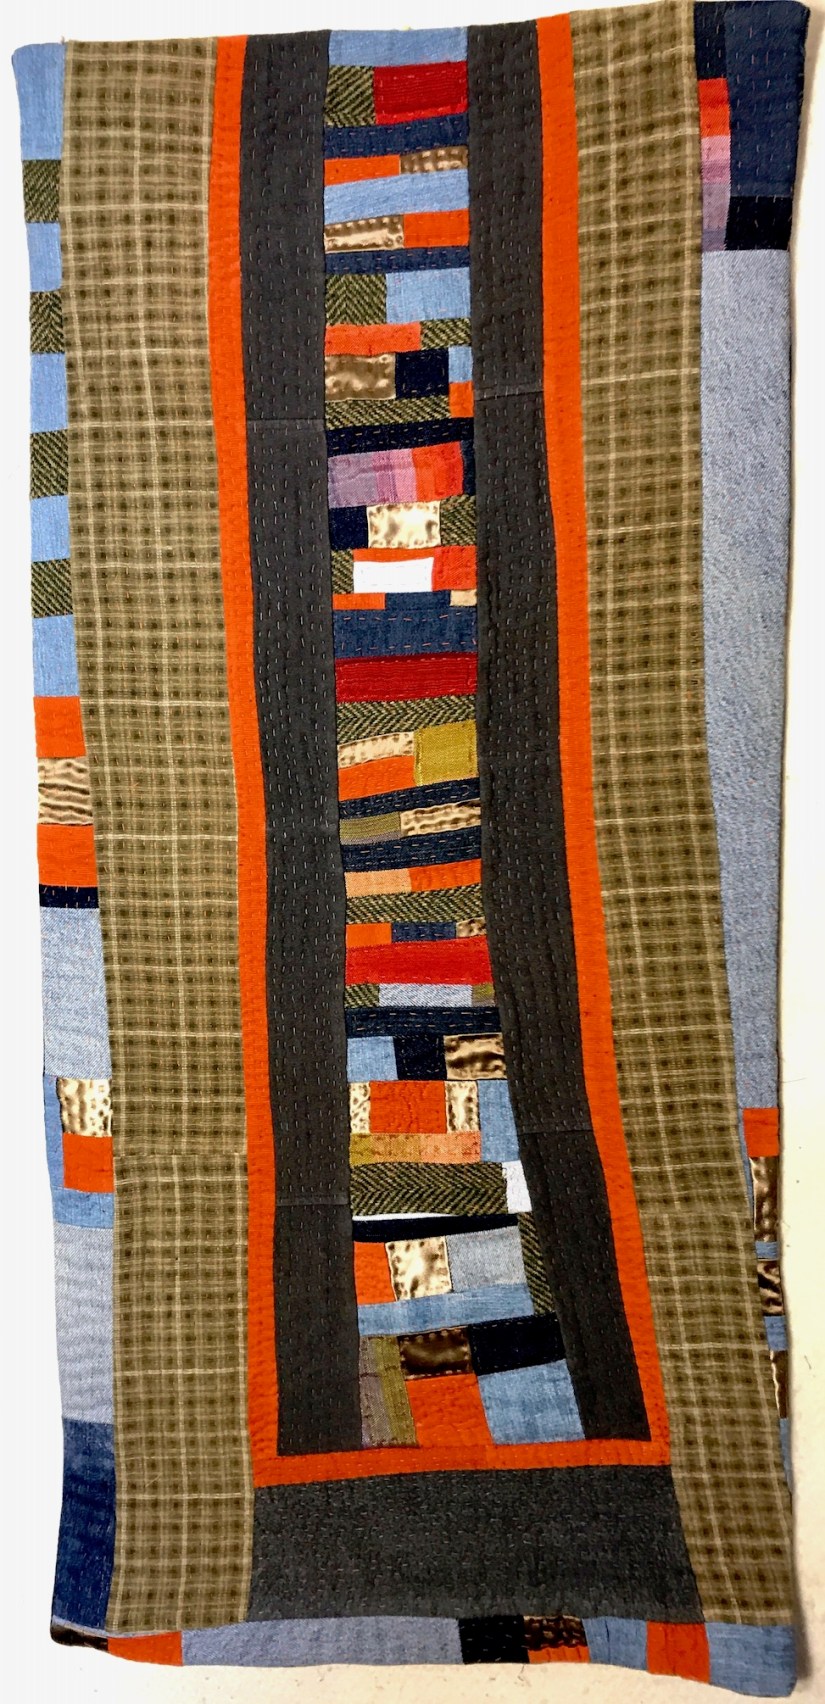
So I spent time researching information about writing Artist Statements and used that information to write the Artist Statement for this piece below – The Recycled Road:
The Recycled Road (2017) by Tierney Davis Hogan
Here are the basic details on The Recycled Road, I will use these later in the post to write my Artist Statement for this piece:
It is made from recycled materials: denim jeans, corduroy pants, corduroy shirt, curtains, sweat pants, home decor fabric scraps, and a tweed jumper
The art quilt is the second in quilt in my series The Recyclings (yesterday I decided the name of my series)
I hand quilted this quilt to give it an organic feel
This quilt was inspired by the Central Oregon SAQA (Studio Art Quilt Associates) group annual exhibit theme “Pathways”.
The piece measures 18″ x 40″
I hand quilted the quilt to give it an organic feel
General Artist Statement vs. Artist Statement About A Work
A bit of research reinforced what I heard in the art quilting community – that there are basically two types of Artist Statements: 1) A general statement about you as an Artist; or 2) a statement about a specific piece of artwork.
General Artist Statement
A couple of years ago at one of our Central Oregon SAQA group meetings, we broke into small groups to do an exercise to work on our (General) Artist Statements, the about our art and ourselves as an artist.
I was overwhelmed by this exercise for several reasons: 1) Our Central Oregon SAQA group contains many real textile artists and art quilters – I mean nationally and internationally known artists – I was completely intimidated; 2) I was a new art quilter, recently transitioned from traditional quilting to dabbling in improvisational art; and 3) I was not sure if I could really consider myself an “Artist”.
Several experienced art quilters in the group shared with me examples of their professional artist Artist Statements, which I politely accepted and graciously thanked them for sharing, but it only intimidated me more (it was a “deer in headlights” experience).
A couple months later, I realized I was just not ready to write my General Artist Statement, and that was okay. I had not established what I feel is a solid and cohesive body of textile art. Currently I am working towards this and in the near future I hope to write my General Artist Statement.
I found some great resources online for writing General Artist Statements that I will use in the future, here are the links:
One of my favorite discoveries on advice on writing General Artist Statements was the article “The Artist Statement & Why They Mostly Suck” on the website bmoreart.com. I loved this quote:
“A good artist statement should enhance what a viewer sees in your work and provide a concise handle to approach a visual piece. It should be accurate, well-written, and correctly punctuated. It also should be specific to your work and offer unique insight into your process.”
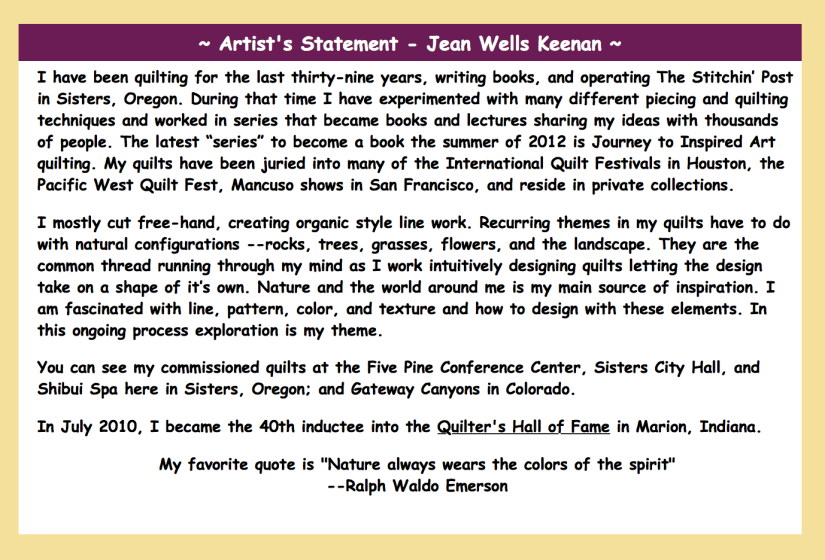
Jean Wells Keenan, textile artist, has a wonderful example of a General Artist Statement on her website jeanwellsquilts.com:
Artist Statement About A Specific Work
It is my goal/dream someday to write a well-crafted General Statement about my body of work and how I approach my art, someday. For now I am just trying to write an Artist Statement about a specific art quilt.
So I searched online for inspiration on writing Artist Statements specific to a piece of work. At ArtsyShark.com I found these helpful tips in the article: “How to Write an Amazing Artist Statement” that could be applied to either General Artist Statements or an Artist Statement on a specific piece of art:
Here are some tips to keep in mind when writing your artist statement:
The ideal length is one to three paragraphs.
It should be in first-person.
You should not tell your audience how to feel or what to look at.
You want to inform your viewer but not overly explain things – leave room for the viewer to make his or her own connections.
Ask yourself: Is this writing specific to my work or can it be about anyone’s?
Don’t use phrases like: I hope, My work aspires to, My goal is, The Viewer will, These paintings (do something).
Remember: The key to an amazing statement is to write A LOT, then edit, edit, edit. You should go through at least 3 drafts. This is not something you can do in an evening – it’s going to take time, so find the best time of day that works for you to write, such as over morning coffee. Write in a way that feels comfortable – type or write long hand.
My favorite guideline I discovered online for writing an artist statement for a specific piece of art, was from the website hysterically named – Getting Your Sh*t Together: making life better for artists (gyst-ink.com). Here are highlights from this websites had the following Artist Statement Guidelines:
An Artist Statement is a general introduction to your work, a body of work, or a specific project.
It should open with the work’s basic ideas in an overview of two or three sentences or a short paragraph and then go into detail about how these issues or ideas are presented in the work.
You can include some of the following points:
Why you have created the work and its history.
Your overall vision.
What you expect from your audience and how they will react.
How your current work relates to your previous work.
Where your work fits in with current contemporary art.
How your work fits in with the history of art practice.
How your work fits into a group exhibition, or a series of projects you have done.
Sources and inspiration for your images.
Artists you have been influenced by or how your work relates to other artists’ work. Other influences.
How this work fits into a series or longer body of work.
How a certain technique is important to the work.
Your philosophy of art making or of the work’s origin.
The final paragraph should recapitulate the most important points in the statement.
Ask yourself “What are you trying to say in the work?” “What influences my work?” “How do my methods of working (techniques, style, formal decisions) support the content of my work?” “What are specific examples of this in my work” “Does this statement conjure up any images?”
Consider – Who is your audience? What level are you writing for? What will your statement be used for? What does your statement say about you as an artist and a professional?
Okay, Ready, Write (The Draft)
I could have spent all day online looking at examples of Artist Statements, but now it is time to write my draft statement for the piece The Recycled Road:
The Recycled Road (2017)
18″ W x 40″ L
Recycled denim, corduroy, cotton jersey, wool and rayon.
Designed, pieced and hand quilted by Tierney Davis Hogan
Artist Statement (draft)
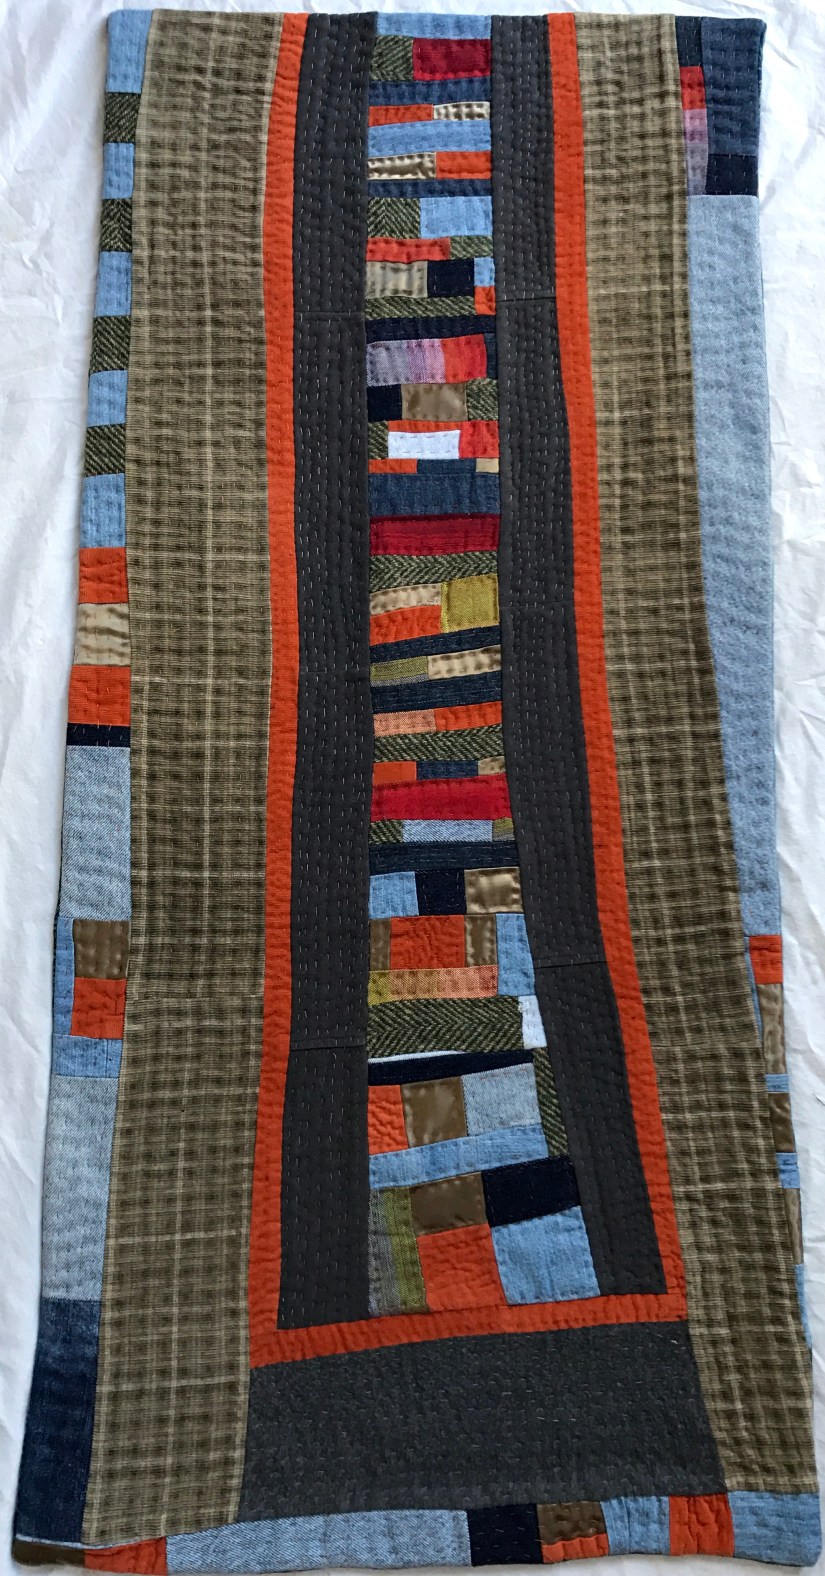
The Recycled Road is the second piece in my series The Recyclings, small art quilts from recycled materials.
Inspired by the theme of “Pathways” for the 2017 Central Oregon SAQA group annual art quilt exhibit, this “pathway” begins at the orange corduroy boundary between the multicolor “road” and the plain gray “road”. This “road” continues beyond the top edge of the quilt; as it has no boundaries beyond the limits we set on our own imagination. The pathway in this quilt represents one of many roads traveled by our creative spirit.
Using improvisational piecing techniques, I created this piece from all recycled materials (denim jeans, corduroy shirt, corduroy pants, tweed jumper, sweat pants, curtains and home decor fabric scraps. Seeking a bit of adventure in working with recycled clothing, I used an old pair of faded and threadbare gray sweat pants to create the edges of the road. I hand quilted the piece to give it an organic feel. Hand quilting the recycled fabrics was an unique multilayered and meditative tactile experience.
Most of the fabrics were not reusable as clothing or home decor and were destined to end up in a landfill. Reimagining recycled clothing and other materials into art quilts satisfies my desire to honor the environment and make art that is eco-conscious. Ending up in an art quilt is a better outcome than ending up in a landfill.
Okay, so now that I have written my draft Artist Statement for The Recycled Road, I am going to let it simmer overnight and see how I feel about it in the morning.
My next post was to be about writing Artist Statements (since I have one I really, really, really need to complete), but if you have followed me for a while you know my mind works like the golden retriever Dug in the Pixar movie, Up – “Squirrel”!
Instead I am going to continue my ongoing series, The Library Stack, sharing my latest stack of borrowed books from my beloved local public library and talk about something dear to my heart: the Danish concept of Hygge (pronounced “hoo-ga”).
Here is the latest stack of library books:
This stack currently contains the book – The Little Book of Hygge: Danish Secrets to Happy Living by Meik Wiking
and How to Hygge: The Nordic Secrets to a Happy Life by Signe Johansen.
The latter book is not in the library stack photo which was taken a couple days ago; I recently picked it up from the library.
You may already be familiar with the concept of “hygge”, however bear with me as I share some of the cool things I learned.
Hygge 101
Meik Wiking (The Little Book of Hygge) refers to hygge as “coziness of the soul”. It is “about atmosphere and am experience, rather than about things…it is about being with people we love…a feeling of home…a feeling that we are safe…shielded from the world and allow ourselves to let our guard down…”
Signe Johansen (How to Hygge) defines hygge as: “a Danish/Norwegian word that translates as a feeling of cosiness…it can also mean kinship and conviviality…hygge is about being sociable and look outward; it’s about taking pleasure in the simple things in life…”
Meik Wiking (The Little Book of Hygge) states that the hygge experience has ten components (The Hygge Manifesto):
In his book, Meik Wiking provides wonderful examples and details in achieving these hygge related experiences. His book includes tips, recipes, and suggested activities and experiences to bring a feeling of hygge into your life.
Signe Johansen’s book (How to Hygge) takes a similar approach but presents the material in the different format. She shares many essays about hygge experiences and strategies to incorporate a sense of hygge in your life by creating a feeling of coziness in your home, using candles, board game nights with family and friends, making delicious healthy satisfying foods and spending plenty of time outdoors.
I am still reading through both of these books, there are so many gems of wisdom and wonderful ideas in these two books. There is also a lot of reinforcement and affirmation of the choices I have made on how I live my life. Basically my life has a lot of hygge in it!
One of my new favorite words (I would slaughter the pronunciation if attempted) is “hyggekrog” which Meik Wiking describes as “a nook…a place in the room where you love to snuggle up with a blanket”. For me that would be a quilt and here is my “hyggekrog”:
Postscript
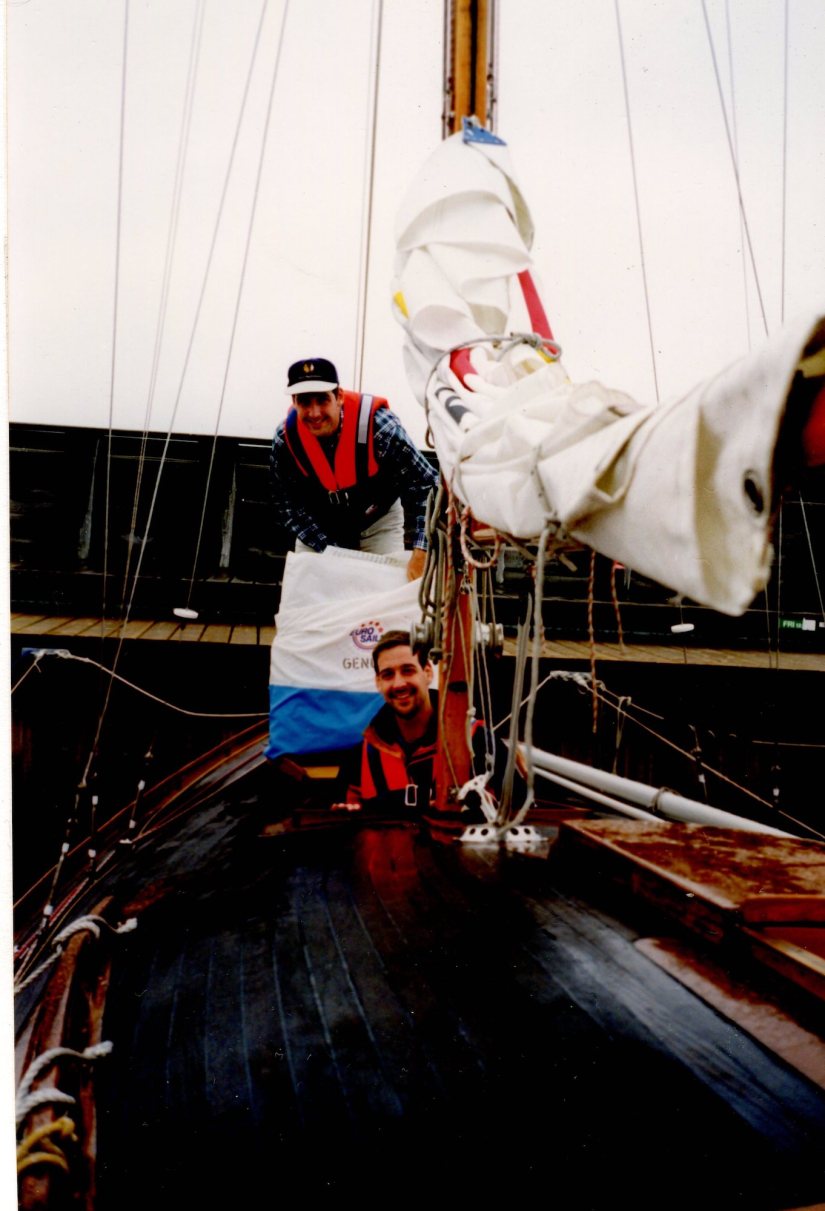
I love Denmark, it is one of my most favorite places I have ever visited.
I first visited Denmark in the summer of 1998 and stayed with my friend Torben (my “Danish brother”) and his parents in their lovely home outside of Copenhagen. I returned to Denmark for a visit in 2004, this time bringing Terry the Quilting Husband to experience this wonderful country and we stayed with Torben and his future wife.
I definitely had a hygge immersion experience visiting Denmark. Although it was August, during my first trip to Denmark, Torben’s mother made Christmas dinner so I could experience Danish Christmas! The Danish-Christmas-in-August experience included board games after dinner and lots and lots of family fun (even a family “floor show”)!
During my first trip I of course had the required tourist experiences such as seeing The Viking Museum, Tivoli and Nyhavn. I also got to rollerblade for the first time, tour the country on an exceptional road trip, bike ride to a castle (only in Europe would you have a castle outside your suburban neighborhood) and many other wonderful experiences. The Danish people were so friendly and I felt so welcome. I sort of felt like I was “home”.
One of my most memorable Danish experiences was going sailing with Torben and his brother in a handmade wooden sailboat in August 1998!
My Danish brothers getting ready for us to sailTierney sailing in Denmark!
These photos were before the days of smart phone photos so these images are scans of the original hard copy photos I have scrapbooked (as part of my minimalism journey I got rid of all loose photos – they are either scrapbooked, in a frame on display or discarded – no more boxes of photos!)
A random bit of info to close out this post – Meik Wiking (The Little Book of Hygge) lists the items that Danes associate with hygge, here are the top 10:
Hot drinks
Candles
Fireplaces
Christmas
Board Games
Music
Holiday (vacation)
Sweets and cake
Cooking
Books
I think the fact that Torben’s family had Christmas for me in August while I visited confirms just how much Danes enjoy Christmas!
A package arrived in the mail yesterday. A very exciting package. A quilted quilt!
I could not wait to open the package and see Cindy Anderson’s, of A Quilter’s Corner with Cindy Anderson (inastitchquilting.com), long-arm quilting magic!
How fast can I get the box open?Oh the anticipation, now I have to unwrap it from the enclosed bag!
Before we get to the reveal (don’t scroll down and peek yet!) here is a little background on this quilt.
I found the pattern for this quilt, Happy Ending, in a book I borrowed from my public library – Perfect Quilts for Precut Fabricsby That Patchwork Place. The pattern was designed by Lesley Chaisson. I used a couple packages of pre-cut 5 inch squares (charm packs) and deep blue (Ink) Peppered Cotton, shot cotton to make the quilt.
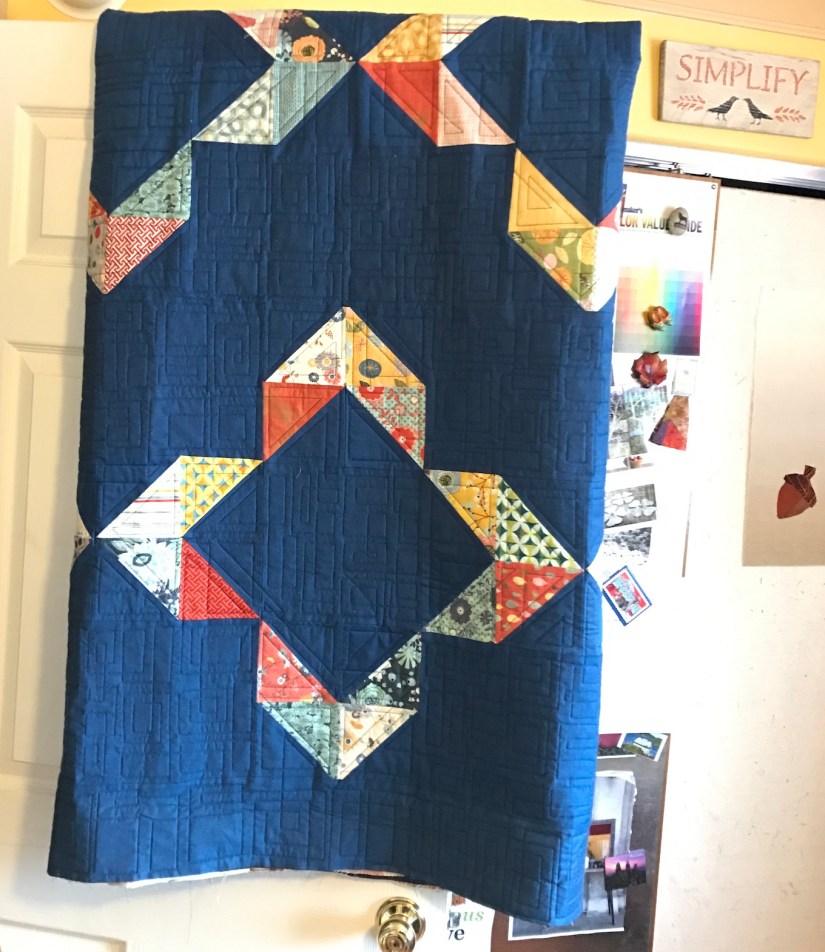
After removing the quilt from the box, Terry the Quilting Husband (TTQH) and I opened it up and laid it out on our bed to get the full effect of the completed:
Draped on a king-size bed
My quilt top traveled from Oregon to Wisconsin and returned from Wisconsin as a quilted quilt!
I wish it was completely done and ready for use, but first I have to make and then sew the binding to the edge of the quilt to finish it.
Originally my plan was to use the deep blue shot cotton (main fabric of the quilt) for the binding. TTQH suggested a contrasting color for the binding instead of the dark blue, like an orange or a red fabric.
I like that idea! I found in my stash a reddish-orange Moda fabric that coordinates with the Moda fabric charm squares. I will post more photos when I get the binding put on the Happy Ending quilt. Photos do not do it justice, the geometric designs of Cindy’s long-arm quilting are lovely on my quilt!
Waiting for the binding to be added
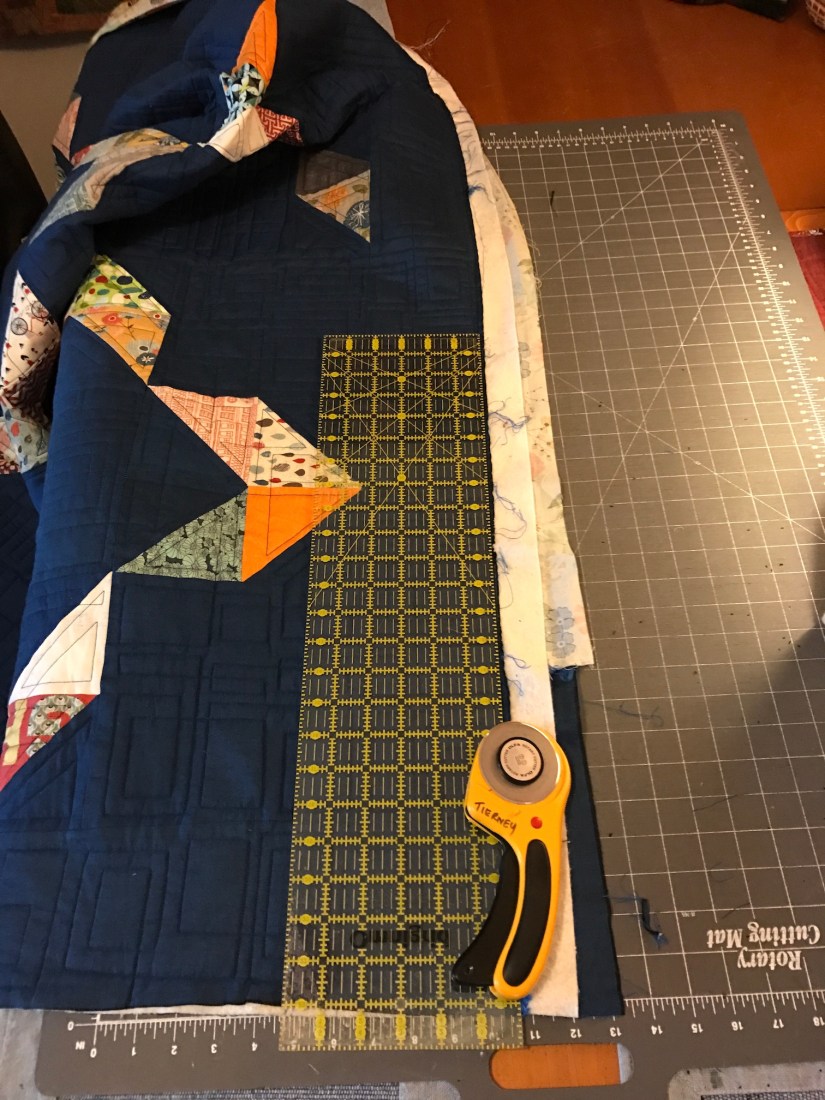
How Do You Trim?
I have a question for the quilters reading: How do you trim the excess batting and fabric off the edges of a quilt that has been long-arm quilted (or domestic machine quilted by you)?
When I began having quilts professionally long-arm quilted, I would use scissors to trim down the quilt. Eventually I moved to using a rotary cutter and a ruler to get a sharp straight edge. This takes a bit of time to complete trimming on a large quilt and I long for the day when I would just use scissors.
Trimming my quilt after long-arm quilting completed
Rotary cutter and ruler or scissors? How do you trim?
Bonus Content
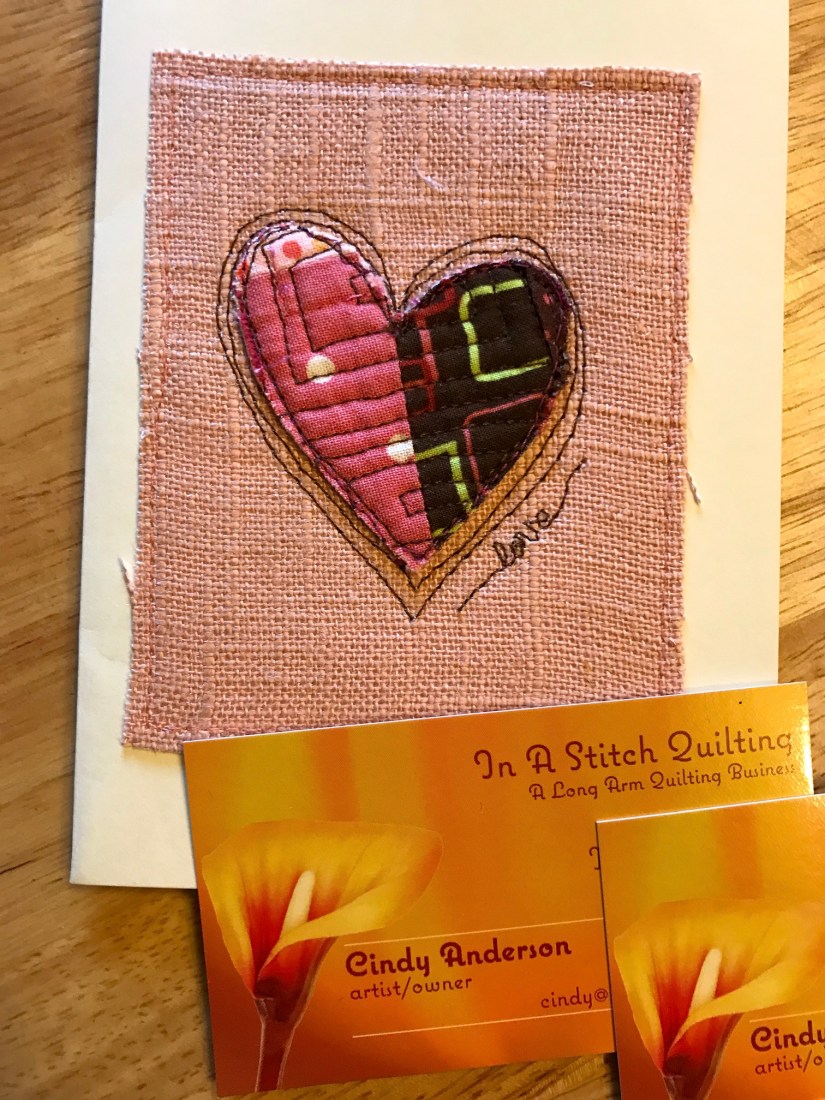
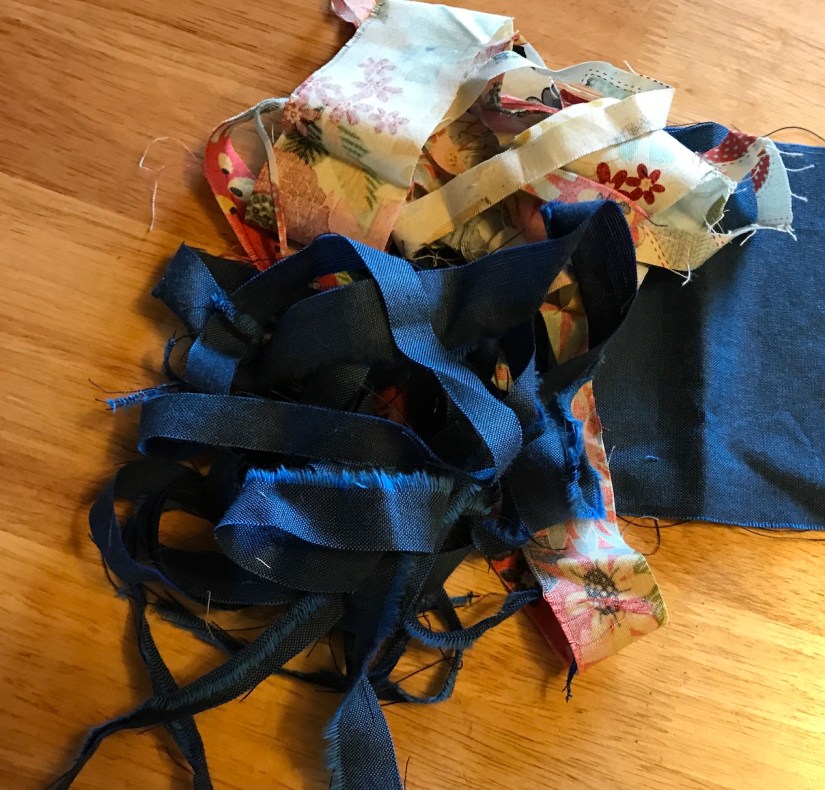
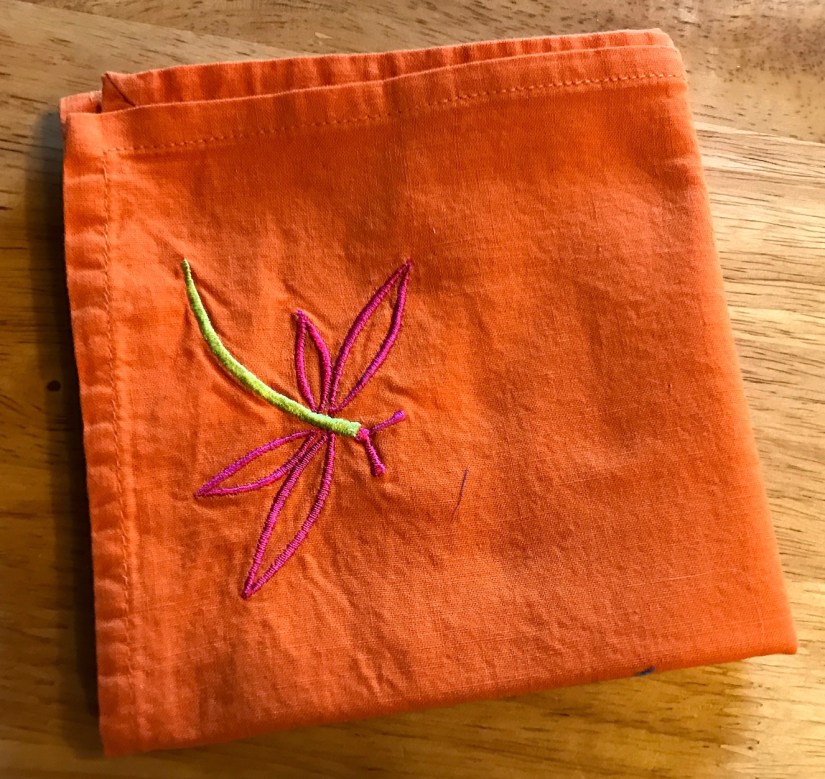
Inside the box with my quilt from Cindy were a couple extra items that made me smile:
A handmade card (not by Cindy but by another artist) from recycled fabric scraps:
Scraps left over from the quilt including some fairly thin scraps that I think Cindy was challenging to make something with! (ok true confession – my quilt back was little bit short on one side and Cindy had to do some “remodeling” on my quilt back to make it work):
And finally – a challenge piece – an embroidered napkin:
When I saw the napkin, I misunderstood why Cindy sent it. I thought she sent it in support of my post The Napkin Story. However, after chatting with Cindy I discovered she sent it to me as a recycled fabric quilt challenge! She wants to see what I can do with it! (I took it out of my cloth napkin drawer and put it in my studio).
Postscript
I love listening to audiobooks and most of the audiobooks I listen to are borrowed from my public library’s digital download system. You reserve audiobooks just like you would hard copy books (the library is given a limited number of licenses of copies of a digital book they can loan out at one time) and the library e-mails you when the audiobook is available for download. On popular audiobooks, you can wait anywhere from a week to a couple months to get that e-mail.
So I went crazy reserving a bunch of audiobooks a couple of weeks ago when I suddenly ran out of audiobooks to listen – PANIC! Then, yesterday in addition to getting the quilt in the mail, I got an e-mail from my library notifying me that FIVE of the audiobooks I had on hold were available for download:
Norse Mythology – Neil Gaiman
For Women Only: What You Need to Know About the Inner Lives of Men
– Shaunti Feldhahn
We: A Manifesto for Women Everywhere – Gillian Anderson & Jennifer Nadel (yup, Gillian Anderson of The X-Files fame)
Good Omens – Neil Gaiman & Terry Pratchett
Smoke and Mirrors: Short Fictions and Illusions – Neil Gaiman
The loan period is 21 days, so I need to listen to all books in 21 days or have to go back into the reserve book queue – yikes!
I went ahead and started listening to For Women Only: What You Need to Know About the Inner Lives of Men as I was in the mood to begin with my nonfiction options. Also I previously read Good Omens and several of the short stories in the anthology Smoke and Mirrors are in the Neil Gaiman book I read last year, Trigger Warning.
The audiobook is very interesting so far! I might share some insights from this book in a future post.
(Shaunti Feldhahn did also write with her husband Jeff Feldhahn the companion book – For Men Only, Revised and Updated Edition: A Straightforward Guide to the Inner Lives of Women. According to Ms. Feldhahn these books are used as reading requirements in some church-based premarital counseling programs.)
Hi there! Here is a quick update on the 03/30/17 post What’s on My Lap.
This weekend I completed the hand quilting on The Recycled Road, an 18″ x 40″ improvisational art quilt for our annual Central Oregon SAQA Art Quilting Group’s themed exhibit. Our 2017 theme is “Pathways”.
The Recycled Road (2017) by Tierney Davis Hogan
For more background on this piece, please see the posts What’s on My Lap, Slow Stitching, and What’s on the Design Wall. Someday, this art quilt is going to be part of a series of 18″ x 40″ art quilts from recycled materials using the same materials/adding in additional recycled materials as needed for the design.
Here is the other quilt in this series so far – Recycled Door (the 2016 theme was “Doors”):
Recycled Door (2016). Designed and pieced by Tierney Davis Hogan; quilted by Guadalupe Designs. Photograph by Marion Shimoda.
The Recycled Road quilt was made completely with recycled materials: old jeans, sweat pants, corduroy pants, corduroy shirt, tweed jumper, curtains, and home decor fabric scraps. The jeans, shirt, pants, jumper and home decor fabric were reused from the first piece in the series, Recycled Door shown above (which is a much better photo).
All of the clothing or home decorating items used in this art quilt were destined for the landfill. There were all in poor condition, or scraps and not donate-able for reuse as their original purpose.
Currently I am working on the Artist Statement, and in a future post I will share the Artist Statement explaining the piece and share my research on writing an Artist Statement (one of the tierneycreates readers asked for more info on writing Artist Statements, something many of us struggle with!).
This art quilt will debut at the 2017 Sisters Outdoor Quilt Show as part of the special exhibit for Central Oregon SAQA. Eventually become part of the Improvisational Textiles Collection – improvisationaltextiles.com.
I hope to share a better photo in the future of this piece.
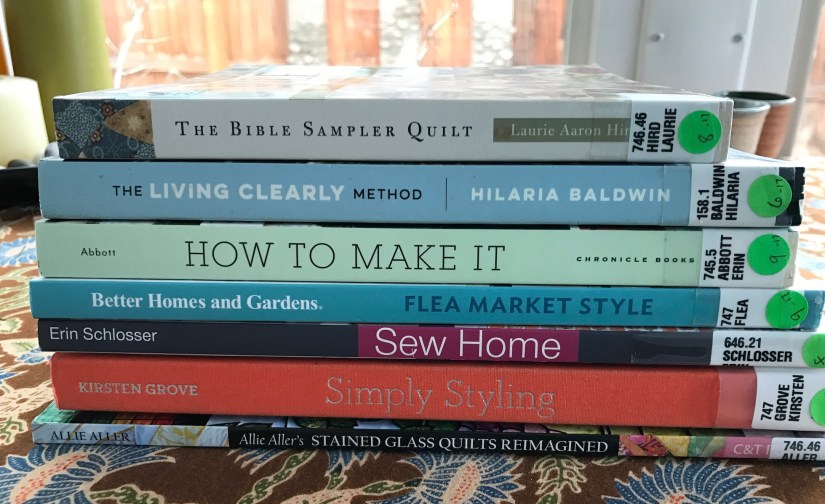
Continuing my ongoing series, The Library Stack, sharing my latest stack of borrowed books from my beloved local public library.
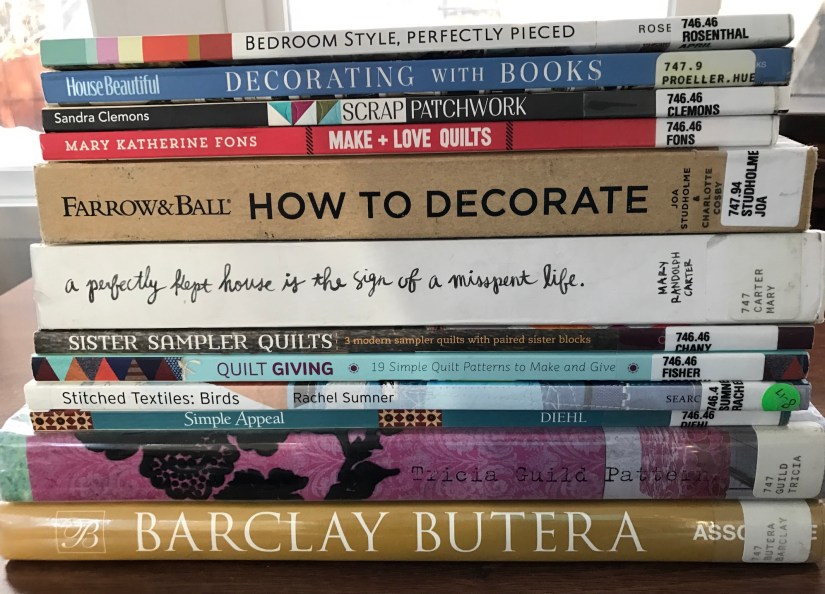
This time it is a mix of crafting, craft business, healthy living and home decorating books:
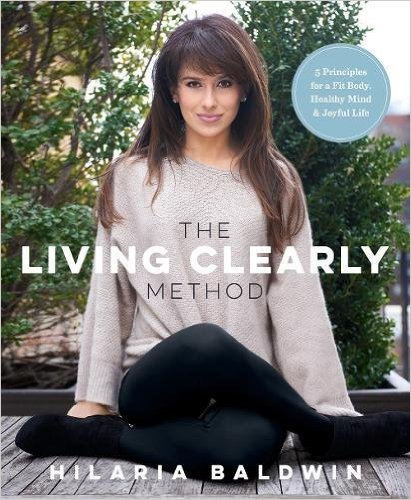
I just finished The Living Clearly Methodby Hilaria Baldwin and now I am reading How to Make It by Erin Austen Abbott.
This is my second time borrowing The Living Clearly Method. The first time I borrowed it I made a delicious lentil soup with cinnamon recipe from the book. I took the book out again to make the soup again. I realized the first time I only skimmed the book, this time I spent longer with the book and appreciated many insights in the book (though you would never catch me doing yoga poses in NYC in high heels!).
Photo credit: Amazon.com
Chapter 7 of this book is about Balance and the chapter opens with a great Rumi quote that resonated with me:
Your hand opens and closes. If it were always a fist or always stretched open, you would be paralyzed.Your deepest presence is in every small contracting and expanding, the two as beautifully balanced and coordinated as birds’ wings.
– Rumi
Postscript
Today I picked up a new stack of library books that I had on reserve and all became available at once! So now I have a super stack. I will save those for a future post.
Monday, I went on my first 2017 Pilot Butte hike! Nearly a year ago, last Spring, I started back hiking our local “mini mountain”, Pilot Butte.
Every Pilot Butte hike I take photos, it is like I cannot control myself, even if I am taking the same photos over and over again!
Monday’s hike I experimented with taking both color and B&W photos of the same scenes. I shared one of my B&W photos with some friends, and my friend Lisa mentioned the photo below would be a great inspiration for a quilt:
The steps to the viewpoint at the summit of Pilot Butte.
A light bulb appeared above my head: my Pilot Butte photos could serve as inspiration for a future art quilt.
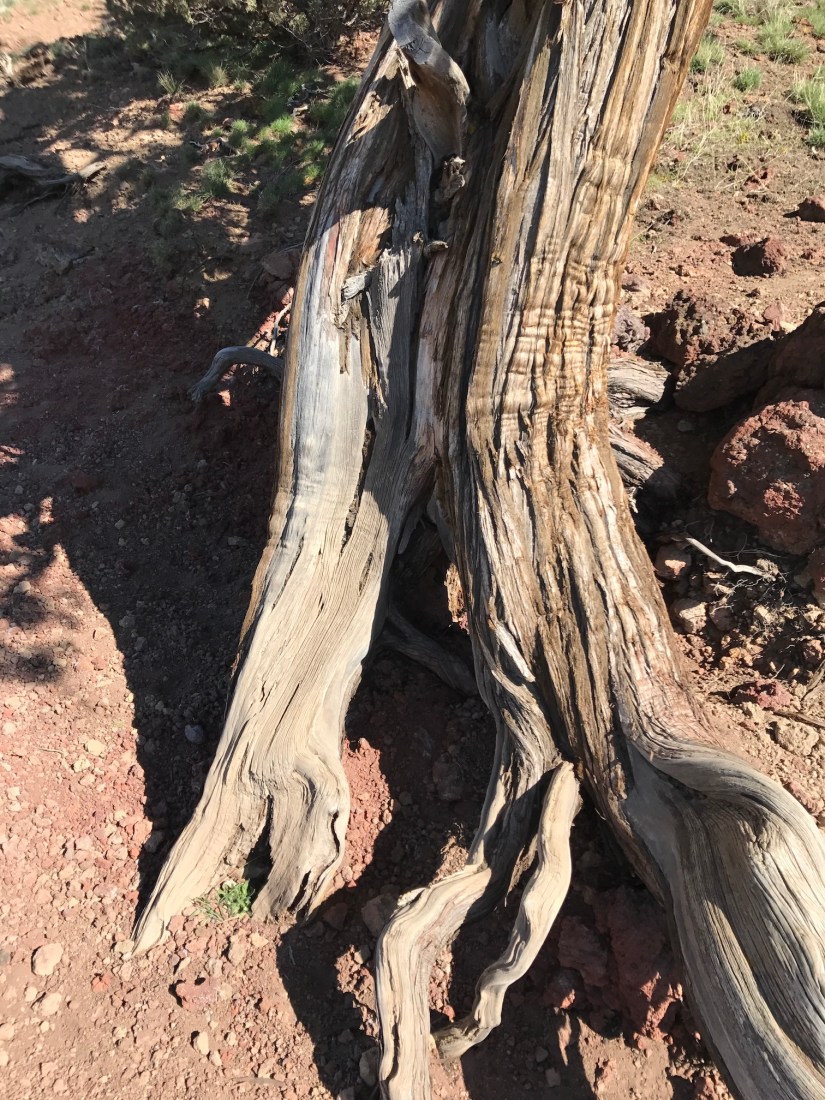
So I thought I would share some of the photos from Monday’s hike that I would consider “creative inspiration”:
You likely noticed, except for the photos of the steps, the photos above feature trees.
Hiking up Pilot Butte affords 360 degrees views of Central Oregon; and I took many photos that looked like this featuring the wonderful Cascade Mountain Range:
However I am not attracted to mountain landscape scenes for art quilting inspiration as I am to structures such as trees. I think trees are among the most magical organic structures on earth! (Check out previous posts featuring trees such as Creative Inspiration: Winter Trees and Creative Inspiration: Fall Foliage).
As much as I love the trees, I will likely give the steps photo priority as creative inspiration for a future art quilt, I love the composition:
To see more photos of the Pilot Butte hike in B&W check out my post from 09/04/16 – Friday at the ‘Butte’ in B&W.
Postscript
Listen While I Walk
I always listen to an audiobook or podcast while I hike Pilot Butte.
On Monday I finished the last two episodes of a six-episode podcast – Missing Richard Simmons. This podcast explores the story behind the fitness guru and eccentric celebrity Richard Simmons’ disappearance in 2014. It is very interesting, I was completely drawn into the story by the middle of the first podcast.
Richard Simmons, whether you loved or hated him, helped and inspired a lot of people. This podcast gives you insight into his world from interviews from clients and friends.
“No tricks, gimmicks, special pills, special potions, special equipment. All it takes is desire and will.” — Richard Simmons
I love podcasts, I cannot believe how many free podcasts there are to download off of iTunes – on so many topics!
Watch for the Wildlife
One more photo to close out this post – I love this sign at the base of Pilot Butte:
I have hiked Pilot Butte for nearly 12 years and luckily no cougar sightings for me. I hope my record of 0 cougar sightings stands.
I wonder if any new hiker to Pilot Butte sees this sign, turns around and gets back in the car!
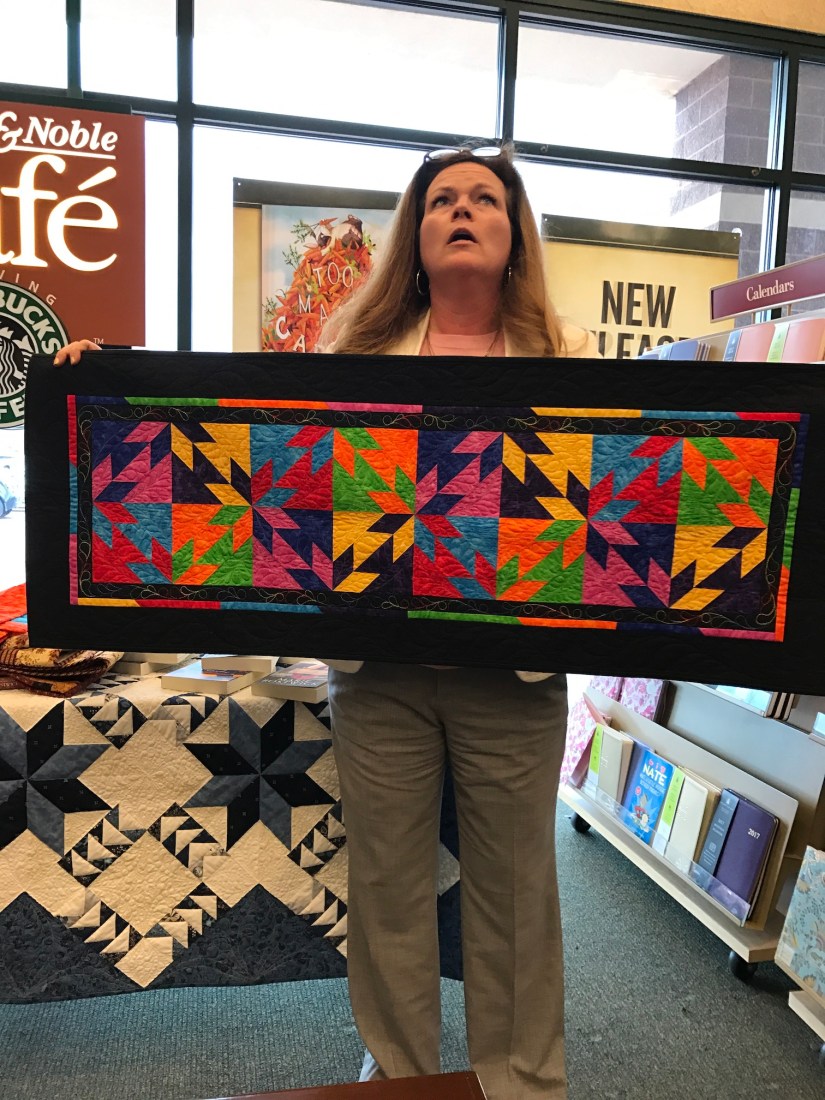
I met NY Times Bestselling Author, Marie Bostwick, through a mutual friend when I attend last Fall’s Trends Show (see the “Postscript” section of the 09/18/16 post The Ladies Friendship Circle (1931)). I had a great time hanging out with her and learned she was moving to my beloved Central Oregon! She is currently on a book tour and Terry the Quilting Husband and I went to see her speak on Saturday.
Marie is a quilter and her first major series of books, Cobbled Court Quilt Series, was strongly quilting/life of a quilter related. The series begins with the book A Single Thread.
In case you have read her books, I thought I would share photos from her Book Tour stop on Saturday April 1, 2017 in Bend, Oregon.
During this tour she is promoting her latest book, The Promise Girls, released at the end of March.
Photo credit: mariebostwick.com
On Saturday Marie discussed her new book as well as some of the history on her other books and how she became a writer. She also did a little “trunk show” and showed us several quilts, many of which were based on quilts/themes in her books:
Even the table she did her book signing featured one of her quilts!
If you would like to see her on her US tour, here is a link with tour dates:
No this post is not about our Oregon Ducks (University of Oregon) men’s basketball team who happens to be in the NCAA Tournament’s “Final Four: playoff today (the last time they won the tournament was 1939!). It is about the annual pair of a hen and drake ducks that wander around our neighborhood and seem to herald the start of Spring.
I do not know a lot about ducks and let’s assume it is not the same pair year after year (but maybe…), however, around this time every year (see my post from 04/02/16 – The Hen and the Drake) while walking the dogs, we come upon a “duck couple” hanging out or just walking about the neighborhood together:
They seem oblivious to the goings on in the neighborhood and even ignore our slightly snarling miniature schnauzers as we walked by the pair. I remember the first time I saw them in the neighborhood, about 11 years ago, and saw my next door neighbor’s cat slowly stalk them down the middle of the street.
The ducks kept walking at their normal pace, despite there was a cat obviously lurking/stalking them 20 – 30 feet away. It was video worthy but I did not think about that at the time.
Ultimately the kitty turned around and went back home. I guess he figured if the duck couple was not afraid of him, maybe he should be afraid of them!
I love my neighborhood. It is just a regular working class neighborhood with primarily older single story houses and kind and friendly neighbors who look out for each other. I feel very safe and peaceful when I walk around my neighborhood.
I titled this post “What’s on My Lap” for two reasons: 1) The obvious: I am hand stitching the quilt, so it is on my lap of course; and 2) As a follow up to the hilarious comment from Sandy (or Cindy?) of Gray Barn Designs, (one of my favorite quilting blogs to follow) on my 03/21/17 Slow Stitching post:
Oh yes, I might do a future post titled “What’s in My Head” if Gray Barn Designs does not beat me to it! Of course that would be a very long post. Way too many design ideas going on in my head.
Update on ‘Recycled Road’
I decided to name to piece Recycled Road, even though I have not written the Artist Statement for it yet. I am having so much fun slow stitching it! (Notice in the photo below I included my shoe so you could see it really is on my lap!)
I am not looking to win any “hand quilting technique competitions” but I have fallen in love with the whole experience of hand quilting. All the fabrics in this art quilt, for our local SAQA group annual themed show, are recycled (jeans, corduroy pants, corduroy shirt, tweed jumper, curtains, home decor fabric sample, and sweat pants!) and they have a wonderful texture.
I especially love stitching through the sweat pants material. It is so soft and supple and I like to brush my hands along the fabric after stitching a section (ok Tierney are you getting weird now with your hand quilting?!?!?). Was that “oversharing”?
Interestingly, Terry the Quilting Husband’s two sisters and mother are quilters and one of his sisters is really into hand quilting. My sister-in-law Sue is a serious quilter. Like a paper piecing and hand quilting quilter. She is an expert hand quilter. I remember years ago watching her hand quilt while she was visiting us and thinking “yikes, why would anyone want to do that?”
Now I get it. I was teasing Terry the other evening as we sat in front of the TV and I hand stitched: “Terry, I have become your sister!” (In reality, the only thing I have in common with Terry’s very talented quilter sister, is that we both hand quilt now. My skills are light years from hers!)
I feel like I am on this cool ongoing journey related to my quilting, even after 17+ years of being a quilter.
(I will unveil a photo of the entire piece once I have it completed. I have to keep up the suspense…or at least the imaginary suspense…)
Postscript
I do plan to return to more Farm Girl Vintage blocks in the future. Hopefully!
I love working with fabrics and in the future I want to focus on more craft items than quilts – like tote bags, pillows, handbags, pincushions and “softies” (plush toys).
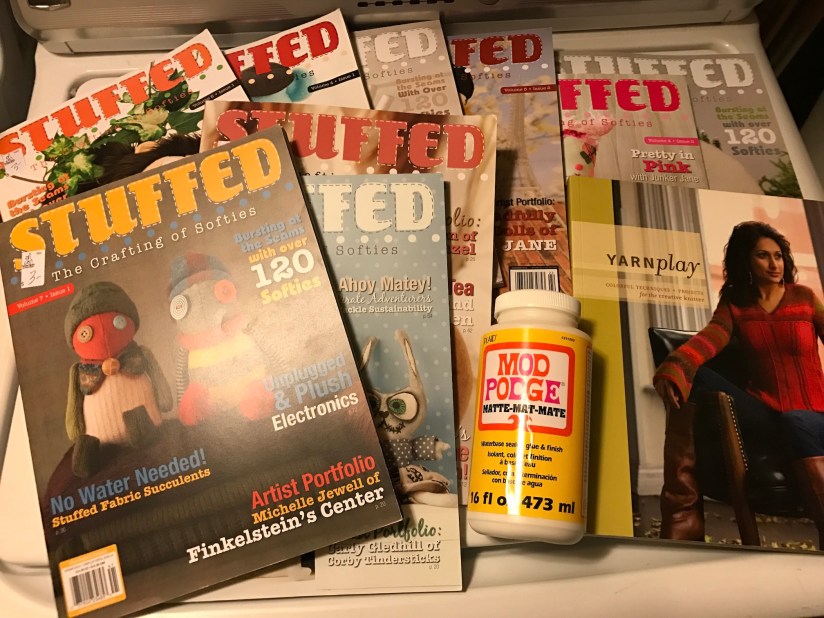
Although I am trying to be good on not buying crafting magazines, whenever we stop by Barnes & Noble for a book and magazine browse, I peek at the latest issue of Stuffed Magazine: The Crafting of Softies, published by Stampington & Company.
Like the other high end crafting magazines, it costs $14.99 an issue, and I could not really justify bringing an issue home with me. Especially when I have other crafting magazines filled with many patterns and inspirations waiting for me!
Until today…
Monday is my day off, and I took a car trunkful of donations (from cleaning out my crafting supplies – see my posts on “Craft Room Archaeology”) to the Humane Society Thrift Store.
I had in my purse a “$5 off a $15 or more purchase” at the Humane Thrift Store coupon, so after turning in my donation, and noticing that all books and magazines were 50% off, I thought I would just stop in for a quick wander.
Guess what I found?
I found 9 issues of Stuffed Magazine, in excellent condition, for $3 each (instead of $14.99). With the 50% off sale on books and magazines, I only paid $1.50 per issue. I also picked up a knitting book, Yarn Play, and a $1 brand new container of Mod Podge (yes I opened it up and made sure it was still usable).
I know what you are thinking….
“Tierney, didn’t we just read a whole series of posts about you getting rid of stuff in your home…and this whole minimalism thing you are embracing?”
Yup. But, but, but – I could not pass this deal by…
Also, I am thinking of it as a “rental“. When I am done with the Stuffed Magazines, I will donate them back to the Humane Society Thrift Shop! For now, I am going to put on the kettle for a HUGE pot of tea for this stack of magazines!
Sharing
Do you ever feel like the Universe is having you hold onto something for someone else?
A couple weeks ago, I clipped the Humane Society Thrift Shop “$5 off a purchase of $15 or more” coupon and stuck it in my purse with no plans to go shopping with it. It just seemed like a good idea to keep it handy.
Today’s impulse wander at Humane Society Thrift Shop led to a $16 purchase but I did not use the coupon. Instead I gave it to the woman at the counter/line next to me, who had 4 young kids with her and was struggling to decide if she could get all her thrift shop purchases.
She had a stack of books for her kids (obviously taking advantage of the 50% off sale) and a couple of kitchen items. She was having the clerk tally the items several times to see what she could get and what she needed to put back/leave at the shop. I handed her my coupon, with the excuse that it was about to expire and I did not need it. She was quite pleased and exclaimed: “Now, I can get everything, thanks!”
I felt like the Universe had me put that coupon in my purse for her.
I was browsing through the tierneycreates archives and I thought I would share this post from 08/21/15.
Encouragement from Others
As John Donne said: “No man (or woman) is an island”. I guess one could live as a hermit somewhere, locked away, working on your art, encouraging yourself creatively. That would not work for me. I appreciate and I am inspired by encouragement from others.
Continuing my series on sources of Creative Inspiration, this post is actual inspired by asurprise I found that last evening.
We all have those precious items from our past that we keep tucked away somewhere. One of my most precious items was a book of William Shakespeare’s Sonnets from my 9th Grade English teacher. I have not seen it in many years and I thought that for some reason during a move it got lost; or I accidentally donated it to a thrift shop in a stack of books for donation.
I mourned its loss.
Last night I was checking the far recesses of my nightstand cabinet, which I store books I am going to “read someday in bed each night before I fall asleep”, but never get around to reading. I was curious what I had way in the back and found my old beloved book!!! I had not opened it in 8 or more years and forgot exactly my teacher had inscribed inside the cover.
My eyes flooded with tears when I read her inscription which included the words “in recognition of her excellent writing ability”. I have always loved writing (and have written a lot in my professional pay-the-bills RN career) and I forgot how much I loved it when I was in grade school through high school. (Disclaimer: I may not have mastered grammar or proofreading but I still love to write!)
Just reading these words again from my 9th grade English teacher made me feel as inspired in that moment as I did all those years ago. Her words of encouragement from the past resonate with me now, like she is right here with me saying: “Tierney, keep writing, I believe in you“.
As far as quilting projects, I am inspired creatively when I receive encouragement on a piece I am working on or on one I have completed.
I am also encouraged creatively when I am feeling uninspired to work on an art quilt and a friend encourages me to just start playing with the fabric and the inspiration with come.
One of my favorite recycled silk art quilts, Color Change, came out of sitting around with a friend having her throw fabric scraps at me for fun, saying “Here, why not try putting this combination together”, when I was feeling too intimidated to work on another recycled silk art quilts.
Creative mentors who encourage you to do your art are important and wonderful to have in your life. See my old post Creative Inspiration: Quilting Mentors, for more on mentors.
So let’s all go out and encourage someone, you never know what lasting impression it will make!
“A word of encouragement during a failure is worth more than an hour of praise after success.”
I decided to hand quilt the piece I am working on for our Central Oregon Art Quilting Group’s annual themed group exhibit. The previous post, What’s on the Design Wall, I shared images of this piece in progress.
I rarely hand quilt. As far as hand quilting an entire quilt, I think I tried that once or twice in my life and hated it. I grew inpatient. It seemed to go on forever…endless repetitive stitches.
I am that way with machine quilting and this is why in the past I have preferred to send my quilts for professional quilting. If I was patient, perhaps I could become a decent machine quilter (perhaps) but it just seems to take so long and i just want it to be done.
But, for some reason, I am really enjoying hand quilting this 18″ x 40″ art quilt made from all recycled materials (jeans, sweat pants, corduroy pants, tweed jumper, a curtain, etc.). It is very meditative and pleasurable. I love seeing the stitches sink into the fabric and relishing the slow process. I am loving: Slow Stitching.
Slow-Stitching in progress
Maybe it is the point I am in life. Maybe I have quieted down enough in my head and in my spirit to be able to enjoy slow meditative work. I am not going to overthink it, I am just going to embrace a potential new evolution.
More photos to come as I complete my hand quilting. The name is still up in the air but I am now thinking “Recycled Road” (keeping with this year’s theme of “Pathways). I still need to write my Artist Statement to know the final name. But that is a month or two away. No hurry. Just time to sit and stitch quietly in the evenings.*
*Why yes, of course I am going to sneak in a couple more projects – my mind won’t completely slow down enough to focus on just one project at a time!
Postscript
Something funny (and perhaps only funny to me) just popped into my head:
Instead of this post being part of my “What on the Design Wall” series, it could be part of a new series “What’s on my Lap“!
Okay that was very lame hand quilting humor (but I cannot always control the talking hamster spinning about on the hamster wheel I call a mind).
Speaking of “hamster wheels in our heads”, recently I read a fantastic article by Quinn McDonald (quinncreative.com) in the latest SAQA Journal, titled “Fool your mind into doing art – instead of laundry” (SAQA Journal, 2017, No. 1).
In this article, the author shares an example of a familiar situation for us crafters: You plan a day (say a Saturday) dedicated to working on craft projects, however before getting started in your studio, you run a couple of errands, maybe throw in some laundry, all the time telling yourself you will still have plenty of time that day for crafting…
But, before you know it, your day entire day of planned time in your studio has ended.
In addition to discussing the challenges with having a lack of discipline – “the kind of discipline that helps you stay focused”, the author also discusses the problem of having too many choices.
I am closing this post with a quote from article that gave me something to about in regards to having too many choices (like which quilting/crafting project to work on):
“Having too many choice derails creativity. You’d think all those choices would be good for your creativity. At the brainstorming stage, it’s helpful to have many ideas. But when you get to execution, too many ideas are dangerous time-wasters. Getting to the studio and getting the creative work done requires fewer, not more, possibilities.” – Quinn McDonald
Check out Sassy the Highly Opinionated Miniature Schnauzer’s musings on her blog Schnauzer Snips!
It’s time to continue my ongoing series, What’s on the Design Wall, on what I have on either the small design wall in my studio or the large design wall in my hallway.
I am taking a break from working on Farm Girl Vintage blocks, and began working on my art quilt for our annual Central Oregon SAQA (Studio Art Quilt Associates) exhibit. Last year our theme was Doors, and here was my art quilt for the group exhibit – Recycled Door:
Recycled Door (2016). Designed and pieced by Tierney Davis Hogan, quilted by Guadalupe Designs
For 2017, our theme is “Pathways”. Inspired by a SAQA online workshop I attend on “Working in a Series” and Elizabeth Barton’s book Visual Guide to Working in a Series: Next Steps in Inspired Design (2014), I want to repeat most of the fabrics used in Recycled Door (2016) and developed the art quilts from my annual participation in our SAQA group’s annual exhibit, into a series.
Recycled Door (2016) was created with all recycled fabric – used clothing and recycled home decor fabric scraps. See the post Blog Tour Day 4: Unlikely Materials for a list of materials used.
I am repeating the same recycled materials for this year’s art quilt and adding two additional fabrics for the 2017 piece: 1) the fabric from a pair of recycled sweat pants; and 2) a recycled curtain. Tentatively I am naming it Recycled Pathway. (I will have to complete the piece and draft up my Artist Statement before I decide on the final title).
My 2017 piece will be truly “recycled” art – in addition to using recycled fabrics (including fabrics from the 2016 piece), this quilt is being created from recycling of blocks made for another art quilt I started for another project – Sherri Lynn Wood’s (The Improve Handbook for Modern Quilters) Make Do Challenge (#makedoquilt). Please see the 09/13/17 post Make Do Quilt Challenge for photos of the progress I made on the piece (which I eventually abandoned because I was stuck and honestly just did not like it).
Since my improvisational pieced blocks for the #makedoquilt were just not going anywhere (except to gather dust in back of the closet), I cut it apart to reimagine it for the 2017 Central Oregon SAQA exhibit.
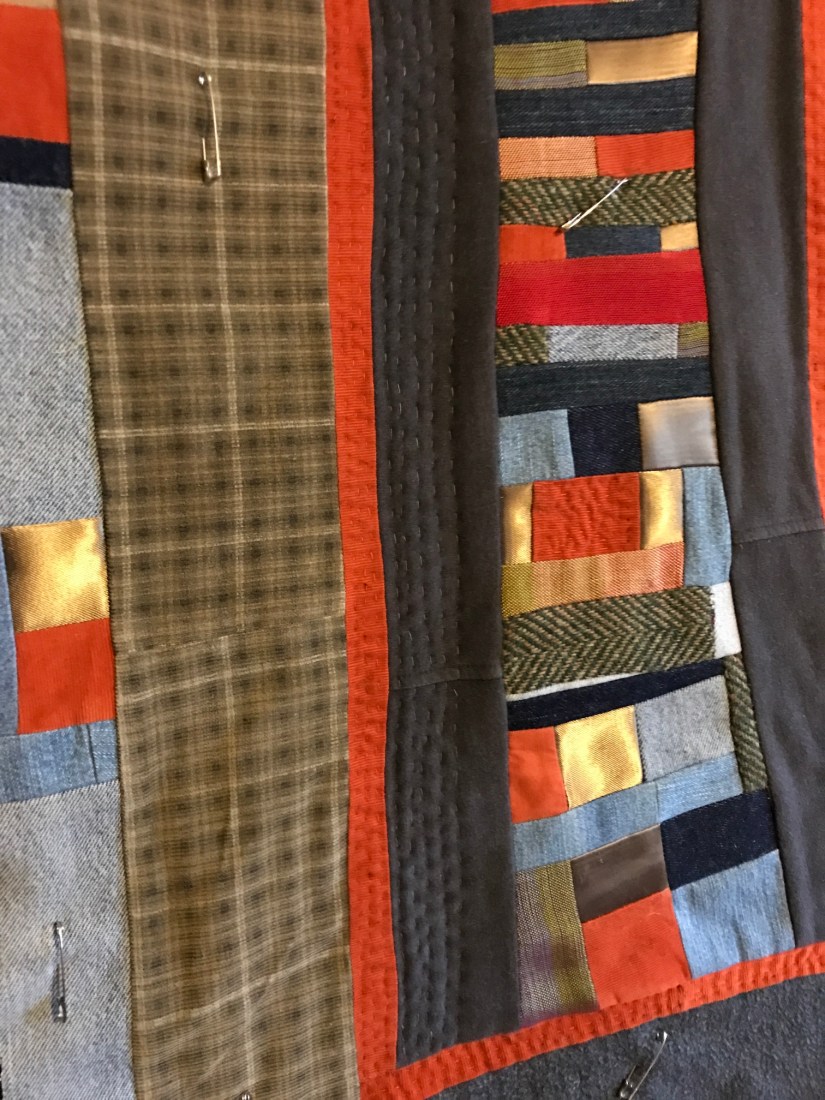
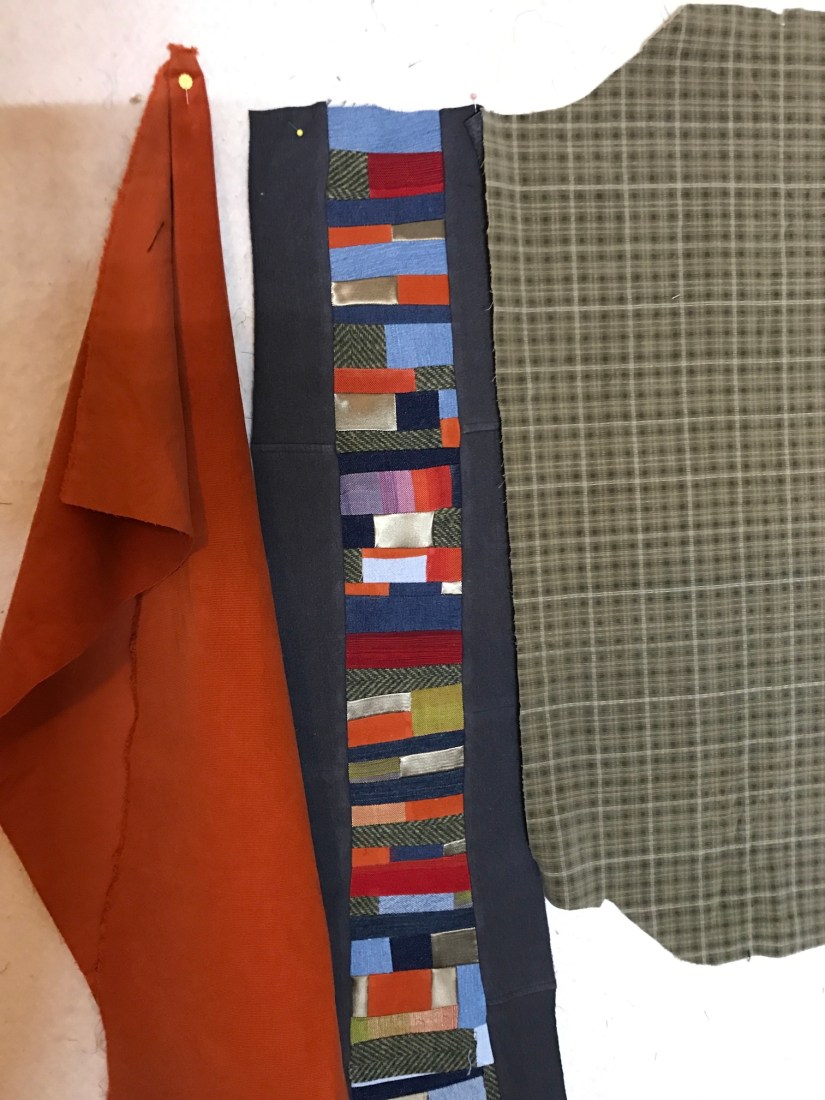
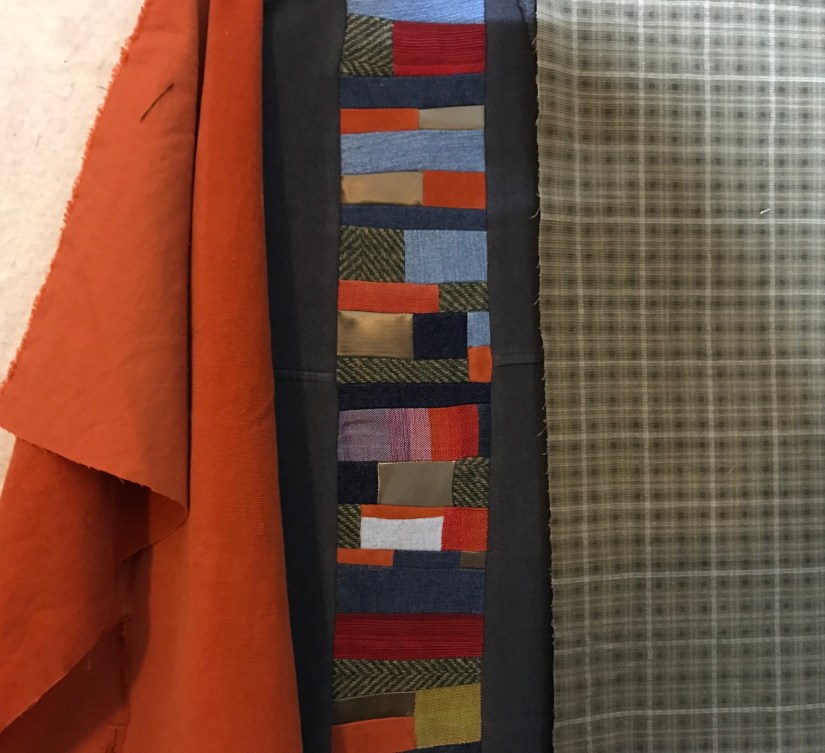
Here are photos of my progress “Recycled Pathway” (tentative name), on the small design wall in my studio. I am using the dark gray recycled sweat pants fabric to border my “pathway”piecing of recycled denims, curtain, tweed jumper, gold home decor fabric and orange corduroy pants:
The completed piece will measure approximately 18″ x 40″. I plan to be bold and either machine quilt or hand quilt the piece myself.
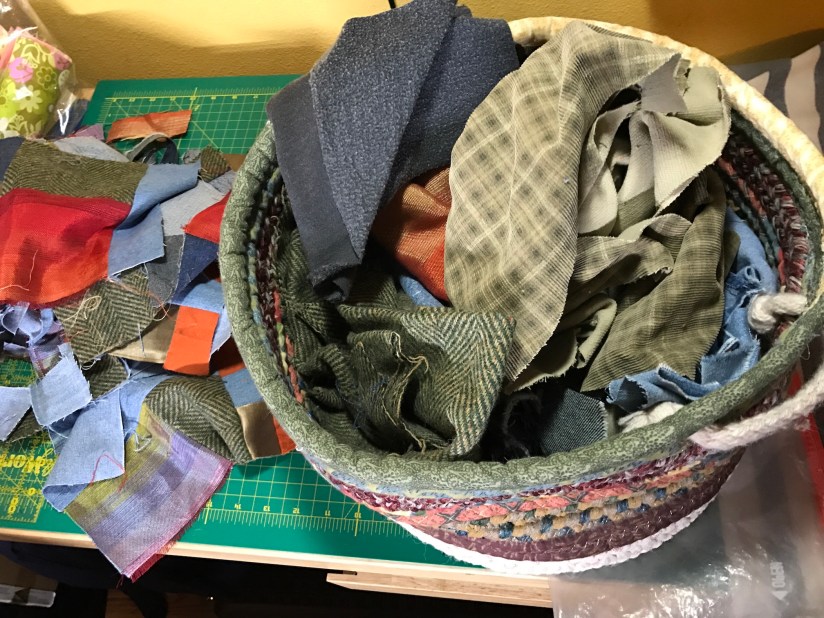
Here are the basket of recycled clothing scraps I am working from:
I really like working with the recycled sweat pants and I want to incorporate the “wrong side” of the sweat pants fabric into the piece also as I love the texture:
More to come, I was happy to be visited by Inspiration today in order to start this new piece. Also it was fun to return to working on some improvisational art quilt making!
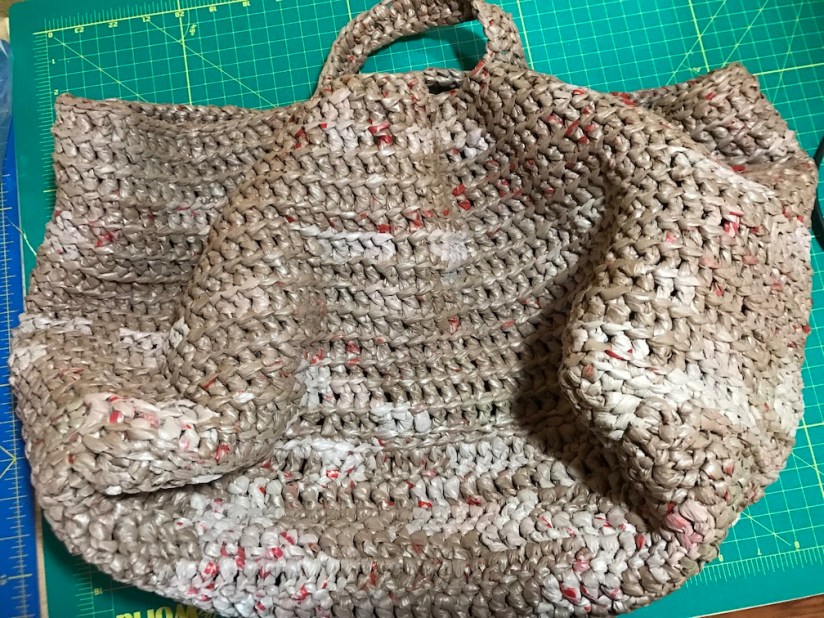
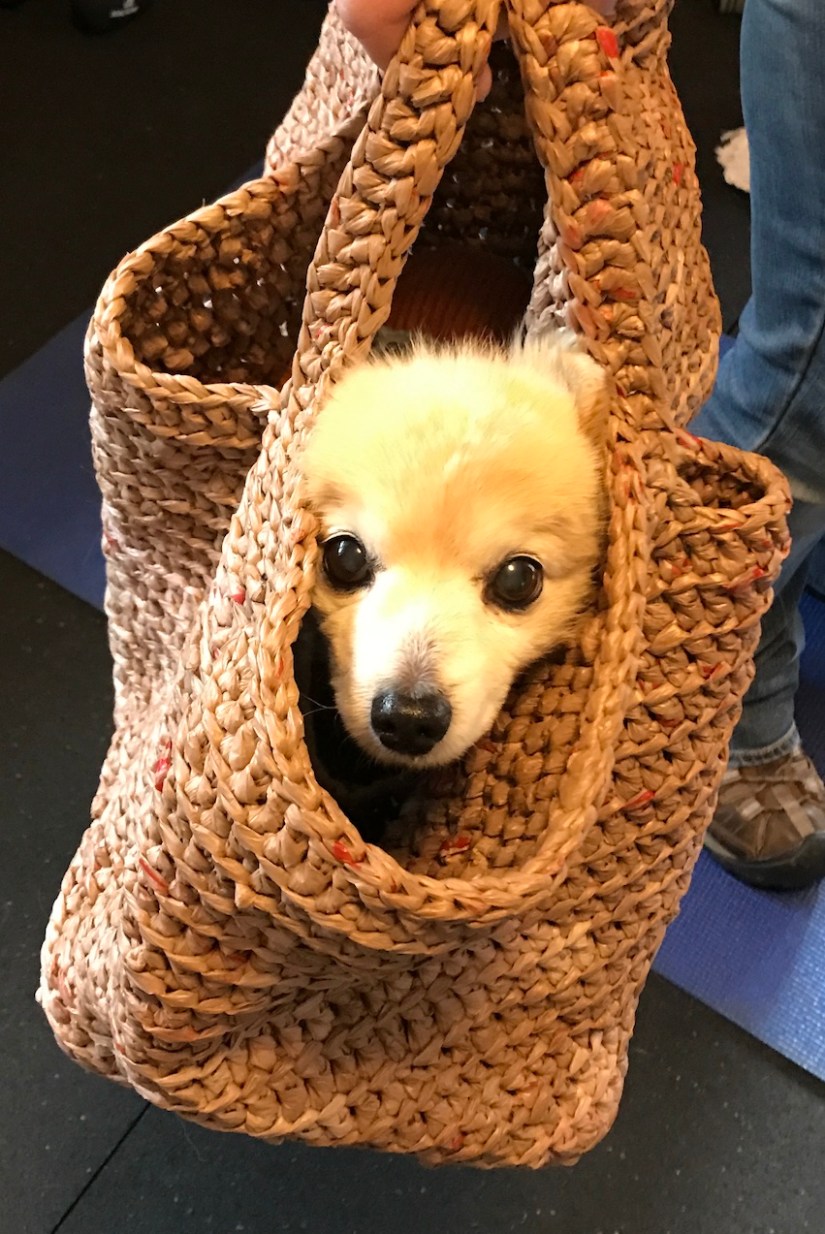
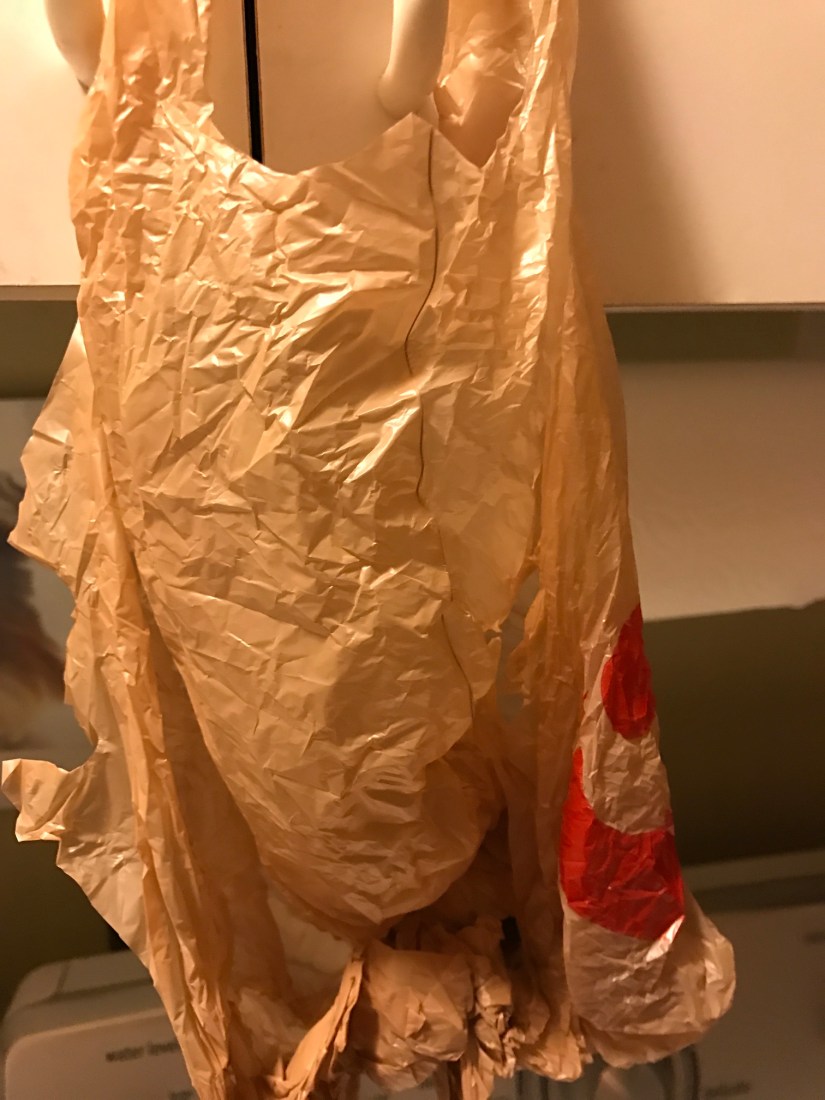
Yesterday a friend surprised me with a gift – a large sturdy tote bag made from recycled grocery store plastic bags by a very talented crafter friend of hers!
It measures approximately 18″ x 12″ x 18″ and appears to be made using a crochet technique. Here is a photo of the bottom and if you crochet the pattern might look familiar:
Just how study is it? Well you can transport a Pom-Chi in it!
Imagine how many plastic bags get recycled to make this bag!
The friend who gave it to me (who also recently adopted the senior Pomeranian-Chihuaha, Chewy) mentioned that her friend who makes these has a huge ball of plastic grocery bag twine in her studio. The artist first makes plastic bags into twine/plastic yarn before crocheting (?) them into bags. She also makes mats/rugs from recycled grocery bags.
After 3+ years of writing on my tierneycreates blog, I thought it would be fun to reach out to other online publications. A new online publication, Minimalism.lifeinvited me to write a short essay summarizing my minimalism journey in 250 – 300 words.
My article, “Living as a demi-minimalist”, was published in their newsletter today (Letter No. 8). Below is the link:
This new online journal, Minimalism.life, was developed in partnership with The Minimalists who I have followed via their blog for several years, listened to their weekly podcasts, read their books and saw their movie (now on Netflix) – Minimalism: A documentary about the important things.
So I am honored to share a little of my journey in this publication!
In my previous post Farm Girl Vintage, Part III I mentioned my past challenges with nearly OCD (obsessive-compulsive disorder) level of desire for order and neatness in my life.
When we lived in Seattle, WA I used to entertain, a lot. Game nights, holiday get-togethers at my house, random dinner parties, birthday party hosting, baby shower hosting, work parties, etc., etc. I was very social – and if I was not throwing party, I was attending a party or going to some event. Notice, I mentioned that “I” was very social, as I learned years later, Terry the Quilting Husband was only playing along, he would have preferred more quiet time at home with me and the dogs. (There is the Thanksgiving he always teases me about – when we out of obligation, courtesy and my desire, attended 3 – 4 Thanksgiving celebrations at various friends’ homes all in one day!)
I enjoyed the gatherings, but when I hosted it was secretly very stressful as I always wanted to have everything absolutely perfect for my guests. I would spend hours before hosting a party making sure everything was perfect. I would read magazine articles about tips for being the perfect host (Martha Stewart in her heyday would have been proud…or perhaps have some concerns about my sanity).
One of the “perfect host” tips was to have a perfectly set table. I always kept a perfectly set dining room table, even when no one was coming over to dine. All the plates, flatware, and cloth napkins perfectly arranged (at least I refrained from keeping glassware set out to gather dust…) in anticipation for the next get together.
The cloth napkins, oh the cloth napkins. They were always freshly pressed, perfectly arranged in their napkin rings and never to be used. Yes, you read correctly, never to be used.
When people came over for dinner, I would pull out disposable napkins and place them next to the cloth napkins. I did not realize how much weirdness this was, but my friends quietly accepted my weirdness and would use the paper napkins while the cloth napkins remained untouched.
Then my sister visited…
My younger sister Rianna is awesome and has helped me evolve to a more “chilled-out” person. I had a dinner party in her honor when she visited with some of my closest Seattle friends.
Rianna did not know of my “napkin weirdness” and sat down at the dining table to eat and proceeded to remove the cloth napkin from its napkin ring and place it on her lap.
A hush fell over the dining room table…
My sister tells the story much better than I but it was like she had climbed on top of the table and started dancing through our plates of food – it was that shocking to me and my other guests (who unfortunately I had obviously trained to accept my weirdness). I am sure I behaved very tensely for a moment but I had no choice but to see the silliness of the situation – being upset that someone was actually using a cloth napkin I had set out on the table.
My sister was patient and understanding (though she thought it was hysterical once she realized what happened). When she returned home from her visit she sent me a HUGE collection of cloth napkins and kindly suggested I actually USE them.
Fast forward many years. Now having embraced minimalism, living with less, and a desire to be thoughtful to the environment, I have completely given up paper napkins and only use cloth napkins!
As you can see from the photo below, they are very well used. We even use napkins several times before throwing them into the washing machine (unless we have a really messy meal).
We do not entertain like we used to and we are very happy with that (notice I said “we” – Terry the Quilting Husband is over the moon that he gets to mainly spend time hanging out with just me and the dogs).
I still keep my house fairly neat and I like things in order. If you read my series of posts on My Minimalism Journey you will see that I have much less things (so they are even easier to keep in order – ha!). I accept that order makes me happy but I try not to be obsessed about it and continually try to let go of perfection (I no longer iron my cloth napkins and I donated all my napkin rings to a local charity thrift shop!)
I realized that in addition to using cloth napkins, we also switched to using old tea towels and old wash cloths to clean the house; and crocheted washcloths for dishes. We keep a supply of paper towels for anything super messy and for draining fat/oil when cooking (i.e. for bacon).
We used to go through a lot of paper towels and now a roll of paper towels seems to last us forever.
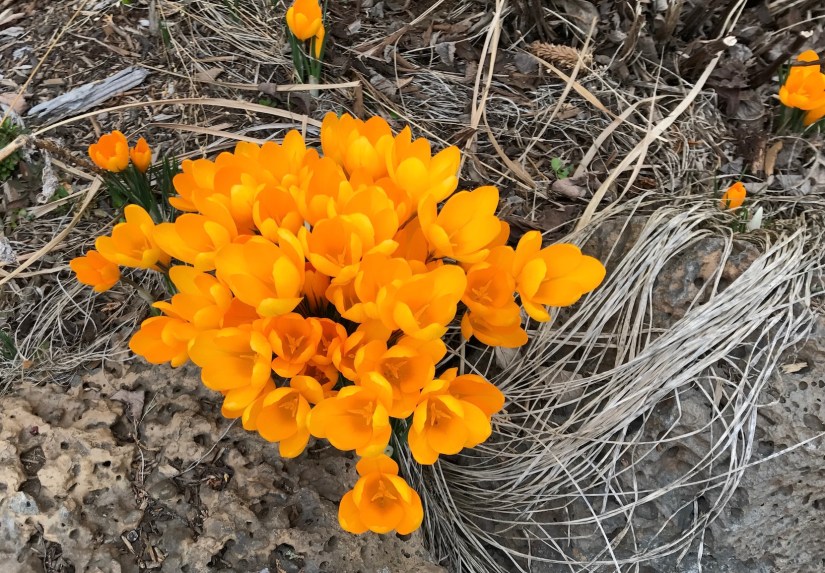
Signs of Spring
It feels like it has been an endless Winter, but yesterday in my neighbor’s garden, I witnessed signs of Spring! The crocus are popping up:
The Easter Schnauzer Bunny?
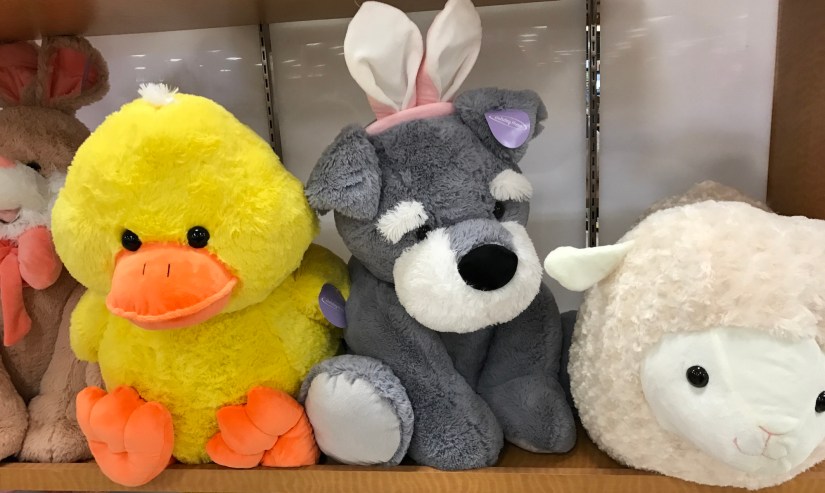
This probably belongs on Sassy the Highly Opinionated Miniature Schnauzer’s blog, Schnauzer Snips, but Terry and I were at the grocery store on Friday and came across this in the Easter display:
Yes, nestled among the stuffed animal rabbits, chickens (or is that a duck?) and sheep, was an “Easter Schnaubunny”. No we did not buy it, as tempting as it was!
How well do we know each other? Are we at the point that I can bare my soul and share with you my deepest secrets? Can we talk about “Fat Quarter Pathology” (and can you try not to judge…okay you can judge a little..I deserve it…)
But before I bare my fat quarter hoarding soul here’s a couple definitions so we are all on the same page:
Fat Quarter – a quarter yard of fabric cut into a rectangle that measures 18″ x 21″, commonly packaged with other fat quarters into a themed fat quarter pack.
Are you ready? Alright here is my darkest fabric hoarding secret…
Fat Quarter Pathology
When I started quilting around 1999/2000 and discovered the magic of fabric shopping, I also discovered my love of little “fabric samples”. I was not into collecting scraps yet (or making many scraps as I only had a quilt or two under my belt). I was intimidated to buy a bunch of yardage when I saw a fabric collection I liked, but I did like buying a fat quarter bundle of the fabric collection that gave me a sample of many of the different fabrics in a collection.
This attraction to fat quarter bundles (usually or 6 – 8 fabrics) morphed into an attraction of fat quarters in general, including individually fat quarters. Quilt shops would display baskets of individual fat quarters and sell them in “baker’s dozens” so if you bought 12 you got 1 free.
Perhaps I only need a couple fat quarters (or likely none) but how could I turn down getting ONE free. So I would buy 12 to get the 13th free (makes sense, huh?)
Fat quarter bundles for a future project, individual fat quarters, fat quarters given to me as gifts, fat quarters won at Quilter’s Bingo, fat quarter found at thrift shops, and more, and more and more fat quarters…
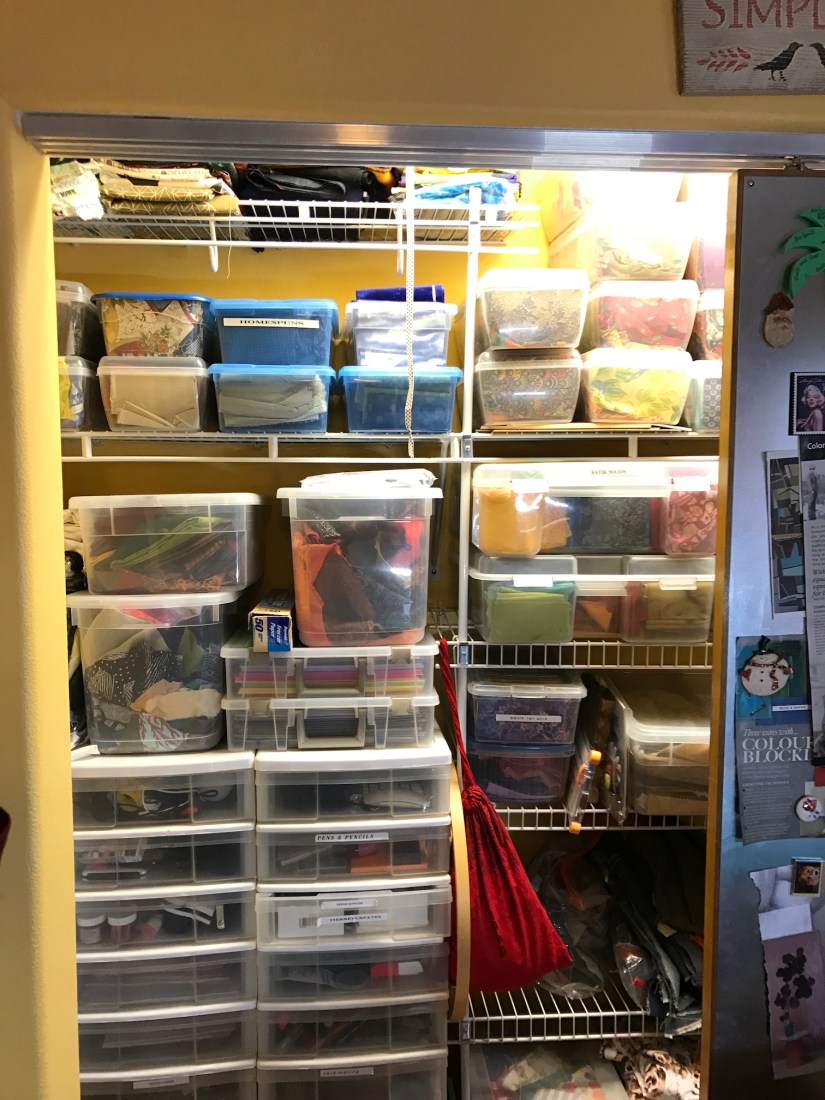
I kept them organized, I kept them…IN THE CLOSET:
I knew as part of the Quilt Studio “Archaeological Dig” I needed to go beyond just looking through them in their containers, I needed to go through them, find the treasures I wanted to keep and let go of what I would never use. I always try to keep lessons from Marie Kondo’s book – The Life-Changing Magic of Tidying Up: The Japanese Art of Decluttering and Organizing in mind.
Marie Kondo says you have to actually look at and hold every single item you own in your hands and decide if it is brings you joy. Every single item.
I knew I needed to go through every fat quarter. Then I needed to create a better system to store them which encouraged me to use them, not just try to create the world’s first Fat Quarter Museum.
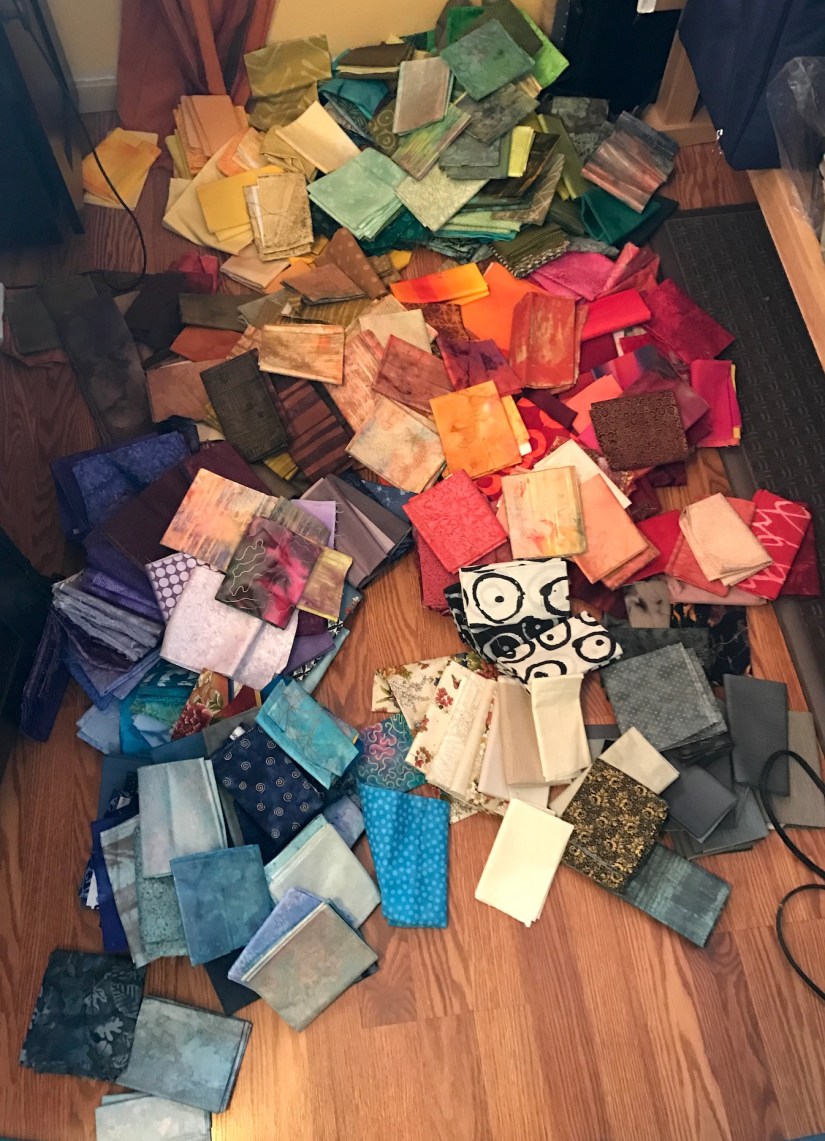
The big step first – go through every fat quarter – here is my secret revealed – it was all laid out in the huge pile on my floor:
I am a fat quarter hoarder!
There it is, now you know. Watch for my story on a future episode of the American TV show Hoarders (there was a UK version of this show but I forgot the name of it).I will be the one sleeping in a mattress in the corner surrounded by piles and piles of fat quarters. The Health Department will send a public health worker for an intervention…
But seriously, I was shocked at the sheer volume of the amount of fat quarters I had in my collection. I just kept accumulating them. I had purged a little in the past but obviously not enough to make a dent.
The Intervention
Similar to what you might see on a reality show about hoarding, I had to get honest with myself, deal with this pile and then find a meaningful way to organize what I kept.
Previously I organized my scraps by color (see post When all else fails, reorganize your fabric scraps) and I tend to think in colors rather than in fabric lines or fabric collections when I am working on a textile project, so I decided to organize the fat quarters I was keeping into the following groups:
Black, white, black & white patterns, and gray
Creams and fabrics where cream to light beige is the predominant color
Browns
Yellows
Oranges
Reds
Purples
Greens
Blues
Teals & Turquoises (I struggle with sorting these into blues or greens so I decided to just let them be their own group)
Interesting, the colors I had the most of in fat quarters, also reflected the colors I had the most of in my fabric yardage:
Green
Blue
Red & Orange (tied)
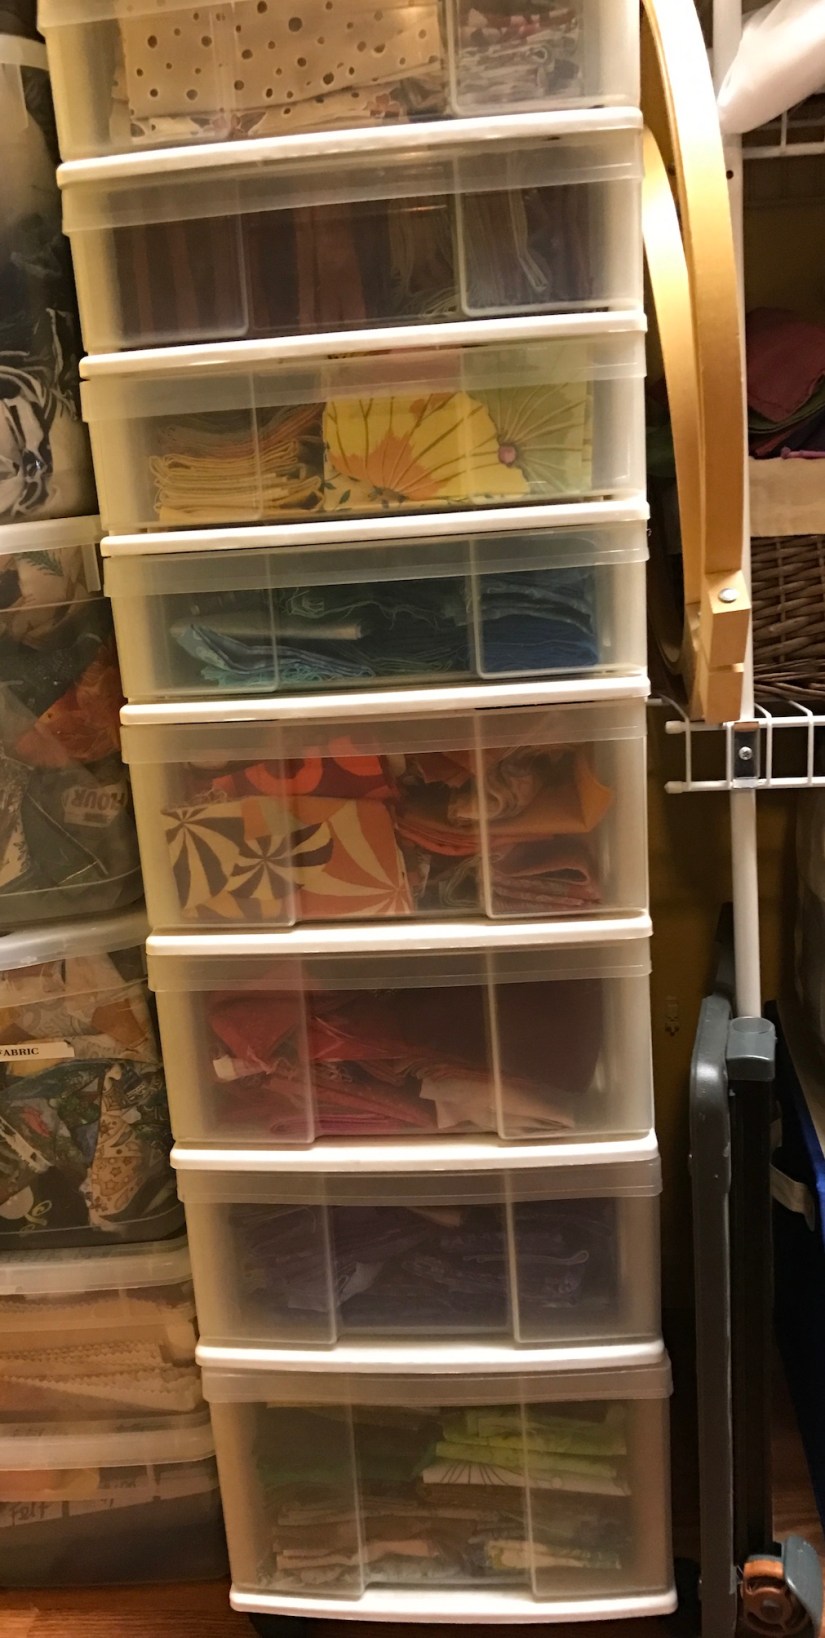
I cleared out another standing storage drawer set and arranged the fat quarters in drawer set so I could easily access them. I also had to use the bottom drawer of another drawer set for the Blues.
Black, black and white, gray
Creams and beiges
Yellows
Browns
Oranges
Greens
Teal and Turquoise
Blues
Reds
Purples
When I dumped out the fat quarters from their previous containers, I pre-sorted them by color into piles on the floor (see photo above). When I put them away by color, I looked at EACH fat quarter and made a decision whether to keep or donate.
Here was my criteria:
Do I love this fabric and do I find it visually pleasing?
Is it high quality quilting cotton (when I first started quilting, I would only buy inexpensive fabric at chain craft stores)?
Would I use it in a future project and is it still my style (our tastes change over the years)?
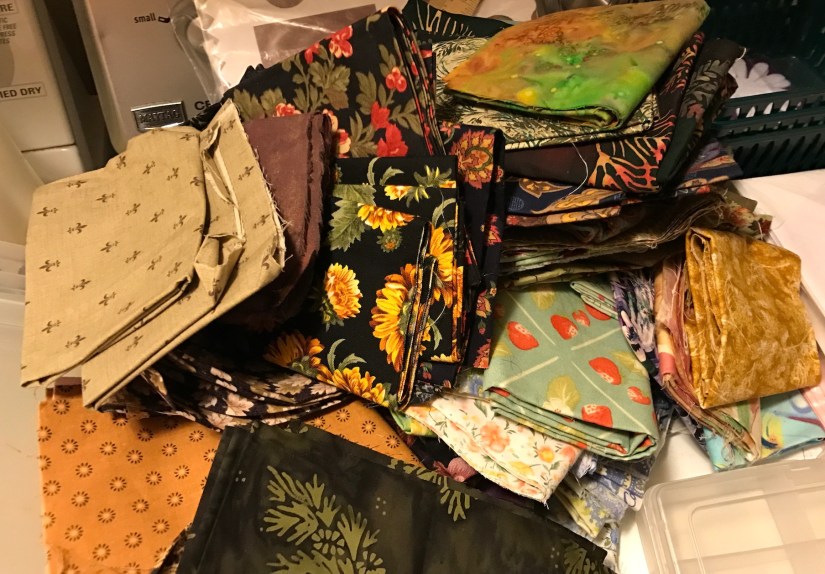
Using this criteria I was able to pull out many fat quarters for donation:
At one point I likely loved all the fat quarters shown in the donation pile above but not any longer – there is no joy for me in that pile!
Epilogue
Now that this project is over, I know I do not need to add any more fat quarters to my life (as I appear to have enough for several lifetimes!)
If you have followed my blog for a while you likely know a little about my minimalism journey and my quest to curate my life with only those items that bring me joy. I have removed and donated so much from my life such as household items, trinkets and kitsch and clothing (I probably own only 25% of the clothes I used to own).
The challenge with my craft supplies is that they BRING ME JOY and I think this is why I have saved this deeper dive into my crafting related supplies for last.
Another bit of Marie Kondo always in the back of my mind:
The space in which we live should be for the person we are becoming now, not for the person we were in the past.
So fat quarters I no longer love – be gone! I am not going to worry about the money lost for bringing you into my life. I hope via my local thrift shop you will find your way into some other crafter’s life who will appreciate you (or perhaps hoard you in their collection, oh no….).
Thanks for letting me share with you my true confessions and my ongoing journey to curate my life to only the things that are useful and bring me joy.
I consider myself an organized person. I try to keep everything nicely organized in my crafting area.
However it is just organized clutter.
In two recent posts Quilting Studio Archaeology and Quilt Studio Closet Purge I discuss going through the stuff in my sewing area with a critical eye and beginning to purge. Perhaps “quilting studio archaeology” is not the most appropriate term as over the past couple of days I have been engaged in Crafting Archeology.
You see, I am not just a quilter. I am also:
A paper crafter (card making)
A beader/jewelry crafting
A knitter
A crocheter
A small fabric craft maker (bags, potholders, pillows, etc.)
A various miscellaneous crafter (like my foray into felting…)
Each craft involves related paraphernalia and supplies. I had all of them organized in the closet in my studio, along with sewing fabric:
Above the closet doors is this a painted sign a friend gave me as a gift – Simplify. I kept this is mind as I go through everything left in the closet and make some honest decisions. I had already purged my unloved knitting, crocheting, and beading supplies. I have avoided until now my card making supplies, random crafting supplies and my fabric fat quarter storage.
Papercrafting Supplies
Between making cards and scrapbooking I have acquired quite a bit a paper and paper crafting supplies.
Over the past couple of years, on my journey towards embracing the minimalism movement and only have in my life that which brings me joy, I have donated a large amount of paper crafting supplies. I completed a huge project in 2015 – all my loose photos were either put into a scrapbook or discarded. I have no more loose photographs.
When I completed this massive scrapbooking project, I decided to give up paper scrapbooking. If I craved another scrapbook in the future, I would have a digital scrapbook professional created.
However I had not decided what to do with my card making paper and supplies. I did sell a set of handmade cards on Etsy a couple years ago and I still like making handmade cards.
Initially my plan was to just box up all my card making and remaining scrapbooking supplies and donate them all. However the I am continually inspired by the beautiful paper crafts I see on blogs I follow such as PaperPuff (paperpuff.wordpress.com) and I want to continue to make cards.
So here was the compromise…
What I kept:
What I let go:
Next post, I will continue sharing my archeological dig and purge; and talk about my “Fat Quarter Pathology” and the big decisions made around my obscene collection of pre-cut fabric/fat quarters.
One of my blogging buddies is also working on Farm Girl Vintage – check out peggycooperquilts.com for her blocks (she has made much further progress!)
Monday 3/6/17 is my last week of my 28 day Fast Metabolism Diet (FMD) that I shared in previous posts. I do not like scales but I feel like I have lost at least 5 – 10 pounds. When I have my annual wellness exam with my MD in April I will find out the official number.
My clothes are definitely looser and I feel great. I am looking forward to having a little dairy when the 28 day program ends!
I took a break from borrowing my normally large stack of library books, spending time instead reading/browsing through books already in my collection and my backlog of crafting magazines.
But, of course, I just had to continue my ongoing series, The Library Stack, so last weekend I borrowed a HUGE stack of crafting and home decorating books from my beloved local public library.
This stack will take several pots of tea to get through! I am hoping some of the decorating books give me inspiration for the living room remodel we want to work on this Spring/Summer, adding in a wall of bookcases and fireplace.
I am slowly working on more Farm Girl Vintage blocks, I just finished the “Chicken Foot” block. I want to complete a few more blocks before I post again on Farm Girl Vintage. I am working through the book in alphabetical order of the blocks, hoping to make each block in Lori Holt’s Farm Girl Vintage book.
I am curious about my recent and ongoing desire to work on blocks from a pattern instead of working on improvisational art quilts. I am wondering when my art quilting muse will return and will there be some improvisational art quilts are in my future (and so I will have something to post on the collaboration art quilting site, Improvisational Textiles…)
Let me close this short post with a quote shared by Gwen Marston in her book A Common Thread: A Collection of Quilts by Gwen Marston, that reminds me to flow with wherever I am on my creative journey:
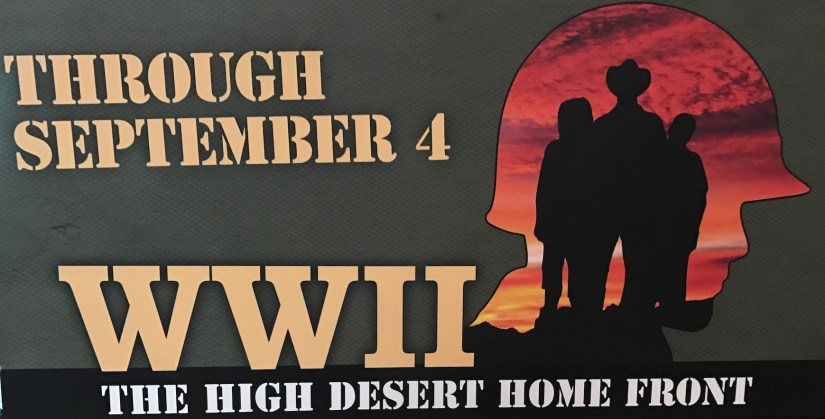
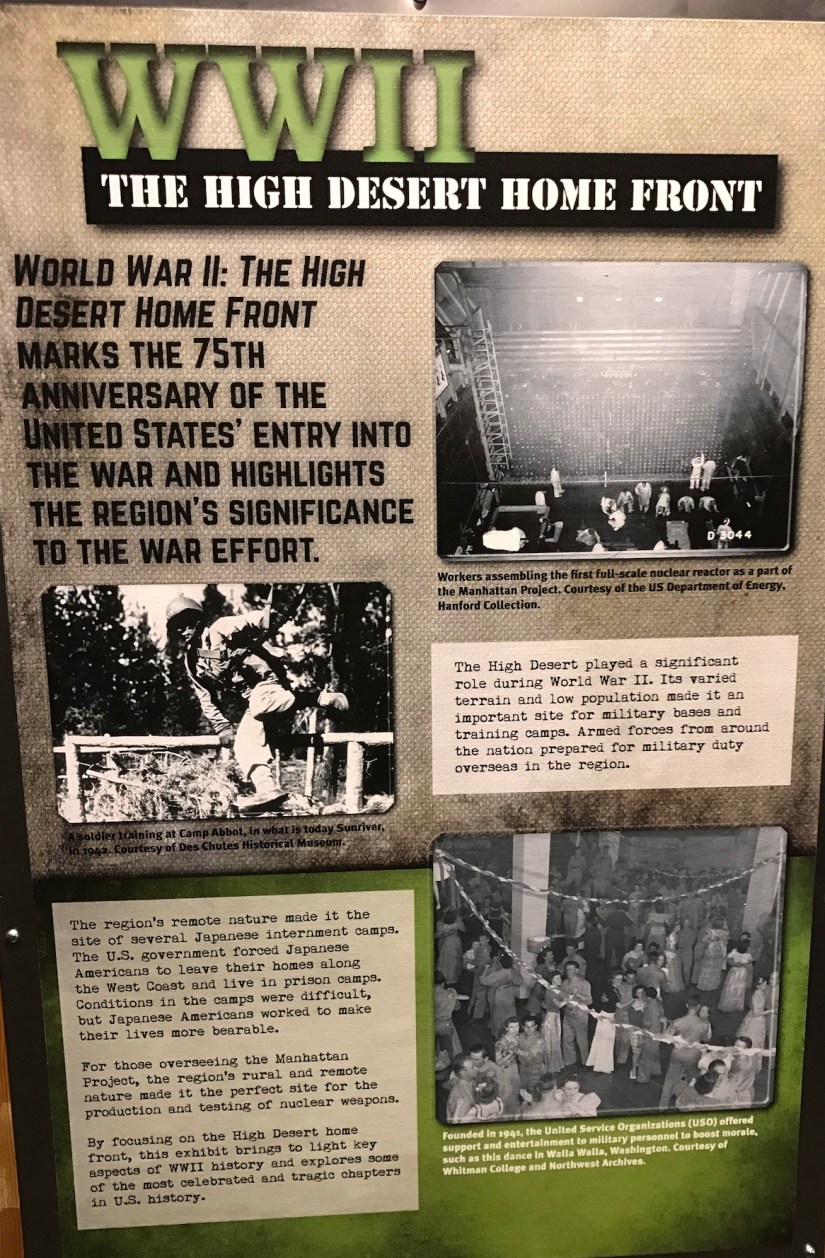
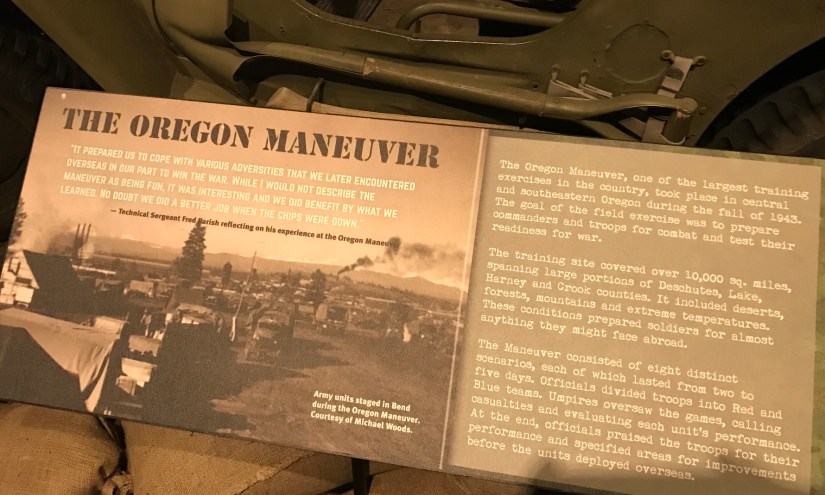
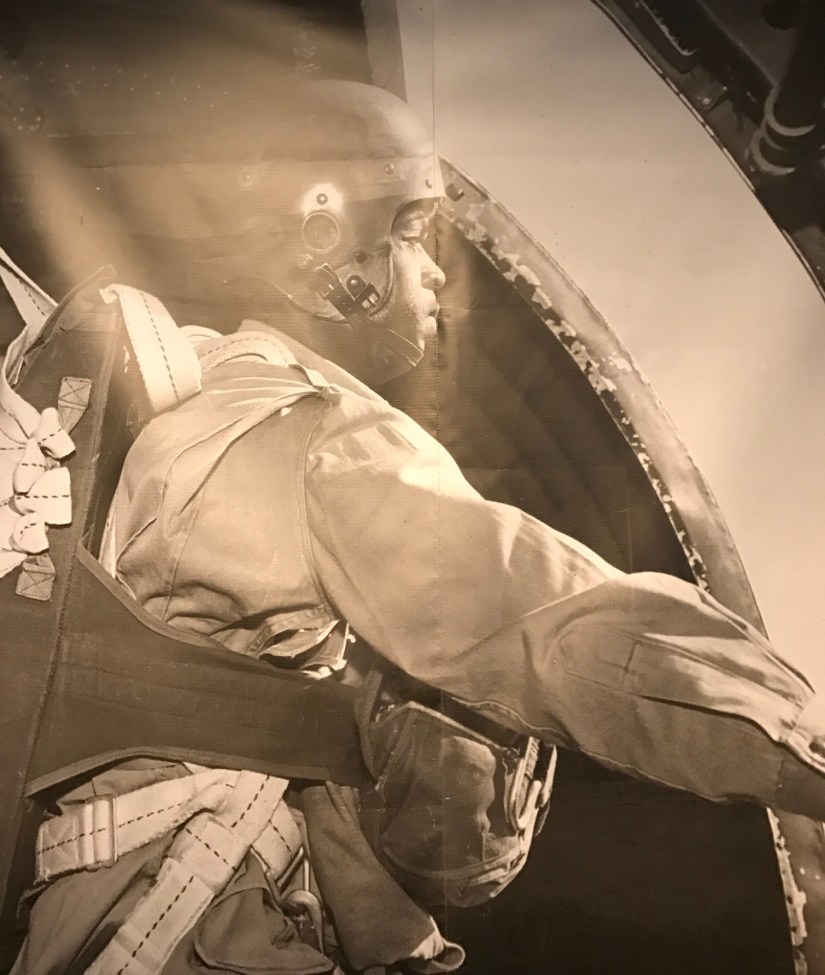
Terry the Quilting Husband (TTQH) is a military history buff and yesterday we went to see the exhibit “WWII: The High Desert Home Front” at the High Desert Museum.
This is exhibit, with many items donated by Oregon WWII veterans or their families, according the the exhibit’s page, “reveals the wartime activities that took place in the High Desert, including some of the most celebrated and tragic chapters in our country’s history”.
This exhibit honors those who served, those who gave the “ultimate sacrifice”, women workers during WWII, efforts by various ethic groups, the dark times of Japanese internment camps, and the development of and decision to drop the atomic bomb.
I took a zillion photos of this excellent exhibit and I thought I would share some of my favorites. (TTQH was in his element quietly wandering around this exhibit reading and looking at everything in awe and respect).
The Vehicles
WWII Harley Davidson and Army Jeep
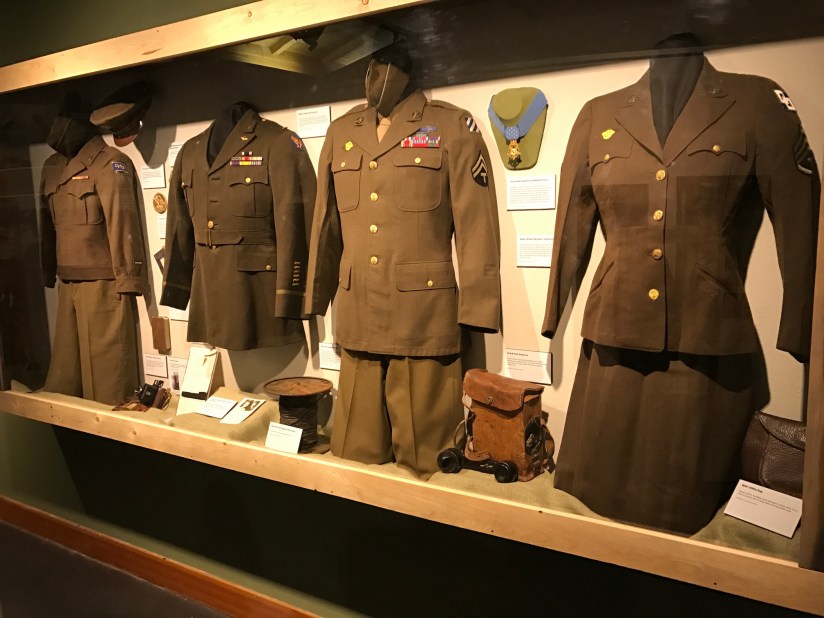
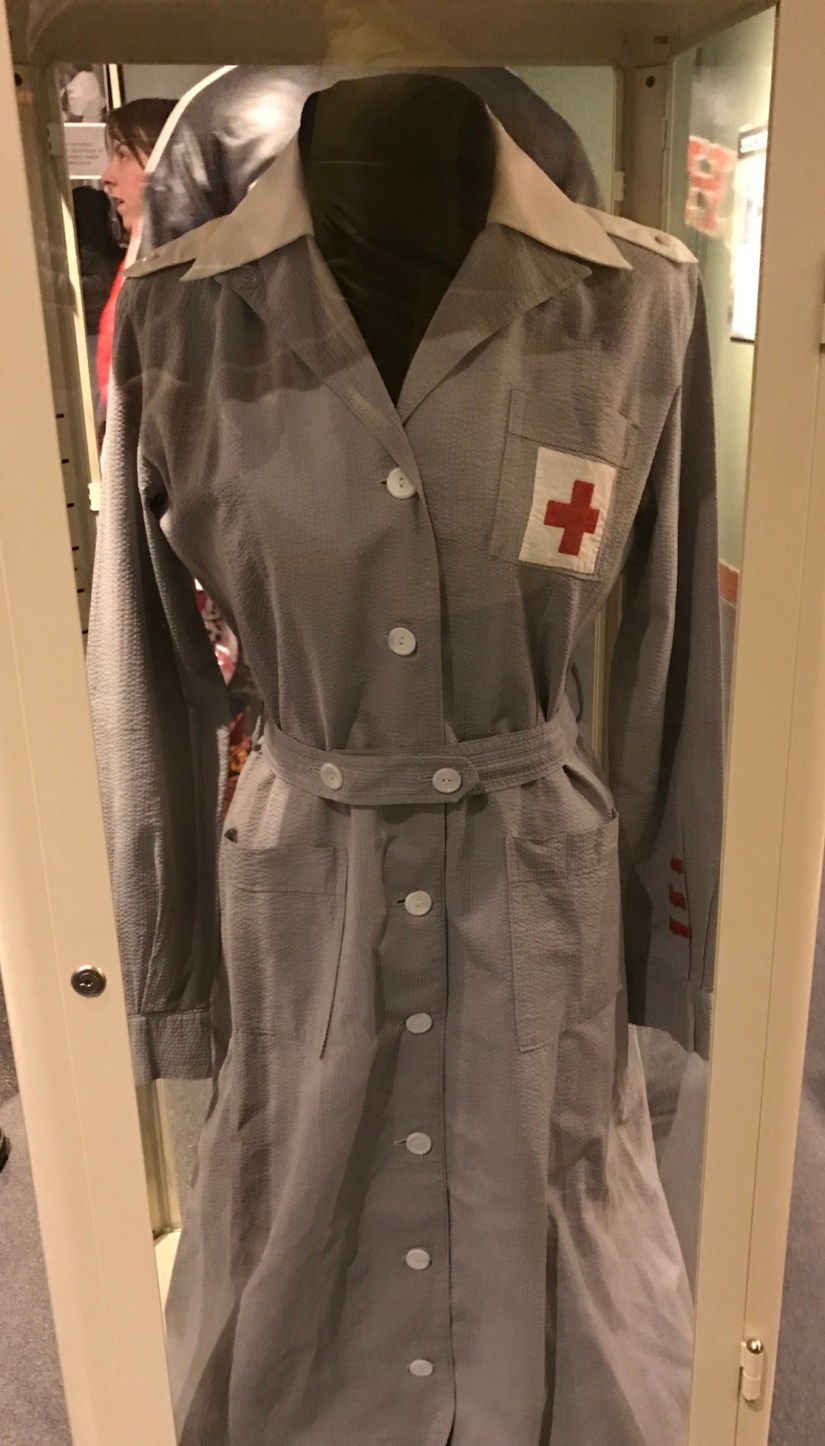
The Uniforms
Of course being a nurse I had to include the Red Cross Volunteer uniform!
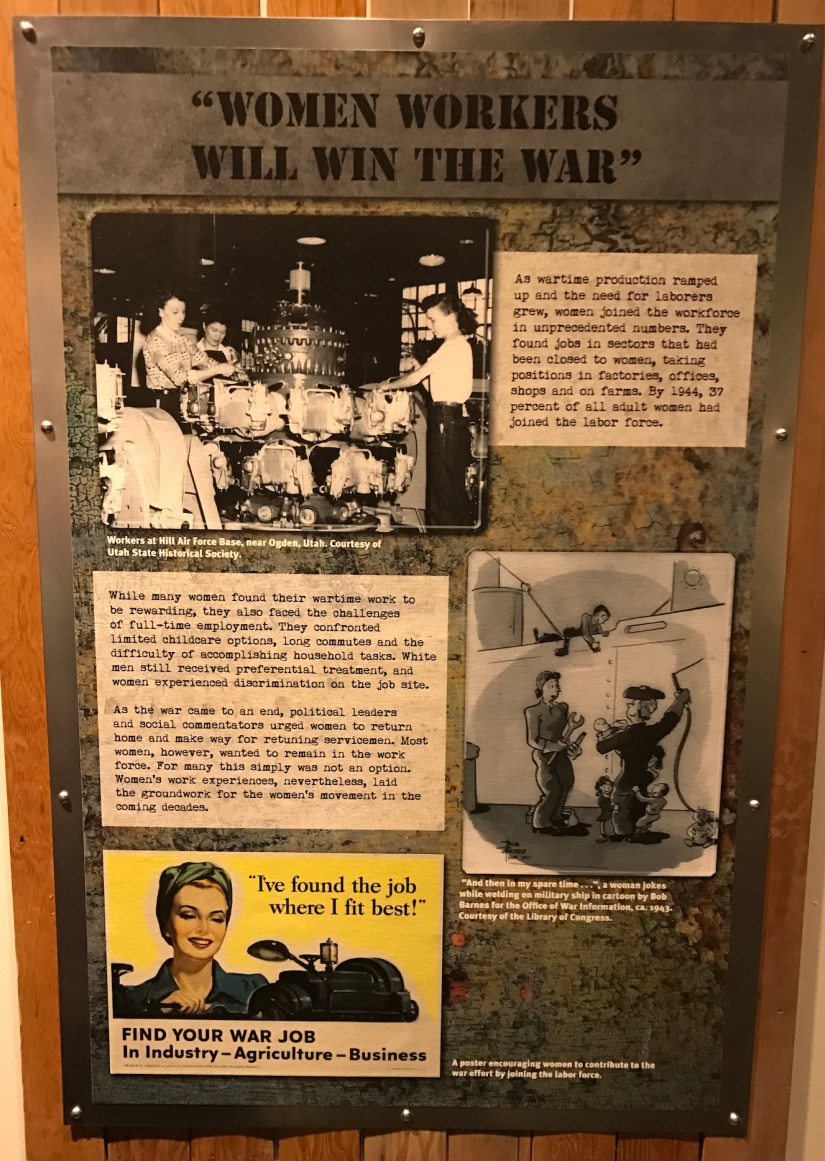
Women and WWII
I do not want World War to be a reason but I think more of us need our own “Victory Gardens” growing our own vegetables:
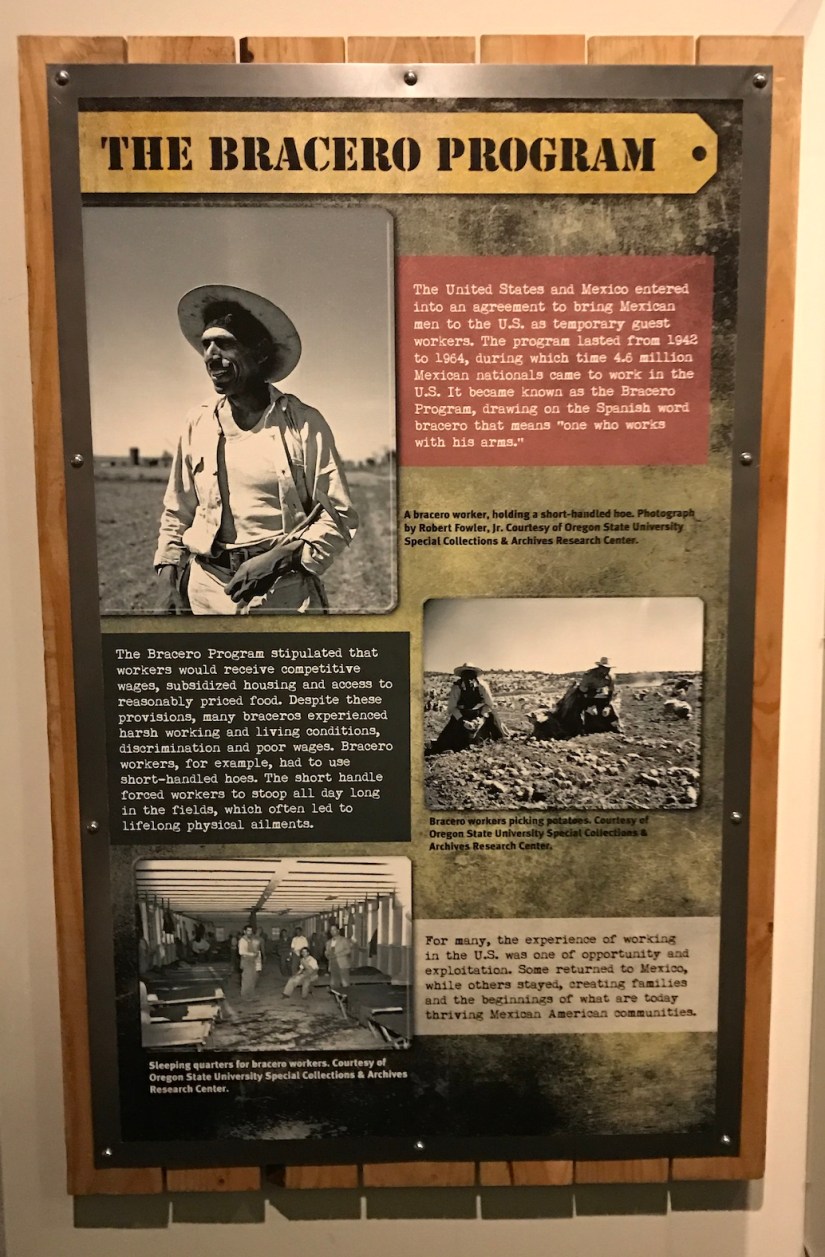
Contributions by Specific Ethnic Groups
Native American, African American, and Mexican American (keep in mind this was the 1940s a much different America than we are now…)
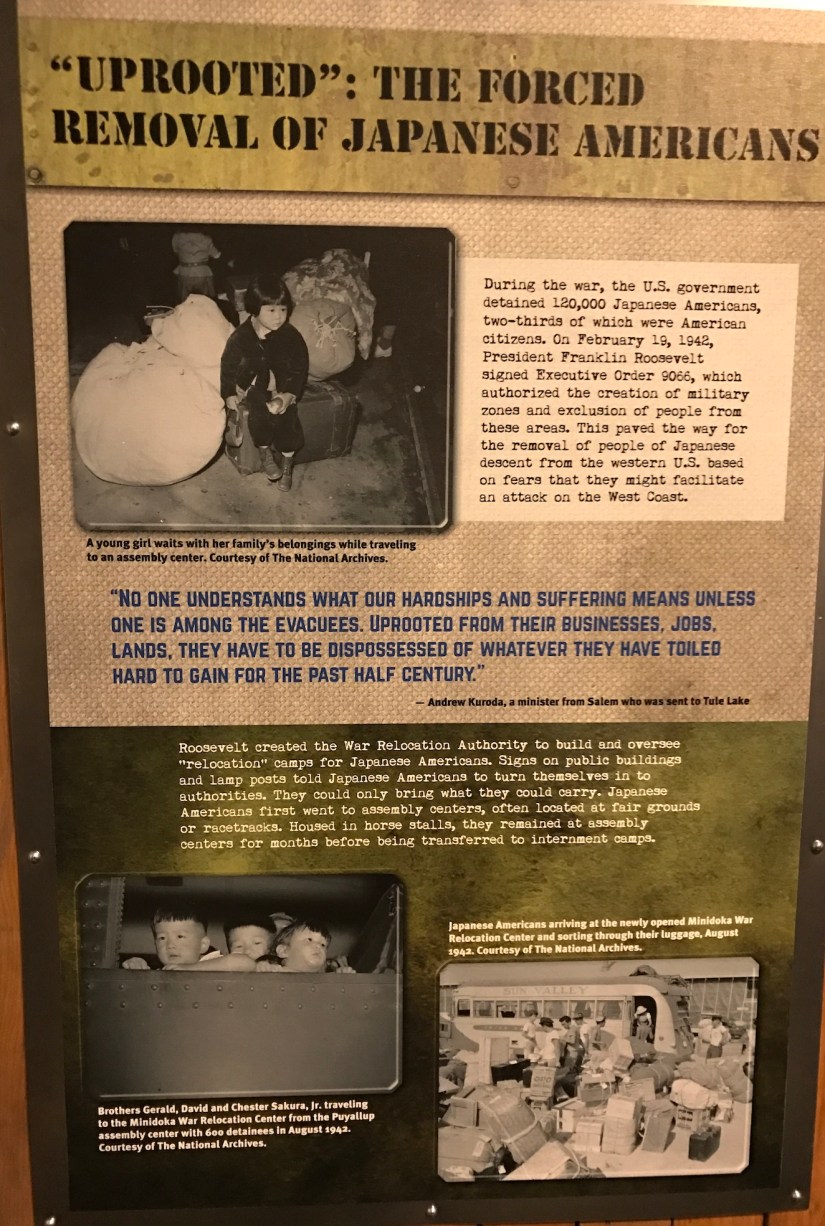
Japanese American Internment
A dark time in American history, hopefully we never forget.
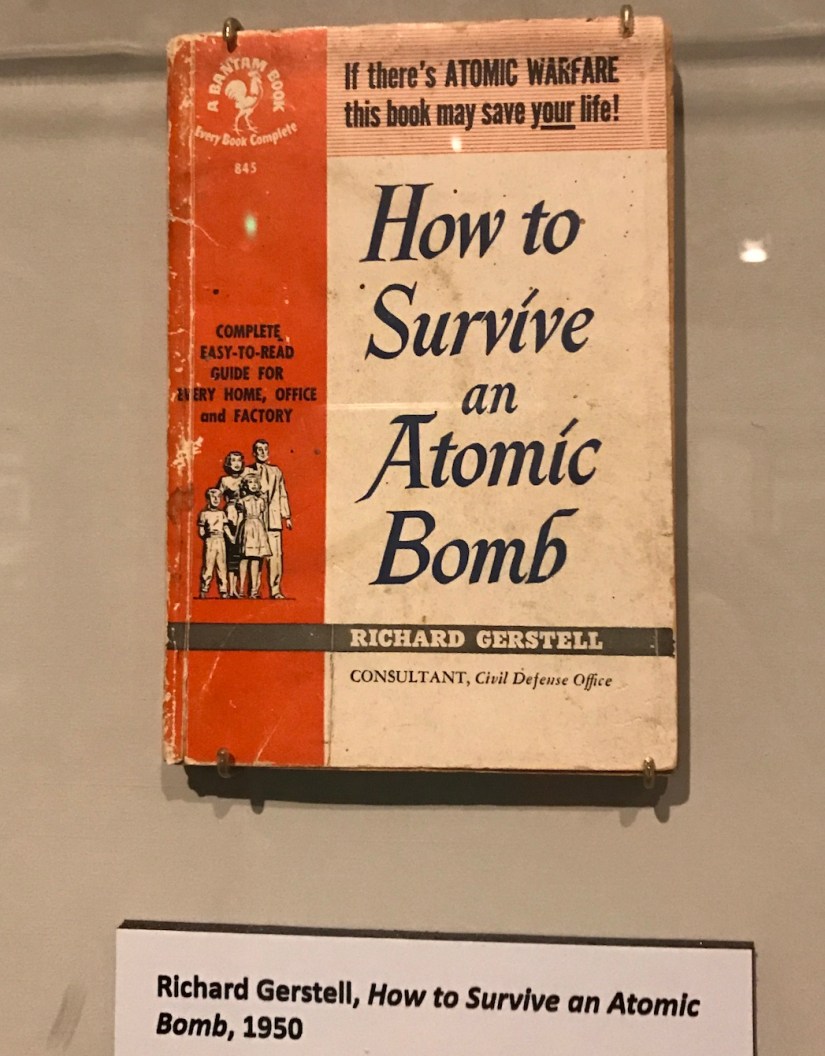
(and finally) The Beginning of the Atomic Age
Postscript
After viewing the WWII: The High Desert Homefront, we needed something lighter before leaving the museum. So went wandered the rest of the museum and enjoyed some lighter “visual fare”:
Prehistoric Buzz Saw Sharks (Helicoprion)
Hysterical T-Shirt in the Gift Shop
A little High Desert humor!
Our Beloved High Desert Raptors
I enjoyed visiting with the museum volunteer holding the raptor in falconry style. We discussed Helen Macdonald’s book – H is for Hawk and the beautiful story of how falconry with a goshawk helps a woman deal with the loss of her beloved father. I listened to the audiobook and I thought it I was listening to beautiful poetry.
Looking through the Raptor exhibit made me think back to a weekend afternoon early last Fall. On a beautiful Central Oregon day with endless blue sky and a few fluffy cloud meandering across the sky, I took a “mini-vacation” in my backyard lying on a lounger and staring meditatively at the sky.
Suddenly my view appeared partially obscured by a large flying reptilian object and I thought for a moment I was in a scene from the movie Jurassic Park. No, it was not a Pterodactyl, it was one of our Central Oregon raptors, flying very low (likely it had spotted something tasty in a backyard…). As I had been intensively and hypnotically staring at the sky the object appeared larger than actual!
The whole moment took my breath away for a second. I guess if you are going to be eaten by a Pterodactyl at least have it happen after a relaxing afternoon…
Image credit: dinosaurpictures.org
So there were so many more photos but I had to stop somewhere with my photo sharing. Thanks for virtually joining me at the High Desert Museum!
Continuing the momentum from my Quilting Studio Archaeology, each evening last week I have continued to evaluate what I have in my quilting studio/sew room.
I decided to take an honest and objective look at all the crafting paraphrenelia and projects in queue that have gathered over the years in my quilting studio closet. As a result I was able to unload and remove two tall rolling organizing/storage drawer sets. I donated them to our local Humane Society Thrift Shop along with some of their contents from my purging.
Here they are in my backseat awaiting their next adventure (I hope they go to a good home). They served me well for at least 15 years:
In one of the drawers I kept my large collection of art brush markers, gel pens and Sharpies. Most of these markers and pens came from a coworker in the early 2000s. She loved cool pens and markers at her local speciality stationary store and would impulsively buy pens. In the early 2000s I was into card making and she decided to purge her huge pen collection and give most of it to me for card making.
I moved all these pens with me from Seattle to Central Oregon in 2005 and most of them have just sat in a drawer since 2005, unused.
On a mission not to keep stuff that is not functional/does not work and that I do not love, I checked every single pen/art marker on Thursday evening (I know you are very envious that we have such wild evenings as “pen checking” in Central Oregon). I was able to toss 30 pens that had dried up.
Here is what remained (still a lot but they all work and I like the colors):
Terry the Quilting Husband and I are planning on doing some remodeling in our living room this Spring/Summer. We want to put in built-in bookcases/entertainment unit/fireplace along the largest wall of the living room. I have spent (or wasted) a lot of time on Pinterest looking at “bookcase porn”.
The plan is to repurpose 1 – 2 of the existing free standing bookcases in the living room as studio closet storage. To make this work, I will need to have less stuff in my quilt studio closet and removing the two storage units gets me a lot closer to that goal.
POSTSCRIPT
Recently I am quite inspired by a newer blog I follow – DEVISE.CREATE.CONCOCT – Finding frugal ways to live more with less (devisecreateconcoct.com). This blogger’s tips on managing your spending on the necessities of life have inspired me to also take an honest and objective look on how we spend money each month, beginning with January 2017.
Today I created an expense tracking spreadsheet and recorded expenses for 2017 year to date. It was very enlightening – for example, I did not realize how much we are spending on groceries!
Now with my quilting studio closet purged (as much as I was willing to purge at this point); and our expenses all documented, I can perhaps return to working on Farm Girl Vintage blocks (see post Farm Girl Vintage, Part II and Recent Audiobook Delights)