I was invited by Wendy Hill and Pat Pease, authors of Creative Quilt Challenges(C&T Publishing, 2016) to participate in their invitational exhibit: Shape Shifting.
Creative Quilt Challenges is a Special Exhibit at the Pacific International Quilt Festival (PIQF) , October 13-16, in Santa Clara, California. Shape Shifting will be an exhibit within their Creative Challenges exhibit. Please be sure to stop by Pat Pease and Wendy Hill’s exhibit at PIQF if you are attending and tell my friends “hello”!
For my piece in this invitational exhibit, I had decided to actually do some “shape shifting” and transform an existing art quilt piece that I was not too sure about, into something that actually made me smile.
SHAPE SHIFTING
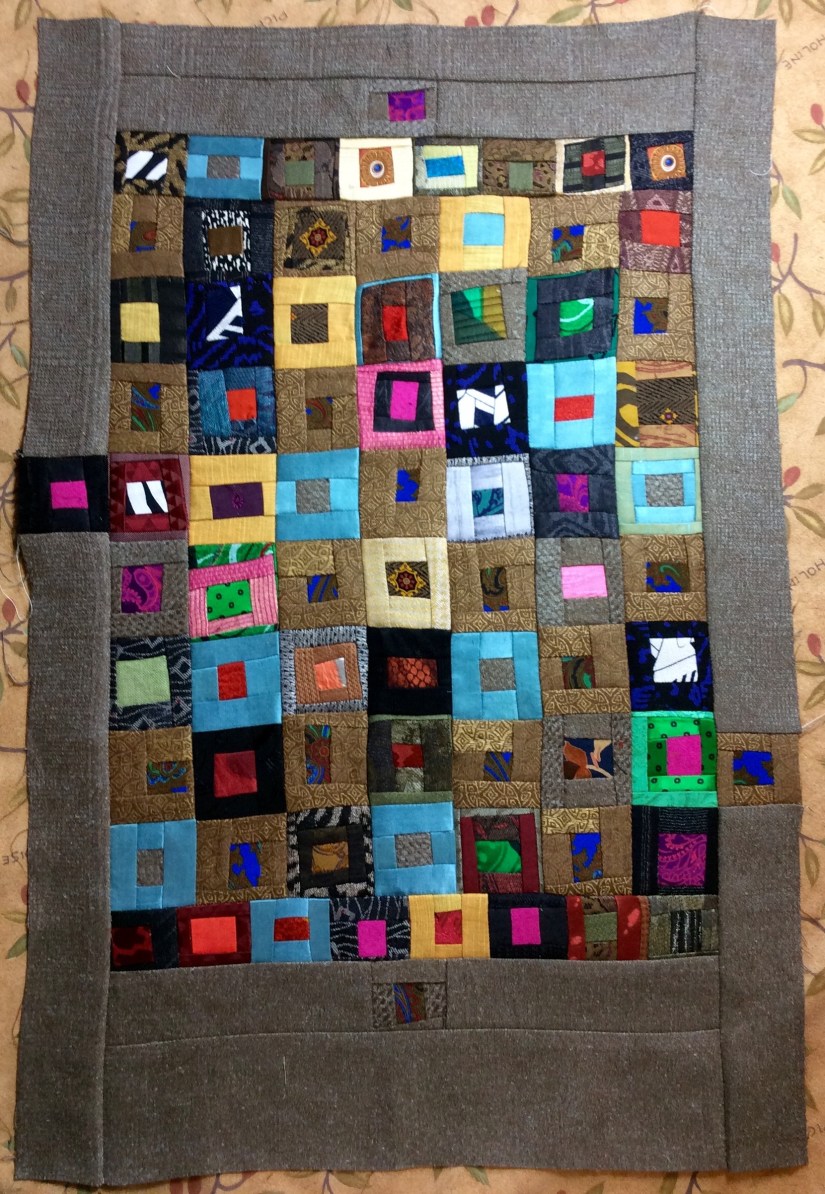
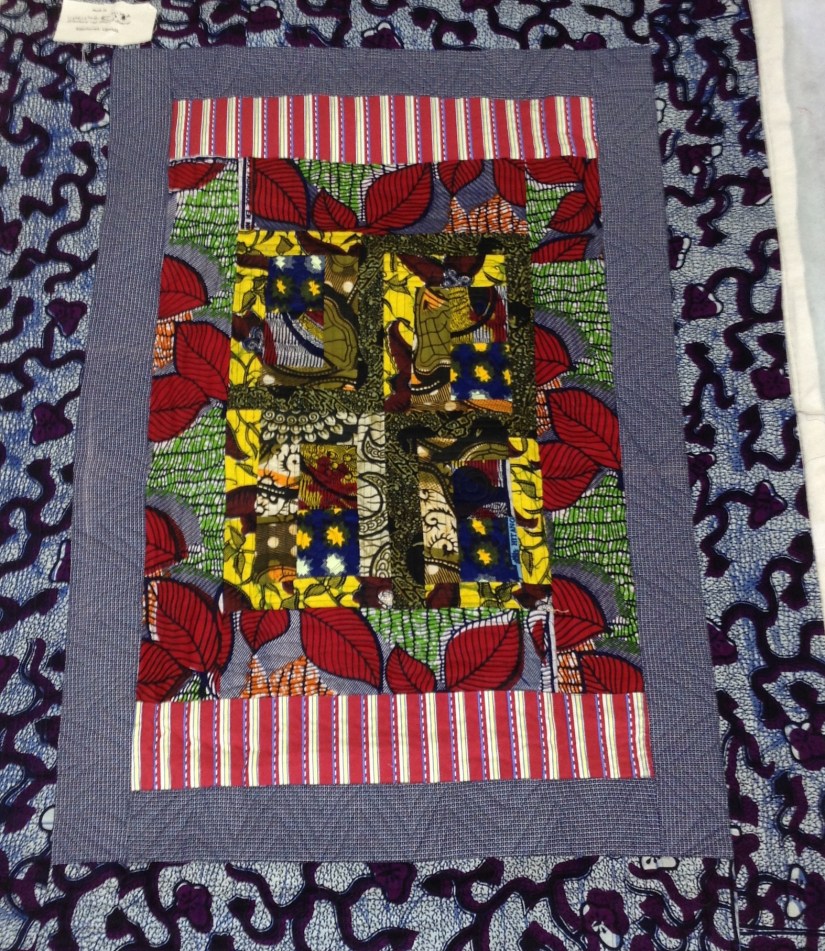
I began with this existing piece, Ohio, which I last discussed in the post Update: Ohio
Something about the piece was displeasing to me and the piece felt kind of “blah”. So I removed the borders using with some very careful seam ripping (the piece is made of recycled silks; and then sliced apart a couple sections of the piece.
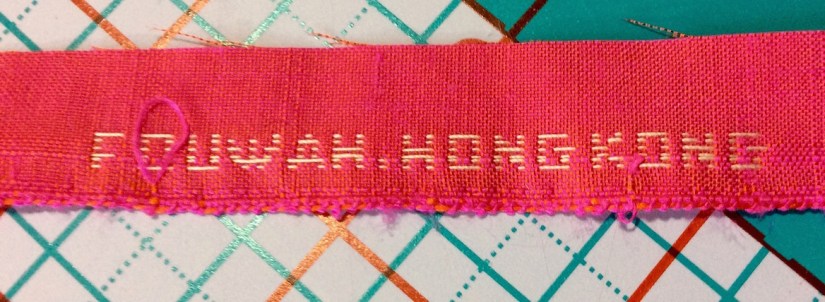
Then I played around with a border of BRIGHT fuchsia-pink raw silk that a friend picked up from a thrift shop and shared with me:
The selvage of the bright fuchsia raw silk had the name “FOUWAH, HONG KONG”. Some “googling” revealed this piece was likely a vintage fabric from Fou Wah Fabrics of Hong Kong:
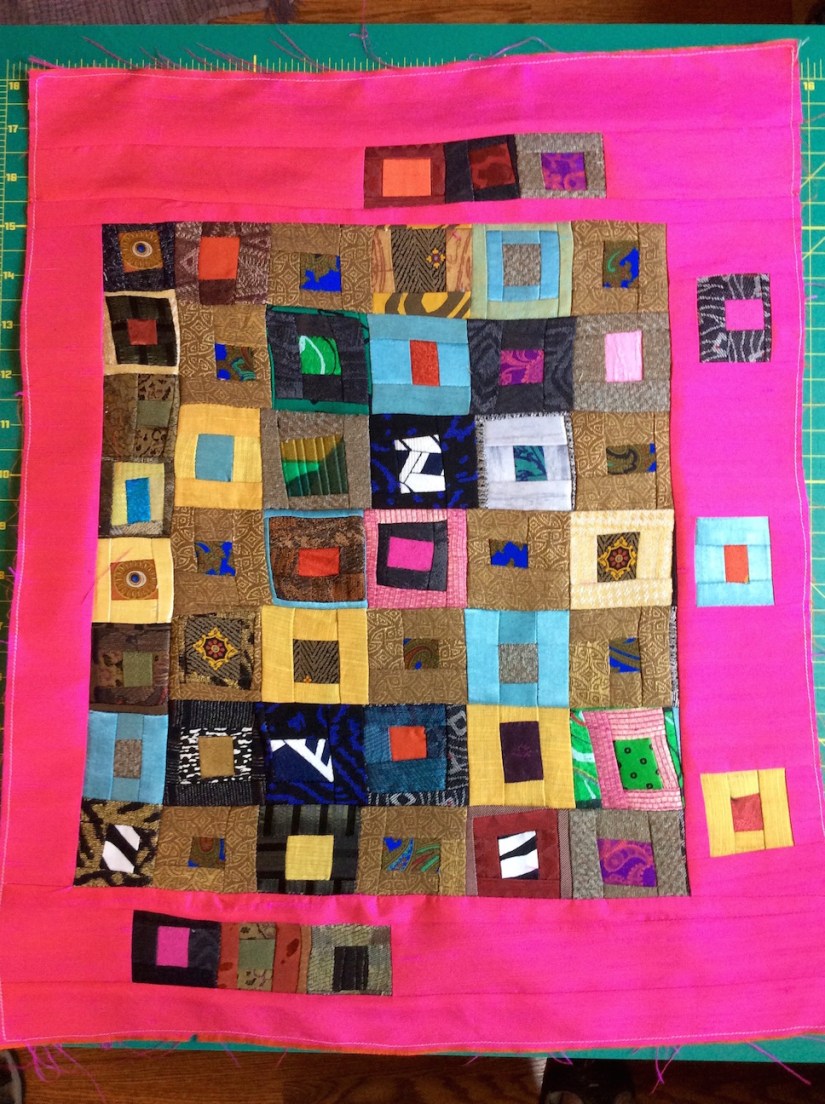
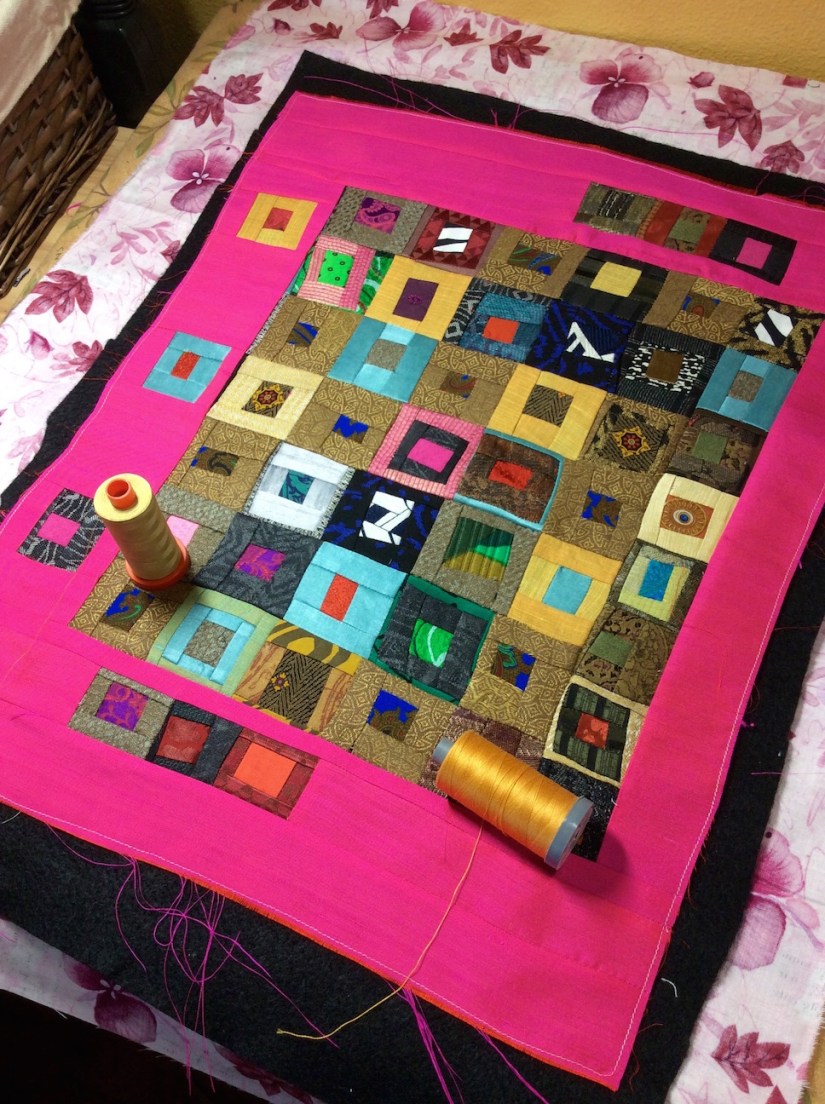
Here is the final design of the piece, which I am tentatively naming: Ohio Shifted (I will have to create quite the Artist Statement on this piece to explain to the viewer where I got the name from…I might rethink the name…we’ll see…)
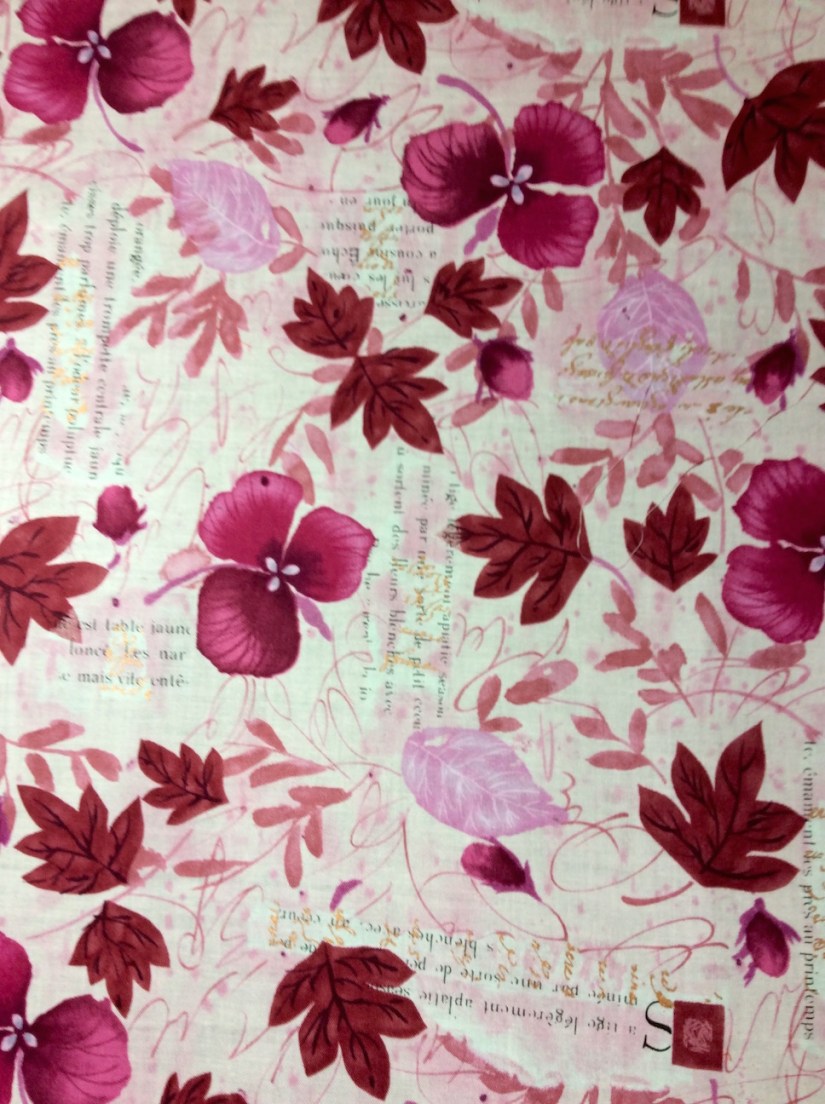
I selected this fabric for the back of the piece:
The piece is now ready for quilting. I am going to “put my big girl panties on” and quilt this art quilt myself. I need to be able to give it to Wendy and Pat by September 15th and I need to keep challenging myself to go to places (my own art quilting) that I do not want to go, so I can grow.
Initially I was going to go buy some bright fuchsia thread to quilt it with but I have selected a soft gold thread (the one on the left) that mirrors the colors in some of the blocks. I might also another another thread color, still deciding.
(Note – I did do a 1/8 an inch stitch around the edge of the piece using a 2.0 stitch length to stop the raw silk from fraying any further than the edges).
I am going to practice what I want to do as far as quilting on the quilt on a scrap silk “quilt sandwich” before I quilt on my actual piece. A couple of months ago I did quilt an entire art quilt myself for a piece for another invitational exhibit that I will post about in the future.
POSTSCRIPT
In March, I did participate in a Blog Tour to celebrate the release of the art quilting book, Creative Quilt Challenges by Pat Pease and Wendy Hill.
If you would like to read my post for my part of the blog tour, where I discuss working with “unlikely materials” (recycled silks, denim, wool) in making quilts please see the link below:
I have some great news to share: My collaborative art quilt, Abandoned Water Structure has been selected for purchase by the City of Seattle for the Seattle Public Utilities’ Portable Works Collection. This collection is part of the City of Seattle’s Public Art Collection.
Abandoned Water Structure was created using recycled silk and linen garment manufacturing scraps and samples.
Abandoned Water Structure (2015). Designed and pieced by Tierney Davis Hogan, quilted by Guadalupe Designs
THE CALL FOR ENTRY
I subscribe to CAFE for Artists – callforentry.org, an online resource for locating “calls for entry” for juried shows; a portal for entering shows; and a platform to store your and art portfolio.
After entering a couple shows over the past year and being rejected (after previous success of being selected), I had stopped entering shows due to the costs. Entering juried shows can run $25 – $45 or more per show (I did have a limit of no more than $35 to enter a show).
After deciding to take a hiatus from entering shows, I continued to read the Call for Entries e-mail that came from CAFE every couple of weeks, just for fun (and daydreaming).
A couple of months ago I saw a Call for Entry from the City of Seattle for the Seattle Public Utilities’ Portable Works Collection. They wanted submissions (for consideration for purchase) of art related to water. If you read the post about the creation of Abandoned Water Structure(which was originally titled “Abandoned Structure”) you will see the piece is all about water!
Also the entry fee was only $10. I figured for $10 I could take a chance.
I had to complete quite the entry/application and basically write an essay. Of course I like writing, so that was okay.
SELECTED!
I was notified a couple of weeks ago but needed to wait until their Public Art Advisory Committee met to finalize the decision. (I have been sitting on this exciting news!)
Their selection panel included three arts professionals from Washington State, and an advisor from Seattle Public Utilities. The panel reviewed the artworks from 307 applicants and selected 36 artworks by 34 artists. I am very honored that Abandoned Water Structurewas selected.
Here is a link to the City of Seattle Portable Works Collection, which includes works by many renown artists such as Jacob Lawrence, Mary Iverson, Gwendolyn Knight, George Tsutakawa, and Dale Chihuly.
Although I doubt Abandoned Water Structure would ever be featured on the main page, I am honored to know it is part of a collection with the works of these real artists! Additionally, as a former Seattle, Washington resident, this honor gives me a special connection to the city I used to call home!
NEXT STEPS
I will post further updates if I find out where the piece will be displayed in Seattle.
Currently I am waiting for the purchase order from the City of Seattle and then I have many, many, many forms to complete (including one on how they need to care and maintain the piece) before the purchase is finalized.
I am living the fantasy, just for a moment, of being a “Professional Artist” (smile)!
UPDATE 09/28/16
The process is complete and I sent the piece to the City of Seattle’s framer. I hope someday I can see a photo of it framed.
In my final communication with the City of Seattle’s Public Art Project Manager I received a formal synopsis of the program and what will happen to the artwork:
The artworks will be exhibitioned throughout the public spaces of Seattle Public Utilities in Seattle. These public spaces include lobbies, entry hallways, reception areas and conference rooms. In order to encourage involvement and understanding of the diversity of artwork in the collection, employees participate in the selection of artwork for their own areas. The artwork moves throughout the offices on a rotation basis, thereby increasing viewing opportunities of the art by employees and the general public. The collection is also occasionally borrowed by museums and galleries for exhibitions.
My next post was going to be about the cool projects other quilters were working on at the retreat (tuffets!) I attended last weekend. However, I do not want to lose the momentum from the project discussed in my Thursday 08/11/16 post –What’s on the Design Wall (Need Your Help).
I so appreciate all the enthusiastic responses, votes, and ideas. I have to tell those of you who commented: You made a MESS of my studio (smile)!
You should have seen my little studio – various fabrics pulled out from my stash in many different colors, from your suggestions, strewn about everywhere. It was like a tornado of fabric options had blown through.
Reading all the comments was very fun – it was like you all were crammed into my tiny studio (where would I fit you all?!??!) and we were looking through my stash together and throwing around ideas (and fabric).
Of course, I would have to plan a snack and beverage for all my studio guests crammed into the tiny room…but where would I set out the plates and cups? (Maybe I could go scavenge some more fruit from my neighborhood to serve as snacks…but that is an upcoming post: Fruits of My Neighborhood Part III!)
THE RECAP
This project began with a bag of colorful Batik scraps (that I embarrassinglyactually purchased…in a moment of weakness from the Stitchin’ Postquilt shop’s basket of scrap bags for sale..that shop is loaded with temptation!)
I turned many of those scraps into 24 6′ x 6″ blocks:
(BTW – I moved these blocks to my new hallway design wall which we created this weekend – but that is another post…)
I presented four (4) options for the layout on the blocks and here are the votes by Option:
OPTION 1A – Float the blocks individually in a neutral background: 2 Votes
OPTION 1B – Group the blocks together and then float the whole grouping in a neutral background: 0 Votes
OPTION 2A – Float the blocks individually in a gray background: 4 Votes
OPTION 2B – Group the blocks together and then float the whole grouping in a gray background: 2 Votes
In addition to voting on options I presented, many of you in your comments suggested different options(I hope I captured the essence of all the comments to date, my apologies if I left a summary of your comment out below):
Group them together on a neutral background not trying to make them perfectly square, use Misty Fuse to attach them
Stitch the blocks together, use a pieced binding to enclose them, they speak so well on their own!
Group them together on the grey but make sure all blue sides are facing opposite of the grey fabric and placed up against another block rather than up against the grey fabric not allowing a blue side to but up against another blue.
Float each block individually, with a PURPLE or RED background- keep the color going! And maybe put a yellowsquare at each “intersection”
Golden brown would be nice also (to float blocks).
I agree with some others are dark brown, plum, dark red, I’d be inclined to try them on different ones and see which calls loudest.I start to wonder if it’s be even better on the dark brown.
I think a chocolate brown would be so cool.
I would make more blocks, group them without sashing or a border, and bind with a pieced binding (NOTE: I did make more blocks, see below!)
If you do want separation, don’t set them straight, in rows and columns. Use your separator in more random sizing — perhaps framing each one with the same fabric but in wonky widths. It might be easiest to pull off with a fabric that has some pattern so the seams between newly framed blocks disappear a bit.
If you really want to set them apart on a different background, what about looking at either a gold dupionior a deep purple dupioni?
(from a text to my phone, not posted to the blog) What came to mind was floating blocks in a round of neutral logs then a round of gray logs – maybe alternate with the reverse – round of gray first then neutral – then you float and have blocks side by side – and I’m thinking of a neutral acid yellow or lime greenor maybe an acid yellow orange – a crisp bright marigold color – all would look good with the blocks and gray.
Option Z: I love love love the blocks, but am partial to flashy colorsmounted on a white background. I also like sashing between the blocks because it makes each one pop.
While I like both versions of placing all the blocks together and placing with sashing, I would need to try the sashing version using a variety of sizes and different shades of either the light or the grey.
One fellow blogger, Melanie @ Catbird Quilt Studio was kind enough to e-mail me a photo of one of her lovely scrappy log cabin quilts, “Broken Pains” as an example of a layout she used:
Photo courtesy of Melanie McNeil, Catbird Quilt Studio. Used with permission; all rights reserved.
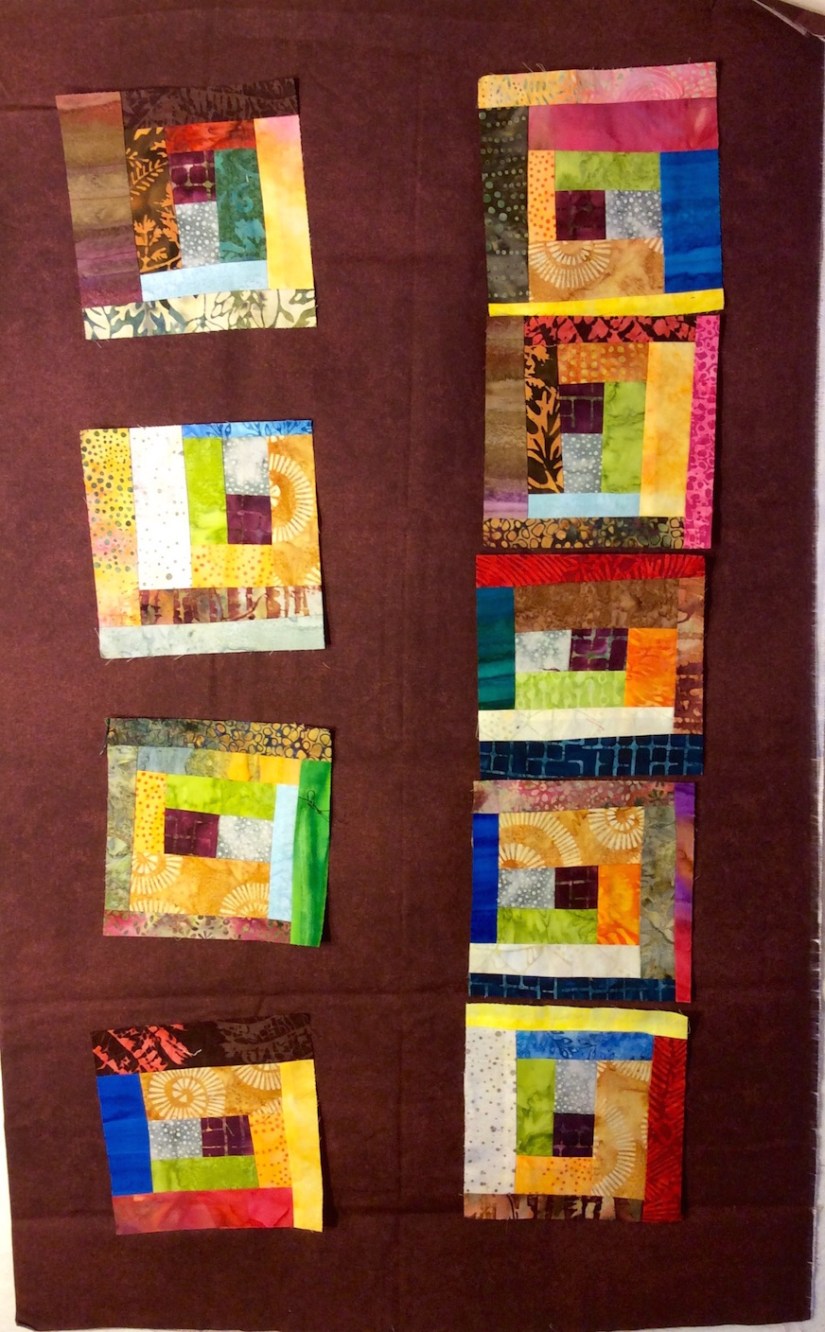
In addition to showing you the scraps I started with, in the previous post I shared the pile of scraps I had left over from trimming the original set of blocks down to a 6″ x 6″ size:
In the evening on Friday and Saturday, I turned the trimmings from those scraps and some of the remaining scraps into 23 more 6″ x 6″ blocks:
(Now why didn’t I make 24 more instead of 23 more? I guess I lost count while piecing!) As you can see, these blocks are somewhat darker and have more piecing. I tried to use all the scraps from the trimmings which had piecing within the scraps.
I now have scraps left over from trimming the latest blocks and the remaining original scraps that started it all…and yes, I am going to make more blocks out of them! (Besides 47, 24 + 23, is an usual odd number of blocks. )
THE EXPERIMENTS
I tried out many of your color suggestions. To save time, I had a “pocket full of scrappy blocks” as I experimented. I never imagined walking around my house with a pocket full of quilt blocks!
Now, try and use your imagination as you look at my experiments. Although I tried to put strong lighting on the design wall, if you have been following my blog for a while, you know I am not the best photographer (if I tried to make photography a career I would be very hungry).
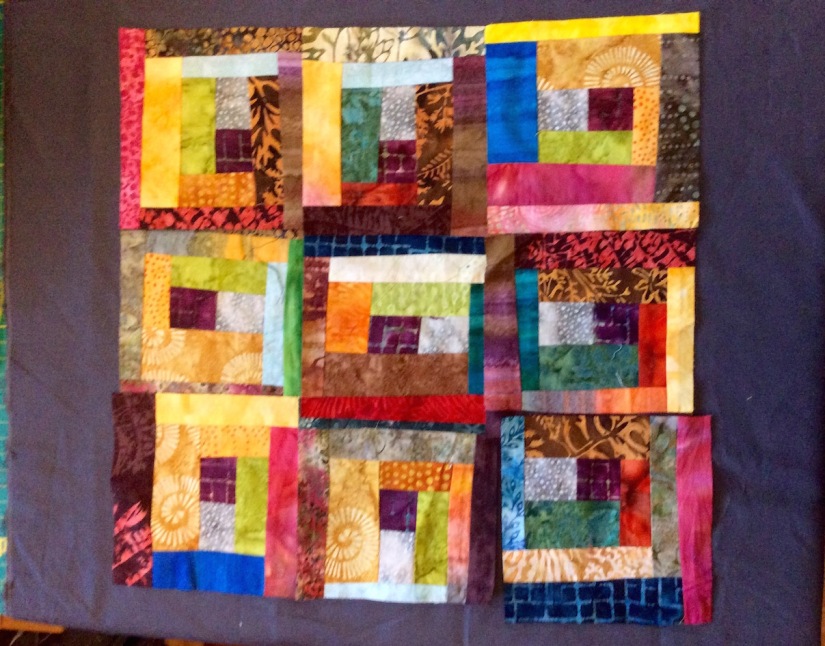
I provide two layouts on each test background fabric: 1) floated and 2) grouped together with a border.
More disclaimers (soon you will be frightened to even scroll down and look…): I did not iron the fabric I used as the test background and I randomly selected the blocks to go onto the test fabric. (If this were a real quilt layout, I would have given more thought to the block placement and order.)
RED – I loved this!Brown – sort of a “milk chocolate” brown – could take it or leave it…Dark Brown – I guess the “dark chocolate” brown – I liked it!Gold – this is a new Moda fabric I picked up – I love it!Different shades of gray using an ombre fabric – could take it or leave itPurple – lovely!White – in concept sounded nice put I do not use large amounts of white in my piecesBlue-gray – sort of denim like – I liked it! This is one of the Peppered Cottons I have on my Etsy shopMARIGOLD! Well as close as I could get to marigold – this is a Moda Grunge line fabric and this is my favorite!Looked for an “acid green” in my stash but this bright lime green was the best I could find. I like it!
THE DECISION
Thank you so much for all the great ideas. I also appreciated all the layout and general design ideas.
My decision is as follows:
Make more blocks, trying to use up nearly all the remaining scraps.
Do not make a quilt with these blocks, instead make a SERIES of artsy table runners for my tierneycreates Etsy shop using various combinationsand layouts of these blocks and my favorites of the backgrounds above (red, marigold, gold, purple, dark brown, and lime/acid green).
Thanks for coming with me on this color and design adventure! I will update you all as I complete the table runners!
POSTSCRIPT
Here is a follow up on the post Mysterious Thrift Store Fabric Find: One of my blogger buddies, Claire @ knitnkwilt.wordpress.com, tapped into her resources and got a translation for the words on the selvage of my mysterious Asian fabric thrift store find:
ll the characters on the left say is ‘manufacturer/maker’. I’m guessing the ones just to the right of Watex are the company’s Japanese name. The handwritten characters say ‘Golden Age’
Thanks so much Claire for helping solve the mystery.
I had more ramblings for this Postscript, but you are likely exhausted after reading this very long post!
Check out Sassy the Highly Opinionated Miniature Schnauzer’s blog on SchnauzerSnips, for her latest musings…
BRIGHT COLOR!!!
One of my blogging-buddies, Laura @ Create Art Every Day, recently asked me in response to my comment on one of her post:
Have you ever done a quilt with lots of white or neutral (back)ground mixed with really bright brights?
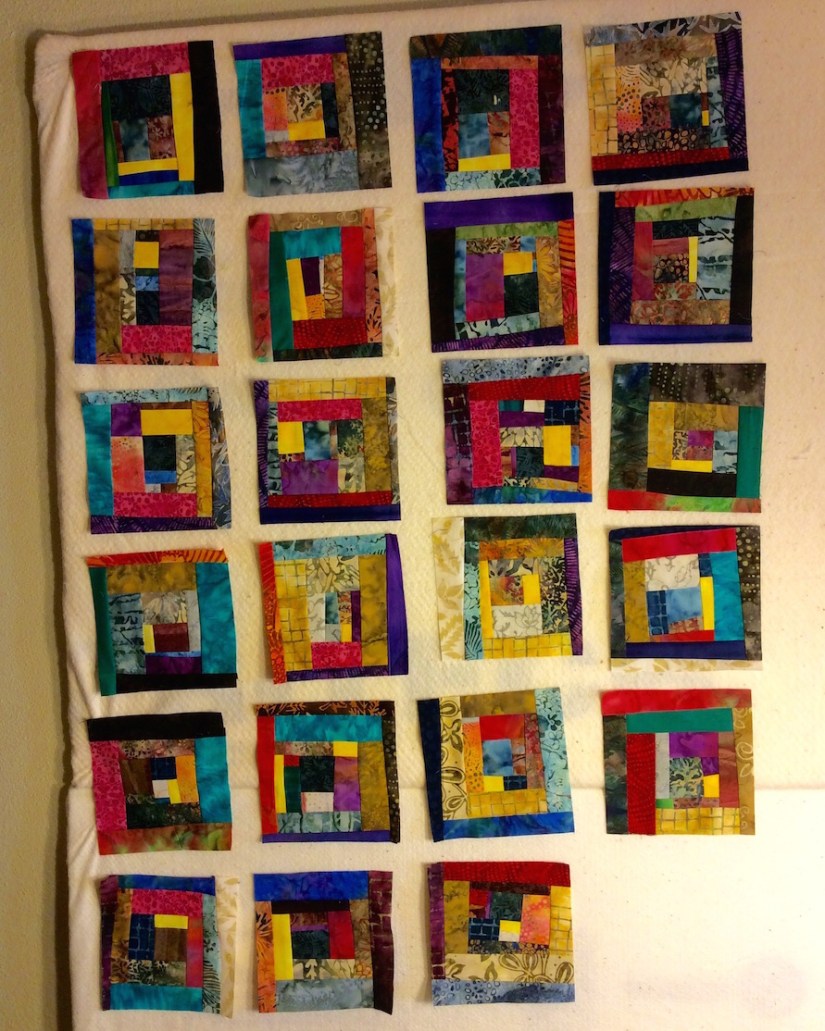
Her timing on this question is amazing as I just returned from a four-day quilt retreat with some of my Quilting Sisters and some new quilting friends I met at the retreat. While at the retreat I worked on free-form piecing of log cabin blocks (“log jamming”).
First round of scrappy log-jam batik blocks
These blocks started as bag of colorful batik fabric scraps:
The bag of batik scraps that started it all
I trimmed each block to a 6″ x 6″ block and I have scraps left over from trimming the blocks and I am going to use those “trimming scraps” and the rest of the scrap back to make more blocks.
The leftovers from trimming the blocks
Now here is where I need your help – I am trying to decide what background color to set the blocks into and what layout. I would appreciate input from crafters and non crafters – I want to know what you find most aesthetically pleasing:
OPTION 1A– Float the blocks individually in a neutral background:
OPTION 1B – Group the blocks together and then float the whole grouping in a neutral background:
OPTION 2A– Float the blocks individually in a gray background:
OPTION 2B– Group the blocks together and then float the whole grouping in a gray background:
This dilemma is actually the fault of Laura @ Create Art Every Day (ha!) as originally I had purchased the gray fabric during the quilt retreat to float the blocks. Then I was inspired by Laura’s comment to float the blocks in a neutral background!
I am stuck and would appreciate your vote and any comments you want to make regarding your rationale. THANK YOU!
In my next post I will share what the other quilters were working on at the quilt retreat I recently attended and some cool fabric finds (in addition to the one mentioned in “Postscript”).
POSTSCRIPT
Frivolous Purchase
Speaking of “Bright Color“, while at the retreat, I bought a frivolous but cool piece of fabric – a panel by Hoffman Fabrics of their entire Hand-Dyed Batik Watercolor Palette:
It is now hanging in my studio.
I do love bright colors and here are the quilts I keep on the chair in my studio. The two on the left are made by my Quilting Sisters (Judy D. and Kathy R.) and I was rotating them as wallhangings in my studio prior to getting the Hoffman Batik panel. The one on the right is my first experiment with creating Half-Square Triangles with charm squares using a Batik charm back I bought in the early 2000s (I made this quilt around 2003).
A Blog Recommendation
I follow many wonderful blogs by other crafters, quilters, painters and other artists. I also follow inspirational blogs by non-crafters. Please see my “Blogs of Follow” list section of my Home page.
I was fortunate to discover (I think by a comment on one of my blog posts) a blog by a Nigerian quilter – Sola, called Alice Samuel’s Quilt Co. Her blog is very interesting to read from a quilter’s perspective outside the US. I have also come across various wonderful Australian and UK quilter blogs.
I love how quilting connects us across the globe!
In Sola’s latest post, she has a wonderfully researched (with lots of links to resources) post on:
Thanks to my fellow bloggers for their engaging blogs I love following; and thanks to the tierneycreates readers/followers (extra thanks to those who take the time to comment on posts). I feel very blessed! (huge smile).
This post is a quick follow up to the post Creating… on 07/27/16 where I discussed pulling out from my project pile and completing a set of “art pillow experimentations”.
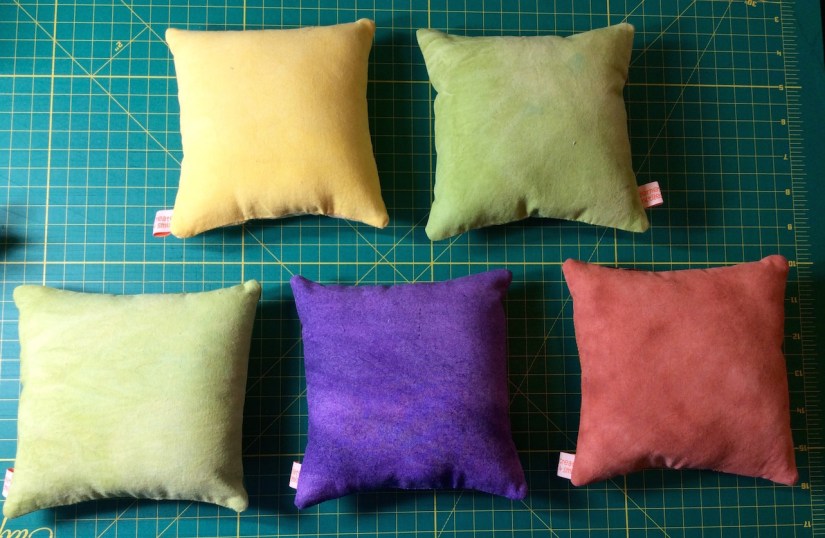
I spent part of this weekend finishing up the rest of the little art pillows (they range from around 6 x 6 inches to 8 x8 inches for the large one).
Here is the full set of the finished pillows (notice my new tierneycreates labels on each pillow):
Here are the backs of the smaller pillows (made with hand dyed fabric found at a thrift store (it was quite the score!)
I was going list these three pillows on my tierneycreates Etsy shop as a set but I decided to just list them separately (they do look cute together though):
Here are close ups of some of the pillows:
I am posting this on Sunday night but you will likely read this on Monday, so I wish you all a wonderful week, and talk to you later!
I am inspired by her paintings! I might do a little quilt piece inspired by her work.
In Central Oregon we actually have a famous quilter and a well-known painter collaborating on art projects – Jean Wells Keenan (quilter) and Judy Hoiness (painter).
I realized it’s time for “Tierney” to return to “creating”…
This blog is not called:
tierneywritesaudiobookreviews;
tierneyshowsterrythequiltinghusband’sprogress;
tierneysharesherrandomthoughts; or
tierneyobsessesaboutsunflowers
The blog is called tierneycreates, so Tierney better get to creating! (I like the imaginary sense of accountability blogging gives me – like you all will be very disappointed if my blog does not live up to its name!)
So last evening, I returned to “creating” and pulled out the “art pillow experimentations” tops I started last year and discussed in the 12/24/15 post What’s On the Design Wall: Playing with Solids.
I was excited to pull these items out of the “set aside to work on later” basket (set aside for 7+ months so far!) and turn them into pillows.
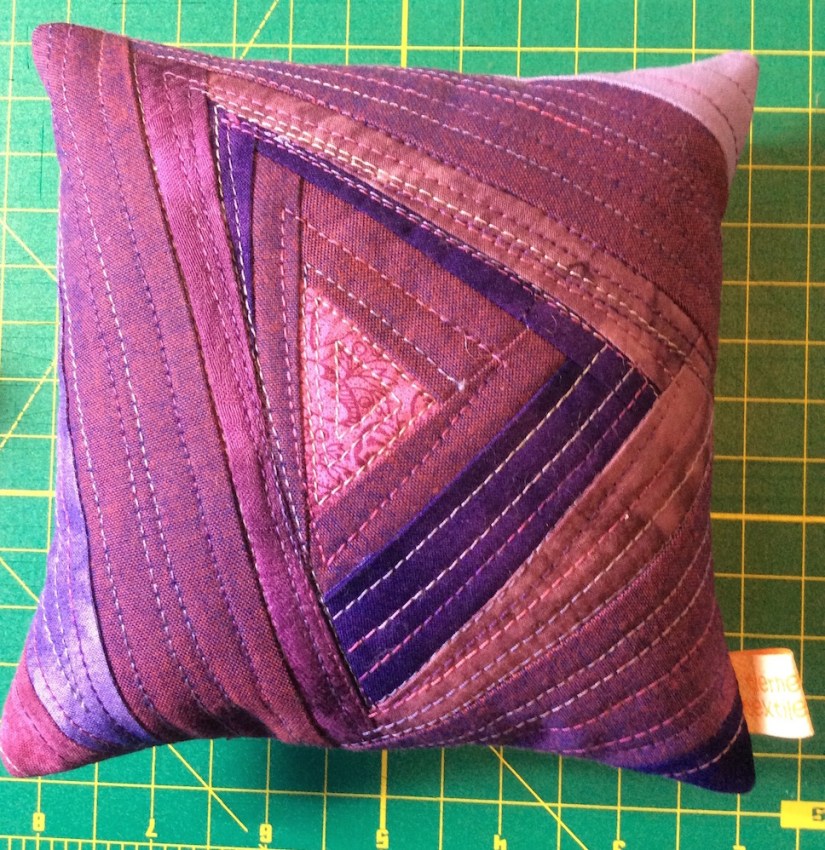
So far, I started with this one:
And turned it into this little pillow which I have named Textured Desert Canyon:
Textured Desert Canyon (2016) by Tierney Davis Hogan
I was excited to use my new “tierneycreates – smiles & textiles” tags (see post Embracing Orange) for the first time on this pillow (can you see the little tag in the photo?). I had to experiment to figure out exactly how to make the tag work but I think I like the outcome.
I experimented with quilting with a solid color thread and then a variegated thread to try and give a lot of depth to the quilting.
What surprised me was the dense quilting gave the hand dyed solid scraps pieced into this pillow a suede like texture and appearance. I am eager to experiment more with dense quilting.
Now onto to working on the next four (4) pillows!
Postscript
I follow many wonderful blogs and recently one of the blogs I follow, Catbird Quilt Studio has begun an interesting series on The Future of Quilting.
Here are links below to the two enjoyable posts in this series so far:
I have accepted the color Orange is part of my creative life, as I discussed in my July 3rd post, Orange. As a matter of fact, I have done more than accepted Orange, I am embracing Orange!
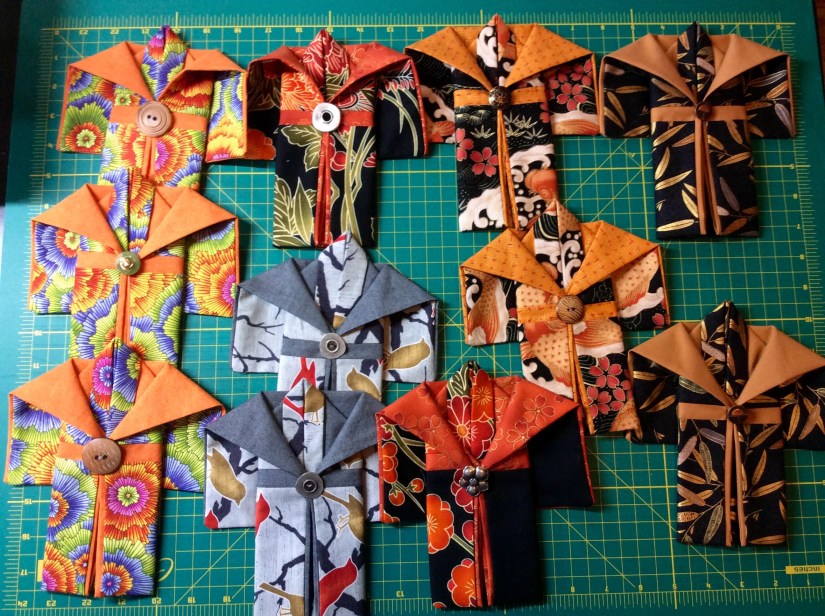
This weekend I worked on restocking my tierneycreates Etsy shop. It is still far from the days when I had 90 items in my shop. My miniature kimonos continue to be popular and I recently sold 4 to a lovely person in Canada as well as 4 to various friends (I continue to fleece my friends in person, making them purchase my handmade items, ha! See the end of the post Quilt Retreat Weekend: The Projects)
Many of the miniature kimonos in the new batch I made feature the color Orange:
I have been building a nice button collection and I enjoyed selecting a button for each kimono.
My friend Dana gave me some wonderful buttons in May at our annual Jelly Rollers Quilting Retreat (she was my Secret Quilting Sister). Additionally I used a couple of the buttons from my recent antique button acquisition during the 2016 Sisters Outdoor Quilt Show (see post 2016 Sisters Outdoor Show Part I).
Now it is time to get each miniature kimono with its hanging chopstick and coordinating embroidery floss for hanging (though some people have put them in shadowboxes instead of hanging). Then it is time for their individual “photo shoots” for their Etsy shop listings.
Figuring in the cost of materials, time to make them, and Etsy seller fees, I figure I make like $3 – $4 per kimono. But my Etsy shop is a fun hobby and I enjoy knowing that my handmade creations are in peoples’ homes around the country (and Canada!).
If I tried to live off my Etsy shop I really would be foraging for free neighborhood fruit (like in prior post) for sustenance – ha!
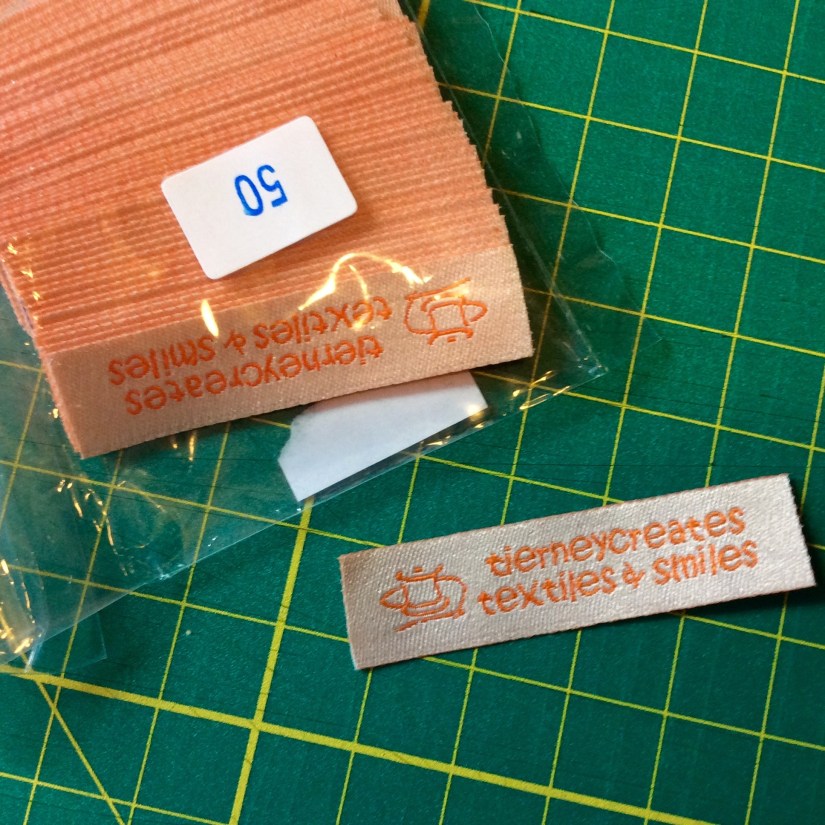
MORE ORANGE (Orange Labels!)
Recently I decided I wanted my Etsy shop items to look a little more polished by adding a professional label to some items. I will not add the label to the miniature kimonos but I will to future art pillow and table runner creations.
I purchased the labels from another Etsy shop (Wunderlabel) and guess what color they are in? ORANGE!
POSTSCRIPT
Speaking of color, I have been following a wonderful blog by a painter, Laura’s Create art every day. A couple years ago while taking a Jean Wells class on art quilting, she suggested that we also seek inspiration from the work of other artists outside of fiber/textile arts – like painters. I have started following the blogs of several painters and I am so inspired by their use of color and their creatively (oh no I see a future “Creative Inspiration” series blog post coming…)
Here is a post from createarteveryday.com with some seriously inspirational use of my new color best friend, Orange:
If you ask me: “Tierney what is your favorite color?” I would likely reply “Purple“.
There is very little purple in my recent art of utility quilts. There is very little Purple in my house. However, there is a lot of ORANGE.
I would never say that Orange is my favorite color but if you look at the background on my blog (which is a photo of a quilt I made based on an old tile floor); if you look at the quilts I have made over the past 5 – 6 years (art and utility quilts); and if you look in my fabric stash, you would think I was beholden to the color Orange.
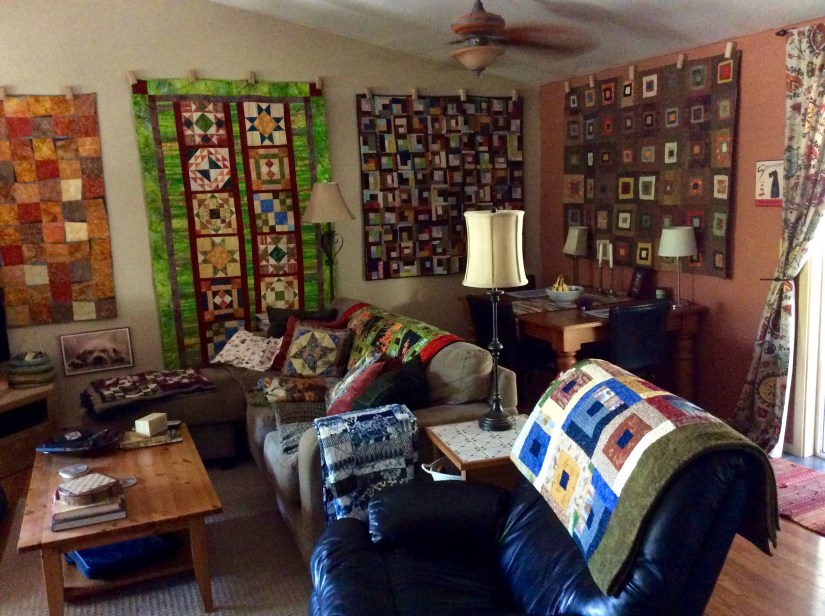
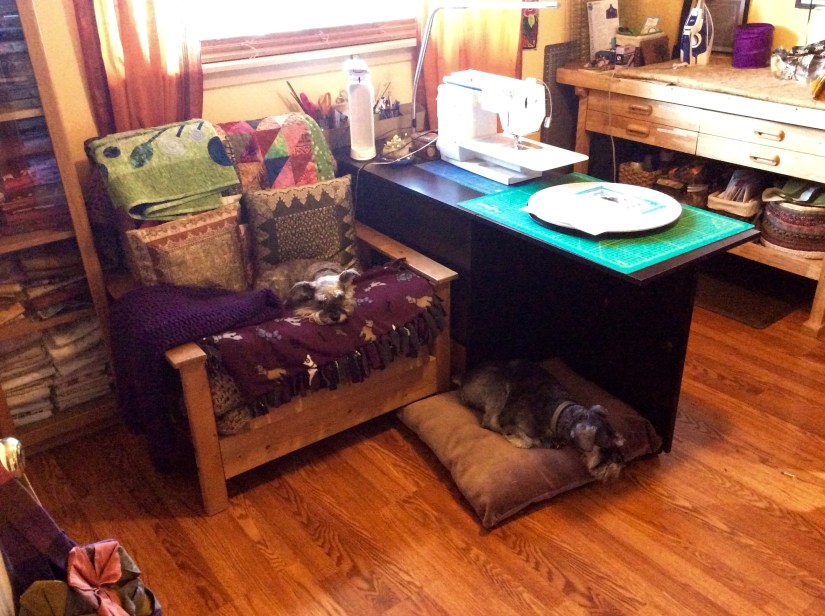
Check out a photo of my living room area – notice a lot of “shades of orange” in the quilts on the wall?
I am not sure when my apparent and subconscious love of the color Orange began and I am not sure when it will end.
There was an article in the 2015 premiere issue of Room to Create magazine on “Color & Creativity” (page 8). In this article the publication discusses how color impacts mood. Here is an excerpt of what the article said on the color Orange:
ORANGE
Looking for excitement, energy and enthusiasm? Orange may be your soulmate.
I guess Orange is my “color soulmate”!
Do you have any color that keeps surprisingly appearing in your work?
POSTSCRIPT
I just realized that I had the quilt below on the wall of my living room for a number of years. I will be showing/selling it in this year’s Sisters Outdoor Quilt Show. The ORANGE is really strong and prevalent in this quilt!
Splendid Splendor – pieced by Tierney Davis Hogan, quilted by Betty Anne Guadalupe. The pattern is called “Slideshow”.
A friend of mine and I have an ongoing joke that we are going to write a book called “An Idiot’s Guide to Being an Idiot”. Over the years we have shared and collected humorous mistakes, miniature disasters and cosmic foibles.
Today I created a new chapter in our imaginary book. The chapter would be titled “How to screw up your iron when you really need it work”.
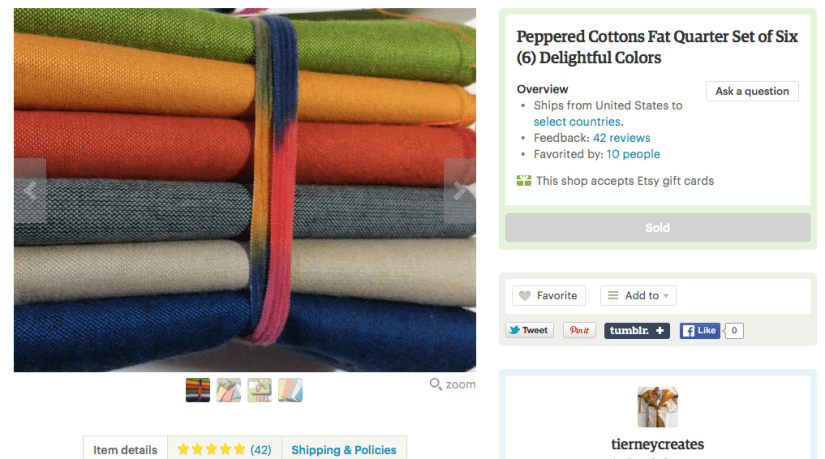
In addition to handmade items on my tierneycreates Etsy shopI also sell some carefully curated fabric (fabric I want to use but needed an excuse to buy the entire bolt…hey – I can share it with my customers!).
I created a fat quarter set from the collection of the solid color Peppered Cotton (“shot cotton”) yardage that I sell.
The fat quarter packs have been a great seller, and yesterday I sold another set and today I needed to prepare it to send to my customer. However, what I did not realize was that I was one set short and needed to cut new fat quarter sets.
Luckily, I recently replaced some of the yardage/bolts I ran out of (the blue, grey, green and tan were very popular). So I needed to open new bolts wrapped in plastic and cut some yardage into fat quarters (18″ x 22″ sections of fabric).
Trying to work efficiently, I warmed up the iron and put it on the floor in the corner so it would be ready for me to nicely iron each fat quarter before packaging them into sets.
The new bolts were wrapped in plastic and here is where my complete “Idiot Moment” began – I accidentally threw the plastic covers for the new bolts on top of the hot iron on the floor.
Are you ready for a huge life lesson (this will be life changing, hold onto your seats):
HOT IRONS AND PLASTIC ARE NOT FRIENDS. DO NOT ATTEMPT TO MAKE THEM FRIENDS. KEEP IRONS AND PLASTIC SEPARATE AND AS FAR AWAY FROM EACH OTHER AS POSSIBLE.
So here I am needing to package up a fat quarter set to mail to an Etsy customer and my iron is now completely out of commission.
I yelled down the hall to “Terry the Quilting Husband”, and he immediately ran in (as he thought perhaps I had sewn through my hand or had rotary cut off several fingers by the way I screamed for help) and we began to troubleshoot the disaster.
I will not review the painfully ineffective steps we tried. Then I thought: it is likely that someone else has made such a silly mistake in the past and maybe there is something on the internet about how they fixed it.
Yes the internet came through for me. A brief search revealed many tips on how to remove plastic from irons (there must be whole communities of people accidentally melting plastic on their irons everyday!). We thought this one was the best resource on removing plastic from the doityourself.com website:
We are now at the step of placing the plate of iron in ice water (yes, of course we unplugged the iron first, we do not want to create an additional chapter to the “Idiot’s Guide”, ha!) after scraping off the plastic with a metal spatula. Wish me luck. I must now return to my disaster..
Postscript
It worked! (HAPPY DANCE). I am now ironing the fat quarters and making them into bundles.
While working on these fat quarter sets/bundles I remembered I had posted about my adventures in starting to sell fabric in 2015 in this post: Adventures in Retail. If you read that post you will wonder why I am still making up these fat quarter sets. The answer is I love this fabric and I am happy to share it at a reasonable price with my fellow crafters out there (so I can justify buying more bolts of it…).
Instead of “P” being for “Procrastination” and “Panic” – “P” is now for “Persistence” and “Progress”! All 10 labels are done, thanks everyone for the encouragement. Sunday to Monday (I am off work on Mondays) I was the focused, focused, focused quilt label sewing quilter.
In case you are curious, and in case you happen to be attending the Sisters Outdoor Quilt Show, here are the names of the quilts we will have in the show and their measurements (I will take photos at the show and share):
Terry the Quilting Husband (he will be in the Special Exhibit “Made by Men“):
Colorful Modern Squares – 53″ x 59″
Squares Gone Wild – 48″ x 60″
Charming You – 45″ x 61″
Cozy Flannel Shirts – 53″ x 61″
Cozy Flannel Snuggle – 58″ x 67″
Tierney (tierneycreates):
Splendid Splendor – 74″ x 62″
Modern Bedtime – 63″ x 72″
Scrappy Modern Delight – 53″ x 53″
Cozy Sunflower Log Cabin – 64″ x 80″
Desert Winds – 56″ x 64″
I will also have one more quilt, “Recycled Door” in a Special Exhibit – “Central Oregon SAQA: Doors Exhibit” which I have mentioned in previous posts.
So we are ready to drop our quilts off at the Sisters Outdoor Quilt Show Office on time!
Once upon a time there was a quilter who was also married to a quilter. The quilter and her husband-the-quilter decided to each put five (5) quilts into the 2016 Sisters Outdoor Quilt Show, for a total of ten (10) quilts. They finished their 10 quilts and had them all back from the magical long-arm quilter by April 2016. The quilts needed to be labeled and ready for the show by June 24, 2016.
The quilter and her husband knew they had plenty of time to get those labels on the quilts…
I think this tale will have a happy ending, but right now I am in the “moral lesson” part of the tale. Like in the “Ant and the Grasshopper ” from Aesop’s Fables (the ant spent the summer planning for winter and the grasshopper spent the summer goofing off and we know how that ended…).
We have a stack of 10 quilts needing labels (see photo above!) and Terry the Quilting Husband does not hand sew (he actually hates needles and has no desire to hand stitch anything). So I need to get all the labels on by 06/23/16 to deliver the quilts on 06/24/16 to the Sisters Outdoor Quilt Show Office.
“P” is not just for Procrastination. “P” is for PANIC.
There is song from the 1980s by a British heavy metal rock band Judas Priest titled “Breaking the Law” where in the song, they repeatedly sing the chorus: “Breaking the law, breaking the law, breaking the law, breaking the law.”
When I lived in Seattle a friend and I would enjoy singing choruses of this very campy 1980s song under our breath or at the top of lungs when we were not following standard rules of behavior or etiquette, etc.
This song was played my head when I made the decision to do a traditional quilt binding instead of a “facing”on the back of my art quilt Recycled Doors for the upcoming Central Oregon SAQA (Studio Art Quilt Art Quilt Associates) exhibit at the 2016 Sisters Outdoor Quilt Show. Please see my post Update: Recycled Door for more information on this piece.
(If you are unfamiliar with “facing a quilt”, here is a link to the Quilting Daily’s page on Finishing a Quilt with a Facing. Facing creates clean edges to the quilt with no edge binding.)
Facing the back of an art quilt to create a smooth edge appears to be the expected and acceptable standard and is what I have always done in the past on any quilt I want to be classified as an “art quilt”.
I feel feeling very rebellious after talking to my friend Wendy who suggested, as an option to finishing the quilt, a binding to bring out the orange in the center of the piece. I was reading to do some “law breaking” and did a traditional binding instead of facing the quilt.
Every act of rebellion expresses a nostalgia for innocence and an appeal to the essence of being. – Albert Camus
Postscript
You may notice my new blog template – quite different from the previous one. I really enjoyed the Chalkboard Template, but after reading that article on making blog pages easy for all readers to read and the feedback you all provided, I am going to try this new format for a while.
Terry “the Quilting Husband” and I live in a relatively small house. Not as small as the houses I looked at during my “tiny-house obsession” period (oh you should have seen my Pinterest board followings) but our house is around 1300 square feet.
I do not mind the small quilting studio but I do struggle occasionally with having a small design wall. It it not really a traditional “design wall” but more of a “design wall closet door” (see post Inside the Studio to see my mini design wall mounted on a sliding closet door).
Wait a Minute, I Have Options
Last year, I moved my paper crafting supplies to our sunroom, to make my studio less cluttered. (Oh yes there are many other crafts in my life besides quilting: knitting, crochet, paper crafting, beading, etc.):
Inside the Sunroom – paper crafting table, equipment and supplies.
My rationale on this move was “why not” – why would anyone care that I have my paper crafting supplies in another room besides my studio?
Recently, the paper crafting supplies in the sunroom gave me an idea: why do I have to keep my quilting related activities confined to JUST ONE ROOM?
Whole House Crafting
We have a long hallway. In the past I have hung quilts on both side of the hallway but recently one side was empty (I burned out on all those quilts hanging everywhere in the house). Why couldn’t that become a MEGA DESIGN WALL?
I may be the only blogger in the history of blogging to post a photo of a blank hallway wall!
We have occasions in the past where Terry “the Quilting Husband” and I were battling for design wall space when working on separate quilts, and this would give us a very large space to work on quilt designs. (See the Postscript section below for the trial run I had on using this space to design a quilt).
A challenge might be that anyone coming over the house will think we are weird as we are designing quilts on our hallway wall, but then who cares – it is our house and if it disturbs them, well they can go back to their house – ha!
Ultimately I would like to have a professional made design wall/design wall sections (like my friend Betty Anne has in her lovely studio) but I need to save up for that to happen. So for now I have purchased a queen size Warm & Natural piece of pre-cut batting to mount on the wall myself.
Purchased on sale!
I did not stop there with my ideas on using the whole house for crafting. I would like a bigger cutting area for working on large projects – what about using my dining room table?
So I did, I used my dining table this past weekend for a large scale quilt trimming project (see the Postscript section) and for other cutting projects such as trimming my Recycled Doorquilt and creating the binding (I will discuss my finishing decisions on this piece in a future post) for the upcoming Central Oregon SAQA Doors Exhibit at the Sisters Outdoor Quilt Show July 2016 (see post Update: Recycled Door).
Cutting binding on the dining room table!
Note, I would not use my dining room table for everyday cutting as it is not ergonomically correct for cutting (not waist height). Also it is not convenient for when you are working on a piece and doing small batches of cutting as you progress on a piece.
I am not sure why I did not think of expanding my crafting areas before. I guess I was brainwashed by all those beautifully illustrated organizing your art studio magazines and books. These publications seem to insist that all your crafting items be confined to one highly organized space!
Now I am a rebel (or now I am just behaving like normal people who do not impose so many rules on them).
Postscript
You may have noticed, if you have been following my blog for a while, that I had not post anything related to my What’s On the Design Wall Series. So it may look like I am not doing very much actual crafting these days.
Actually I have been doing MAJOR crafting. For the past couple months I have been working on a by invitation only exhibit I was honored to be invited to participate in. I cannot reveal any specifics the exhibit curator is ready to unveil the show. I am nearly done with the piece (putting on my label) and will send it off to the exhibit soon.
The parameters of this exhibit/show were very precise and I was required to create a quilt a specific size. Also I wanted this quilt to be a story quilt. In order to accomplish these two things I needed a bigger space than my little closet door design wall. So that was my first experience in using the hallway as a design wall. It worked very well!
Also I had to trim the quilt to a specific size and my cutting table in my studio would not work, so this was my first trial run as the dining table as a large cutting table.
Here is a little peek of the piece, and as soon as I am able to reveal the details and the full piece I will:
Sharing this post from The Wardrobe Meets the Wall blog as a follow up to my previous post about our collaborative show opening at the Mott Gallery in Richmond, VA on 06/06/16.
Check out Sassy the Highly Opinionated Miniature Schnauzer’s page Schnauzer Snips for her latest musings…
It was about more than just improving my appliqué skills
Yesterday I took at wonderful appliqué class at the Stitchin’ Post in Sister, Oregon. The class was more than an appliqué skills building class, the class was about creating stories with quilts. It was a day long class from 9:00 am to 4:00 pm (with flexible time for lunch whenever we wanted).
The class was titled: Historic Story Quilt and was taught by the wonderful Janet Storton. The focus of the class was to work on blocks for story quilt (bible story blocks were used as an example) using various appliqué techniques for appliqué skill building.
I signed up for this class to build my appliqué skills for a future of series of quilts I want to make based on stories my father told us growing up (see post Creative Inspiration: Stories My Father Told Me). However I got way more out of the class than just improved appliqué techniques!
At the Stitchin’ Post we don’t attend our classes in a regular classroom – we study in a Textile Education Center!
Sisters of the Heart Foundation‘s mission is bring hope, build a future, and empower a community in impoverished areas of the world such as Uganda. Janet spends part of the year teaching women in Uganda to create quilts and other crafts to sell in order to economically improve their lives and the lives of their communities.
You can read more about this incredible foundation at www.sistersoftheheartfoundation.org. They greatly appreciate fabric donations from quilters purging their stashes!
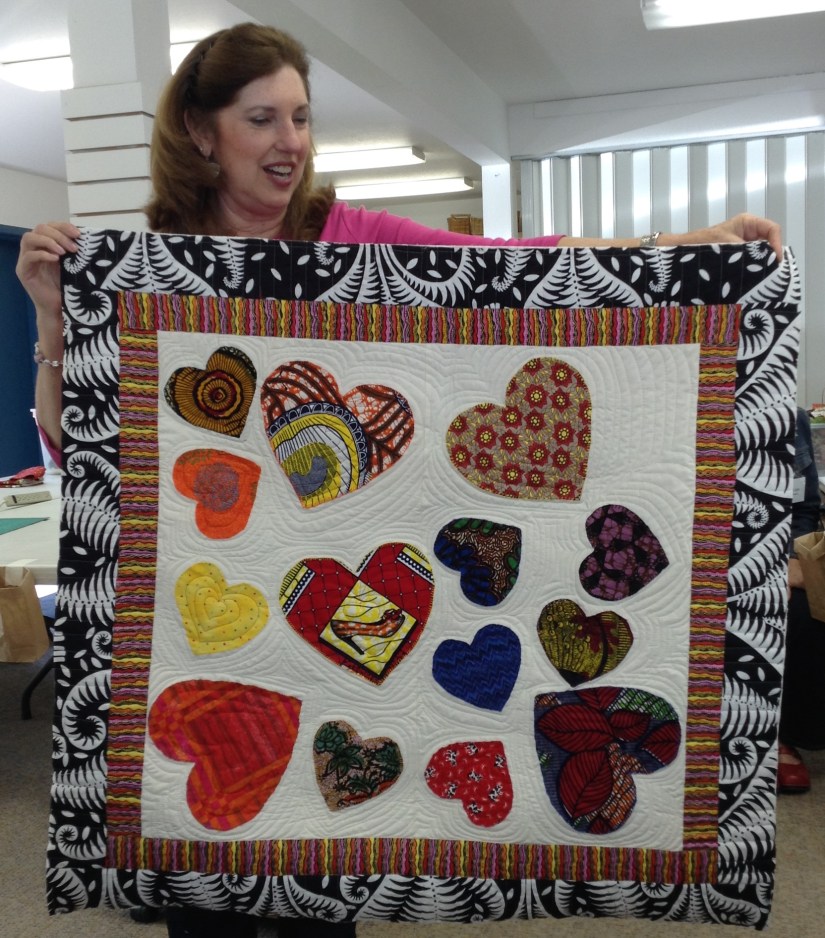
Here is Janet with a heart quilt (Sisters of the Heart) where each one of her students in Uganda made a different heart. She just got it back from long-arm quilting by Barbara of the Stitchin’ Post and trimmed off the extra batting before I took the photo:
Two other quilts made by her students in the community in Uganda, these quilts are sold or raffled to raise money for the quilters’ community in Uganda:
Here is the Bible Stories appliquéd quilt made by her students in Uganda:
My Adventure in Appliqué (what I actually did in class)
Here is what I worked on as I brushed up on my needle-turn appliqué technique and learned buttonhole appliqué techniques:
Our teacher instructed us to create folk-art looking elements, so “imagine” on the left is an acorn!
So you now thinking: “Whaaaat?!?!?” You spent 7 hours in an appliqué class and made two elements on a beige piece of fabric? Well…yes!
It is actually a story quilt I am working on that has to do with an acorn and a tree. Janet helped me perfect my needle-turn appliqué on creating the acorn (and help me select the scrap fabrics I used); and she taught me how to do buttonhole appliqué for the beginning of the tree. I also learned how to stitch words onto fabric so when I am ready I can add the words that go with my piece.
For now it will be a UFO (Unfinished Object for the non quilters reading) until I finish some of my pending urgent projects (due dates zooming closer!)
The class was a joyous way to spend a Saturday and in addition to the teacher, I got to meet some other wonderful people – the fellow students. They had incredible stories to share during class too.
Postscript
One other thing I learned in the appliqué class was just how meditative working on an appliqué project can be – I think I might fall in love with hand stitching.
I needed good light to do the needle-turn appliqué on the acorn section and found that sunlight worked best. I spent quiet meditative time sitting in the window of the classroom (it was a glorious sunny day in Sisters, Oregon) and just hand stitching.
Wow. Now I get it.
I plan to take more “techniques” classes. I have been quilting since 1999 or so but I am ready to spend more time “studying” quilting.
Have you ever just randomly cracked yourself up laughing? Maybe it is a joke no one would understand but you?
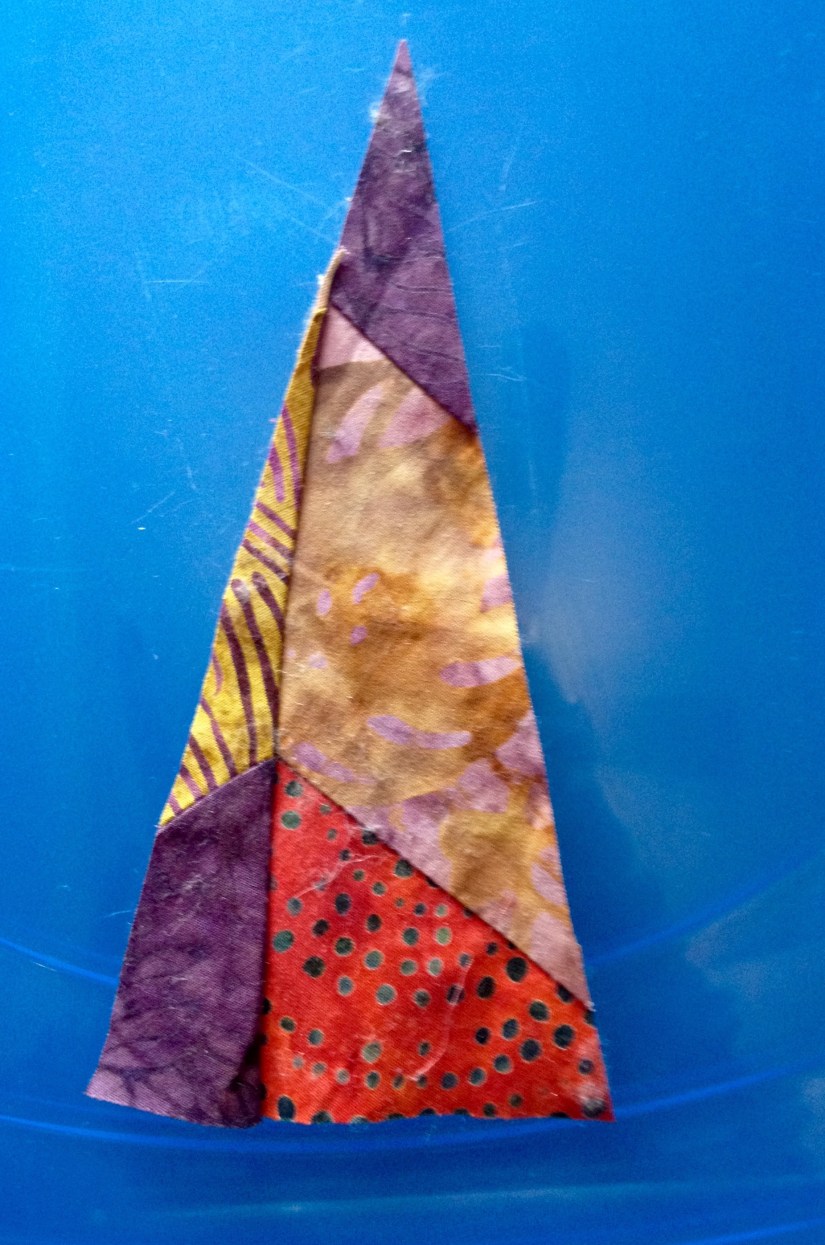
Well I was cleaning up my quilt studio and rearranging it to make it more cozy and less cluttered feeling, and I found this in a corner under a table:
What is this? Well if you refer to my post, We Will Not Be Discarded’s Debut, you will see it is a leftover scrap from another quilters project (their discard, headed for the trash) that I trimmed into a triangle. It’s other “friends” became the piece We Will Not Be Discarded! (that I sold at the Twigs Gallery Show in March – April 2016).
I began laughing at this sly piece hidden away that did not make it into the art quilt. I now have to make a tiny art quilt called – I Will Not Be Discarded!– or maybe just a potholder with it. I cannot bring myself to throw it away.
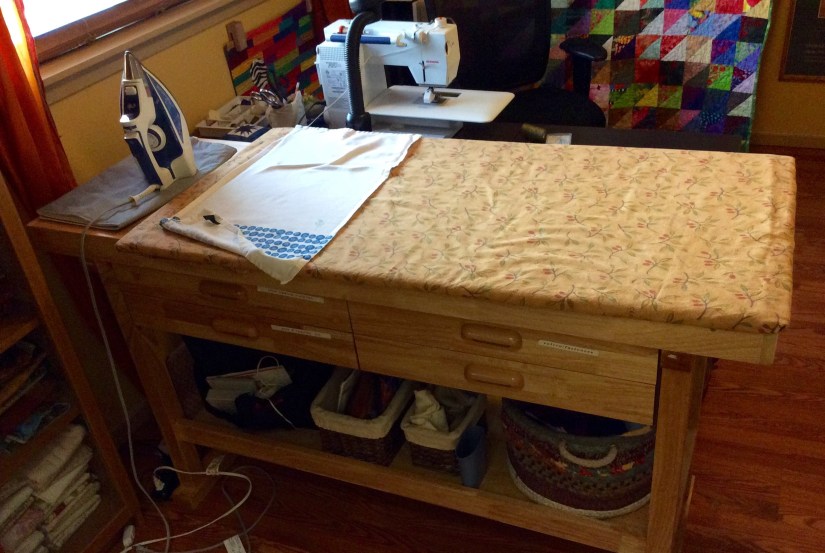
Studio Refresh
I got rid of one of the tables in my studio, even though I will have to now iron and cut on the same table (I have a removable wide ironing top). It felt like the room was way too clutter.
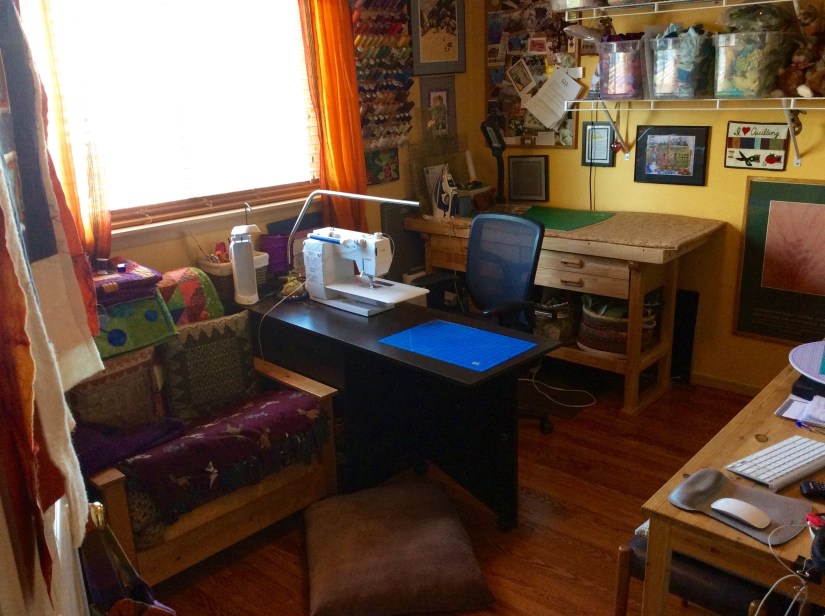
Instead of the table, I moved a comfy old chair into the room and I can sit and watch TV in the room while sewing down binding if I like. My TV is both a computer monitor and TV (so I can also watch “Tiny House Living” videos – my secret obsession).
The BEFORE:
The table covered with the quilt in the back is the one I got rid of, and I moved the work table to the back of the room.
THE AFTER:
Minus the table that was in the back of the room; moved the worktable to the back of the room and added a comfy chair!I can sit in a comfy chair and think about my huge backlog of projectsThe dogs are really enjoying “THE AFTER”
Postscript
I am headed off to the Stitchin’ Post in Sisters, Oregon this am for a day long class on appliqué.
In my post, Creative Inspiration: Stories My Father Told Me, I share how I would like to do a series of art quilts based on stories my father told me growing up. Well I want to brush up my appliqué skills (okay I want to obtain some decent appliqué skills) so that I have more options in creating these quilts which would lend themselves to appliqué.
In the March 2016 post BLOG TOUR DAY 4: Unlikely Materials I shared a work in progress called Recycled Door. This art quilt is part of the Central Oregon SAQA (Studio Art Quilt Associates) group exhibit “Doors” that will debut at the 2016 Sisters Outdoor Quilt show.
We were challenged with making an 18″ x 40″ art quilt/wallhanging that represented our interpretation of a door. I found a door image I liked on Australian door and window manufacturer’s website Brisbane Timber . I created my interpretation of one of their doors, using recycled materials: jeans, corduroy shirts, a tweed jumper, and home decor fabric.
I just got this piece back from Betty Anne Guadalupe, my long-arm quilter and collaborative partner in The Wardrobe Meets the Wall Collection. She quilted it to represent the texture/grain of an wooden door.
Now I need put finish the facing for the back (finishing off an art quilt with a smooth edge instead of binding the edge) and it is ready for the July 2016 Sisters Outdoor Quilt Show!
As it was made with recycled materials, it will become part of The Wardrobe Meets the Wall Collection.
Postscript
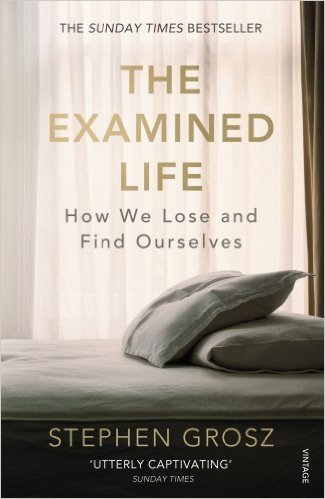
I am listening to a new non-fiction audiobook, The Examined Life: How We Lose and Find Ourselves by Grosz, Stephen.
It is pretty DEEP. The author is a British psychoanalyst who shares 25 years of his client’s stories (confidentiality maintained of course!) in relation to baffling behavior based on hidden feelings.
The narrator also is British and I am enjoying the British English pronunciation of words such as “schedule” and “garage”!
One of the most interesting parts of the book so far, besides all the interesting stories, is the author sharing a very profound interpretation of Charles Dickens’ famous story, A Christmas Carol. He delves deep into what actually made Ebenezer Scrooge change his ways!
Off to the post office today to mail 4 silk art quilt pieces to the Mott Gallery in Richmond, VA.
Here is the post from The Wardrobe Meets the Wall about that show. (I cannot wait to see photos by my wonderful sister of our exhibit/opening night of the show!)
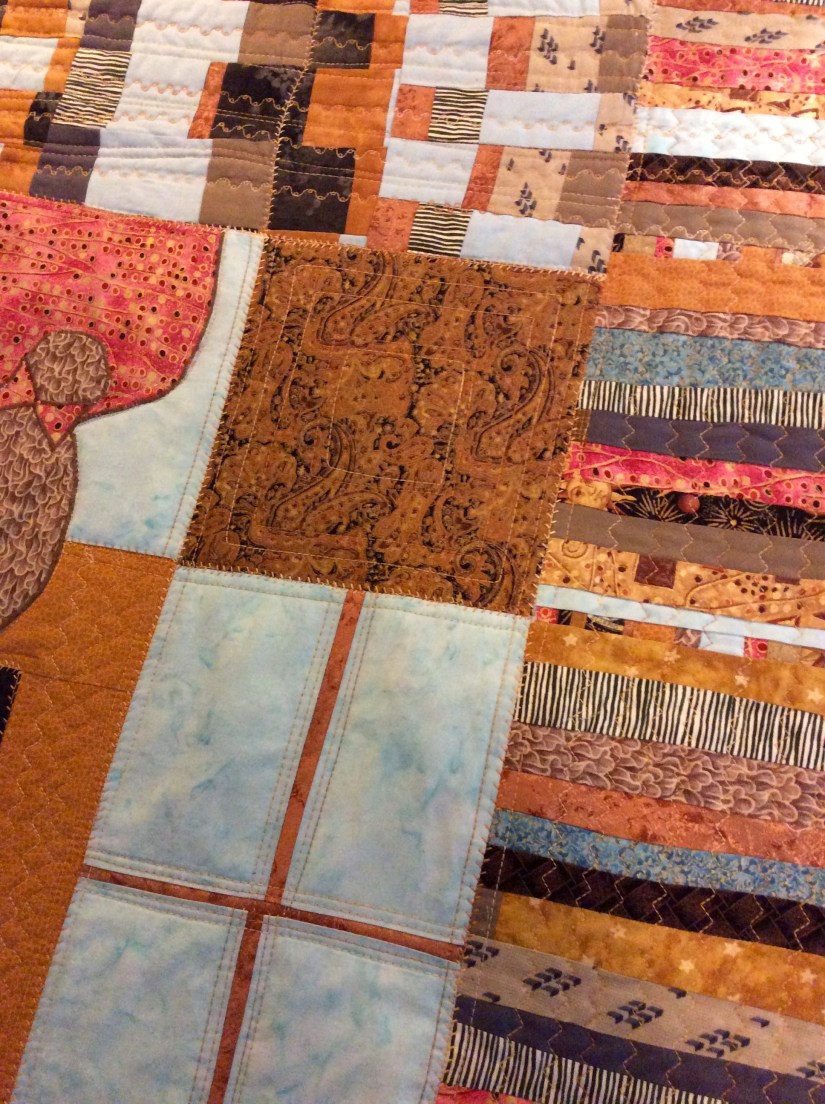
This is a quick follow up to my post from earlier this week: In Progress: Ohio.
My new recycled silk garment scrap piece is done and ready to go to Betty Anne Guadalupe to work her art quilting magic. It measures approximately 24″ x 14″.
I have not decide if I want the piece to orientate this way:
Or this way:
I welcome any thoughts and comments you have on the orientation – thanks!
Check out Sassy the Highly Opinionated Miniature Schnauzer’s page Schnauzer Snips for her latest musings (and a new homemade dog biscuit recipe!)
This is an update to my 04/07/16 post, What’s on the…Table. I am making progress with my piece “Ohio” and still using the table to design it rather than the design wall (the mini recycled silk log cabin blocks were not sticking well on the design wall).
Ohio (2016), in progress
I have sewn all the 2.5″ x 2.5″ recycled silk blocks together. I decided to “float” them in a piece of taupe/tweed looking recycled silk (it has a beautiful texture, it is a tweed like woven silk).
I am still deciding what I want to do with the little 2″ x 2″ blocks I made; and how I want to float the blocks in the lovely tweed-like recycled silk.
It will be a small piece overall, it was meant to be a companion piece to Betty Anne Guadalupe’s piece, Ohio Star, part of our The Wardrobe Meets the Wall Collection.
I cannot wait to complete the piece and give it to Betty Anne to work her quilting magic/artistry!
I have some scraps left over, and we’ll see if Betty Anne is up to the challenge to try and make a third small piece from the tiny scraps! (My piece in progress, Ohio, is made from her scraps from Ohio Star, which was made from my original piecing disaster Ohio Star!)
Congratulations to Beth T. who won the free copy of Creative Quilt Challenges from the random drawing of names from those who left comments on my Creative Quilt Challenges Blog Tour post – BLOG TOUR DAY 4: Unlikely Materials. Thank you to every who visited the tierneycreates blog for Day 4 of the tour and thank you to those who commented. I so enjoyed reading the comments and they got me inspired to keep experimenting with “unlikely materials”!
What’s on the…Table: “Ohio”
This post is a continuation of my ongoing series: What’s on the Design Wall.
However, this time I am going to share what is laid out on the table in my Studio, instead of up on my Design Wall. This post also demonstrates another example of using “Unlikely Materials” (recycled silk garment scraps) discussed in my Blog Tour post on 03/31/16.
Yesterday I posted about being inspired to create after a walk on a beautiful Spring day and inhaling the delightful fragrances of neighborhood Dogwood trees (Creative Inspiration: The Scents of Spring). Well later that day I pulled out the piece had I started a month or so ago (see post What’s on the Design Wall: Silk Squares) and got creating!
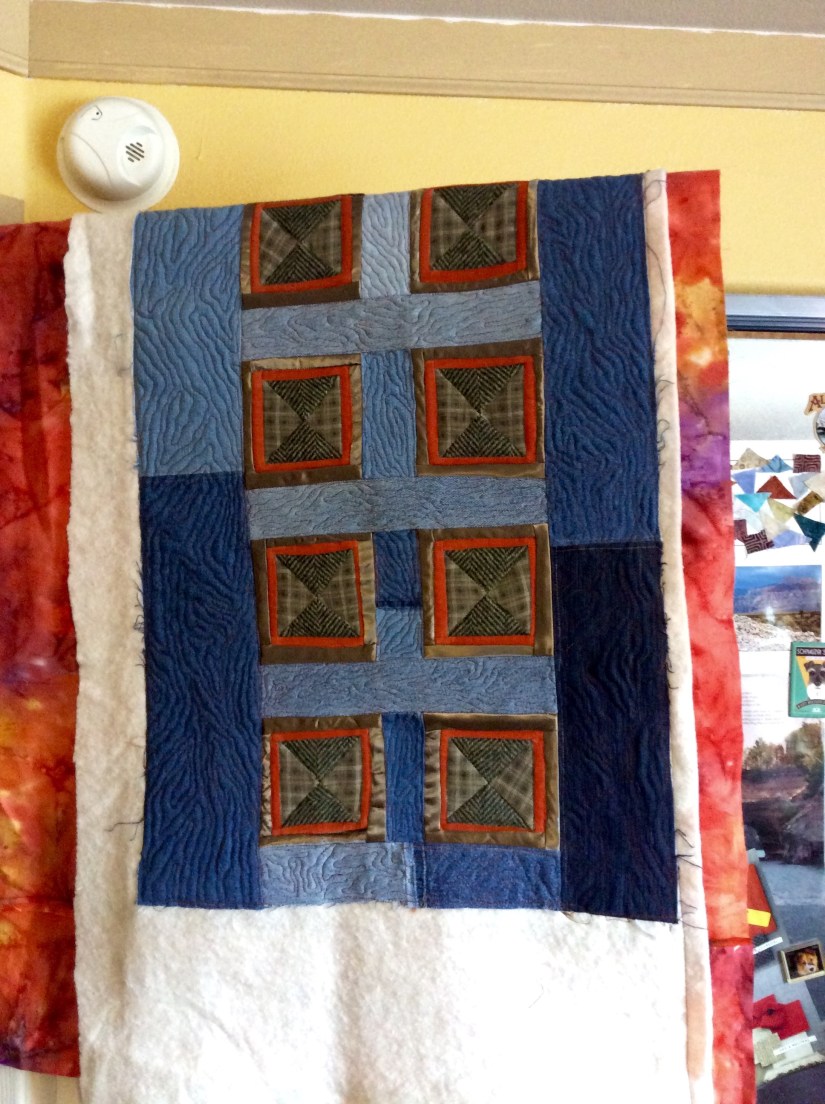
Here is the piece in progress, I am going to name it “Ohio“:
What do a bunch of miniature log cabin style patches (2″x2″ and 2.5″ x 2.5″) have to do with the State of Ohio? Absolutely nothing, but they are part of a story. An ongoing story. Here is a visual summary of that story:
1) The piece started out as my attempt to create an Ohio Star (a traditional quilt block) from recycled silk
Ohio Star, recycled silks (in progress)
2) I was very unhappy with the accuracy of the points on the star (although I interfaced the back of the silks, I had some challenges with accurately piecing the points). So I attempted to save the piece by reimagining the piece, slicing up the Ohio Star and sewing it into a new configuration. I was still not pleased with it.
3) I gave the piece and the coordinated recycled silk pieces I have selected to a friend. She reimagined it into a completely new piece, while integrating all the elements from the original Ohio Star into the piece.
Ohio Star (2016). Designed, pieced and quilted by Betty Anne Guadalupe.
4) My friend gave me the leftover scraps from this piece which included scraps from my original piecing and new scraps from additional recycled silks she used in the piece. She challenged me to make something from those scraps!
5) So, I started working on this piece over a month ago, and I am calling it “Ohio”
Right now I am just continuing to make tiny blocks (2″ x 2″ and 2.5″ x 2.5″) and enjoying the challenging of using up small pieces of recycled silk. I find it to be meditative to quietly work on small slow piecing.
Will post about this piece again when it is nearly complete.
Welcome to Day 4 of the Blog Tour in support of Pat Pease & Wendy Hill’s new book Creative Quilt Challenges (C&T Publishing, 2016).
If you are just joining the tour today on my blog, you can see the full list of the 10 participating blogs on this tour at the C&T Publishing blog post: Creative Quilt Challenges Blog Tour Kickoff.
At the end of this post I will pose a discussion question, please post a comment to automatically enter a drawing for a copy of Creative Quilt Challenges. The random winner will be selected and notified around 04/07/16.
CHALLENGE #3 – UNLIKELY MATERIALS
In Creative Challenges, Pat Pease and Wendy Hill invite readers to flex their quilt-making creative muscles by experimenting with different “Challenges”. In Challenge #3 – Unlikely Materials, Pat and Wendy invite readers to stretch their creative muscles by working with materials other than traditional quilting cottons!
Transitioning from Cotton Material to “Unlikely Materials”
Four years ago, I would have looked at you as if you were insane if you suggested I use anything other than high quality quilting cottons, purchased from a quilt shop, for my quilt-making. Then in 2012 my friend and mentor, Betty Anne Guadalupe of Guadalupe Designs invited me to work on a collaborative project involving making art quilts out of recycled silks and linen samples from garment manufacturing. These samples had been saved from the trash heap by someone working for an Italian silk manufacturer in the 1990s and stored away since then.
At first I was terrified of working with anything but cotton for quilting. Cotton is so crisp and stable. Silk is slippery, delicate, and…well…terrifying!
One of the first skills I learned when working with silk was how to back delicate silks with interfacing. The best interfacing I have used for backing silk is “French-Fuse“. I learned about French-Fuse from Betty Anne, who learned about it from another art quilter, Grace. This interfacing provides much needed stability to delicate silks and makes them easier to rotary cut and to piece.
Here is one of the early pieces I made with recycled silks – Silk Landscape:
Silk Landscape (2012). Designed and pieced by Tierney Davis Hogan. Quilted by Betty Anne Guadalupe. Photography by Jeremy Koons.
The Wardrobe Meets the Wall
Betty Anne and I both became hooked on using the recycled silks and linens to create art quilts. We formed a collaboration which eventually became The Wardrobe Meets the Wall: A collection of art quilts created from recycled garments, manufacturing remnants, and samples.
We have a blog, The Wardrobe Meets the Wall (we are working on evolving this into a a website, “Art Quilts by Guadalupe & Hogan”). See our page The Collection if you would like to see a samples of art quilts all made with “Unlikely Materials”.
Our collection includes quilts made from mens ties, recycled silk and linen samples, scrap wool from clothing or blanket manufacturing, recycled denim, and general recycled clothing.
Once You Start Experimenting with Unlikely Materials, You Might Get Hooked!
Betty Anne already had many years experience working with “Unlikely Materials” and before I knew it, she had me experimenting with using recycled wools and denims to create art quilts.
Here is my first experiment with working with recycled wools (from wool mens suiting manufacturing scraps and wool blanket manufacturing scraps) and denims (recycled jeans) – He Dresses Up, He Dresses Down:
He Dresses Up, He Dresses Down (2014). Designed and pieced by Tierney Davis Hogan. Quilted by Betty Anne Guadalupe
Basically – if you can sew with it, we will now try and make an art quilt with it. There are so many unlikely materials we have yet to try out. We enjoy recycling.
I was intrigued that in the Creative Quilt Challenge book, Pat Pease makes an adventurous art quilt with “hair canvas interfacing“. I bow my head to that level of creativity with “unlikely materials”!
(Disclaimer: We still love and support our local quilt shops and still make many quilts with traditional cottons. There are so many beautiful fabric collections to choose from and our new fabric stashes mysteriously continue to grow despite our obsession with recycled materials.)
Tips for Working with Unlikely Materials
I will not deny it – working with “unlikely materials” for the first time is scary. Here are some tips I have learned over the past 4 years. I am still learning and growing in my knowledge and comfort with using “unlikely materials”.
Do not be afraid to experiment and play: You do not have to create a great work of quilting art your first time working with a new “unlikely material”. I played with silk for a while before piecing it into an art quilt.
Check your sewing machine manufacturer’s website for tips on working with various materials and fibers.
Search for YouTube videos on working with a particular fabric and sewing tips on handling that type of fabric in your machine.
Network with other crafters that have experience working with a particular textile you are interested in trying. For example if you know a seamstress who has worked a lot with silk, you could ask her/him for tips.
Determine if a fabric/material needs to be interfaced in order to stabilize it for sewing. As I mentioned earlier, French-Fuse (which can be purchased at sites such as Annie’s Craft Store) is wonderful for backing delicate silks. It makes them so much easier to cut and piece. There are also YouTube videos on using French-Fuse.
If you are using heavy weight materials such as denim and some wools, consider pressing open your seams, and using 1/2 inch seams (like in making garments) as opposed to 1/4 inch seams. A trick that my mentor Betty Anne taught me is to run a tiny (1/8″ inch or less) seam along the front of the seams (front of your piece) to hold down the pressed down seams. This will be helpful if you have your piece professionally long-arm quilted so that the thick seams do not flip and catch the needle when being quilted.
If at first you don’t succeed, don’t give up! I have had several “unlikely materials” piecing/sewing disasters (bad words were said, not suitable for repeating). Some disasters were so bad I had to put them in the trash, I could not even recycle them into another project. Speaking of recycling a disaster into another project, see the post A Very Successful Rescue! about a piece made with recycled silk that was destined for the trash but was recycled by another quilter into a wonderful piece!
Warning – your other quilter friends who only enjoy using cottons, may at first give you a lukewarm response on your pieces made with “unlikely materials”. Do not be discouraged – art is a private and personal thing and you cannot control others reactions. (I love the saying: “It’s not my business what others think of me”…or my art!). I am sure I have quilter friends who thought at first I had lost my mind working with recycled silks and linens. As you grow in your experience with working with “unlikely materials”, your confidence will grow as will your adventurous spirit.
Working on My Latest Piece with Unlikely Materials
The timing of this blog tour post is great, as I am currently working on a new piece for a group exhibit I am participating in, called “Doors” for the local SAQA (Studio Art Quilt Associates) group I belong.
Designing the piece: Selecting the “Unlikely Materials”
I decided to use a photo of a door for inspiration, and located a wonderful collection of unique door photos on an Australian door and window manufacturer’s website Brisbane Timber .
I wanted to created a semi-realistic version of one of their doors, using recycled textiles (“unlikely materials”) and name the piece Recycled Door.
Here are the materials I selected:
Recycled Corduroy Shirt
Recycled Corduroy Pants
Recycled Tweed Wool Jumper
Bag of Recycled Jeans
Shiny Gold Home Decor Fabric
(List clockwise from top)
Recycled Corduroy Shirt
Recycled Corduroy Pants
Recycled Tweed Jumper
Unusual shiny gold home decor fabric (this fabric was given to me by the very talented art quilter, Dianne Browning, who primarily uses the unlikely materials of home decor fabrics and decorator samples in her art – you can check out her incredible art at her website Art Quilts by Dianne Browning)
Recycled Denim (from my bag of recycled jean sections)
The Piece in Progress
Below is a photo of Recycled Door in progress. If you like, for fun, you can go to the Australian door and window manufacturer’s website Brisbane Timber and see if you can figure out which door inspired this piece.
(The thread at the lower right hand of the piece is orange thread – I think it needs to be quilted with orange thread to repeat the strong orange accent in the piece.)
Are You Ready to Experiment or Have You Already Experimented?
Now it is time for you to weigh in on your experience with using “Unlikely Materials” or whether you are interested in experimenting with “Unlikely Materials” in the future in your quilting projects.
Please comment below and all comments will be automatically entered into a drawing for a copy of Creative Quilt Challenges.
The random winner will be selected and notified around 04/07/16.
The Creative Quilt Challenges Blog Tour continues tomorrow, Friday April 1, at BOLT Fabric Boutique, boltneighborhood.com. Thanks for joining me on the blog tour today!
“When you are scared but still do it anyway, that’s BRAVE.” – Neil Gaiman
Tomorrow the tierneycreates blog is a stop on the “Blog Tour” for Pat Pease and Wendy Hill’s new book Creative Quilt Challenges (2016).
When I join the tour on 3/31/16, I will discuss Challenge #3: Unlikely Materials from this wonderful book.
The Blog Tour opened on Monday 3/28/16 and here are the other “blog tour stops” posts to date (if you would like to read them prior to the tierneycreates Blog Tour stop tomorrow 3/31/16).
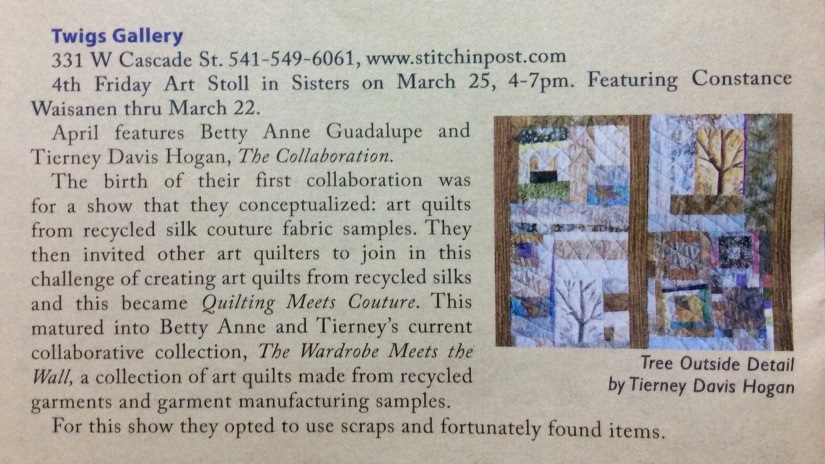
My collaborative art quilt partner, Betty Anne Guadalupe and I will have a show, “The Collaboration”, opening at Twigs Gallery during the 4th Friday Art Walk, in Sisters, Oregon on Friday, March 25, 2016. The show will run through April 2016 and will feature art quilts we created from “rescued” quilt blocks (projects discarded by other quilters and reinvented/reimagined by us), and recycled materials.
Several of the pieces I have discussed on the tierneycreates blog, including We Will Not Be Discarded! and Tree Outside My Window, will debut at this show.
Below are images from the March 2016 issues of Cascade A&E Magazine (Central Oregon’s Arts & Entertainment Magazine):
This post is a follow up to my February 2016 post Surrendering My Piece to “Rescue” in which I shared my frustration with an “Ohio Star” type block I was piecing with recycled silks. I abandoned the piece due to “major creative blockage” and my friend adopted it.
Betty Anne Guadalupe, who adopted my abandoned piece, took it apart and completely reimagined it!
I gasped (and nearly fainted) when I saw the wonderful reinvention she did with my humble beginnings!
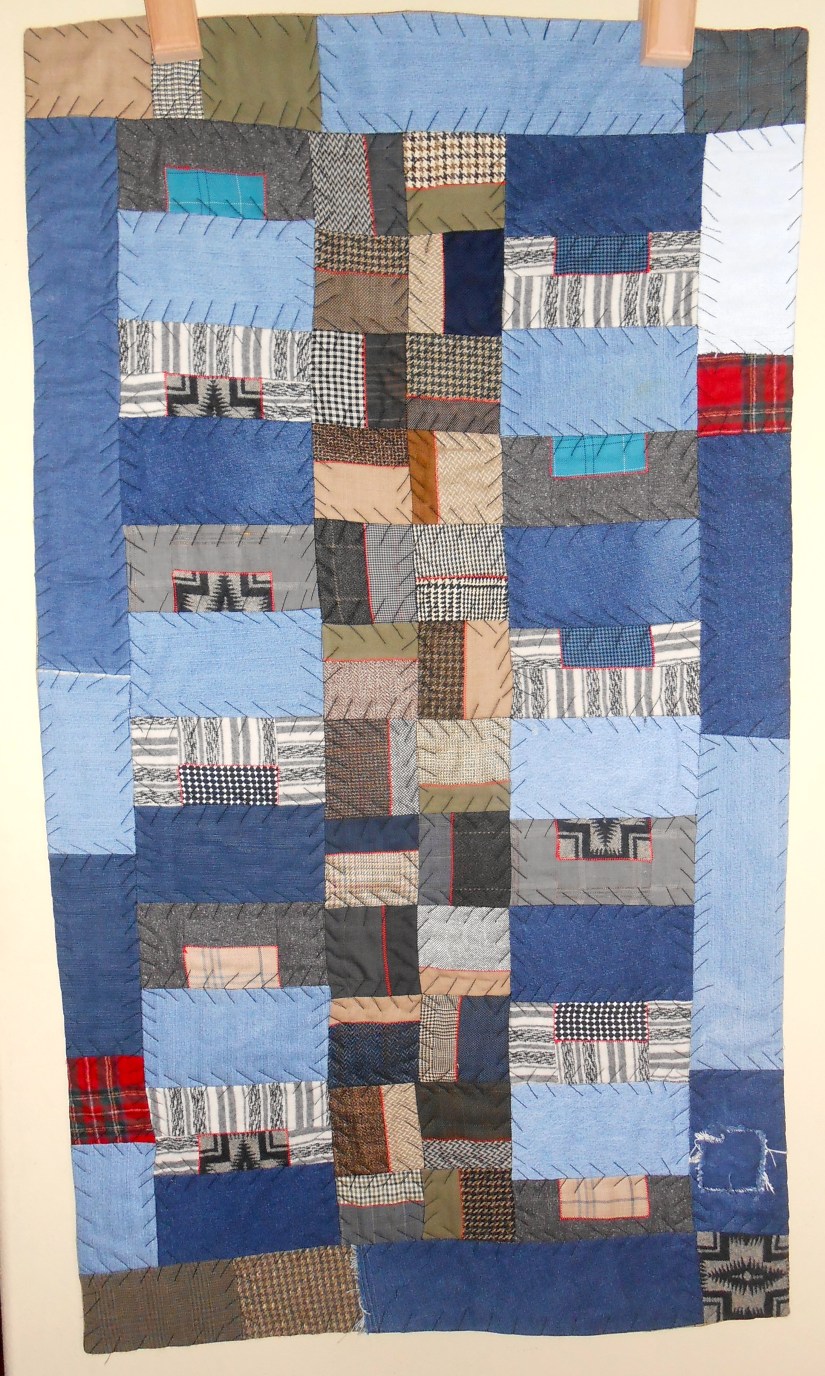
Here is what I gave her:
A “hot mess” by Tierney Davis Hogan (ha!)
Here is what she created:
Ohio Star (2016) by Betty Anne Guadalupe
The piece measures 18” x 23” and is made with recycled silks and wools. If you look closely you can see sections of my original piecing. Betty Anne integrated all of my original piece in her piece! This piece will be in our show at Twigs Gallery this Friday (see my post The Collaboration for more details on this show).
I think this is a very successful rescue!
As I discussed in the post What’s on the Design Wall: Silk Squares, I am now working on a piece made from her leftovers from her piece! More to come as this new piece develops…