Check out Sassy the Highly Opinionated Miniature Schnauzer’s page Schnauzer Snips for her latest musings (and a new homemade dog biscuit recipe!)
This is an update to my 04/07/16 post, What’s on the…Table. I am making progress with my piece “Ohio” and still using the table to design it rather than the design wall (the mini recycled silk log cabin blocks were not sticking well on the design wall).
Ohio (2016), in progress
I have sewn all the 2.5″ x 2.5″ recycled silk blocks together. I decided to “float” them in a piece of taupe/tweed looking recycled silk (it has a beautiful texture, it is a tweed like woven silk).
I am still deciding what I want to do with the little 2″ x 2″ blocks I made; and how I want to float the blocks in the lovely tweed-like recycled silk.
It will be a small piece overall, it was meant to be a companion piece to Betty Anne Guadalupe’s piece, Ohio Star, part of our The Wardrobe Meets the Wall Collection.
I cannot wait to complete the piece and give it to Betty Anne to work her quilting magic/artistry!
I have some scraps left over, and we’ll see if Betty Anne is up to the challenge to try and make a third small piece from the tiny scraps! (My piece in progress, Ohio, is made from her scraps from Ohio Star, which was made from my original piecing disaster Ohio Star!)
Congratulations to Beth T. who won the free copy of Creative Quilt Challenges from the random drawing of names from those who left comments on my Creative Quilt Challenges Blog Tour post – BLOG TOUR DAY 4: Unlikely Materials. Thank you to every who visited the tierneycreates blog for Day 4 of the tour and thank you to those who commented. I so enjoyed reading the comments and they got me inspired to keep experimenting with “unlikely materials”!
What’s on the…Table: “Ohio”
This post is a continuation of my ongoing series: What’s on the Design Wall.
However, this time I am going to share what is laid out on the table in my Studio, instead of up on my Design Wall. This post also demonstrates another example of using “Unlikely Materials” (recycled silk garment scraps) discussed in my Blog Tour post on 03/31/16.
Yesterday I posted about being inspired to create after a walk on a beautiful Spring day and inhaling the delightful fragrances of neighborhood Dogwood trees (Creative Inspiration: The Scents of Spring). Well later that day I pulled out the piece had I started a month or so ago (see post What’s on the Design Wall: Silk Squares) and got creating!
Here is the piece in progress, I am going to name it “Ohio“:
What do a bunch of miniature log cabin style patches (2″x2″ and 2.5″ x 2.5″) have to do with the State of Ohio? Absolutely nothing, but they are part of a story. An ongoing story. Here is a visual summary of that story:
1) The piece started out as my attempt to create an Ohio Star (a traditional quilt block) from recycled silk
Ohio Star, recycled silks (in progress)
2) I was very unhappy with the accuracy of the points on the star (although I interfaced the back of the silks, I had some challenges with accurately piecing the points). So I attempted to save the piece by reimagining the piece, slicing up the Ohio Star and sewing it into a new configuration. I was still not pleased with it.
3) I gave the piece and the coordinated recycled silk pieces I have selected to a friend. She reimagined it into a completely new piece, while integrating all the elements from the original Ohio Star into the piece.
Ohio Star (2016). Designed, pieced and quilted by Betty Anne Guadalupe.
4) My friend gave me the leftover scraps from this piece which included scraps from my original piecing and new scraps from additional recycled silks she used in the piece. She challenged me to make something from those scraps!
5) So, I started working on this piece over a month ago, and I am calling it “Ohio”
Right now I am just continuing to make tiny blocks (2″ x 2″ and 2.5″ x 2.5″) and enjoying the challenging of using up small pieces of recycled silk. I find it to be meditative to quietly work on small slow piecing.
Will post about this piece again when it is nearly complete.
Welcome to Day 4 of the Blog Tour in support of Pat Pease & Wendy Hill’s new book Creative Quilt Challenges (C&T Publishing, 2016).
If you are just joining the tour today on my blog, you can see the full list of the 10 participating blogs on this tour at the C&T Publishing blog post: Creative Quilt Challenges Blog Tour Kickoff.
At the end of this post I will pose a discussion question, please post a comment to automatically enter a drawing for a copy of Creative Quilt Challenges. The random winner will be selected and notified around 04/07/16.
CHALLENGE #3 – UNLIKELY MATERIALS
In Creative Challenges, Pat Pease and Wendy Hill invite readers to flex their quilt-making creative muscles by experimenting with different “Challenges”. In Challenge #3 – Unlikely Materials, Pat and Wendy invite readers to stretch their creative muscles by working with materials other than traditional quilting cottons!
Transitioning from Cotton Material to “Unlikely Materials”
Four years ago, I would have looked at you as if you were insane if you suggested I use anything other than high quality quilting cottons, purchased from a quilt shop, for my quilt-making. Then in 2012 my friend and mentor, Betty Anne Guadalupe of Guadalupe Designs invited me to work on a collaborative project involving making art quilts out of recycled silks and linen samples from garment manufacturing. These samples had been saved from the trash heap by someone working for an Italian silk manufacturer in the 1990s and stored away since then.
At first I was terrified of working with anything but cotton for quilting. Cotton is so crisp and stable. Silk is slippery, delicate, and…well…terrifying!
One of the first skills I learned when working with silk was how to back delicate silks with interfacing. The best interfacing I have used for backing silk is “French-Fuse“. I learned about French-Fuse from Betty Anne, who learned about it from another art quilter, Grace. This interfacing provides much needed stability to delicate silks and makes them easier to rotary cut and to piece.
Here is one of the early pieces I made with recycled silks – Silk Landscape:
Silk Landscape (2012). Designed and pieced by Tierney Davis Hogan. Quilted by Betty Anne Guadalupe. Photography by Jeremy Koons.
The Wardrobe Meets the Wall
Betty Anne and I both became hooked on using the recycled silks and linens to create art quilts. We formed a collaboration which eventually became The Wardrobe Meets the Wall: A collection of art quilts created from recycled garments, manufacturing remnants, and samples.
We have a blog, The Wardrobe Meets the Wall (we are working on evolving this into a a website, “Art Quilts by Guadalupe & Hogan”). See our page The Collection if you would like to see a samples of art quilts all made with “Unlikely Materials”.
Our collection includes quilts made from mens ties, recycled silk and linen samples, scrap wool from clothing or blanket manufacturing, recycled denim, and general recycled clothing.
Once You Start Experimenting with Unlikely Materials, You Might Get Hooked!
Betty Anne already had many years experience working with “Unlikely Materials” and before I knew it, she had me experimenting with using recycled wools and denims to create art quilts.
Here is my first experiment with working with recycled wools (from wool mens suiting manufacturing scraps and wool blanket manufacturing scraps) and denims (recycled jeans) – He Dresses Up, He Dresses Down:
He Dresses Up, He Dresses Down (2014). Designed and pieced by Tierney Davis Hogan. Quilted by Betty Anne Guadalupe
Basically – if you can sew with it, we will now try and make an art quilt with it. There are so many unlikely materials we have yet to try out. We enjoy recycling.
I was intrigued that in the Creative Quilt Challenge book, Pat Pease makes an adventurous art quilt with “hair canvas interfacing“. I bow my head to that level of creativity with “unlikely materials”!
(Disclaimer: We still love and support our local quilt shops and still make many quilts with traditional cottons. There are so many beautiful fabric collections to choose from and our new fabric stashes mysteriously continue to grow despite our obsession with recycled materials.)
Tips for Working with Unlikely Materials
I will not deny it – working with “unlikely materials” for the first time is scary. Here are some tips I have learned over the past 4 years. I am still learning and growing in my knowledge and comfort with using “unlikely materials”.
Do not be afraid to experiment and play: You do not have to create a great work of quilting art your first time working with a new “unlikely material”. I played with silk for a while before piecing it into an art quilt.
Check your sewing machine manufacturer’s website for tips on working with various materials and fibers.
Search for YouTube videos on working with a particular fabric and sewing tips on handling that type of fabric in your machine.
Network with other crafters that have experience working with a particular textile you are interested in trying. For example if you know a seamstress who has worked a lot with silk, you could ask her/him for tips.
Determine if a fabric/material needs to be interfaced in order to stabilize it for sewing. As I mentioned earlier, French-Fuse (which can be purchased at sites such as Annie’s Craft Store) is wonderful for backing delicate silks. It makes them so much easier to cut and piece. There are also YouTube videos on using French-Fuse.
If you are using heavy weight materials such as denim and some wools, consider pressing open your seams, and using 1/2 inch seams (like in making garments) as opposed to 1/4 inch seams. A trick that my mentor Betty Anne taught me is to run a tiny (1/8″ inch or less) seam along the front of the seams (front of your piece) to hold down the pressed down seams. This will be helpful if you have your piece professionally long-arm quilted so that the thick seams do not flip and catch the needle when being quilted.
If at first you don’t succeed, don’t give up! I have had several “unlikely materials” piecing/sewing disasters (bad words were said, not suitable for repeating). Some disasters were so bad I had to put them in the trash, I could not even recycle them into another project. Speaking of recycling a disaster into another project, see the post A Very Successful Rescue! about a piece made with recycled silk that was destined for the trash but was recycled by another quilter into a wonderful piece!
Warning – your other quilter friends who only enjoy using cottons, may at first give you a lukewarm response on your pieces made with “unlikely materials”. Do not be discouraged – art is a private and personal thing and you cannot control others reactions. (I love the saying: “It’s not my business what others think of me”…or my art!). I am sure I have quilter friends who thought at first I had lost my mind working with recycled silks and linens. As you grow in your experience with working with “unlikely materials”, your confidence will grow as will your adventurous spirit.
Working on My Latest Piece with Unlikely Materials
The timing of this blog tour post is great, as I am currently working on a new piece for a group exhibit I am participating in, called “Doors” for the local SAQA (Studio Art Quilt Associates) group I belong.
Designing the piece: Selecting the “Unlikely Materials”
I decided to use a photo of a door for inspiration, and located a wonderful collection of unique door photos on an Australian door and window manufacturer’s website Brisbane Timber .
I wanted to created a semi-realistic version of one of their doors, using recycled textiles (“unlikely materials”) and name the piece Recycled Door.
Here are the materials I selected:
Recycled Corduroy Shirt
Recycled Corduroy Pants
Recycled Tweed Wool Jumper
Bag of Recycled Jeans
Shiny Gold Home Decor Fabric
(List clockwise from top)
Recycled Corduroy Shirt
Recycled Corduroy Pants
Recycled Tweed Jumper
Unusual shiny gold home decor fabric (this fabric was given to me by the very talented art quilter, Dianne Browning, who primarily uses the unlikely materials of home decor fabrics and decorator samples in her art – you can check out her incredible art at her website Art Quilts by Dianne Browning)
Recycled Denim (from my bag of recycled jean sections)
The Piece in Progress
Below is a photo of Recycled Door in progress. If you like, for fun, you can go to the Australian door and window manufacturer’s website Brisbane Timber and see if you can figure out which door inspired this piece.
(The thread at the lower right hand of the piece is orange thread – I think it needs to be quilted with orange thread to repeat the strong orange accent in the piece.)
Are You Ready to Experiment or Have You Already Experimented?
Now it is time for you to weigh in on your experience with using “Unlikely Materials” or whether you are interested in experimenting with “Unlikely Materials” in the future in your quilting projects.
Please comment below and all comments will be automatically entered into a drawing for a copy of Creative Quilt Challenges.
The random winner will be selected and notified around 04/07/16.
The Creative Quilt Challenges Blog Tour continues tomorrow, Friday April 1, at BOLT Fabric Boutique, boltneighborhood.com. Thanks for joining me on the blog tour today!
“When you are scared but still do it anyway, that’s BRAVE.” – Neil Gaiman
Tomorrow the tierneycreates blog is a stop on the “Blog Tour” for Pat Pease and Wendy Hill’s new book Creative Quilt Challenges (2016).
When I join the tour on 3/31/16, I will discuss Challenge #3: Unlikely Materials from this wonderful book.
The Blog Tour opened on Monday 3/28/16 and here are the other “blog tour stops” posts to date (if you would like to read them prior to the tierneycreates Blog Tour stop tomorrow 3/31/16).
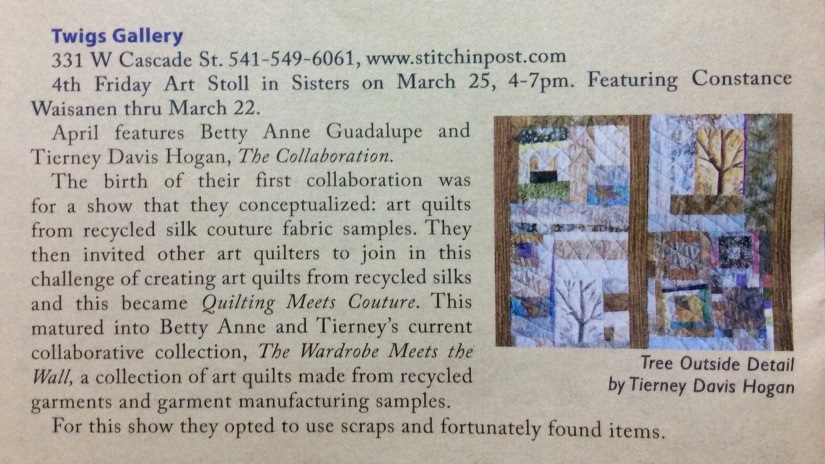
My collaborative art quilt partner, Betty Anne Guadalupe and I will have a show, “The Collaboration”, opening at Twigs Gallery during the 4th Friday Art Walk, in Sisters, Oregon on Friday, March 25, 2016. The show will run through April 2016 and will feature art quilts we created from “rescued” quilt blocks (projects discarded by other quilters and reinvented/reimagined by us), and recycled materials.
Several of the pieces I have discussed on the tierneycreates blog, including We Will Not Be Discarded! and Tree Outside My Window, will debut at this show.
Below are images from the March 2016 issues of Cascade A&E Magazine (Central Oregon’s Arts & Entertainment Magazine):
This post is a follow up to my February 2016 post Surrendering My Piece to “Rescue” in which I shared my frustration with an “Ohio Star” type block I was piecing with recycled silks. I abandoned the piece due to “major creative blockage” and my friend adopted it.
Betty Anne Guadalupe, who adopted my abandoned piece, took it apart and completely reimagined it!
I gasped (and nearly fainted) when I saw the wonderful reinvention she did with my humble beginnings!
Here is what I gave her:
A “hot mess” by Tierney Davis Hogan (ha!)
Here is what she created:
Ohio Star (2016) by Betty Anne Guadalupe
The piece measures 18” x 23” and is made with recycled silks and wools. If you look closely you can see sections of my original piecing. Betty Anne integrated all of my original piece in her piece! This piece will be in our show at Twigs Gallery this Friday (see my post The Collaboration for more details on this show).
I think this is a very successful rescue!
As I discussed in the post What’s on the Design Wall: Silk Squares, I am now working on a piece made from her leftovers from her piece! More to come as this new piece develops…
In yesterday’s post “When Studios Attack” I mentioned I was taking a class at a local quilt shop.
The class I took was called “iCases”. It was taught by a wonderful teacher Lavelle, and was held at BJ’s Quilt Basket (Central Oregon’s largest quilt shop).
I made my first iPad case and I had a blast in class. This is just a quick post to share the photos. The pattern is called iCase and is by Patterns by Annie.
Do you remember the cheesy TV specials on the Fox Network in the 1990s (and maybe early 2000s) with titles like “When Animals Attack”, “When Good Pets go Bad”, and other ridiculous titles?
I am not sure if the Fox Network will ever revive these TV specials, but I do have an idea to pitch to them for a future special: “When Good Studios Go Bad”…
When You Do Not Want to Enter the Room
Early this year I posted photos of where I do my “tierney-creating”, in the posts Inside the Studio and Inside the Closet (these titles sound like TV Specials themselves, but I think there would need to be a bit more spicy drama in these stories for a TV Network to want to air them.)
My studio space is approximately 10 feet by 12 feet and I try to keep it tightly organized at all times, as I have a small space to work in.
Yesterday after a crazy day of my healthcare-industry-pay-the-bills-job, I went to our monthly Central Oregon Studio Art Quilt Associates (SAQA) meeting and then to dinner with friends. I also picked up two completed quilts from my long-arm quilter. Prior to leaving for the SAQA meeting, I was frantically busily sewing last minutes labels on the quilts for a collaborative show which openings Friday 3/25/16 (they had to be delivered to the gallery ASAP).
When I got home it was late, and I was very tired mentally and physically. I placed the quilts from the long-arm quilter in my studio; visited for awhile with Terry the Quilting Husband, Sassy the Highly Opinionated Miniature Schnauzer, and Mike (also a miniature schnauzer but not as highly opinionated); and then headed to bed.
I had decided to take Friday off from work (today) and to take a class at a local quilt shop. However, I was too tired last night to do the required pre-class cutting before bed and figured I would deal with it in the morning… (are those not the famous last words of a procrastinator?!?!)
I overslept this morning, got up in a panic, stumbled into my studio to deal with all the pre-cutting before my 10:00 am class, and found this scene:
Now to many people, this does not look too bad. To me – this was like a terrifying Fox Network TV Special about something attacking something it should not, or some thing going very very very bad. I seriously did not want to walk into the room.
I could not even locate the instructions for the class of what I needed to pre-cut. I had actually sort through most of the stuff lying on top of other stuff to find what I needed. The photo does not look as bad as it looked in person.
We all have different ways we deal with clutter, and many are comfortable with clutter. Clutter freaks me out. It shuts down my creative process and makes me not even want to enter a room.
I made it on time to the class today and had most of my fabric pre-cut. When I returned home, I cleaned up the studio and promised myself to not let my studio become a Fox TV Network Special again!
Also debuting in this show will be the piece that Betty Anne created from my abandoned recycled silk Ohio Star project she rescued (see post Surrendering My Piece to “Rescue”).The piece is amazing – she used all my original piecing and reworked it, with additional recycled silks and linens, into a completely new and deliciously intuitive design. I will post a photo after it debuts at the show. We were so inspired by this “handing off of the start of a piece” to another person to reimagine the piece, that Betty Anne gave me her start of another piece based on the same group of recycled silk and linens scraps. This will be a new challenge – I will create a piece based on her leftovers from her work on my piece that I abandoned …but that is another post…
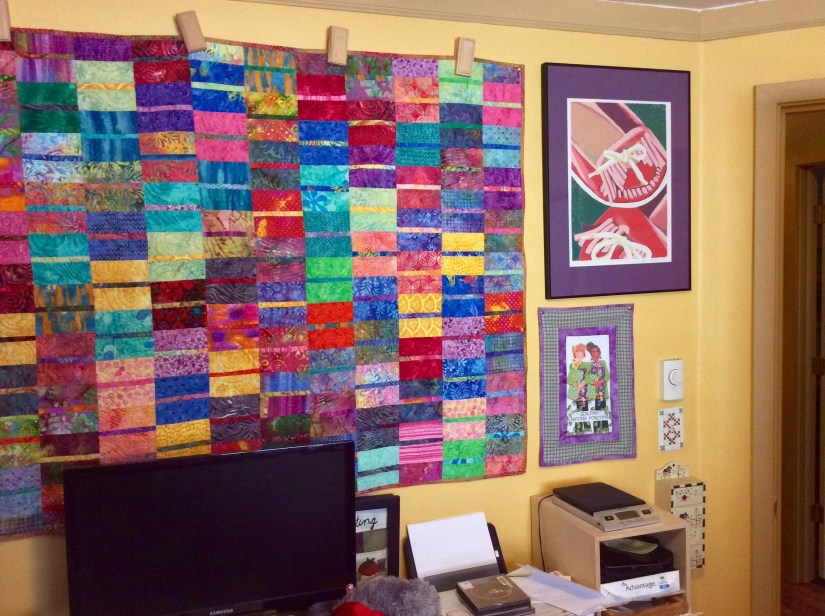
Well, I have started on the piece inspired by the scraps my friend Betty Anne gave me (from her reworking of a piece I had started and then abandoned). She also gave me a small “square within a square log cabin style block” she had made from the scraps. I used this block as the starting point for my challenge.
It is now in progress on the Design Wall.
Here is the story of it’s evolution to date, in photos:
The stash of recycled silk and linen scraps that Betty Anne gave me from her silk piece (which was a reworking of a piece I started, then abandoned)
I made approximately 56 – 58, 2 x 2 inch and 2.5 x 2.5 inch free form “log cabin” style blocks. (I do not remember exactly which one of the blocks is the one Betty Anne originally gave me to start the challenge; but I know it is one of the black silk blocks with a bright center.)
I played around with potential layouts (like floating them in a solid silk like you see above photo) and I am leaning towards grouping them all together. I love the intensity of all the colors together.
Here is a close up of one of my favorite 2.5 x 2.5 inch blocks – I am having so much fun coming up with combinations from the limited fabric options I was given. I enjoyed the tiny piecing challenge and many of the silks had to be backed with interfacing to stabilize their delicate weaves.
Now the blocks are on the Design Wall.
Now I can decide, from the remaining fabrics, what additional blocks I need to add and their color combinations.
This past weekend I witnessed the ultimate in “home studio fabric organization”!
I visited the home of a quilter friend of mine for the first time and she showed me her quilting studio. As I turned the corner to enter her studio, my jaw dropped when I saw her extremely well organized fabric stash: It looked like I had stepped into a quilt shop!
How She Did It
My friend collected empty cardboard fabric bolts from quilt shops and cut them in half. She wrapped her fabric stash fabrics around the half bolts and then organized the fabrics by theme/category in a large wide bookcase.
If she had more than a certain yardage of fabric (I forgot her threshold), she would organize the fabric on a full size cardboard bolt (bottom left of the bookcase).
Advantages
I think the advantages of this type of fabric stash organization are as follows:
Her fabric organization and display feels like she is shopping directly from a quilt shop every time she goes to select a fabric in her stash – AMAZING!
She can clearly see what is in her stash.
This may reduce her need to actually go to a quilt shop, and spend money on fabric that she does not actually need.
(I know, I know, right now all quilters reading this are rolling their eyes. Buying fabric is not about needing it – it is about wanting it!)
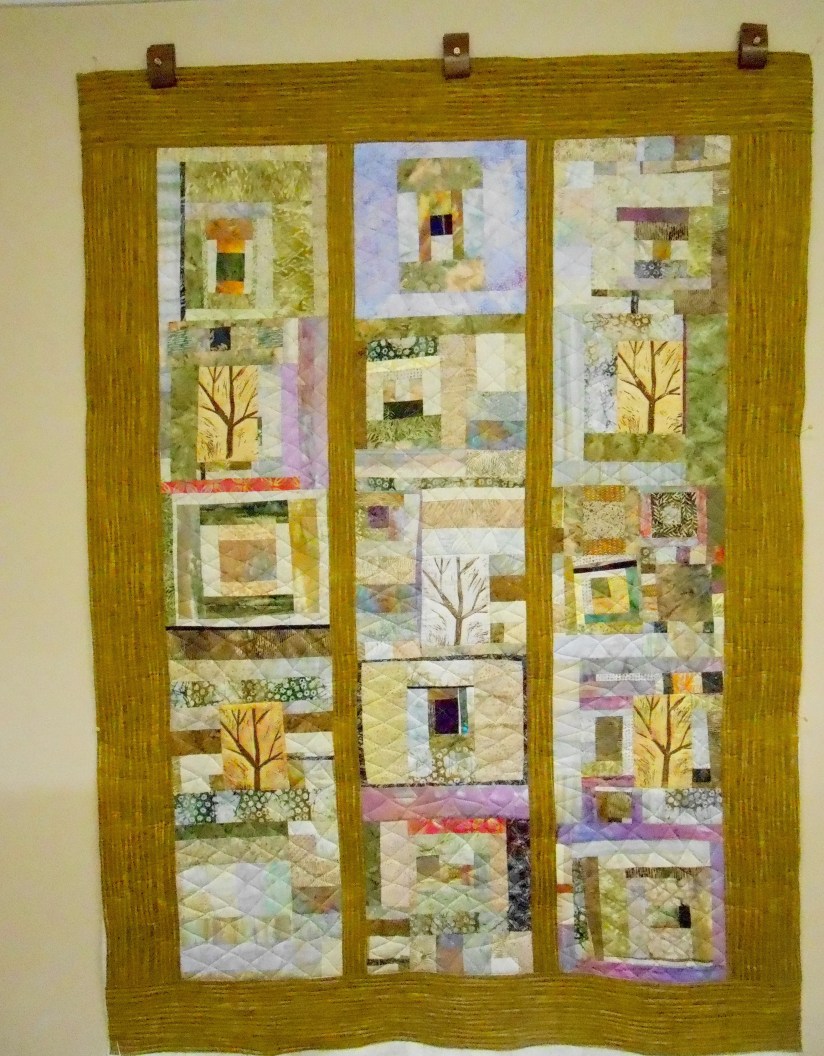
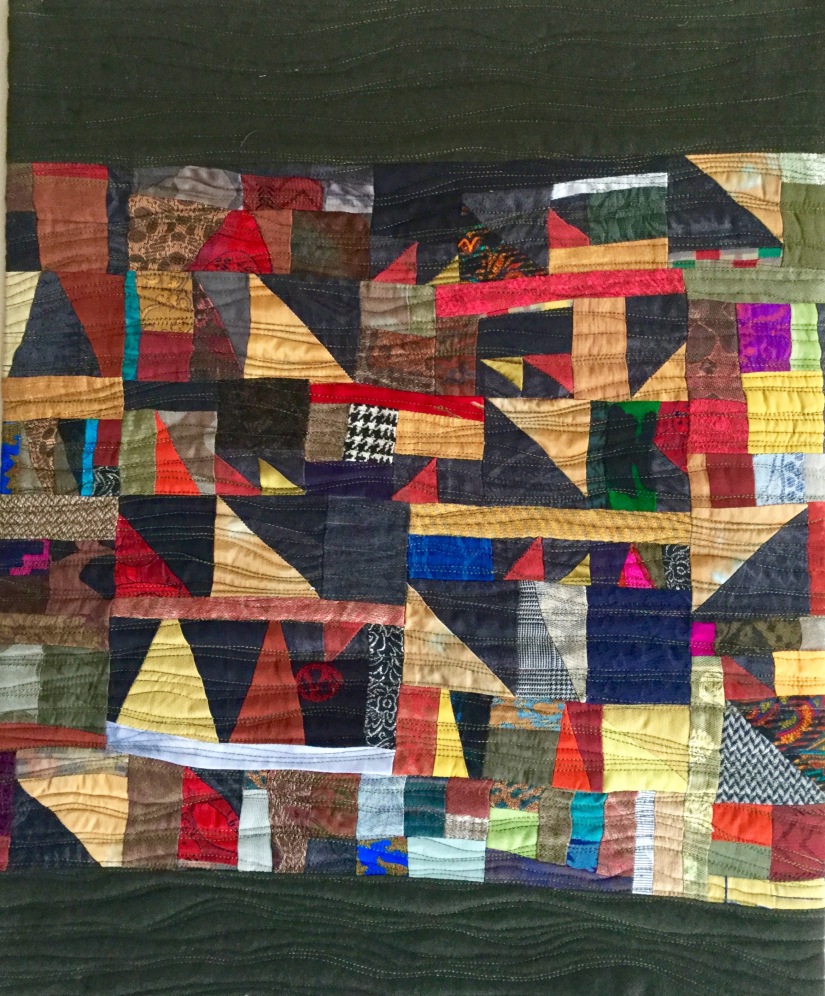
Last month in the post What’s on the Design Wall: “We Will Not Be Discarded!” I shared a piece in progress made from discards (destined for the trash) from another quilter’s quilt. It was a fun challenge. I used nearly every trimmed section/discard in this piece, setting them in a solid copper cotton fabric.
The long arm quilter, Guadalupe Designs, has finished quilting the piece and it is awaiting facing (a type of finishing/binding for art quilts where the binding does not show on the front).
Here is a sneak peek of the piece (to follow up on the post from last month):
Detail: We Will Not Be Discarded! (2016). Designed & pieced by Tierney Davis Hogan; quilted by Guadalupe Designs.
The piece measures 51″ x 17″ and will debut in March 2016 at the show at Twigs Gallery in Sisters, OR. The show opens on the Sisters 4th Friday Art Walk on 3/25/16 (After it debuts at the show I will post a photo of We Will Not Be Discarded!).
I will have 4 pieces in the show and all my pieces will feature “Recycled” Blocks, rescued from either discards of other quilters or donated abandoned projects. I love the idea of working to create something of beauty from something that was once abandoned. I love the idea of shared creative energy (see my post What’s on the Design Wall: “Ohio Star” (a taste of “Big Magic”) – “When an Idea is ready to be born, it will visit numerous people to find someone who going to bring it into existence” – Elizabeth Gilbert).
I am working on the hanging sleeves and labels for some of the piece which are unlabeled. I am feeling honored and excited about being in the show – more later!
Let’s just say it is a person’s prerogative to be able to change their minds…
If you never change your mind, why have one? – Edward de Bono
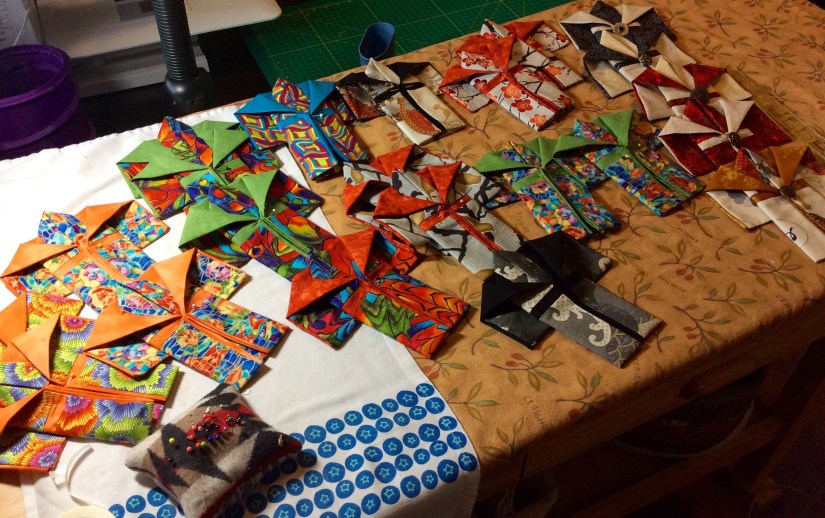
A couple weeks ago, one of my wonderful tierneycreates Etsy shop customers, who has been very supportive of my miniature kimonos, asked for some new kimono color and fabric options. She was so enthusiastic about my miniature kimonos, I got enthusiastic about them again and made a fresh new batch:
They’re Baaaack!
23 new kimonos in total. Currently I am busy adding buttons and finishing details, eventually they will get posted to my tierneycreates Etsy shop.
I have been negligent with my Etsy shop for a couple months now due to work and other life related things. I am working on new offerings and refreshing current offerings.
I do not expect my tierneycreates Etsy shop to ever become a “quit your day job” kind of thing (it is more of a fun hobby) but I really enjoy connecting with people across North America (I have Canadian customers too!) and adding a little “fusion of textiles & smiles” to peoples’ lives!
Starting out with a strong idea and good intentions…
In this previous post, I shared my excitement over my sudden inspiration to create a traditional pattern quilt from nontraditional fabrics (recycled garment silks and linens). I knew it would be an experiment and in this first experiment, I created a traditional Ohio Star block from my collection of recycled silk and linen samples from garment manufacturing.
If you are not a quilter, an Ohio Star block is a “nine patch” block made from quarter square triangles around a central square. This block is a very traditional quilt block and was used in early pioneer and Amish quilts in the 19th century. The pattern I used was for a “Star-within-a-star” Ohio Star.
Ohio Star, recycled silks (in progress)
The plan was to make a small wallhanging. I pieced the Ohio Star block, and as I auditioned fabrics to use in the border, I grew more and more unhappy with the Ohio Star block.
At first I could not figure out what specifically was bothering me, as I was pleased with the color combinations/palette.
I realized what was bothering me – the piecing itself. My prior work with recycled silks involved intuitive free-form designs for art quilts. This was my first attempt at making a traditionally pieced structured quilt block from recycled garment silks and linens.
When I used to make traditional quilt pattern quilt blocks I would use crisp quilting cottons – this fabric was easier to manipulate to achieve accurate piecing and star points.
Working with silk and linen samples intended for garment making can be challenging, especially when attempting to accurately piece shapes such as star points. In order to work with the delicate silks, you need to put a backing/stabilizer material on the back of each silk section. Silk backed with a fusible stabilized can be cumbersome to cut into small accurate sections. Silk also frays.
So…to shorten what could grow into a very long and tedious story of my explanation why the Ohio Star was not working for me (and to avoid putting my non quilter readers to sleep), let’s just say: I was quite unhappy with the imprecise piecing of the block.
For a moment, I started to – just throw it away (gasp) ! Then I thought: let me try reimagining it – into some sort of “fractured” Ohio Star, where the accuracy of the piecing would not be as much an issue.
I sliced up the Ohio Star and sewed it back together into a new configuration. I revisited my stash of recycled silks and linens to audition other combinations to try to build some sort of abstract wall hanging art quilt piece around the “fractured star”.
“Fractured” Ohio Star
Frustrated and drained of inspiration, I put the piece and its potential coordinating fabric away. I did not know where to go next with them.
Time to let someone else “rescue” the piece
I have several previous posts about working with “rescued” and “recycled” quilt blocks. Another quilter started a piece/making quilt blocks and abandoned the project; I then “adopted” the project and created a new piece based on the original blocks and my imagination.
While sharing my dilemma with an art quilting friend (that I was going no where with my Ohio Star silk and linen experiment), my friend offered to “adopt” the piece and create an art quilt with it.
I was delighted! Not only was I delighted but I felt a great sense of relief! I realize a textile project is not a living being but I felt as if I had recklessly abandoned a piece in progress, filled with creative energy, to the lonely “Projects on Hold” box in the back of my closet.
My experiment is going to be adopted and go to a good and loving home, where it can grow into something wonderful!
(Yes I will share a photo when my friend completes the piece from wherever her imagination takes her!)
Life is a balance of holding on and letting go – Rumi
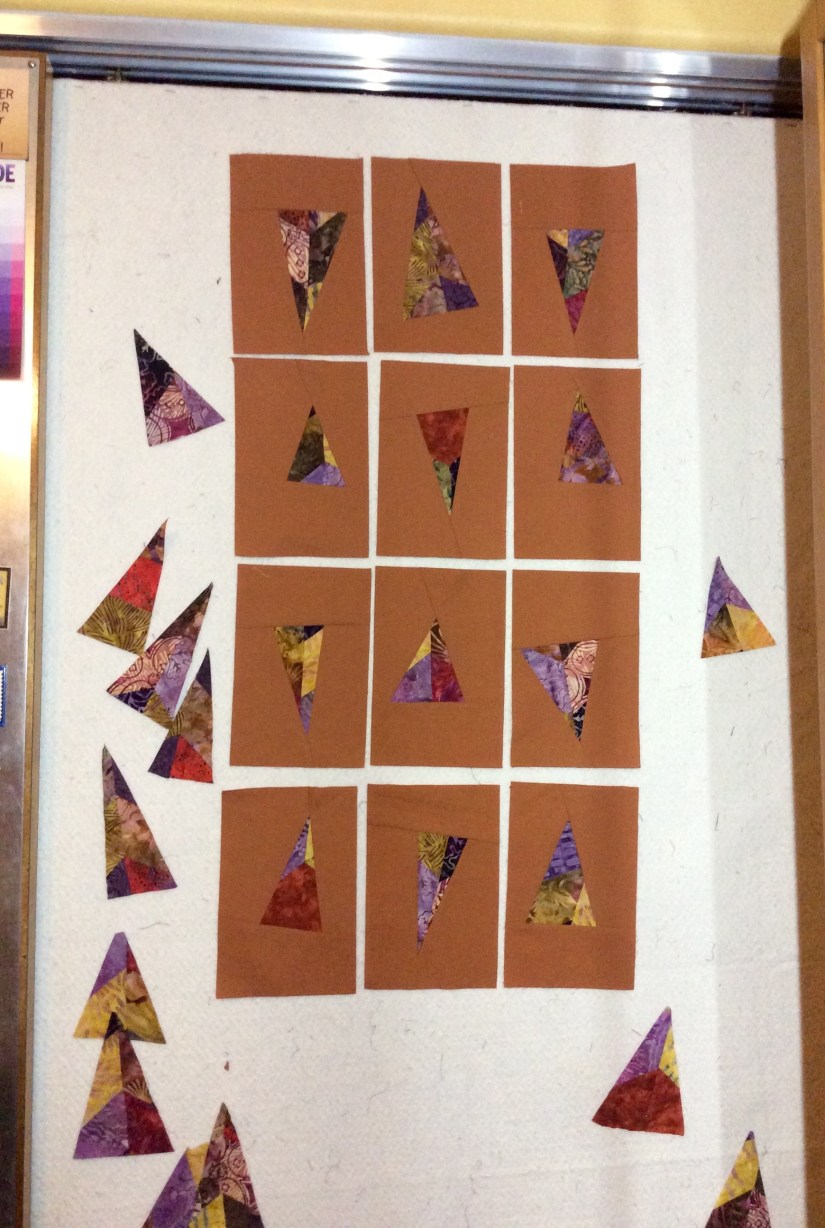
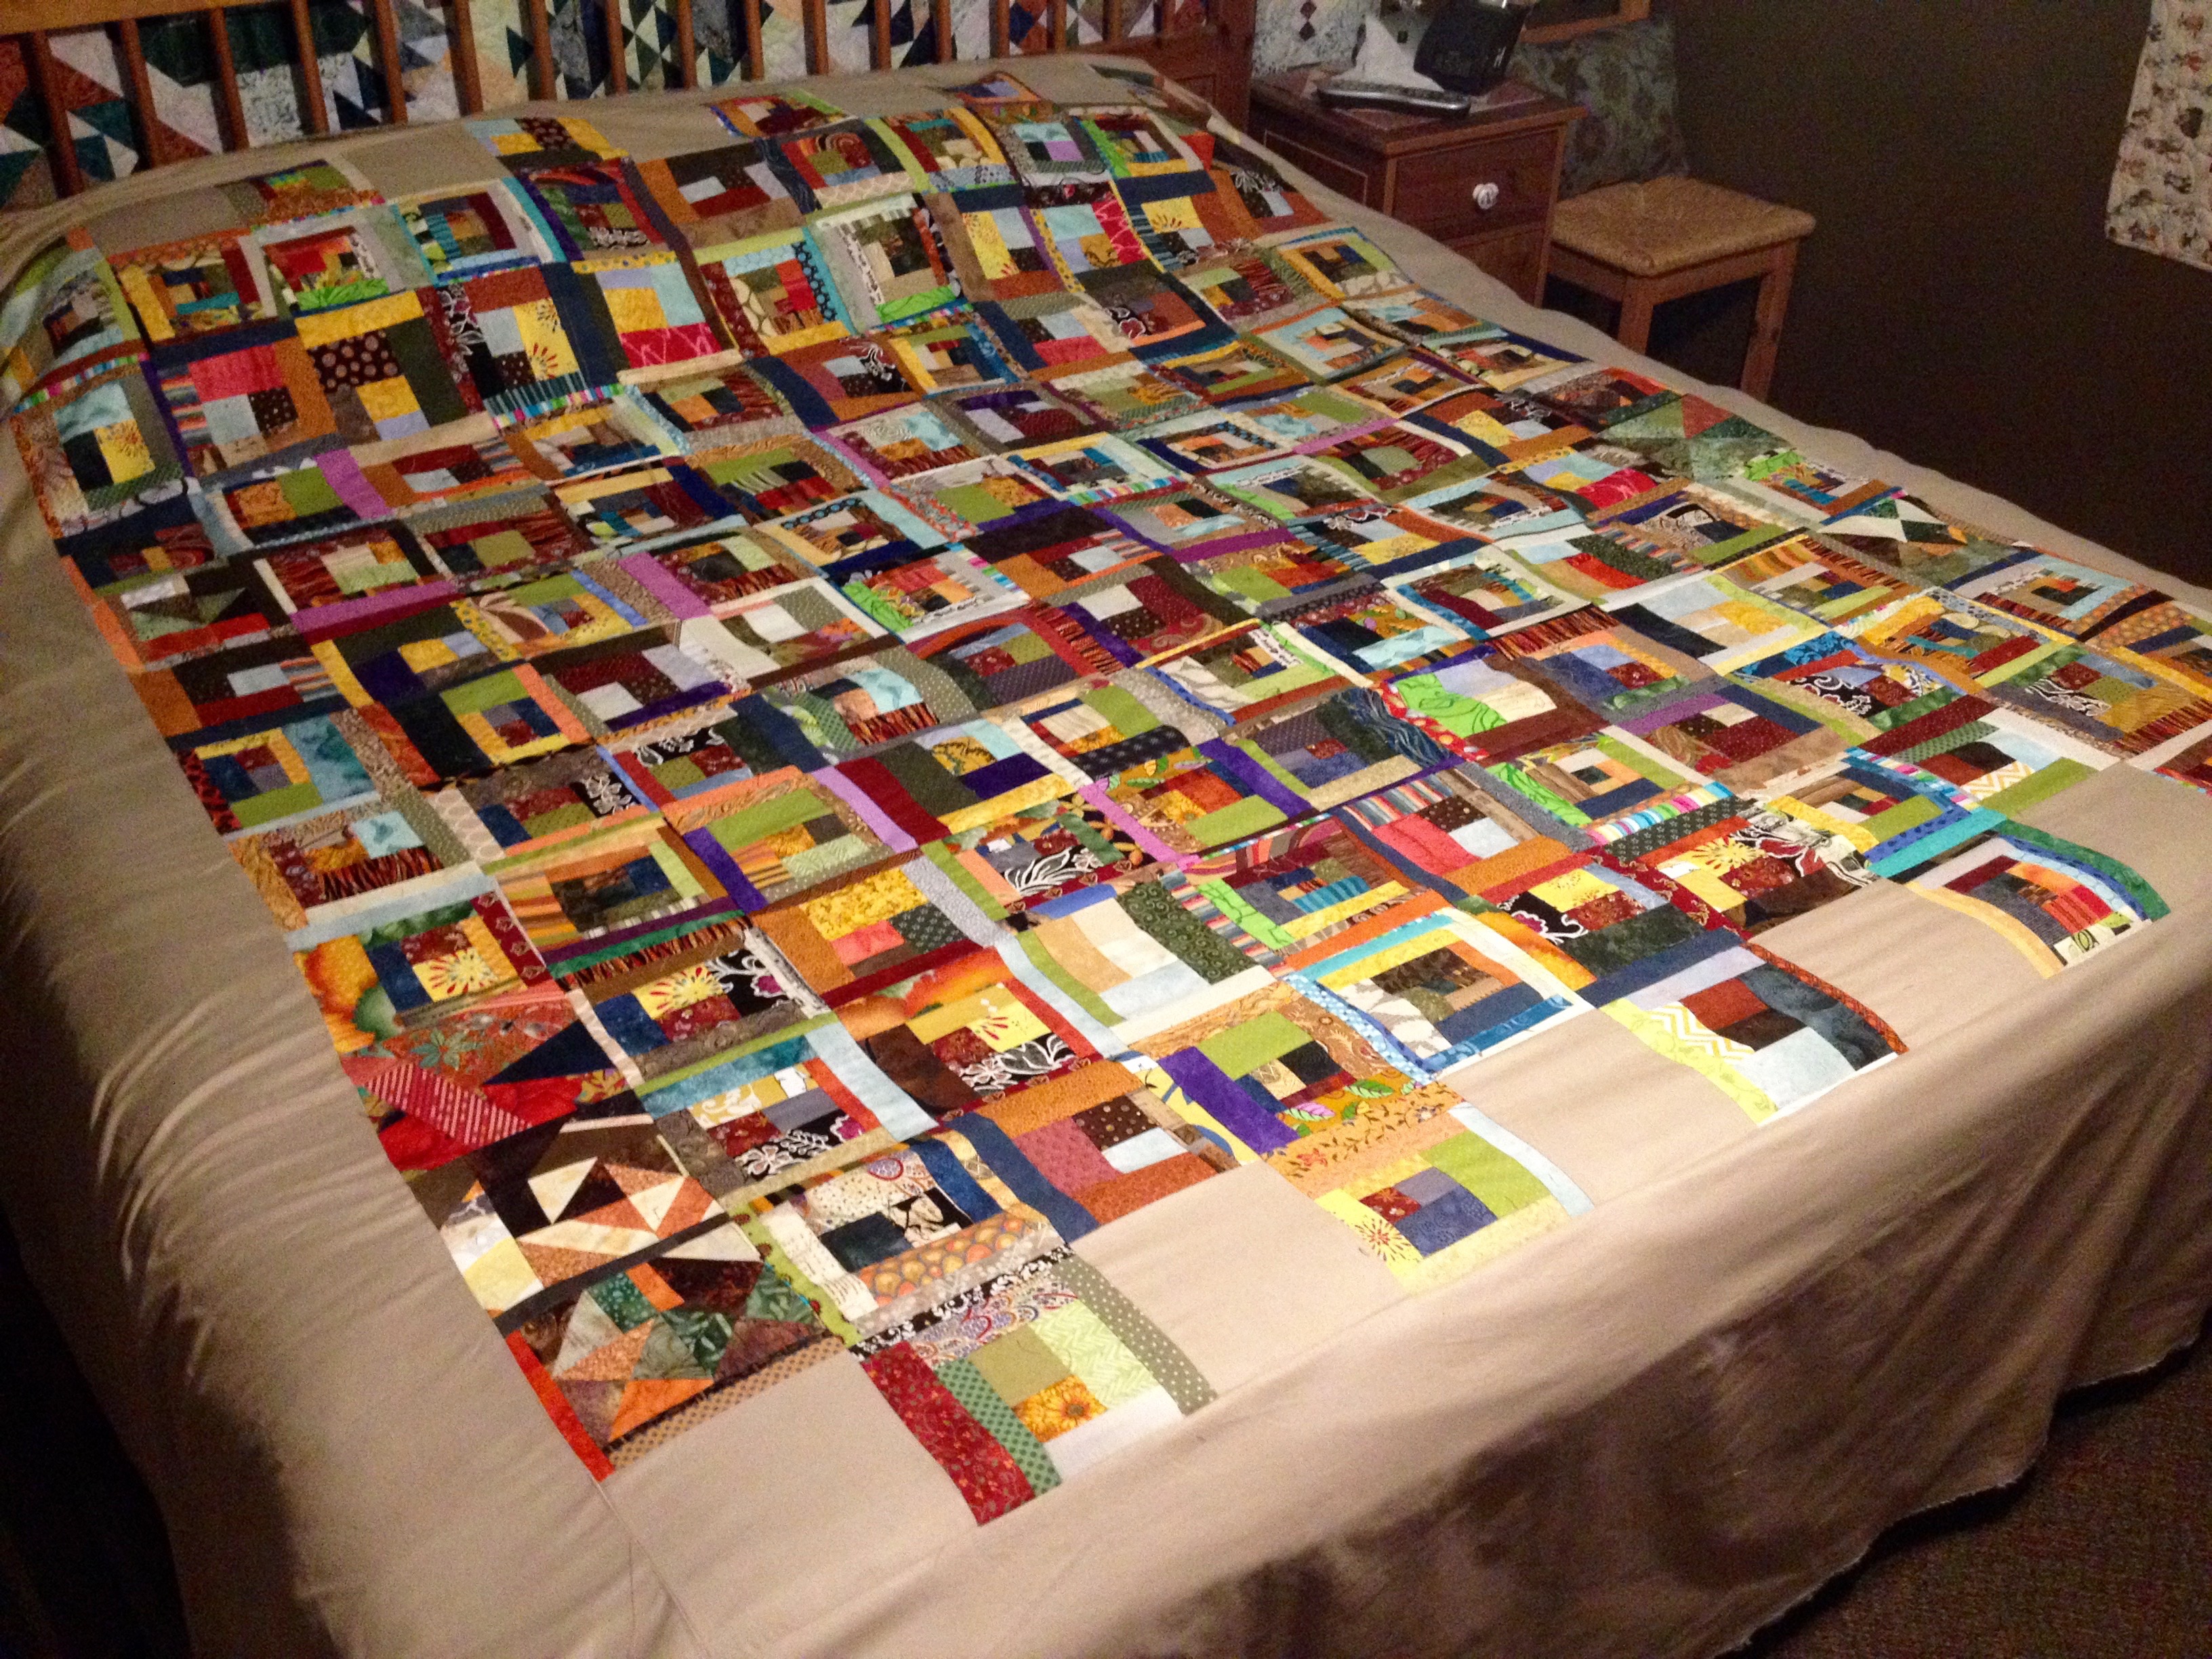
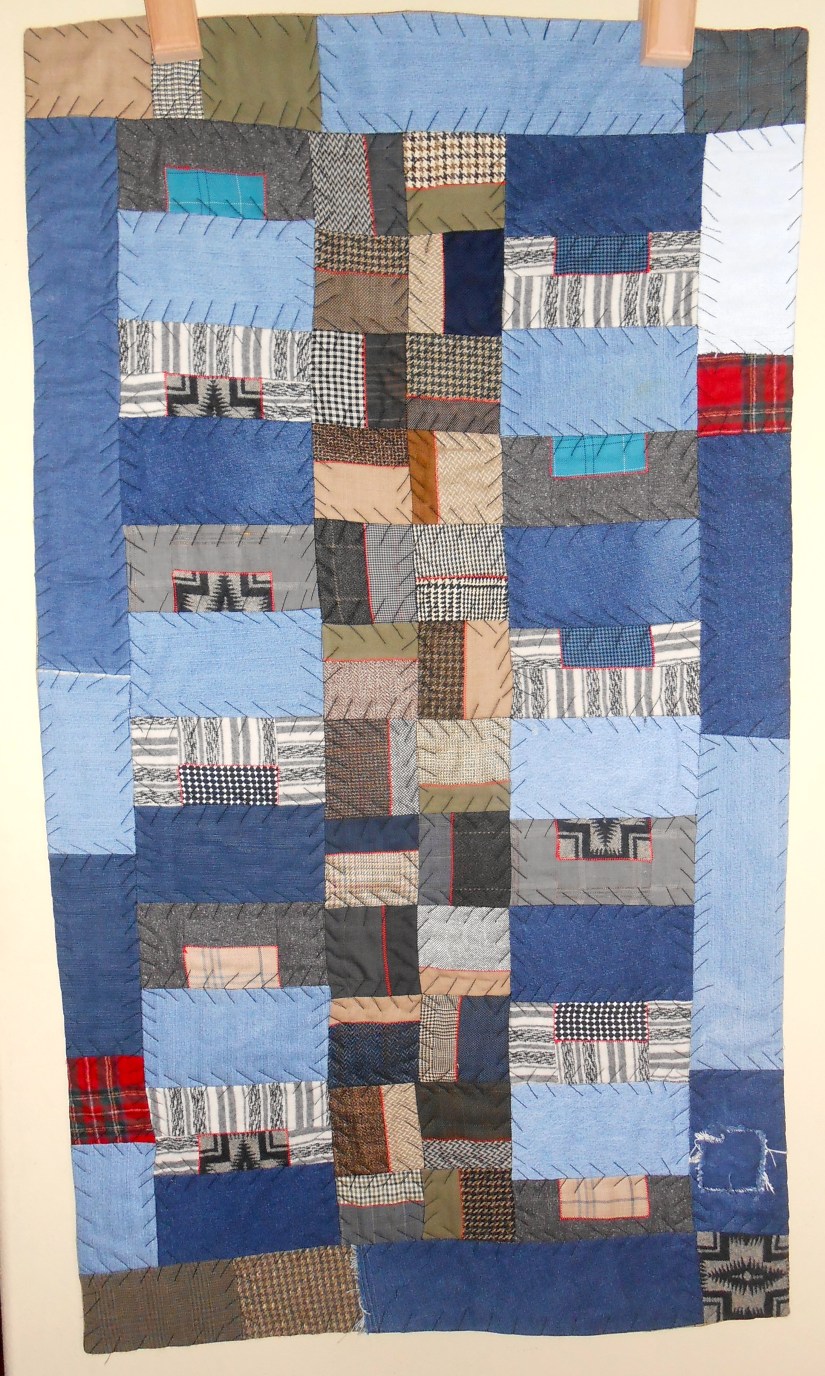
I have been working on assembling the blocks designed from discards, from another quilter’s block piecing, and a solid coppery-rust fabric, into a piece called “We Will Not Be Discarded”.
I am playing with the block arrangements and looking at two different arrangement options for the 15 blocks in progress:
OPTION #1 – All blocks pointing the same way:
OPTION #2 – Blocks pointing opposite ways:
I am leaning towards Option #2 as it makes the piece appear to have more “movement”. Once I finish all 15 blocks, I will play again with the final arrangement.
We Still Will Not Be Discarded!
I am playing with the idea of making a second piece (“We Still Will Not Be Discarded!”) from the discards/trimming of the original discards! (And the scraps from the solid fabric they are set in)
That would be taking recycling to the extreme, right? The challenge does seems interesting…
Trimmed discards from the “trimmed discards” in my little trash basket – tempting!
In the post The “Basted” Quilt, Dilemma, and Temptation I bemoaned about my dilemma of wanting to just let the large basting stitches on a quilt suffice as the quilting. Well I put on my “big girl panties” and made it through quilting it myself, using just straight stitches, 1/4 inch apart. So glad it is done! (BTW the whole I time I quilted it I was groaning “why didn’t I just let the long-arm quilter quilt this for me?!?!)
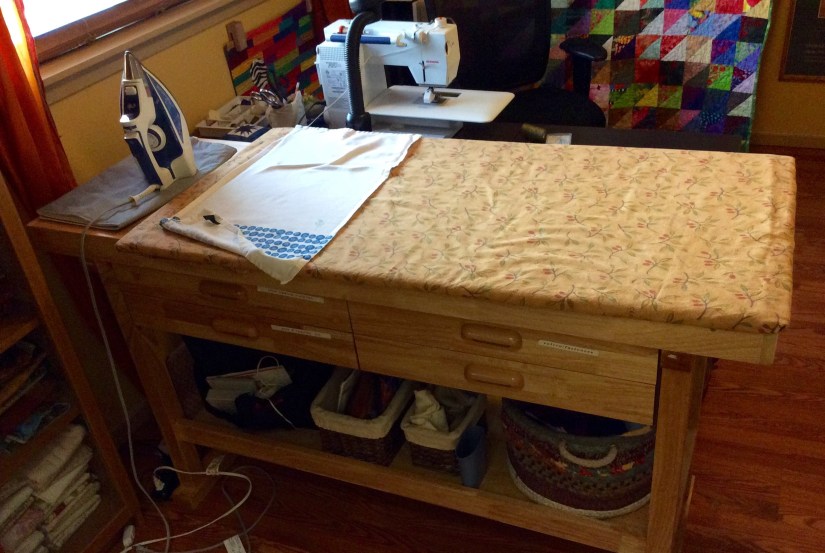
NEW “FURNITURE” ADDED TO THE STUDIO
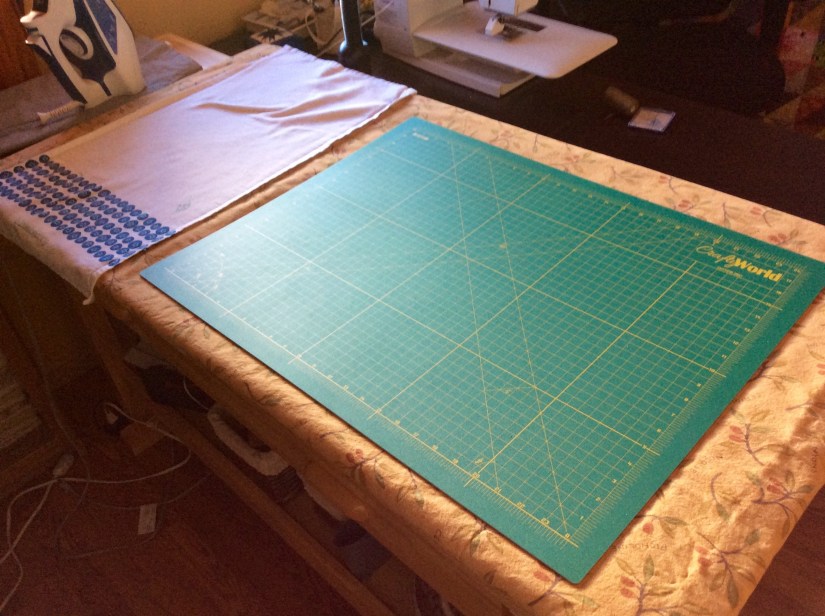
In my recent post Inside the Studio I shared photos of my tierneycreates studio layout. This weekend I added another item to the studio – I pulled the sad ironing board out of the room and added a workbench table from Harbor Freight Tools. This table was on sale this past weekend for an excellent price. One of my Quilt Sisters gave me a heads up on this wonderful find. Terry “The Quilting Husband” got it assembled and we made a removable wide ironing board top for the table. I love it!
My younger brother surprised me with a new cutting mat for Christmas and I discovered the cutting mat fits nicely on top of the removable ironing board. I can cut and press small pieces on the same surface area. My brother has been very supportive of my quilting adventure (and he and his family has benefited from various quilts I have made them!) Past Christmases he has surprised me with quilting books I do not have! (I suspect he has a secret inside quilting connection, ha!)
MISC UPDATES
Handmade at Amazon
I shared in several prior posts how I was looking at listing items on Amazon’s new platform for crafters to sell their handmade items –Handmade at Amazon. I was accepted to become an “artisan” on this platform but I have decided to just stick with Etsy. I love the experience of working with Etsy customers and I think I would be stretching myself too thin with my full-time healthcare job, my tierneycreates Etsy shop, and the Amazon shop.
Terry the Quilting Husband’s Future Exhibit
Terry, the Quilting Husband, is going to submit 5 quilts to the Sisters Outdoor Quilt Show for consideration to be in the show. They will be having a special Male Quilter Exhibit. More details later this year!
Also Terry is looking at working on Quilts of Valor quilts to be donated to local Veterans, in the future. A Veteran himself and a military history hobbyist, this would be a wonderful was to combine quilting and his deep respect/wanting to honor those who served. There is currently a local project trying to get red, white and blue quilts to the oldest of the local Veterans, primarily WWII Veterans.
Upcoming Show
My The Wardrobe Meets the Wall collaborator and beloved long-arm quilter and friend, Betty Anne, and I are having an upcoming show at Twigs Gallery in Sisters, Oregon, opening the end of March. More details in the future.
This is technically Part II of yesterday’s post “Inside the Studio“. A friend suggested I share what is inside the closet in my studio.
Here are photos of the left and right side of the closet, which has sliding doors so I cannot fully open the closet to expose both sides at once.
The Left Side
The Right Side
I like to think I am organized. I know I am more organized than I used to be and I can find things fairly quickly. I bought a label maker a couple of years ago and have fully embraced its use!
Postscript
A friend shared a wonderful quote with me today that I have been mulling it over the entire day:
(Check out Sassy the Highly Opinionated Miniature Schnauzer’s latest musing on her Schnauzer Snips page)
The title of this post makes it sound like a thrilling exposé of what really goes on behind the scenes at tierneycreates: drama, intrigue, maybe even a little scandal…
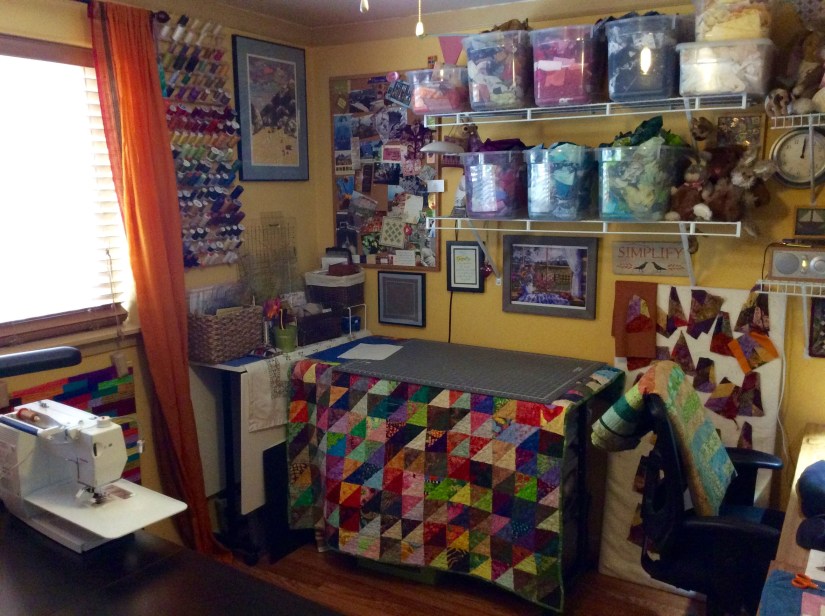
No not that exciting – just recent photos of my studio where I do my tierney-creating!
The back wall where I keep my fabric scraps by color, and my cutting table where I hide underneath those things that-are-not-finished (that brightly colored batik quilt it meant to distract the viewer from what is beneath…).
To the lower right of the photo you will see my mini design wall. I learned from a quilting friend that it is handy to have a smaller portable design wall.
My sewing machine and ironing board (two very essential items!) I got the idea from another quilter to cover my ironing board with a towel to make ironing smoother and easier. Sometimes I also use a cotton dishtowel to iron small pieces on.
My wonderful brother gave me the sewing table for my birthday last year and the leaf folds down and the table becomes a small cabinet if I need more room).
My IKEA Billy Bookcase of fabric! This organization came out of my massive fabric purge in 2015 (see post The Fabric Purge!). The curtains in the room are made from a sari my friend Jenny brought back from her trip to India for me.
My storage closet with custom made sliding doors which I first discussed in the post Rethinking a Closet. One door has sheet metal mounted to serve as a magnetic idea board. The other has batting attached to serve as a design wall (refer to all my posts on “What’s on the Design Wall).
I am not sure why I selected the color yellow when I painted this room 8 or so years ago. Somedays I think: “I am going to paint it white or some other neutral color”. Yellow can be overstimulating, but I simply embrace the over stimulation and decorate the room with brightly colored things – like this lovely quilt my friend Judy made me and several silk screen prints from an artist friend in my youth (the other silk screen is in the first photo).
I like to watch “quilting movies” (movies you don’t really have to pay close attention to) and documentaries while I am quilting on the screen below.
Another brightly colored piece of art in my studio – a wallhanging from my friend Betty Anne.
Well back to creating in the tierneycreates Studio – I better not keep that Design Wall empty for too long!
Thanks to my dear friend in NYC whose partner is Finnish and travels to Finland at least once a year, I am starting to amass a nice collection of Marimekko Fabric. This Finnish fabric is boldly colored and has large scale and unique modern and Scandinavian designs. I find it so visually pleasing!
I am so completely in love with this fabric that if I were to visit Finland, I would have to bring a large empty suitcase just for my Marimekko Fabric purchases at the outlet in Helsinki!
My friend only is only able to send me a little at a time (she bring back from Finland only what she can transport in her suitcase with her other items). However, I recently discovered that in NYC there is a Marimekko Flagship store! Next time I visit my friend in NYC, I will have to insist her take me there! I am not sure she will be able to get me out of the store (no, no, no I will remember my commitment to buying less stuff and living with less…maybe…the Marimekko store may need to be an exception).
Below is a photo of my collection to date:
Confession: This fabric is so “precious” I have to admit I have only made one thing with the fabric so far: a small zippered bag for my friend who sends me the fabric.
One of the things I enjoy about blogging is it gives me an imaginarysense of accountability: that I need to follow through on my projects so I can post about them!
Here are some recent updates in case you wondered what became of the projects I discussed (hopefully worrying about whether I completed them did not keep you up at night…smile):
HANDMADE HOLIDAY CARDS
In my 11/12/15 post, Terry the *Not” Quilting Husband, I shared that I was going to take a break from quilting and work on handmade holiday cards. I did and finished about 20+ handmade holiday cards using recycled images from “dog of the day” calendars and scavenged items and images from other handmade or professionally manufactured cards. I am not posting photos as I want to respect the copyright on the images which belong to other photographers.
I used heavy cardstock for the cards in red or green and inserted (if I remembered) folded plain white paper to make writing the holiday greeting easier. Some of the cards I decorated with a ribbon tied through the center.
Lesson Learned: do not wait until Thanksgiving weekend to start making handmade cards!
KING SIZE QUILT COMPLETE
In my 12/6/15 post, What’s on the Design Wall: Backlog, I shared that I discovered 120+ 6.5 inch log jam blocks (scrappy pieced log cabin style blocks) that I had pieced earlier this year. I added in a couple extra blocks recycled from a friend’s discarded blocks and pieced a king size quilt! I will send it off to the long-arm quilter once I figure out what color to use for the backing. I want to do a solid color back, not a pieced back. I am going to buy some 108″ wide backing fabric for it.
I set the log jam squares to float in khaki-colored Peppered Cottons fabric, which I had listed on my tierneycreates Etsy shop. I decided to pull it from the shop and use nearly the entire remaining bolt of fabric to do the float blocks and wide border. I have a little left of the fabric but not enough to list on the shop any longer.
After applying to be considered as an “Artisan” on Handmade at Amazon and having my portfolio reviewed by their selection committee, I was accepted to be an Artisan on Amazon.com’s Handmade at Amazon.
I have several e-mails from Amazon to review and figure out how to set up my Amazon.com shop. I still plan to keep my tierneycreates Etsy shop and I am trying to figure out what to sell through Amazon and what to sell through Etsy. I need to sit down and do some product planning.
Of course, the full-time-healthcare-industry-pay-the-bills gig I have tends to interfere with my handmade item production time!
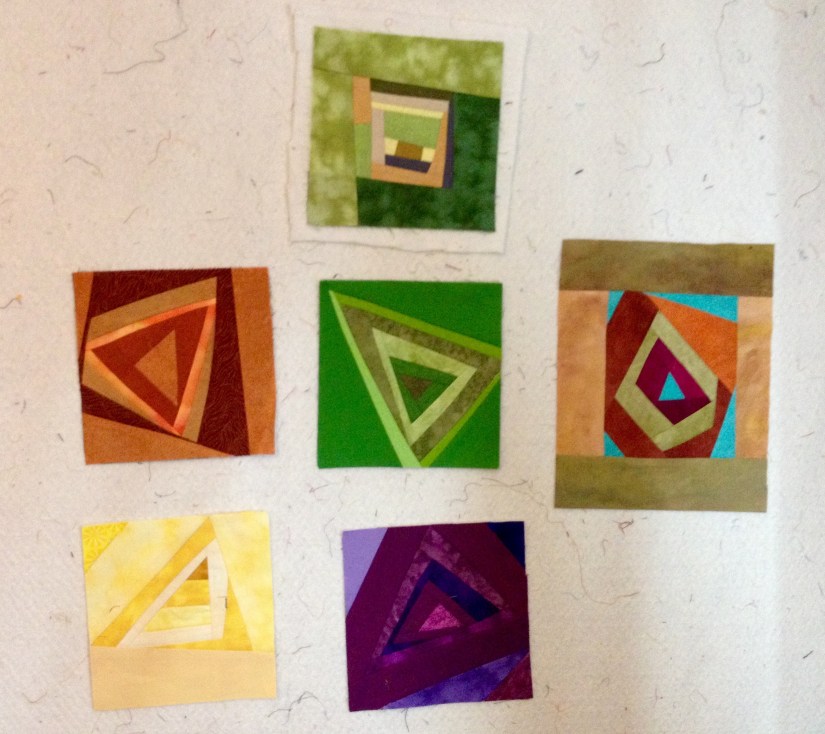
Interested in experimenting with solids, I made these 6.5 – 8.5 inch pieced blocks a couple of months ago. I recently put them up on the design wall to decide what I wanted to do with them.
I am thinking of making them a series of little decorative modern art pillows to sell on my tierneycreates Etsy shop.
(In addition to the oranges, greens, yellows and purples blocks I did, I also made one with blues and one with reds but I did not like the combination of shades of the blues or reds so they got recycled.)
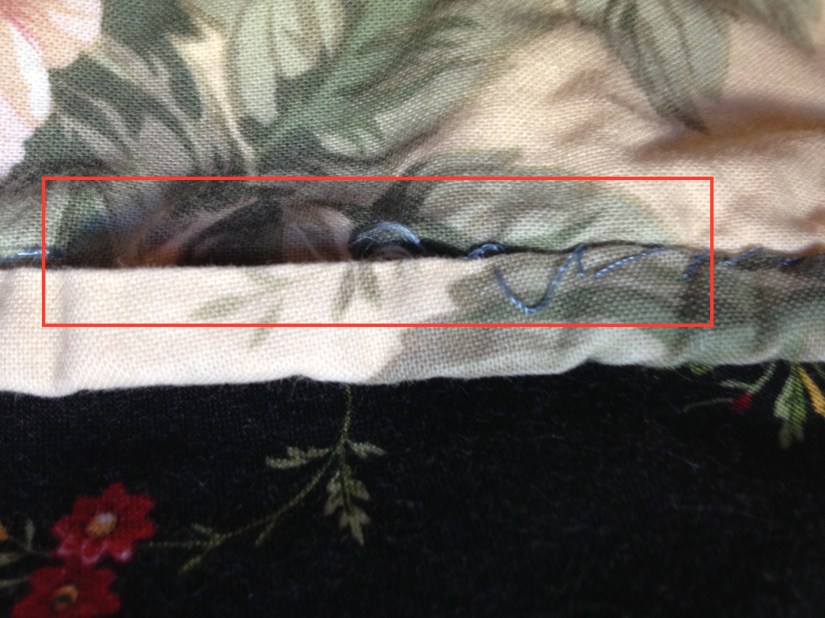
In my early days of quilting, I was rather impatient with the last stage of completing a quilt – “sewing down binding”. In my mind I was quickly sewing down the binding to the back of the quilt. In reality I was sloppilysewing down the binding to the back of the quilt.
Recently I went to wash an old (my early days of quilting) quilt, and discovered the binding was loose and missing in some areas.
I took a good and honest look at the stitches in the back of this old quilt, and I was APPALLED. Yes that is appalled in all caps because that is how I felt.
As you can see in the image below – on the left side of the rectangle is where the thread left the binding; and on the right side is an example of my sloppy stitching. (Yes, it looks like I was under “some chemical influences” with one eye closed, while I was sewing).
Gasp.
I am going to remove the old binding and redo the entire binding. This time I will carefully sew it down.
I did not realize I had an issue with being sloppy with sewing down binding until a couple of years ago when a friend asked me to help her sew down binding on her quilt. We were at a quilt retreat and in the process of taking a break from sewing and doing the local “quilt shop hop” near the retreat center.
I was sitting in the backseat with a couple other quilters (two were up front and one of the them was driving of course, as we have yet to afford the special QUILTER AUTOMATED VEHICLE that drives you around on its own to quilt shops while you visit with your friends and sew). My friend had a lovely quilt for her son that she was trying to finish and brought along to work on in the car, as it only needed its binding sewn down. So she gave me one end of the quilt to work on while she worked on the other.
She tried to be polite, but she had to remove and redo all the stitches I had done. This is when I realized (as the truth was now starring me in the face): that I need to take sewing down binding more seriously. Binding a quilt deserve the same level of care and patience that goes into piecing a quilt.
I committed to becoming a better “quilt binder” and my quilts over the last couple of years and had high quality binding stitching.
Interesting: once you get into the habit of doing something correct, sometimes you forget what you used to do in the past. I was in shock when I saw what I had done on the old quilt!
POSTSCRIPT
Originally when writing this post I was going to title it: “Quilter’s Hall of Shame: Binding”. However ever since listening to the audiobook of Brene Brown’s book Daring Greatly (2015) I have no time for the concept or feelings of “shame”. I figure life is a learning and growing experience (for a summary of key insights I gained from reading this book, see my post Life is Nonfiction Part II) and I am not going to fill it with any feelings of shame.
Check out Sassy the Highly Miniature Schnauzer’s latest musing on her Schnauzer Snips page.
My sister loves wolves and I wanted to make her a quick quilt for the holidays. She and her family have been the recipient of many quilts from me over the years. These quilts were more complicated and elaborate quilts that a “panel quilts”.
She loves wolves and I came across this wolf panel a couple months ago and knew it would be an easy quilt to make that would give her a big smile! I finally realized that not every quilt made as a gift needs to be a major project, it is okay to do something quick but thoughtful!
The photo is not the best as I took it in a rush before packaging it up to send it across the country.
She already opened up her gift and loves it, so I can share.


 Now to many people, this does not look too bad. To me – this was like a terrifying Fox Network TV Special about something attacking something it should not, or some thing going very very very bad. I seriously did not want to walk into the room.