This post is a quick follow up to the post Creating… on 07/27/16 where I discussed pulling out from my project pile and completing a set of “art pillow experimentations”.
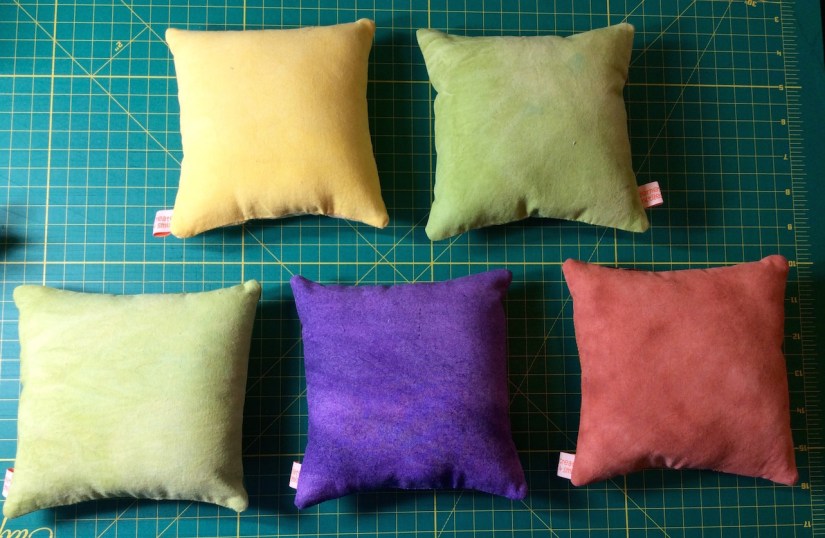
I spent part of this weekend finishing up the rest of the little art pillows (they range from around 6 x 6 inches to 8 x8 inches for the large one).
Here is the full set of the finished pillows (notice my new tierneycreates labels on each pillow):
Here are the backs of the smaller pillows (made with hand dyed fabric found at a thrift store (it was quite the score!)
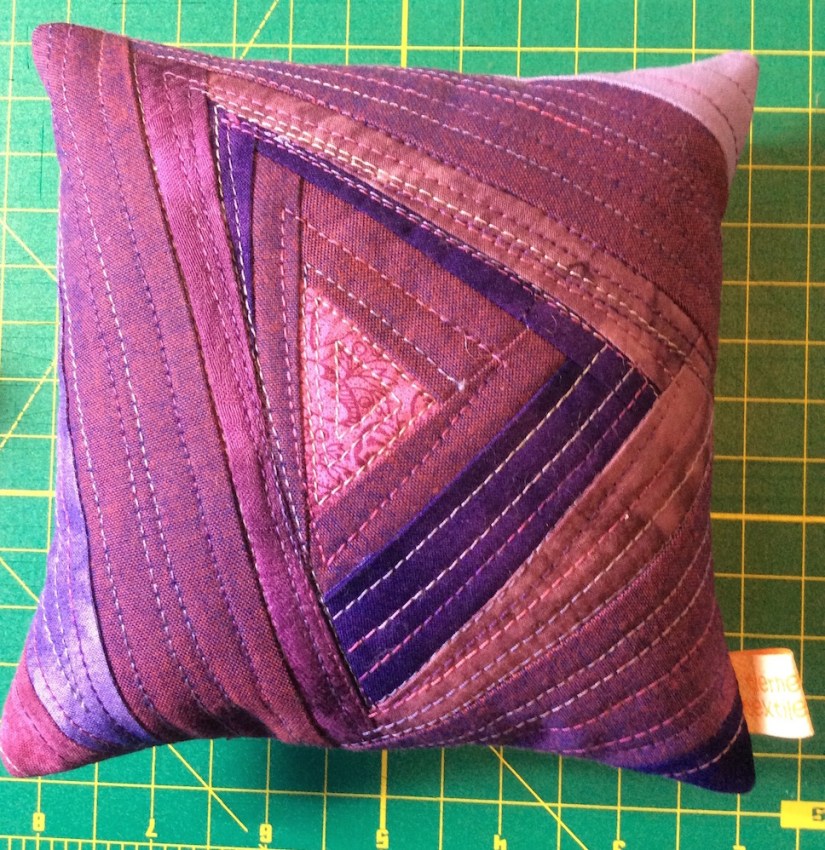
I was going list these three pillows on my tierneycreates Etsy shop as a set but I decided to just list them separately (they do look cute together though):
Here are close ups of some of the pillows:
I am posting this on Sunday night but you will likely read this on Monday, so I wish you all a wonderful week, and talk to you later!
I am inspired by her paintings! I might do a little quilt piece inspired by her work.
In Central Oregon we actually have a famous quilter and a well-known painter collaborating on art projects – Jean Wells Keenan (quilter) and Judy Hoiness (painter).
Continuing my series on What’s on the Design Wall: Projects in Progress…
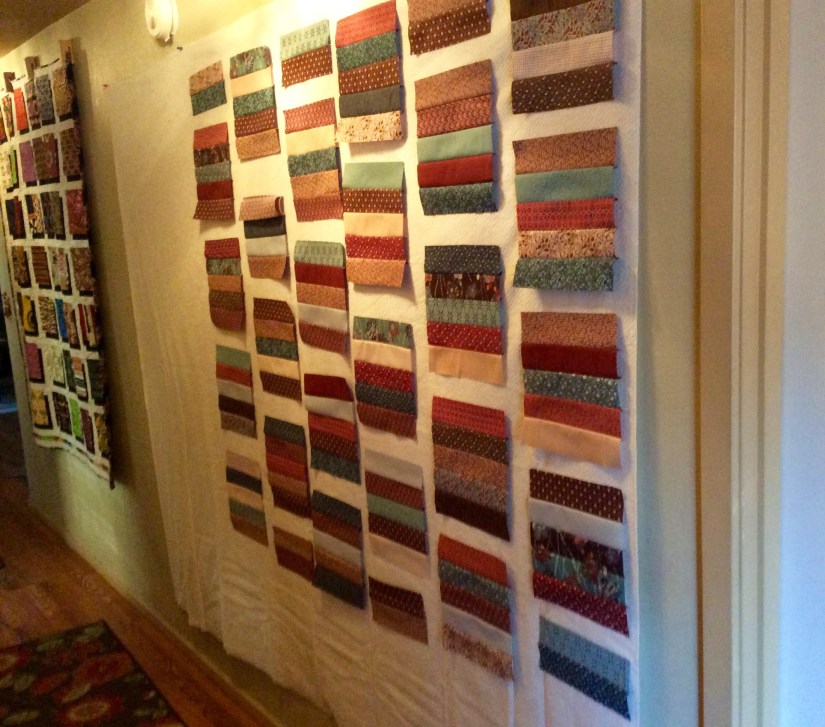
Terry the Quilting Husband, fresh from his sale of two of his quilts during the 2016 Sisters Outdoor Quilt Show, is eagerly working on a new piece (maybe for the 2017 Sisters Outdoor Quilt Show?).
Terry is using our new temporary “giant design wall” that I discuss in the post Whole House Crafting. Until we get the interior walls of our house repainted (someday) we are just using a package of Warm & Natural batting on one of our hallway walls. A future house project is to build a nice large design wall on this side of the one hallway in our little home.
Terry likes to work from parameters I start him off with and he does not like quilt patterns of any kind. I tried to help him learn how to follow quilt patterns, but he strongly prefers to work intuitively.
I had a stack of 2.5 inch strips from an old kit (for a very ugly table runner) that I was never going to make. After sewing sections of the strips together, he is going to inset denim between them some how. All his concept – I only gave him the strips.
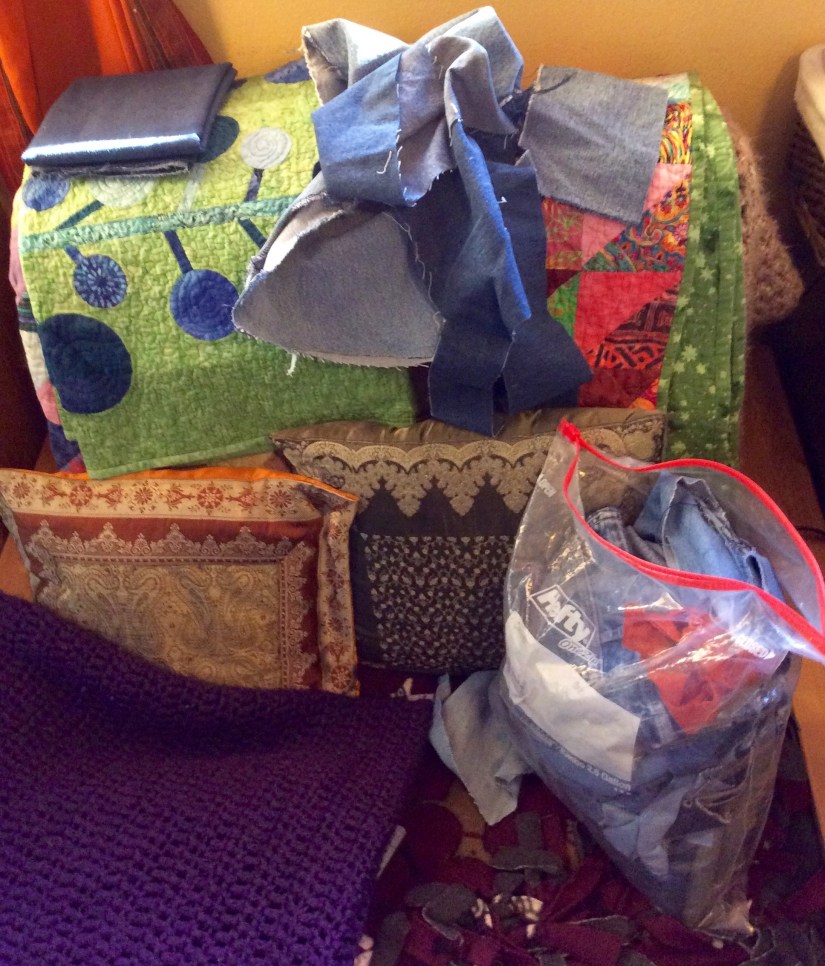
Here is my stash of recycle denim he is looking through to complete his design:
The chair in my studio with my stash of denim scraps
Once upon a time there was a quilter who was also married to a quilter. The quilter and her husband-the-quilter decided to each put five (5) quilts into the 2016 Sisters Outdoor Quilt Show, for a total of ten (10) quilts. They finished their 10 quilts and had them all back from the magical long-arm quilter by April 2016. The quilts needed to be labeled and ready for the show by June 24, 2016.
The quilter and her husband knew they had plenty of time to get those labels on the quilts…
I think this tale will have a happy ending, but right now I am in the “moral lesson” part of the tale. Like in the “Ant and the Grasshopper ” from Aesop’s Fables (the ant spent the summer planning for winter and the grasshopper spent the summer goofing off and we know how that ended…).
We have a stack of 10 quilts needing labels (see photo above!) and Terry the Quilting Husband does not hand sew (he actually hates needles and has no desire to hand stitch anything). So I need to get all the labels on by 06/23/16 to deliver the quilts on 06/24/16 to the Sisters Outdoor Quilt Show Office.
“P” is not just for Procrastination. “P” is for PANIC.
There is song from the 1980s by a British heavy metal rock band Judas Priest titled “Breaking the Law” where in the song, they repeatedly sing the chorus: “Breaking the law, breaking the law, breaking the law, breaking the law.”
When I lived in Seattle a friend and I would enjoy singing choruses of this very campy 1980s song under our breath or at the top of lungs when we were not following standard rules of behavior or etiquette, etc.
This song was played my head when I made the decision to do a traditional quilt binding instead of a “facing”on the back of my art quilt Recycled Doors for the upcoming Central Oregon SAQA (Studio Art Quilt Art Quilt Associates) exhibit at the 2016 Sisters Outdoor Quilt Show. Please see my post Update: Recycled Door for more information on this piece.
(If you are unfamiliar with “facing a quilt”, here is a link to the Quilting Daily’s page on Finishing a Quilt with a Facing. Facing creates clean edges to the quilt with no edge binding.)
Facing the back of an art quilt to create a smooth edge appears to be the expected and acceptable standard and is what I have always done in the past on any quilt I want to be classified as an “art quilt”.
I feel feeling very rebellious after talking to my friend Wendy who suggested, as an option to finishing the quilt, a binding to bring out the orange in the center of the piece. I was reading to do some “law breaking” and did a traditional binding instead of facing the quilt.
Every act of rebellion expresses a nostalgia for innocence and an appeal to the essence of being. – Albert Camus
Postscript
You may notice my new blog template – quite different from the previous one. I really enjoyed the Chalkboard Template, but after reading that article on making blog pages easy for all readers to read and the feedback you all provided, I am going to try this new format for a while.
Check out Sassy the Highly Opinionated Miniature Schnauzer’s page Schnauzer Snips for her latest musings…
It was about more than just improving my appliqué skills
Yesterday I took at wonderful appliqué class at the Stitchin’ Post in Sister, Oregon. The class was more than an appliqué skills building class, the class was about creating stories with quilts. It was a day long class from 9:00 am to 4:00 pm (with flexible time for lunch whenever we wanted).
The class was titled: Historic Story Quilt and was taught by the wonderful Janet Storton. The focus of the class was to work on blocks for story quilt (bible story blocks were used as an example) using various appliqué techniques for appliqué skill building.
I signed up for this class to build my appliqué skills for a future of series of quilts I want to make based on stories my father told us growing up (see post Creative Inspiration: Stories My Father Told Me). However I got way more out of the class than just improved appliqué techniques!
At the Stitchin’ Post we don’t attend our classes in a regular classroom – we study in a Textile Education Center!
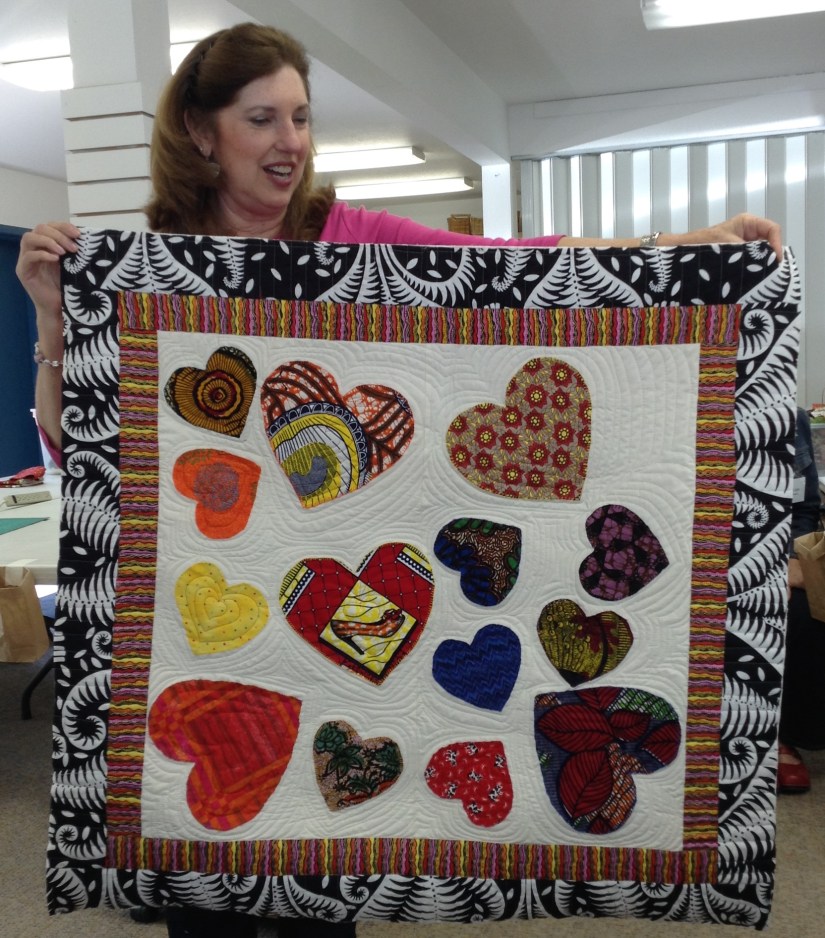
Sisters of the Heart Foundation‘s mission is bring hope, build a future, and empower a community in impoverished areas of the world such as Uganda. Janet spends part of the year teaching women in Uganda to create quilts and other crafts to sell in order to economically improve their lives and the lives of their communities.
You can read more about this incredible foundation at www.sistersoftheheartfoundation.org. They greatly appreciate fabric donations from quilters purging their stashes!
Here is Janet with a heart quilt (Sisters of the Heart) where each one of her students in Uganda made a different heart. She just got it back from long-arm quilting by Barbara of the Stitchin’ Post and trimmed off the extra batting before I took the photo:
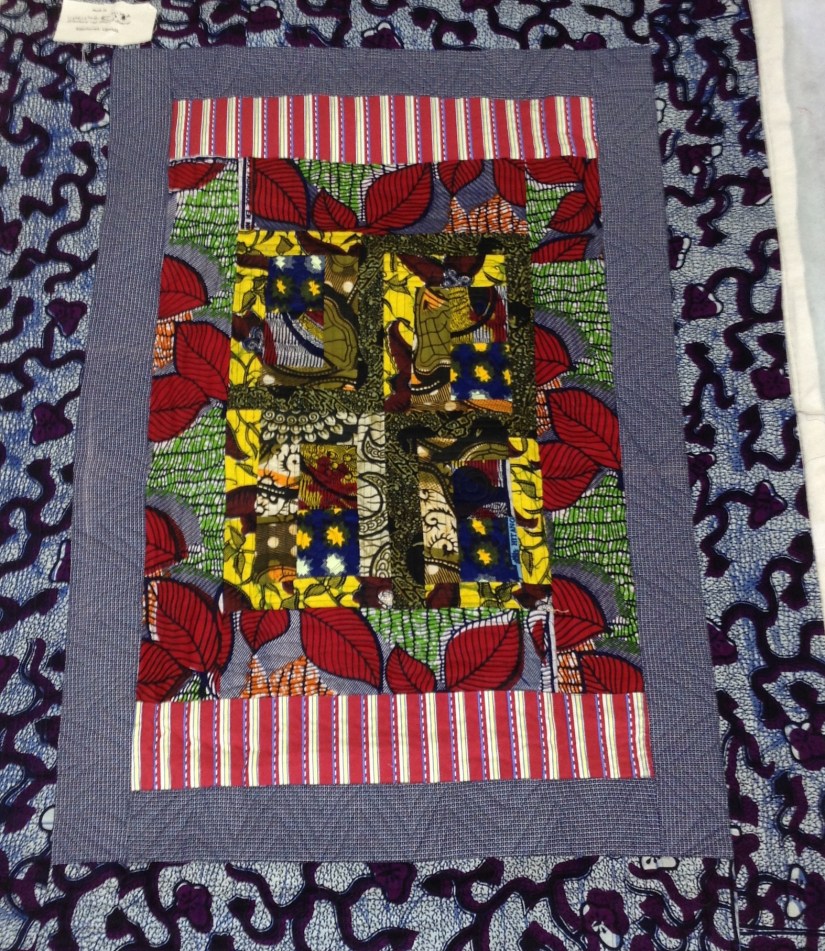
Two other quilts made by her students in the community in Uganda, these quilts are sold or raffled to raise money for the quilters’ community in Uganda:
Here is the Bible Stories appliquéd quilt made by her students in Uganda:
My Adventure in Appliqué (what I actually did in class)
Here is what I worked on as I brushed up on my needle-turn appliqué technique and learned buttonhole appliqué techniques:
Our teacher instructed us to create folk-art looking elements, so “imagine” on the left is an acorn!
So you now thinking: “Whaaaat?!?!?” You spent 7 hours in an appliqué class and made two elements on a beige piece of fabric? Well…yes!
It is actually a story quilt I am working on that has to do with an acorn and a tree. Janet helped me perfect my needle-turn appliqué on creating the acorn (and help me select the scrap fabrics I used); and she taught me how to do buttonhole appliqué for the beginning of the tree. I also learned how to stitch words onto fabric so when I am ready I can add the words that go with my piece.
For now it will be a UFO (Unfinished Object for the non quilters reading) until I finish some of my pending urgent projects (due dates zooming closer!)
The class was a joyous way to spend a Saturday and in addition to the teacher, I got to meet some other wonderful people – the fellow students. They had incredible stories to share during class too.
Postscript
One other thing I learned in the appliqué class was just how meditative working on an appliqué project can be – I think I might fall in love with hand stitching.
I needed good light to do the needle-turn appliqué on the acorn section and found that sunlight worked best. I spent quiet meditative time sitting in the window of the classroom (it was a glorious sunny day in Sisters, Oregon) and just hand stitching.
Wow. Now I get it.
I plan to take more “techniques” classes. I have been quilting since 1999 or so but I am ready to spend more time “studying” quilting.
In the March 2016 post BLOG TOUR DAY 4: Unlikely Materials I shared a work in progress called Recycled Door. This art quilt is part of the Central Oregon SAQA (Studio Art Quilt Associates) group exhibit “Doors” that will debut at the 2016 Sisters Outdoor Quilt show.
We were challenged with making an 18″ x 40″ art quilt/wallhanging that represented our interpretation of a door. I found a door image I liked on Australian door and window manufacturer’s website Brisbane Timber . I created my interpretation of one of their doors, using recycled materials: jeans, corduroy shirts, a tweed jumper, and home decor fabric.
I just got this piece back from Betty Anne Guadalupe, my long-arm quilter and collaborative partner in The Wardrobe Meets the Wall Collection. She quilted it to represent the texture/grain of an wooden door.
Now I need put finish the facing for the back (finishing off an art quilt with a smooth edge instead of binding the edge) and it is ready for the July 2016 Sisters Outdoor Quilt Show!
As it was made with recycled materials, it will become part of The Wardrobe Meets the Wall Collection.
Postscript
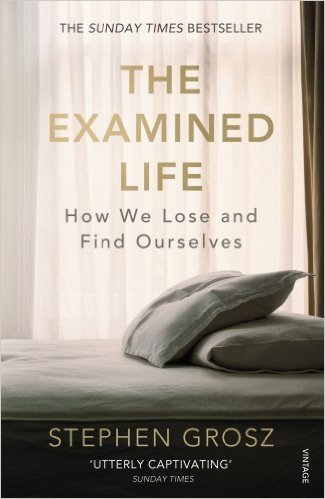
I am listening to a new non-fiction audiobook, The Examined Life: How We Lose and Find Ourselves by Grosz, Stephen.
It is pretty DEEP. The author is a British psychoanalyst who shares 25 years of his client’s stories (confidentiality maintained of course!) in relation to baffling behavior based on hidden feelings.
The narrator also is British and I am enjoying the British English pronunciation of words such as “schedule” and “garage”!
One of the most interesting parts of the book so far, besides all the interesting stories, is the author sharing a very profound interpretation of Charles Dickens’ famous story, A Christmas Carol. He delves deep into what actually made Ebenezer Scrooge change his ways!
Why do quilters go to quilt retreats? Yes of course to spend time with quilting friends or meeting new quilting friends. Quilters also attend retreat to relax; to see what others are working on and get new ideas; and to work on our BACKLOG of projects!
At a quilt retreat you have the opportunity to focus on getting those quilting projects D-O-N-E! (While not having to cook, clean, or even get dressed out of your PJs.)
Here is what some of the “busy bees” were working on during this year’s annual Sew N Go Retreat:
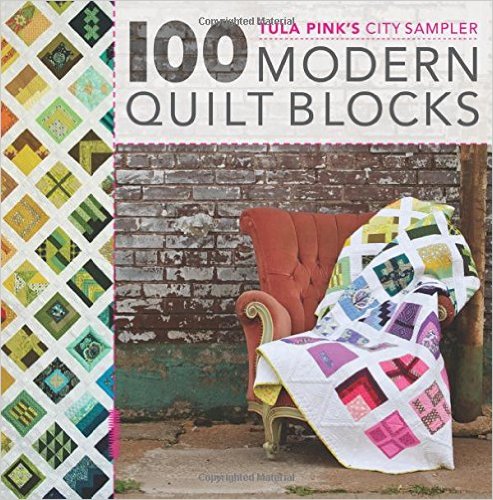
Tula Pink Would be Proud
Tula Pink is a very talented fabric designer and I had the opportunity to meet her at the Sisters Outdoor Quilt Show 40th Anniversary celebration last summer (she is absolutely lovely in person). She has several publications but one of her most popular publication is Tula Pink’s City Sampler: 100 Modern Quilt Blocks.
Photo credit: amazon.com
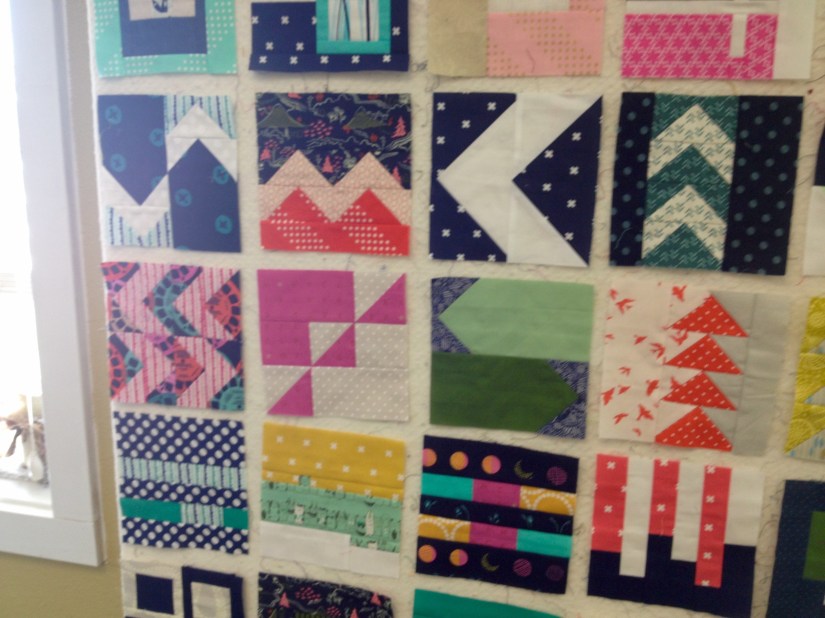
One of my Quilt Sisters at the retreat has been working (for many months) on a sampler of all 100 blocks! Below is a photo of initial block layout on the design wall at the quilt retreat (she is still deciding the final layout):
Here are a couple of my favorite blocks on the design wall:
What patience to complete 100 blocks for a sampler! I own this book, but I have not completed one block to date from this book (but I am now inspired to consider completing a block – ha!).
Study in Black and Gray
Another amazing quilt different Quilt Sister worked on quilt retreat weekend was a star block in black and gray flannels that had a 3-D effect due to the placement of the colors.
Here it is in progress:
Completed with the borders added (she is going to put beautiful special gray and black Minky fabric on back!):
The Mother of All Embroidery Machines
One quilter and her daughter worked on a major embroidery project with their fancy embroidery machine – an embroidered doll house for their great granddaughter/granddaughter! They had to make each panel separately and then assemble it into a house. They got 3 – 4 panels finished but unfortunately I only took a photo of one of the panels, darn!
The Machine!
One of the doll house sections (the courtyard):
Pretty amazing!
Other Wonderful Projects
I did not capture a photo of all the projects, but here are some of the other wonderful projects in progress or completed by other Quilt Sisters during quilt retreat weekend:
Tierney, Where are Your Projects?
Well…
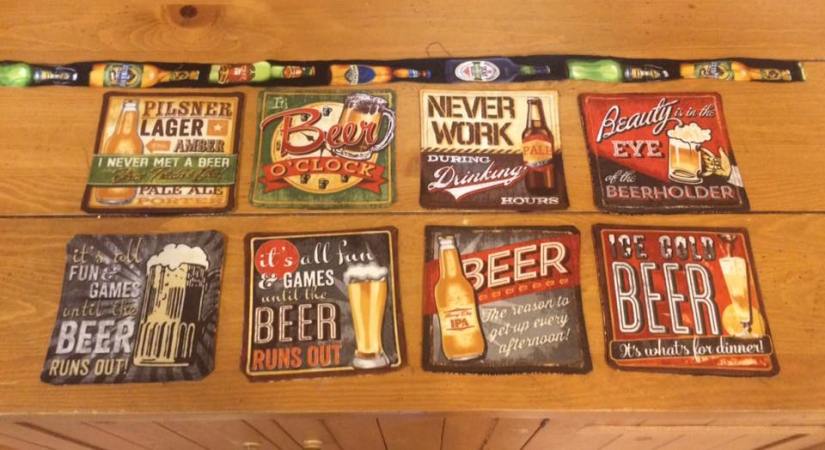
I had good intentions. I brought 5 – 6 projects to quilt retreat including some vintage style beer label fabric coasters to work on for my tierneycreates Etsy shop. My stock of offerings in the tierneycreates Etsy shop is dwindling due to sales (which is good); due to being busy and stressed at my pay-the-bills healthcare job (and not wanting to face a sewing machine after a long day of work); and due to focusing my extra time on art quilting projects.
So I brought several projects related to items I wanted to make for the tierneycreates Etsy shop. I ended up making nine (9) sets of vintage style fabric beer coasters during the quilt retreat weekend.
What happened to those coasters? Well they never made it to the Etsy shop, all 9 sets were purchased by quilt retreat attendees and the quilt retreat owner to give as gifts or keep for their own home. I cannot complain – I made stuff and sold it at the retreat.
I call it “fleecing my friends”!
Here is a photo taken by a Quilt Sister’s husband after he got his coasters she brought back from the retreat:
Today a thought popped into my head: “tierneycreates is a quilter’s blog, perhaps I should post something about quilting!”
The Original Plan
I completed the binding on a “log jam” (free form log cabin block piecing) quilt I am putting the in the July 2016 Sisters Outdoor Quilt Show (SOQS) called Modern Bedtime.
It measures 63″ x 72″ which is short of a Twin size quilt and more like a large Lap size quilt.
This quilt was meant to be a King size quilt. I originally made its dimensions 98″ x 100″. I worked within the limit of the dimensions of acceptable quilts for entry into the SOQS (a maximum of 104″ on any side).
Last year the quilt I sold at the 2015 SOQS was a large Queen size quilt and I thought I would have a better chance of selling another quilt in the show this year if it were also bed size. I thought: “Maybe there won’t be a lot of large Queen/King size quilts in the show; so if someone attending the show was looking for a large bed size quilt my quilt would be available for consideration!”
Below is a photo of how the quilt started out. The original design had the log jam pieced center floating in a large khaki border. It is draped over a King size bed and you can see there is a nice drape (which I trimmed down to meet the less than 104″ on each side limit for SOQS).
The Universe however did not want this quilt to be King size (or Queen size, or Full size, or Twin size…).
Disaster Strikes!
Something very bad occurred when I pieced the border, I am not sure what exactly as I have been piecing/sewing borders on quilts for many years.
The long-arm quilter discovered that the borders where extremely uneven when she loaded it on her professional quilting machine. Not just uneven, they were “majorly wonky”! She tried to fix it but the borders were so strangely pieced she could not fix it without disassembling a large amount of the quilt.
Additionally, there were several other strange and embarrassing quilt piecing errors (I am too embarrassed to mention these).
What the heck happened? I do not make mistakes like this! I do remember that I was in a hurry to finish up the quilt to get it to her to put it in her queue of customer quilts for the SOQS (she gets very backlogged with customer quilts prior to the SOQS). I was always working long hours on a challenging work project and very tired at the end of the workday.
Perhaps I should not have engaged in “Piecing While Tired” (PWT).
Downsizing
I had a painful phone conversation with the very kind and patient long-arm quilter as we tried to figure out what could be done about this quilt. She had tried removing one of my borders and trying to fix it for me. I kept thinking: “I am so disappointed in myself, I so wanted to sell this quilt at SOQS as a King size quilt”. I wanted so badly for this quilt to work out as I had planned.
Then suddenly I decided to just let it go. I asked the long-arm quilter to just cut off the offending borders and finish quilting the quilt.
Modern Bedtime (2016) by Tierney Davis Hogan, quilted by Betty Anne Guadalupe
I trimmed off the left over borders, put on the binding and have embraced the quilt as it. I am still showing it/listing it for sale at the SOQS.
Life is a balance of holding on and letting go – Rumi
Warning: Never work on a quilt while tired and stressed from work! Lesson learned!
Postscript
I am working on something exciting right now but it is a secret. It is a piece for an invitation only special juried exhibit. More to come!
Congratulations to Beth T. who won the free copy of Creative Quilt Challenges from the random drawing of names from those who left comments on my Creative Quilt Challenges Blog Tour post – BLOG TOUR DAY 4: Unlikely Materials. Thank you to every who visited the tierneycreates blog for Day 4 of the tour and thank you to those who commented. I so enjoyed reading the comments and they got me inspired to keep experimenting with “unlikely materials”!
What’s on the…Table: “Ohio”
This post is a continuation of my ongoing series: What’s on the Design Wall.
However, this time I am going to share what is laid out on the table in my Studio, instead of up on my Design Wall. This post also demonstrates another example of using “Unlikely Materials” (recycled silk garment scraps) discussed in my Blog Tour post on 03/31/16.
Yesterday I posted about being inspired to create after a walk on a beautiful Spring day and inhaling the delightful fragrances of neighborhood Dogwood trees (Creative Inspiration: The Scents of Spring). Well later that day I pulled out the piece had I started a month or so ago (see post What’s on the Design Wall: Silk Squares) and got creating!
Here is the piece in progress, I am going to name it “Ohio“:
What do a bunch of miniature log cabin style patches (2″x2″ and 2.5″ x 2.5″) have to do with the State of Ohio? Absolutely nothing, but they are part of a story. An ongoing story. Here is a visual summary of that story:
1) The piece started out as my attempt to create an Ohio Star (a traditional quilt block) from recycled silk
Ohio Star, recycled silks (in progress)
2) I was very unhappy with the accuracy of the points on the star (although I interfaced the back of the silks, I had some challenges with accurately piecing the points). So I attempted to save the piece by reimagining the piece, slicing up the Ohio Star and sewing it into a new configuration. I was still not pleased with it.
3) I gave the piece and the coordinated recycled silk pieces I have selected to a friend. She reimagined it into a completely new piece, while integrating all the elements from the original Ohio Star into the piece.
Ohio Star (2016). Designed, pieced and quilted by Betty Anne Guadalupe.
4) My friend gave me the leftover scraps from this piece which included scraps from my original piecing and new scraps from additional recycled silks she used in the piece. She challenged me to make something from those scraps!
5) So, I started working on this piece over a month ago, and I am calling it “Ohio”
Right now I am just continuing to make tiny blocks (2″ x 2″ and 2.5″ x 2.5″) and enjoying the challenging of using up small pieces of recycled silk. I find it to be meditative to quietly work on small slow piecing.
Will post about this piece again when it is nearly complete.
Tomorrow the tierneycreates blog is a stop on the “Blog Tour” for Pat Pease and Wendy Hill’s new book Creative Quilt Challenges (2016).
When I join the tour on 3/31/16, I will discuss Challenge #3: Unlikely Materials from this wonderful book.
The Blog Tour opened on Monday 3/28/16 and here are the other “blog tour stops” posts to date (if you would like to read them prior to the tierneycreates Blog Tour stop tomorrow 3/31/16).
Also debuting in this show will be the piece that Betty Anne created from my abandoned recycled silk Ohio Star project she rescued (see post Surrendering My Piece to “Rescue”).The piece is amazing – she used all my original piecing and reworked it, with additional recycled silks and linens, into a completely new and deliciously intuitive design. I will post a photo after it debuts at the show. We were so inspired by this “handing off of the start of a piece” to another person to reimagine the piece, that Betty Anne gave me her start of another piece based on the same group of recycled silk and linens scraps. This will be a new challenge – I will create a piece based on her leftovers from her work on my piece that I abandoned …but that is another post…
Well, I have started on the piece inspired by the scraps my friend Betty Anne gave me (from her reworking of a piece I had started and then abandoned). She also gave me a small “square within a square log cabin style block” she had made from the scraps. I used this block as the starting point for my challenge.
It is now in progress on the Design Wall.
Here is the story of it’s evolution to date, in photos:
The stash of recycled silk and linen scraps that Betty Anne gave me from her silk piece (which was a reworking of a piece I started, then abandoned)
I made approximately 56 – 58, 2 x 2 inch and 2.5 x 2.5 inch free form “log cabin” style blocks. (I do not remember exactly which one of the blocks is the one Betty Anne originally gave me to start the challenge; but I know it is one of the black silk blocks with a bright center.)
I played around with potential layouts (like floating them in a solid silk like you see above photo) and I am leaning towards grouping them all together. I love the intensity of all the colors together.
Here is a close up of one of my favorite 2.5 x 2.5 inch blocks – I am having so much fun coming up with combinations from the limited fabric options I was given. I enjoyed the tiny piecing challenge and many of the silks had to be backed with interfacing to stabilize their delicate weaves.
Now the blocks are on the Design Wall.
Now I can decide, from the remaining fabrics, what additional blocks I need to add and their color combinations.
Starting out with a strong idea and good intentions…
In this previous post, I shared my excitement over my sudden inspiration to create a traditional pattern quilt from nontraditional fabrics (recycled garment silks and linens). I knew it would be an experiment and in this first experiment, I created a traditional Ohio Star block from my collection of recycled silk and linen samples from garment manufacturing.
If you are not a quilter, an Ohio Star block is a “nine patch” block made from quarter square triangles around a central square. This block is a very traditional quilt block and was used in early pioneer and Amish quilts in the 19th century. The pattern I used was for a “Star-within-a-star” Ohio Star.
Ohio Star, recycled silks (in progress)
The plan was to make a small wallhanging. I pieced the Ohio Star block, and as I auditioned fabrics to use in the border, I grew more and more unhappy with the Ohio Star block.
At first I could not figure out what specifically was bothering me, as I was pleased with the color combinations/palette.
I realized what was bothering me – the piecing itself. My prior work with recycled silks involved intuitive free-form designs for art quilts. This was my first attempt at making a traditionally pieced structured quilt block from recycled garment silks and linens.
When I used to make traditional quilt pattern quilt blocks I would use crisp quilting cottons – this fabric was easier to manipulate to achieve accurate piecing and star points.
Working with silk and linen samples intended for garment making can be challenging, especially when attempting to accurately piece shapes such as star points. In order to work with the delicate silks, you need to put a backing/stabilizer material on the back of each silk section. Silk backed with a fusible stabilized can be cumbersome to cut into small accurate sections. Silk also frays.
So…to shorten what could grow into a very long and tedious story of my explanation why the Ohio Star was not working for me (and to avoid putting my non quilter readers to sleep), let’s just say: I was quite unhappy with the imprecise piecing of the block.
For a moment, I started to – just throw it away (gasp) ! Then I thought: let me try reimagining it – into some sort of “fractured” Ohio Star, where the accuracy of the piecing would not be as much an issue.
I sliced up the Ohio Star and sewed it back together into a new configuration. I revisited my stash of recycled silks and linens to audition other combinations to try to build some sort of abstract wall hanging art quilt piece around the “fractured star”.
“Fractured” Ohio Star
Frustrated and drained of inspiration, I put the piece and its potential coordinating fabric away. I did not know where to go next with them.
Time to let someone else “rescue” the piece
I have several previous posts about working with “rescued” and “recycled” quilt blocks. Another quilter started a piece/making quilt blocks and abandoned the project; I then “adopted” the project and created a new piece based on the original blocks and my imagination.
While sharing my dilemma with an art quilting friend (that I was going no where with my Ohio Star silk and linen experiment), my friend offered to “adopt” the piece and create an art quilt with it.
I was delighted! Not only was I delighted but I felt a great sense of relief! I realize a textile project is not a living being but I felt as if I had recklessly abandoned a piece in progress, filled with creative energy, to the lonely “Projects on Hold” box in the back of my closet.
My experiment is going to be adopted and go to a good and loving home, where it can grow into something wonderful!
(Yes I will share a photo when my friend completes the piece from wherever her imagination takes her!)
Life is a balance of holding on and letting go – Rumi
Check out Sassy the Highly Opinionated Miniature Schnauzer’s blog page Schnauzer Snips for her latest musings.
Quilt in Progress
Terry the Quilting Husband has been hard at work finishing another quilt for the Sisters Outdoor Quilt Show in July 2016, hoping to get into the Male Quilter exhibit (in the upcoming weeks he will submit his entries to the selection committee).
Over the past couple of months he made 82 9.5 inch blocks from my flannel scraps using the log jam method (see previous posts on “log jamming”) and sewed them into 9 rows of 9 blocks each:
Rows of flannel scrap log jam blocks waiting to be sewn together
If you do the math – 9 rows with 9 block each equals a 81 block quilt. So what became of the 82nd block? I was wondering about that also and went into Terry’s “studio” (he uses the guest bedroom as his sewing studio) to discover the fate of the extra block.
Here is what I found: he kept one of the blocks that had a schnauzer in the center (from a flannel dog fabric scrap with different breeds) and displayed it in his sewing area:
Note: our guest room is extremely dog themed. You would not want to stay at our house if you do not like dogs – ha!
The Pillow
The one block displayed made me smile and I wanted to make it into something more permanent for him, so I made a quick little throw pillow for him with the block.
Now he is focused on sewing the rows together so we can get it to the long-arm quilter.
I suspect when the quilt is quilted, we are going to struggle with wanting to part with it if we decided to put it for sale at the Sisters Outdoor Quilt Show!
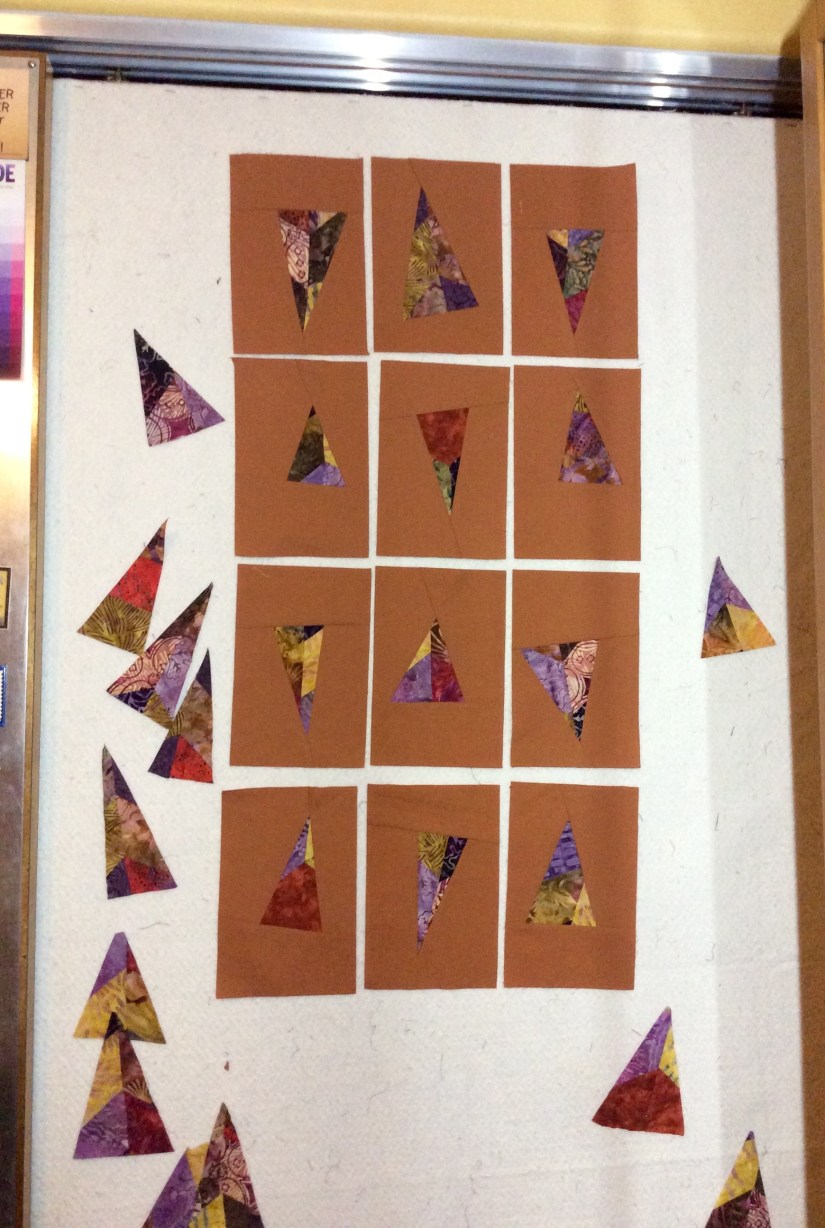
I have been working on assembling the blocks designed from discards, from another quilter’s block piecing, and a solid coppery-rust fabric, into a piece called “We Will Not Be Discarded”.
I am playing with the block arrangements and looking at two different arrangement options for the 15 blocks in progress:
OPTION #1 – All blocks pointing the same way:
OPTION #2 – Blocks pointing opposite ways:
I am leaning towards Option #2 as it makes the piece appear to have more “movement”. Once I finish all 15 blocks, I will play again with the final arrangement.
We Still Will Not Be Discarded!
I am playing with the idea of making a second piece (“We Still Will Not Be Discarded!”) from the discards/trimming of the original discards! (And the scraps from the solid fabric they are set in)
That would be taking recycling to the extreme, right? The challenge does seems interesting…
Trimmed discards from the “trimmed discards” in my little trash basket – tempting!
Not all quilters are like me: saddled with a backlog of projects. I know quilters who (they are freaks!) work on ONE project at time, seeing it through completion, and not starting another project until their current project is complete.
My mind does not work that way. I am basically that golden retriever in the movie Up, who says “Squirrel!“when I see a new project to start. I am easily distracted and I tell myself I will get back to the current/previous project eventually.
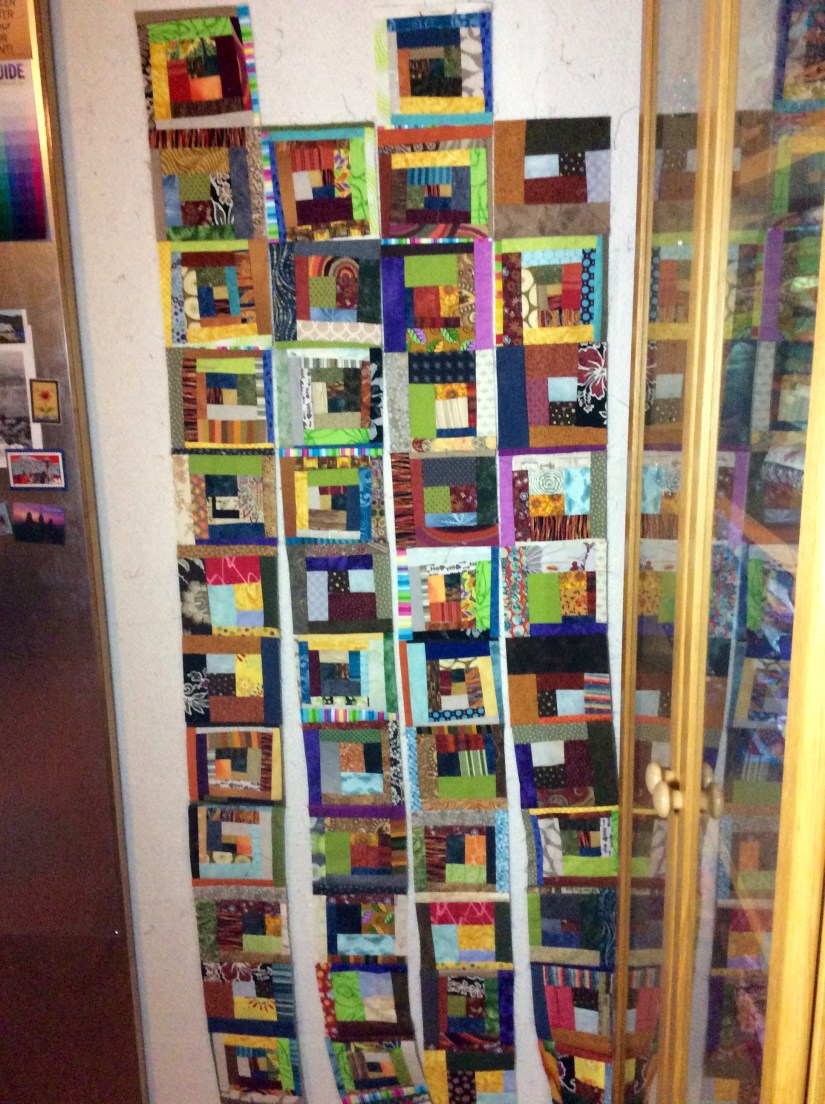
I was having a bit of creative block on designing a new art quilt and I realize I need to work through my project backlog. So here it is sitting up the cutting table, festering:
In this pile under the cutting table, I discovered 120+ 6.5 inch log jam blocks (scrappy pieced log cabin style blocks) that I had pieced earlier this year. With the assistance of Terry the Quilting Husband, I got them sewn together and now they are on the Design Wall awaiting assembly of the rows.
I have a total of 10 rows with 12 blocks in each row. I am hoping that by floating the pieced blocks in a solid color border, I can make it a twin, full or queen size quilt top. I will post a photo when the top is complete (before it journeys to the long-arm quilter).
“Never put off till tomorrow what may be done day after tomorrow just as well.” – Mark Twain
If you have followed my blog for awhile, then you know about my addiction to fabric scraps. This addiction seems to be incompatible with my desire to downsize and minimize my possessions.
The fabric scrap addiction began innocently enough – friends would give me their fabric scraps at quilting retreats. I would go for a “sew day” at a fellow quilter’s house and leave with some of her fabric scraps. As if that was not enough, I began to actually BUY scraps.
Yes, BUY FABRIC SCRAPS, you read correctly. There is a wonderful quilt shop in Central Oregon called The Stitchin’ Post and occasionally they would sell scraps bags of their beautiful high-end quilting fabrics. I bought numerous bags from them.
Beautiful scraps or not, still I was buying fabric scraps.
In my post “Creative Inspiration: Organization???” I shared my new organization of my favorite fabric scraps by color. Although I had organized scraps by color I still had a GIANT box of remaining fabric scraps.
I knew I had to do something. I needed to let go of the fabric scraps I did not completely and absolutely love. However, I did not want to throw them away or try to convince another quilter to adopt them.
So I packaged them up into 30 bags and organized them into two baskets and DONATED them to our local Humane Society Thrift Store to sell! (How do I know that the Humane Society Thrift Store sells fabric scraps? Do you want to take a guess? Yes, because I have bought fabric scraps also from several thrift stores include the Humane Society Thrift Store in the past).
The Humane Society Thrift Store Volunteer accepting my donation seemed pleased that I had packaged them up for sale. I like to imagine if they sell each bag for a couple dollars or more each that could be over $90 – $150+ profit for a wonderful local animal shelter! Some of the bags are packaged by color and some are random – so many options for the Humane Society Thrift Shops’ customers!
A “Humane” way to let go of excess fabric scraps!
When I buy fabric from quilt shops in the future, it will be actual whole fabric (fat quarters or yardage). I still have plenty of fabric scraps and my fabric scrap collection contains only scraps I truly love and plan to use…eventually.
POSTSCRIPT
I am still working through the lessons from the book The Life-Changing Magic of Tidying Up: The Japanese Art of Decluttering and Organizing by Marie Kondo that I discussed in the post “The Space in Which We Live“.
Check out Sassy the Highly Opinionated Miniature Schnauzer’s latest musings on the Schnauzer Snips page; and check out the latest updates on the Textile Adventures page.
Terry, the “Quilting Husband” really got into making “log jam” style free form log cabin blocks. He ended up making over 100+ 6.5 inch x 6.5 inch blocks. We set them in 10 x 10 rows to create a quilt top. Betty Anne Guadalupe of Guadalupe Designs professionally quilted the top.
Log Jam by Terry (2015). Quilted by Betty Anne Guadalupe.
The plan was to list it on the tierneycreates Etsy Shop but I fell in love with it and decided – IT’S A KEEPER! So now it is displayed on our dining room wall.
I have pieced many 6.5 inch by 6.5 inch log jam blocks myself (they are a fun and meditative way to use up fabric scraps) and I am thinking of making a Queen size (yikes) quilt with them for sale at the 2016 Sisters Outdoor Quilt Show. First I will have to see how many I have done and then do some math (yikes, again) to figure out how many I will need (hint: 100 blocks only made a lap size quilt…).
POSTSCRIPT
I am not sure how it happened, but my previous post Because Nice Matters, was my 100th blog post! I remember when I started the tierneycreates blog in October 2013, I did not imagine getting to my 100th post (I was just happy to be at 5 posts!). It has been so fun so far connecting with other bloggers and I so appreciate my readers and followers!
I have been working for a while on downsizing my stuff and reducing clutter in my life (see recent post The Space in Which We Live).
As part of this process I have been working through my craft magazine collection (as a prequel to some day conquering my craft book collection – see post Craft Book Hoarder?!?!?!).
Since 2008 I have been reading and collecting Interweaves’s Cloth-Paper-Scissors Studios magazine (who’s tagline is “inspiration & ideas for your art and craft space).
In order to let go a a magazine, I feel like I have to read it again or at least skim it and see if there is anything interesting in the issue that I want to reference or stick in the back of my mind. So I stacked all my old issues of Cloth-Paper-Scissors Studios magazine and started going through them.
I came across this great article in the Spring/Summer 2009 issue by Lesley Riley: “Clutter Out Creativity In: 10 Steps to a More Artful Studio”, and I wanted to share a listing of her steps to deal with studio clutter. I think they are fairly self-explanatory but I have added a couple comments based on the article or my own experience.
Hoarding is a primitive instinct (but having a more limited selection may force you to be more creative!)
Know thyself (think about what colors and fabrics you now enjoy working with and consider ditching the rest)
Treat your stash like your clothes (in your closet if you have not worn something in a long time or it no longer fits you, maybe it is time to get rid of it – the same applies to using fabric)
It’s not “all or nothing” (you don’t have to get rid of things all at once, you can whittle it down over time)
Take your time (relax and find time to slow sort your stash)
Share your favorites (shared a little of your favorite fabrics with others)
Spread the wealth (I personally enjoy donating fabric I no longer need to the local Humane Society Thrift Shop as I know it can be a treasure to a fellow crafter who stumbles upon it and the proceeds help support the animal shelter)
Create coordinated bundles
The artist, not the fabric, makes the art
You control the fabric (it does not control you!)
After I finishing letting go of my already read (twice) Cloth-Paper-Scissors Studiosmagazine, I can’t promise I will never buy an issue again. This is truly a wonderful magazine with glimpses into artists’ studios and their inspiration.
I found an organic branch-like/wood grain-like tone on tone fabric from my collection of Marcia Derse fabrics and placed it between the columns and then as the border.
So now the quilt top is done!
I am looking forward to seeing what it looks like once the machine quilter works her magic!
Some photos below…
NOTE: In the last photo, the quilt top looks a little askew, that is just because The Quilting Husband is trying to hold it still for the photo while the wind is blowing.
A close up of one of the blocks with the setting fabricThe Tree Outside My Window under a tree outside my window!Quilt Top completed on The Tree Outside My Window
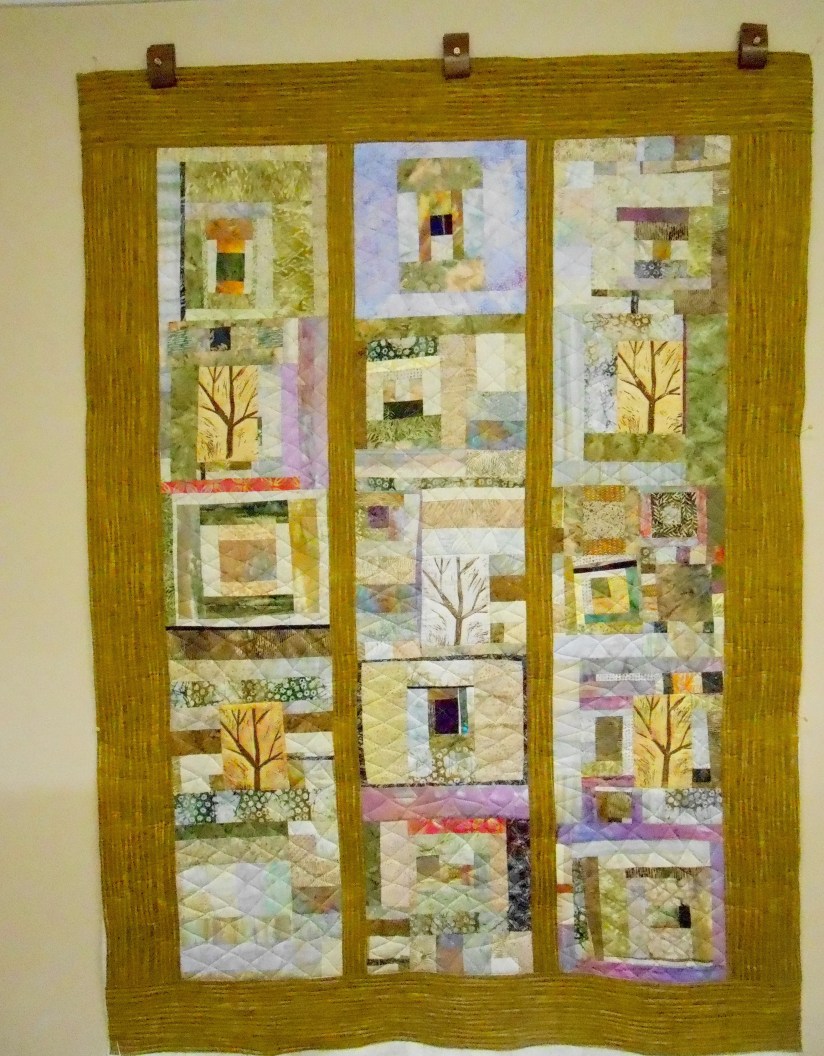
Continuing my series “What’s On The Design Wall” with an update on where I am in my design and piecing of a new piece that I first introduced in the post: “What’s on the Design Wall: Rescued Blocks II“.
Recently, the name for this piece came to me – “The Tree Outside My Window” as I completed 15 blocks to create this art quilt.
As you will see in the photos below, this piece has FIVE images of trees in it (the post “What’s on the Design Wall: Fabric Surface Design Experimentation” discusses how these trees were created) but “The Trees Outside My Window” did not sound right on my tongue. I believe when naming a piece, it has to sound right to you when you say the name aloud.
After creating fifteen 12.5 inch by 12.5 inch blocks from: 1) 4 inch – 10 inch blocks originally pieced by a friend (“Rescued Blocks”): 2) scraps from my friend; and 3) five printed trees from a surface design workshop, I decided to piece the blocks into 3 columns of 5 blocks each.
Now I am deciding what I want to do next with my design. I am leaning towards putting a strip of solid (or solid like) fabric in between each row and then floating it in the same color as a border. Originally I was going to use a cream batik but it did not look right. Next I thought: “Ah a brown batik with texture would work”, but alas, I only had brown batik scraps in my stash.
Then my fabric stash spoke to me (which is good because I did not want to go out and buy more fabric as I am trying to use my stash)! I spotted the perfect fabric – mono color textured design yardage from my collection of Marcia Derse Riverwoods Collection from Troy Corporation. (At one point I was addicted to this amazing collection and tried to be a sample of all fabrics in this line from The Stitchin’ Post in Central Oregon.)
I am going to leave it a mystery for now which fabric from this beautiful collection I selected for the strips between the three rows and the border. You have to wait until the next post on this piece!
Here are photos from my design wall to include some close-ups:
Continuing my series of posts on what is on the design wall…
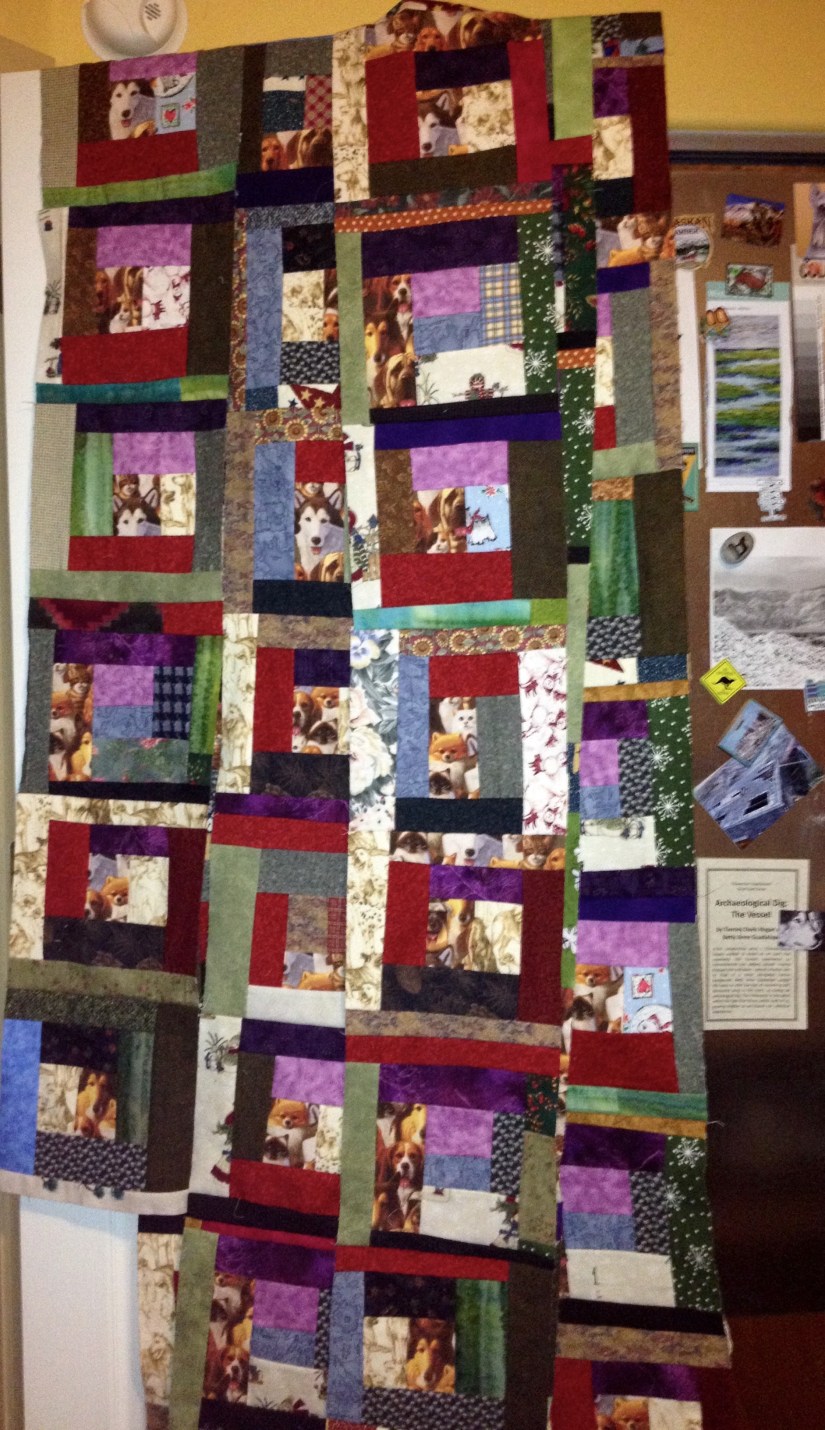
THE QUILTING HUSBAND IS BUSY AGAIN
I had some of my blocks up on the design wall and Terry “The Quilting Husband” was getting impatient. He kept giving me subtle hints (and not too subtle hints) about moving my stuff off the design wall so he can put his blocks up on the design wall (we have a small house and can only make 1 shared design wall work).
The Quilting Husband is working on a new “Log Jam” quilt (see my other posts on “Log Jamming” and “Log Jams” which are free form pieced log cabin style blocks) made with flannel scraps. I have a large box of flannel scraps from making flannel quilts and flannel quilt backs, and Terry came up with the idea of trying to use of the scraps making flannel log jam quilts.
As his confidence grows as a quilter, he gets comfortable with making his own design decisions. He found a stash of dog and cat themed flannel scraps and used them as the center so each block would feature a dog and/or cat face. Very creative!
I taught “The Quilting Husband”, Terry a couple months ago how to make log jam blocks. If you would like to know more about log jam blocks and “log jamming”, see these posts:
Terry, loaded with a box of color coordinated scraps I pre-selected, made endless 6 1/2 inch log jam blocks (120+) and put a dent in my scraps (a small dent but any dent is appreciated!).
Then he took a 100 of the 6 1/2 inch block and created a 10 x 10 quilt. It was a collaborative process as he completed ten – 10 block rows, and I did the final sewing of the ten rows together to make the quilt top. Terry, The Quilting Husband, is not much for matching seams to sew rows together, but that is okay – look at how much he accomplished!
Now I am working on putting the back of the quilt together so it can go to the long-arm quilter!
Then comes the decision – keep it or list it on the Etsy site for sale. We will likely list it for sale…we’ll see…
I love sunflowers and years ago (maybe 10) I bought some sunflower fabric I found on sale. I never used this fabric and it ended up in the back of my stash, forgotten.
A couple of months ago I was purging the fabric that I no longer loved to donate to a charity thrift store (see blog post The Fabric Purge!) and came across the sunflower fabric again. I do not have a photo of the original fabric, but 10 years later, looking at it I thought “what was I thinking?!?!?”
It was…well…quite ugly fabric. Little sunflower images with a very cheesy looking patterns and other images surrounding the sunflowers. No wonder it had been on sale 10 years ago!
A quilter friend of mine suggested a Challenge: Don’t get rid of the fabric – cut out the sunflowers and use them as centers in a log cabin style quilt. She offered to give me some coordinating fabric that she was purging from her stash!
I took on the challenge and made the quilt! I just gave to my long-arm quilter the 88″ x 66″ quilt top made with just the sunflower sections of the ugly fabric and coordinating fabric from a friend’s stash! I set the 9.5″ by 9.5″ inch blocks in a Moda paper bag colored fabric. I cannot wait to see what it looks like quilted!
Continuing my series of posts on sources of Creative Inspiration…
HOW ORGANIZING MY SCRAPS GOT ME INSPIRED
Sounds like a testimonial, right?
“At first my life was empty of direction and meaning and then I organized my fabric scraps and suddenly everything was much much much better!” – Anonymous Scrap Hoarder
Not exactly. However organizing my fabric scraps last evening did inspire my creativity!
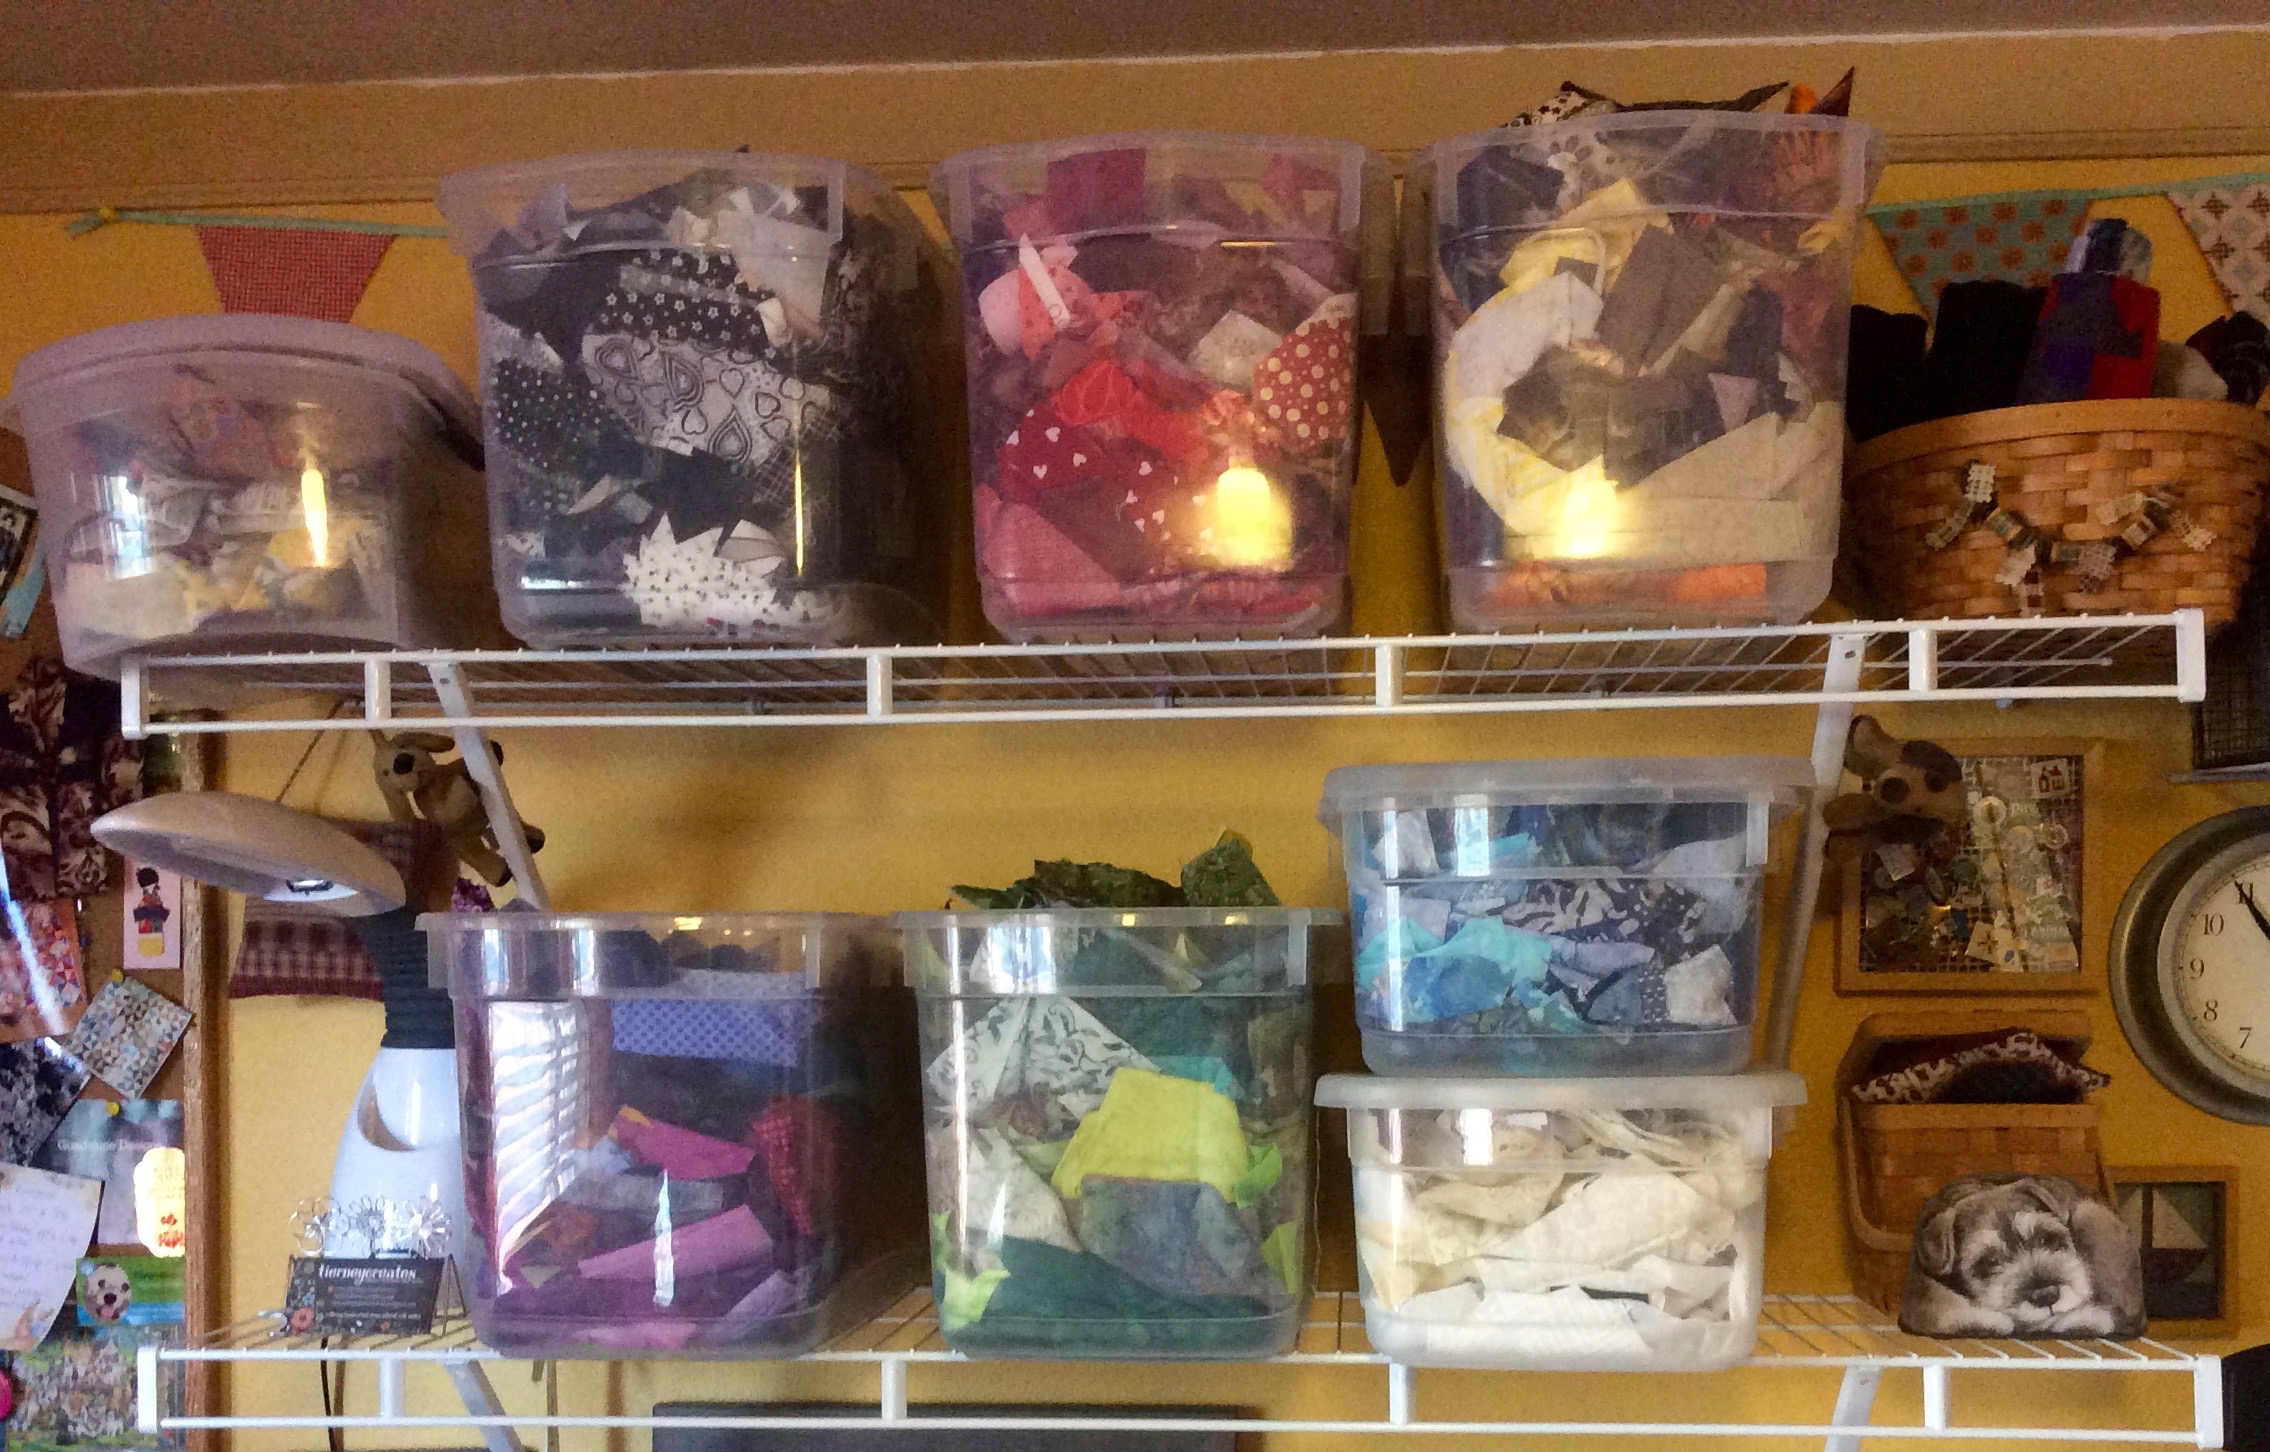
I love fabric scraps and I have quite a collection. I have several blog posts about my love of scraps. My fabric scraps were getting out of control and were in two fairly large boxes. I enjoy the “hunt” for the right fabric scraps when creating a scrappy quilt, but found I grew irritated with not being able to easily find the colors I want.
So I decided to organize my fabric scraps in two ways, to give me flexibility of how I create with fabric scraps:
By color
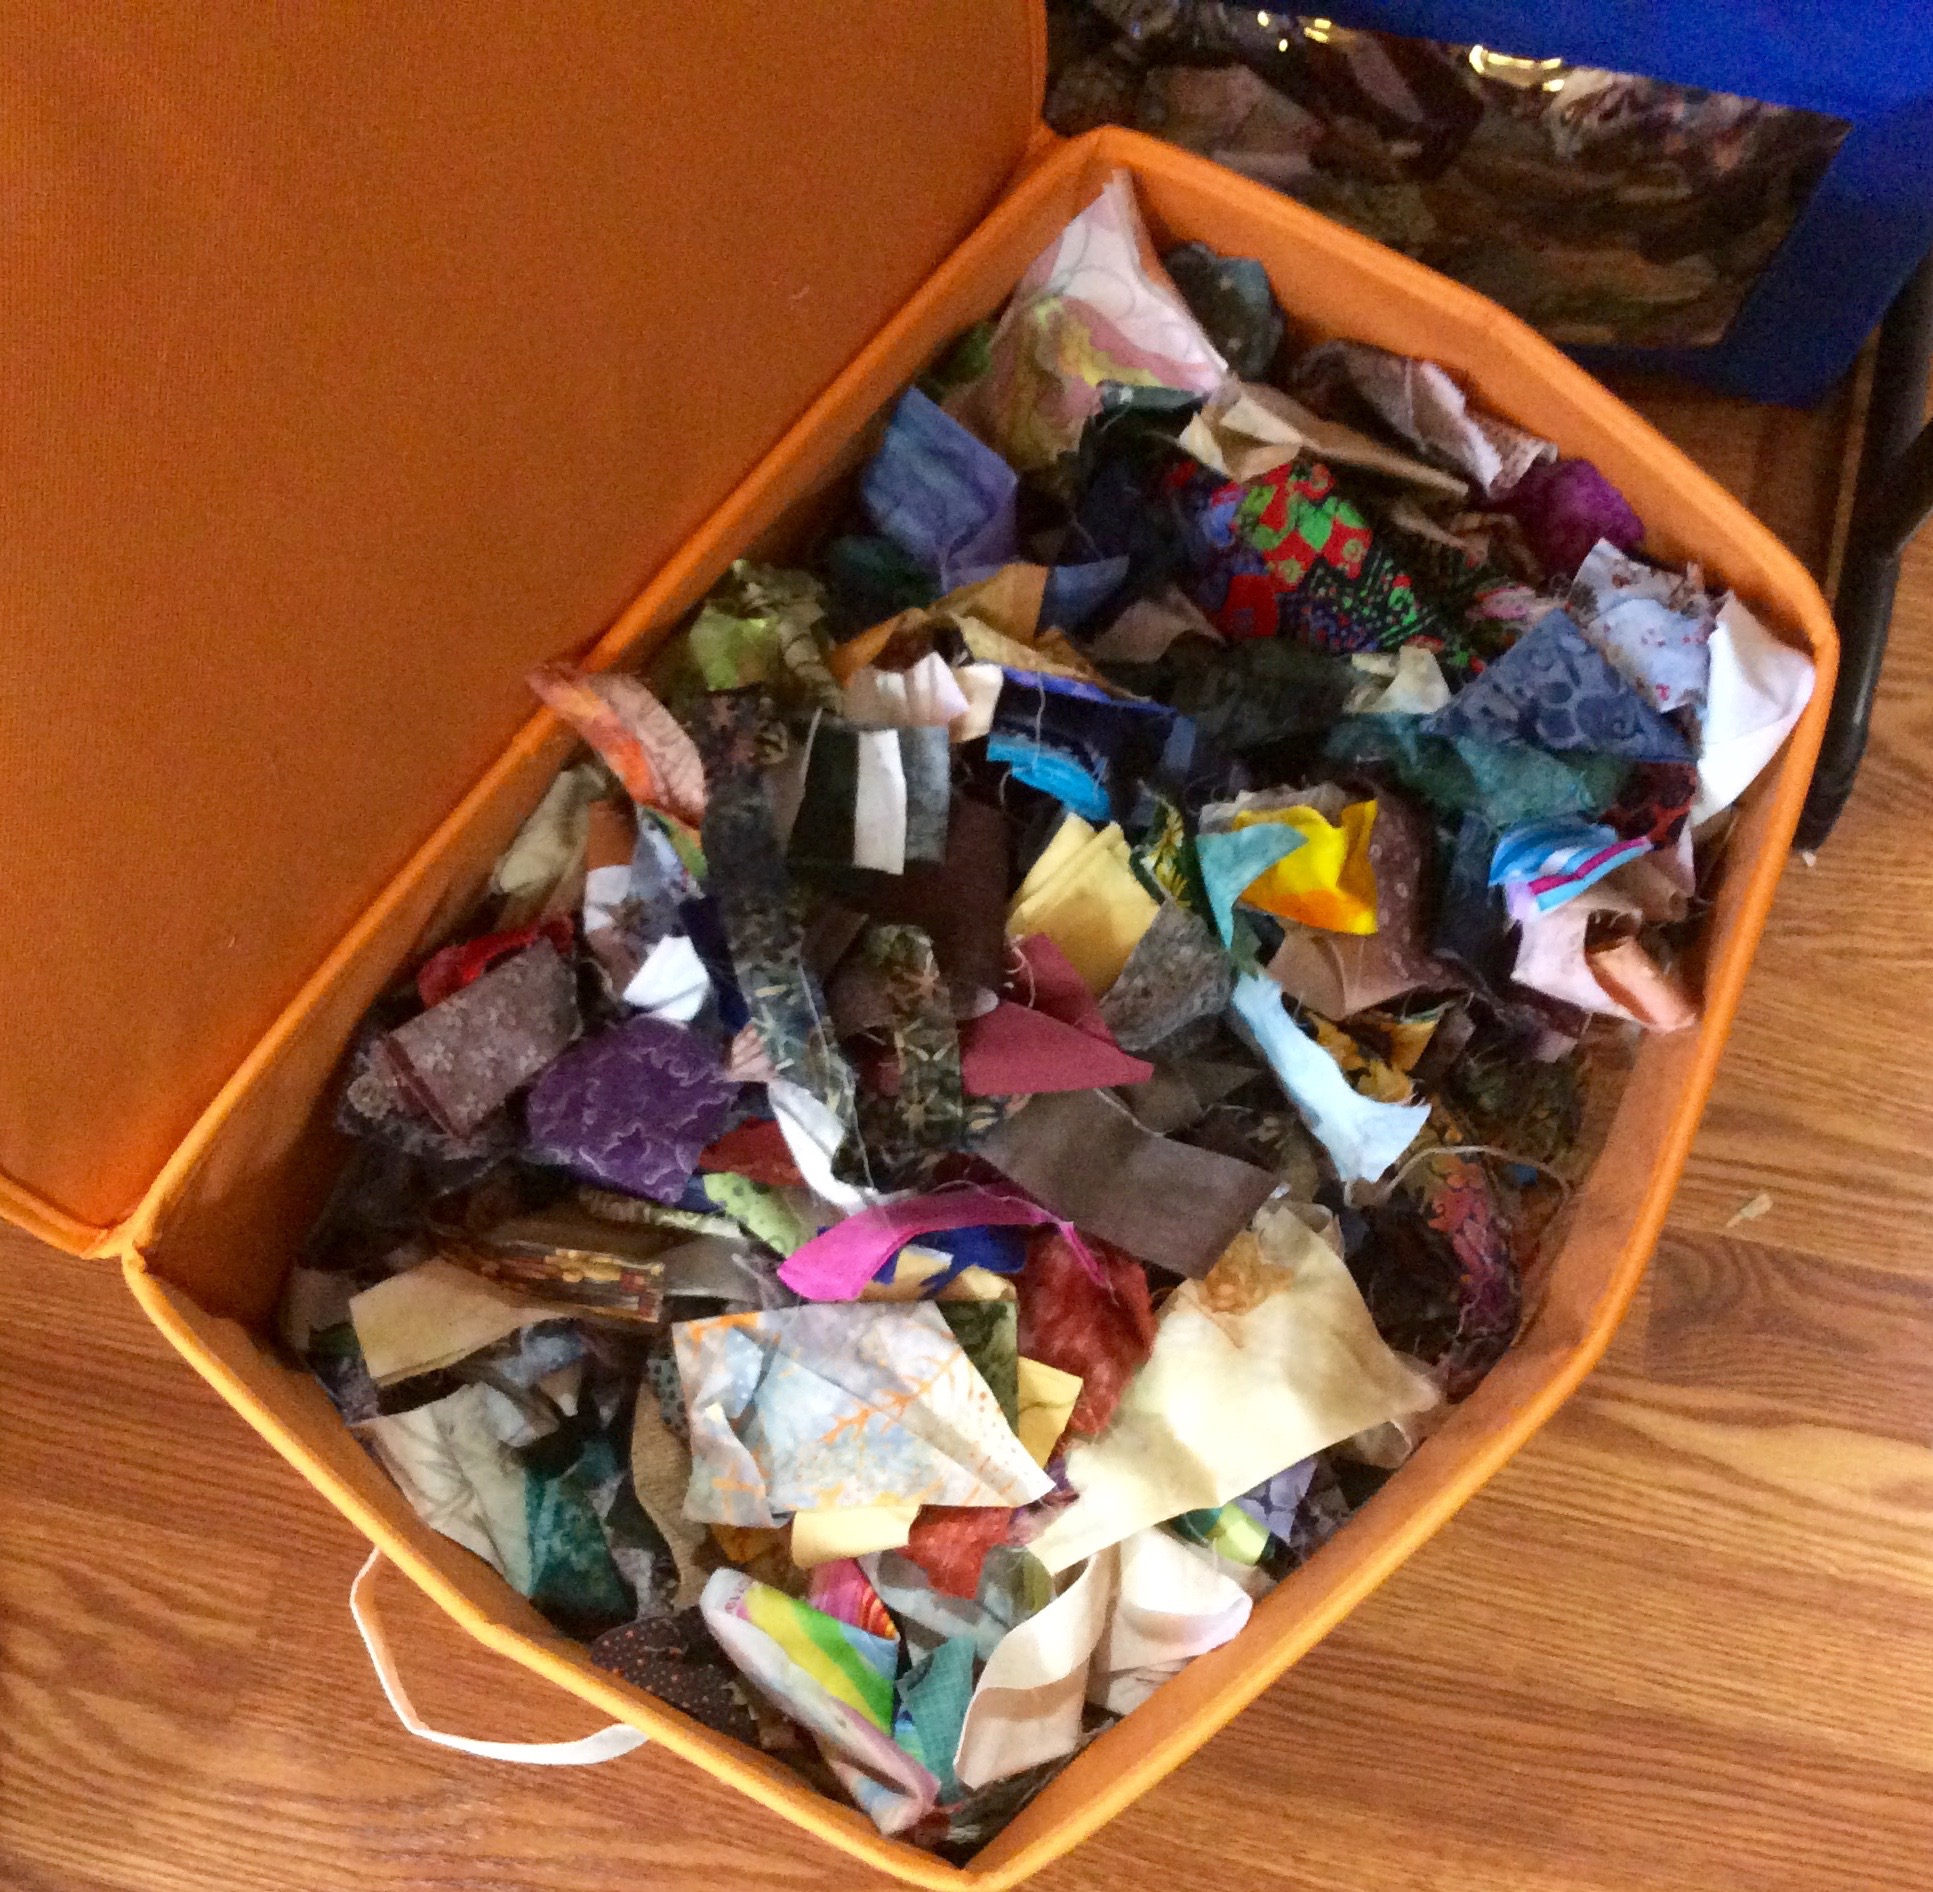
All thrown in a box (random)
This new system allows me to create fabric scrap pieces (quilts, pillows, wallhanging, table runners, etc.) based on my “creative mood”. I might want to work on a piece that it focused on oranges, yellows and reds; or I might want to work on a piece that is very scrappy and more random. Now I have two options!
I am interested in working on some pieces in the future that are more monochromatic but with fabric of different patterns and textures in the same general color. Having fabric scraps organized by color will make this design process easier.
As I was organizing my fabric scraps I got very excited as ideas for new pieces ran wildly through my head!