Studio, What's on the Design Wall

What’s On the Design Wall: A Homecoming

Yesterday the long-arm quilter, Guadalupe Designs, unveiled the quilting done on my piece Abandoned Structure, which is based on an abandoned power plant in Central Oregon that I photographed many years ago.

For more on the development of this piece, the story behind it, and the original photo that inspired it, please see the post What’s On the Design Wall: Working Through a New Art Quilt Piece.

Once I got it home I stuck it up on the Design Wall (a sort of homecoming from where it originally was born).  I have not yet trimmed the batting from the edges or put the finish  on the edges, but I am enjoying just looking at the piece as it came off the long-arm quilting machine.

I am excited to add it to my collection of art quilts made from recycled clothing and garment manufacturing scraps.

Abandoned Structure (2015, in progress). Designed and pieced by Tierney Davis Hogan, Quilted by Betty Anne Guadalupe.
Abandoned Structure (2015, in progress). Designed and pieced by Tierney Davis Hogan, Quilted by Guadalupe Designs
Quality of Life, Studio

Invite Creativity In by Kicking Clutter Out!

I have been working for a while on downsizing my stuff and reducing clutter in my life (see recent post The Space in Which We Live).

As part of this process I have been working through my craft magazine collection (as a prequel to some day conquering my craft book collection – see post Craft Book Hoarder?!?!?!).

Since 2008 I have been reading and collecting Interweaves’s Cloth-Paper-Scissors Studios magazine (who’s tagline is “inspiration & ideas for your art and craft space).

In order to let go a a magazine, I feel like I have to read it again or at least skim it and see if there is anything interesting in the issue that I want to reference or stick in the back of my mind. So I stacked all my old issues of Cloth-Paper-Scissors Studios magazine and started going through them.

IMG_2625

I came across this great article in the Spring/Summer 2009 issue by Lesley Riley: “Clutter Out Creativity In: 10 Steps to a More Artful Studio”, and I wanted to share a listing of her steps to deal with studio clutter. I think they are fairly self-explanatory but I have added a couple comments based on the article or my own experience.

  1. Hoarding is a primitive instinct (but having a more limited selection may force you to be more creative!)
  2. Know thyself (think about what colors and fabrics you now enjoy working with and consider ditching the rest)
  3. Treat your stash like your clothes (in your closet if you have not worn something in a long time or it no longer fits you, maybe it is time to get rid of it – the same applies to using fabric)
  4. It’s not “all or nothing” (you don’t have to get rid of things all at once, you can whittle it down over time)
  5. Take your time (relax and find time to slow sort your stash)
  6. Share your favorites (shared a little of your favorite fabrics with others)
  7. Spread the wealth (I personally enjoy donating fabric I no longer need to the local Humane Society Thrift Shop as I know it can be a treasure to a fellow crafter who stumbles upon it and the proceeds help support the animal shelter)
  8. Create coordinated bundles
  9. The artist, not the fabric, makes the art
  10. You control the fabric (it does not control you!)

After I finishing letting go of my already read (twice) Cloth-Paper-Scissors Studios magazine, I can’t promise I will never buy an issue again. This is truly a wonderful magazine with glimpses into artists’ studios and their inspiration.

Studio, What's on the Design Wall

What’s no longer on the Design Wall: The Tree Outside My Window

This is a follow up to the post: What’s on the Design Wall: The Tree Outside My Window.

I found an organic branch-like/wood grain-like tone on tone fabric from my collection of Marcia Derse fabrics and placed it between the columns and then as the border.

So now the quilt top is done!

I am looking forward to seeing what it looks like once the machine quilter works her magic!

Some photos below…

NOTE: In the last photo, the quilt top looks a little askew, that is just because The Quilting Husband is trying to hold it still for the photo while the wind is blowing. 

A close up of one of the blocks with the setting fabric
The Tree Outside My Window under a tree outside my window!
Quilt Top completed on The Tree Outside My Window
Fabric Scraps Obsession, Studio, What's on the Design Wall

What’s on the Design Wall: The Tree Outside My Window

Continuing my series “What’s On The Design Wall” with an update on where I am in my design and piecing of a new piece that I first introduced in the post: “What’s on the Design Wall: Rescued Blocks II“.

I provided an update on my progress in the post “What’s on the Design Wall: Making Progress?“.

Recently, the name for this piece came to me – “The Tree Outside My Window” as I completed 15 blocks to create this art quilt.

As you will see in the photos below, this piece has FIVE images of trees in it (the post “What’s on the Design Wall: Fabric Surface Design Experimentation” discusses how these trees were created) but “The Trees Outside My Window” did not sound right on my tongue. I believe when naming a piece, it has to sound right to you when you say the name aloud.

After creating fifteen 12.5 inch by 12.5 inch blocks from: 1) 4 inch – 10 inch blocks originally pieced by a friend (“Rescued Blocks”): 2) scraps from my friend; and 3) five printed trees from a surface design workshop, I decided to piece the blocks into 3 columns of 5 blocks each.

Now I am deciding what I want to do next with my design. I am leaning towards putting a strip of solid (or solid like) fabric in between each row and then floating it in the same color as a border. Originally I was going to use a cream batik but it did not look right. Next I thought: “Ah a brown batik with texture would work”, but alas, I only had brown batik scraps in my stash.

Then my fabric stash spoke to me (which is good because I did not want to go out and buy more fabric as I am trying to use my stash)! I spotted the perfect fabric – mono color textured design yardage from my collection of Marcia Derse Riverwoods Collection from Troy Corporation. (At one point I was addicted to this amazing collection and tried to be a sample of all fabrics in this line from The Stitchin’ Post in Central Oregon.)

I am going to leave it a mystery for now which fabric from this beautiful collection I selected for the strips between the three rows and the border. You have to wait until the next post on this piece!

Here are photos from my design wall to include some close-ups:

IMG_1117
The Tree Outside My Window (in progress)

IMG_1115 IMG_1114 IMG_1112

Studio

Completion!

An update to my post Progress and Fear about the 5 quilts awaiting completion:

Finally, I finished binding all 5 quilts back from the long-arm quilter! I  have listed 4 of them for sale on the tierneycreates Etsy shop.

I still need to master photographing quilts as they are much prettier in person than my photos seem to reveal.

The 5th one, the “Ugly Sunflower Fabric Quilt” I wavered on and was going to keep, then was going to sell on Etsy, and now I am completely undecided.

I might just hold onto it until the Sisters Outdoor Quilt Show entry time next year to decide.

Perhaps I will put the sunflower quilt in the Sisters Outdoor Quilt Show as I am guessing bed size quilts are easier to sell at the show than lap size quilts (of the 5 quilts I had in the 2015 Sisters Outdoor Show, only the bed size quilt sold).

The plan is for next year’s Sisters Outdoor Quilt Show, I put in 5 quilts again and Terry “The Quilting Husband” put in 5 of his quilts!

Studio, What's on the Design Wall

What’s On The Design Wall: Flannel “Log Jam” Blocks

Continuing my series of posts on what is on the design wall…

THE QUILTING HUSBAND IS BUSY AGAIN

I had some of my blocks up on the design wall and Terry “The Quilting Husband” was getting impatient. He kept giving me subtle hints (and not too subtle hints) about moving my stuff off the design wall so he can put his blocks up on the design wall (we have a small house and can only make 1 shared design wall work).

The Quilting Husband is working on a new “Log Jam” quilt (see my other posts on “Log Jamming” and “Log Jams” which are free form pieced log cabin style blocks) made with flannel scraps. I have a large box of flannel scraps from making flannel quilts and flannel quilt backs, and Terry came up with the idea of trying to use of the scraps making flannel log jam quilts.

As his confidence grows as a quilter, he gets comfortable with making his own design decisions. He found a stash of dog and cat themed flannel scraps and used them as the center so each block would feature a dog and/or cat face. Very creative!

Studio, Sunflowers!

“Ugly Sunflower Fabric Challenge” Part II

Check out Sassy-the-highly-opinionated-miniature-schnauzer’s blog Schnauzer Snips for her latest musings…

IT’S A KEEPER!

In my post Ugly Sunflower Fabric Challenge I shared how a friend had challenged me to make a quilt with fabric I was going to give away. I completed the quilt top and pieced a sunflower flannel back and sent it off to the long-arm machine quilter.

The plan was when I got it back, to either give it as gift to a friend or sell it on the tierneycreates Etsy shop. That was the plan, until I got it back from the long-arm quilter, and fell in love with it!

My long-arm quilter, Betty Anne Guadalupe of Guadalupe Designs, did a sweet all-over flower quilting pattern. I sat under the cozy quilt (with the sunflower flannel) while sewing down the binding (we did have the A/C on) and decided it needed to become part of my “quilt family”.

So it is staying in my home, and will be nested on the top of one of the overstuffed reading chairs for cozy winter tea and reading sessions. If we lose heat this summer, I can pile the quilts on top of me and stay warm!

POSTSCRIPT

This quilt was one of the 5 quilts I got back from the long-arm quilter that needed binding put on and sewn down to be completed as I shared in the post Progress and Fear. I have completed a second quilt and have 3 more to go. The remaining 4 quilts I will make myself list on the tierneycreates Etsy shop as originally planned. Maybe.

Books, Music, Podcasts, Studio

Progress and Fear

Interesting combinations of words, huh? One sounds positive (Progress) and the other sounds, well…fearful (Fear)!

Actually the title is about two positive things!

PROGRESS

Making progress on the five (5) quilts that are back from the long-arm quilter and need bindings to be completed (refer to the posts “Some Progress Made” and “The Quilting Husband Saga Continues” for more info). Terry the Quilting Husband assembled the bindings and I have sewn them onto all 5 quilts. Now they are waiting in a nice pile to taken turns sitting on my lap and have their binding sewn down. Then they will be complete!

"Please complete us" (Pile-o-Quilts waiting for their bindings to be sewn down)
“Please complete us” (Pile-o-Quilts waiting for their bindings to be sewn down)

FEAR

My previous post was on Creative Inspiration: Words. Currently listening to Susan Jeffers’ fantastic audiobook Feel the Fear and Do It Anyway and feeling very inspired. I wanted to share her 5 Truths About Fear she has published on her website (susanjeffers.com):

  1. Fear will never go away as long as you continue to grow (this is a good thing)!
  2. The only way to get rid of the fear of doing something is to go out and do it!
  3. The only way to feel better about yourself it to go out and do it!
  4. Not only are you afraid when facing the unknown, so is everyone else!
  5. Pushing through the fear is less frightening than living with the bigger underlying fear that comes from a feeling of helplessness!

I am really enjoying this audiobook. Of course now you all expect that I will quickly complete the bindings on the stack-o-quilts as I should feel pretty fearless about them now…

Studio

Some Progress Made…

Check out Sassy the highly opinionated miniature schnauzer’s latest happenings on her Schnauzer Snips page!

In an earlier post The Quilting Husband Saga Continues, I lament over the fact that I need to do the binding for three of the quilts that Terry, The Quilting Husband, got back from the professional long-arm quilter.

Here is an update – a wee bit of progress has been made. Terry did create folded 2 1/2 bindings strips for two of the quilts and is working on the binding strip for the third quilt. So here are two of the quilts waiting for their binding to magically be put on.

Yes I will go to bed tonight and in the am I will discover that the Binding Fairies, Gnomes, Elves, etc. appeared during my slumber and not only sewed on the bindings but also sewed the binding down! (I am very thoughtful and have left the binding strips draped over the quilts, all ready for the magical creatures to get to work!)

Okay, maybe no magical creatures are coming during the night to take care of the binding, sigh. My main issue is I would rather be designing and piecing a quilt than finishing one.

I think it might be a summer thing and I am just not in the mood to sit for a long spell and sew down binding will sitting under a quilt.

Alright – enough whining – I will get the three bindings done. Sometime soon…

By the way, our long-arm quilter has informed me she has two more of The Quilting Husband’s quilts quilted and will be delivering them soon (look of panic).

Fabric Scraps Obsession, Studio

Collaborative “Jamming”

I taught “The Quilting Husband”, Terry a couple months ago how to make log jam blocks. If you would like to know more about log jam blocks and “log jamming”, see these posts:

Terry, loaded with a box of color coordinated scraps I pre-selected, made endless 6 1/2 inch log jam blocks (120+) and put a dent in my scraps (a small dent but any dent is appreciated!).

Then he took a 100 of the 6 1/2 inch block and created a 10 x 10 quilt. It was a collaborative process as he completed ten – 10 block rows, and I did the final sewing of the ten rows together to make the quilt top. Terry, The Quilting Husband, is not much for matching seams to sew rows together, but that is okay – look at how much he accomplished!

Now I am working on putting the back of the quilt together so it can go to the long-arm quilter!

Then comes the decision – keep it or list it on the Etsy site for sale. We will likely list it for sale…we’ll see…

Colorful Jam by tierneycreates and terrycreates!
Studio

The Quilting Husband Saga Continues…

THE MAN WHO WOULD NOT BIND HIS QUILTS

Feeling a little overwhelmed….

Terry, the Quilting Husband (see previous posts “This is the Story of a Quilting Husband“, etc.), has been hard at work piecing quilts. We just got back from the long-arm quilter THREE of his quilts and now they need binding sewn on and then sewn down to finish the quilt.

I am in charge of binding quilts – The Quilting Husband wants NOTHING to do with binding quilts. I have not pushed the issue as when I started quilt-making I was terrible at putting binding on quilts and sewing binding down. It was very frustrating for me, I just wanted to be done with making the quilt and not deal with the binding (I redid the binding many years later on my original quilts which looked like I had been taking mind-altering substances while binding…).

I am happy he is quilting and I want him to keep enjoying the process, so I do his binding.

(By the way – now I actually enjoy sewing down the binding as it builds the anticipation to the completed quilt.  I do not mind plopping in front of the TV and sewing down a binding. The Quilting Husband would equate this to enjoying a dental procedure!)

Keep in mind I have my own quilts to bind too, but I will just take it on, one quilt binding at a time!

IMG_0915

POSTSCRIPT

If you are not a quilter, binding a quilt can take several hours or more to complete depending on how large the quilt you are working on. A quilt is truly a labor of love –  from figuring out the pattern (or creating your own design), selecting the fabric, measuring and cutting the fabric, hours of sewing to piece the quilt, machine quilting (or paying to have professional quilted), trimming the edges after machine quilting, measuring and cutting the binding, sewing the binding onto the quilt, and finally sewing down the binding! (Whew I got exhausted just writing that – ha!)

Why do we keeping doing it (us crazy quilters)? Because it is fun and addicting!!!

Studio, Sunflowers!

Ugly Sunflower Fabric Challenge

IMG_1448I love sunflowers and years ago (maybe 10) I bought some sunflower fabric I found on sale. I never used this fabric and it ended up in the back of my stash, forgotten.

A couple of months ago I was purging the fabric that I no longer loved to donate to a charity thrift store (see blog post The Fabric Purge!) and came across the sunflower fabric again. I do not have a photo of the original fabric, but 10 years later, looking at it I thought “what was I thinking?!?!?”

It was…well…quite ugly fabric. Little sunflower images with a very cheesy looking patterns and other images surrounding the sunflowers. No wonder it had been on sale 10 years ago!

A quilter friend of mine suggested a Challenge: Don’t get rid of the fabric – cut out the sunflowers and use them as centers in a log cabin style quilt. She offered to give me some coordinating fabric that she was purging from her stash!

I took on the challenge and made the quilt! I just gave to my long-arm quilter the 88″ x 66″ quilt top made with just the sunflower sections of the ugly fabric and coordinating fabric from a friend’s stash!  I set the 9.5″ by 9.5″ inch blocks in a Moda paper bag colored fabric. I cannot wait to see what it looks like quilted!

Studio, What's on the Design Wall

What’s on the Design Wall: Making Progress?

PLAYING…

In my post What’s on the Design Wall: Rescued Blocks II  I shared that a quilter friend gave me a cool stack of batik freely pieced abstract fabric blocks that she no longer wanted to work on, and a pile of coordinating scraps of fabric.  I was planning to combine those blocks and scraps with a couple trees stamped on batik fabrics, from a fabric surface design workshop I took earlier this year.

Here is what I started with:

IMG_0627

After playing with the pieced blocks and assorted scraps for awhile, I decided to create 12.5 inch blocks. I am aiming for 15 blocks, so far I have 8. I am looking into non-traditional block settings once I complete the 15 (or more blocks).

Here is what it looks like now (so far):

in progress
in progress

Occasionally I wish I had a larger design wall to put more blocks up on during the design process, but I can use the top of a bed to continue my design layout when I have 15 blocks (or more). All sorts of ideas have been running through my mind (the fun of designing a piece) such as spacing out the blocks by setting them at wide intervals in a neutral fabric, etc. We will see how it turns out and of course I will post future photos!

POSTSCRIPT 

I love good quotes! I came across this quote the other day that made me smile and reflect:

“Continual is the journey: Past sunset towards morning.” – Willis Eberman

Is this quote referring to my marathon art quilt design sessions where I lose track of time? Or perhaps my ongoing journey on my “tierneycreates” path!

Studio, tierneycreates

Being Proactive: 24 New Miniature Kimonos in Progress

This week I started a new schedule for my health care job (the job that keeps the lights on) – I work Tuesdays to Fridays and have Mondays off from work. Mondays are now a day to focus on tierneycreates – making handmade items for my tierneycreates Etsy shop and working on art quilts for The Wardrobe Meets the Wall.

In my previous post, The Seven Habits of Highly Effective Crafters, I discuss my crafting goals in the context of Stephen Covey’s 7 Habits of Highly Effective People. Covey’s habit #1 is “Be Proactive”. On my first Monday off in my new work schedule, motivated by revisiting Covey’s 7 Habits, I was actually PROACTIVE!

As I stated in my previous post: “Those projects will not just start or finish themselves, Tierney!” Today I worked on 24 new miniature kimonos for my Etsy shop. Miniature kimonos were the first items (besides my vintage Barbie collection) that I offered on the tierneycreates Etsy shop when I first opened it in late 2013. They ended up being more popular than I anticipated and I am adding a new batch. I may stop making them after this batch as I would like to focus on other small items for the shop.

I experimented with some new colors and combinations I have not tried before. I will finish them up with their own unique decorative button and possibly a tassel (if the tassel works with the button and color combination.

A new batch of miniature kimonos in progress, July 2015

It felt good to be proactive and get a new load of kimonos started, even if it was tedious and tiring at times. I am still working towards to achieving my 2015 goal of having 100 items on the tierneycreates Etsy shop and the only way to achieve that is to be proactive and make stuff!

Studio, What's on the Design Wall

What’s on the Design Wall: Rescued Blocks II

Update: If you would like to see the completed quilt top for the abstract art quilt piece I discussed in What’s on the Design Wall: Working Through a New Art Quilt Piece, check out the post on The Wardrobe Meets the Wall blog In Progress: Abandoned Structure. It is awaiting quilting mastery by Betty Anne Guadalupe my collaborator in the The Wardrobe Meets the Wall.

If you don’t want them, I will take them…

In a previous post What’s Was On the Design Wall: Rescued Blocks I discussed the pleasures of working with “abandoned blocks“. Abandoned quilt blocks are blocks that another quilter does not want and gives to you or you find at a thrift shop or garage sale and decide to adopt!

Recently a quilter friend gave me a cool stack of batik freely pieced abstract blocks that she no longer wanted to work on in addition to a pile of coordinating scraps of fabric. I love batiks and I love her combination of colors so I was very excited to adopt these blocks! As a bonus I discovered that the trees that I printed on batik fabric during a fabric surface design workshop I took in April (see post What’s On the Design Wall: Fabric Surface Design Experimentation), appear to work well with the newly adopted blocks!

Below is the piece in it’s very early stages (I threw all the adopted blocks and my tree printed blocks up on the Design Wall in a random manner) and we’ll see how the piece progresses. You know I will post updates.

My friend who also likes working with abandoned blocks (she collects them from thrift stores, garage sales and guild meetings) and I joke about someday having an exhibit of our collection of pieces made from other’s discards!

IMG_0627
What will I become?
Studio

Very Cool Website and Tool: Play Crafts and Palette Builder

Before becoming a blogger, I did not follow many blogs. Now  I find myself following many interesting blogs, including one by a fellow quilter/crafter knitNkwilt. Thanks to one of her recent posts I was introduced to a wonderful website Play Crafts and their free online tool Palette Builder 2.1!

In my post Creative Inspiration: Nature, I discuss how the colors in a photo from Red Rock Canyon State Park inspired an abstract art quilt I created. I manually determined what colors were in the photo and matched them to fabric in my stash. Play Craft’s tool Palette Builder 2.1 identifies the key colors in a photograph for you automatically and for free!

Below is a photo I took while in Morrison, Colorado near the famous Red Rocks Amphitheater:

IMG_2200

Here is the photo after running it through Palette Builder:

Screen Shot 2015-06-17 at 10.16.04 PM

Palette Builder has identified the palette for a piece based on the photo. You could use this palette to create a painting or to design a textile based piece inspired by this photo! Palette Builder appears to be connected with Moda Fabrics (one of my favorite quilt fabric manufacturers) and lists the specific Moda fabric that corresponds to the color identified in the photo.

If I were working on a piece based on this photo, and say using batiks, I would add in additional tones and shades of the colors suggested to include a forest green color for the foliage and perhaps another shade of brick red. However this tool gives you a great place to start on your palette – for free!

I am looking forward to using this tool in designing a future textile piece based on a photo that inspires me creatively!


Studio, What's on the Design Wall

What’s on the Design Wall: Working Through A New Art Quilt Piece

This weekend I worked on a new abstract silk art quilt piece: Abandoned Structure, inspired by a photograph of an abandoned water power plant in Central Oregon.

The water plant is called White River Falls Power Plant and it is located at White River Falls State Park in the Tygh Valley of northern central Oregon. Here is a link to an article, Nature and modern history mix at White River Falls, by station KATU on the history of the hydroelectric dam and powerhouse that was built in 1910 and decommissioned in the 1960s.

Around 6 – 7 years ago, while attending a “Quilt & Cast Retreat” (the wives attend a quilt retreat while the husbands go on a fly fishing day trip) in Maupin, Oregon, we went on a day excursion to White River Falls and I fell in love with abandoned power plant. I took many photos and the photo below inspired the art quilt I am working on:

White River Falls Power Plant

By the way, this post could have also been a continuation of my series on Creative Inspiration, as here is an example where I was inspired by a structure to create an abstract art quilt. Note: I refer to the piece I created as “abstract” as it is not a pictorial recreation of the structure but my interpretation of the feeling I get from the photograph.

Here is the quilt in process on my design wall:

Abandon Structure in progress

I am using recycled garment silks, recycled lines, and some of the Elite Gelato variegated gray fabric I used to carry in my Etsy shop (the bolt ran out except for the 2 yards I kept for my own use).

I will post the completed quilt top on The Wardrobe Meets the Wall blog as it will be part of that collection.

Studio

Sorting and Organizing: Sometimes All You Need is a Friend

schnau

I have coworker (in my non-crafting, health care industry day job that keeps the electricity on so I can blog) who likes to say: “Sometimes all you need is a friend” (to resolve an issue). She says this tongue-in-cheek and is usually referring to a complex software challenge and “a friend” means someone who knows how to resolve your software issue, or a tool/reference to guide you towards resolution of your issue.

Although she says it tongue-in-cheek, her statement holds true. In my observations, in many situations in life, such as taking an overwhelming project to sort, declutter and organize your stuff – sometimes all you need is a friend.

Recently I helped two friends with their different organization projects:

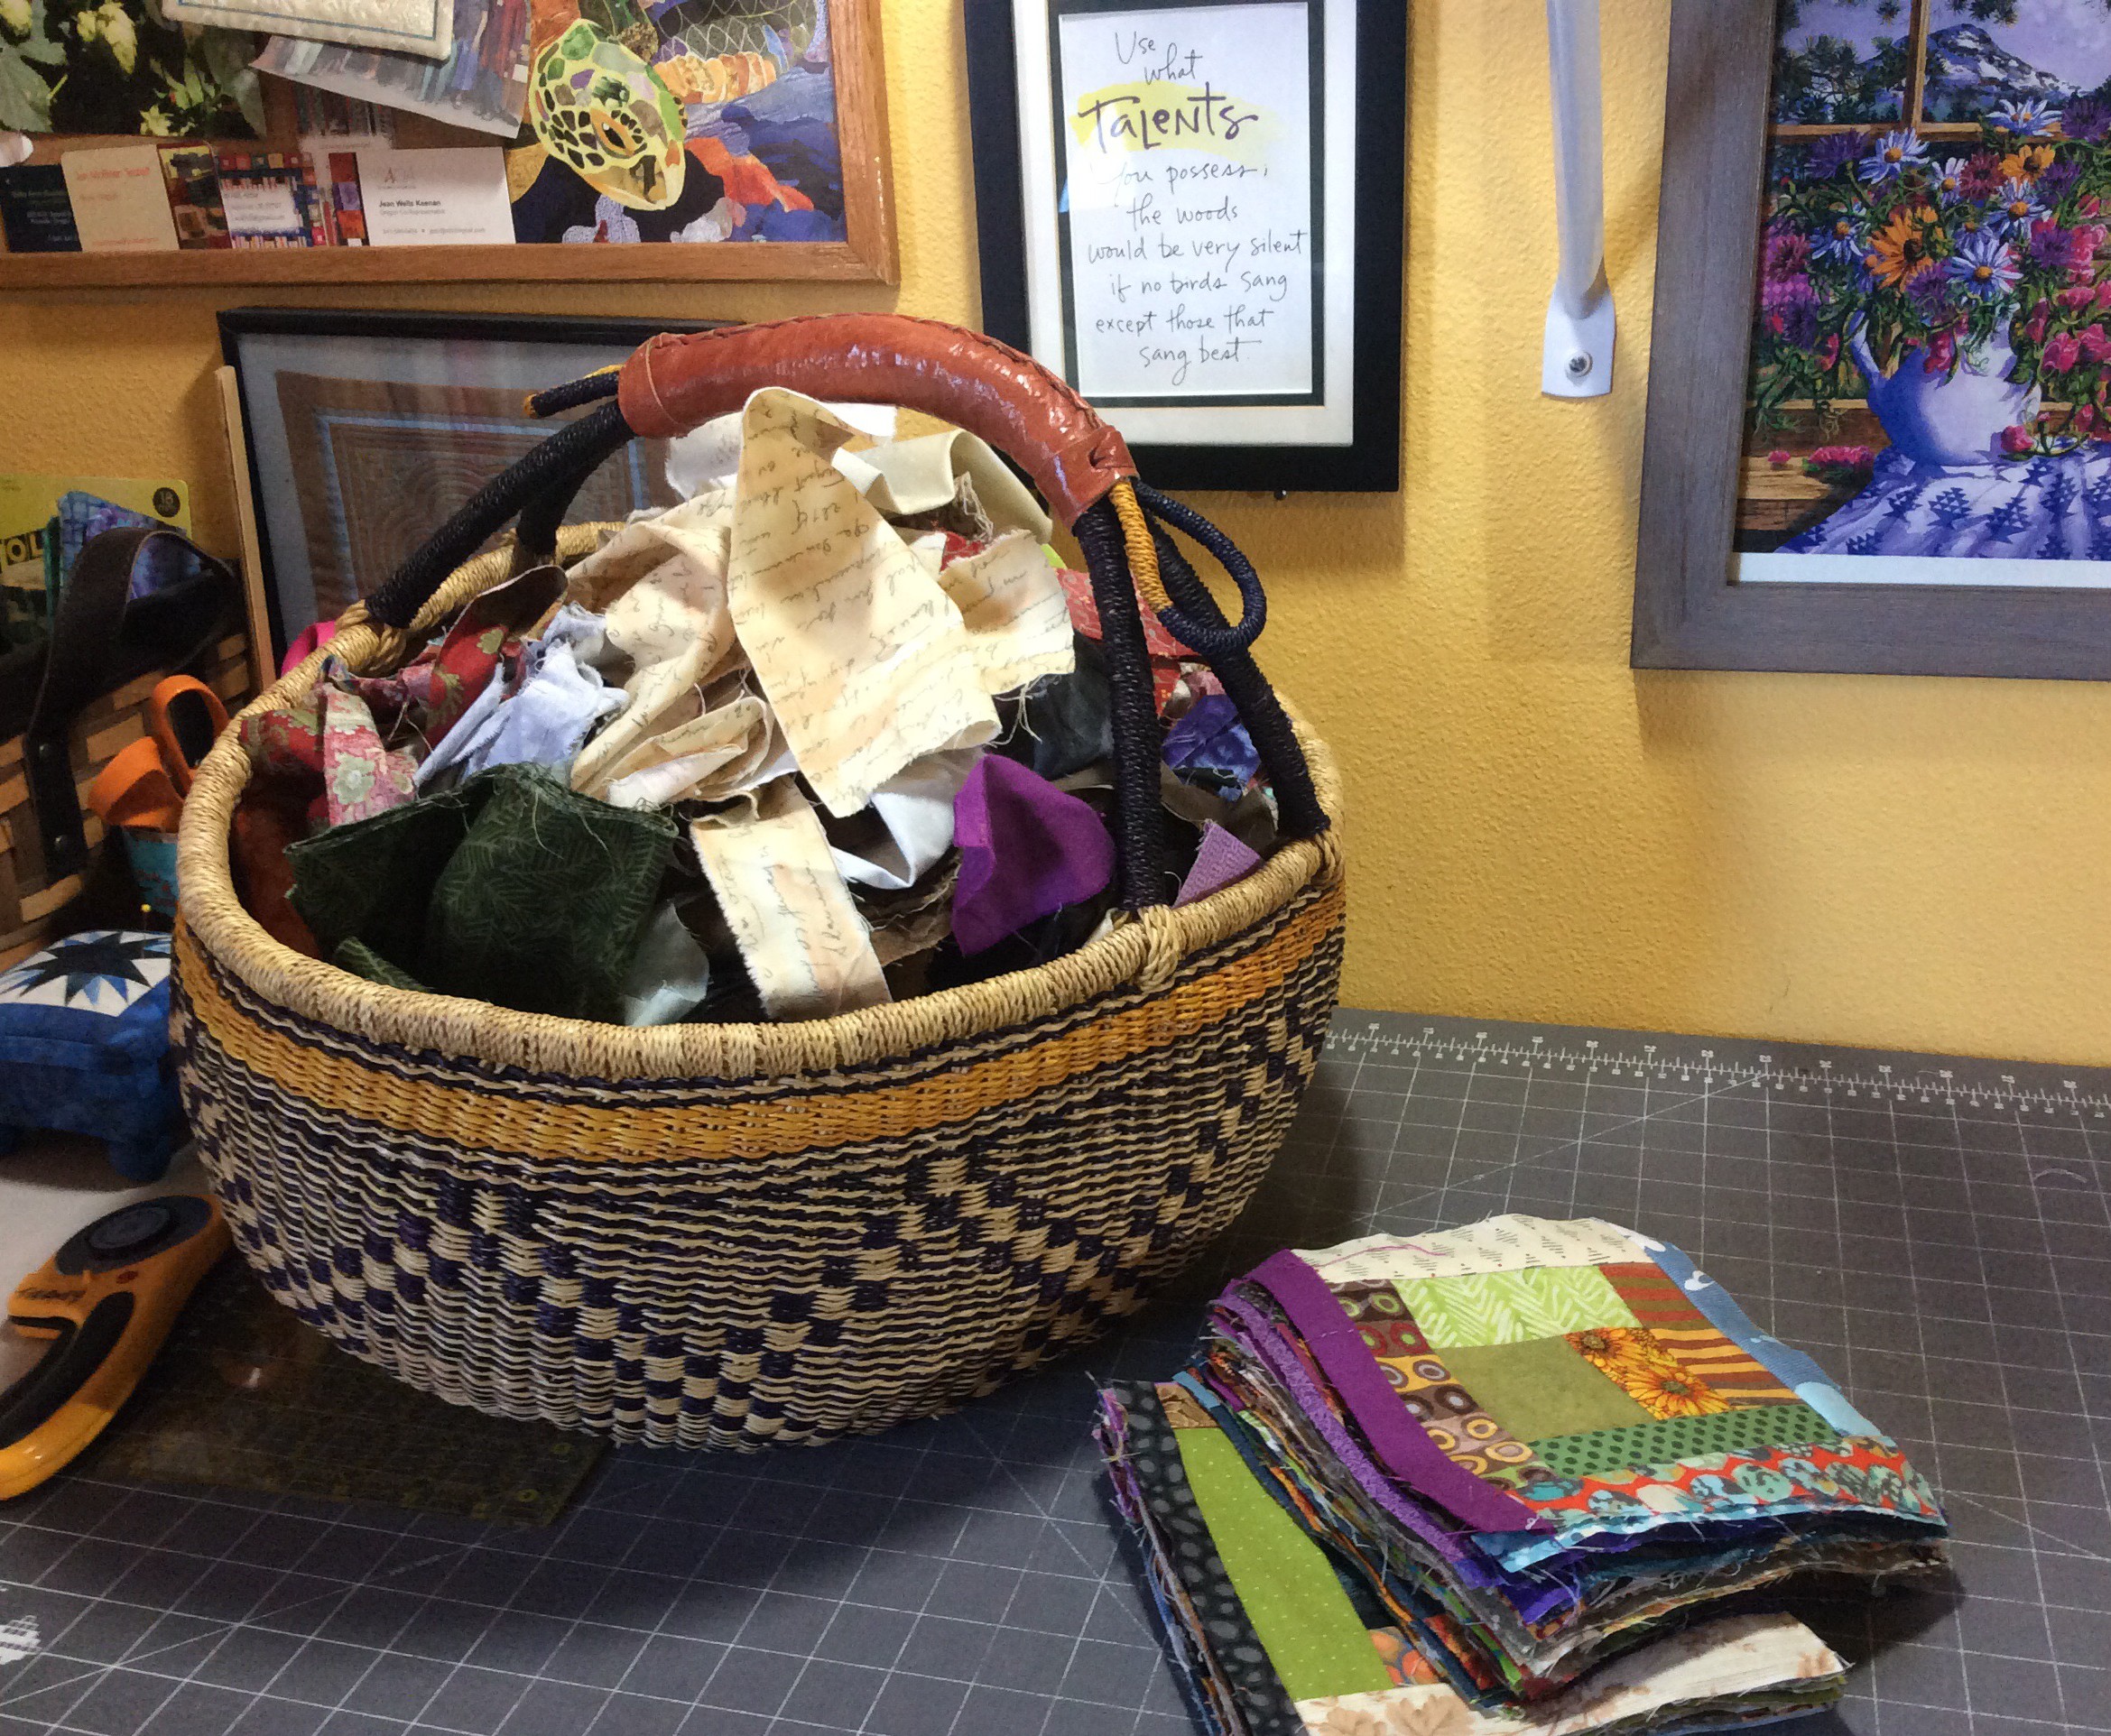
  • A friend who wanted to gain control of a huge and unwieldy fabric stash; and
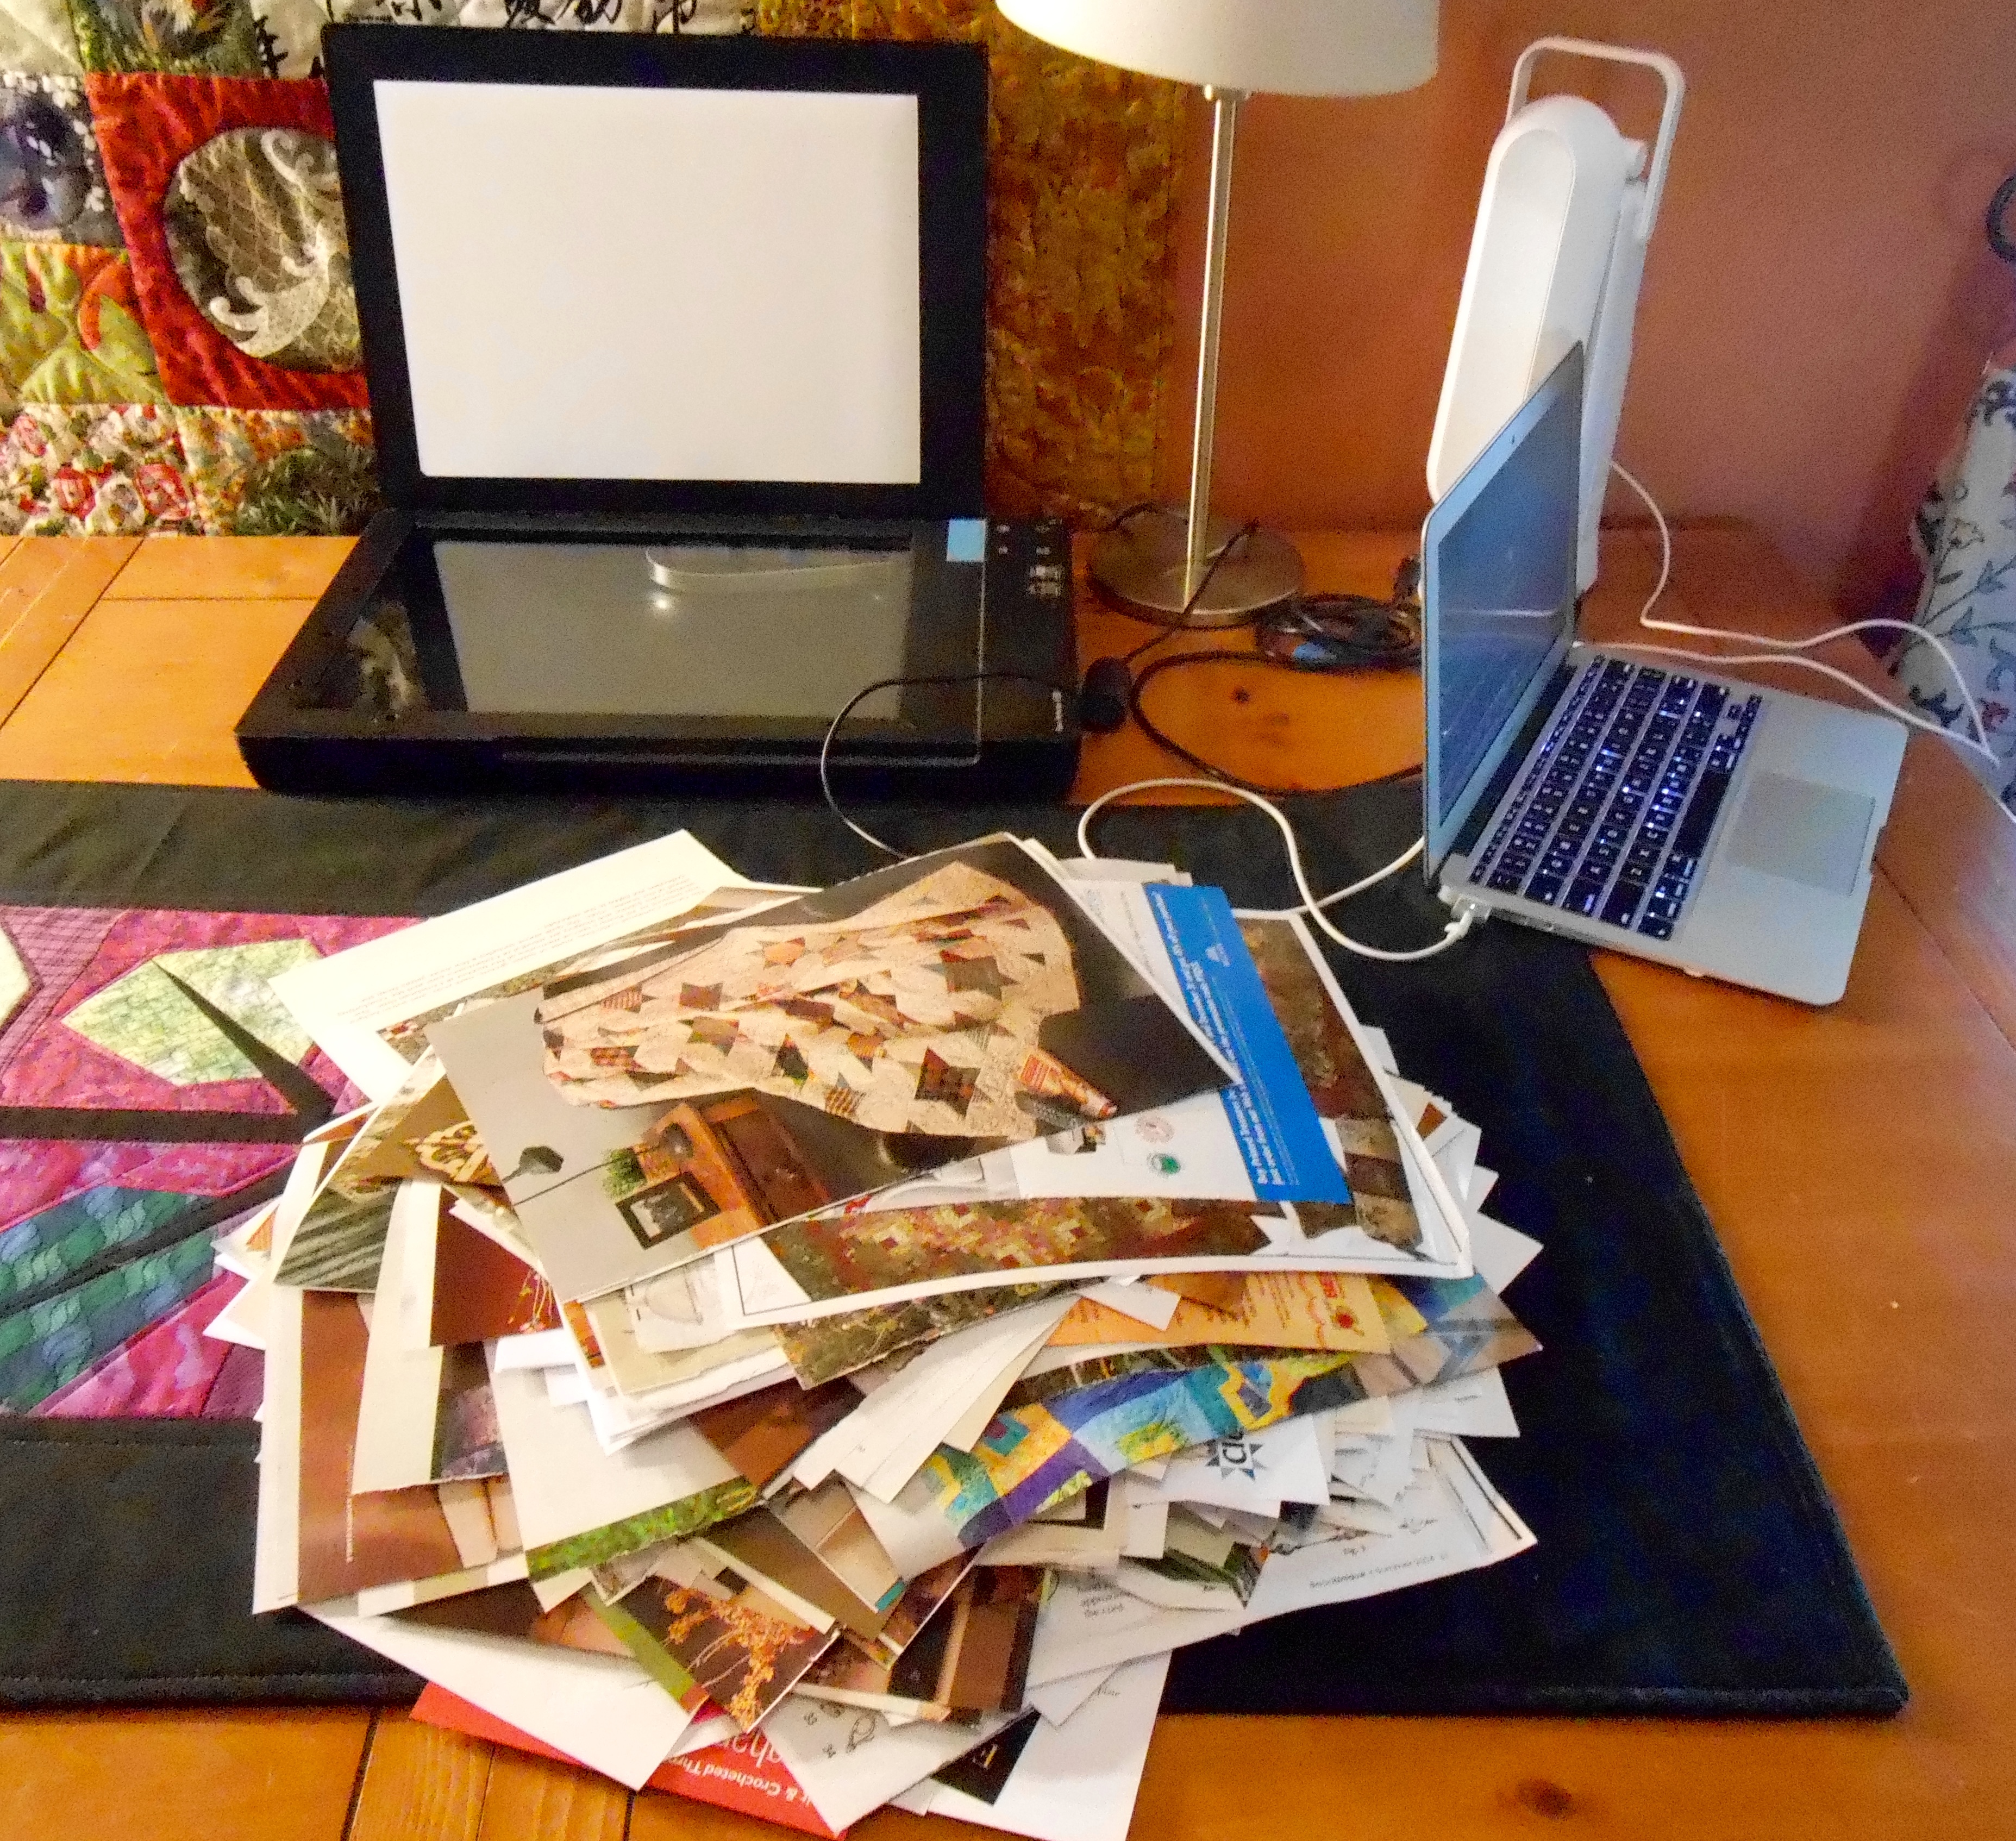
  • A friend who wanted to declutter and organize a desk where intense piles of paper had taken control

Both friends were overwhelmed with the tasks before them.

I can relate to being overwhelmed when it comes to a large decluttering/organization project of your own stuff. In my post The Fabric Purge! I share that during the sorting and reorganization of my fabric stash, I became so overwhelmed I sat on the floor and cried for a while, as there seemed to be no end in sight of my fabric purging and organization project.  I could have definitely used a friend there, even if for just mere moral support.

SORTING (DON’T DO IT ALONE)

I think one of the biggest challenges to taking on a decluttering/organization project on your stuff, is SORTING YOUR STUFF.  Why is sorting your stuff so difficult? Well, because it is your stuff.  It is interesting to you, it has history, it brings back memories, it makes you think about things good and bad, it makes you realize what you forgot to do, it is meaningful to you. You can get stuck trying to sort through your stuff as you take that trip down memory lane or get anxious on what you have YET to accomplish.

This is where a having friend there can help. Your friend knows you but does not have the level of connection to your stuff that you have to your stuff. Your friend can more objectively sort your stuff to help you make quicker decisions. What does this mean? Below are some examples of when I worked with my two friends on their decluttering/organization projects:

Friend with the Unwieldy Fabric Stash – For this friend I sorted her fabrics into what I thought were piles of the same collection, and presented those collections to her to quickly sort through and decide – keep or not keep. I noticed when she was left to sort from scratch she had some memory lane bonding with fabric. I was not pushy, but I kept her moving forward by continually asking her to make decisions about piles of fabric. Once she made a decision I boxed up the fabrics and put them on the shelf. She could not spend anymore time visiting with that particular fabric collection until we finished getting through her whole stash. I did let my friend visit with her unsorted fabric as she liked while I was sorting as she knew when I started asking questions, it was time for rapid decisions. 

Friend with the Desk-from-Heck – For this friend, first I sorted her papers (using my quick best guess from quick glance) into 4-6 general piles such as 1) important looking papers; 2) stuff she might want to keep; 3) business cards and small tags/cards; 4) photos; and 5) junk mail looking stuff. I made quick decisions and since I wanted to respect my friend’s privacy I did not read through any of the important looking papers (statements, business like correspondence, bills, etc.). If my friend had started sorting from scratch on her own, she might have gotten stuck on reviewing each important looking paper, etc. When I was done sorting materials from her desk into the various piles, I handed each pile to my friend and she made quick decision on each piece of paper of 1) keep; 2) recycle; or 3) save for immediate action. Before you know it her overwhelming pile of papers turned into a clean desk with a stack of important papers to go through on her own the next day. Plus by pulling out all the recycling (mailers, catalogs, obsolete papers) it made her pile that actually needed her attention look much smaller and less overwhelming.

In both cases, I think the key to success is having someone you trust (such as a friend) do the initial sorting (even if they get it wrong); and then having a friend with you to encourage you (not pressure you) to make as quick decisions as possible. You can get stuck if you are sorting through your stuff alone.

Even if your friend is not into organization and not interested in helping you sort, sometimes just having a friend there with you to hang out with while you work on your project, encourages you move forward.

Sometimes all you need is a friend. 

Studio

Updates

One of the cool things about blogging is I feel obligated to complete the projects I write about. Maybe you all do not really care (ha!) but I feel a sense of obligation to finish things or my readers will think I am a…non-finisher (not even sure if that is a proper word).

Here is an update on some projects related to previous blog posts:

The Charming Continues

In my posts What’s on the Design Wall: Rediscovering My “Charms” and What’s on the Design Wall: Pre-cuts Wrangling, I discuss trying to use up my out of control collection of pre-cuts such as charm squares (5 inch pre-cut coordinated squares). Another charm square quilt has been completed – this one I call The Charming Continues.  It was pieced by my quilting husband and myself using a couple Moda Basic Grey charm packs and coordinating Moda Basic Grey/Grunge line of fabric. It was long-arm quilted  by Betty Anne Guadalupe of Guadalupe Designs. Originally I was going to list it on my Etsy shop but I fell in love with it and it is very happy now in my cozy reading area (where the 370 Craft Books live, see that post…).

Right on Target

In a recent post, What’s on the Design Wall: Not What Should Be There, I discuss how at a recent quilt retreat, I began impromptu working on the same quilt another retreat attendee was piecing – the pattern Right on Target. I have now completed piecing the top and now I am deciding whether to use it as a quilt or as a quilted tablecloth. I am going to quilt it myself (just a simple “stitch in the ditch” or “stitch outside the ditch”). I am happy it did not become an UFO (unfinished object) – this can happen to random projects you start on an impromptu basis at a quilt retreat!

Studio

Paper Wrangling: Organizing my clipped patterns

In my post Craft Book Hoarder I mention my discovery that I now have 370+ craft books. If I have that many craft books, you might suspect I have a lot of crafting magazines.

I used to have a ridiculous amount of crafting magazines, especially quilting magazines. I had a subscription to 4-5 quilt magazine publications (plus the quarterly and annual special publications I would pick up at a quilt shop) and I would hold onto every issue in case there might be a pattern I might want to make someday or a helpful quilting tip. I had the same issue with Beading magazines and even for a while Scrapbooking magazines!

A couple of years ago, over a series of several weeks, I made myself go through every magazine and clip out only the patterns I would actually make and only the tips that I would refer to over and over again. Then I put them in a large binder in sheet protectors.

I was so proud. I thought I had conquered paper clutter.

Then this huge binder sat on the shelf, with all those nice patterns and tips inside, unloved, untouched, unused and gathering dust. I had started downloading free and purchased patterns from the internet and storing them on my laptop. I did cancel all my quilting magazine subscriptions (because seriously, how many new and unique patterns are there to find after a while?) but for any additional magazines that trickled in, I would just scan the pattern I wanted and then donate the magazine to the Humane Society Thrift Shop.

This past weekend I rediscovered the MEGA BINDER of patterns in sheet protectors. It was actually unwieldy to remove from the shelf. I realized I primarily use my laptop for storing patterns now and if I buy a new pattern I like to get it online. I also have a nice folder organization of patterns and quilting tips on my laptop…

IT WAS TIME TO GET RID OF THE PAPER! 

So now a new huge project has commenced: I have removed all the paper patterns from the sheet protectors (donated the mega binder of sheet protectors to my favorite thrift shop for the next organization victim) and I am going to SCAN them all into my laptop and then recycle the paper! Then I can organize all the patterns for quick access..and…maybe actually USE them.

I am a woman with a plan and ready to SCAN!
Studio, What's on the Design Wall

What’s On the Design Wall: Not What Should Be There…

Check out Sassy the highly opinionated miniature schnauzer’s blog on the page Schnauzer Snips for her latest thoughts and adventures. 

This is the last of my series of posts on the 4-day quilting retreat I attended last weekend. In my post Getting Ready to “Retreat” I shared photos of the projects I was bringing to the quilting retreat to work on during the retreat.

So one would expect that they would see on my Design Wall a work in progress (or near completion) that I worked on during the retreat – right?

Nope.

What is on my Design Wall is what should not be on my design wall: a quilt I started at the retreat because someone else was working on it and I liked it! This is how new UFOs (unfinished objects) are born!

My Quilt Sister Barb was working on a pattern called Right on Target by A Quilter’s Dream (2013) at the retreat. It involved taking 2 1/2 inch strips from say a pre-cut jelly roll and making a quilt by essentially making one giant log cabin square-in-a-square block. I happened to have a Hoffman Bali Pop on me (a set of 40 pre-cut 2 1/2 inch coordinated batik fabric strips) which was perfect for this pattern. Next thing you know, I had abandoned what I was working on for the afternoon at the retreat and borrowed her pattern and started making the same quilt!

Of course this only reinforces what I discussed in my post Creative Inspiration: What Others are Working On! I know I am not the only quilter to do this – there is something so engaging when you see a quilt in progress that is very appealing and the pattern is very easy!

What became of the projects that I brought to the retreat? Well the two UFOs in boxes (in the photos in the Getting Ready to “Retreat” post) I did not even touch (I guess I brought them as decoration for my assigned work table). Instead I worked on a log jam project (refer to my numerous posts on Log Jamming), started a new project as mentioned above, went on a quilt store shop hop, ate way too much naughty food, and in general goofed off and visited with quilt friends. My kind of retreat weekend!

Studio, What's on the Design Wall

What’s on the Design Wall: Flannel Shirt Log Jamming

Check out Sassy’s related post on her blog Schnauzer Snips about her time napping in flannel shirt material  Okay, I promise – no more posts about log jamming for a while after this post…maybe. The log jamming continues and now I have a new recruit: If you read the post This is the Story of a Quilting Husband, you read that my husband Terry recently learned to quilt. This past weekend I taught him to log jam (see posts What’s on the Design Wall: “Log Jamming” and “Log Jamming”: The Sequel). On the Design Wall are his first batch of log jamming blocks, made from Flannel Shirt Flannels!*

First set of shirt flannel log jam blocks by Terry, the Quilting Husband

*The shirt flannels were rediscovered during part two of my purge of fabric (see post The Fabric Purge!). This time I worked through my flannels and weeded out those no I no longer needed and rediscovered my tucked away collection of shirt flannels. 

Fabric Scraps Obsession, Studio

“Log Jamming”: The Sequel

This is a followup to my post What’s on the Design Wall: “Log Jamming” :

Last Tuesday evening I took the Log Jam Class at the Stitchin’ Post quilt shop, this time with the actual instructor, Jackie. Jackie is the Queen of the Log Jam (and a wonderful and fun instructor) and I picked up a couple tips I missed when my friends and I made our own class up earlier this year (when our instructor had to cancel so my friends taught me how to “log jam” as discussed in the post What’s on the Design Wall: “Log Jamming” ).

Taking the class again (well taking it for real with the official instructor), got me even more addicted to log jamming. I also learned that the log jamming technique is based on an old African sewing process. I thought it was something the quilt shop had developed, I did not realize it had so much history. Log jamming is such a great way to work through your fabric scrap collection!

So far I have completed 56 – 6 1/2 inch log jam blocks and I have another 30 some in progress. Not sure when I am going to stop working on the blocks and make them into something. Maybe I will just create a huge pile of log jam blocks enough for a couple King-size quilts. But, alas, that will still not put a dent in my fabric scrap collection

Below is a photo of the basket of coordinating scraps I use while log jamming and my current stack of blocks. My plan is to keep  log jamming with this palette until I exhaust this palette of scraps (or I become exhausted from using the same palette!)

IMG_0378
Basket of scraps for log jamming and stack of completed blocks
Books, Music, Podcasts, My Minimalism Journey, Studio

The Fabric Purge!

Before I talk about my FABRIC PURGE, I wanted to give a little follow up on my Addicted to Audiobooks post:

I had mentioned in the post that one of the disadvantages of free audiobooks from your local library is a short loan period (14 days for example). Recently I discovered that my library allows up to a 21 day audiobook loan period but you have to set up your account that way! I guess when I first set up my digital book account with my library originally I accidentally selected the 14 day hold as my default. I wish I knew this earlier as recently I was in the middle of enjoying Beyond Willpower by Alexander Loyd and my loan expired! The audiobook has other library patron holds on it so I have to wait patiently until my turn comes around again. Ultimately it is my fault for alternating between three audiobooks at once time – 21 day loans will make it even easier (maybe I can alternate between four or five audiobooks…just kidding!)

FABRIC PURGE!

Sometimes you have to let go of clutter to make space for your creativity. I had collected an unwieldy amount of fabric in my 15+ years of being a quilter. My fabric collection (aka “Stash”) includes purchased new fabric, purchased (from thrift shops and garage sales) used fabric, recycled fabrics (old jeans, manufacturing remnants), and fabric given to my by quilting friends.  When I say “fabric” I mean anything from a 1/4 yard to several yards of fabric, not scraps. We won’t talk about my scrap collection at this point…

I had organized all my quilting cotton, non flannel fabrics either by color, by type (Batiks) or by collection in an old IKEA bookcase cabinet. This cabinet was REALLY STUFFED. It was so stuffed that I could not find smaller pieces that have somehow “melted” into the larger pieces. It was time to reevaluate what I really loved and needed in my collection and to let go of that which I do not really love or really need. I had taken Monday and Tuesday off from work for a little “staycation” so I had no excuse not to begin the PURGE!

The purge was kind of painful and tedious. I do not want to discourage anyone from evaluating their clutter and purging, I just want to be honest. I removed all the fabric from the bookcase cabinet and it transformed into a scary mess on the floor. In the spirit of honesty and full disclosure – I did at one point sit on the floor crying and exclaim: “Why do I have this much fabric? I do not need all this!” I had to keep self-coaching to get through the project, reminding myself how wonderful it will be to quickly find the fabric I am looking for and to get rid of what I will never use.

It took two days of sorting through fabric and refolding fabric to complete the project (by the way, I did take many breaks of course and did other things on my “staycation”). I found on Pinterest this wonderful link to instructions on how to uniformly fold your fabric using a ruler so that your fabric will stack easily together: How to Tuesday: Ruler Folding  (from a lovely blog – Create Kids Couture). I organized most of the fabric by color (this time I integrated the Batiks) and some by special collection (one shelf). I purged a giant bag of fabric to give my local quilting friends (oh no I am just adding to their stash so they have to purge someday!)

The fabric purge was worth it, despite some brief emotional distress. I feel like I have made room for my creativity by eliminating clutter!

BEFORE THE PURGE

IMG_0324.2015-04-26_195115

AFTER THE PURGE

IMG_0328.2015-04-27_194415

Studio

A “Charming Quilt”

In my posts What’s on the Design Wall: Rediscovering My “Charms” and What’s on the Design Wall: Pre-cuts Wrangling, I discuss trying to use up my out of control collection of pre-cuts such as charm squares (5 inch pre-cut coordinated squares).

Update: I continue to work through my pre-cuts collection, actually MAKING QUILTS out of them instead of using them to just decorate my studio!

Below is a quilt, “Charming You”, that I created from two packages of charm squares (40-42 squares per package) Moda fabrics.  This quilt measures 45″ x 61″ and has a cozy flannel backing. I just got it back from the long-arm quilter and it is ready to put on the Etsy shop!