Finishing out my little series of posts on a recent trip to North Carolina when I joined my partner John on a business trip to Wilmington, NC. Here are the previous two posts in the series:
I’ve never visited Raleigh, North Carolina before, so we flew into Raleigh and spent an evening and 1/2 a day there before driving our rental car to Wilmington, NC. The two major airports to fly into when going to Wilmington are either Myrtle Beach or Raleigh.
We got a great deal on a hotel near Raleigh downtown and then randomly decided where to go eat (and later what to do after eating) in downtown.
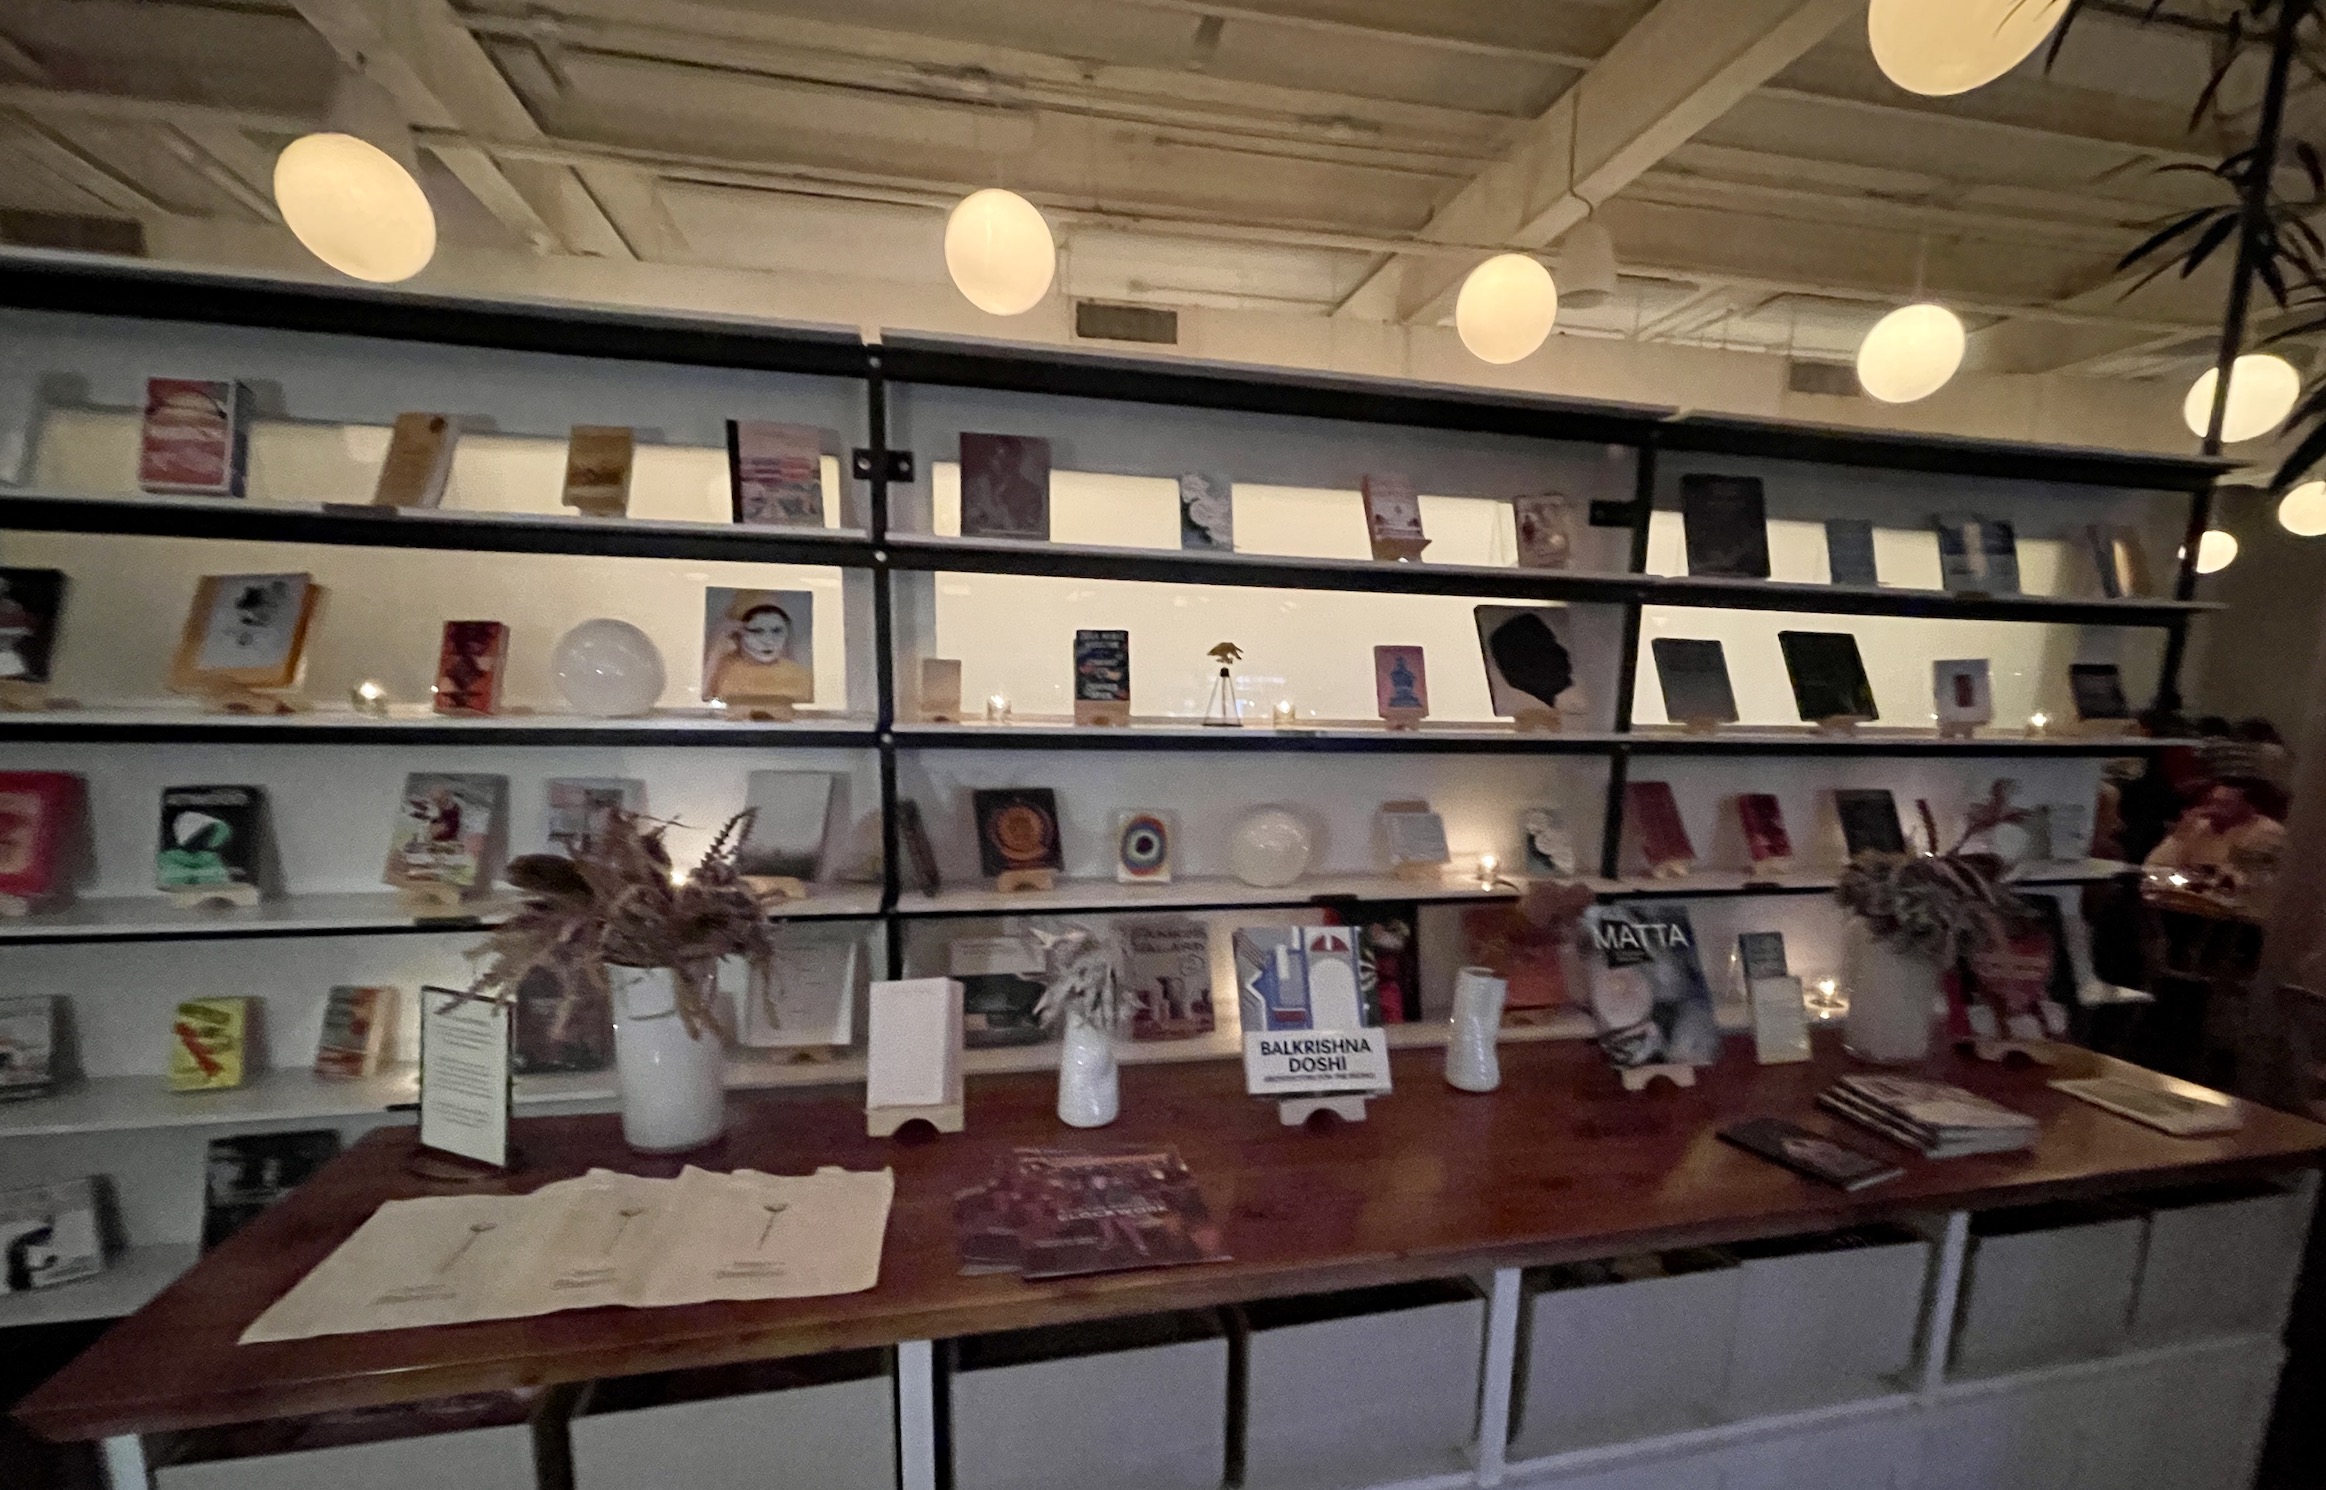
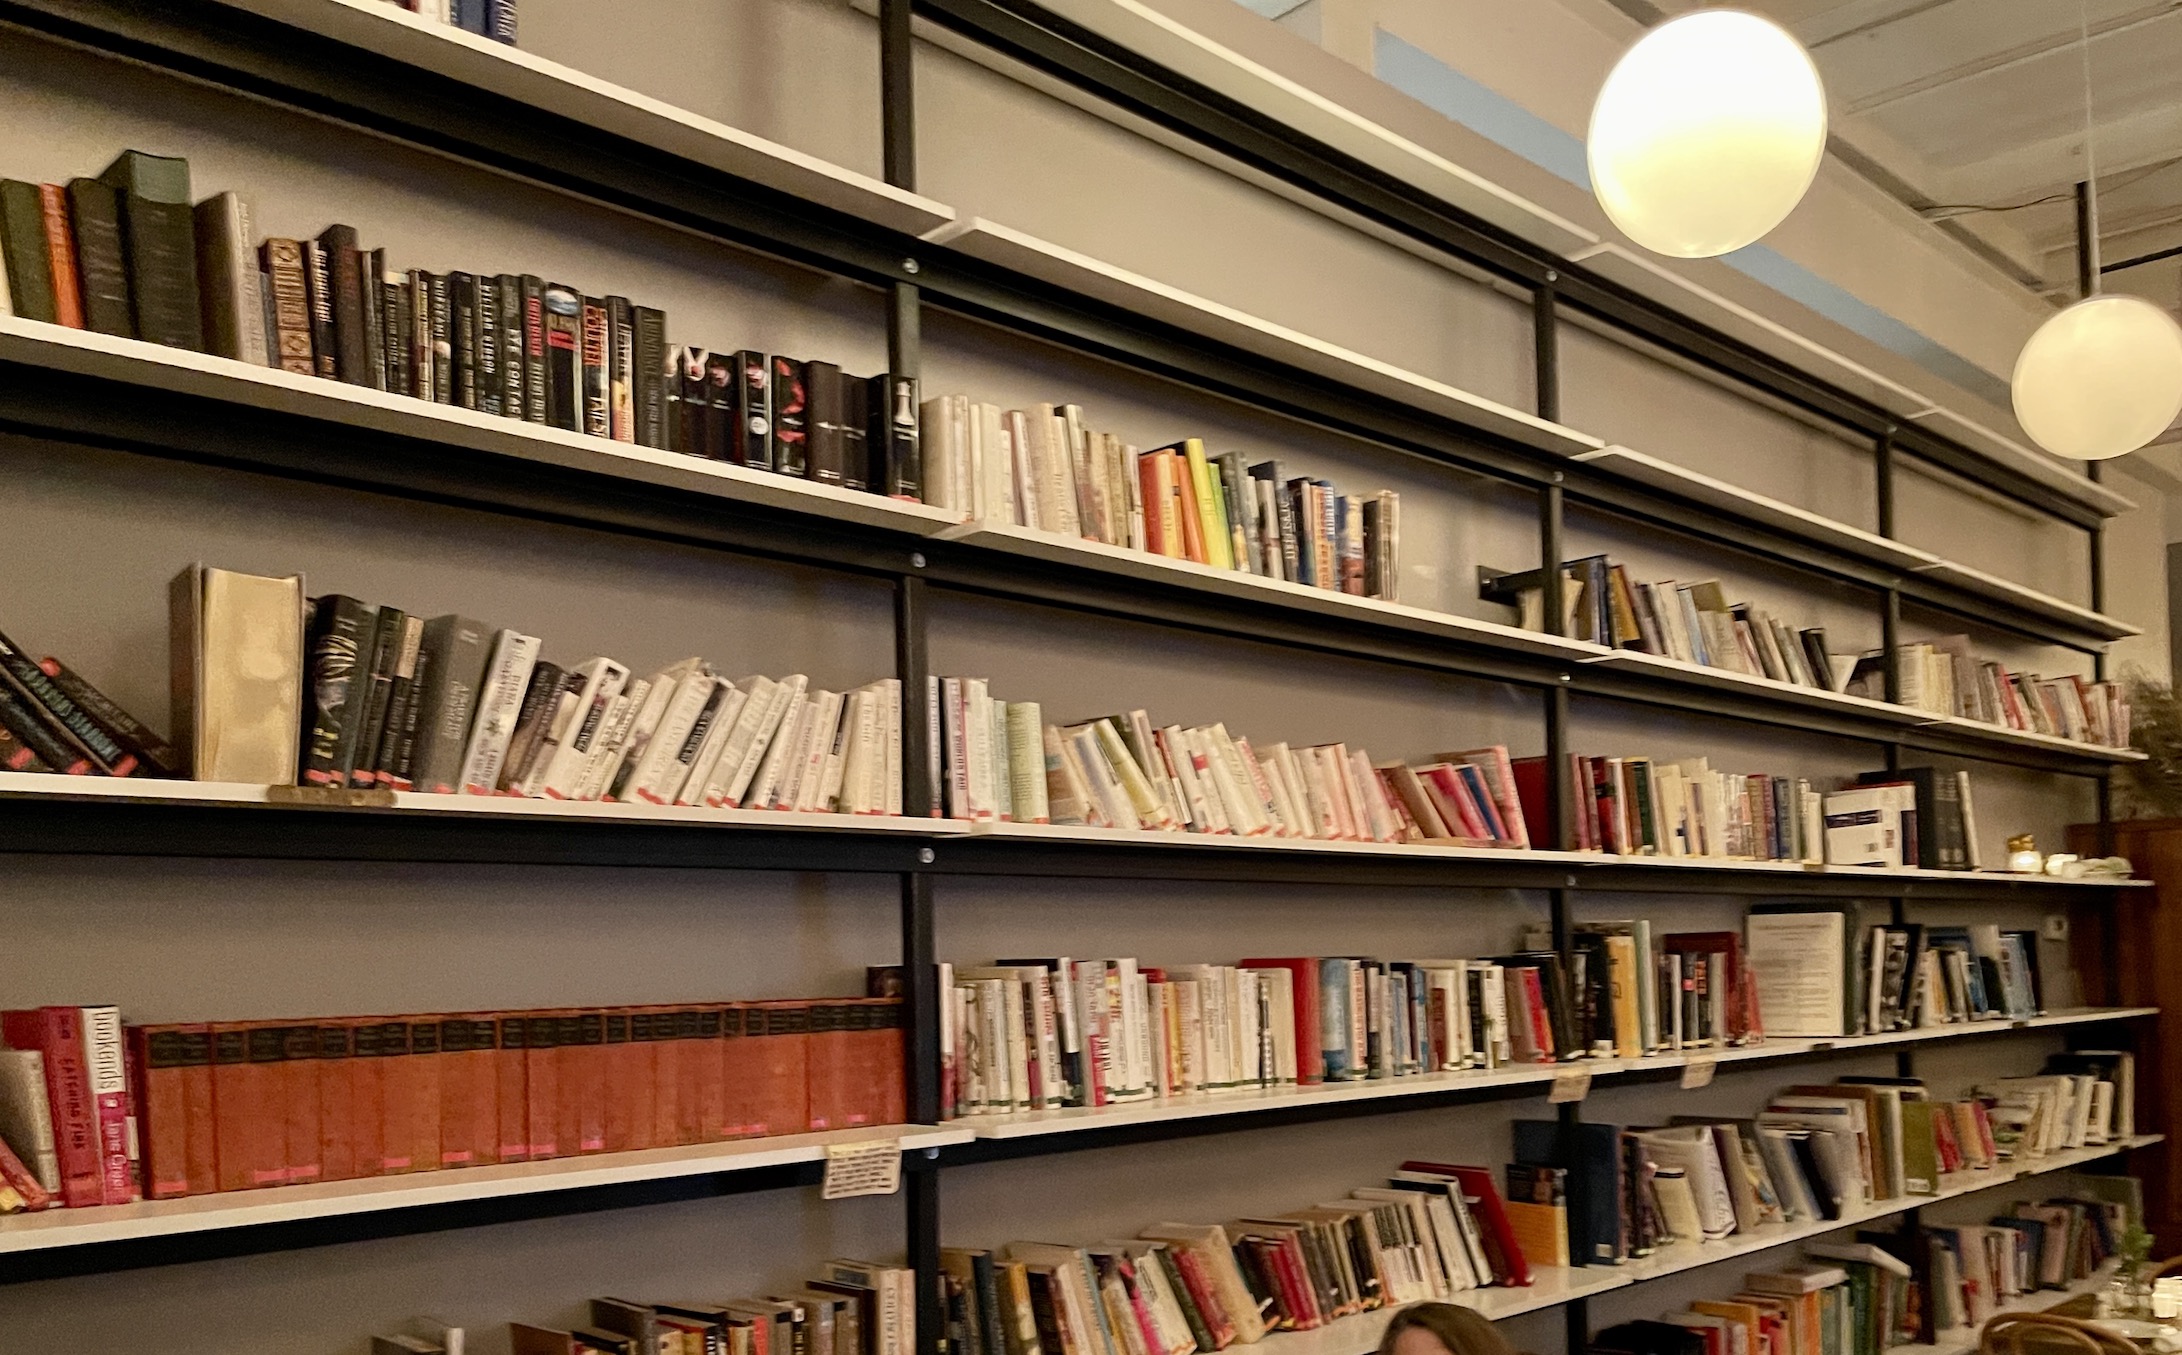
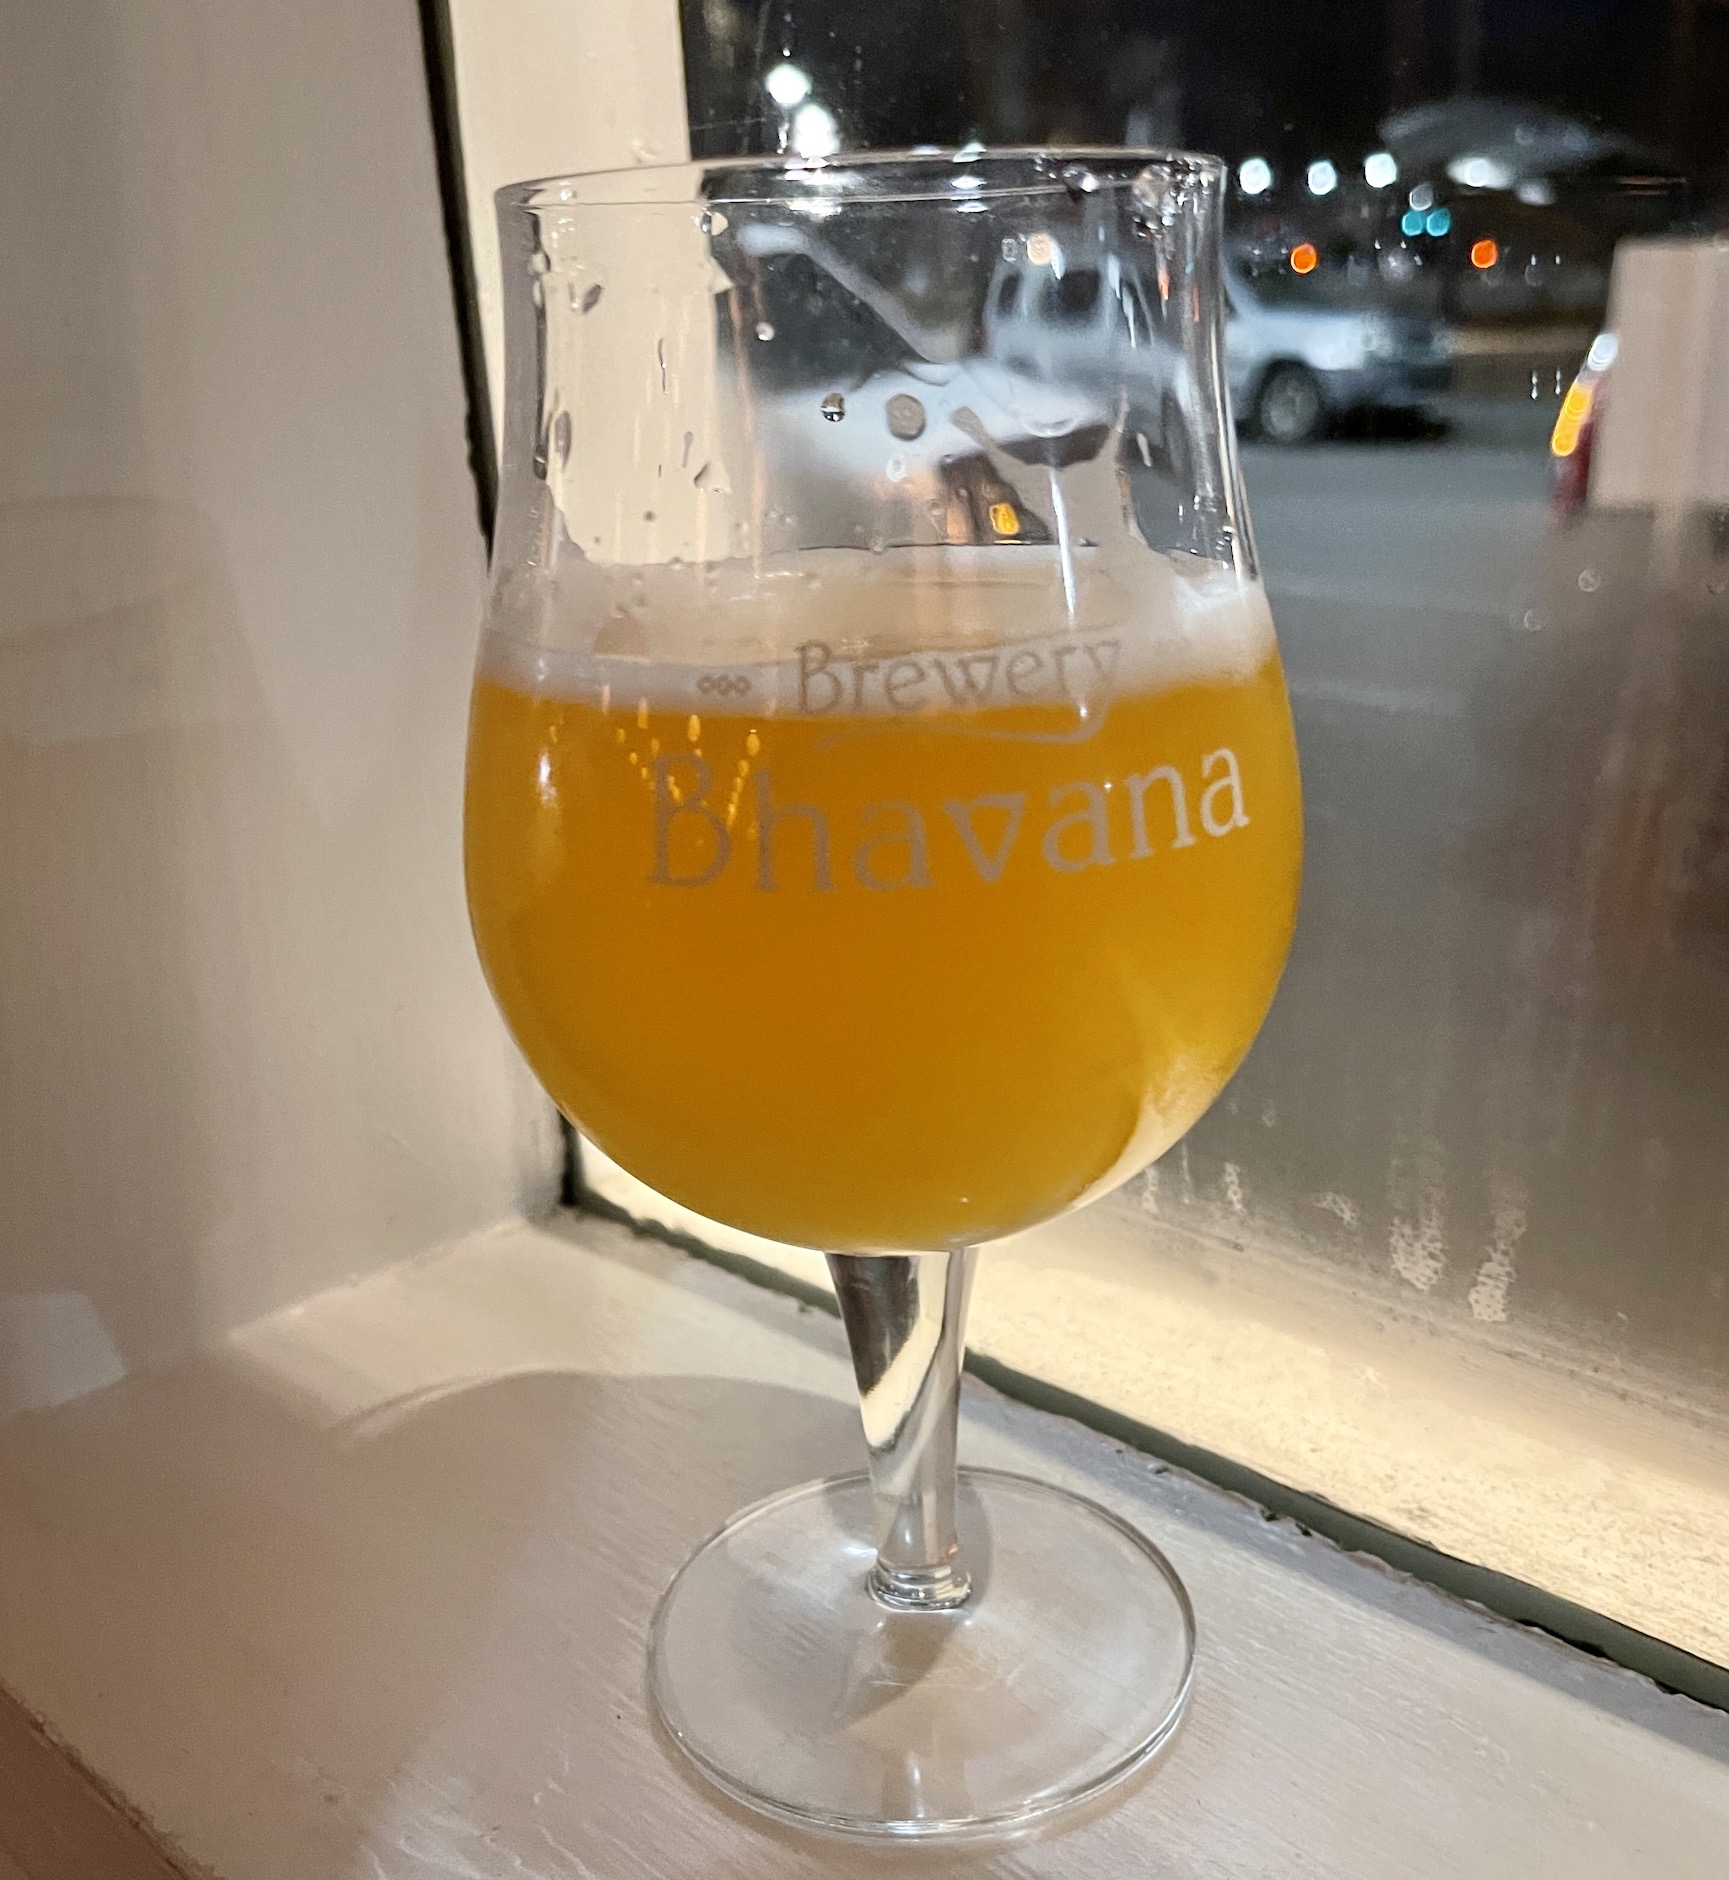
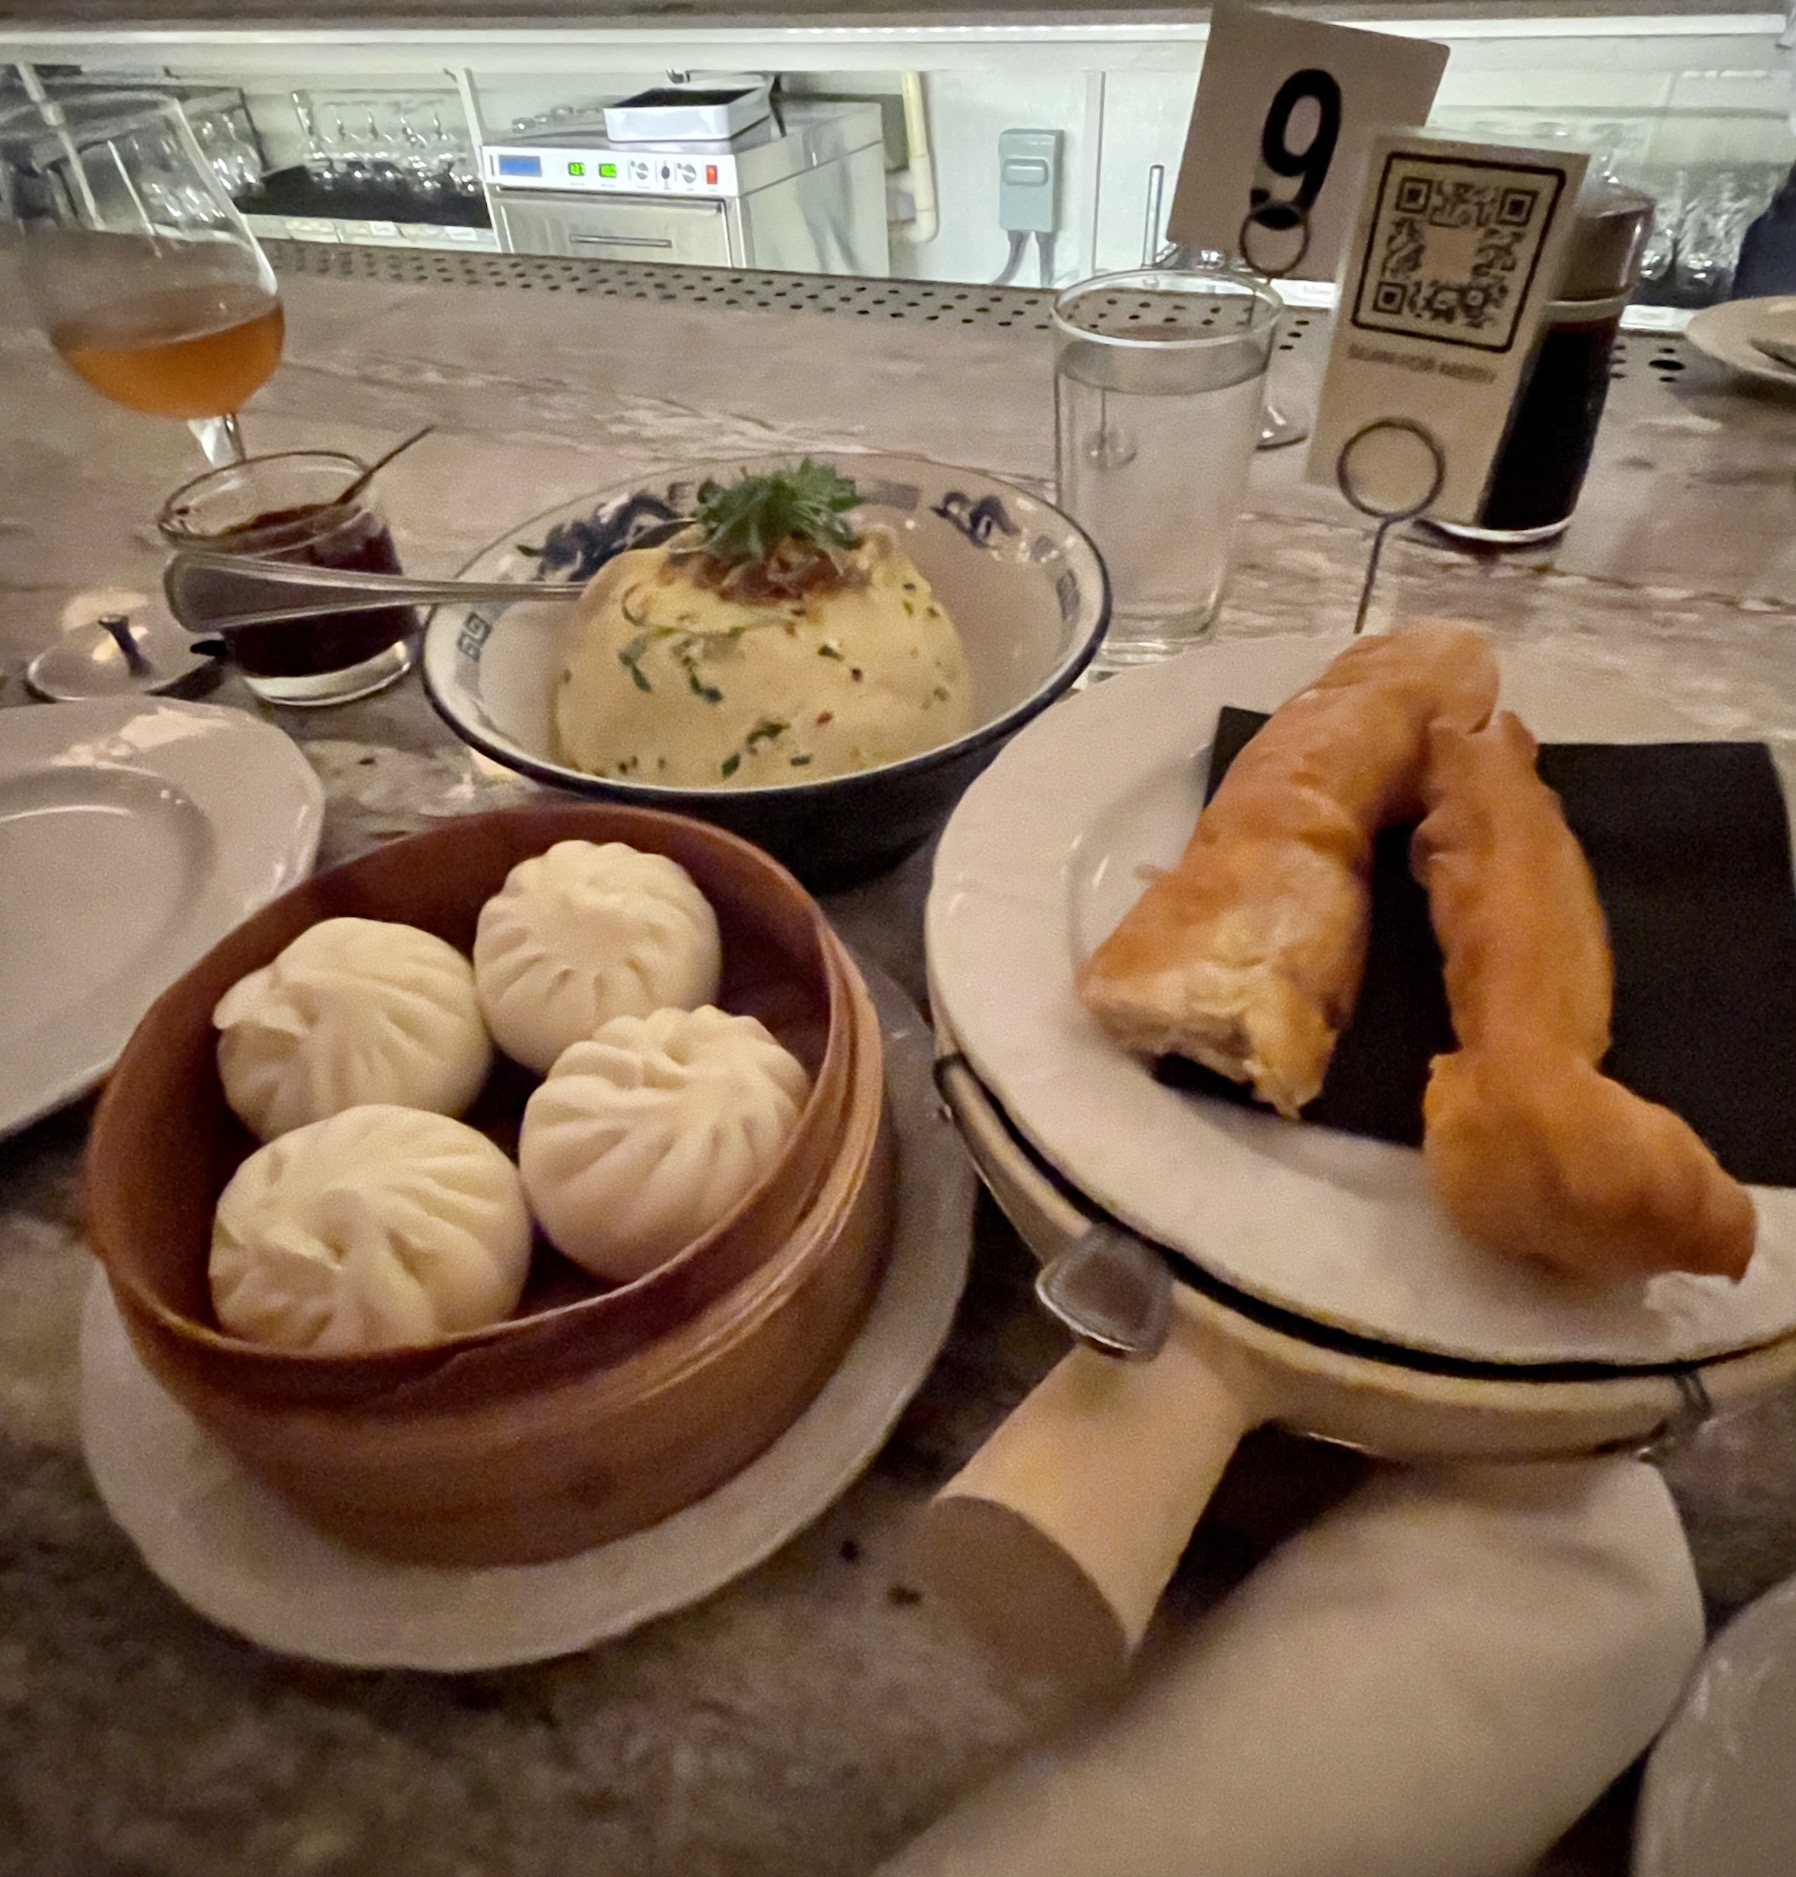
I was in the mood for Dim Sum and we found online a restaurant that is both a brewery (we both love a good craft beer) and specializes in Dim Sum – Brewery Bhavana!
As an added bonus, it also had a bookstore next to and inside the dining area, so I got to browse books while we waited for a seat at the bar for our amazing meal!
Here are photos from our experience there.
Books, craft beer, and Dim Sum – YES PLEASE!
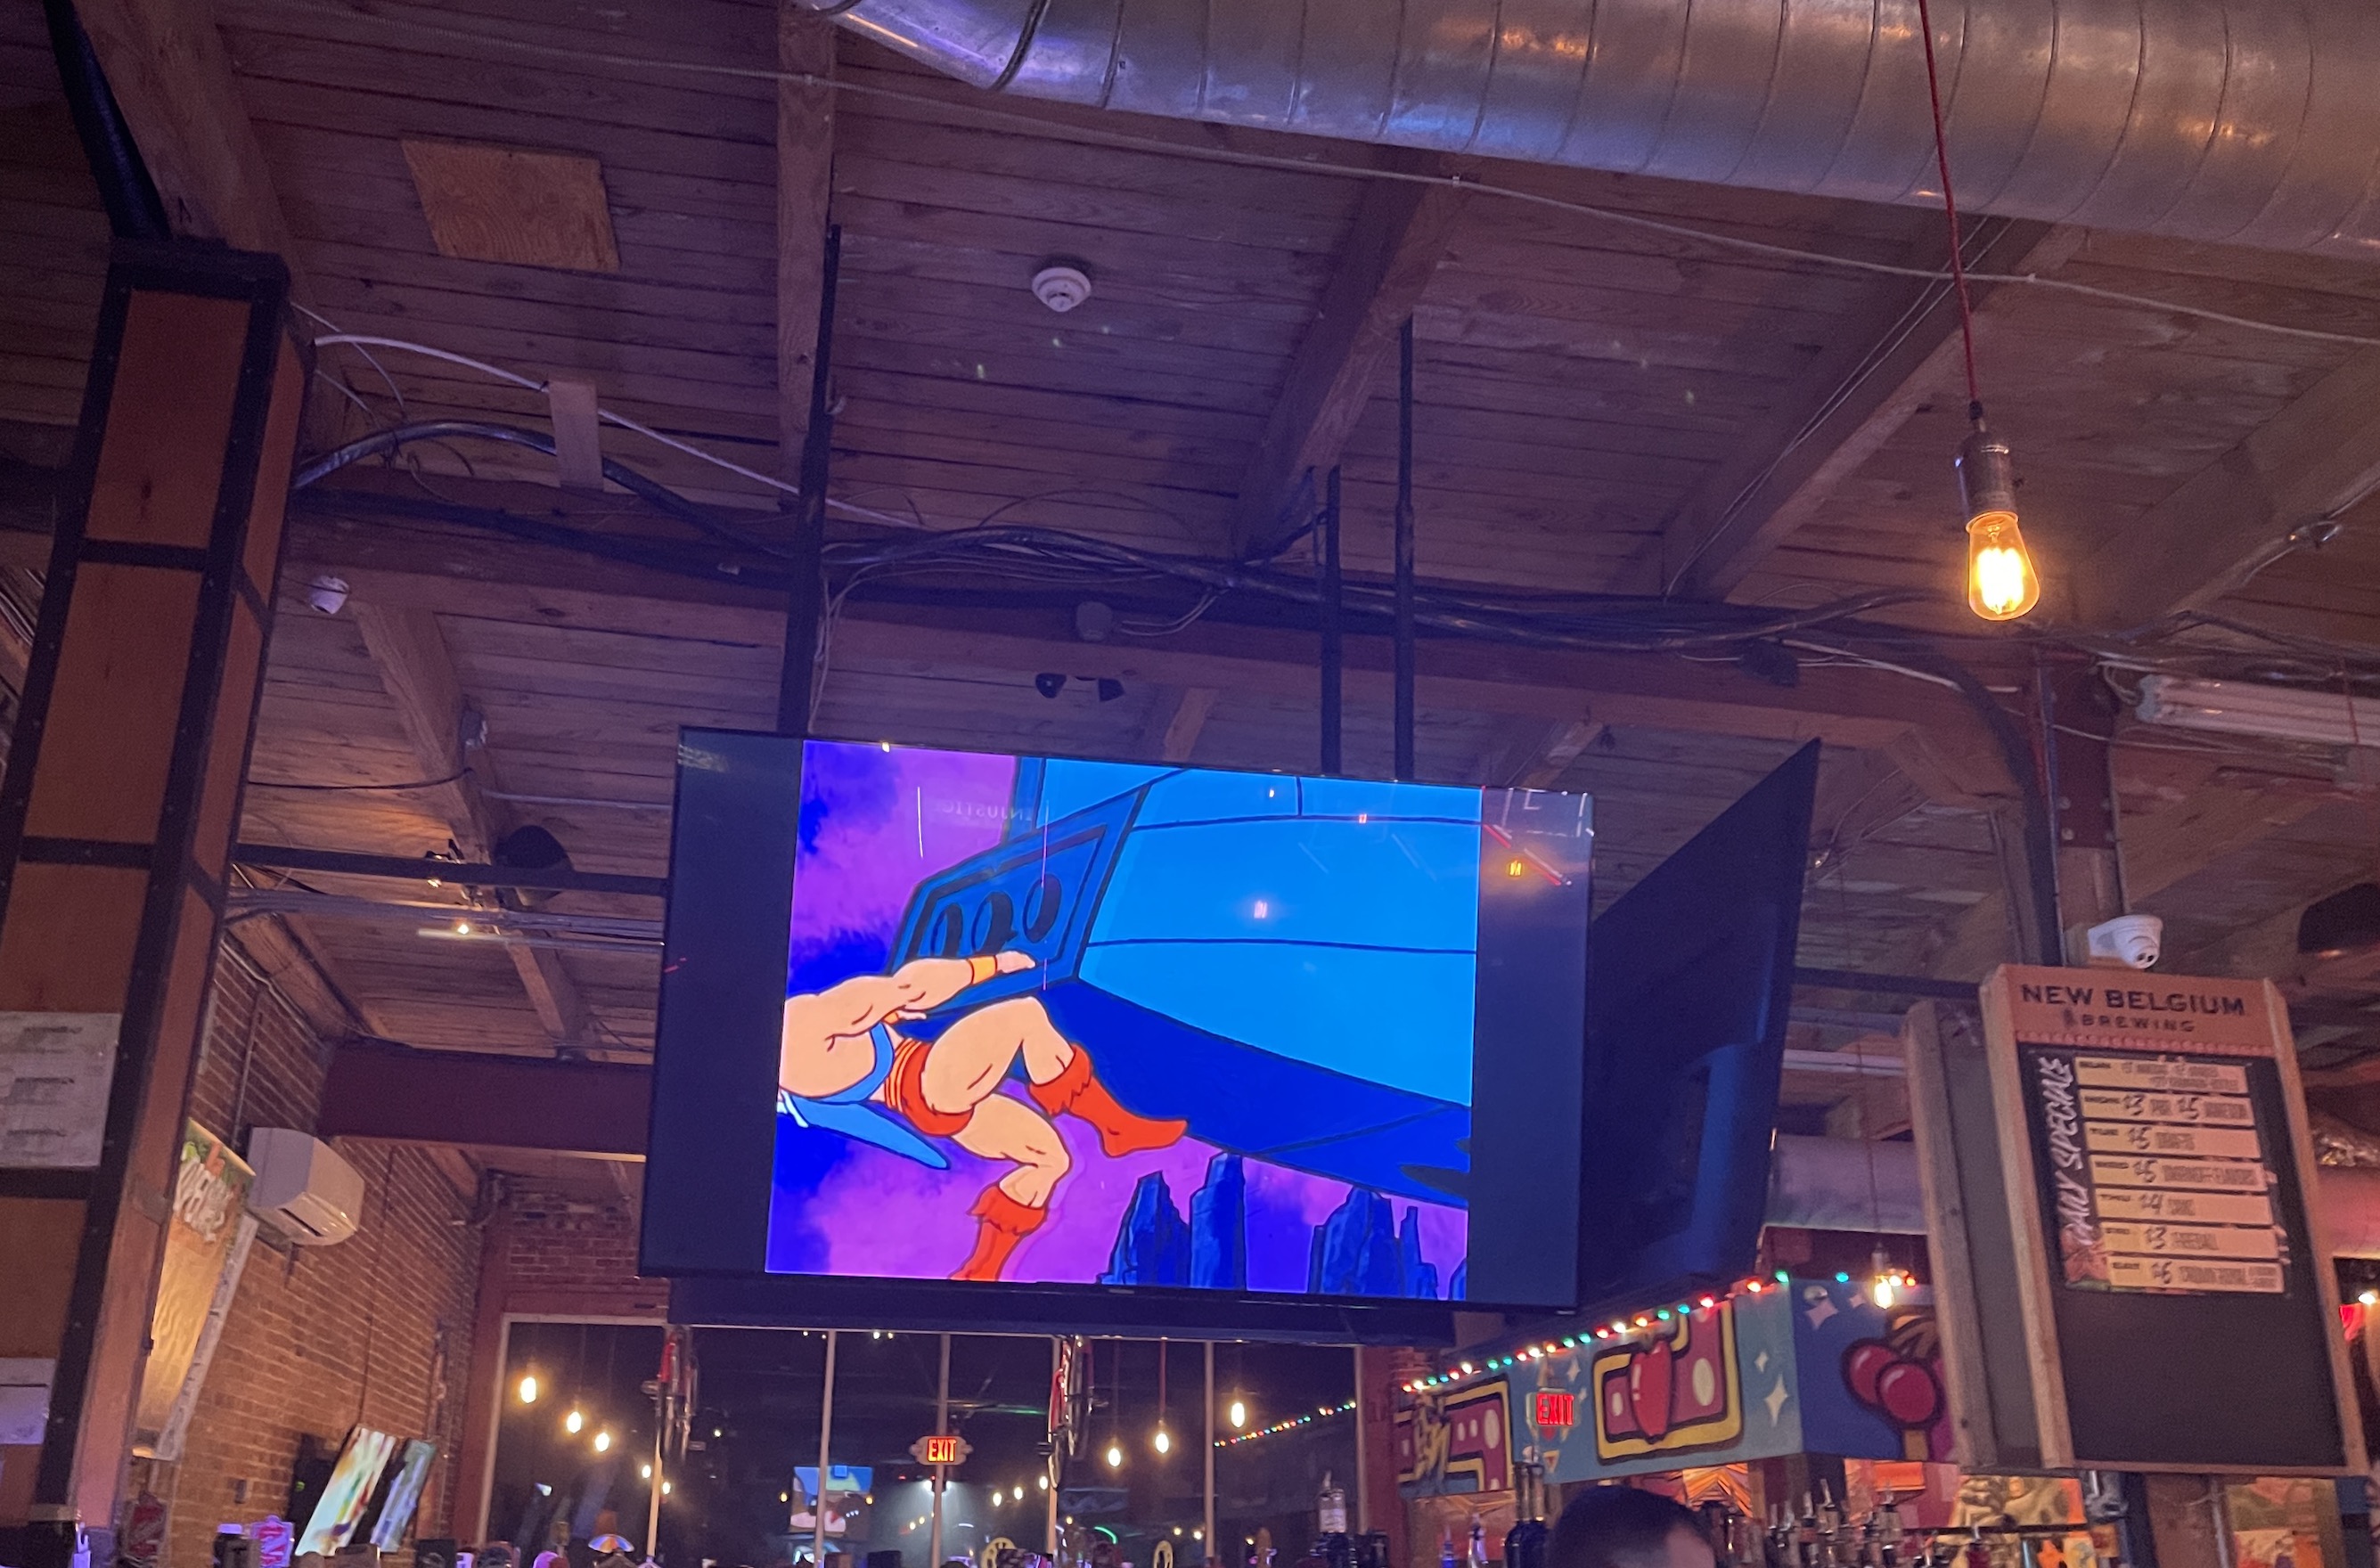
After a wonderful meal (and exceptional friendly service), we randomly decided to check out a place called – the Boxcar Bar + Arcade in downtown Raleigh. Yes, it was exactly what the name says – a bar and an arcade!
It was an arcade for adults (you had to be 21 to enter, which is legal drinking age in North Carolina). It was filled with vintage (and some newer) arcade games to include Pacman, Centipede, Donkey Kong, Galaga, air hockey, skee ball, and lots of pinball machines!
We got a roll of tokens for the arcade games and proceeded to lose track of time and play for several hours. We had so much fun! The vintage arcade games like Pacman we only 25 cents just like when I was a teen.
John was much better at the games than I was but I had an awesome time (even if I was absolutely terrible at pinball).
One of the very cool things is that the bar had TV screens in which they played vintage cartoons from the 1980s and 1990s including the one my brother was addicted to growing up: He–Man and the Masters of the Universe.
Watching it for a while at the bar reminded me of my younger brother being glued to the TV screen while that animated show played; and him wanting all the action figures!
Here are some photos from our time at the arcade bar (they are dark because it was rather dark in the bar-arcade).
What an evening! I look forward to flying into Raleigh again on our next trip to Wilmington, NC for John’s job and exploring more of Raleigh!
Next post I will finish up sharing more about our North Carolina trip, but I thought I would share that I am currently preparing for an upcoming quilt retreat with my long time quilt friends from California, Washington, and now NE England and South Carolina.
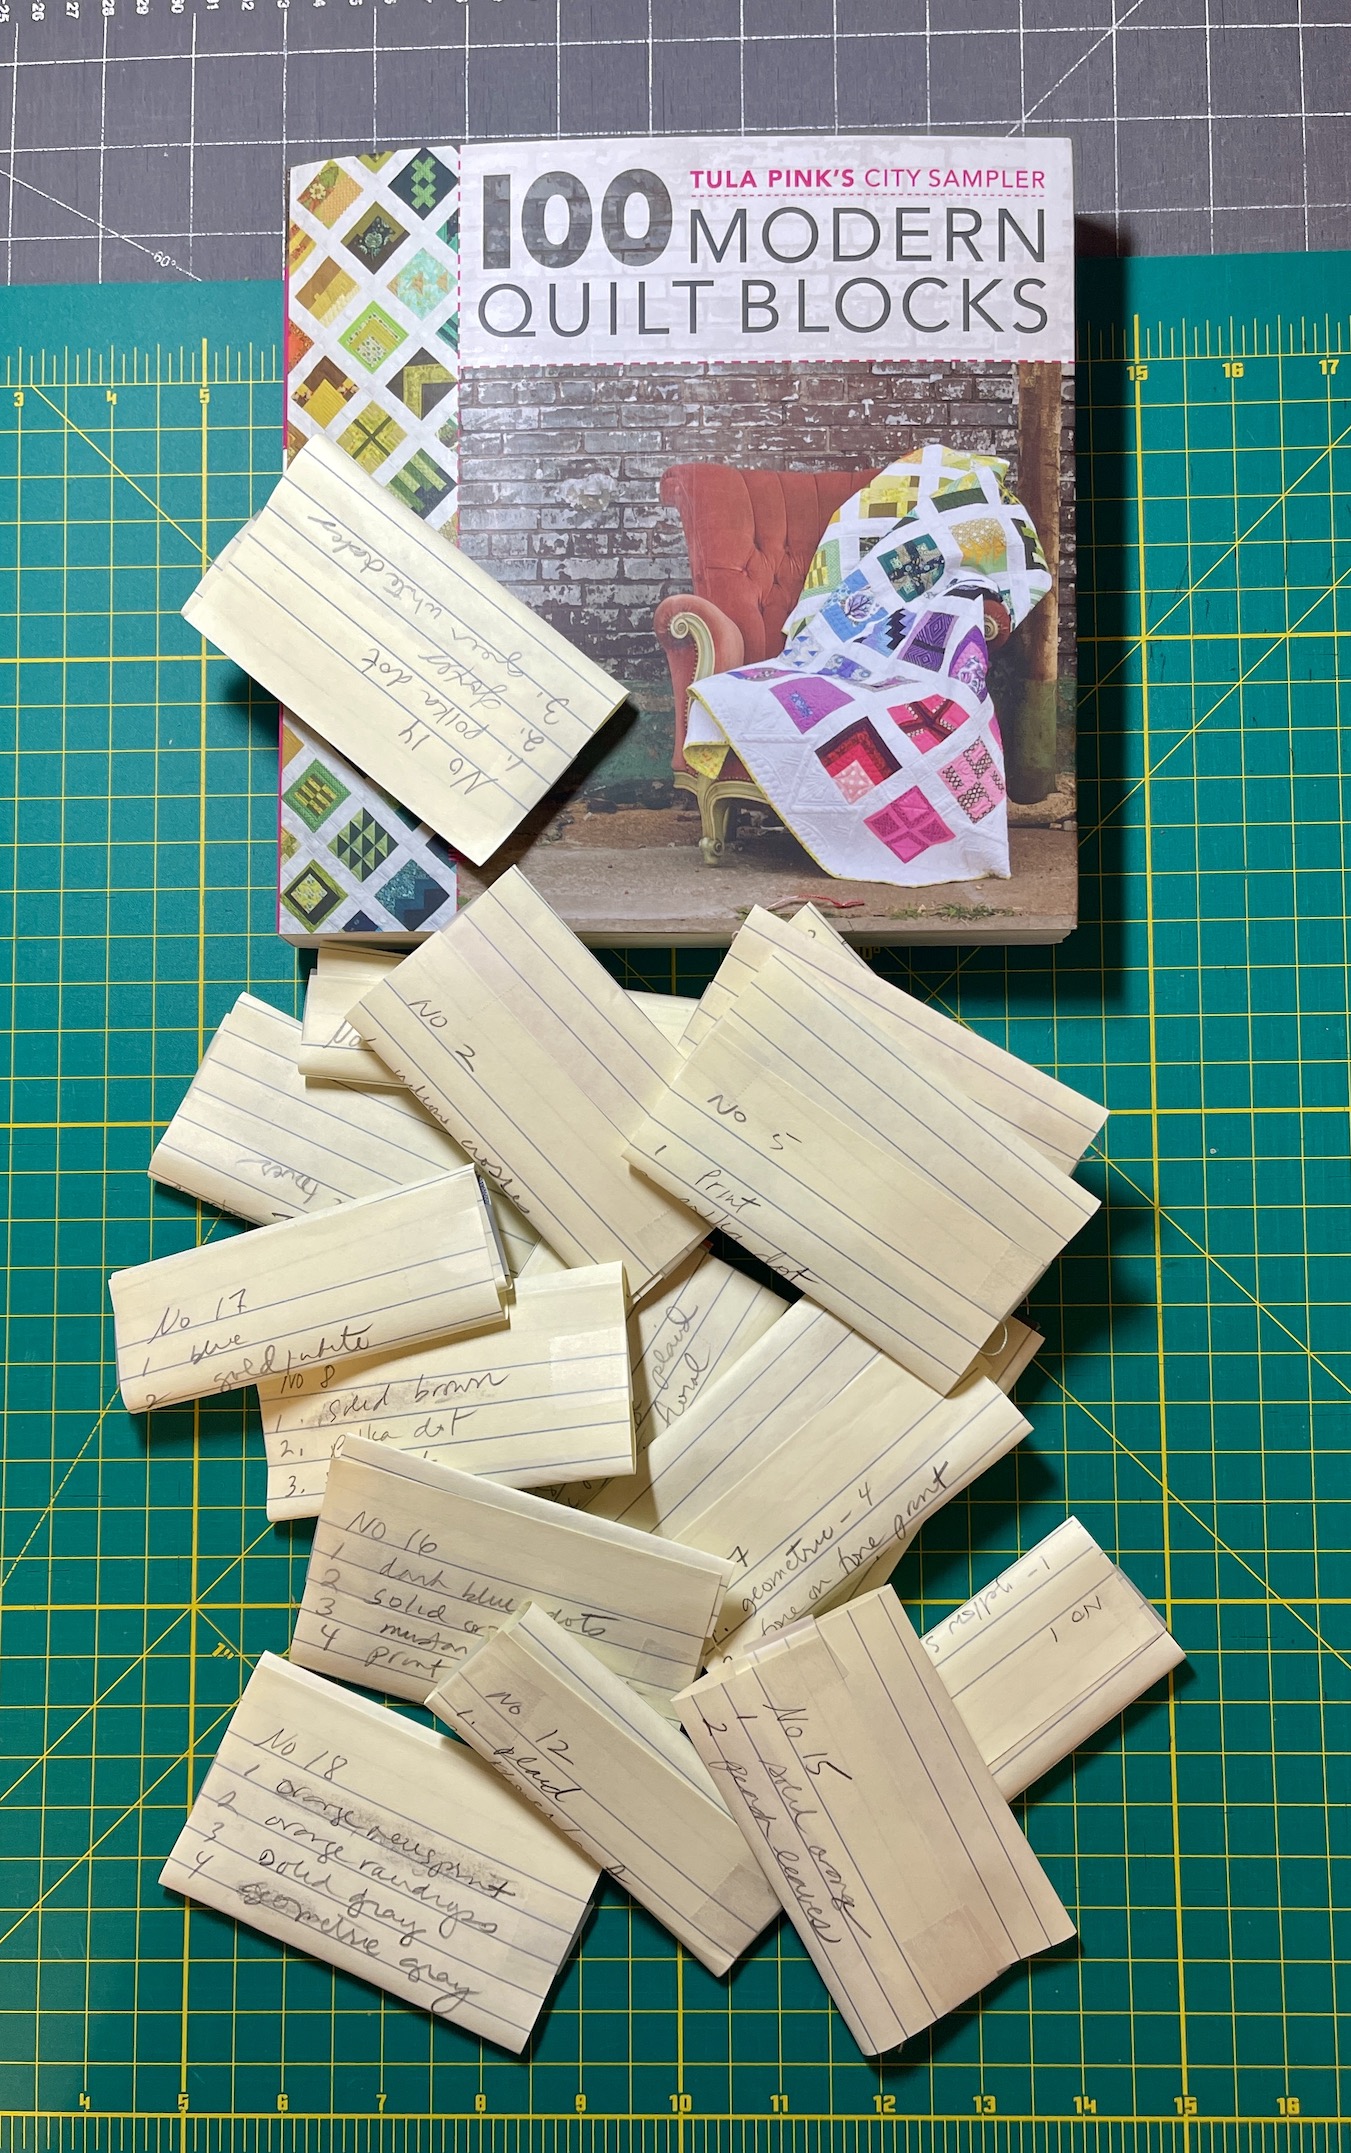
I decided to be very prepared for the quilt retreat and pre-cut a project so I can have more time to just relax and sew and visit with my quilting friends.
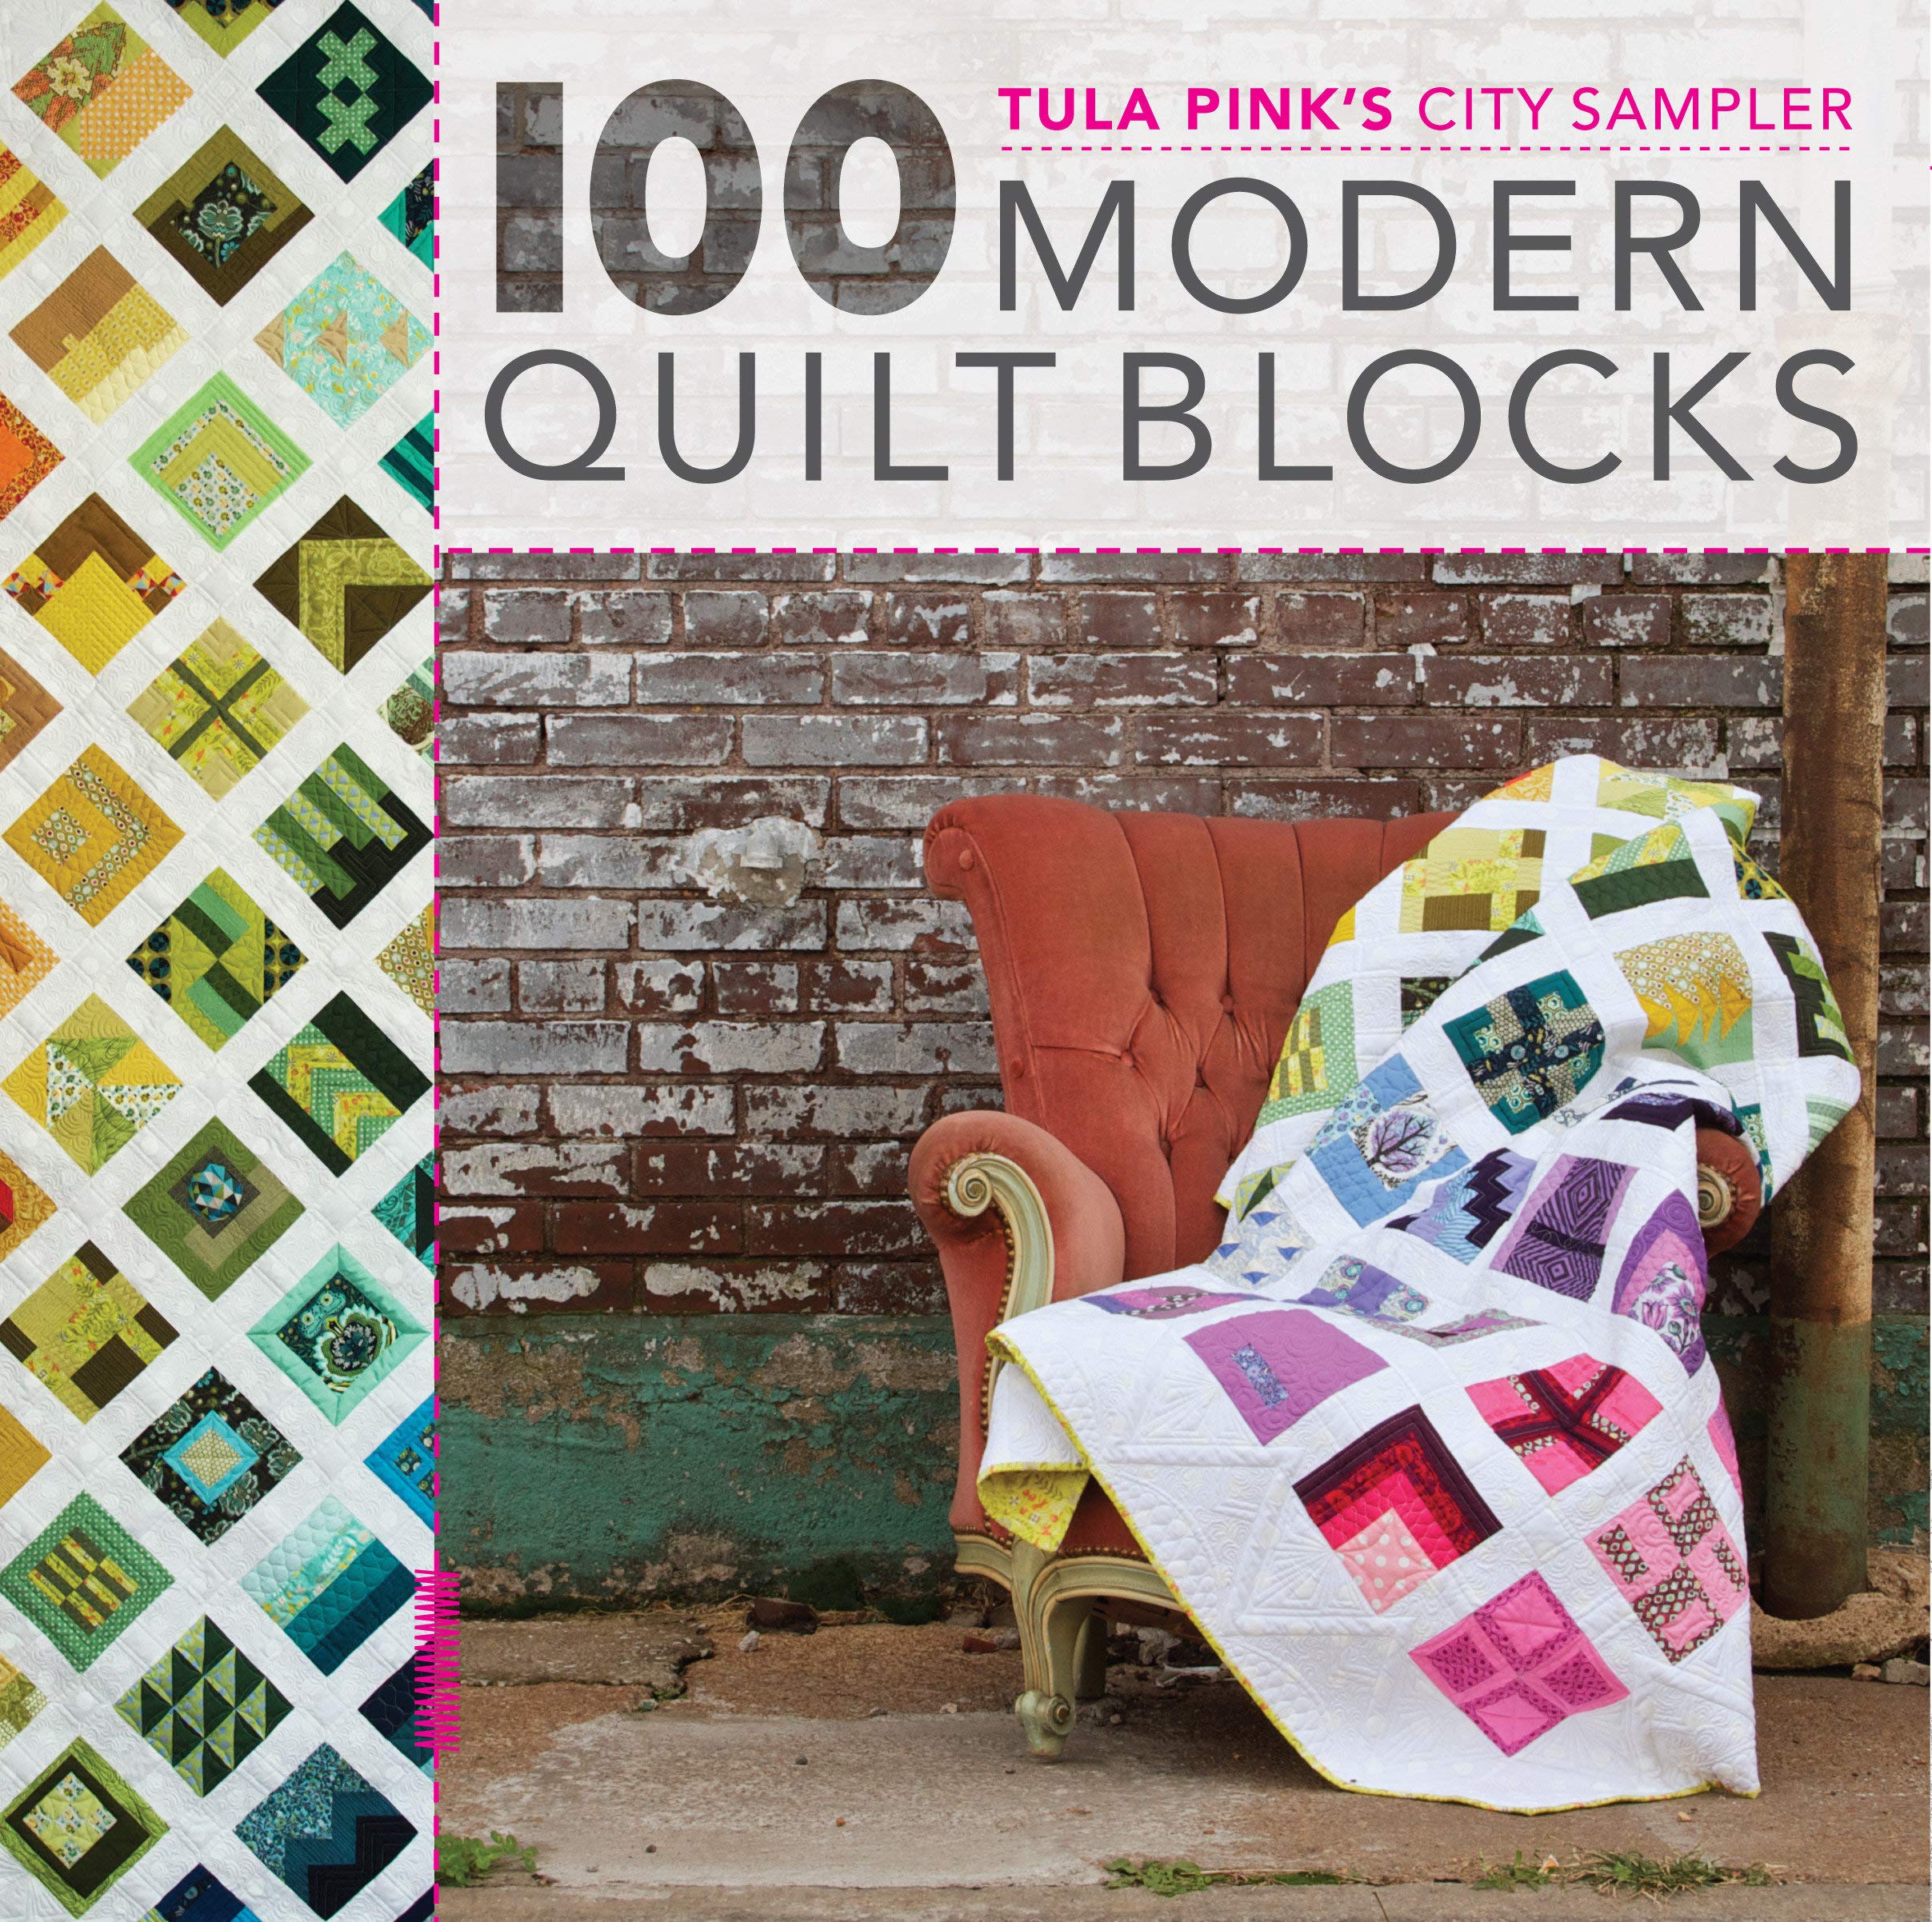
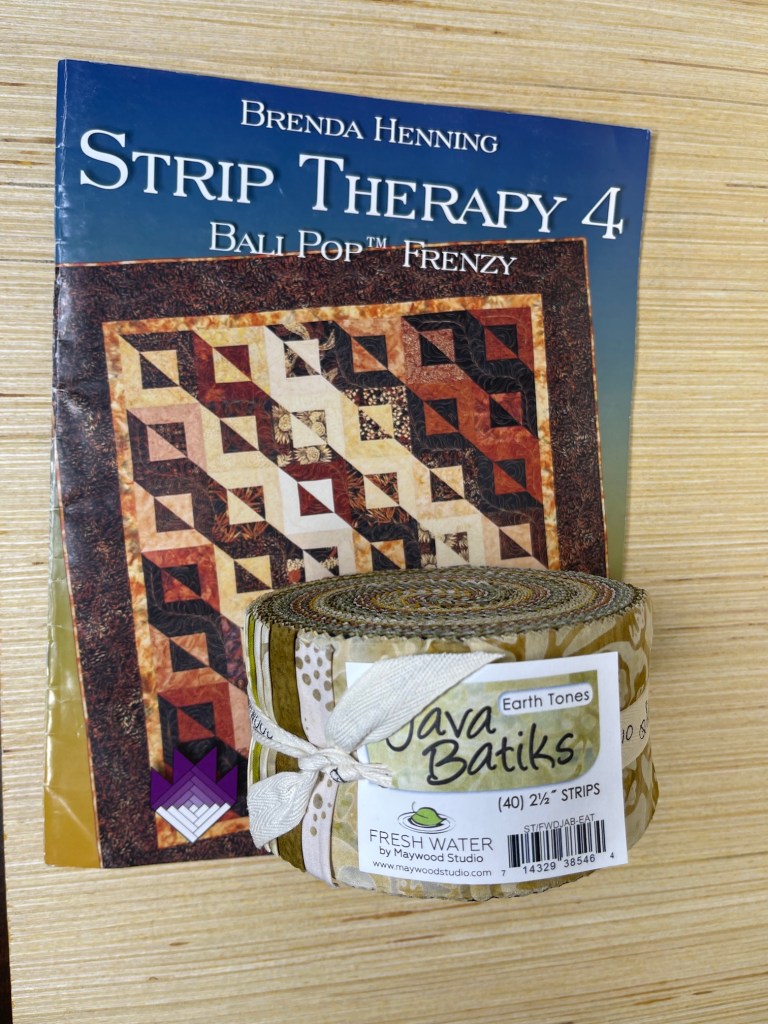
I’ve decided to work on making the Tula Pink’s City Sampler 100 Modern Quilt Blocks quilt. I’ve had the book on Kindle for years and I also found a copy at a thrift store.
image credit: amazon.com
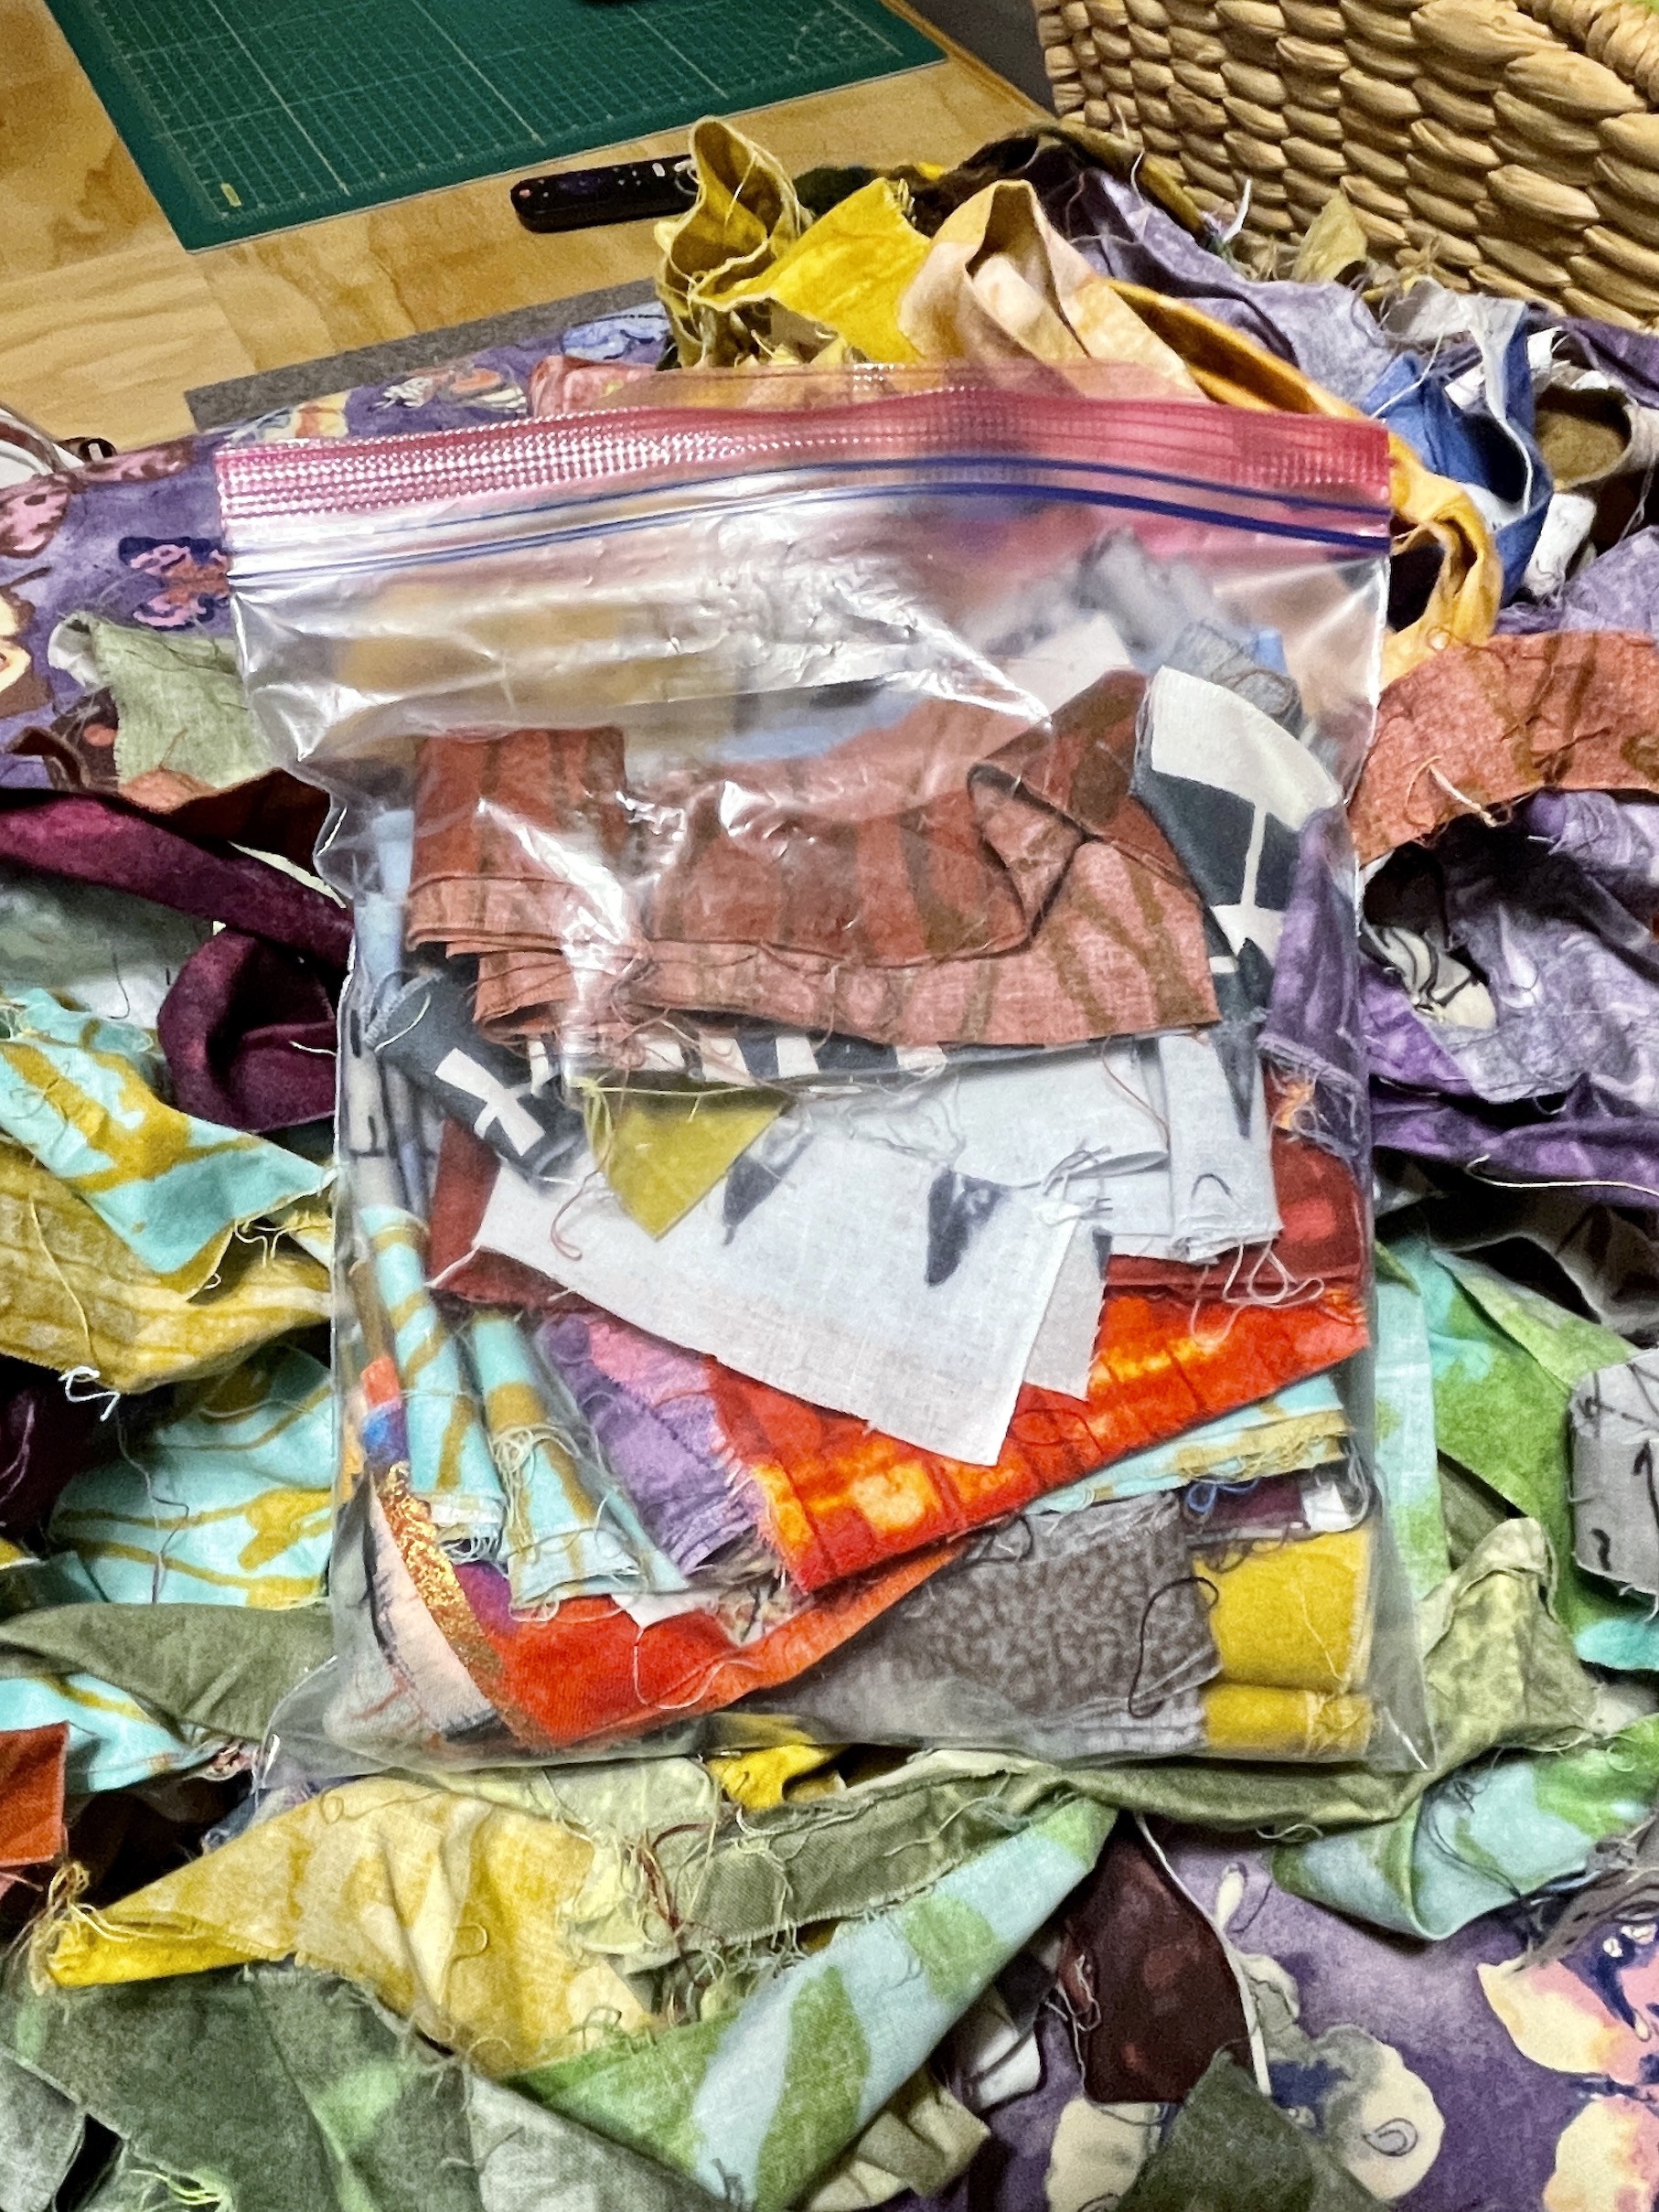
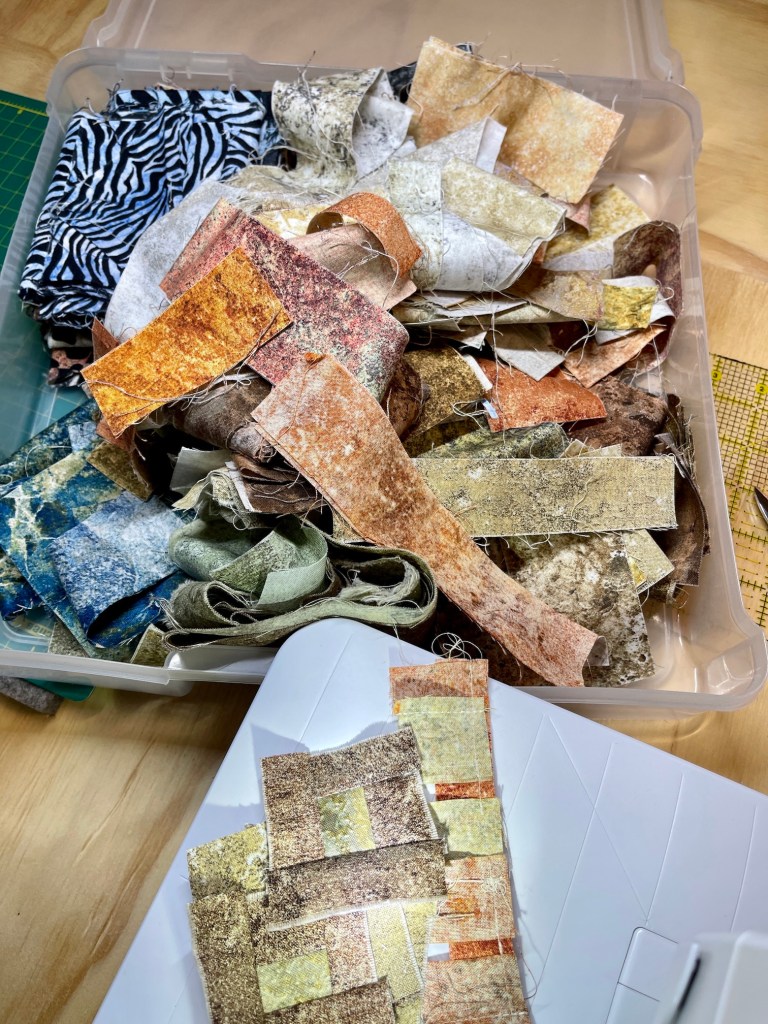
The blocks are all 6.5 inches by 6.5 inches. Over the past couples days I’ve cut out 18 of the 100 blocks. I think I am going to cut out about 25 blocks to work on for the week long quilt retreat, that should keep me busy!
I organized the cut pieces for each block into little packets:
I had a lot of fun digging through this box of scraps and putting together the fabrics for each block.
I can’t wait to open each packet I’ve made at the quilt retreat (one at a time of course) and work on the blocks!
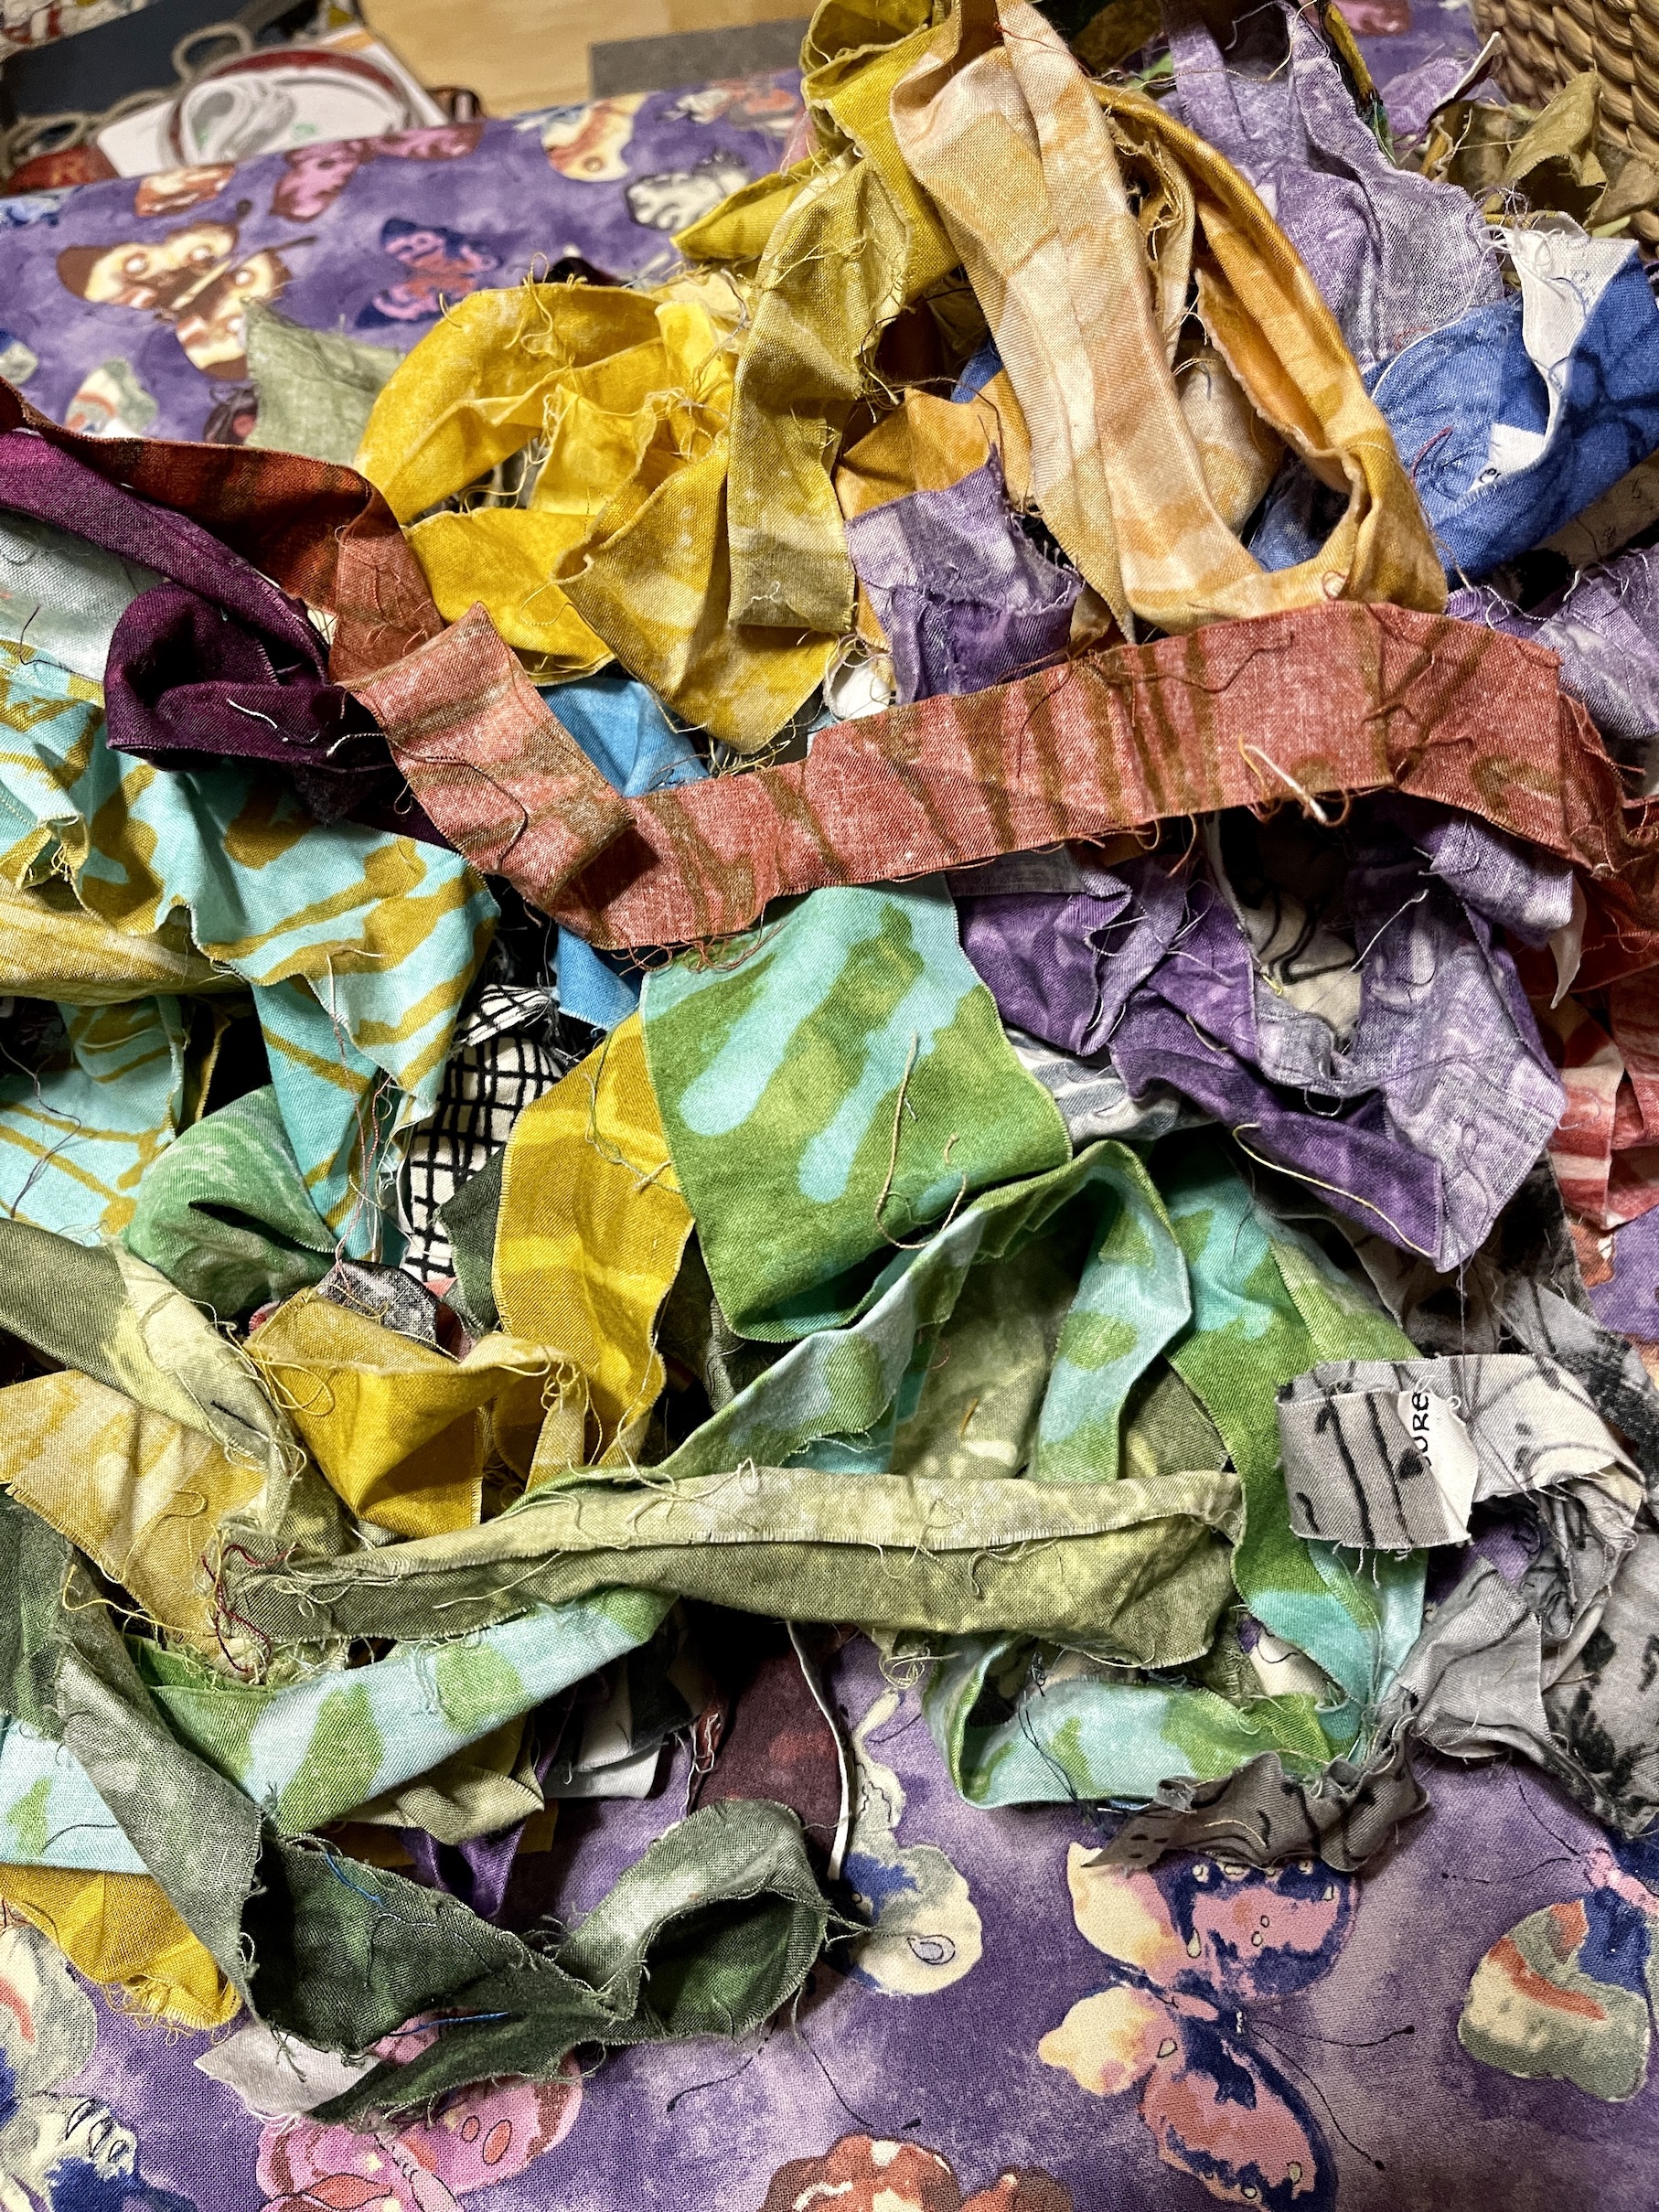
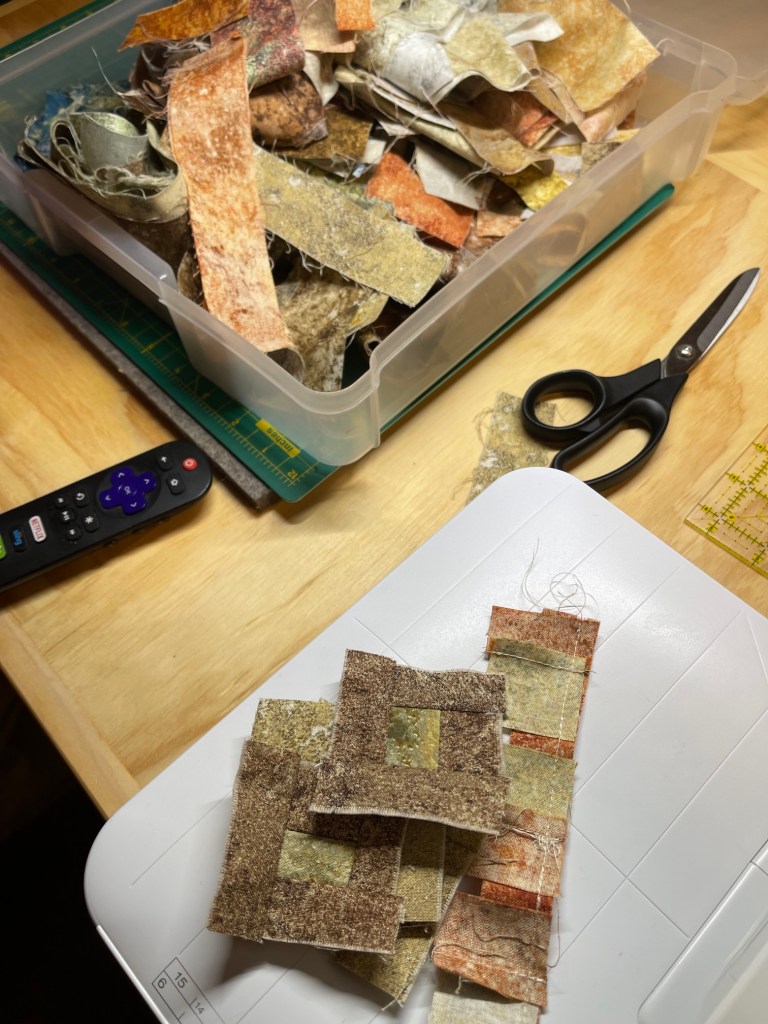
I have one other project for the retreat that I’ve prepared so far. I have a collection of Marcia Derse fabric scrap strips.
I love her fabric designs, and if you check out this post you will see how I got all “fan girl” on her when I met her in person a couple years ago at a Sewing Festival – Fabric Fangirl Frenzy.
Some of the scrap strips are fairly thin (under 2 inches, some are an inch) and besides a “string quilt” I was trying to decide what to do with them.
Well I came across a method of piecing small strips/small scraps of fabric using adding machine tape as a foundation while watching quilting videos on YouTube:
So I bought a couple rolls of adding machine tape for $1 at a thrift store and I am going to try it out with the thinner of the Marcia Derse fabric scrap strips.
I put together a packet of smaller scrap strips that I ironed (so they would be ready to use at the retreat) to pack in my suitcase.
I will let you know how it goes. I will probably open up my laptop at the retreat, watch the video while listening on my headphones, and follow along with the instructions.
I might also bring my English Paper Piecing hexie project I’ve been working on for a couple years, just to have some handwork with me.
The retreat is a week long but I am sure it won’t be “sweat shop quilting” where we do not take breaks to do other things. So I do not want to bring too many projects!
By the way, my tierneycreates Beastie is excited because I am going to bring her on the quilt retreat. She might even do a “guest blogger” post about it!
Her dog, Mikelet, won’t be coming. Just her and her Beastnina. So I need to be sure to leave room in my suitcase for her and her machine!
In yesterday’s post about my recent trip to North Carolina to accompany my partner John on a business trip (Trip to North Carolina: Quilt Shop Wander), I mentioned how happy I was to have fresh seafood because we are “landlocked” in Colorado.
Well in addition to seafood fresh from the ocean, I was so happy to be back at the ocean!
Wilmington, NC is right on the Atlantic ocean and I spent a lot of time wandering along Wrightsville Beach either with my partner or alone (while poor John had to work!)
We stayed at The Blockage Runner Beach Resort, which was right on the ocean (and we had wonderful views of the ocean from our room).
image credit: Blockage Runner facebook page
Here is a view from our hotel room window:
And each morning, we woke up to some amazing sunrises! We made sure to be up early each morning and watch the “show” out our window:
I brought several handwork craft projects to work on during the trip but I got nothing done because I got distracted by this:
The Atlantic Ocean, so happy to just stand here
I spent a lot of time walking the beach. Here is very happy me (taking a bad selfie as usual) about to head out for another walk along the beach:
Even if it was a gloomy/overcast day, I still walked the beach:
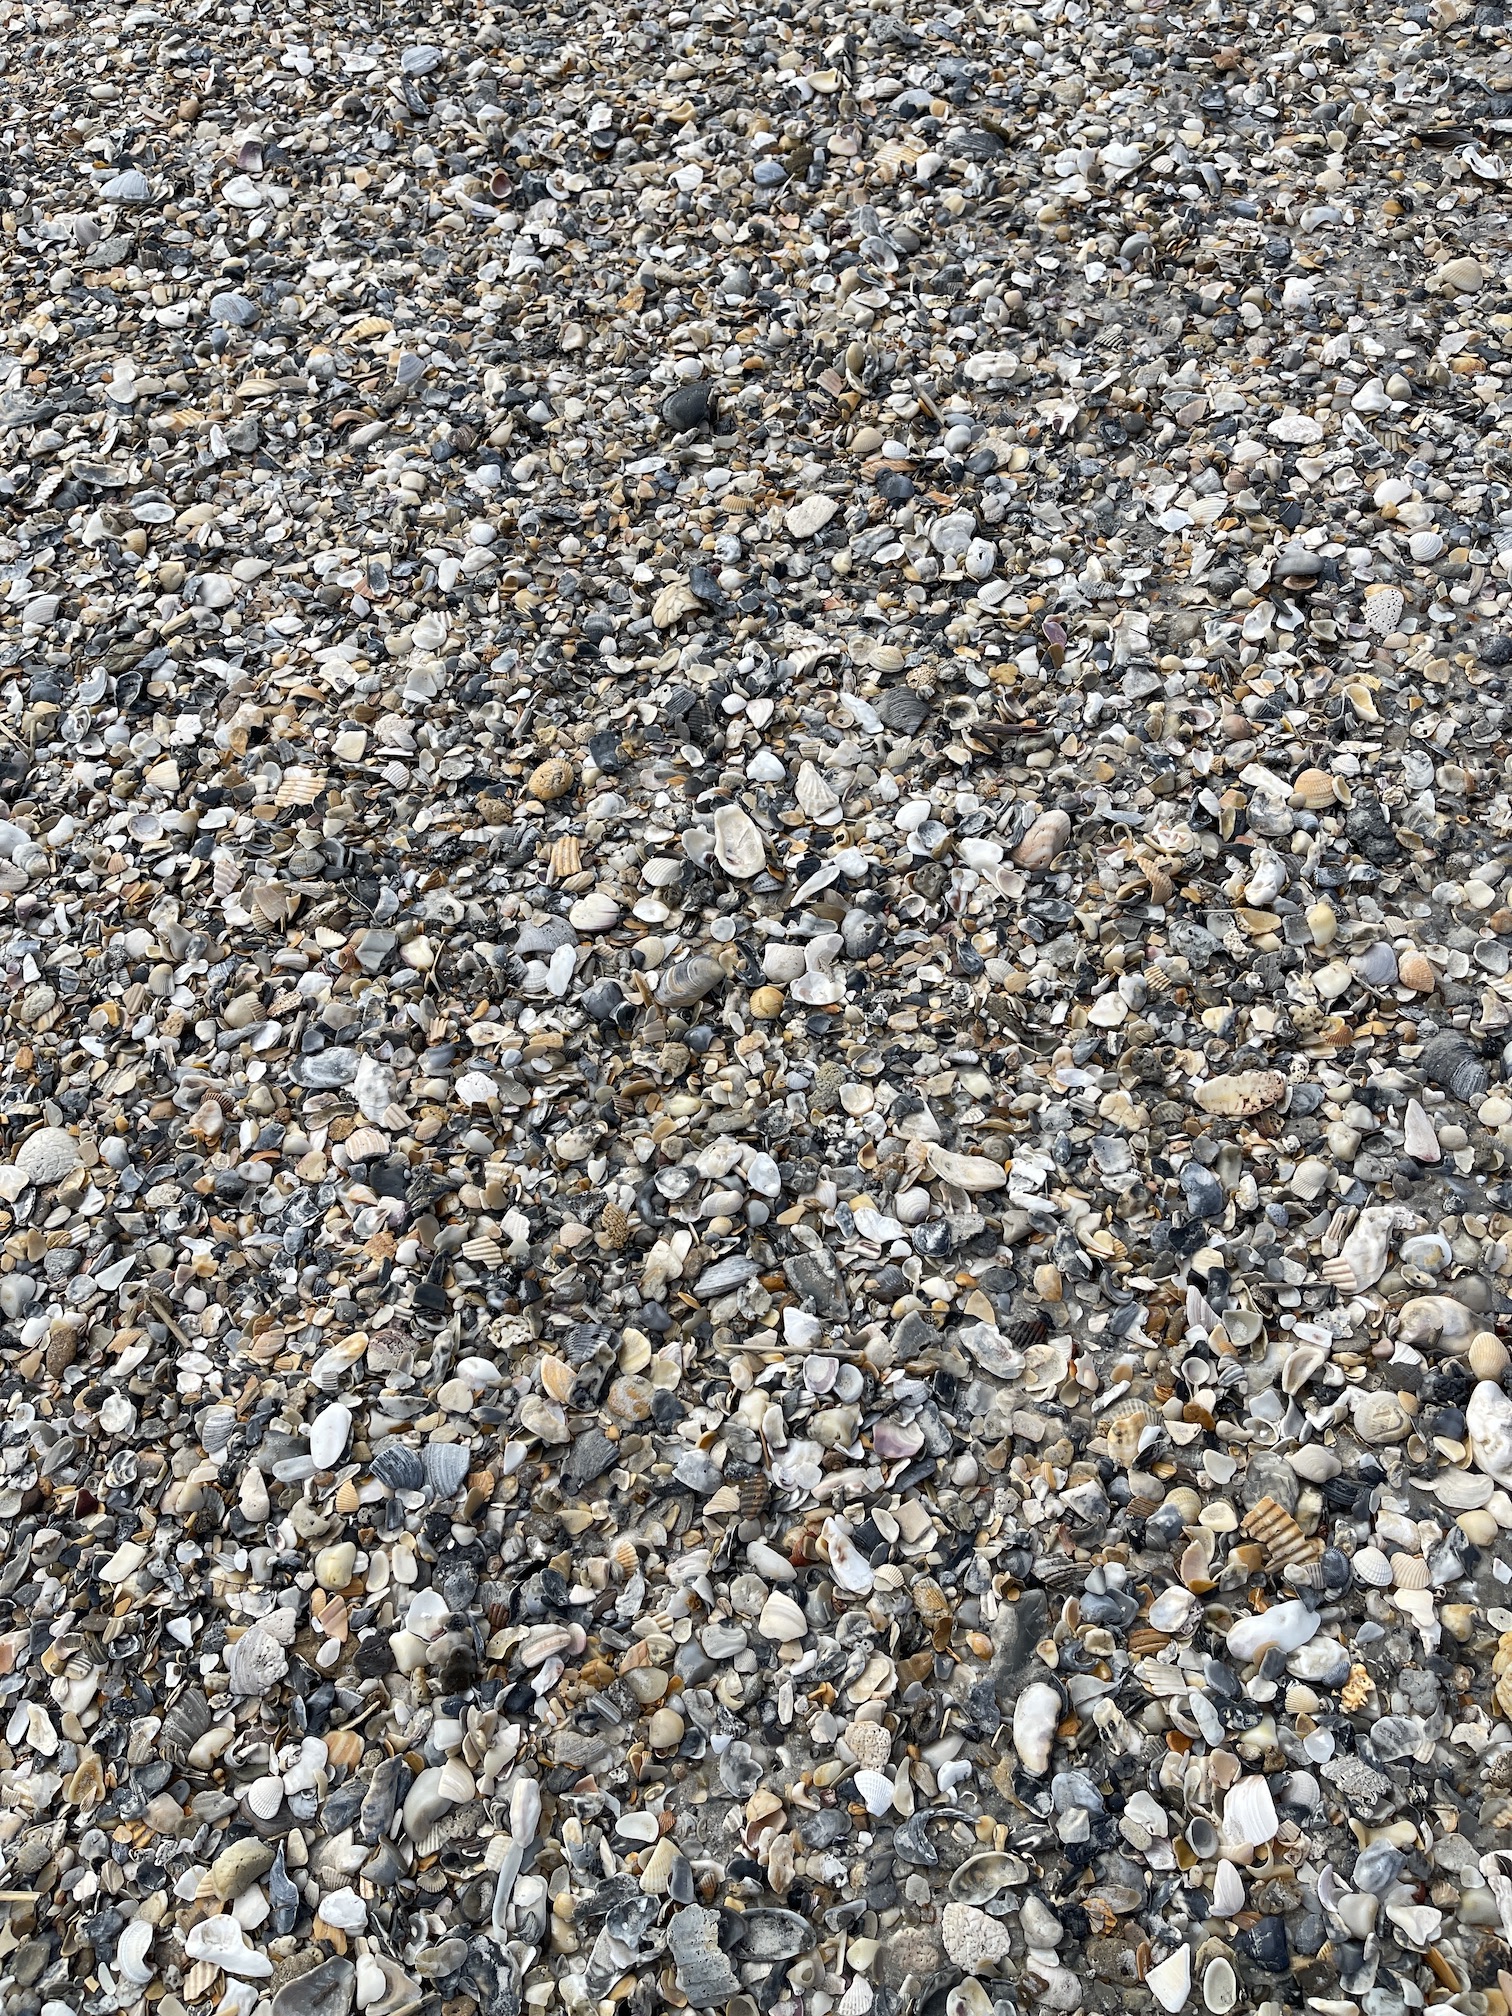
I had fun one afternoon selecting seashells from all the shells washed up on the shore. I only took a little as already had some from our previous visit to Wilmington, NC.
My partner John joined me for some of the walks. On one of our walks on the beach we spent a long time just standing there watching pelicans dive for fish in the ocean. There was something so peaceful, quiet and amazing doing that, I just cannot put the experience in to proper words. Here is a little video snippet from our experience:
Pelicans diving for fish
I took a hundred additional photos but most of us have seen the ocean before (and likely more beautiful ocean vistas than the ones I had from the Atlantic Ocean in the Winter) so I will spare you from all the other photos.
I do love the mountains of Colorado, but every so often it is so wonderful to see the sea…
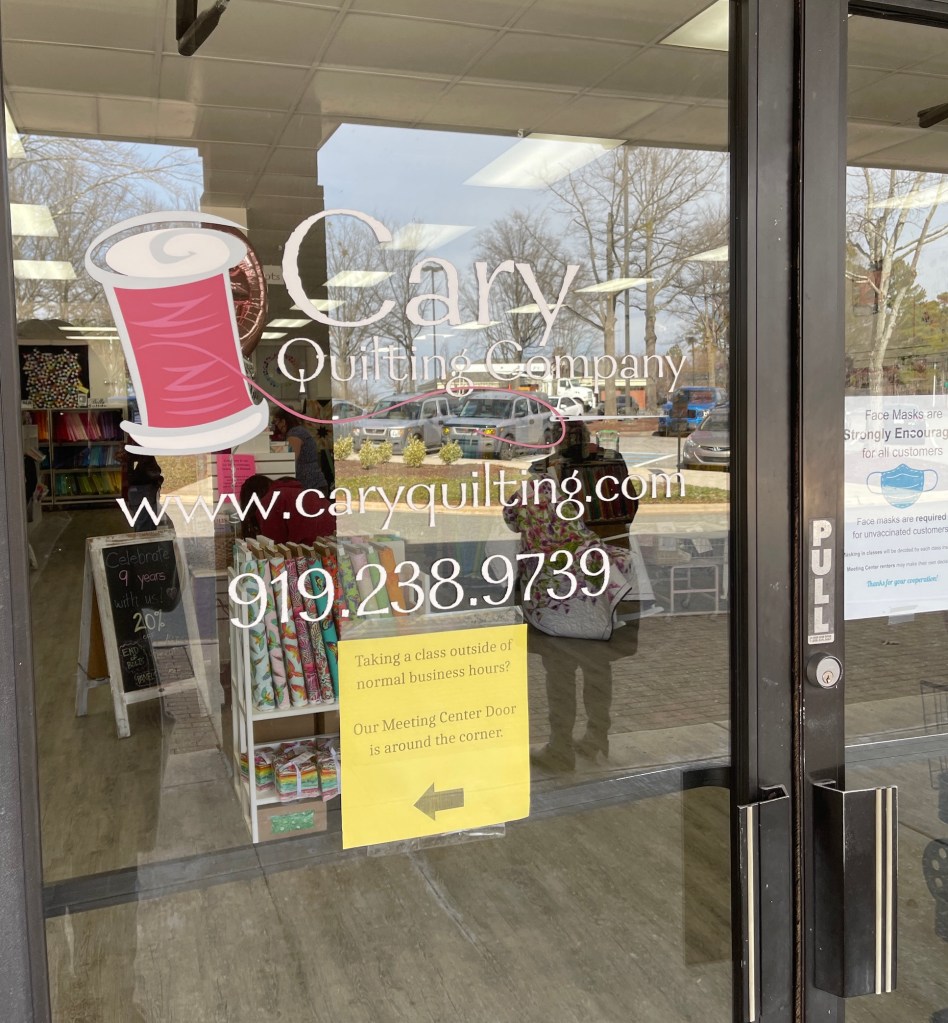
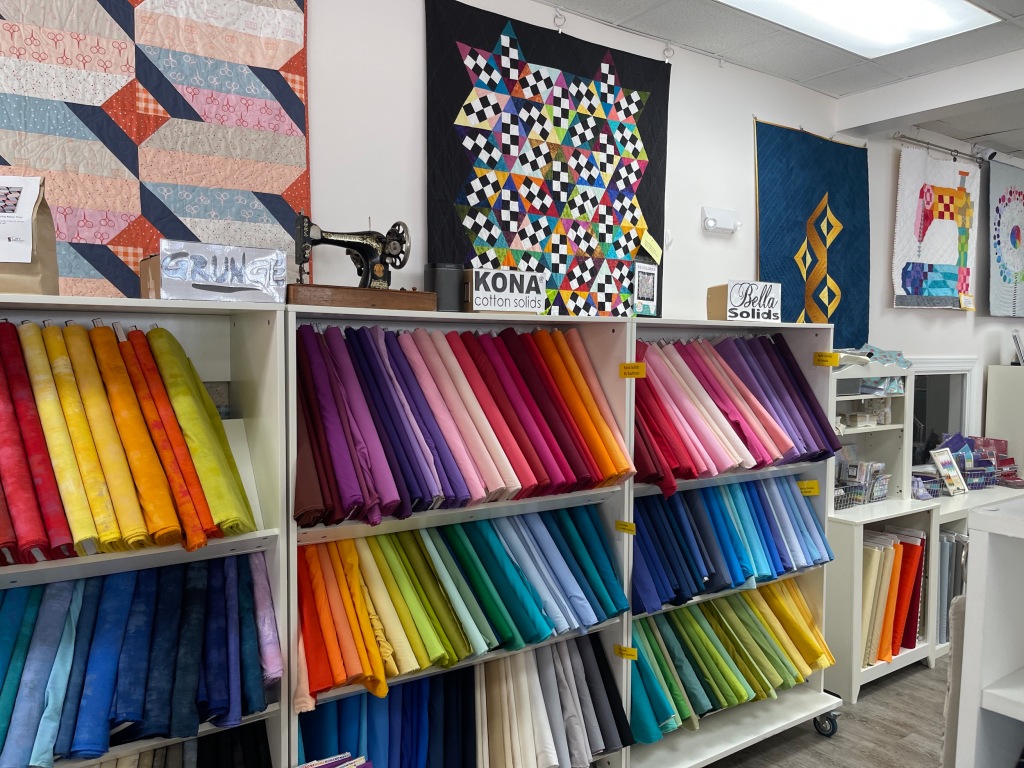
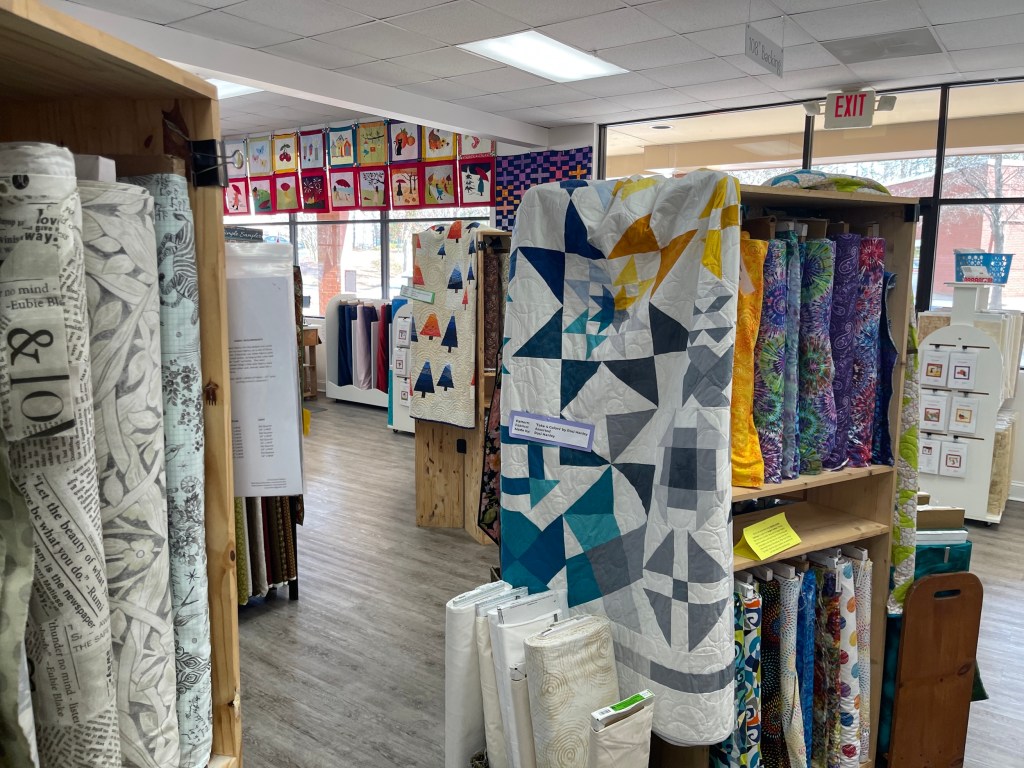
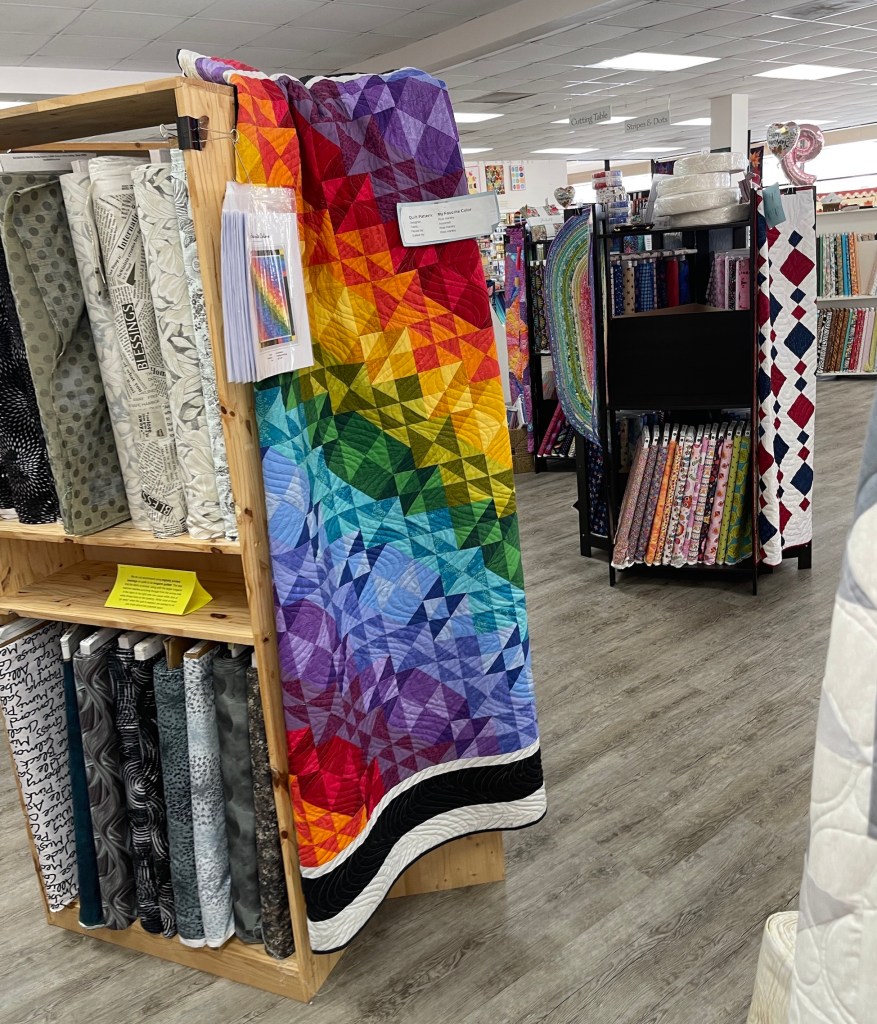
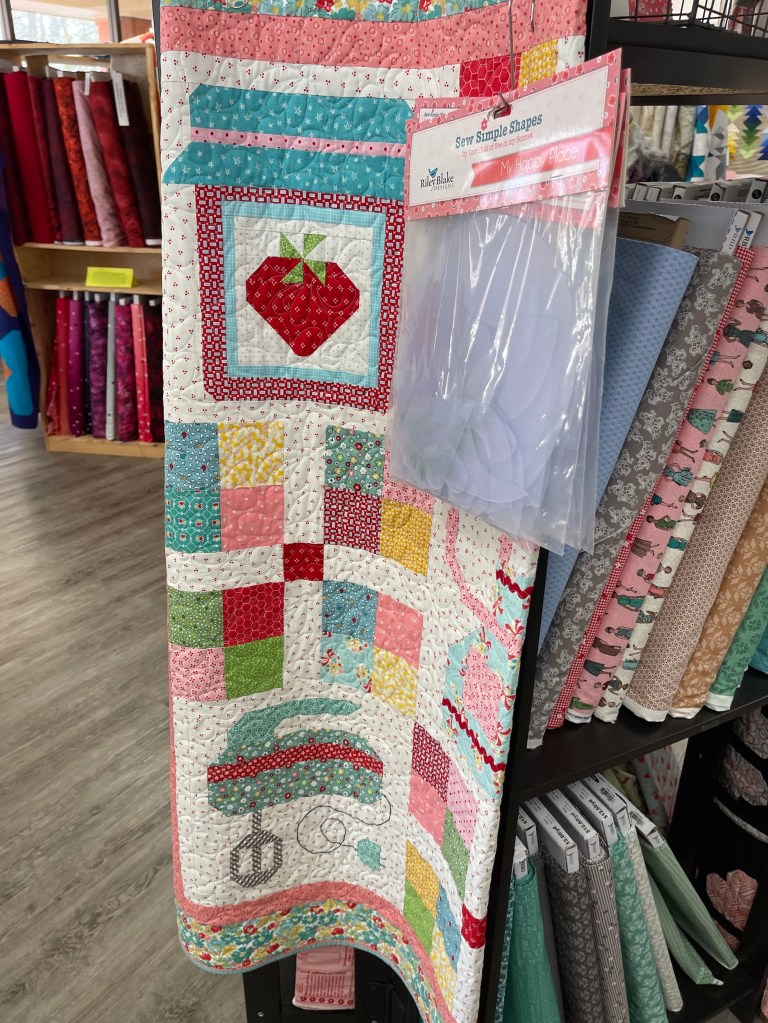
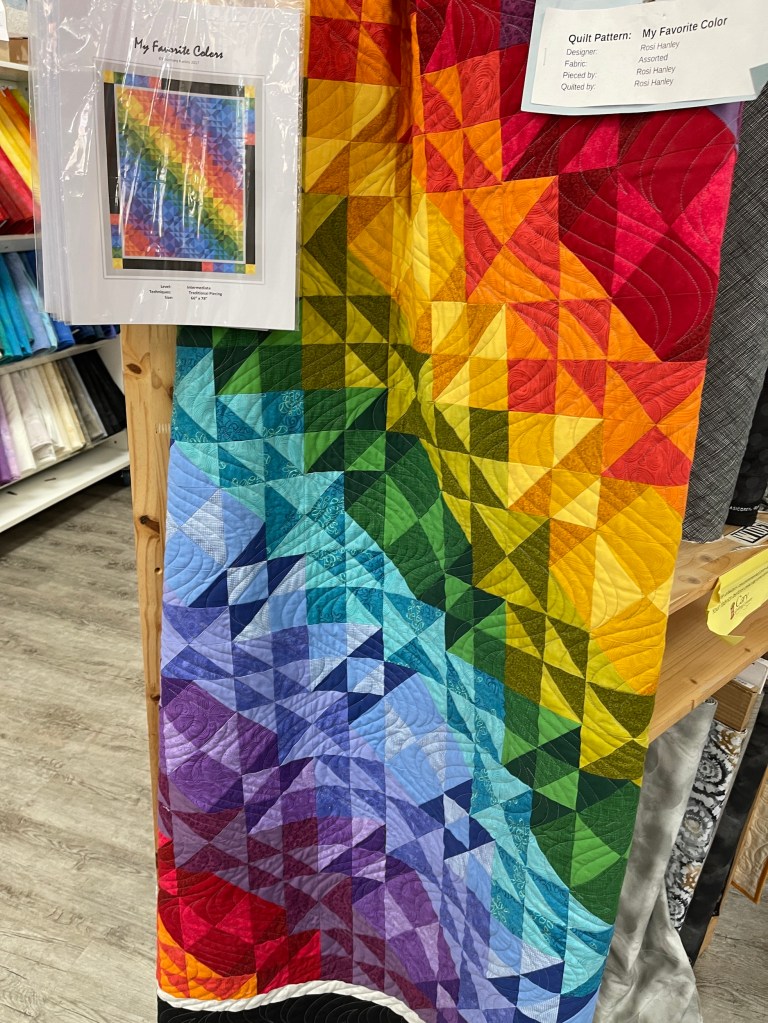
We needed to return to Wilmington, NC for his work conference, but first we stopped for an evening and 1/2 a day in Raleigh, NC which I’ve never visited before. I will share a little about our trip to Raleigh in an upcoming post, but for this post I wanted to share photos of the quilt shop we stopped at during our drive from Raleigh to Wilmington, NC on Sunday January 30.
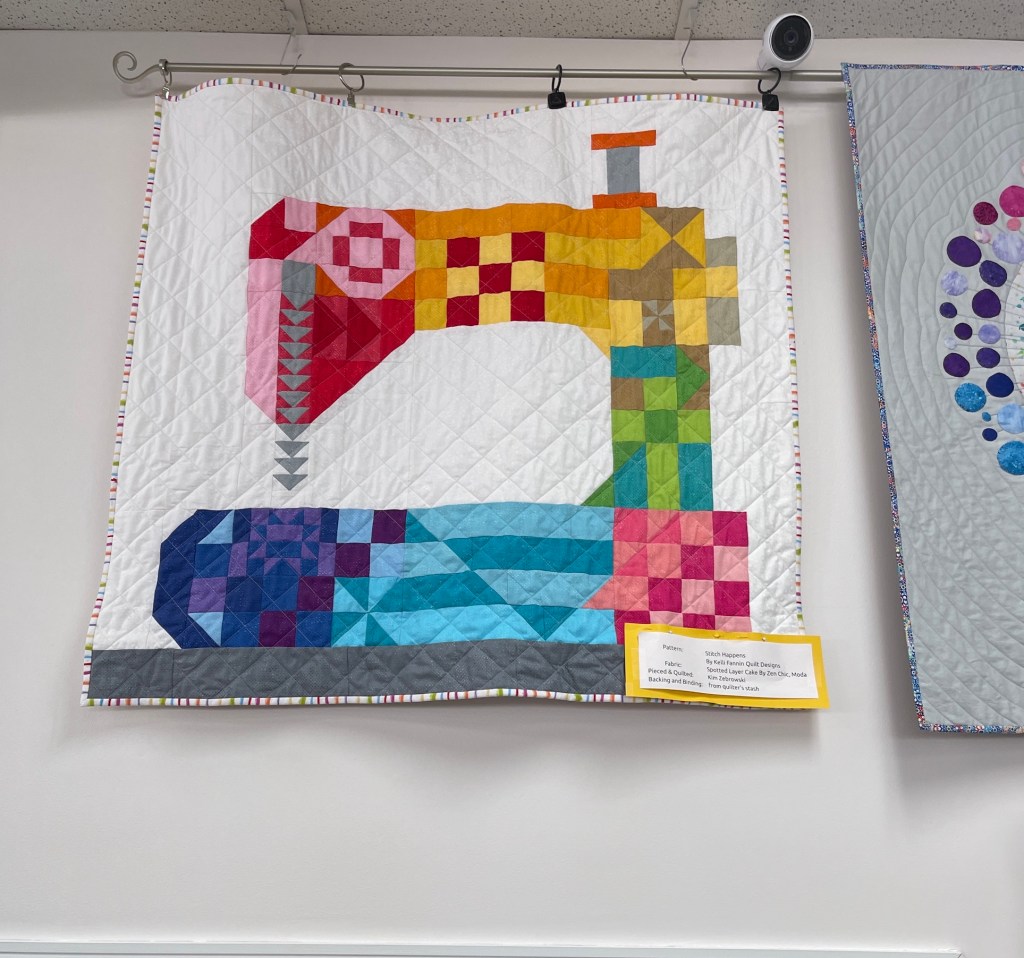
For a quilter, besides the thrill of returning home to fondle your new fabric purchases or completing a major quilting project, is there anything more awesome than wandering around a quilt shop you’ve never visited before? For me, it is one of life’s true pleasures!
I may not buy something at every quilt shop I visit but I love seeing the “creative potential” of the fabric, patterns, samples quilts, etc.
And here is the very patient partner John, waiting while I wandered about the shop:
Hope you enjoyed that virtual wander, sorry you could not fondle the fabric with me!
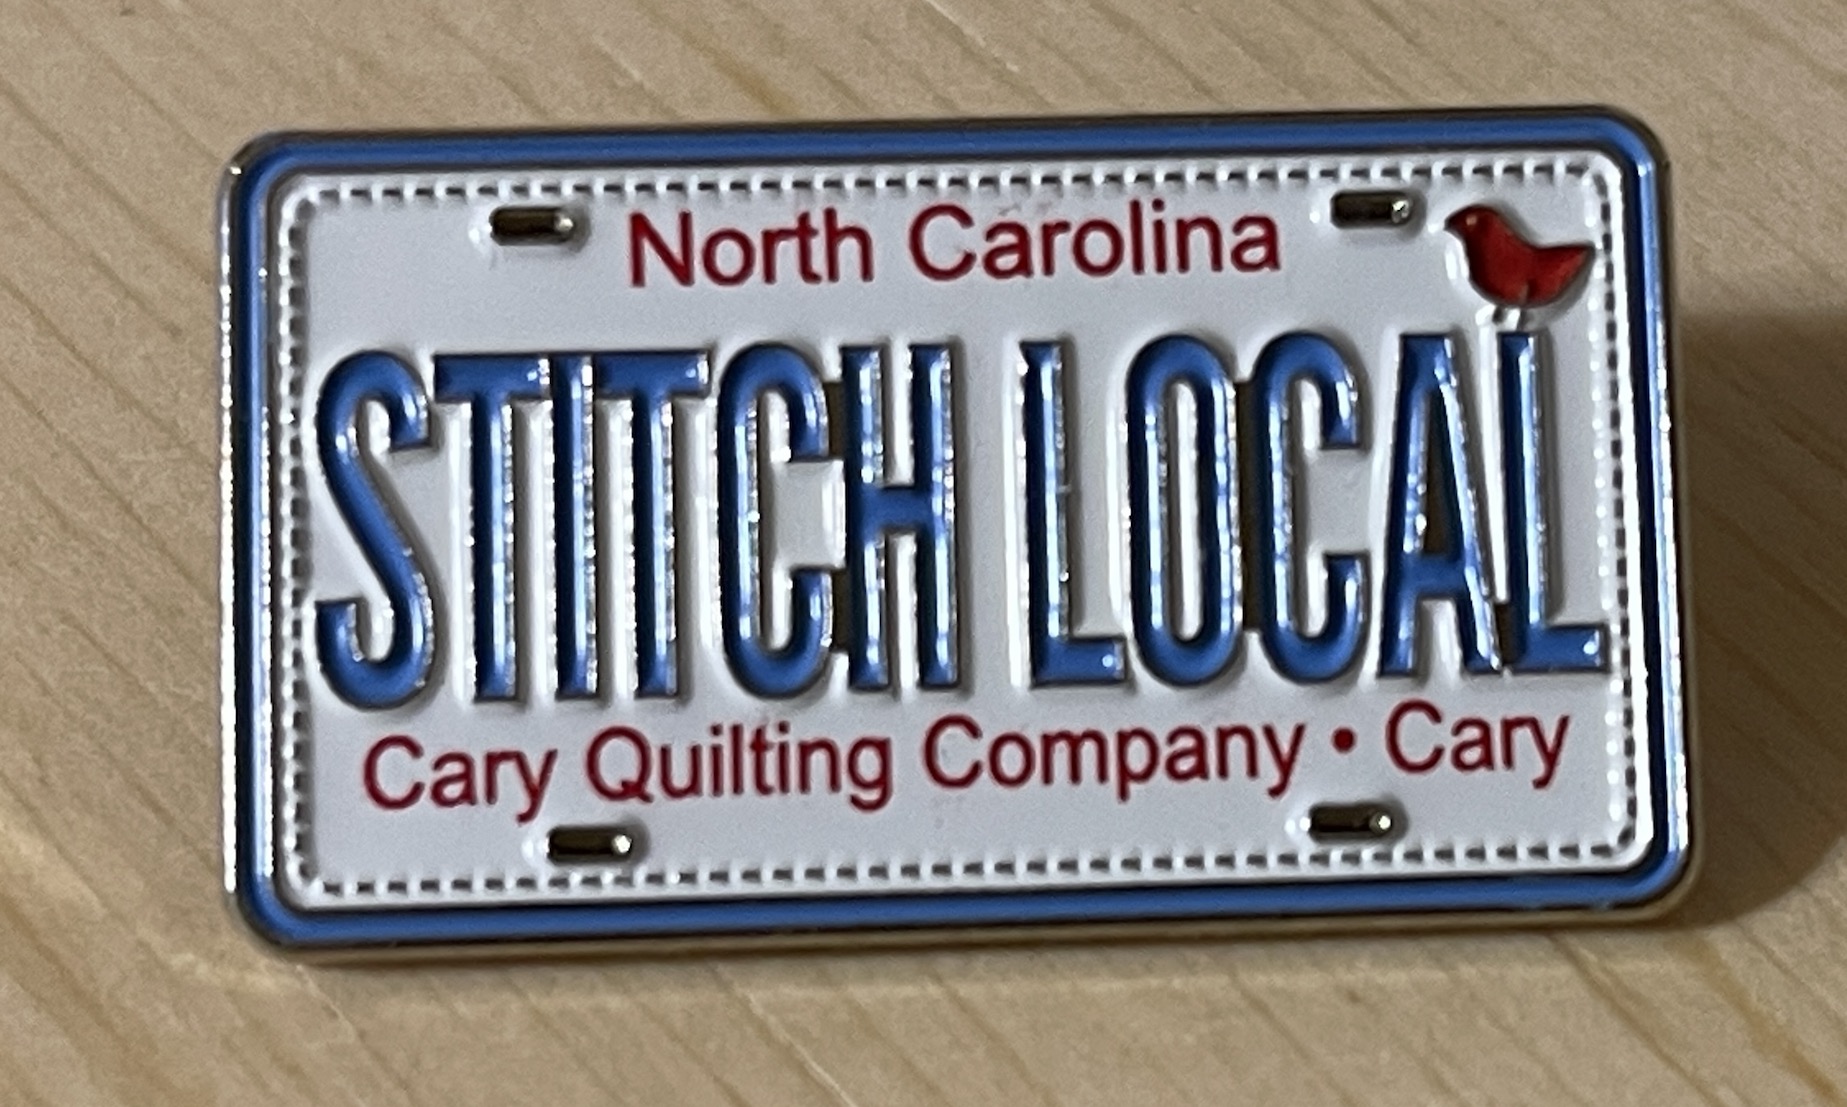
The staff was very friendly and the wonderful woman who rang up my purchases (I bought a pattern), gave me this wonderful pin as a gift to welcome me to the shop and to North Carolina:
It can be worth chatting with friendly people in quilt shops!
Postscript
Before we went to the quilt shop, we stopped for an amazing seafood lunch at a Farmers Market in Raleigh called the State Farmers Market. We ate at this friendly and amazing fish fry/seafood fry place called N.C. Seafood Market.
Oh my goodness. We are “landlocked” in Colorado and do not get much access to fresh seafood (unless a Colorado restaurant has a system to fly in seafood fresh each day), so we were in “seafood heaven” at this place.
The food was very reasonably priced and tasty is an understatement. It was so good that on our way back to Raleigh (we flew home to Denver via Raleigh) we stopped there again for lunch (and they recognized us and welcomed us back)!
I did not take any photos, I was just too excited! But here is a photo that I downloaded from Google Images from the restaurant to give you an idea of what our platter looked like:
Hmm…suddenly I am very hungry…
Next couple of posts I will share more about our trip to North Carolina.
My partner John, who only took up woodworking a couple years ago, has been busy crafting up a storm in his woodshop in our basement.
Our basement serves several purposes: a den, John’s home office, our bar, John’s woodshop, and the guest bedroom/guest bathroom.
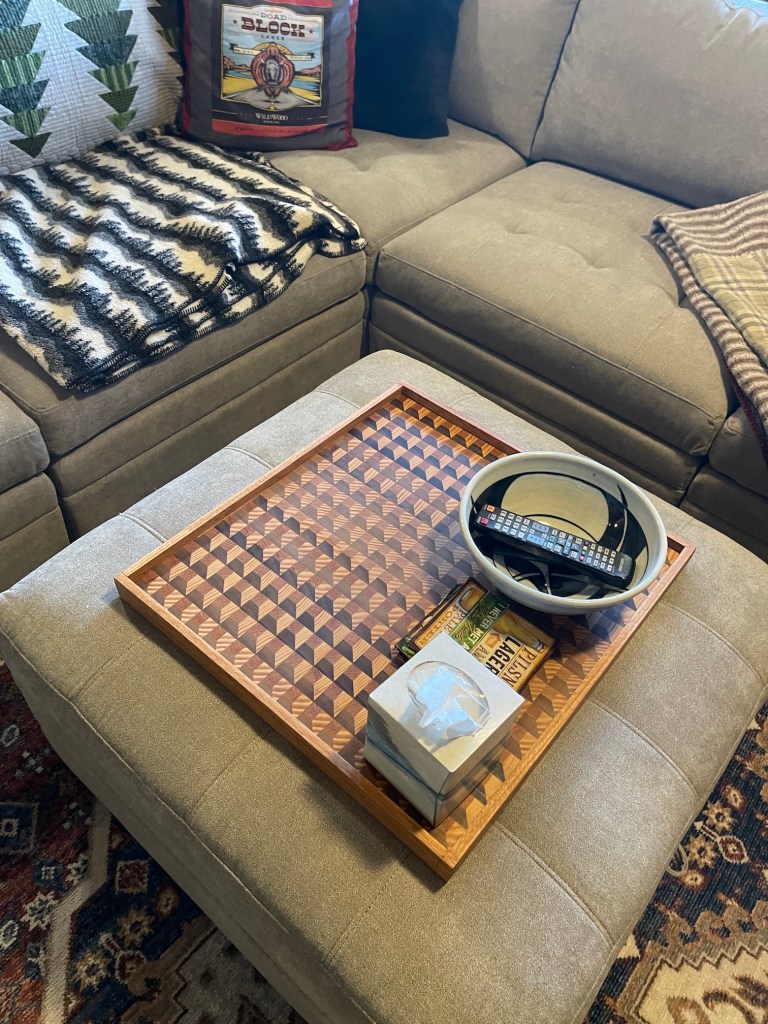
Recently we bought a new sectional sofa with a storage ottoman set to replace the old sofa and loveseat in “den” area of the basement.
In order to make the sectional and ottoman work, we had to give away the old coffee table and end table along with the old sofa and loveseat (we gave them to our neighbor’s son who needed furniture for his first apartment).
We decided to use the ottoman like a coffee table and I found an old tray to put on it so we could stabilize any food or drinks we wanted to put on it when we have “movie night” in the basement.
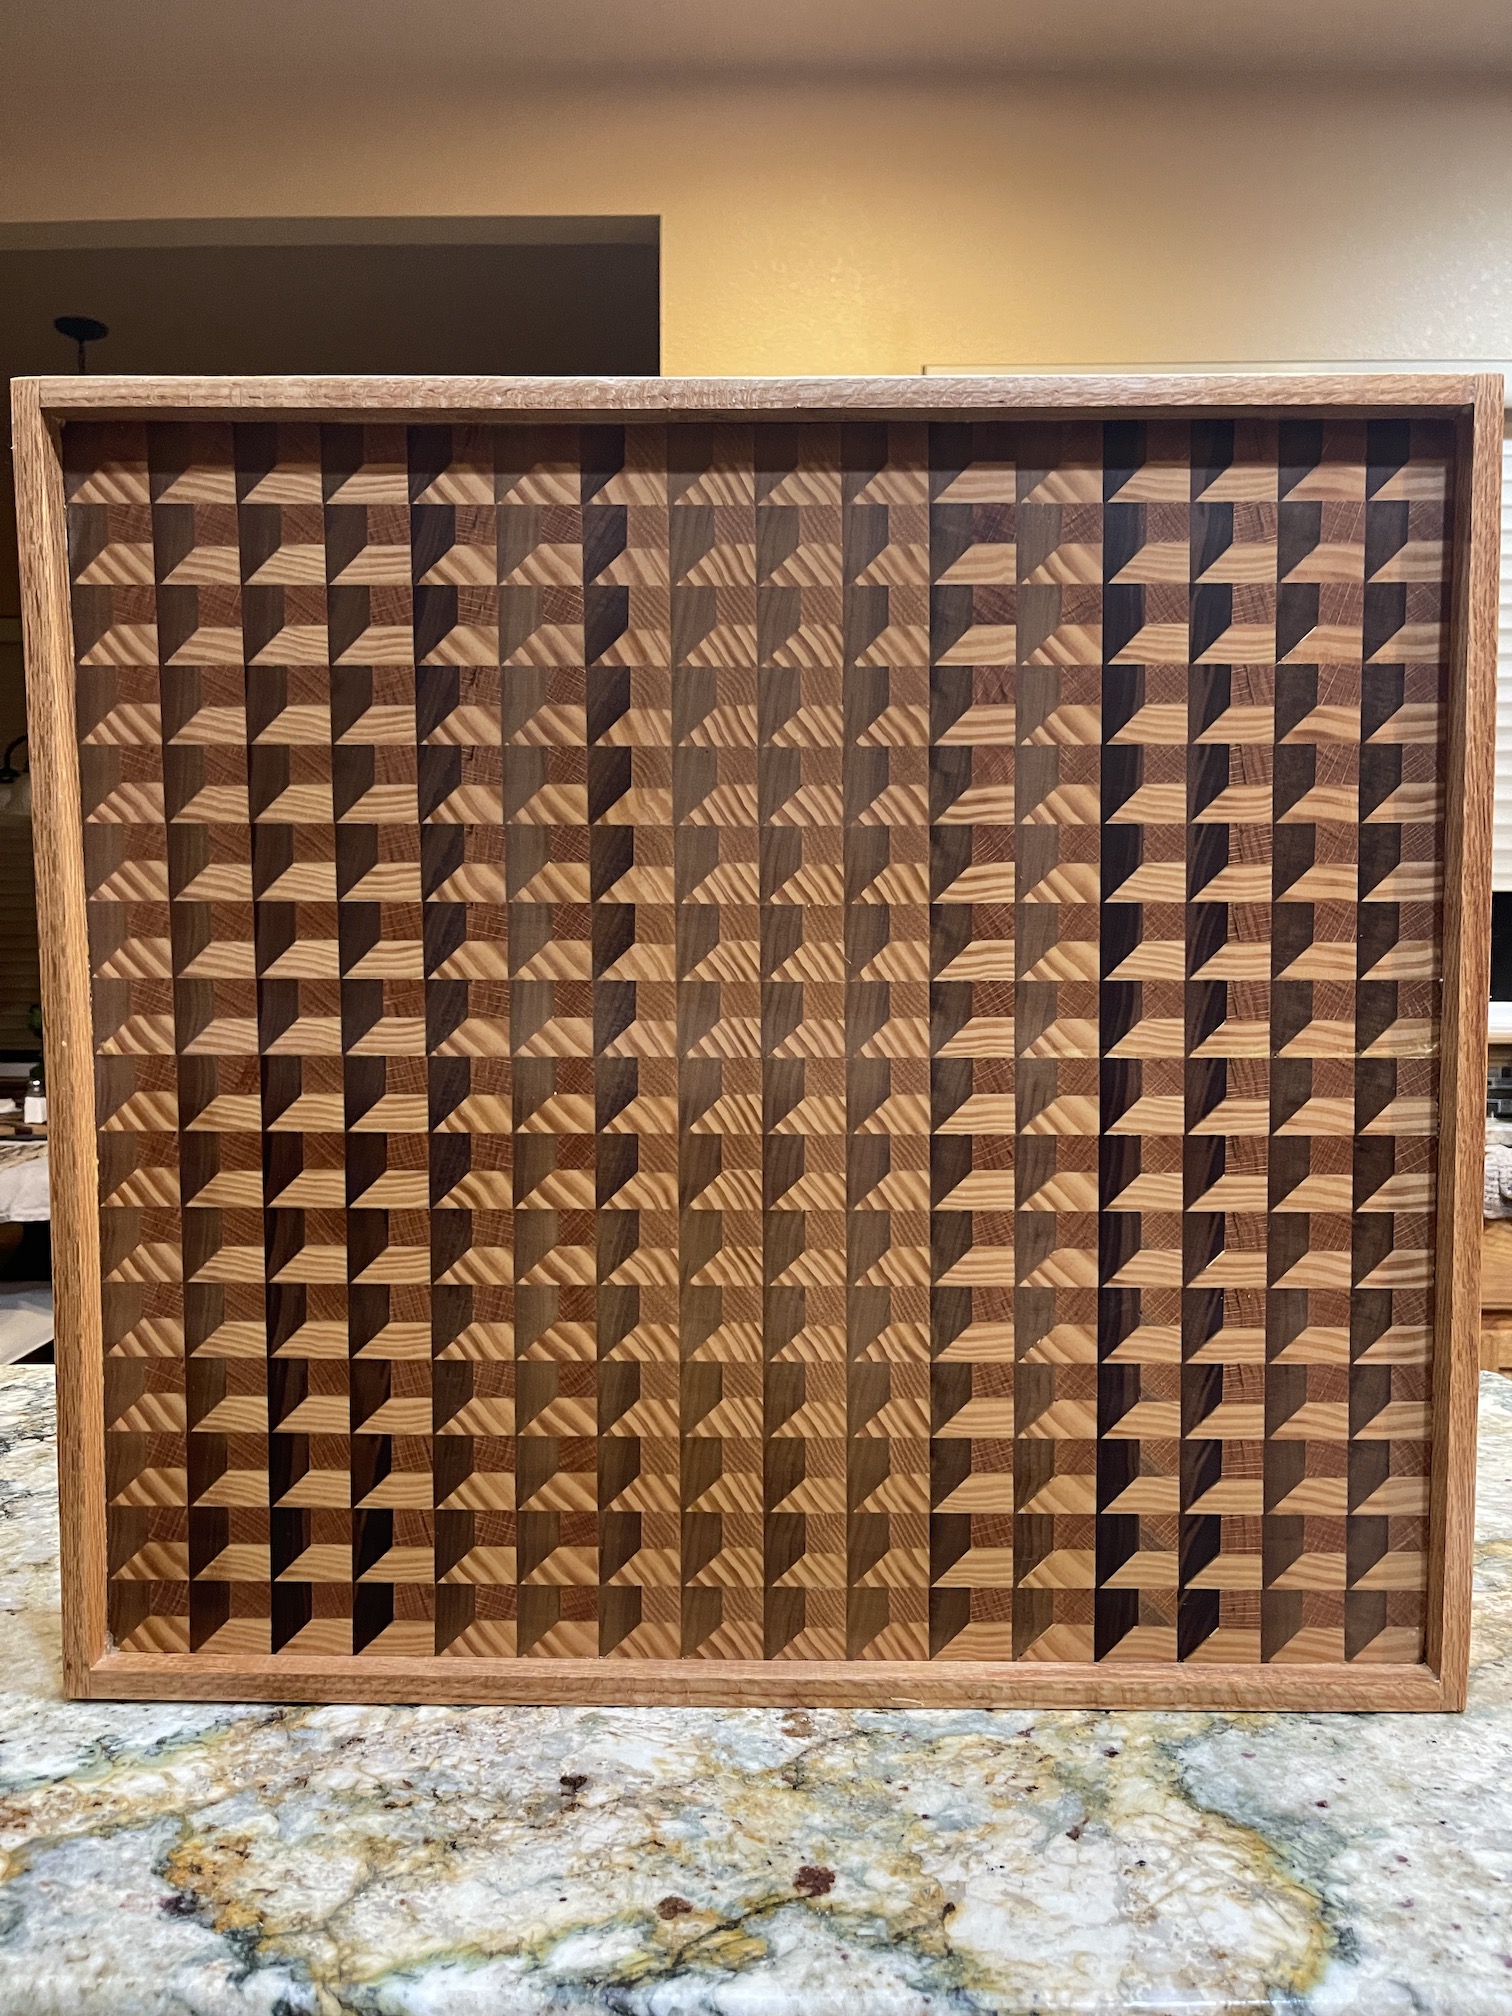
John was not happy with using that old tray and decided to make a custom tray for the ottoman. And not just a simple designed tray, he decided to try and make one with a 3D effect that he found on YouTube (where he watches endless woodworking videos).
Here is the tray in progress in his woodshop:
Here is the finished tray:
Here is the tray on the ottoman!
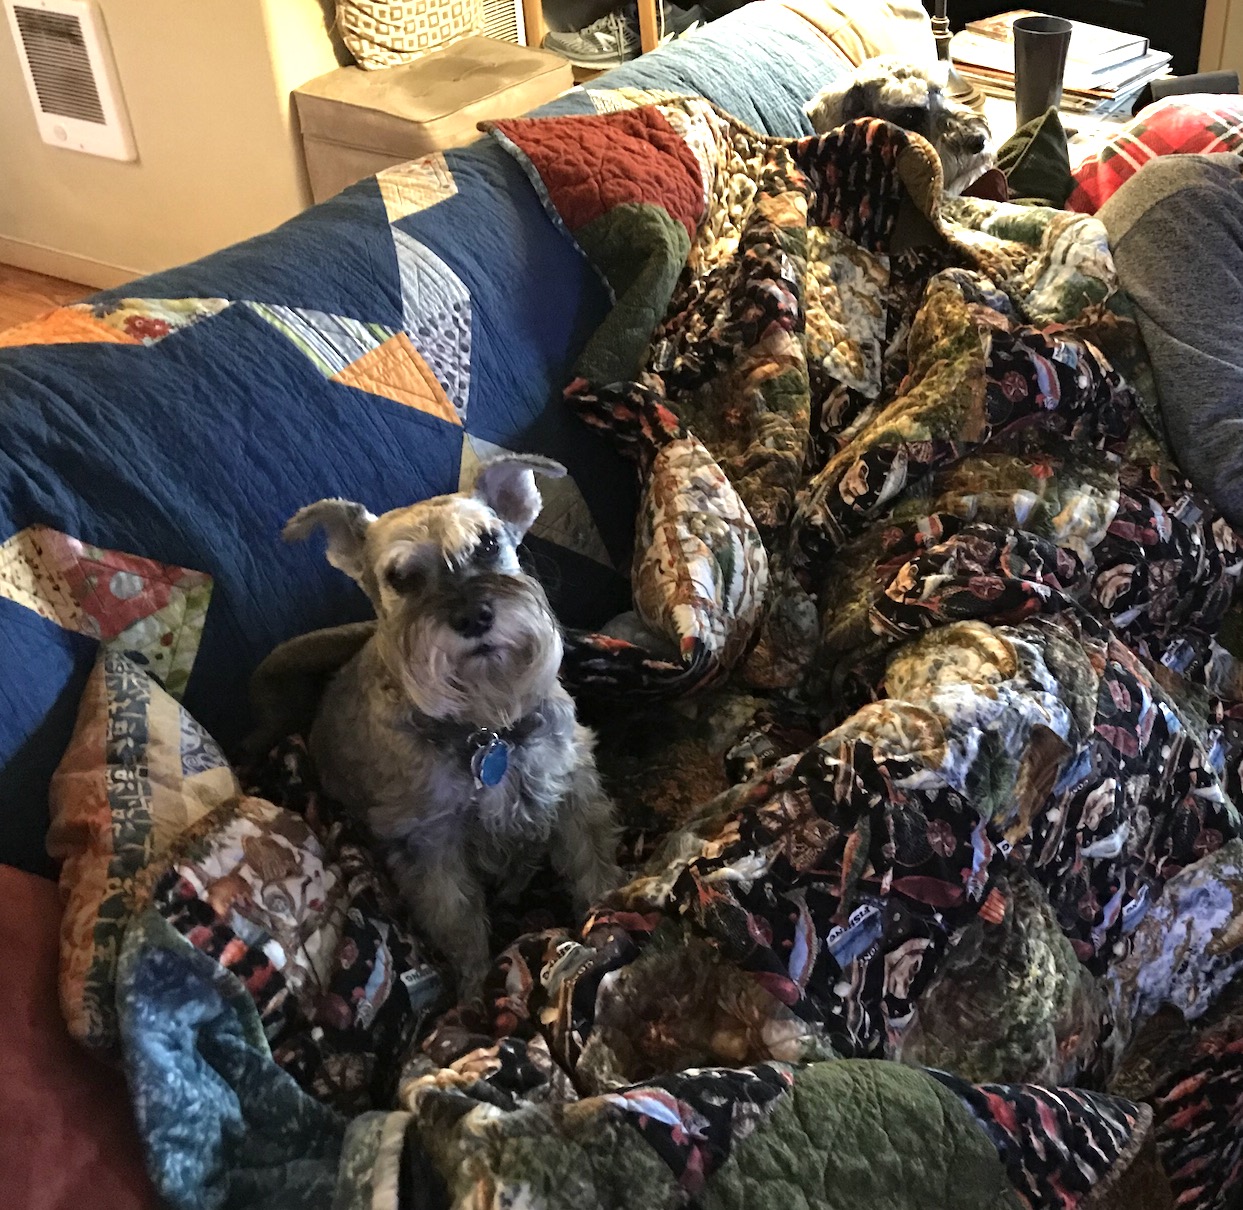
And here is our miniature schnauzer Mike who did not like I was taking photos of the ottoman and not of him on the sofa – ha!
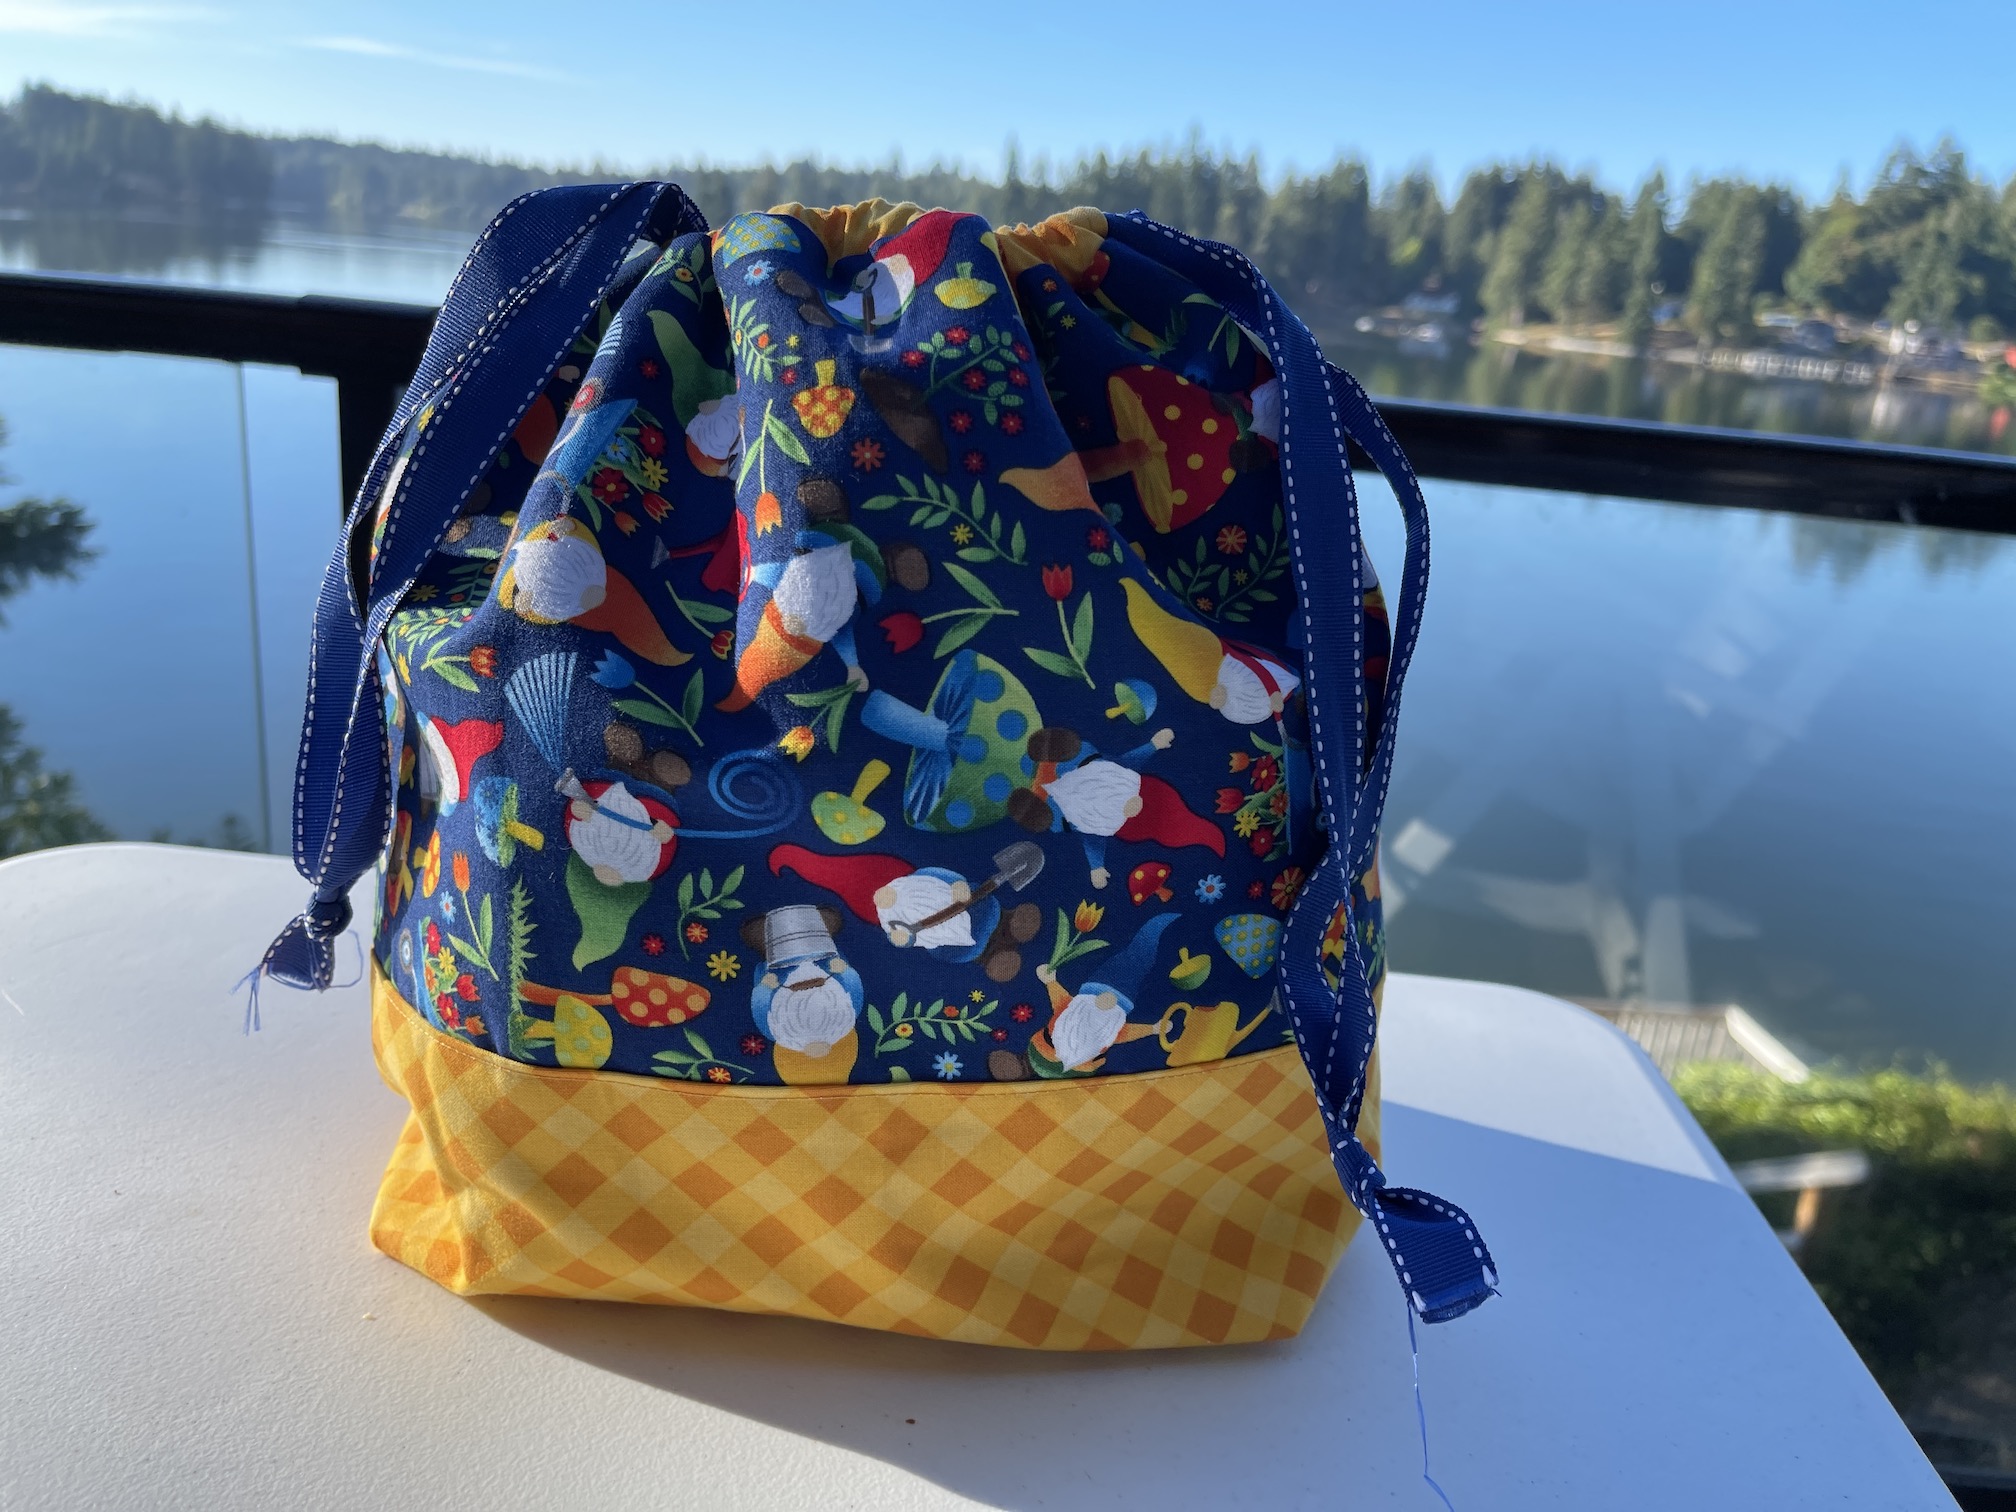
A couple posts ago I shared the craft exchange that @Mildy Granola and I did – drawstring bag for hand knitted socks, in this post The Exchange! .
Well my friend Wendy and I call this “Good Mail“.
Good Mail is when you get something very fun in the mail, like a handmade item or some type of fun treat. Through out the pandemic, Wendy and I have exchanged Good Mail.
THE GOOD MAIL DELIVERED TO MY HOUSE
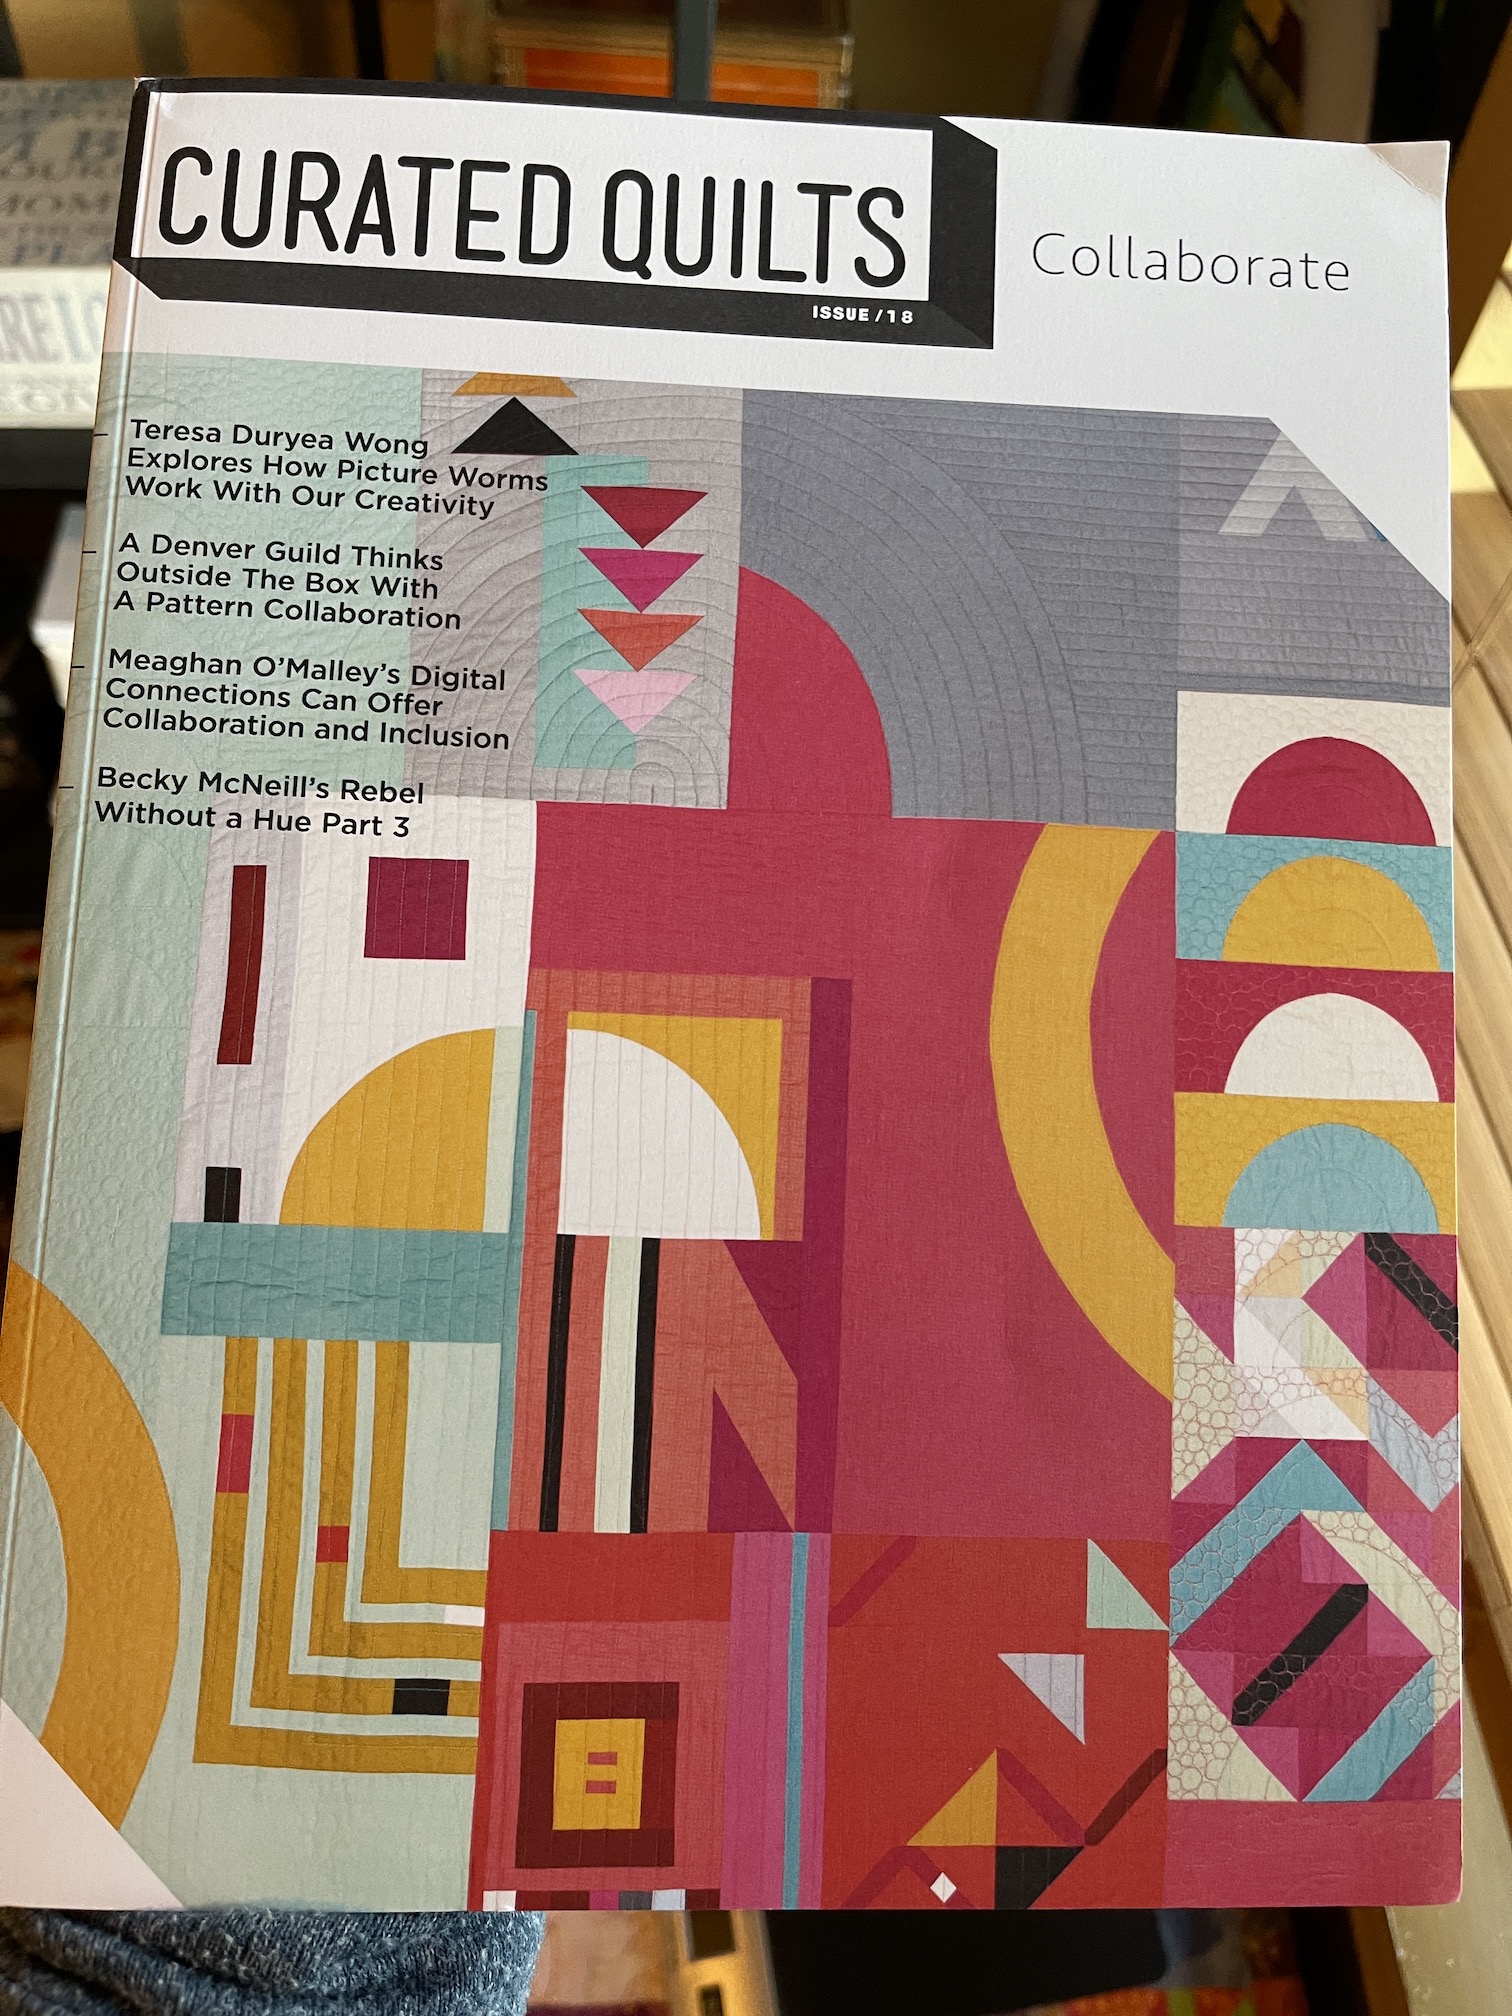
For this round of Good Mail Wendy sent me an issue of the amazing periodical Curated Quilts and a beautiful Chinese New Year artist postcard for the Year of the Tiger.
What made this issue of Curated Quilts so special is that it featured the story of Wendy’s Quarantine Quilt Collaboration.
If you are just joining us, Wendy did a series of five (5) guest blog posts sharing the amazing story of how deep in the early days of the COVID pandemic quilt she made during quarantine with the four (4) rambunctious boys next door (aka “The Boys”) ages 2 – 8.
Could you imagine (and perhaps you can) being quarantined with your four young children ages 2 – 8 for months on end? Wendy provided an amazing distraction/project for the boys and likely made their parents lives a little saner.
Here are the links to those 5 posts if you’d like to read the full story (or re-read):
In the Curated Quilts (the theme of the issue is “Collaborate”) article Wendy provides a nice summary of the whole experience and shares the best of the photos (including my favorite – the one with the whole family and the finished quilt). It was such an amazing and selfless gift she gave to this family my eyes get a little teary when I think about it.
THE GOOD MAIL DELIVERED TO WENDY’S HOUSE
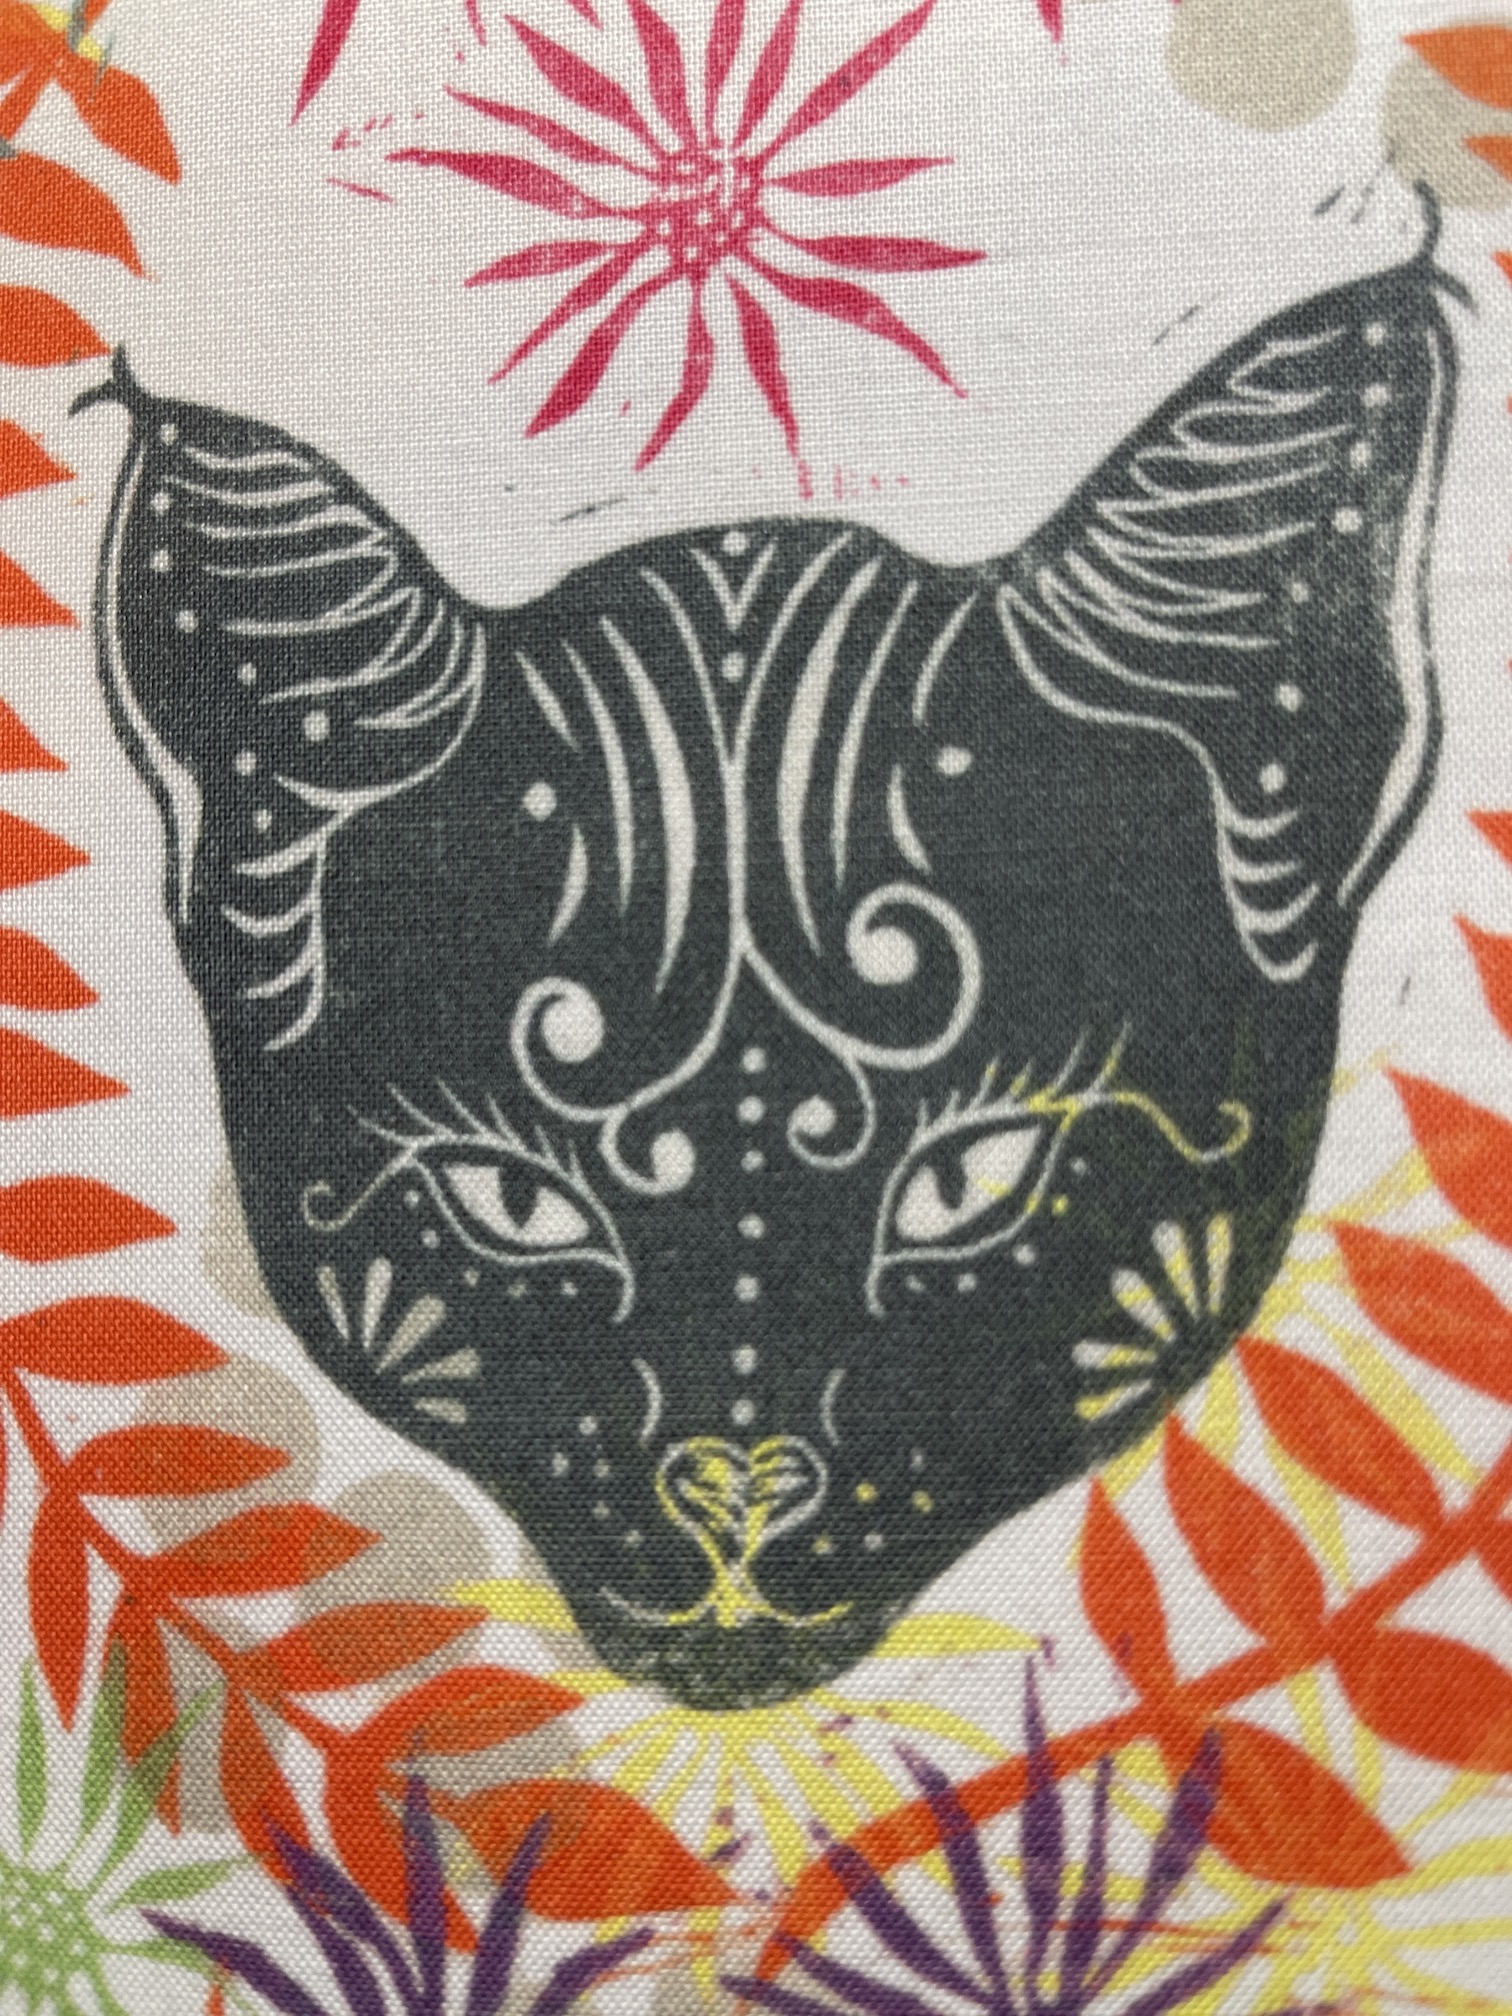
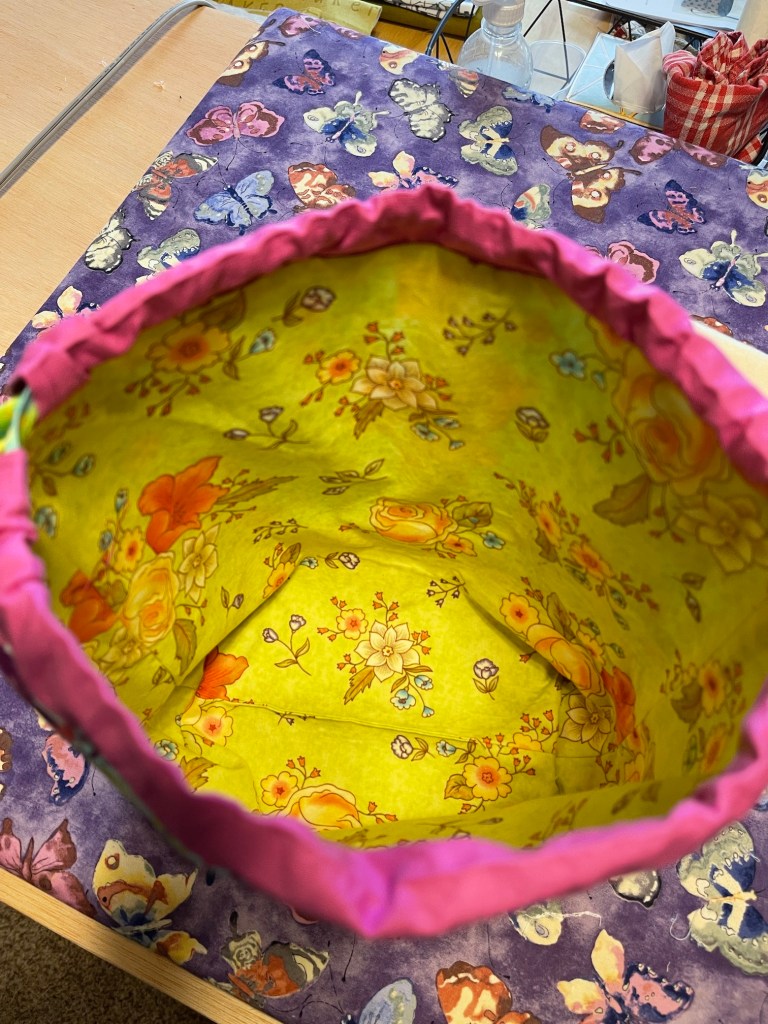
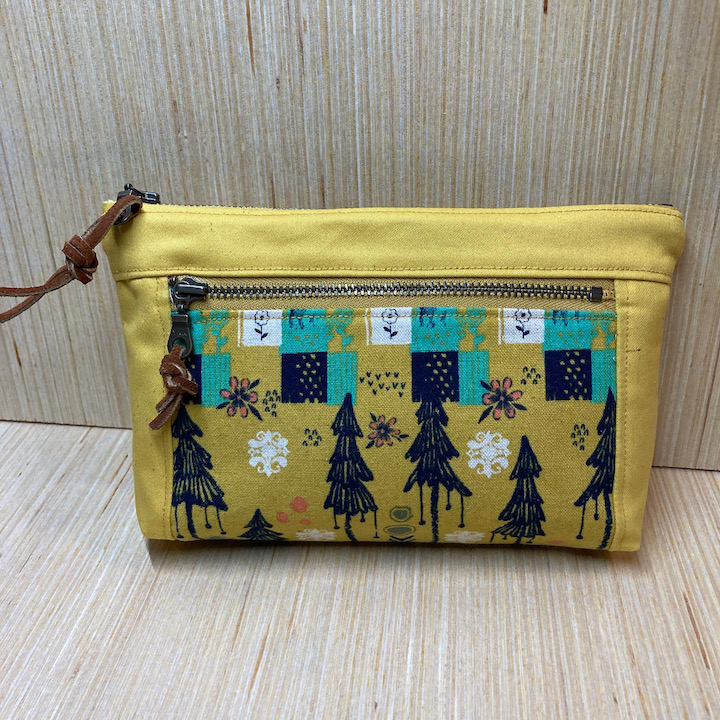
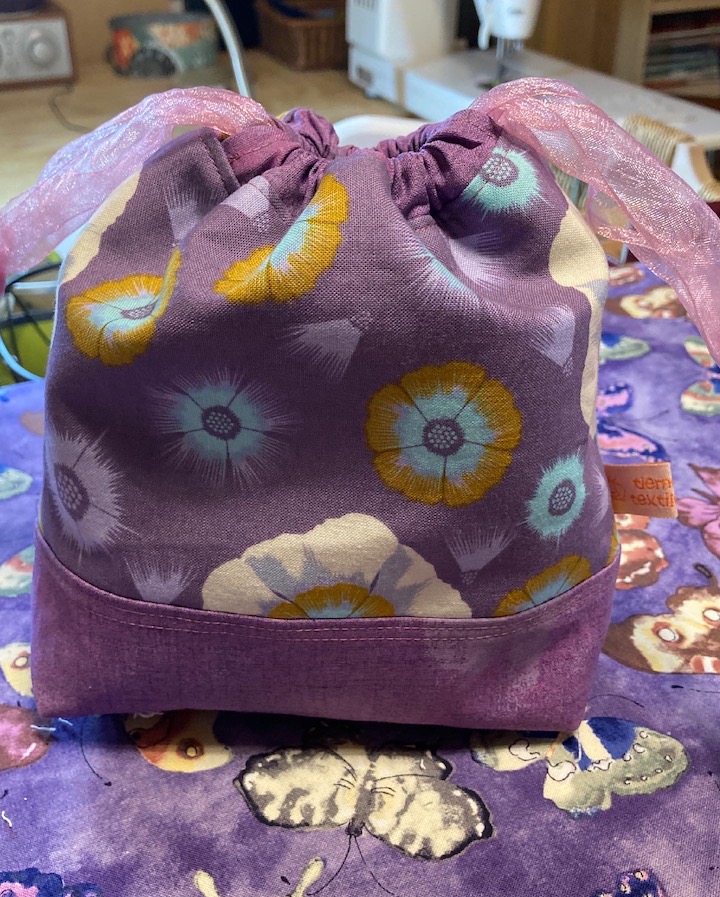
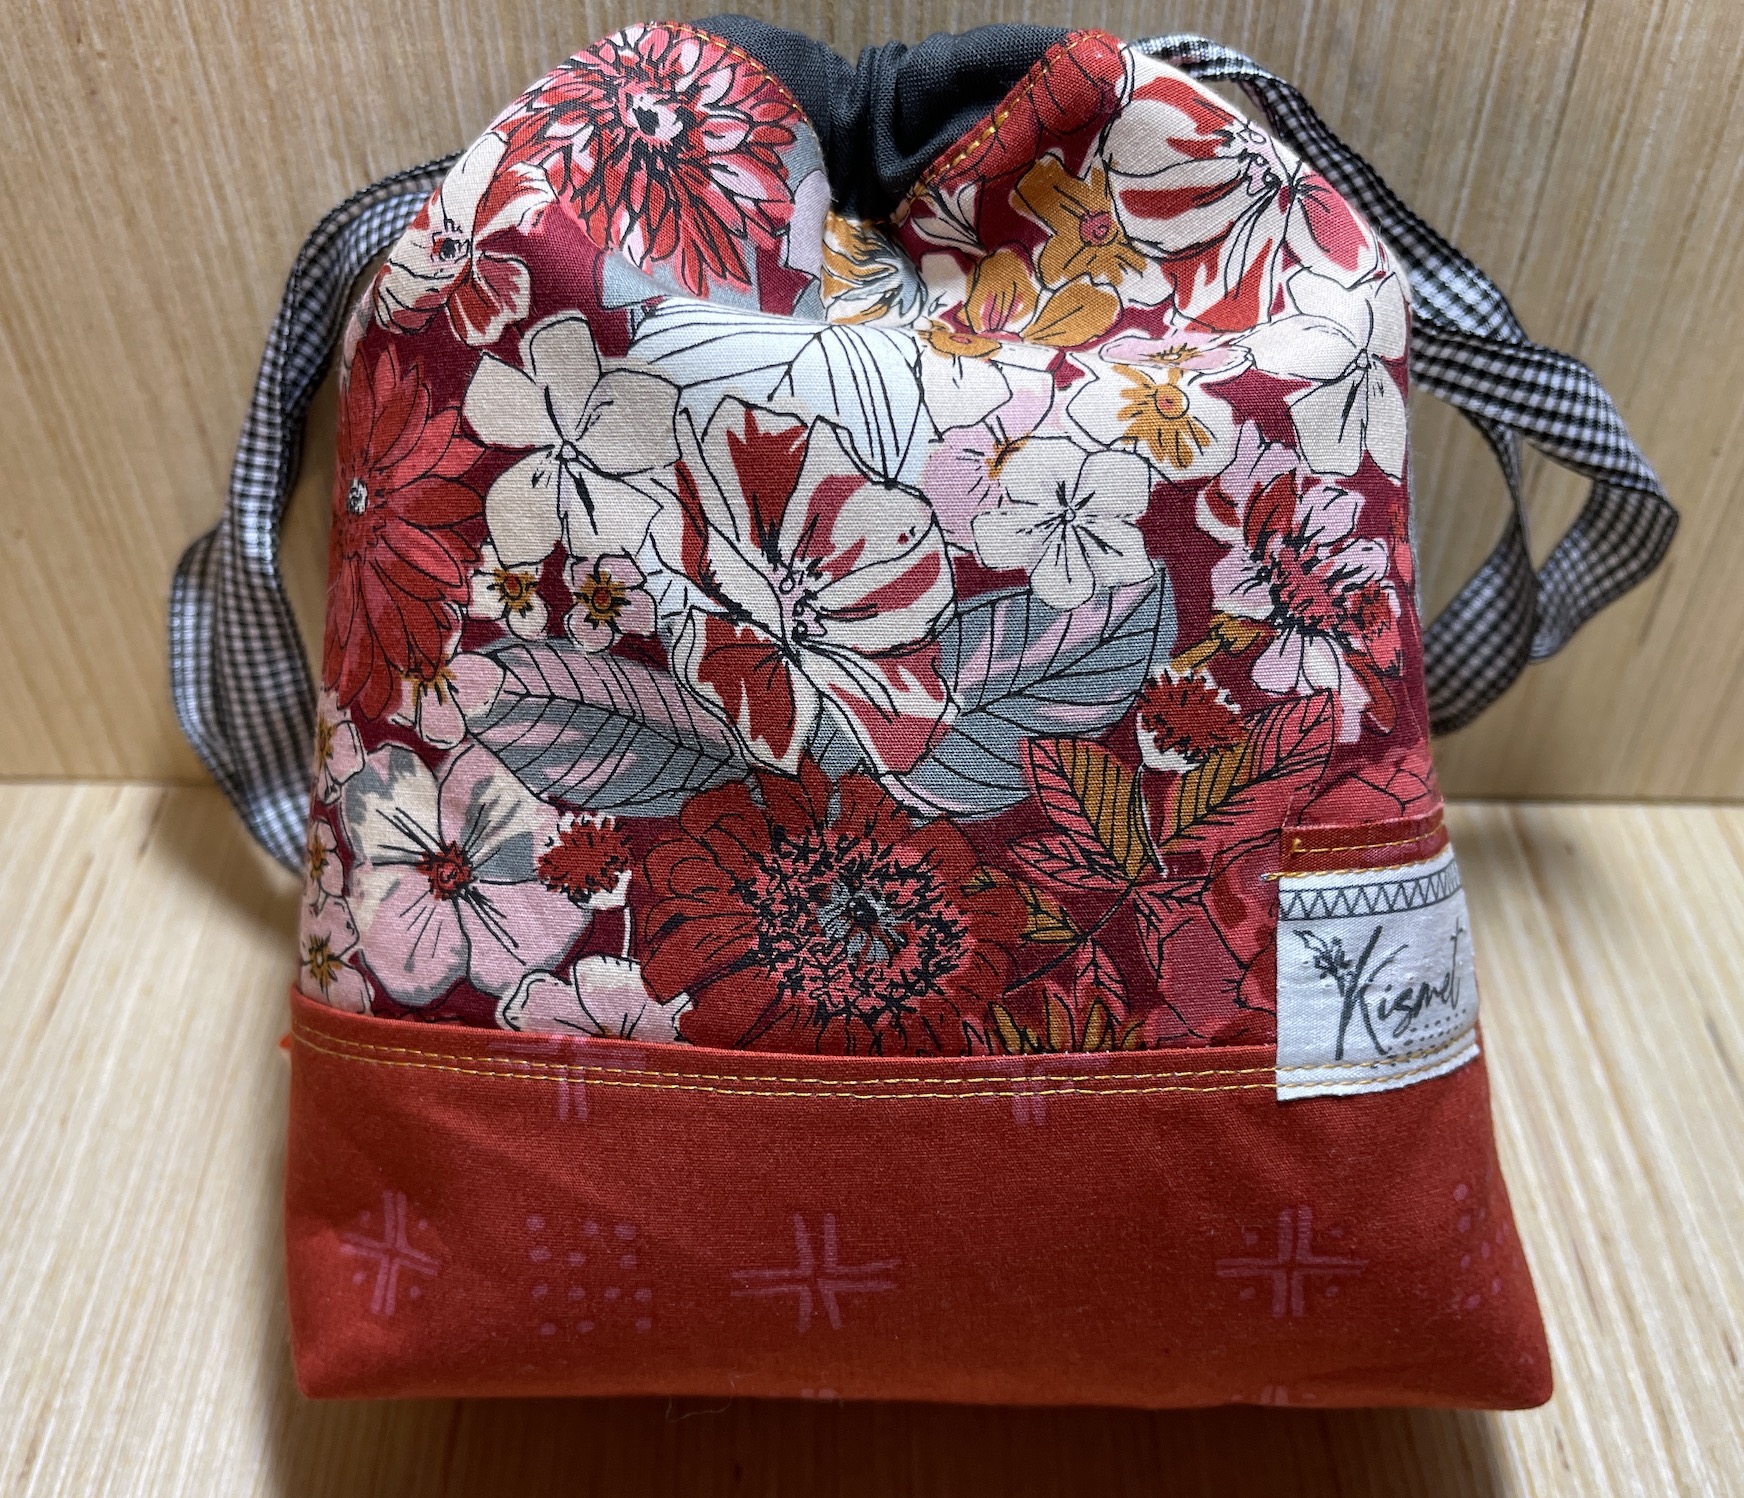
And what did I send Wendy for her Good Mail? Well she loves cats, and has a couple darling cats at home, so I made her a project bag with this fabric:
It was some cool fabric I found in my stash, I did not know where I got it from. When I posted the bag on Instagram, someone mentioned it is from a Valori Wells fabric line. Since I only had a little more than a fat quarter’s worth of fabric, I must have picked it up from a scrap bag I bought at the Stitchin’ Post when I lived in Central Oregon.
Here is the completed bag:
I included the rest of the fabric for Wendy inside the bag in case she wanted to make something with the fabric, as well as some other goodies (couldn’t just send her an empty bag!)
She has hung her bag with some other previous Good Mail from me (the tote bag I made her):
I had a different post planned for this morning, but I was thinking about “Black History Month” in the US, which is every February. Here is a link from the History Channel network if you are not familiar with it or would like to learn more: Black History Month.
No matter where you live in the world I am guessing you are familiar with the history and struggles of people of African decent in the United States. I want to share a post I put on facebook yesterday about Black History Month:
Today is the first day of Black History Month and I know there are individuals in this country who might roll their eyes each February when this month comes around. When I was growing up my parents always made a big deal about Black History Month and we even had some type of encyclopedia they had bought related to Black History and had me read it regularly. Some of you might might not understand what it meant to me as a young Black child to learn about people like me who did GREAT THINGS. Growing up in the 1970s most of the history taught my school focused on “White History”. Back then they even skewed stories of slavery being focused on African tribes selling their tribe members instead of the horrors of our ancestors being stolen also from Africa. Growing up in a time where the focus was that as a person of color you were “less than” a White person was a very different experience than growing up today. I am so thankful for Black History Month and I will always celebrate it! I am so thankful to my parents that in a country that said I was “less than”, I was raised to know that I am “more than” any oppression that tries to tell me I am “less than”.
I am grateful that my parents who believed in education and making the best of yourself despite any challenges you might face. I always think of that Mahatma Gandhi quote when I think of how I was raised:
I will not let anyone walk through my mind with their dirty feet.
Remembering this quote has served me well when I am in a situation (which still happens today) in which it is implied that I am “less than”.
I recently finished an awesome audiobook by the Young Adult Fiction writer, John Green – The Anthropocene Reviewed: Essays on a Human-Centered Planet. In this amazing collection of essays where he “reviews” common human experiences during our geological age, the Anthropocene.
To give the readers a perspective of time since the geologic creation of the earth, he uses the span of a year. The time humans appeared on the earth would be late December and what we would consider “major events in history” would be mere seconds, or milliseconds in the time span of the earth.
So you might be wondering where I am going with this…
Well the author’s use of a familiar time scale – a year’s period – really put into perspective how little time has really passed in the scope of human history (and tiny in the scope of earth’s history) of what we consider to be significant changes in race relations in the US like the end of slavery and the Civil Rights movement. I think in a couple more generations, how people treat each other will evolve (hopefully for the good). Just my musings I am sharing.
I will close this post with a song that I’ve been listening to a lot lately, by Damien Marley, one of the very talented musician sons of Bob Marley, called Speak Life. It gives me a lot of thought on how I want to live my life.
If you are wondering what “Speak Life” means, I did a little googling and it is related to a Bible verse and here’s a general summary which is a consensus of my research:
To speak life is to be a person of encouragement, edification, and blessing to others through what you say.
– gotquestions.org
I say we all go forward and “Speak Life” and make this world as bright as we can.
I guess I’ve officially turned this in to a series: posts about what my woodworking partner John has made in his woodshop!
If you want to see other posts on what he’s made they are all under this link – From the Woodshop (it will include this post; after you click on the link, scroll down to see earlier posts).
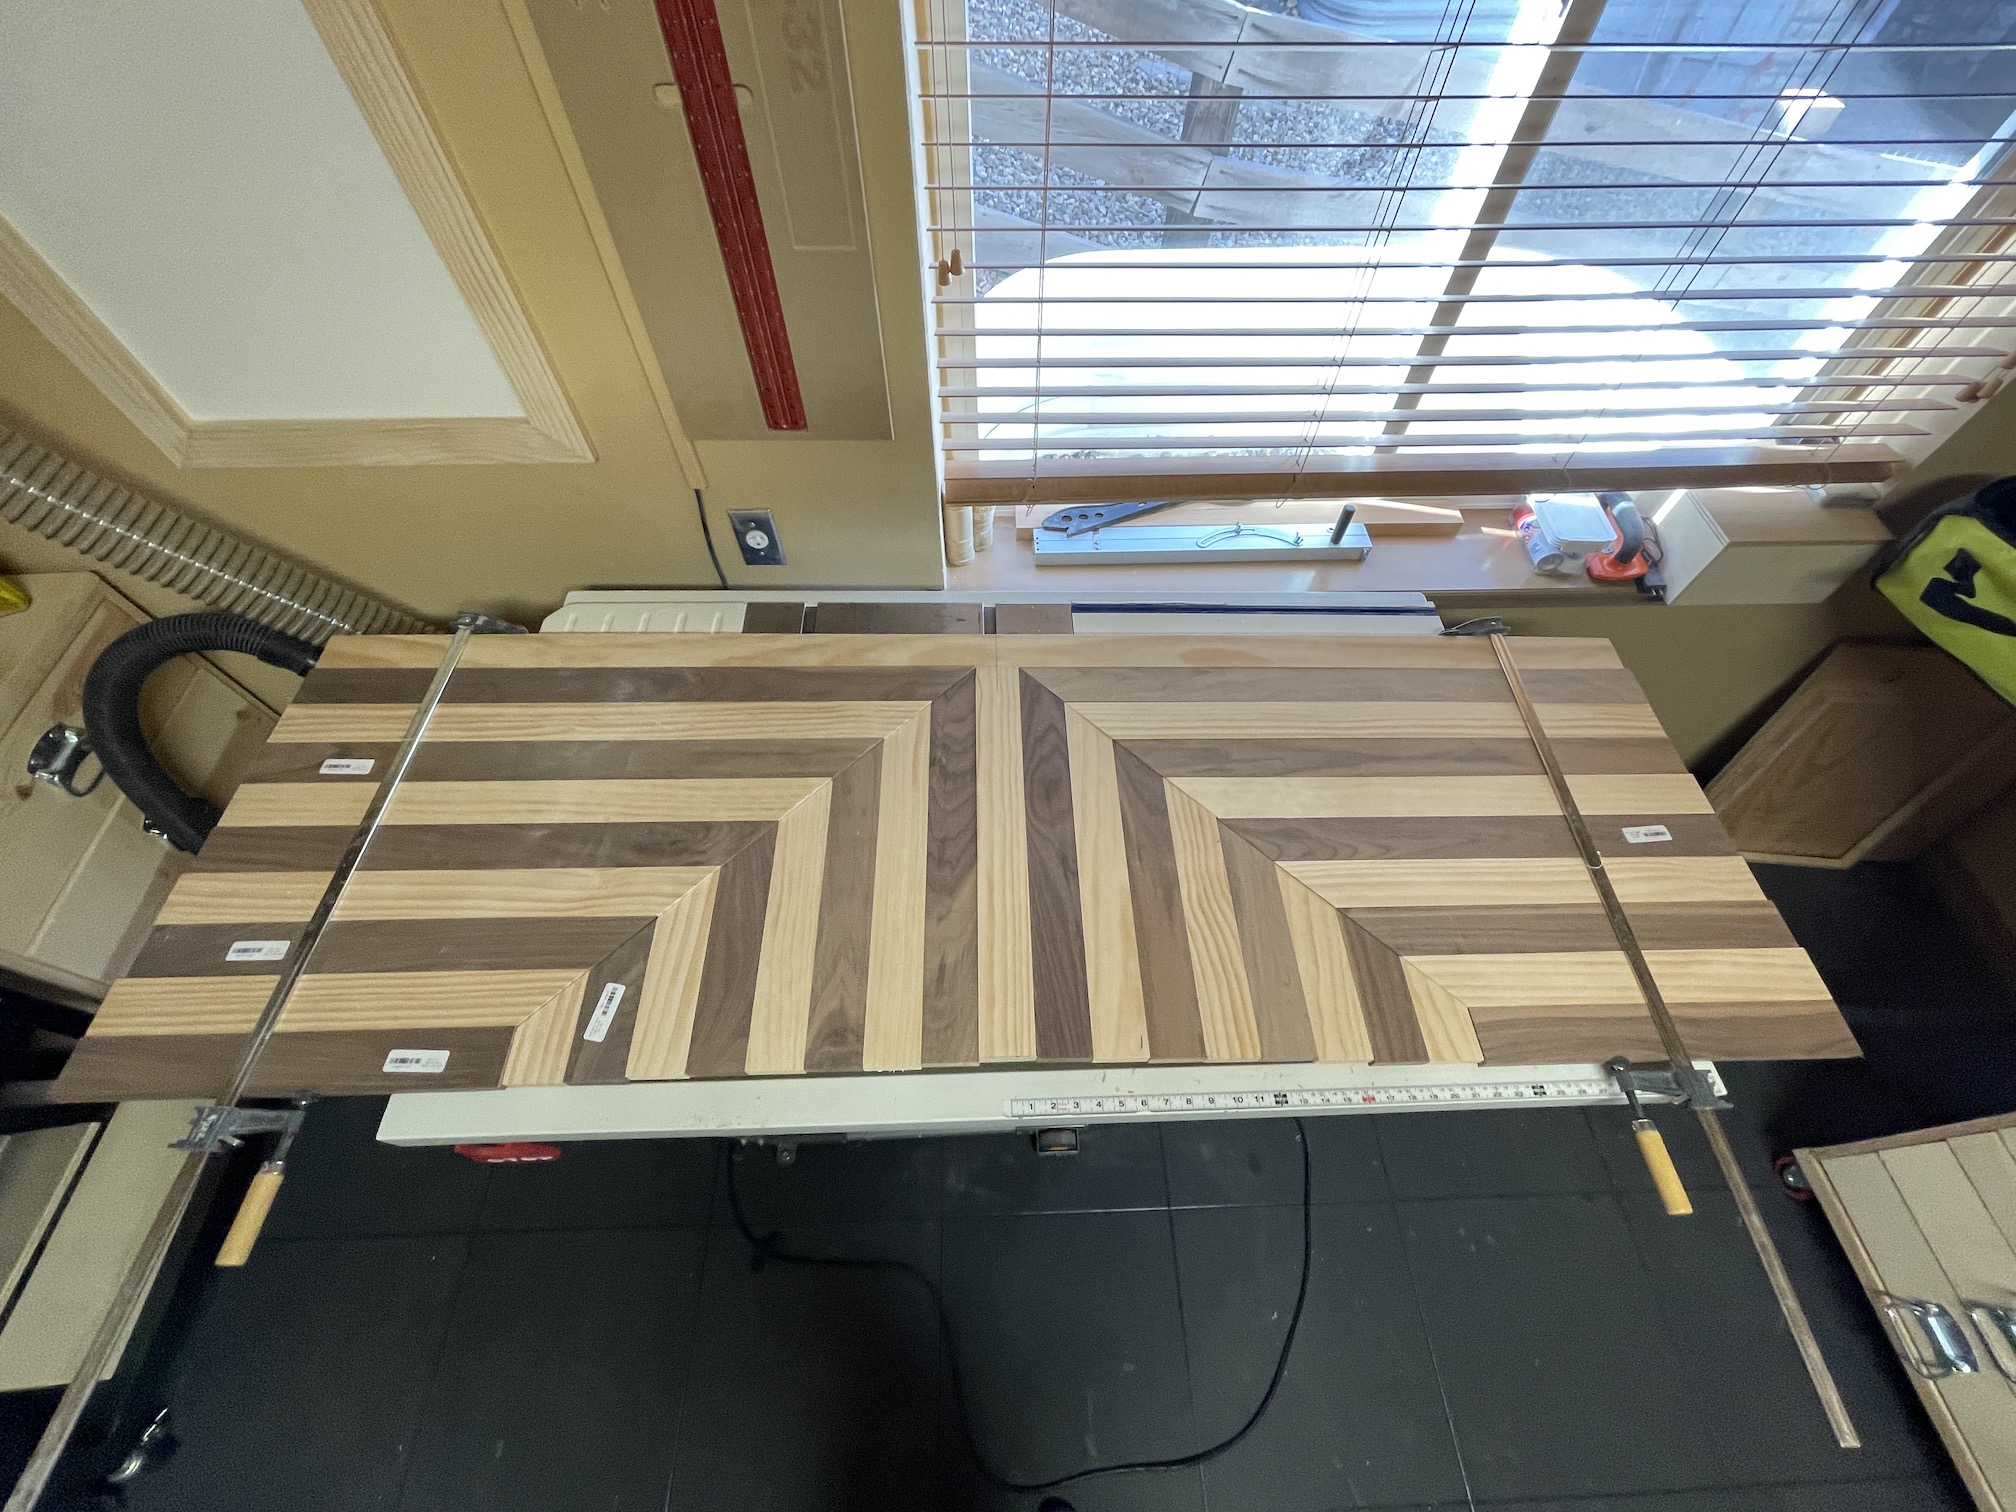
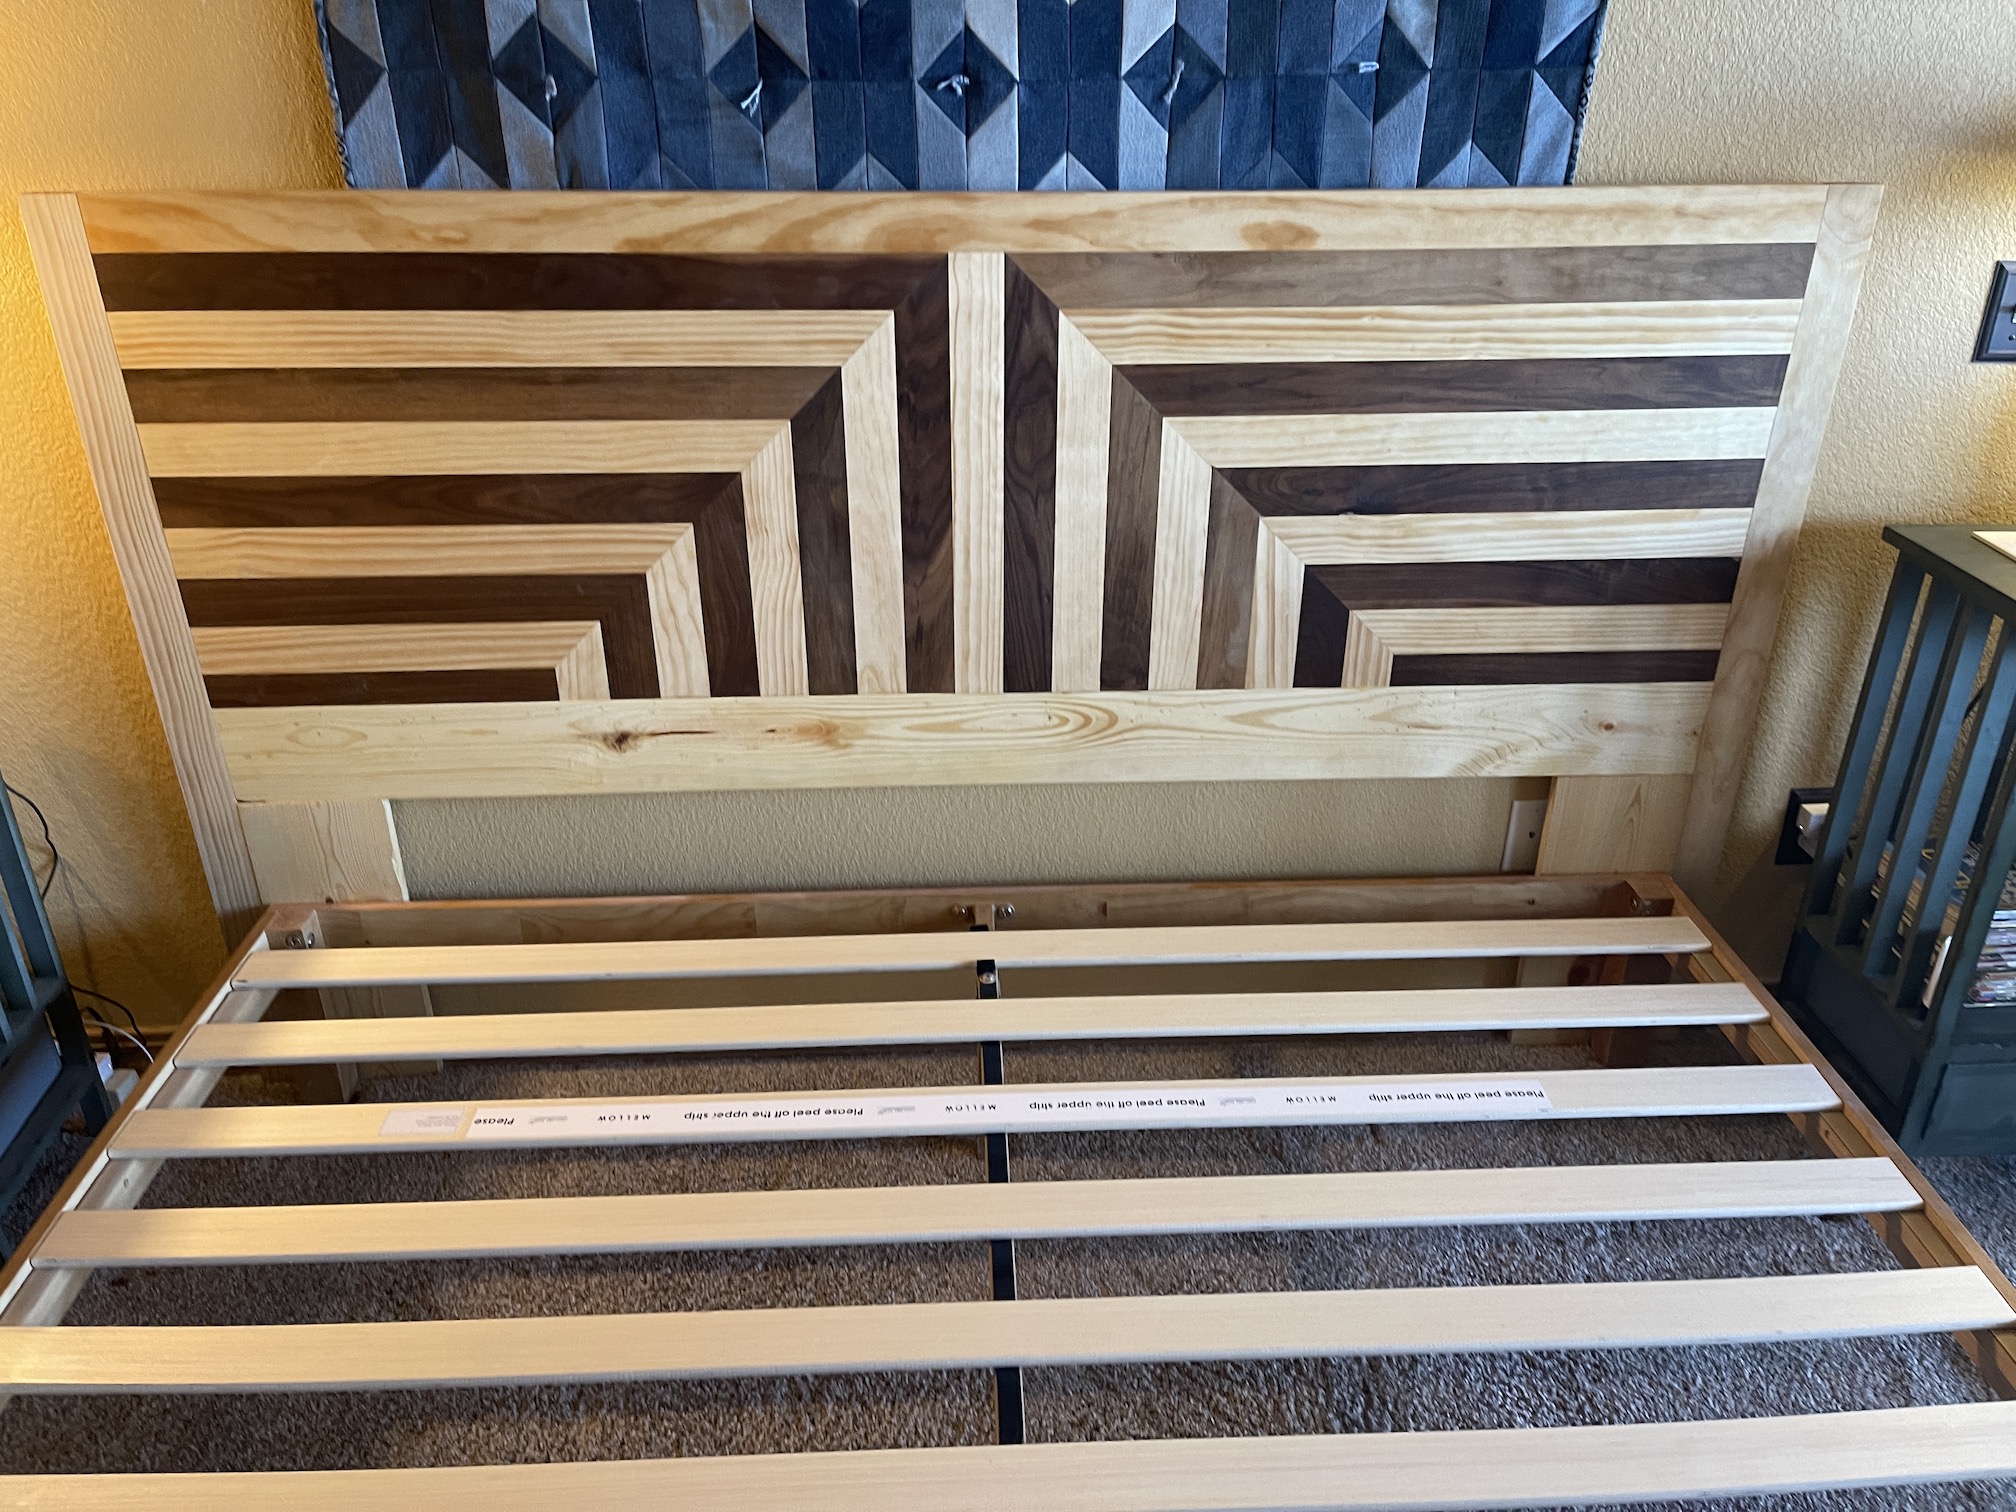
We did not have a headboard on our bed, we just had a platform on which our mattress rested. John decided to make a headboard for our bed using a design similar to the one he used for making Lazy Susans (see post From the Woodshop: No “Lazy” in the Making of a Lazy Susan):
Here is the headboard in progress in his woodshop:
And here are some images of the completed headboard:
It’s amazing how he keeps progressing on his woodworking journey, all self taught using YouTube videos!
Rose Atkinson-Carter a London-based writer with Reedsy, reached out to me with an offer to write a guest post that tied quilting and writing together. I thought it was a fabulous idea, and here is her fabulous guest post!
How Quilting and Writing are Similar Creative Processes
by Rose Atkinson-Carter
This may surprise you, but quilting and writing are really similar. Sure, one is sewing fabric together to make elaborate designs, and the other is putting words to a page to tell a story. But, if you pick apart the steps of writing a story, they’re practically the same steps that you follow to create a quilt. I believe that if you can create a quilt from scratch, you can definitely write a book. Just follow these four quilting steps, and you’ll have a story in no time.
1. Pick a theme
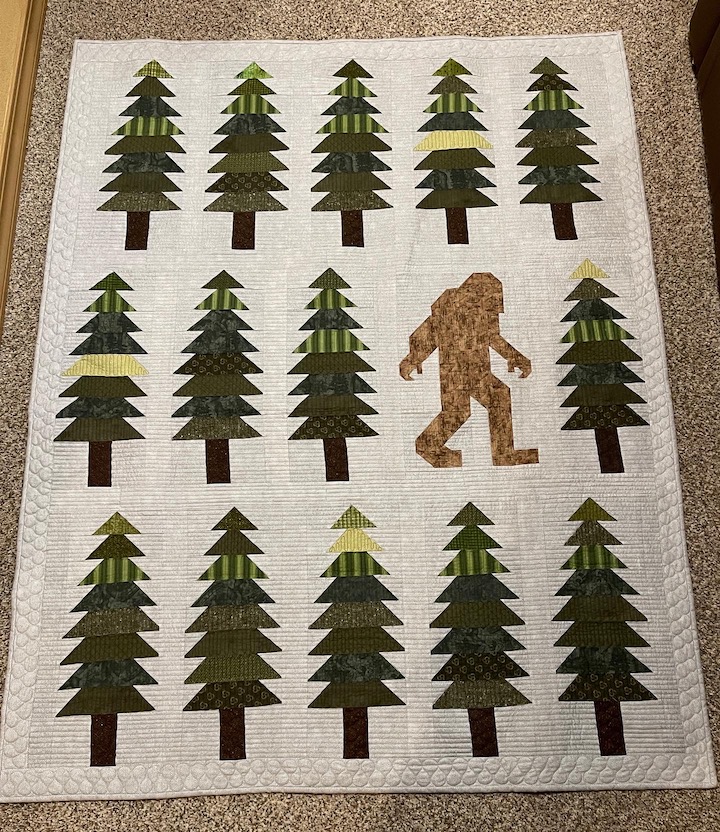
Whether you love playing with colors and patterns in patchwork, or are more interested in the details of the sewing on a single-color background, you’ll want to choose an eye-catching design for your quilt. And while the technical, visual characteristics (i.e. colors, shapes, composition) are important, adding a theme to your quilt — like how this legendary quilt is focused on Bigfoot — can take your design to the next level.
“Legendary” quilt pieced by tierneycreates, quilted by Krista Moser, pattern by Elizabeth Hartman
In the legendary quilt, the artist deliberately uses colors and design elements to emphasize the concept of Bigfoot and his environment. The mossy, sylvan green and brown on a contrasting white background draws the eye to the quilted Bigfoot, who is made of classic quilting shapes of triangles and squares.
When it comes to writing, the same is true. When picking a theme — the thread running through your story — you can give your technical skills a sense of purpose and direction. Just as your theme on your quilt is supported by certain shapes and colors, the theme in a story is supported by a character’s actions and thoughts, or repeating ideas and motifs. What’s more, a well-developed theme is very effective at drawing your readers in.
When your story carries a strong theme, it will be able to reflect the reader’s own experiences or curiosity, leading them to think about your work beyond just when they’re sitting with the book in hand.
So for quilting and writing both, start with an idea for a theme, something that you can build off of toward a finished product.
2. Pick out your fabric
After creating your quilt design, you’ll want to pick out the perfect fabric. This will be the canvas for your masterpiece to unravel on, the ideal characteristics of which depend on the purpose of your quilt. If you’re making a coat or blanket, you’ll want to pick fabric that’s comfortable, won’t scratch, and something that will hold stitches for a long time. If you’re making a piece of wall art, you might choose fabric that’s more of a statement — something with texture, or bold colors.
The fabric you choose can make or break your project. To make this decision, you have to take a “big picture” look at your quilt’s theme and vision so that you can choose a strong foundation to advance your product from the get-go.
The same goes for creating a story. Sure, you won’t write your story on yards of quilter’s cotton, but it is important to determine the right structure for your story. Will the theme you pick be supported by a hero’s journey plot structure, or more of a simple three act structure? If you’re able to put together an outline (it doesn’t have to be super fleshed out) before you write, you’ll have a stronger start to the project as a whole. So take the time to pick a structure that helps build the theme you’ve chosen.
This is why picking a theme that you truly care about is important. Whether you’re designing on fabric or on the page, a theme keeps you guided throughout the whole process, reminding you with every step that the aim is to create a cohesive end product.
3. Sew it all together
Once you’ve gathered the materials that will support your theme, you’ll be ready to start sewing. If you’re creating a patchwork quilt, you’ll have quite a few pieces to create and arrange in just the right way. Swapping one triangle or granny square for another of the wrong color will distort the image you’re trying to create, so you have to go through the sewing process paying close attention to the details of your design. Much like the various elements involved in book cover design, you’ll need to weave together multiple elements that communicate a cohesive story or theme.
Recycled Hope I: Recycled Road by tierneycreates
This all will take time, as is the case with writing a novel. Even if you already have some plot points laid out, and now you just have to fill in the details, you’ll still have to pay careful attention to how it all fits together. Be mindful of plot holes or inconsistencies of character descriptions. If that sounds like a lot, the good news is that developmental editors exist to help you with these issues. Or if you can’t go pro, consider asking a writer friend to do a feedback exchange with you: creative exchanges are always fruitful!
4. Add finishing touches
After weeks of hard work, your quilt is almost ready for photos! You’ve sewn your design and everything is looking great. Now, it’s time to add any finishing touches. This might include ironing out any kinks, clipping any thread ends that have snuck through the fabric, or adding a border around the motif. At this final stage, you’re doing everything to make sure the quilt reflects your best work.
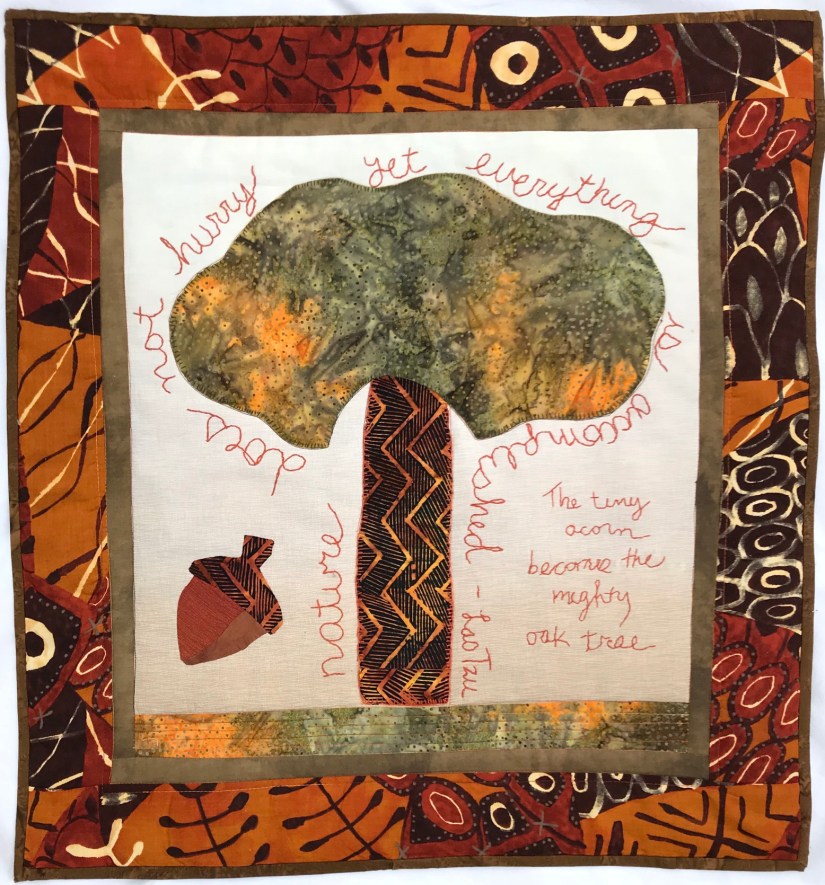
Tree of No Hurry by tierneycreates
In writing, this type of editing is typically known as copy editing. You’ve gone through the hard work of getting your words down on the page and cleaning up your story. A copy editor will help clean up the prose to make sure the story shines. Now, it’s time to cut those thread ends and close the quilt. As a final safety net, a proofread will take your writing to a professional level. Any grammatical errors, typos, or weird spacing that might have slipped by you will be caught by a proofreader, making your pages spotless.
If you can put in all that time and energy in creating a gorgeous quilt, you’ll have no problem at all getting a story together. Just remember your quilting steps, and your story will come together just as beautifully.
Rose Atkinson-Carter is a writer with Reedsy, a marketplace that connects authors with the world’s best self-publishing resources and professionals like editors, designers, and ghostwriters. She lives in London, and loves writing and crafts.
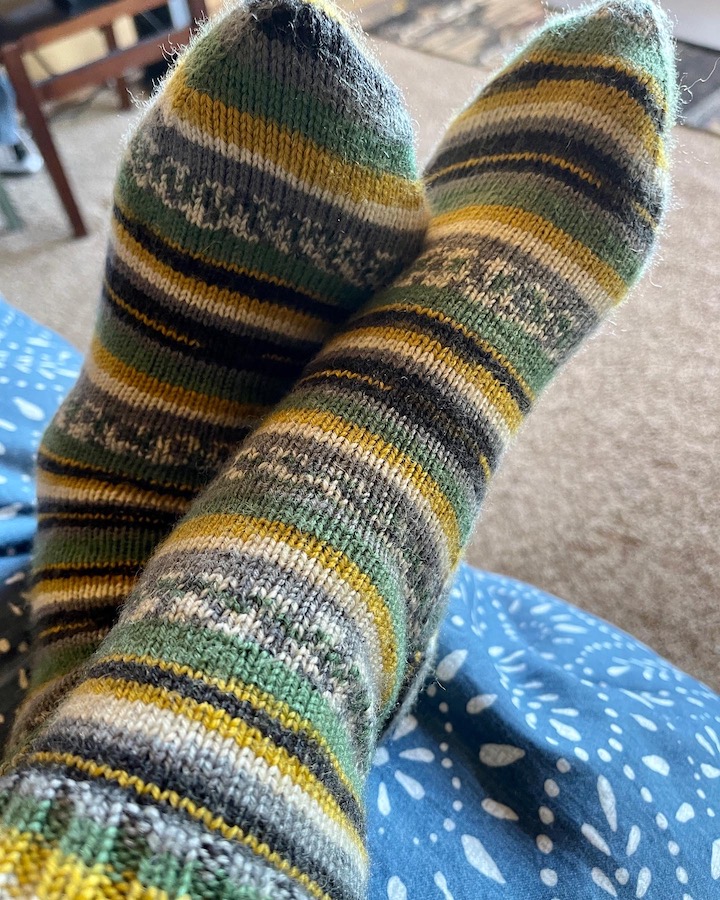
I am fascinated with the talent of the knitters whose blogs I follow. One of those is @Mildy Granola who is the queen of knitting socks. I think her entire family (hubby and adorable kids) only wear her hand knitted socks.
I’ve never owned a pair of hand knitted socks and I am Terrified (yes with a capital “T”) of knitting socks (even though I can knit a basic hat so I know all about double pointed needles).
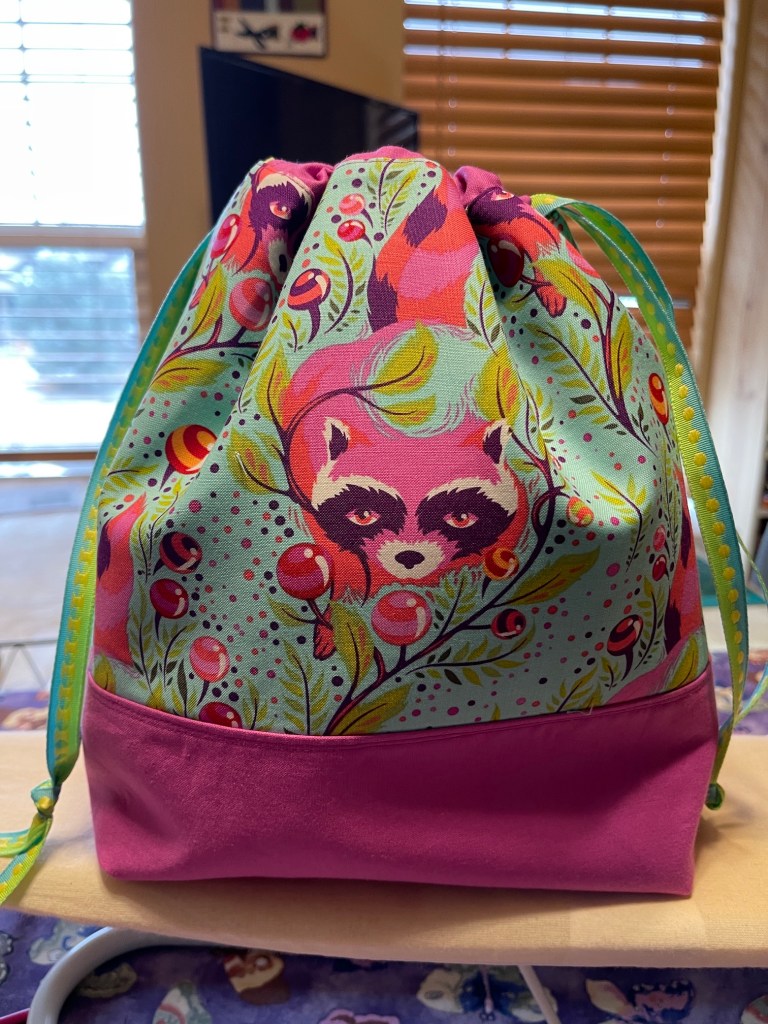
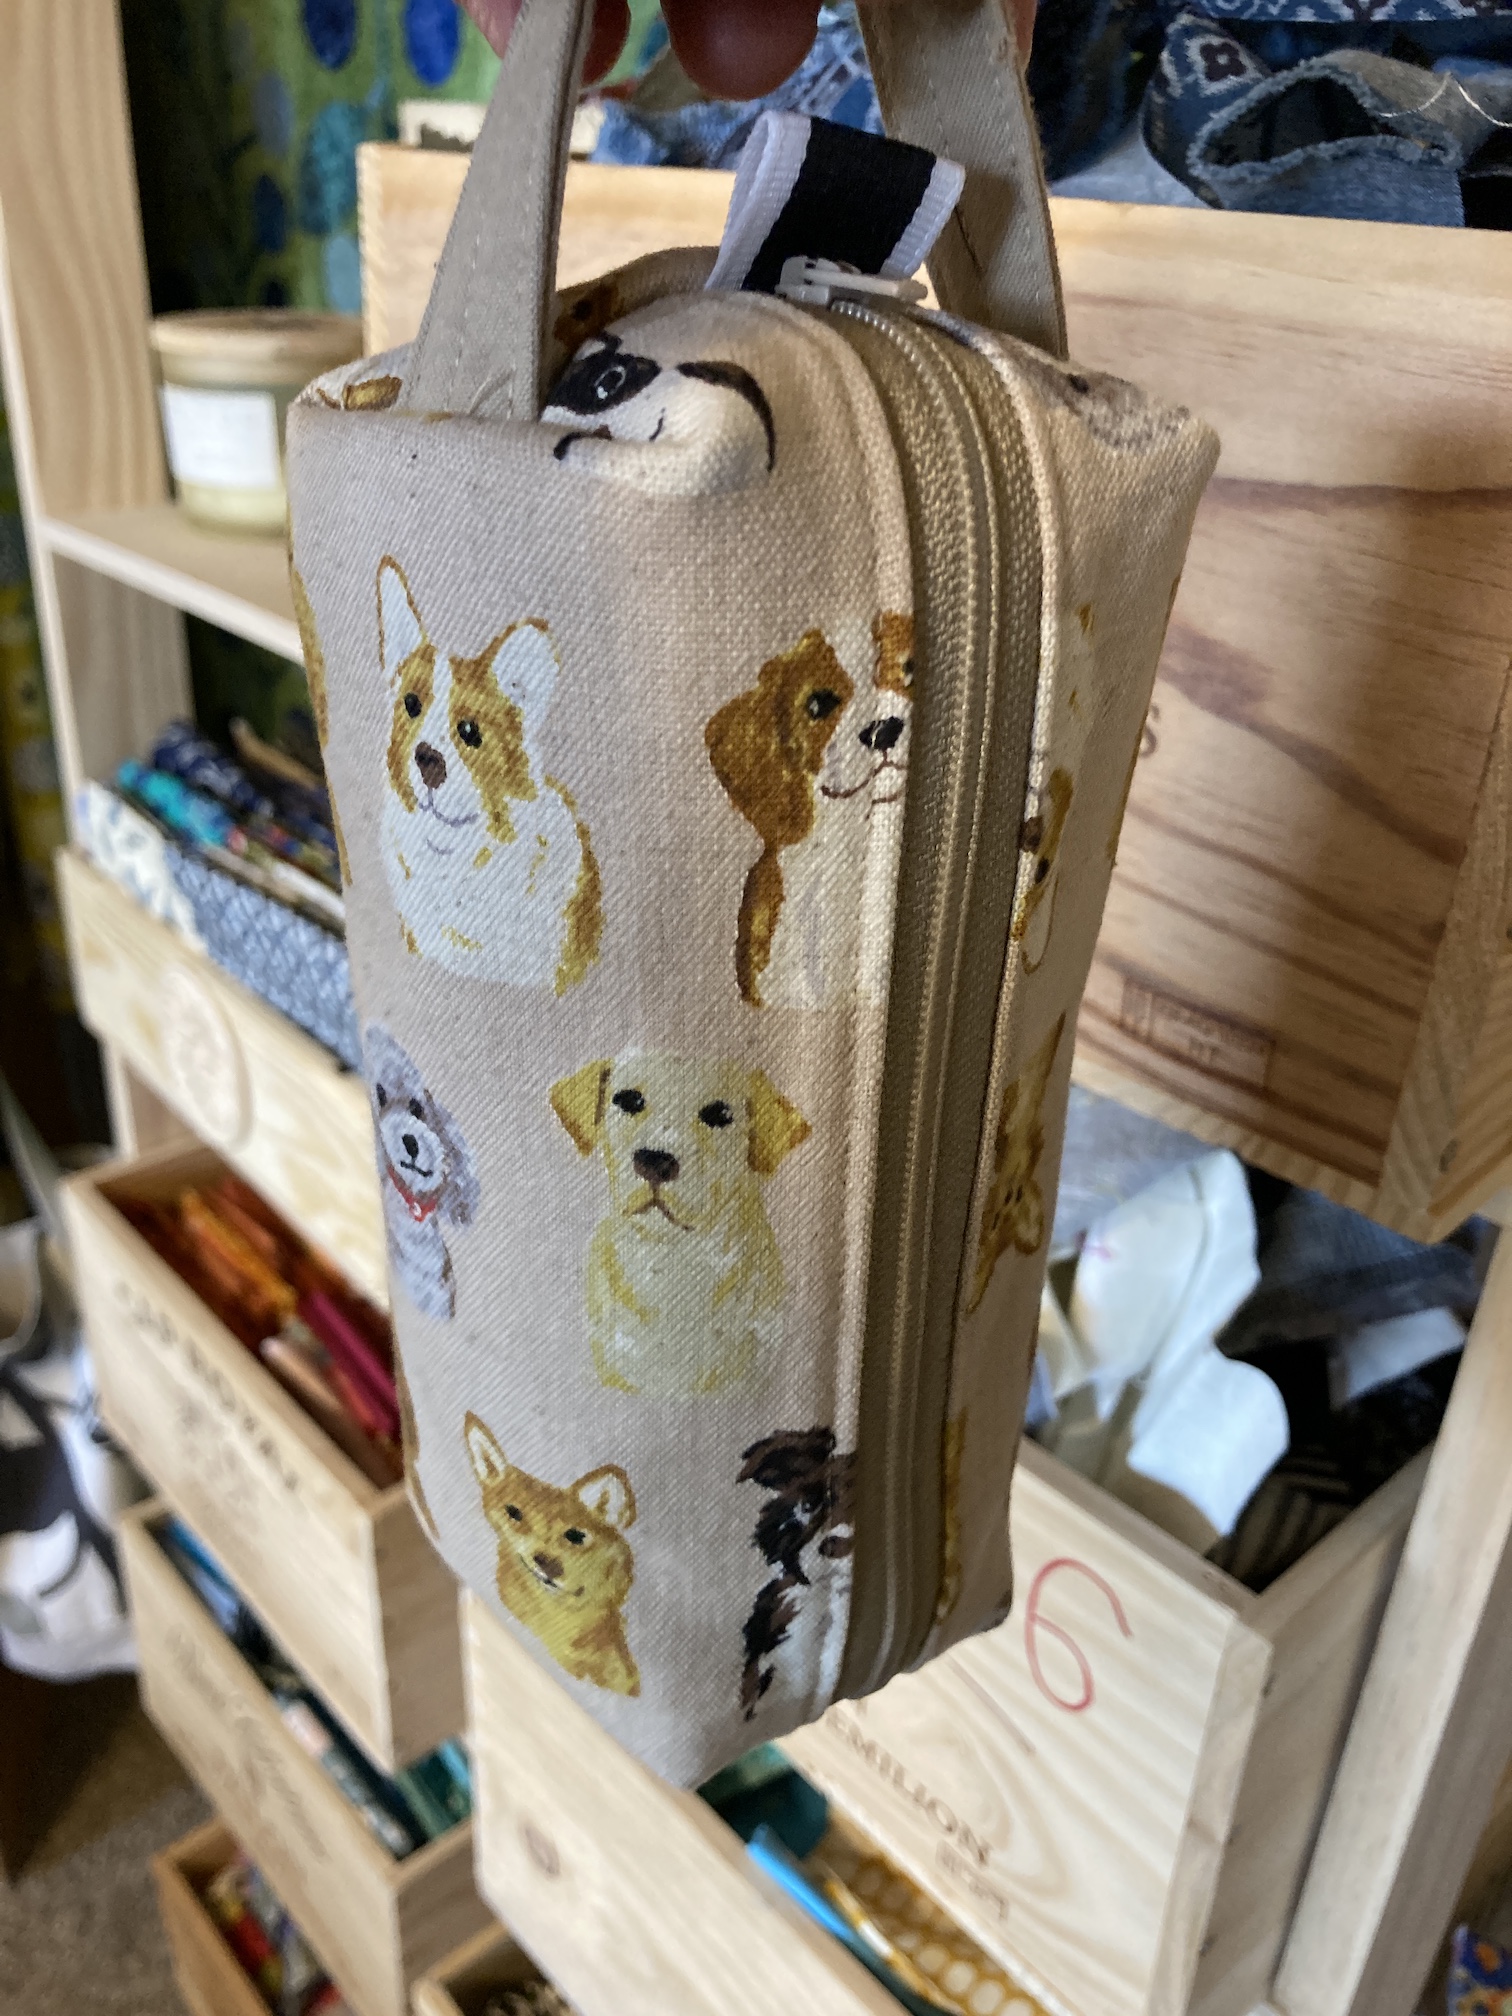
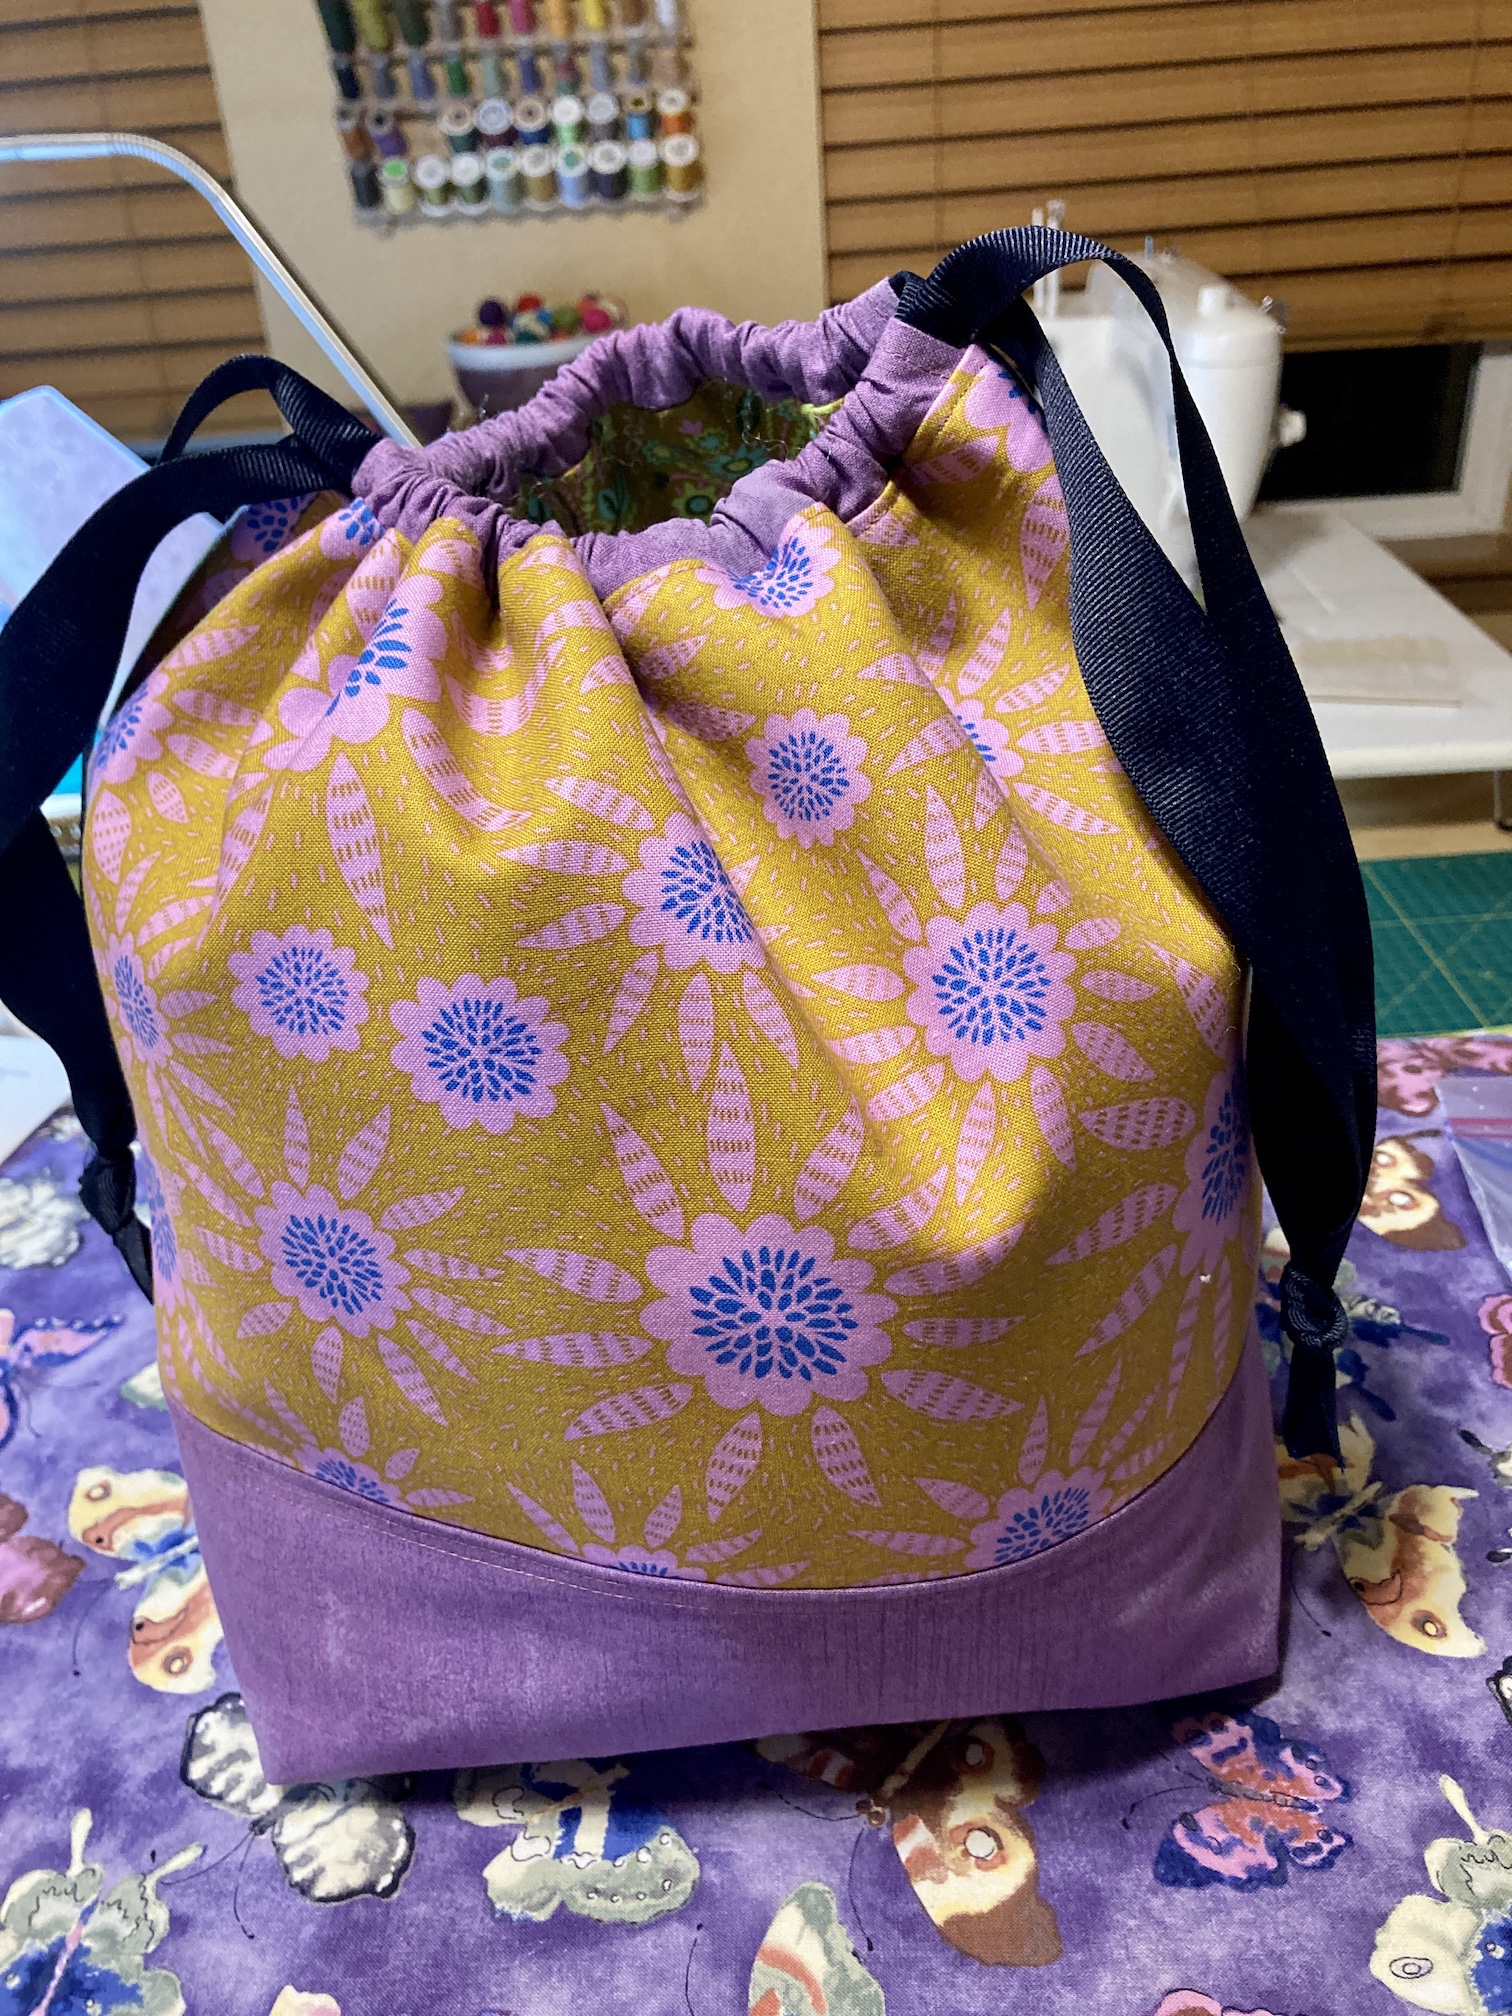
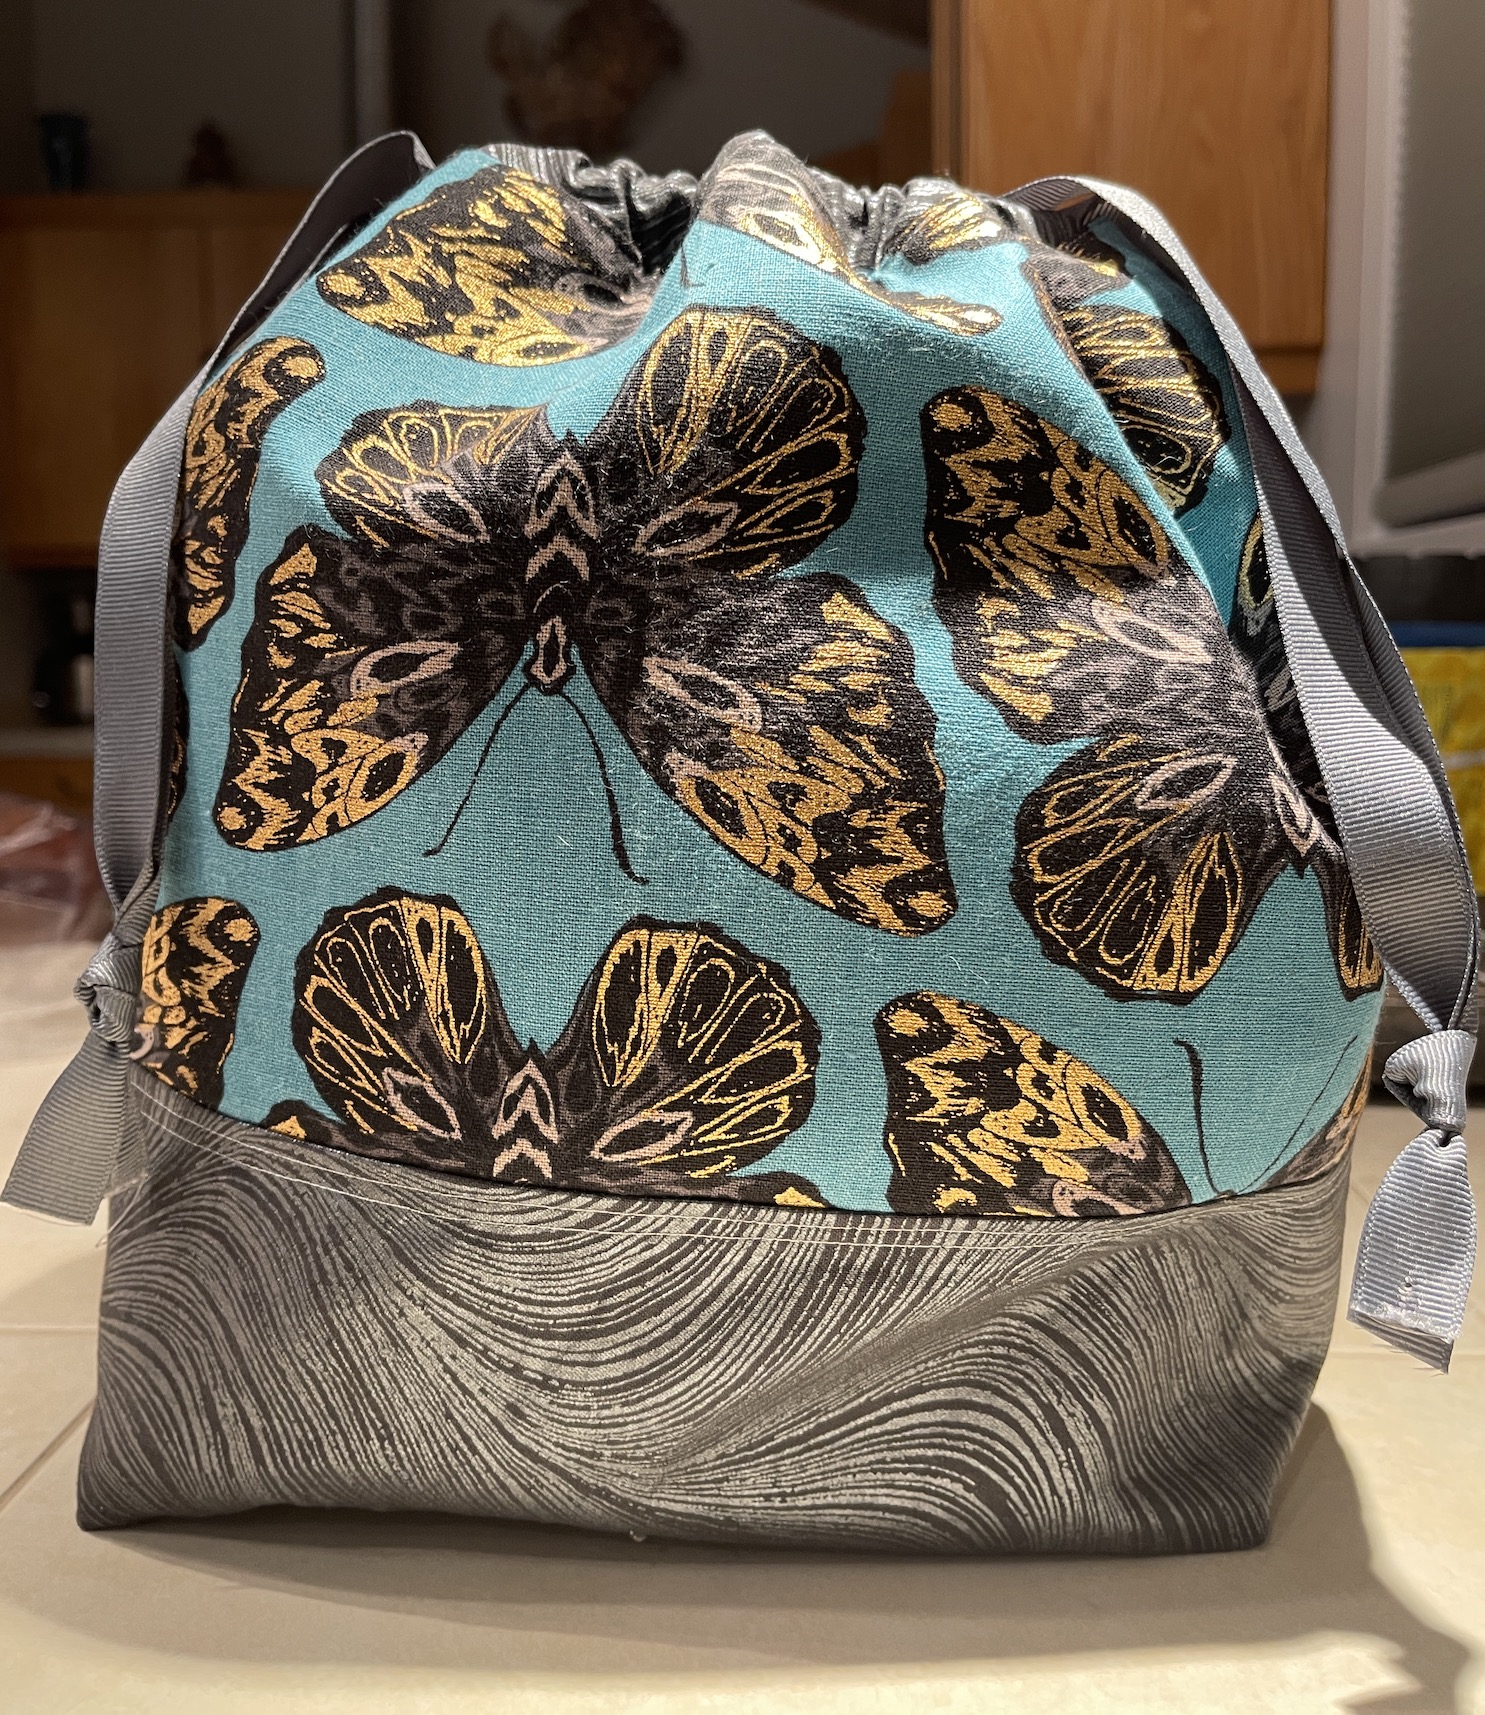
So when Sarah @mildygranola offered to make me a pair of hand knitted socks in exchange for one of my drawstring/project bag, I quickly said YES!
Here are the amazing socks she made me:
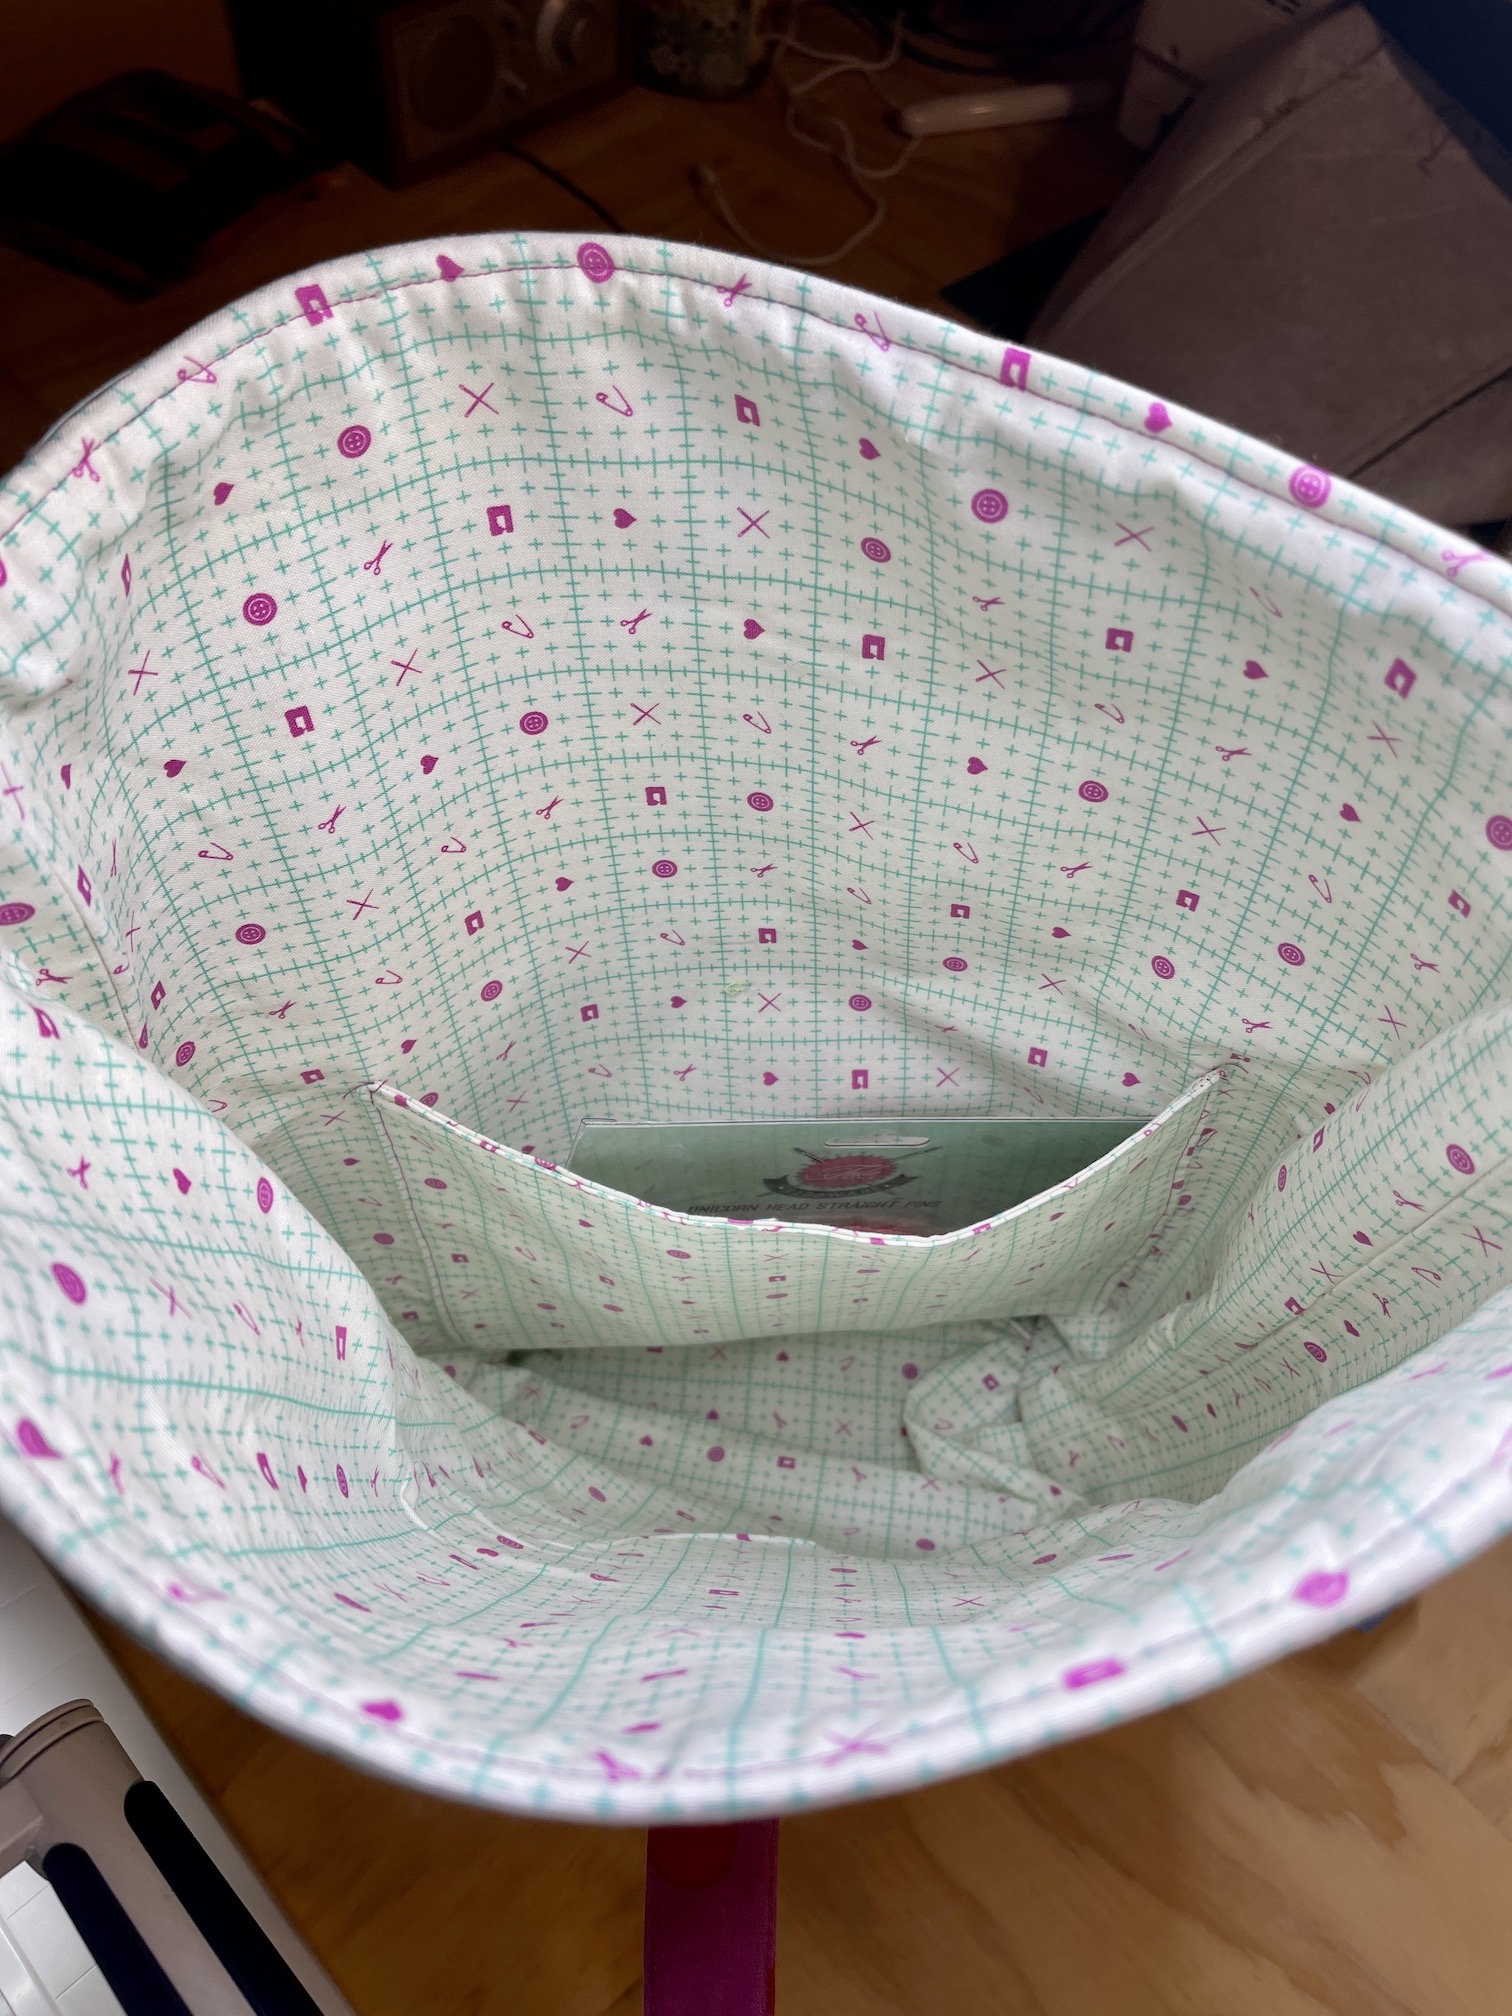
And here is the drawstring/project bag I made her with the fabric she requested:
Sarah was not particularly focused on the fact that the outside bag fabric was Tula Pink fabric, she just liked the raccoon fabric, so I did not use Tula Pink fabric for the inside bag. Instead I found this lovely floral fabric that coordinated better in my opinion.
Sarah of course has already received her bag and it is already featured in photo in her latest post: Quick Trip
I think I made out better than she did with my first pair of hand knitted socks!
I better get this post out before the end of January! I’ve enjoyed seeing 2021 crafting retrospectives by my blogging buddies and thought I would do one myself.
So here is it is gallery format:
image credit – The James Museum
On one hand it seems like I made a lot of things in 2021, and on the other hand it seems like I definitely did not make all that I planned!
I am avoiding for some reason (unknown) any official New Year’s Resolutions this year but I would like to challenge myself to make more things in 2022 than I did in 2021.
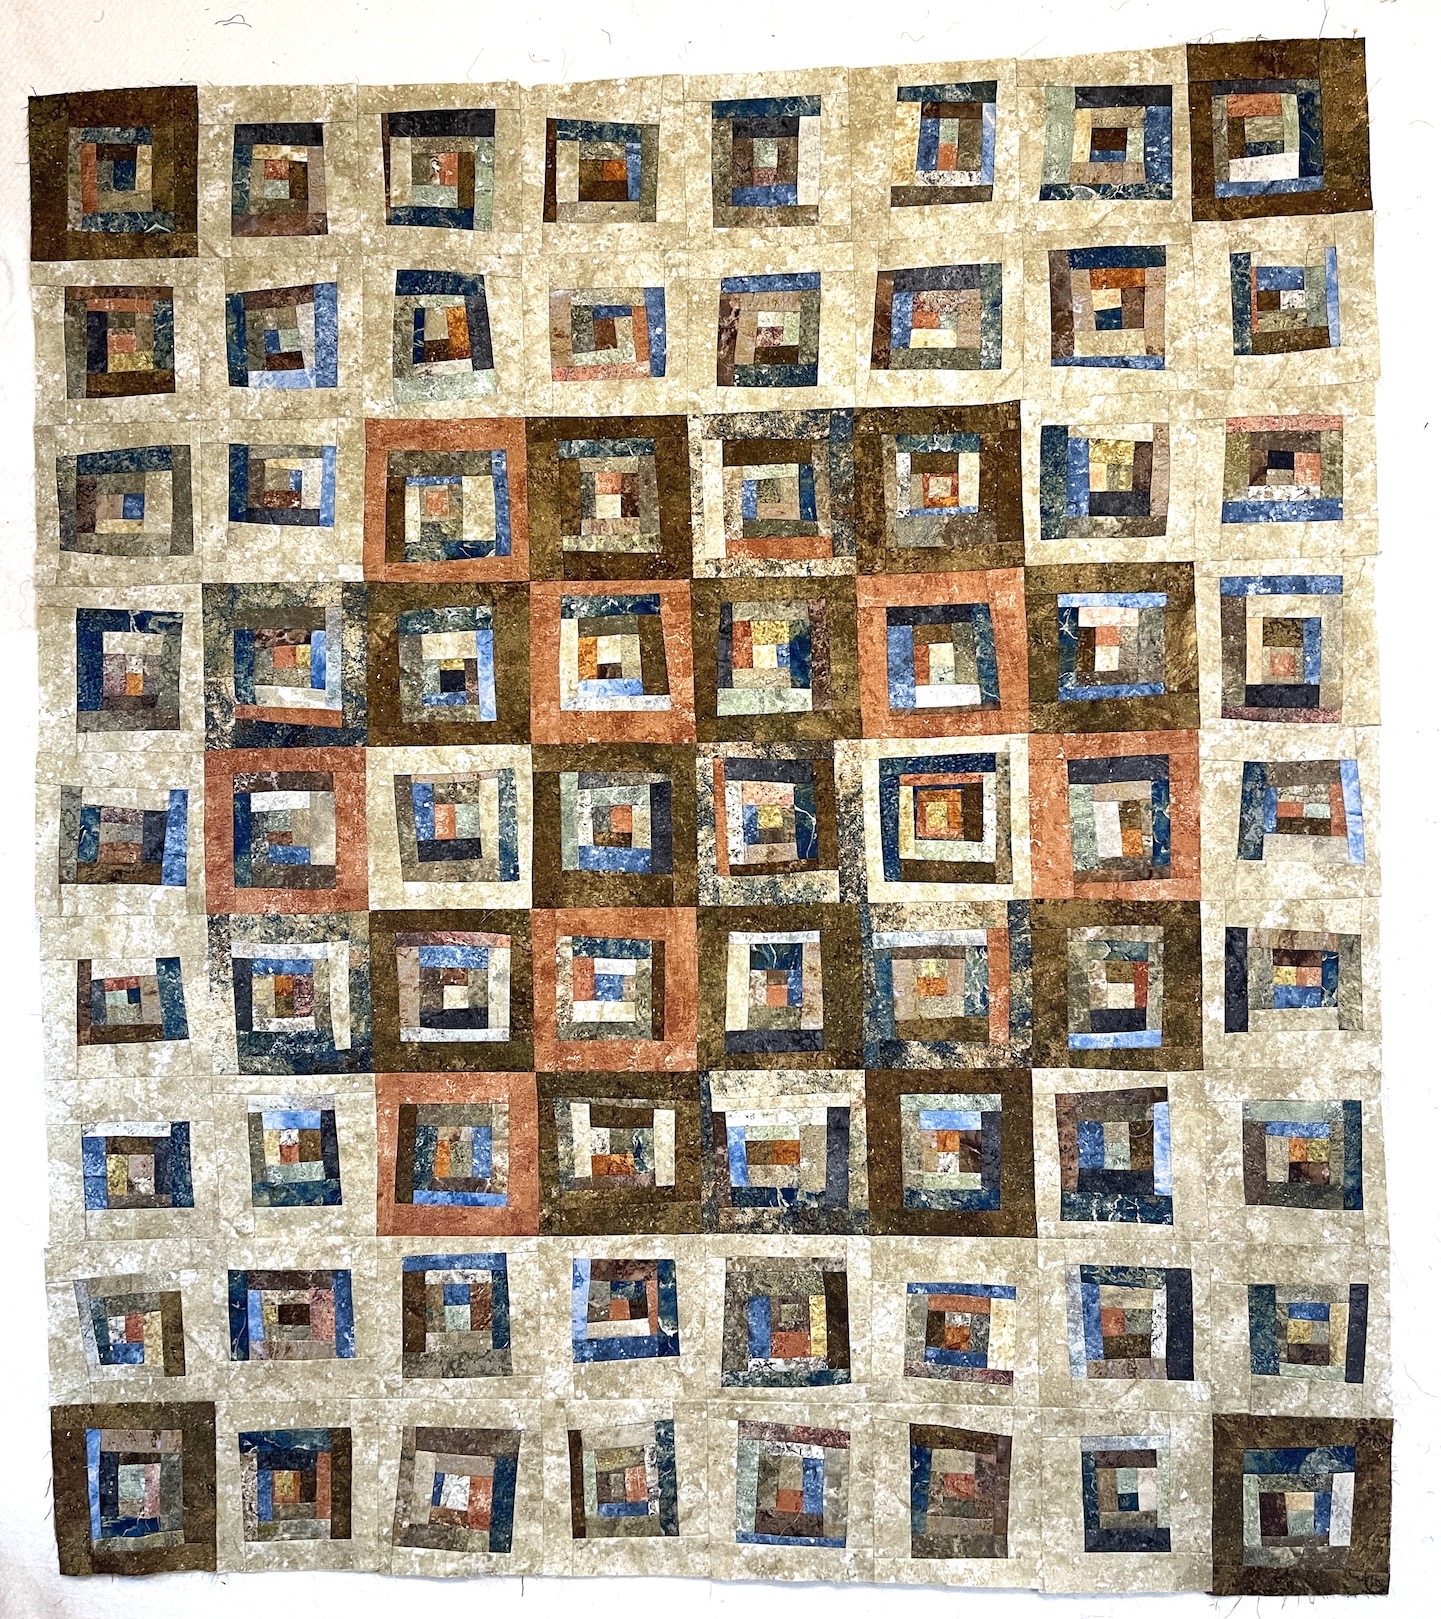
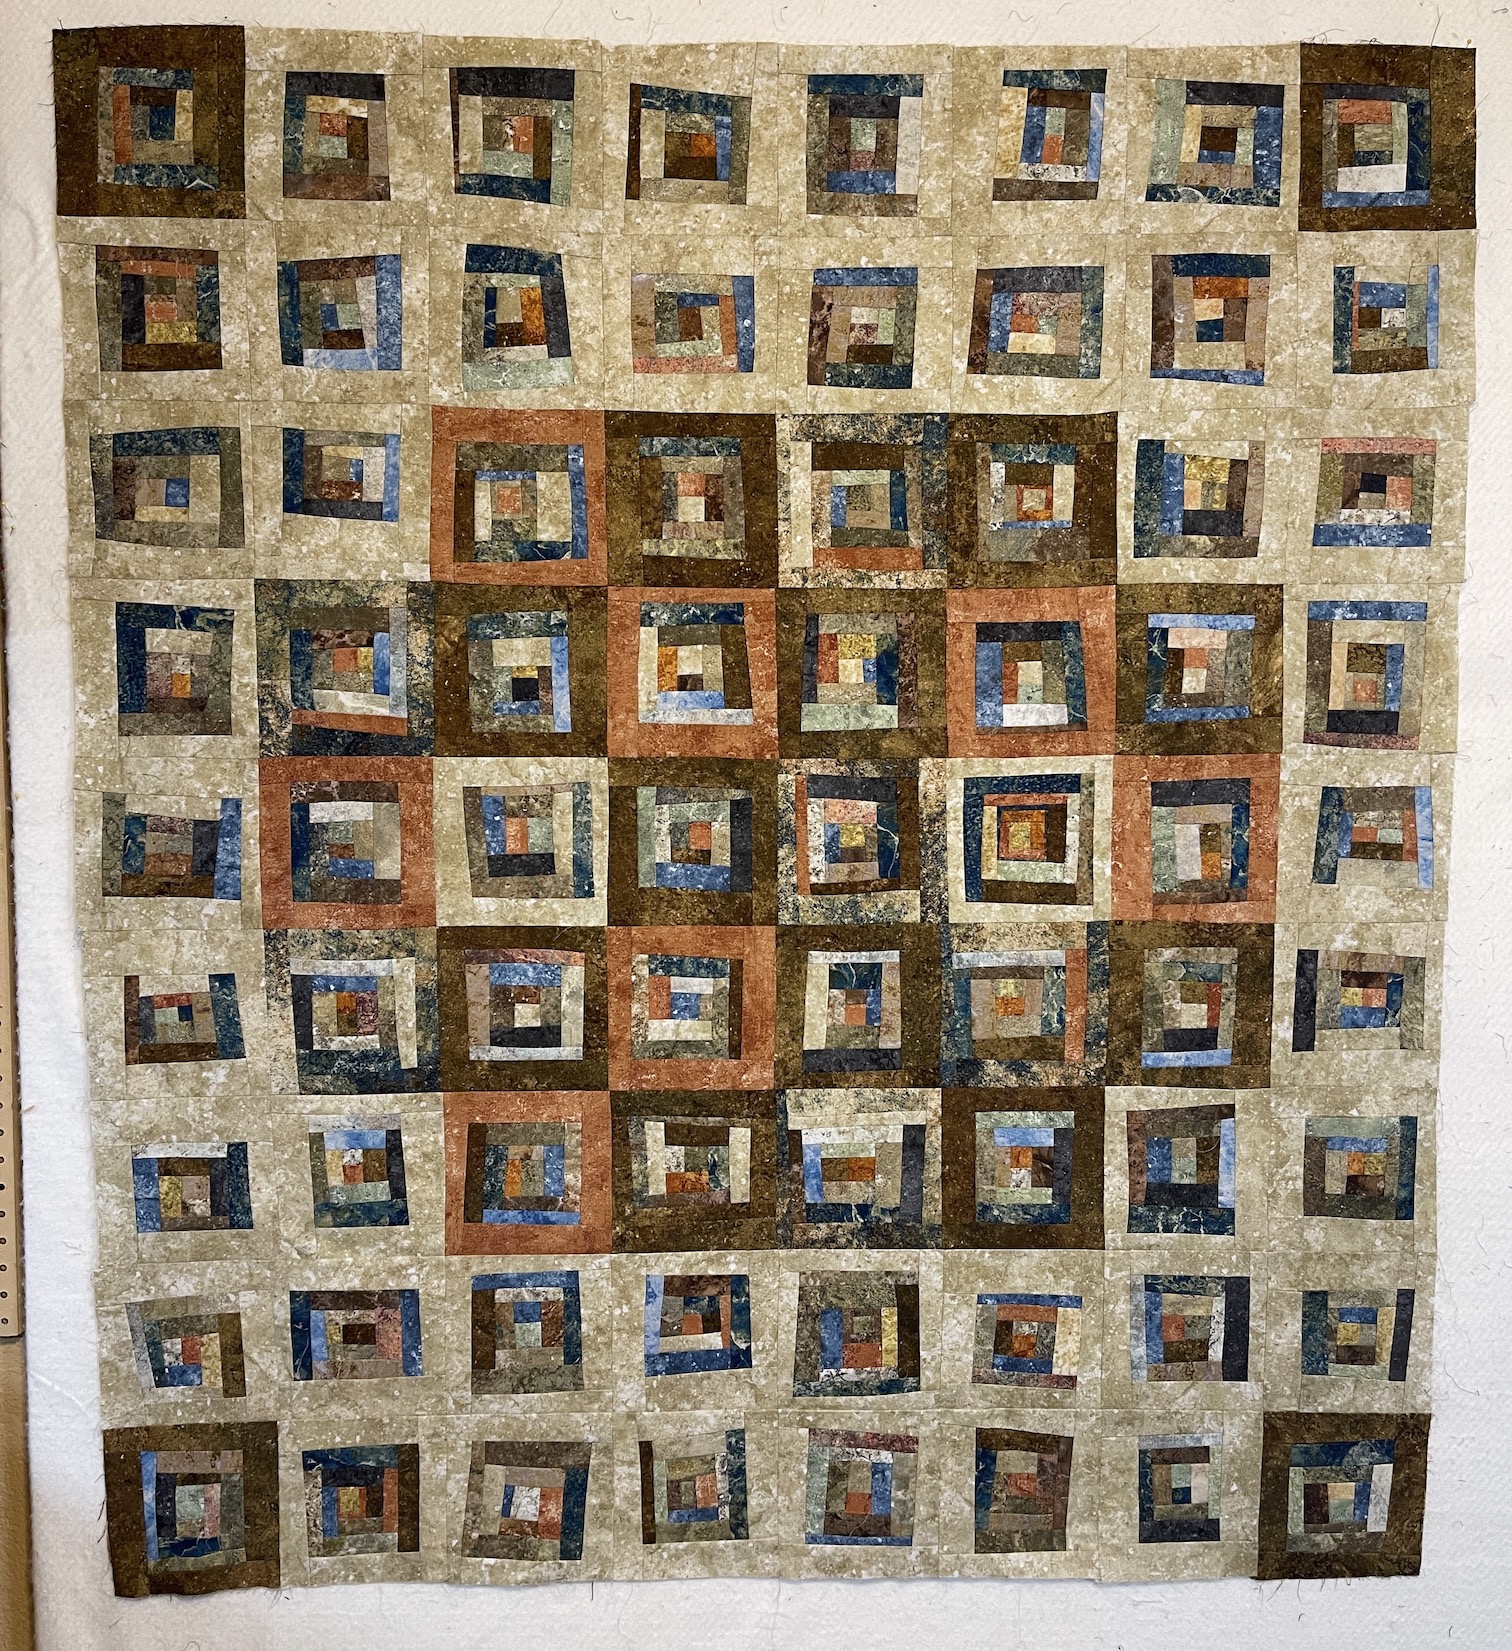
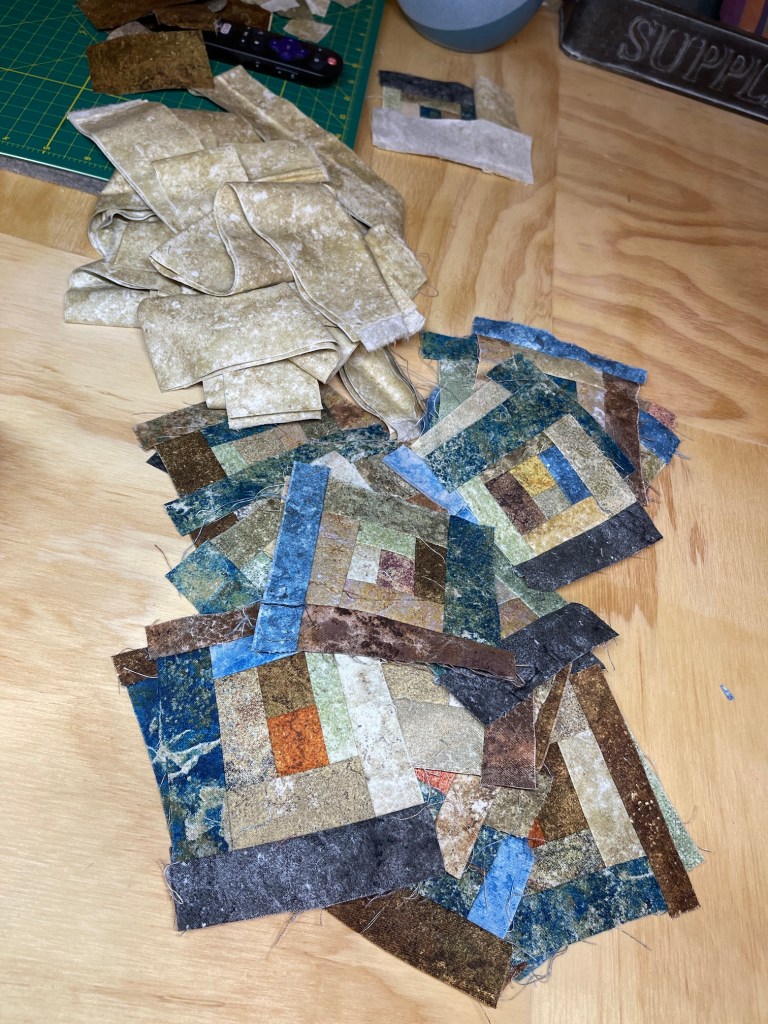
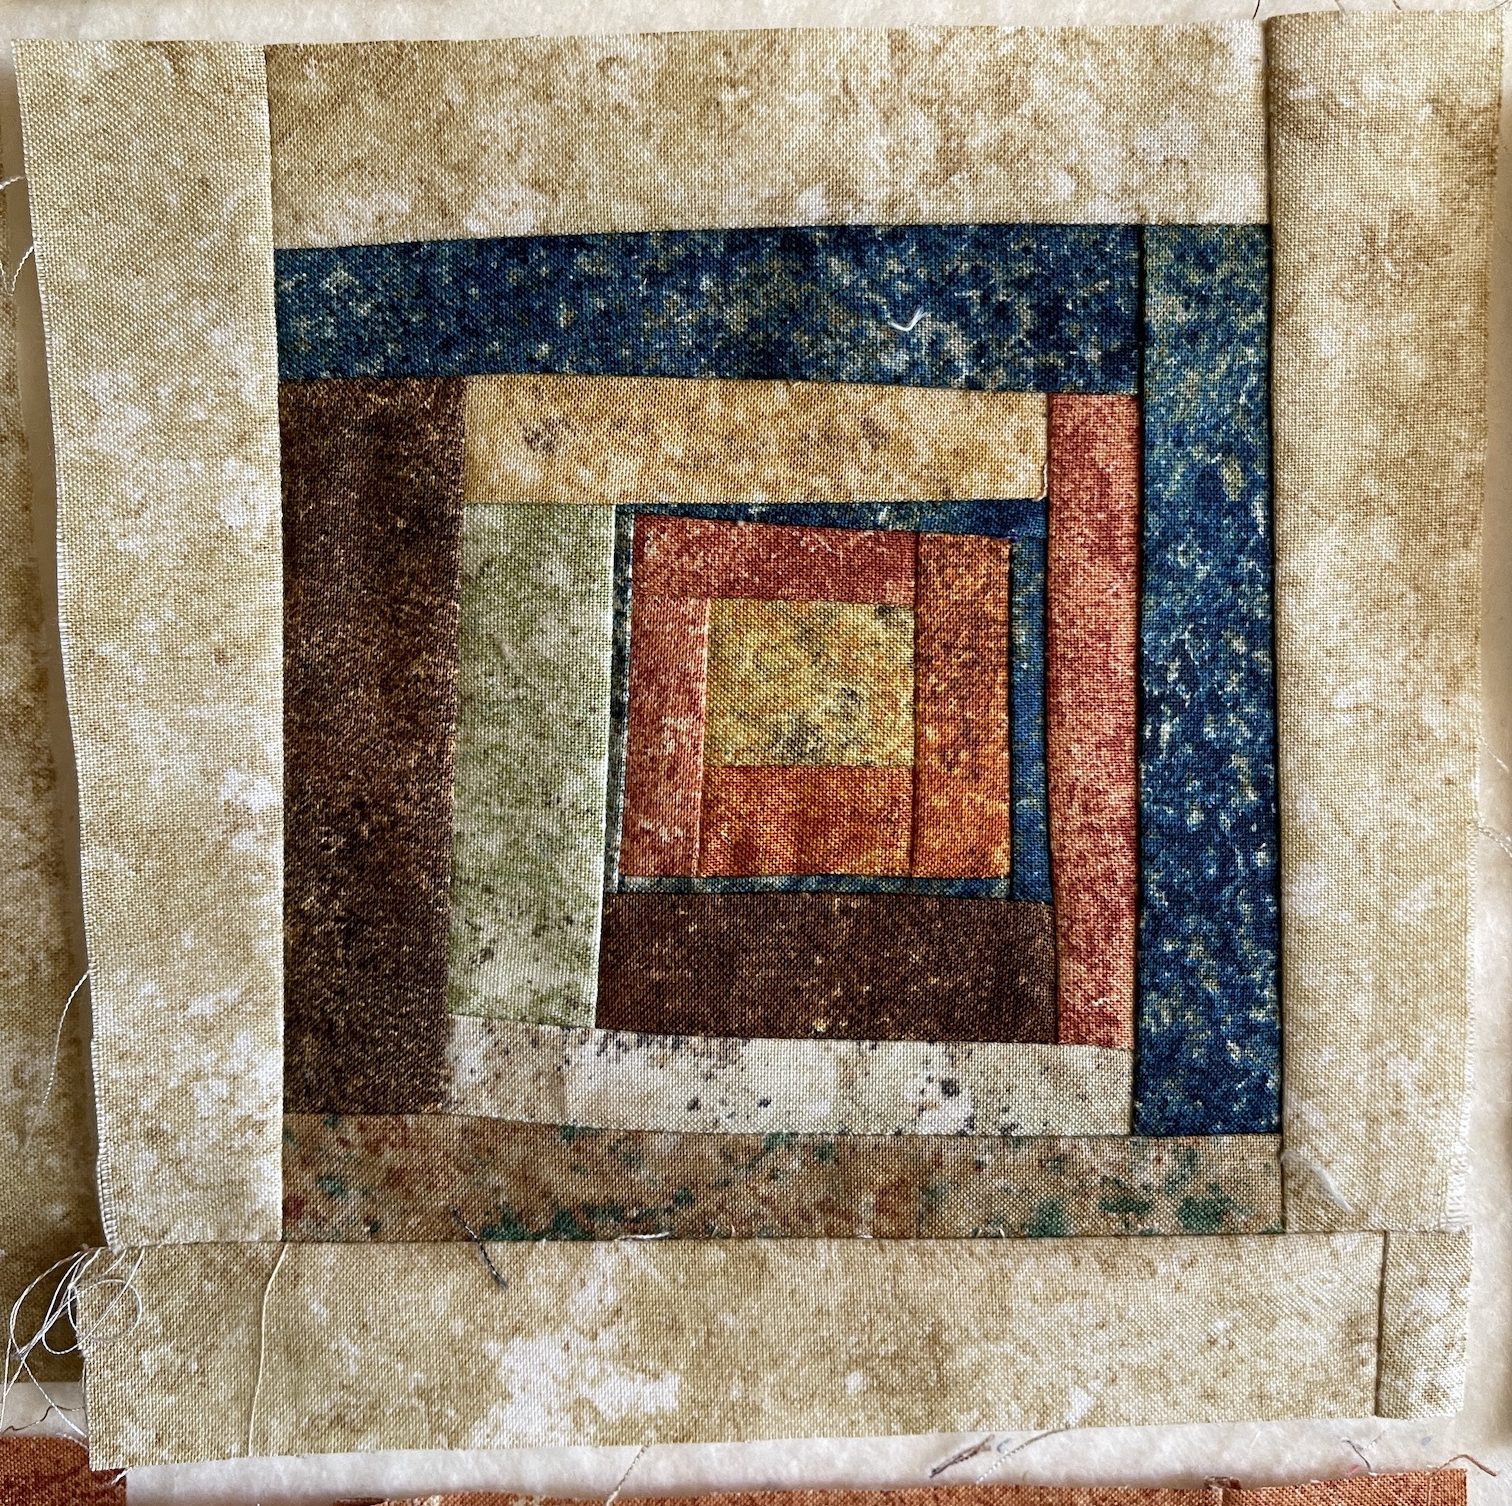
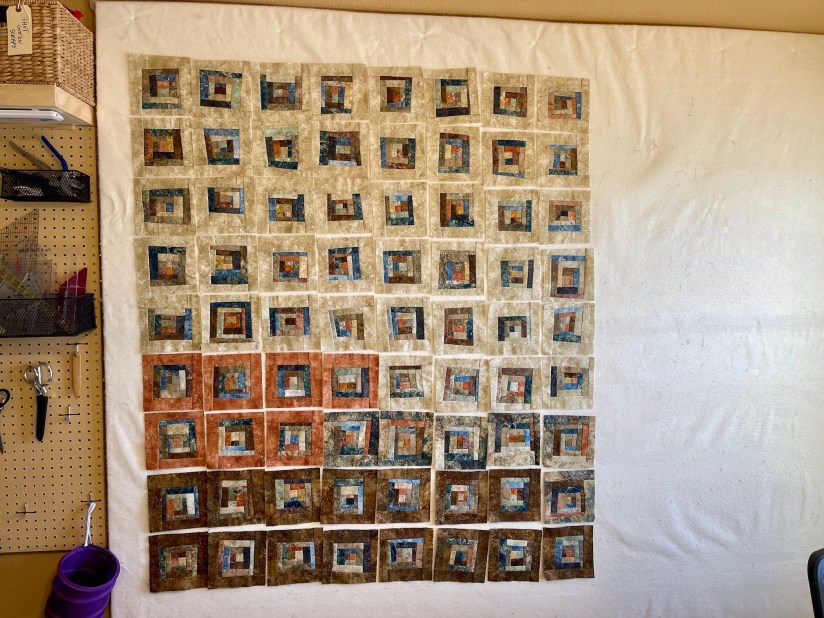
This post is a follow up to my previous post What’s On The Design Wall: Stonehenge Scrappy Freeform Log Cabin, where I was using the freeform/improvisational log cabin block piecing technique – “log jamming” – to create a scrap quilt from my Northcott Fabrics Stonehenge line scraps.
I completed all the blocks and was deciding on a layout.
The layout I came up with was one in which the blocks set in other colors besides the cream Stonehenge fabric, were set in the center of the quilt (except for 4 I saved to use as cornerstones).
I decided to name the piece “Scraphenge” since it was made from Stonehenge fabric line scraps!
It is not a very large quilt, it measures 55 inches tall by 48 inches wide (139 cm by 122 cm).
Right now I am trying to decide whether to quilt it myself or send it to a long arm quilter. However for now I am just going to leave it up on the design wall as I have other projects in queue I want to work on (smile).
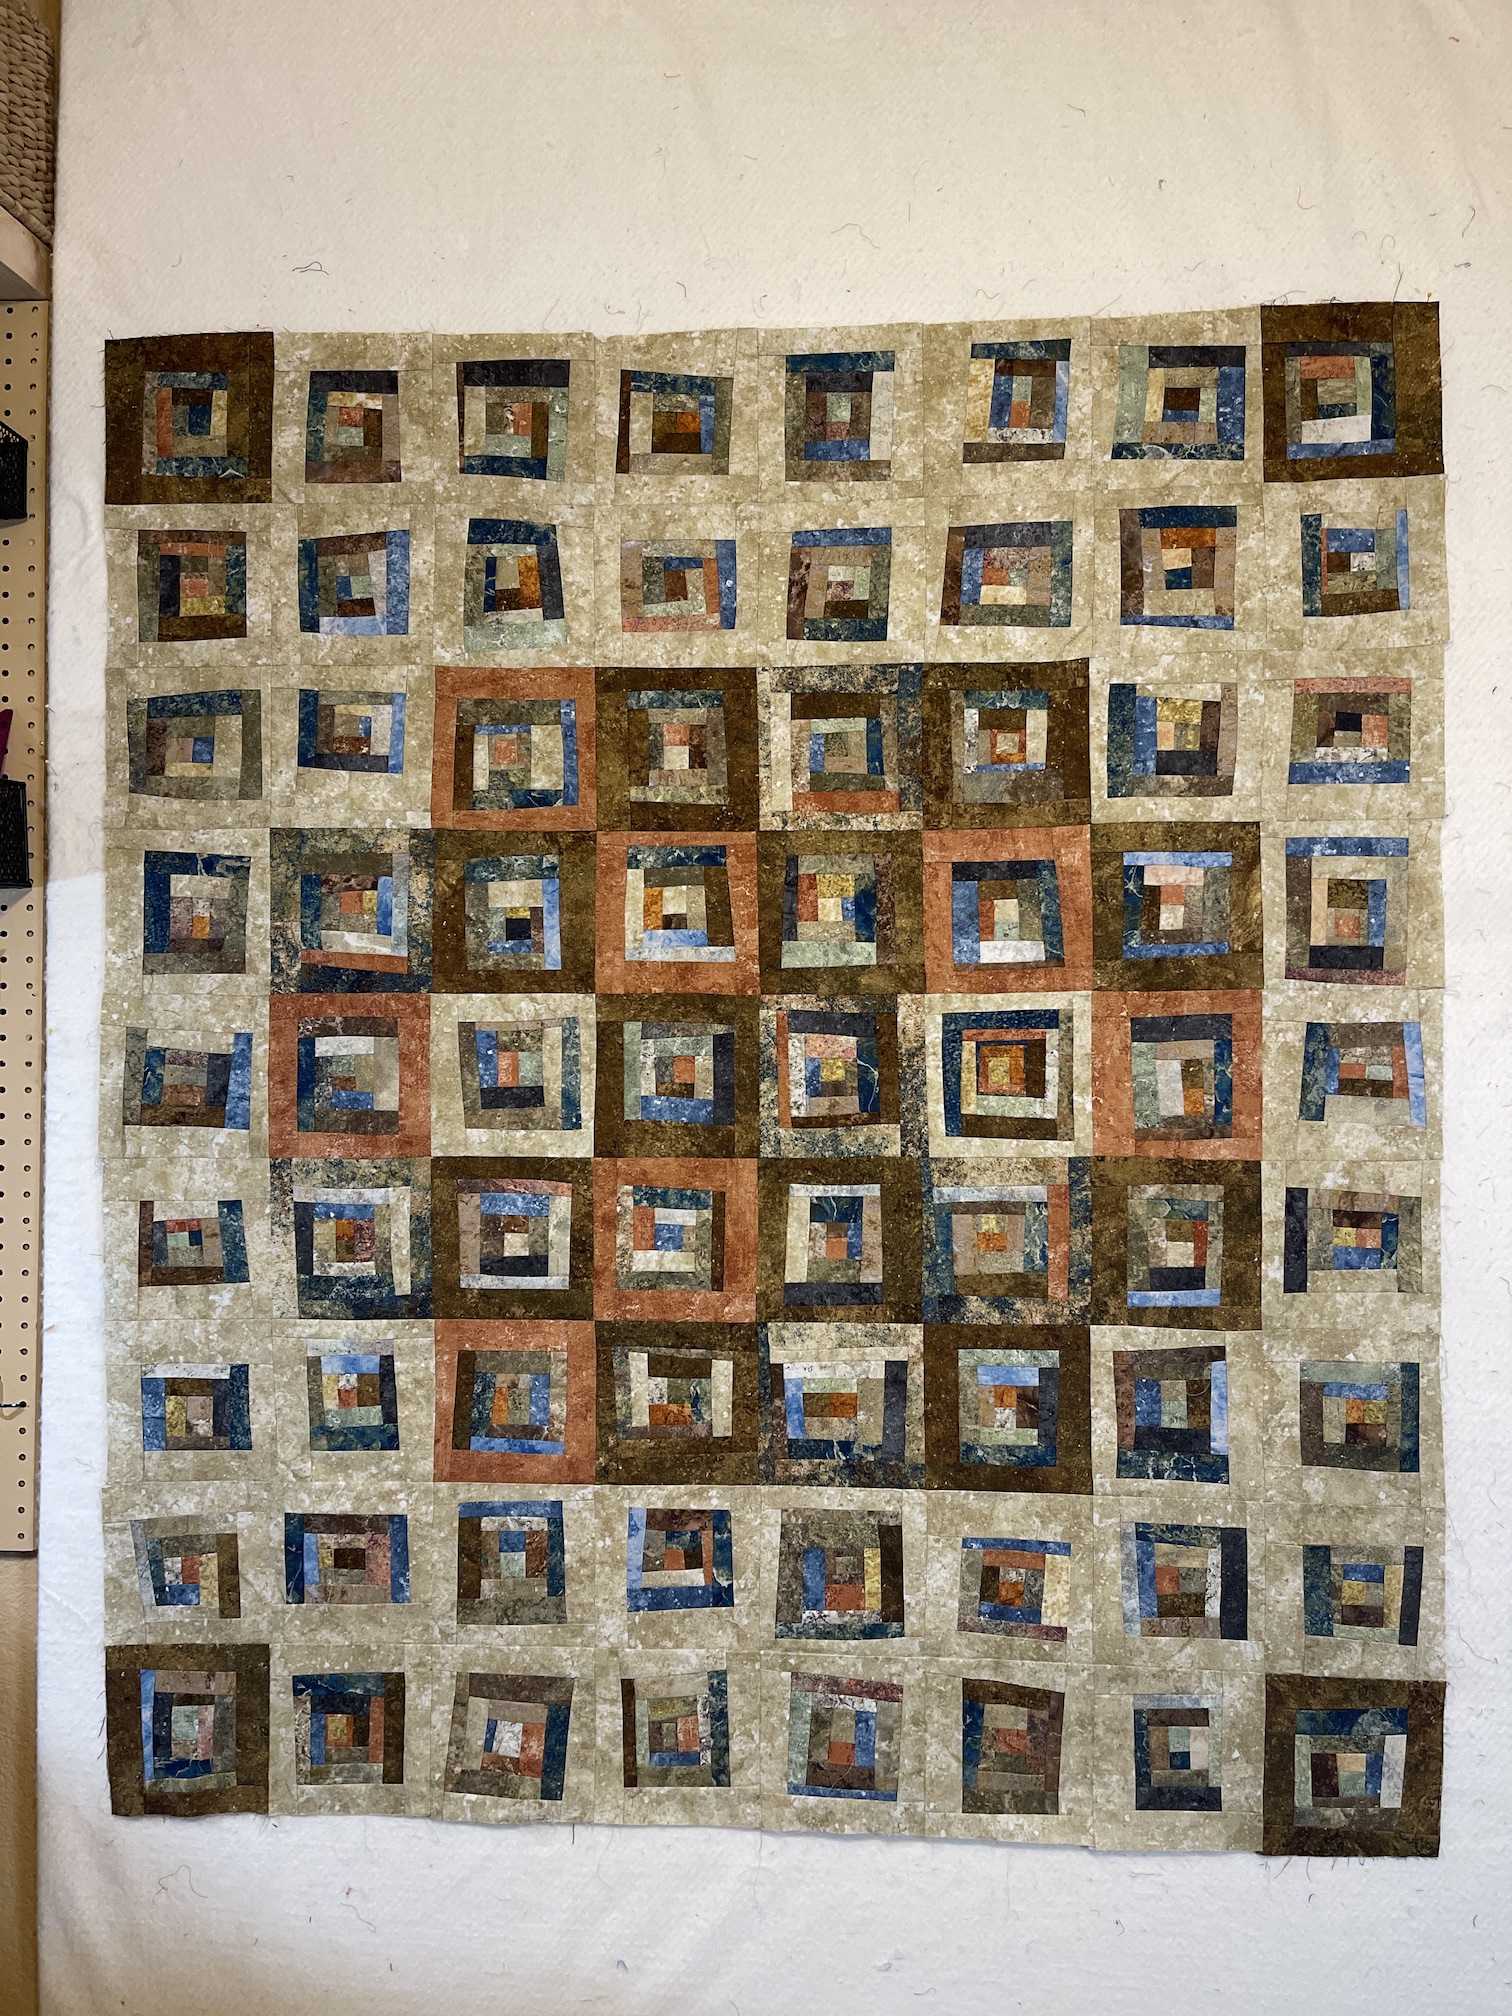
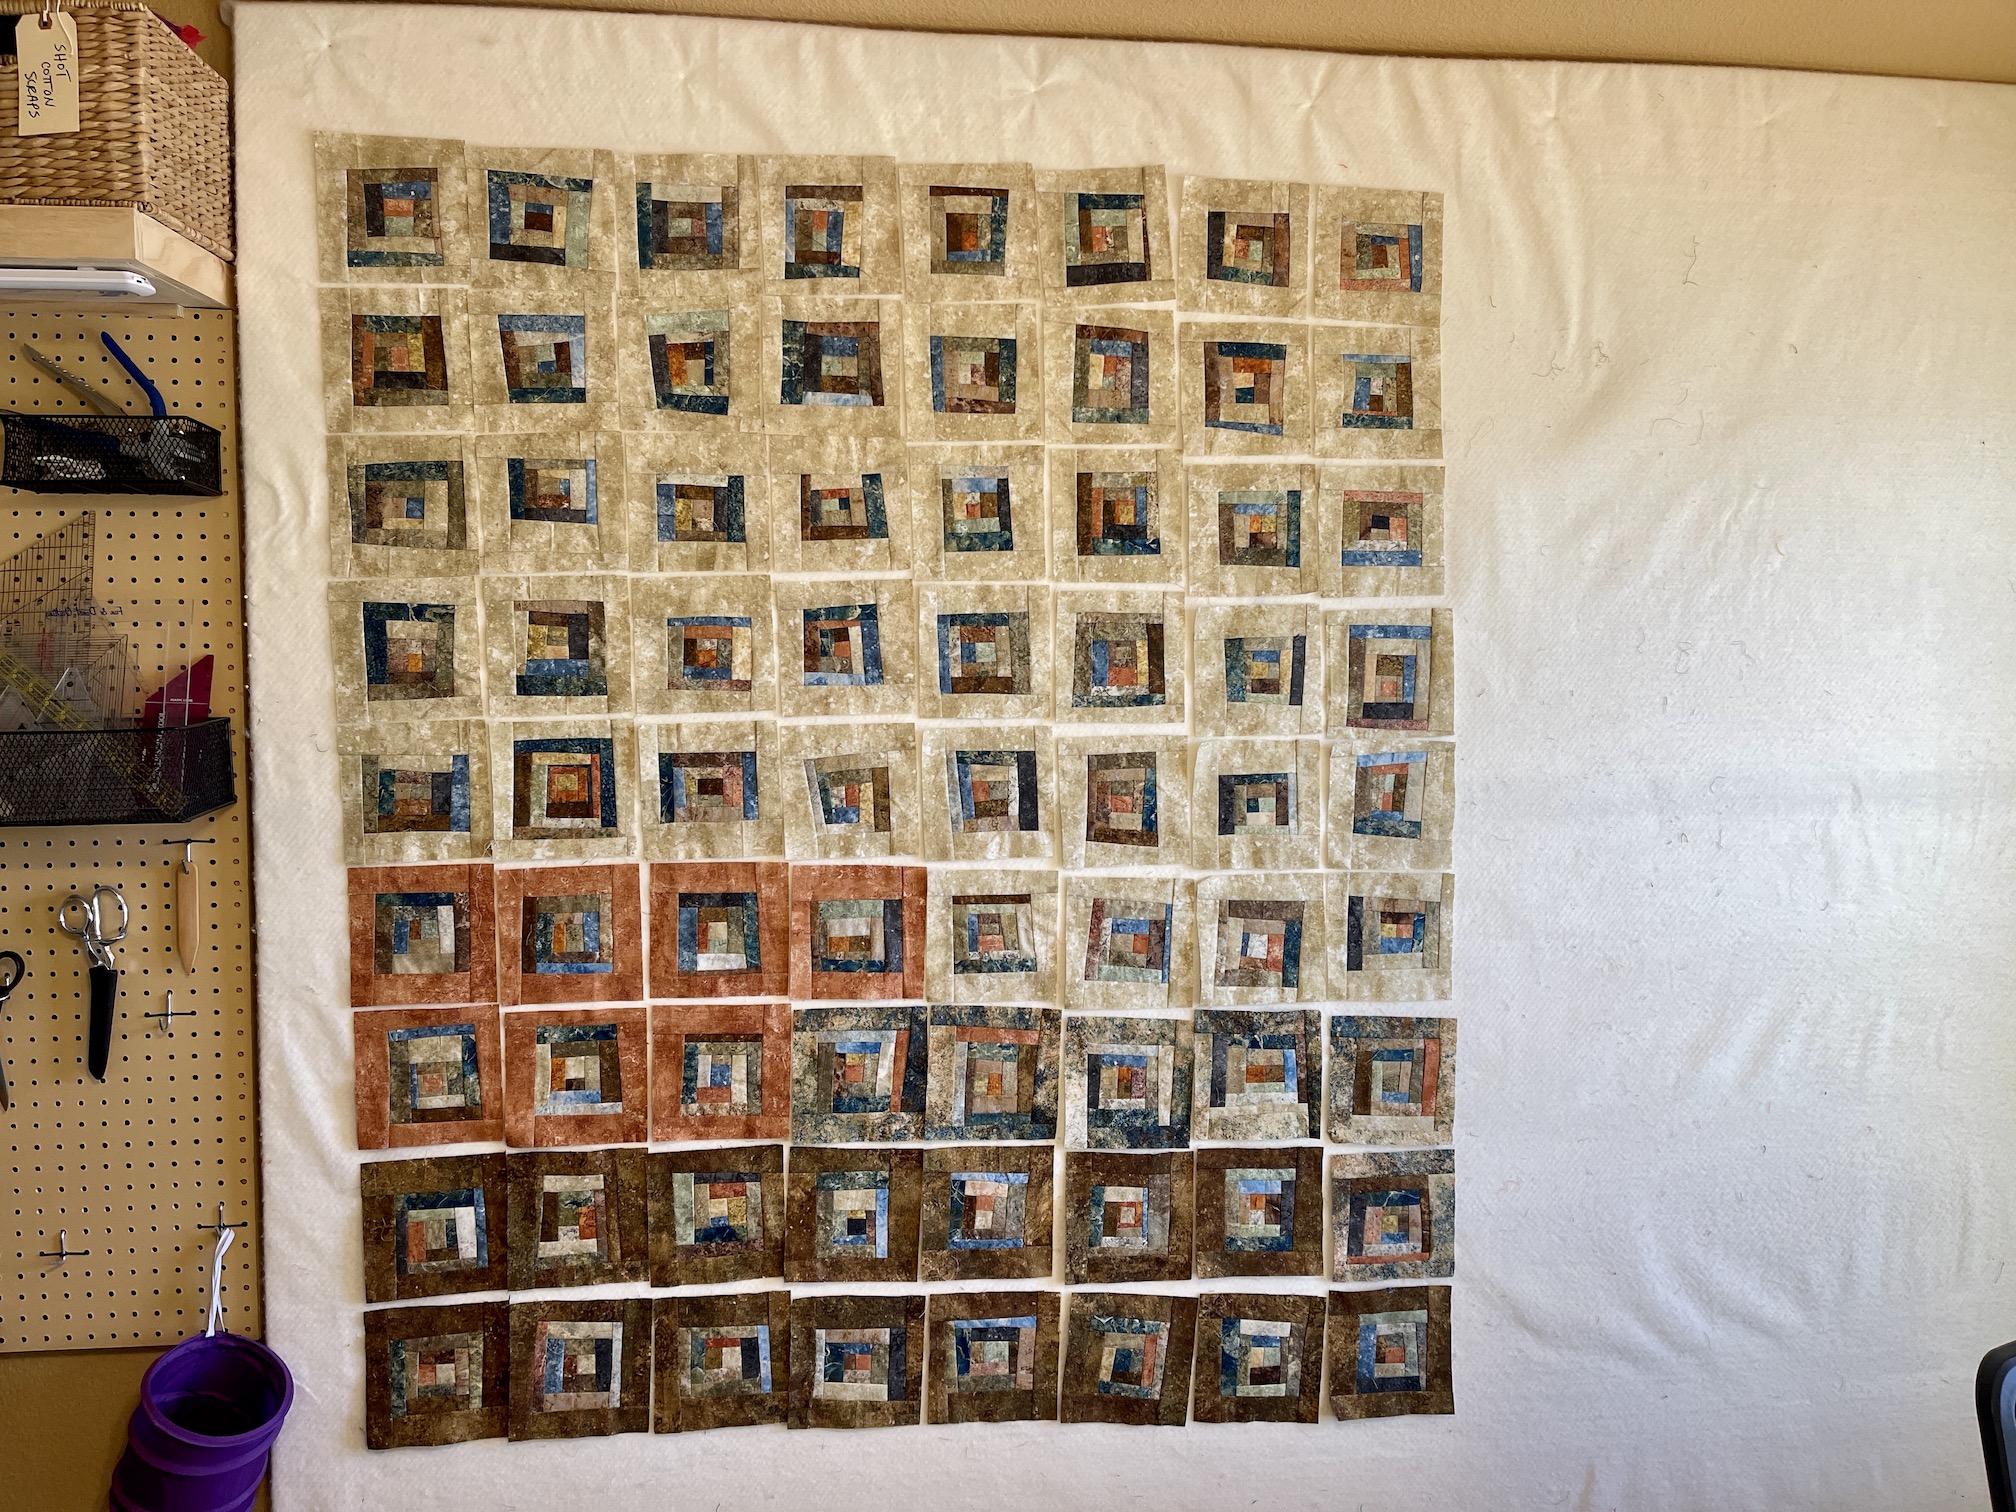
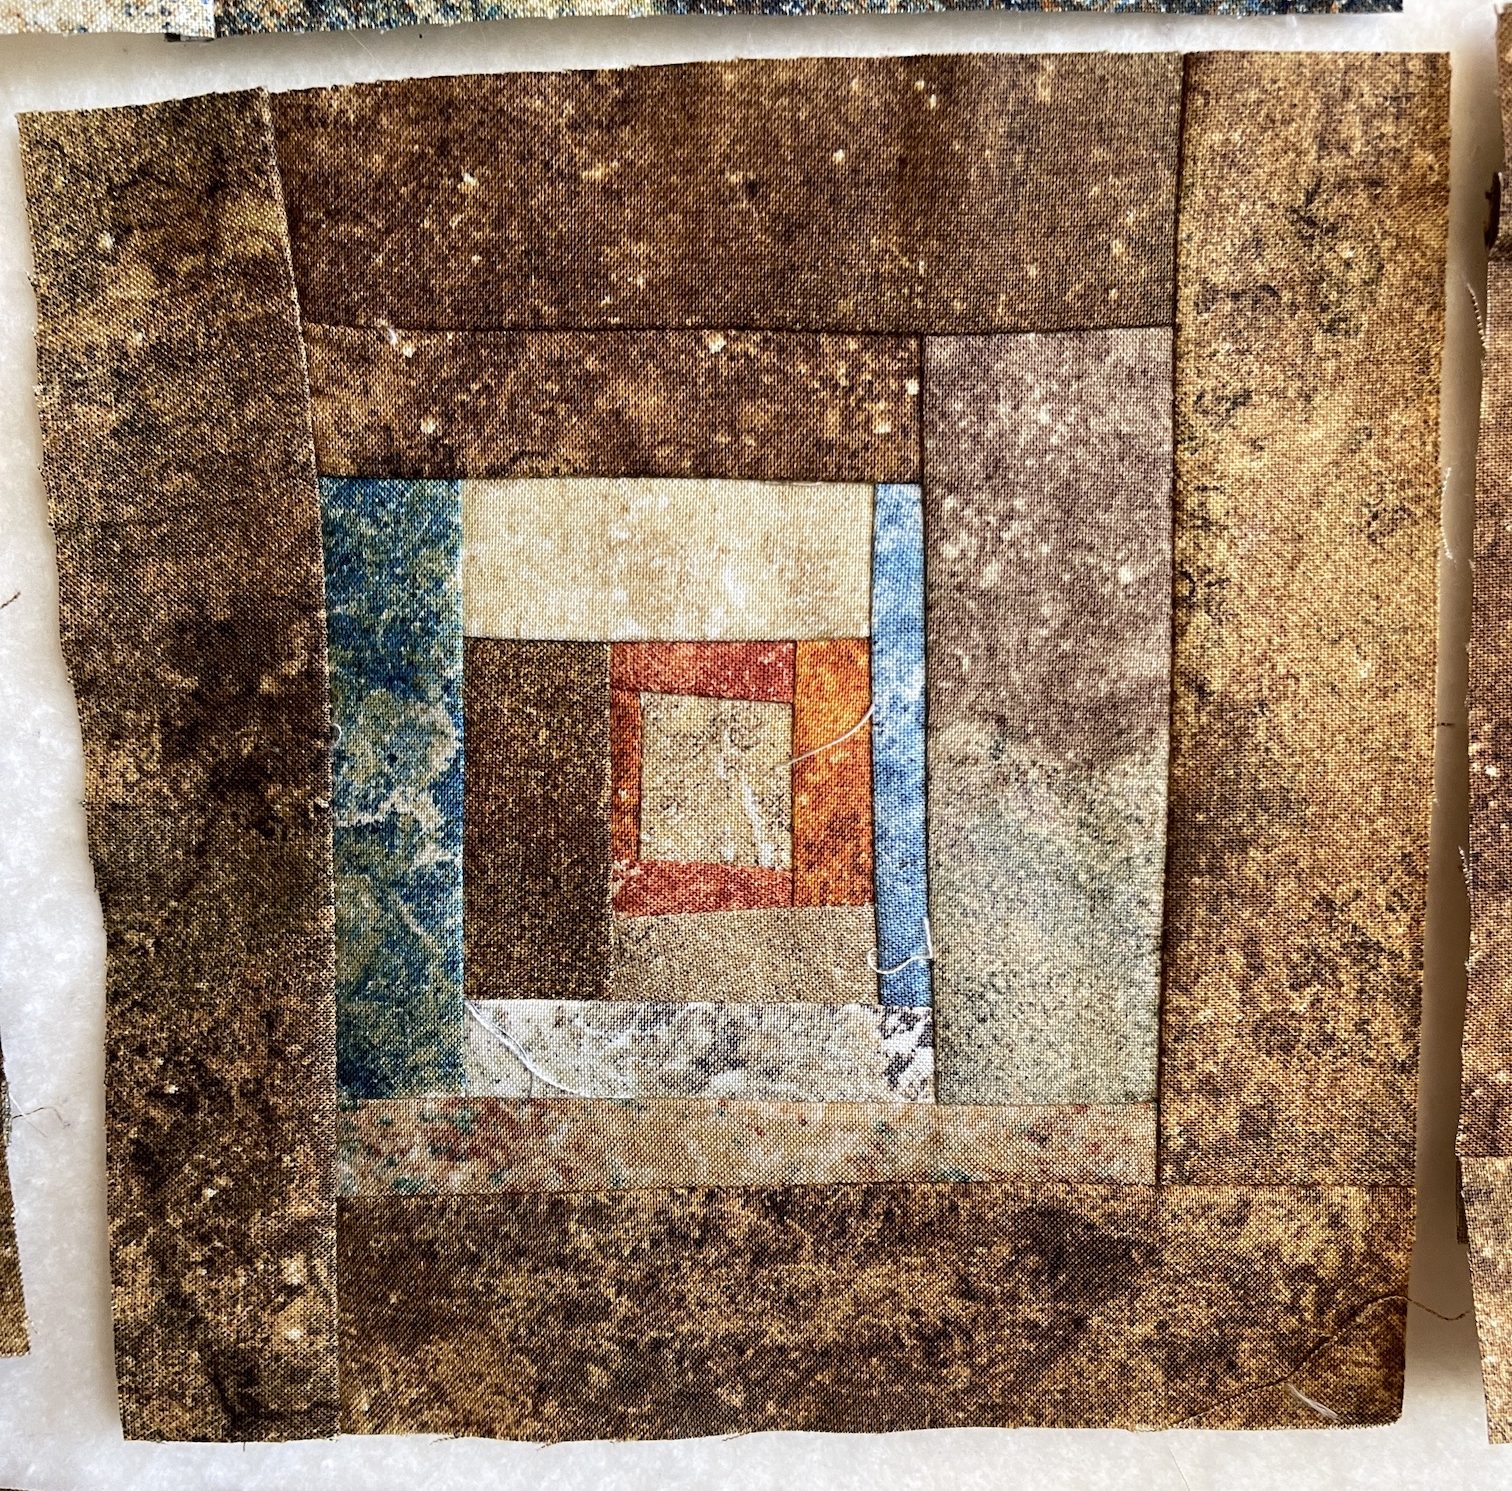
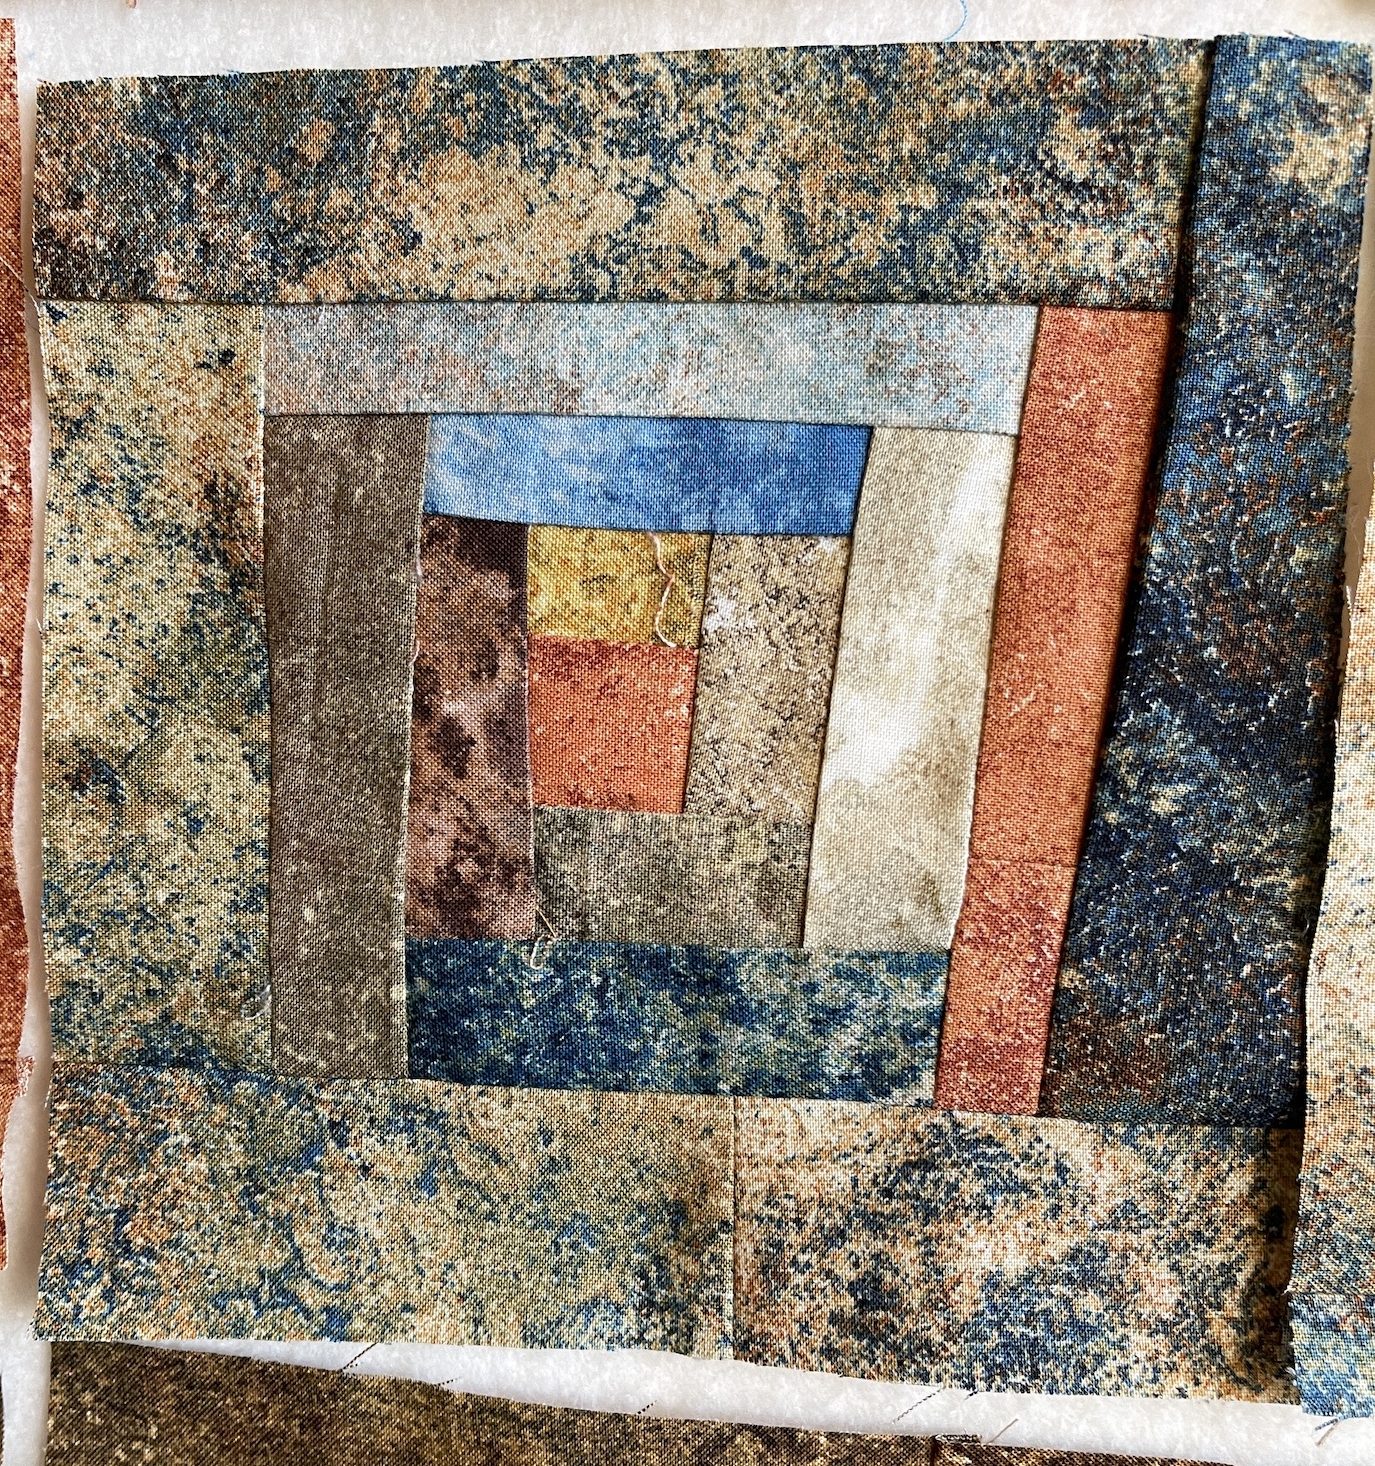
I mentioned in my post Things to Do When You Have a Bad “Cold”, that I’ve been working on a scrappy improvisational “log cabin” block style quilt. I thought I would show you my progress on the piece so far.
All I’ve done is lay the blocks out for now on my design wall, this is not the final design. I have a name in mind for the piece but I am keeping that under wraps until I see if the final design will work.
Each block is 6.5 inches x 6.5 inches and was made using scraps of Northcott Fabrics’ Stonehenge line which I love, as well as some small yardage pieces of Stonehenge I had in my stash.
The scraps primarily came from this quilt I made a couple years ago:
This was my pile of scraps that I started with for the piece currently up on my studio design wall which include scraps from the quilt above and scraps given to me by quilting friends:
Eventually I decided not to use the Stonehenge animal print scraps that someone gave me (and recently I donated a pile of them to a local charity thrift store so they can be enjoyed by another crafter).
Here are photos of me chain piecing the improvisational log cabin blocks via a technique I learned from Jackie Erickson at the Stitchin Post when I lived in Central Oregon.
Jackie told us in a class I took at the Stitchin’ Post that “log jamming” that is technique originated in Africa – the using of scraps to randomly put together fabric and create a larger piece of fabric, etc.
While writing this post I googled “log jamming quilting” to see if I could find any official history on this technique and found a VIDEO by the Stitchin’ Post about log jamming!!!
If you want to see a demonstration of the technique, here is the video – enjoy!
Jackie has a pattern she sells on making a log jam quilt and here is the link to it: Modern Log Jam.
image credit: stichinpost.com
I have used the technique I learned from Jackie on so many quilts over the years (as well as taught the late Terry the Quilting Husband to make quilts this way also – see post What’s On The Design Wall: Flannel “Log Jam” Blocks) that she holds a special place in my heart (and she is an awesome teacher!).
In her class she would use a shoppingbag of random scraps and you just pull from that bag and “jam on” while chain piecing.
Okay I went off on a tangent on log jamming, and let’s get back to the story on this current log jam quilt in progress…
Originally I wanted to frame all the blocks in a cream colored Stonehenge fabric I had in my stash, but it turned out I did not have enough. So I used a smaller brown yardage as well as a couple fat quarters from my stash that I thought would coordinate.
Here are the resulting four (4) types of blocks:
Yes, I have not cleaned up all the loose threads from all that chain piecing I did. But I’ll do that as I sew the blocks together in whatever their final configuration.
For now they all sit on my design wall awaiting my further musings on layout…
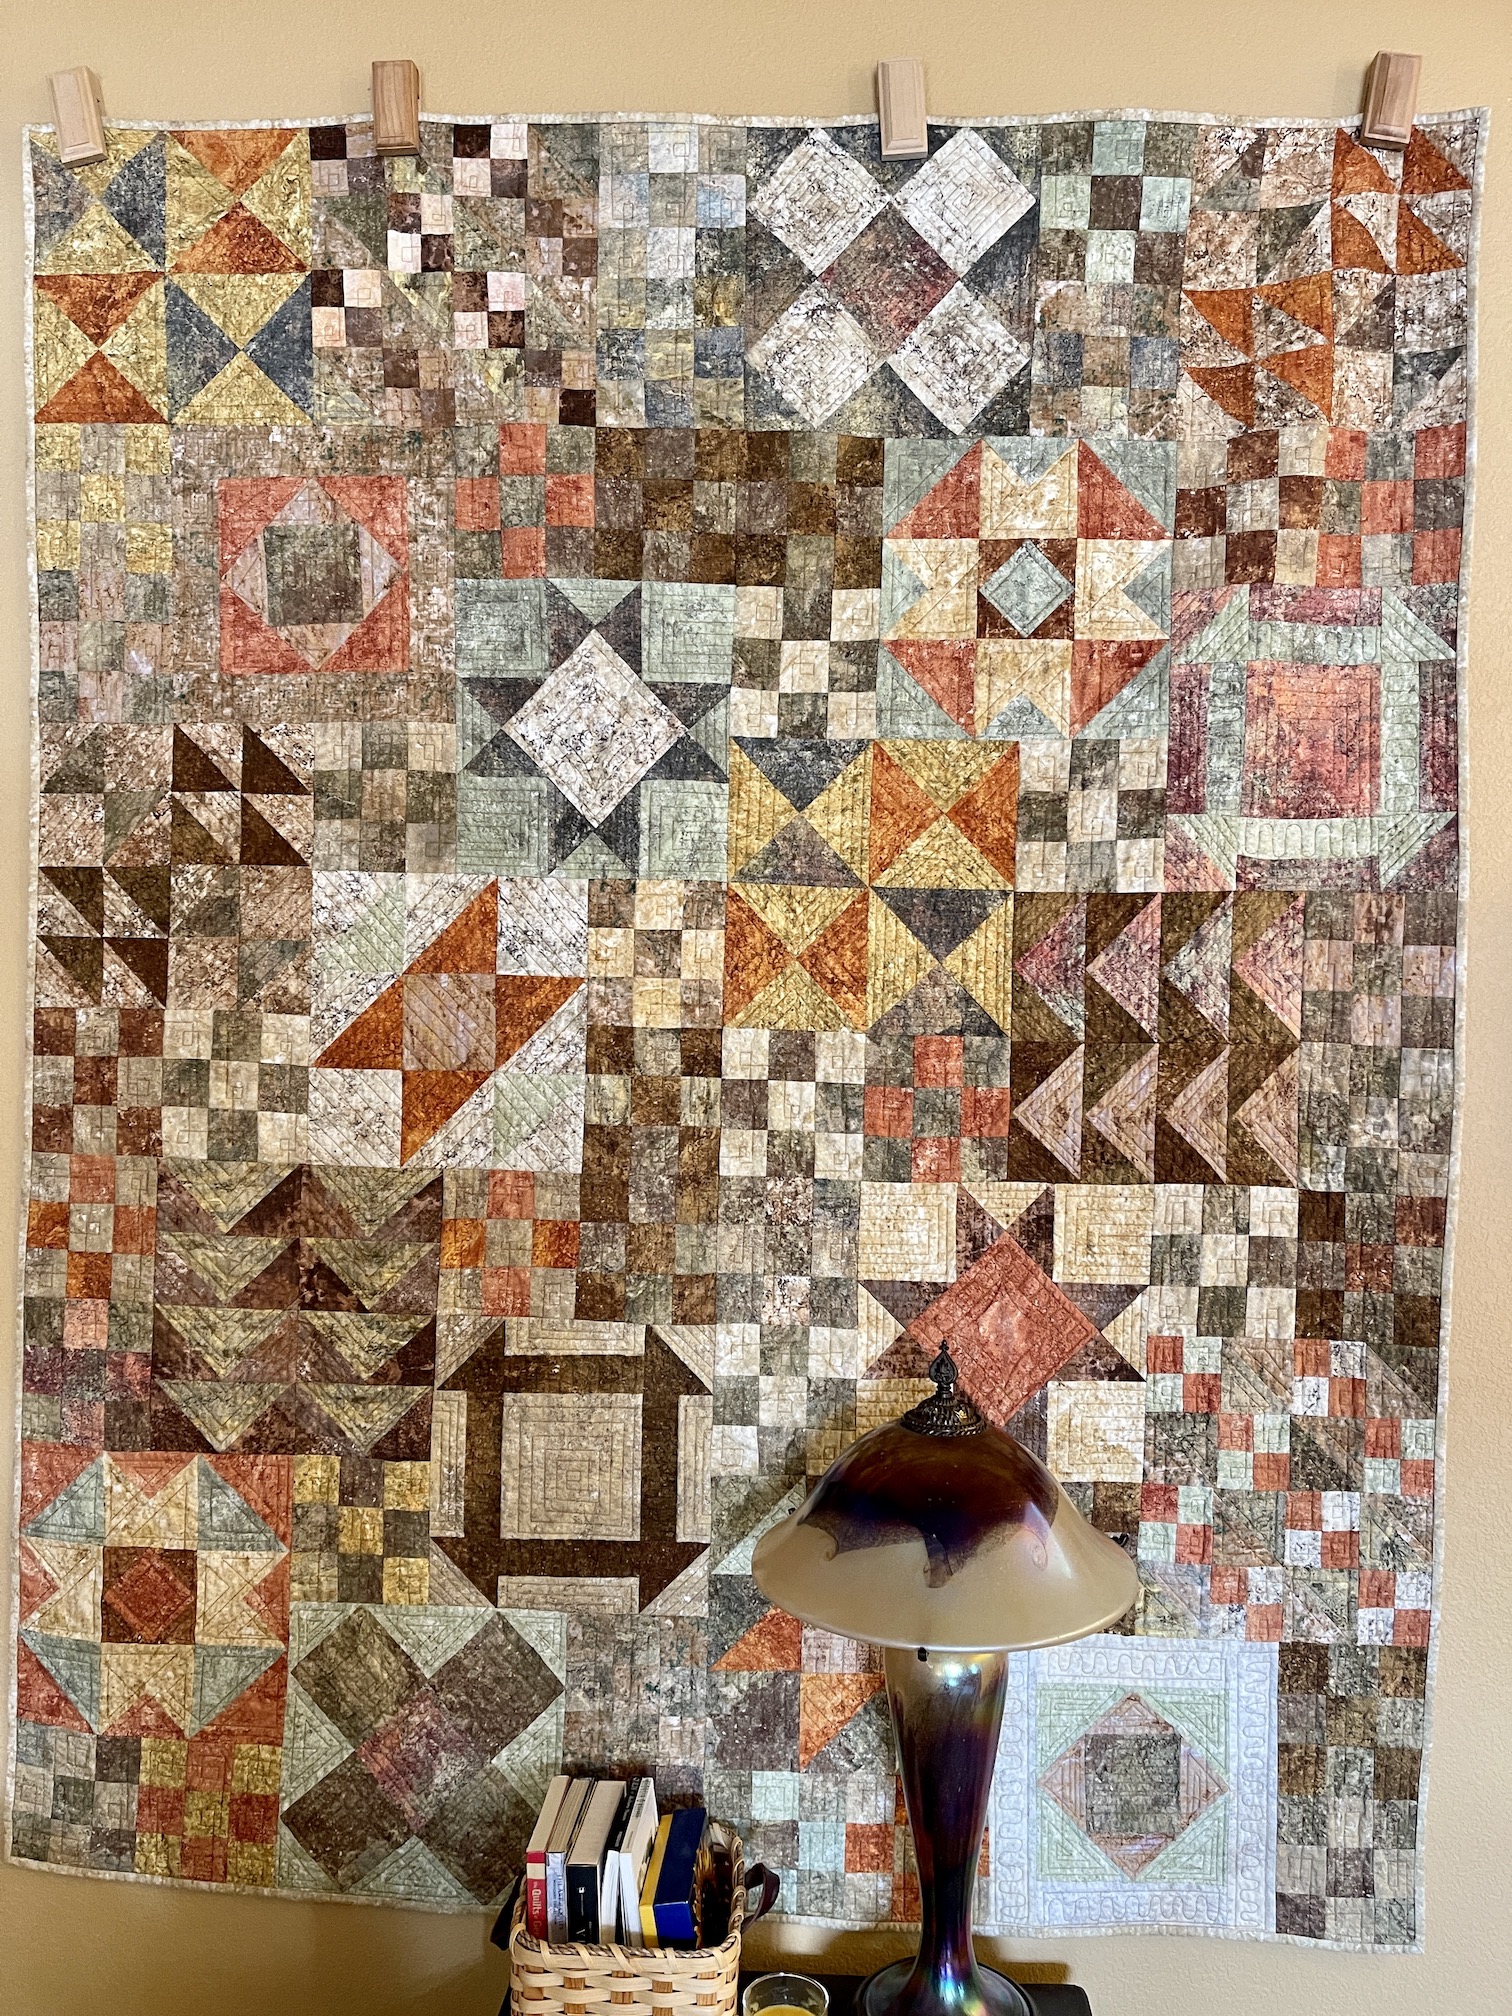
I realized I had not shared a follow up to the August 2021 post Creating a back for a “Legendary” quilt. I received the quilt back from the long arm quilter just before Christmas and shared the finished quilt on my @tierneycreates Instagram, but not on my blog where I had talked about it in several posts over the years.
I was able to get the binding on right before Christmas and I gave it to my partner John for Christmas. Below are photos of the quilted quilt including where John keeps it on the sofa in the basement where his “man cave” is:
I was trying to take pictures of the back of the quilt and a miniature schnauzer slowly snuck into the photo (photo-bombing)!
Mike: Hey what you doing?Mike: Don’t mind if I sneak right on to the quilt while you try and photograph it!Mike: Hi, I am cuter than this thing you are photographing!Mike: Pay attention to me now!
This was taken before he got his haircut at the beginning of January. He got a bit furry through the holidays!
Oh the the extra tree block you see on the back of the quilt is by my friend Kathy, who gave me the scraps to make the quilt (plus scraps she got from our friend Dana). It was an extra she had when she made her quilt. That block reminds me/connects me to the love and generosity I constantly get from my long time quilting sisters!
I am feeling SO MUCH BETTER! Unfortunately now John has my “cold” but it seems to be milder for him.
I’ve been making quite a bit of progress on the quilt I showed you I started while self-isolating due to me “cold”. I should be able to share on my next post what it is looking like on the “design wall”.
It’s cold outside in the Denver Metropolitan area (with snow on the ground) and I have a “cold”.
I’ve put the word “cold” in quotes as I do not know if it is just your standard old fashioned winter cold, or our friend Omicron the COVID variant. Omicron, Omicroon, Omicruel, Omicrap, Omiramadingdong. Yup I so over all this.
Perhaps it is a cold, perhaps it is the COVID variant, did not go get tested as did not feel up to it and I’ve been isolating. My partner John has not gotten sick. We are vaccinated for COVID and the flu, etc.
I’ve been stuck at home with lots of fun “cold” type of symptoms but no fever. Actually the symptoms are about the same as every winter cold I’ve had before. Except add in the paranoia of maybe I’ve finally caught COVID.
My nutrition over the past couple of days have come from water, tea (so much hot tea), chicken noodles soup (homemade by John!), chicken broth (when the soup was way too busy for me), toast, jello, ice cream, and hummus (don’t ask me why but hummus worked for me today as food).
Sounds like all of Denver has it (perhaps I exaggerate) but I wonder if you have to just walk around in full protective gear to avoid it now.
Back to isolating – I’ve been stuck inside past couple of days but made it out once for a dog walk. I maintained social distancing and refrained from running up and kissing anyone I ran in to on my walk.
But here is what I’ve been up to while being stuck inside over the past couple days.
QUILTING
Working on a scrappy quilt on my old Bernina using the “log jam” free form log cabin block style piecing, with my Northcott Stonehenge fabric line scraps:
(oh warning; the photos in this post will likely be crappy, as I feel like crap..)
I’ll share a whole post on this project once I get some full blocks done. Right now I am just “chain piecing” and trying to build each block up to 6.5 inches by 6.5 inches (a random block size I selected based on the size of the ruler I want to trim them with).
TAKING ON THE JUKI
This is embarrassing, but I bought a used Juki sewing machine for making bags (using heavier fabrics), etc. in I think Spring 2021 (2021 is a blur now, I am just making up when things happened in 2021 at this point) and I could not get it to work right because I was confused on threading it, etc.
So I just abandoned it and made it a mysterious sewing machine object on the other side of my sewing table from my Bernina (or “my beloved” as I like to call it).
I let the Juki stare at me anytime I sat at the table sewing on the other machine.
I learned to ignore the Juki and pretend it was invisible, but while being stuck at home I decided to actual get out something called a MANUAL (that I had printed out months ago and placed on the Juki as decoration…or perhaps to keep it company) and read the MANUAL. I also watched a couple YouTube videos on threading the Juki, winding the bobbins, fixing bobbin tension, etc.
It was all very dry reading/watching and it seems way more complicated than my Bernina (which basically functions as an extra body part for me) but I got it working!
So I am going to make myself make my next bag on it. No more neglecting it for my beloved Bernina…at least this is what I am telling myself.
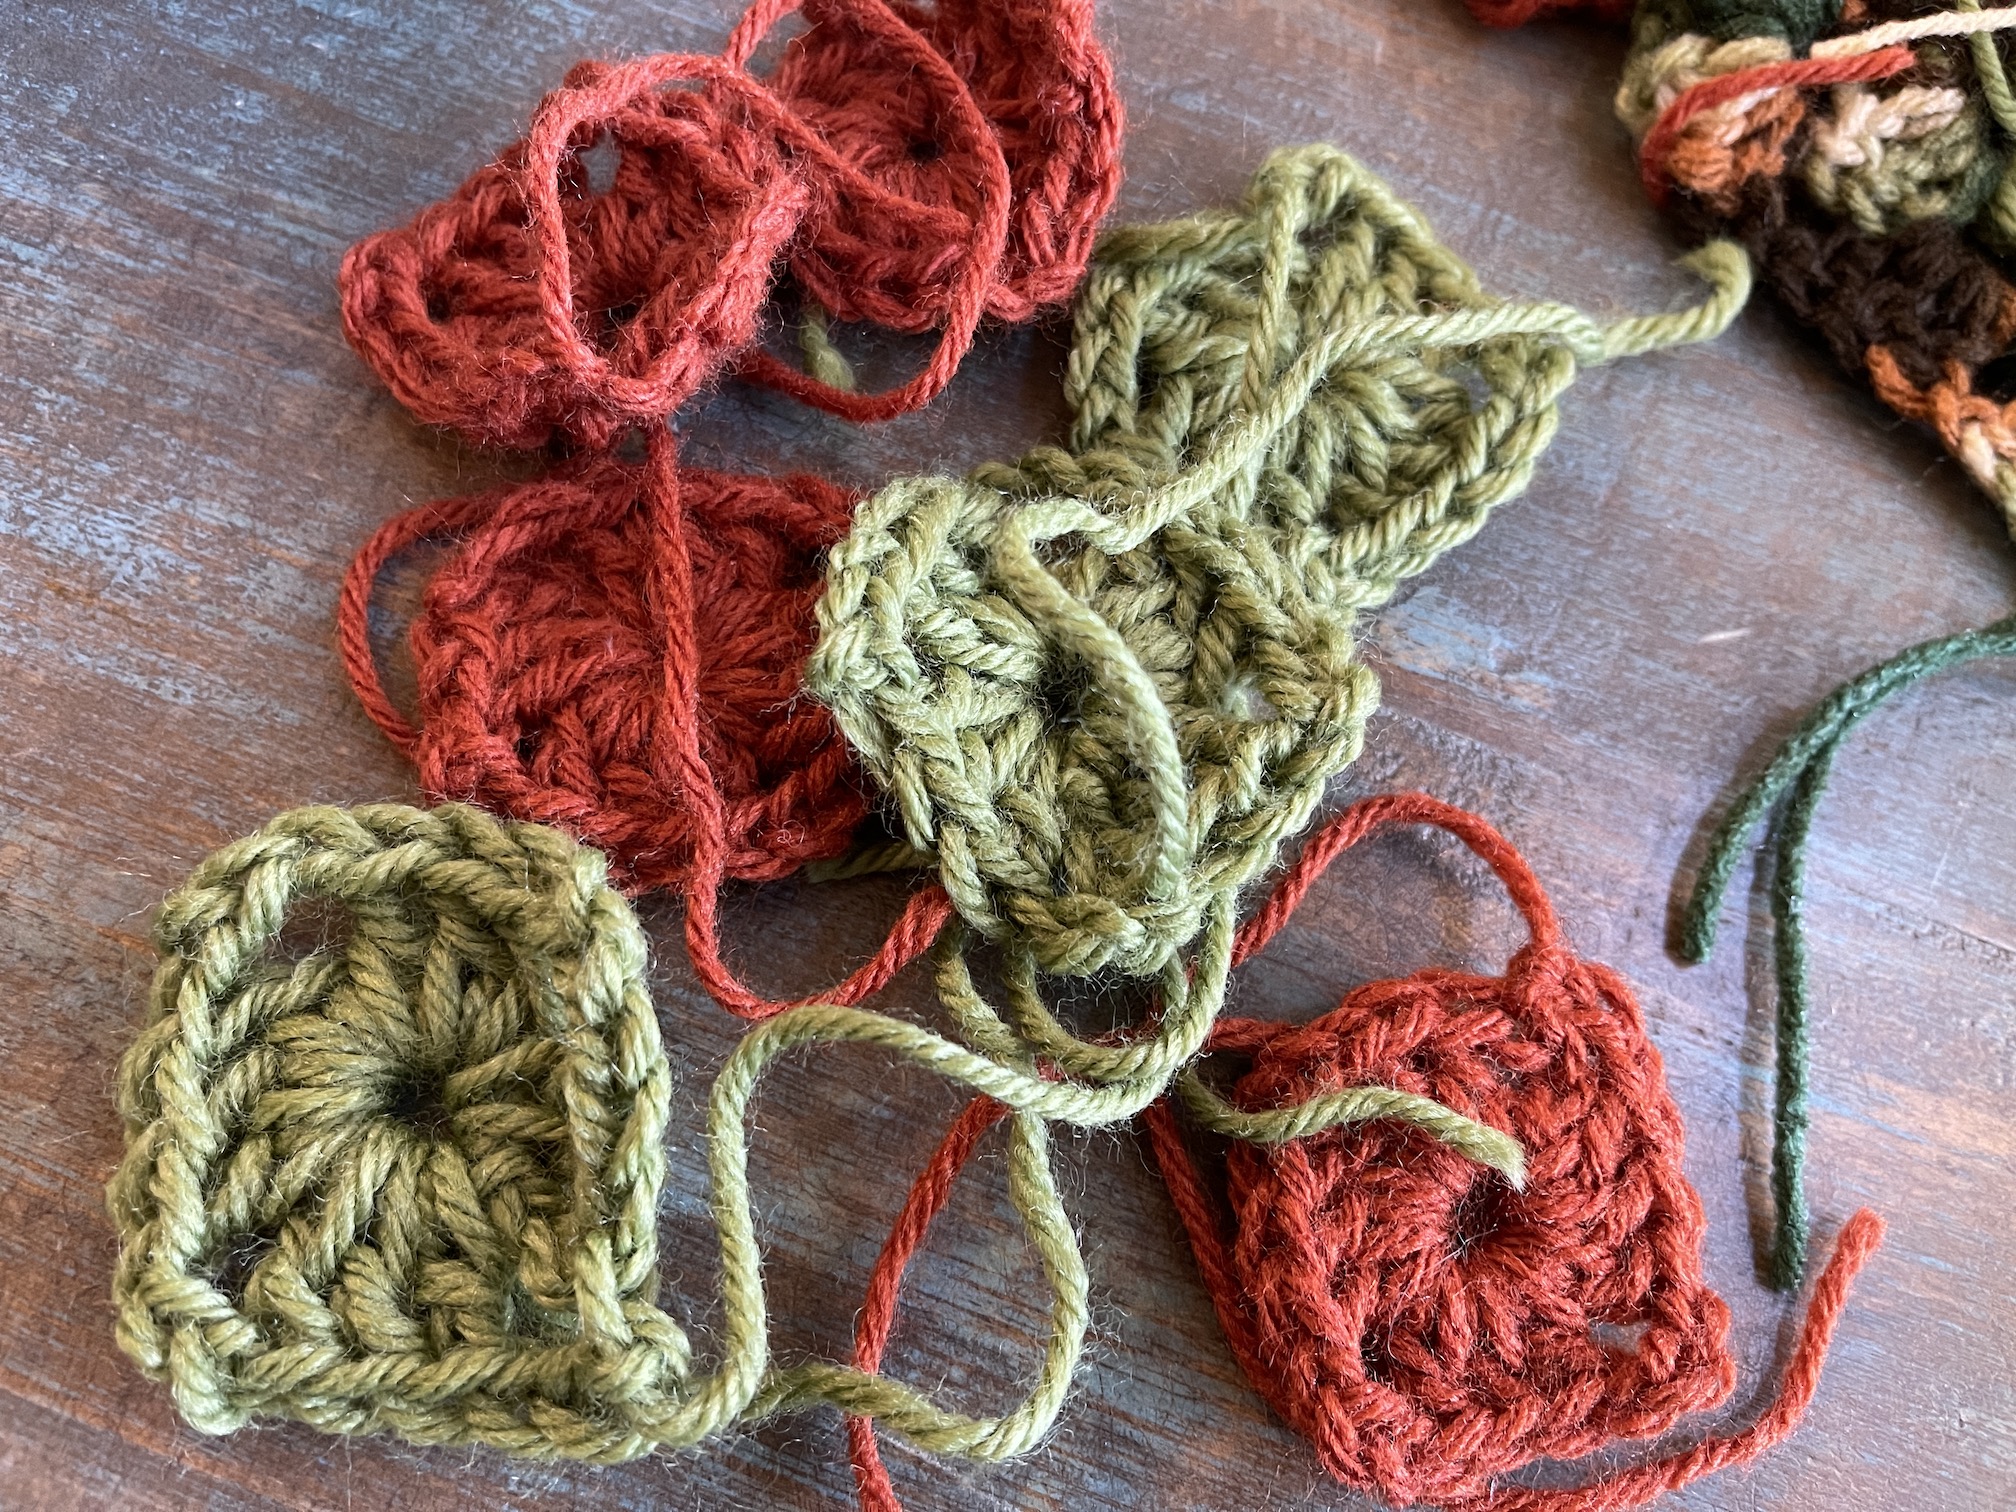
GRANNY SQUARE PARTY
Sat around and made granny squares, creating a kingdom of crochet on the sofa table where I was stationed somedays:
READING
Reading the book Billy Summers by Stephen King, which is so good so far…
And finally reading random magazines I bought during the early days of pandemic in 2020 when they finally opened back up our local Barnes & Nobles bookstore and I pick up whatever looked acceptable enough to read!
AND LOTS OF LOTS OF NAPPING WITH MIKE
My dog Mike is a professional napper and he guided me into proper positioning for many naps of the past couple of days. Here he is demonstrating his solo nap technique.
Alas I did not take photos of me nappy curled up with him.
So that has been my life past couple of days. I apologize for any crazy grammatical errors I made in this post as I am too sleepy now to proofread.
I’ll close this post with this awesome postcard I found which is a positive way to think about having a “cold”:
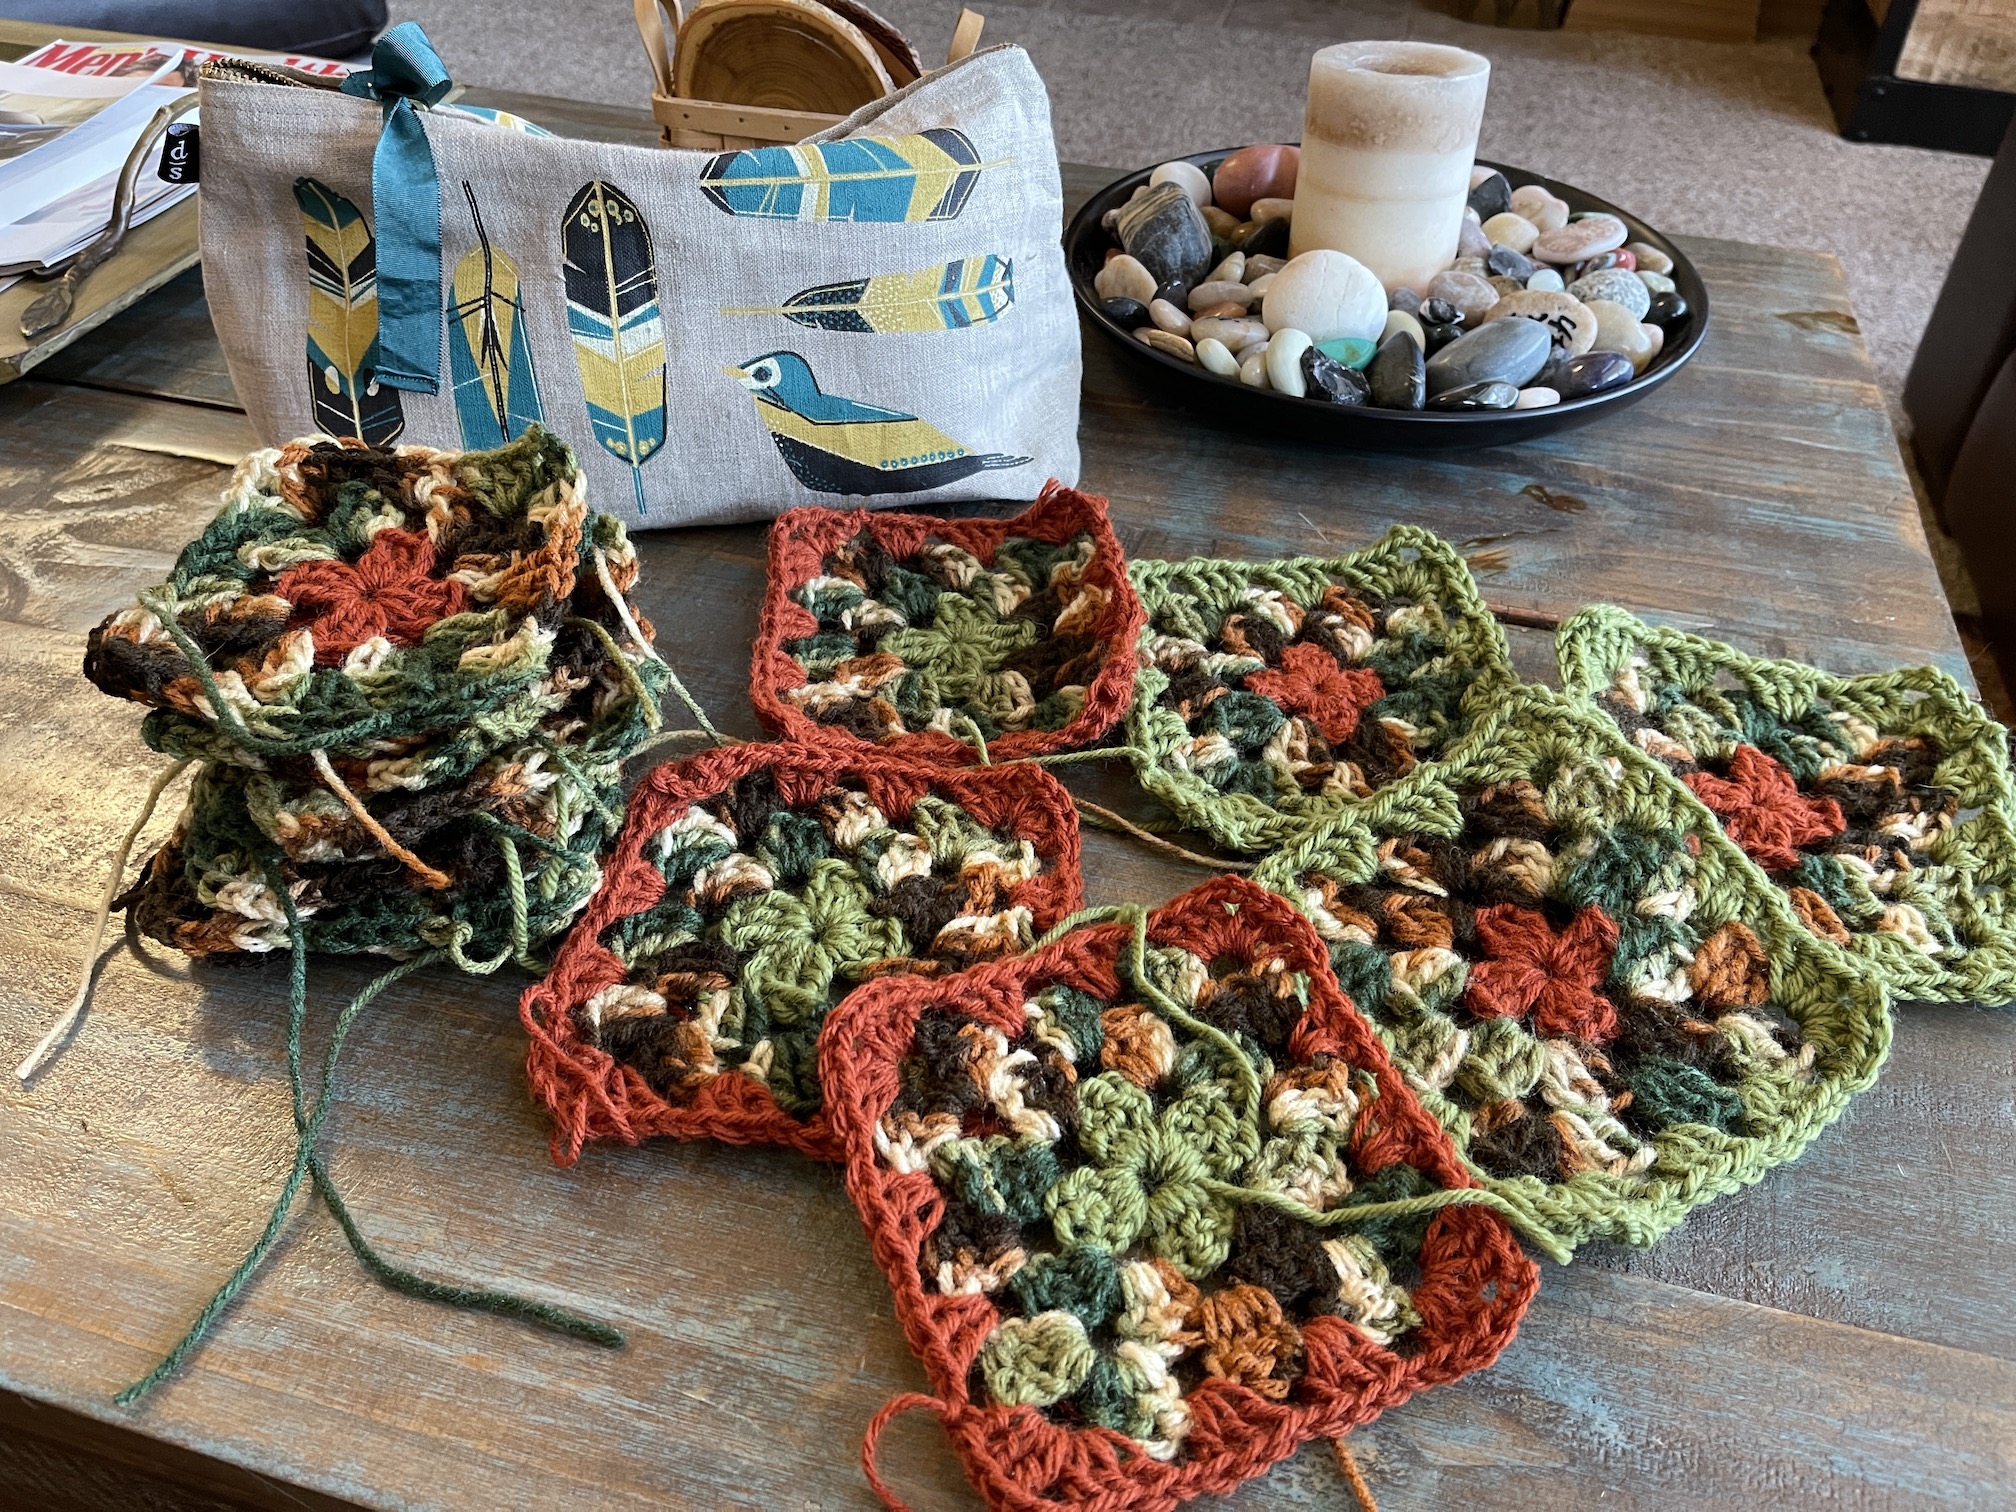
In November 2020 I finished my first crocheted “Granny Square” blanket after teaching myself via YouTube videos to make a granny square:
I’ve been itching to work on granny squares again – they are a portable hand work project and great to keep your hands busy while riding in the car, waiting around, or just sitting about watching television in the evening.
In my yarn stash I found some variegated yarn and some coordinating yarns that I thought would make a cool granny square blanket:
Here are the centers I started making:
And here are the granny squares in progress and completed:
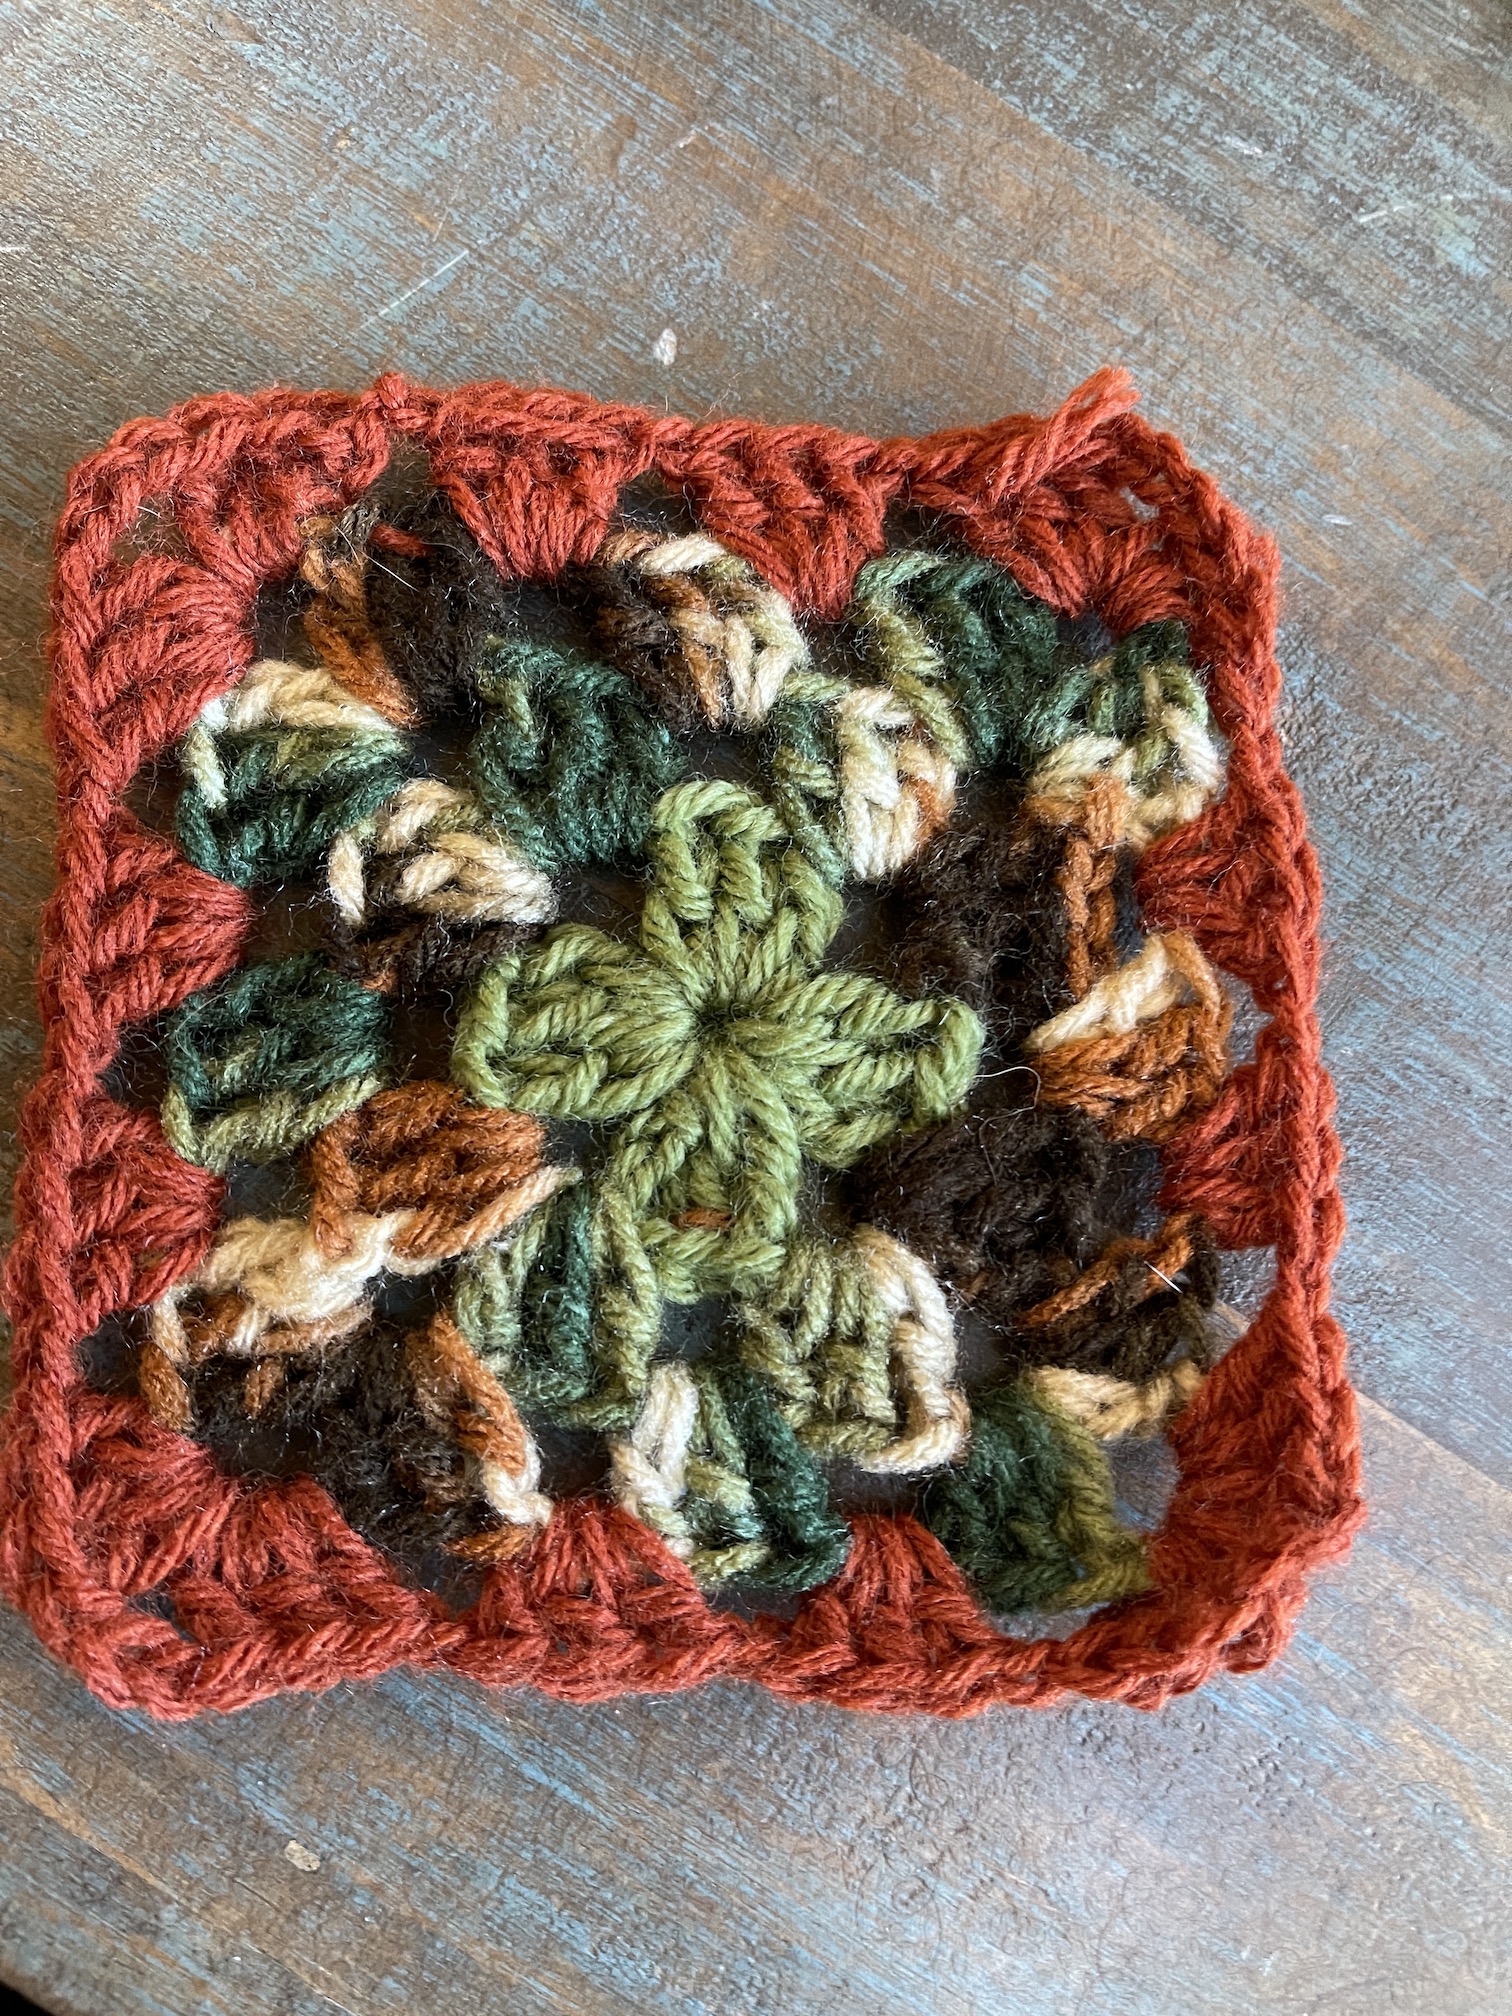
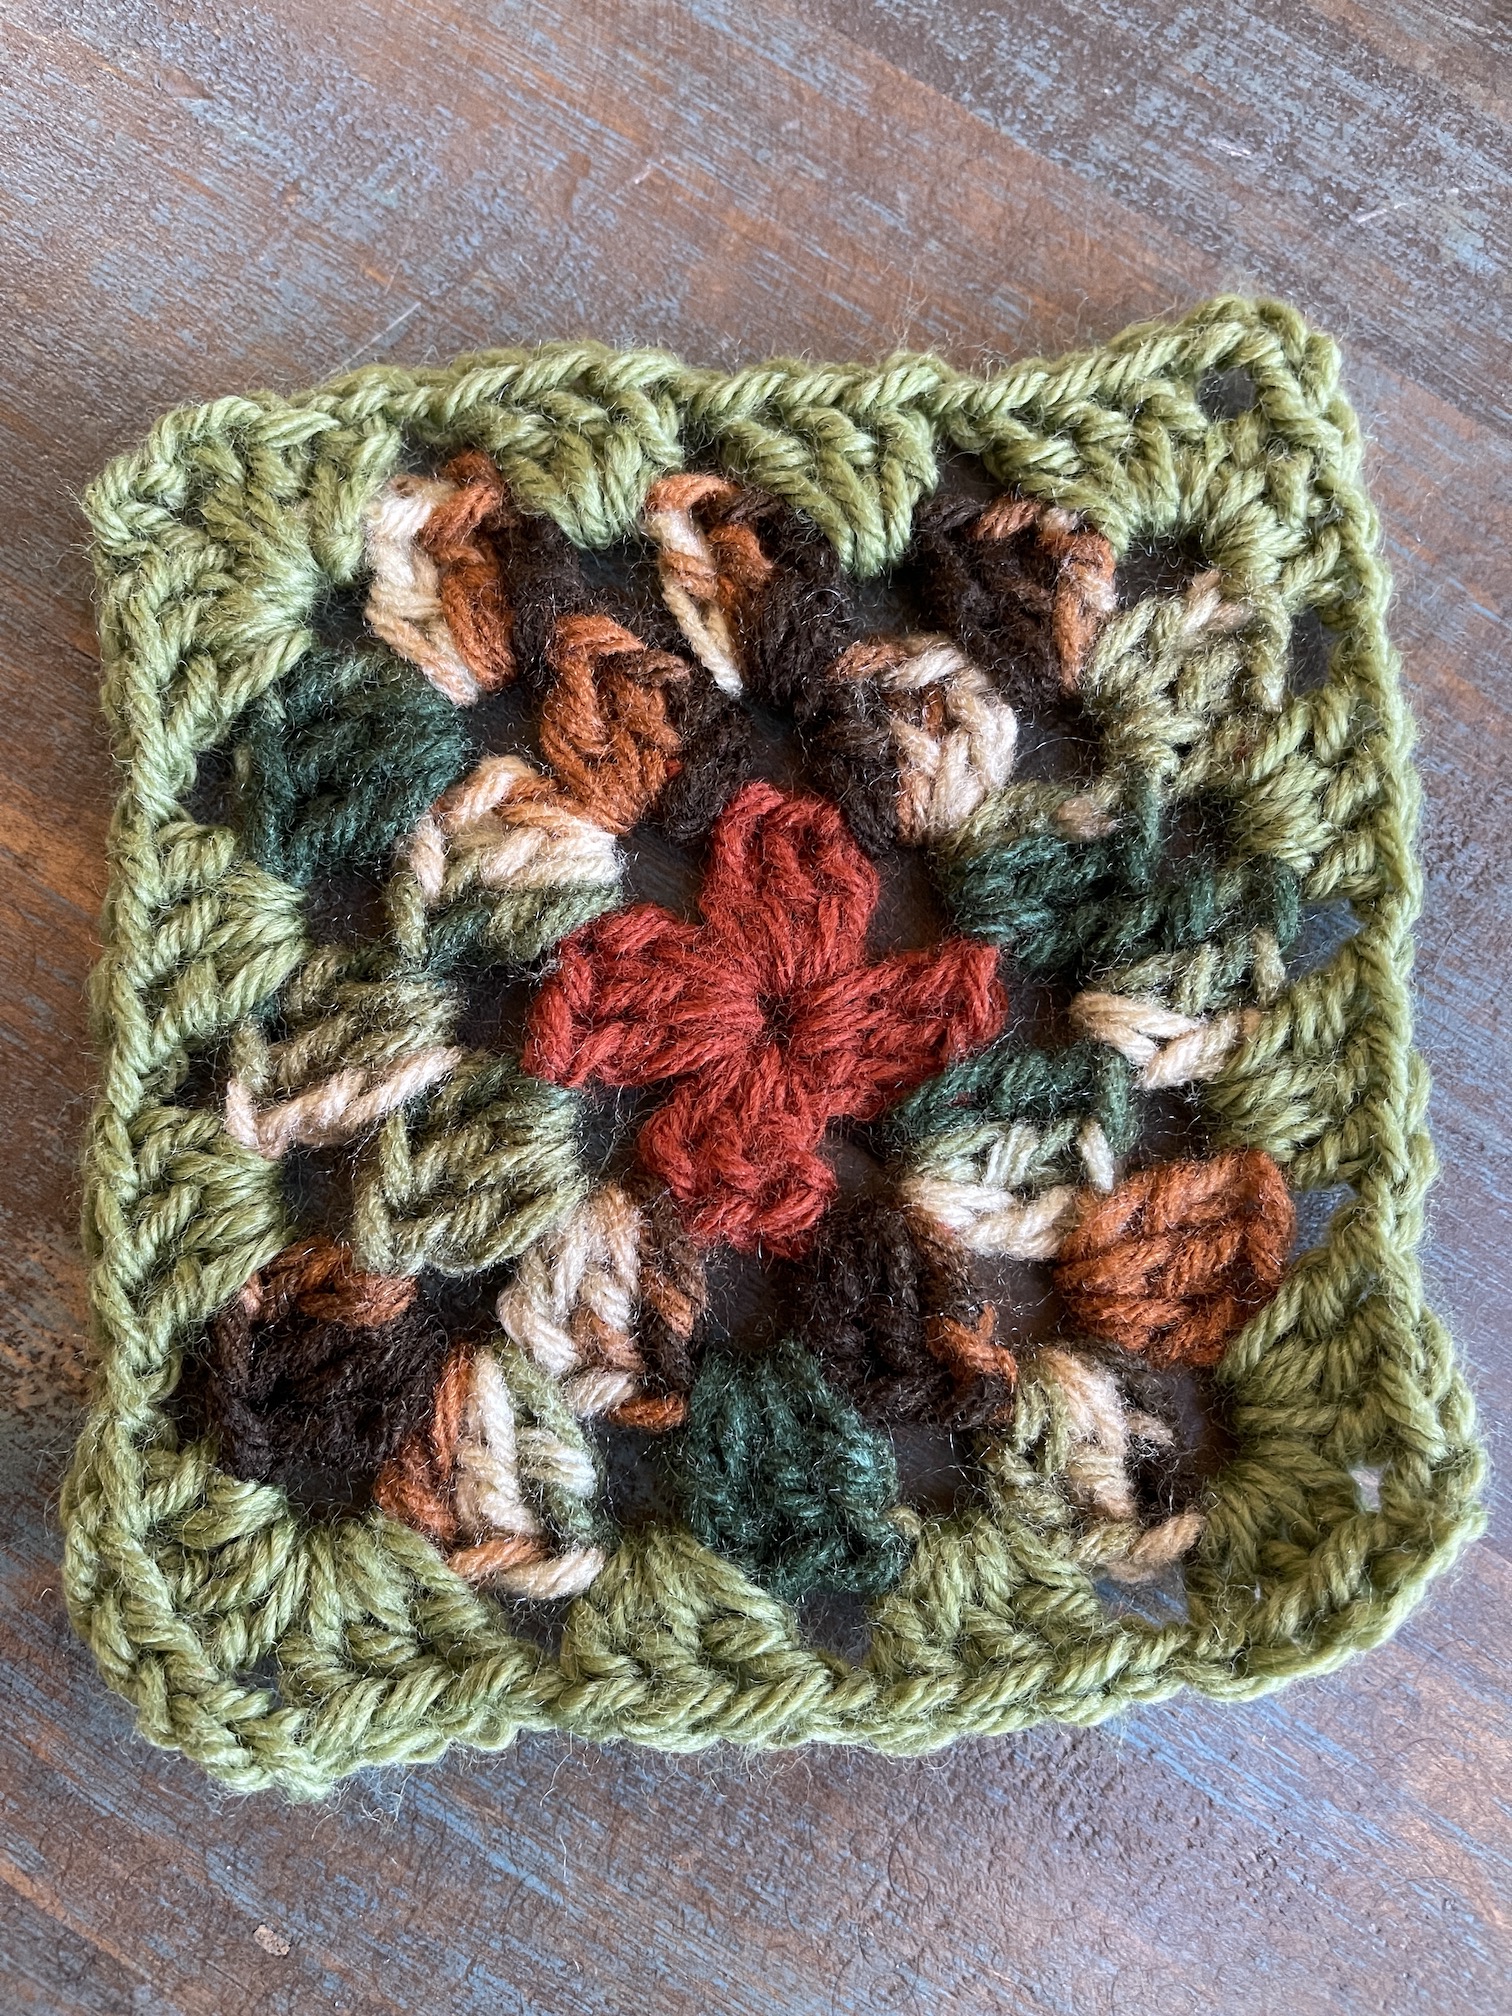
I have two different types: 1) center green, surrounded by variegated yarn, framed by rust colored yarn; and 2) center rust, surrounded by variegated yarn, framed by green yarn.
I will update you on my progress on the blanket as it progresses!
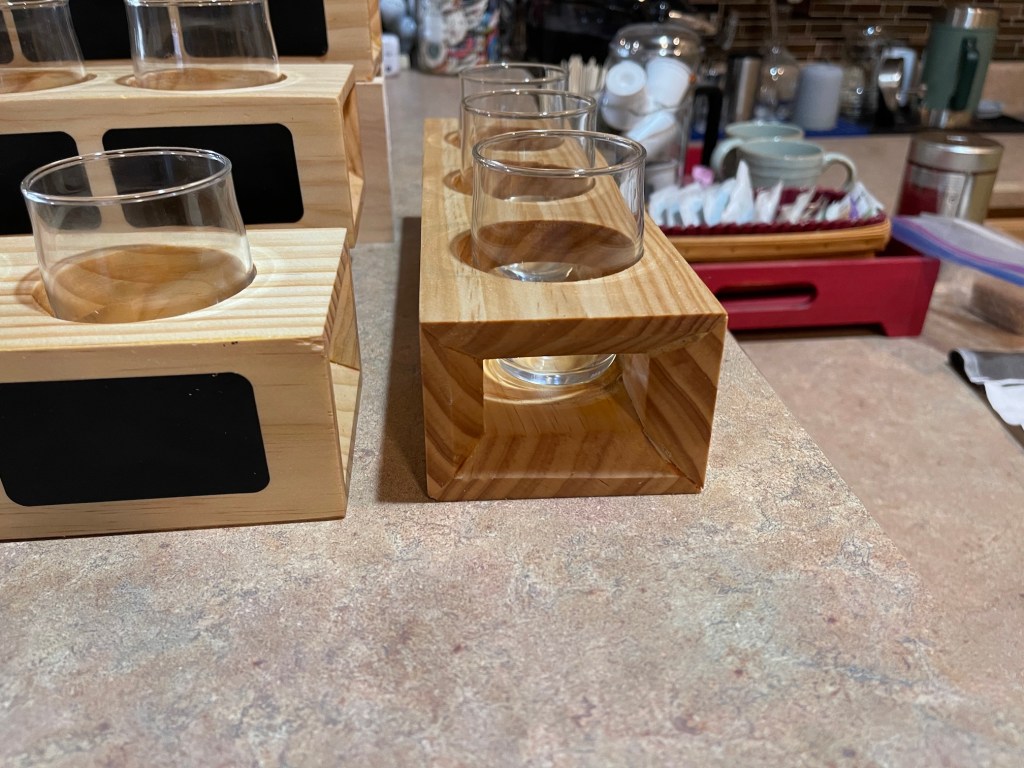
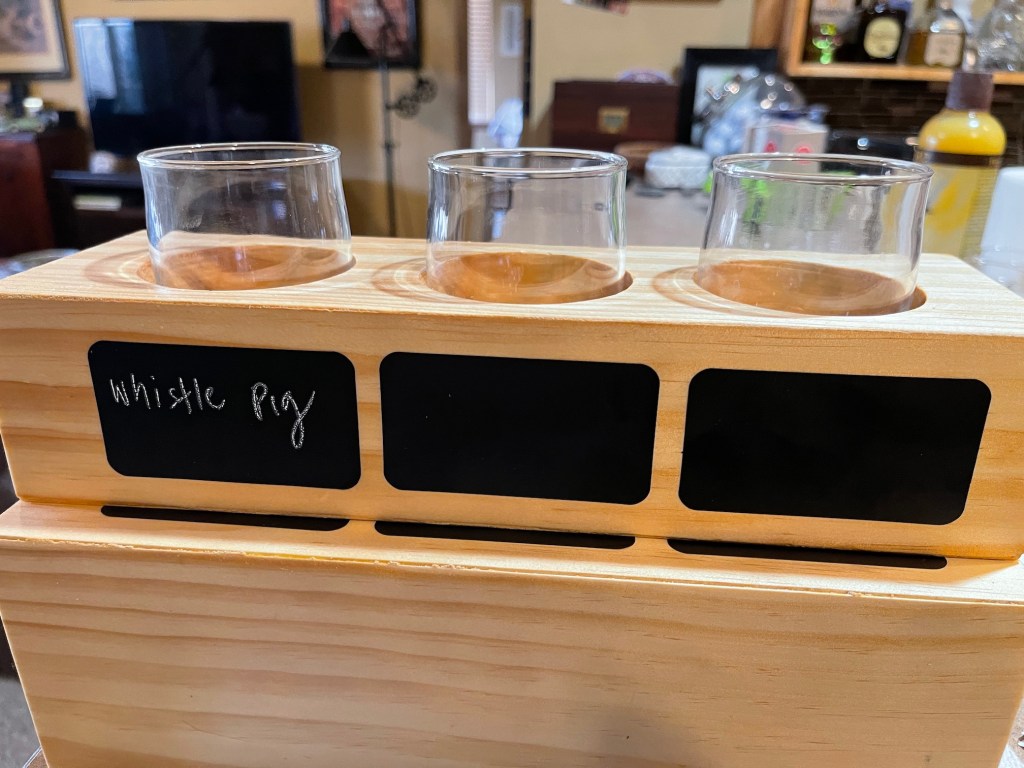
In this post I’ll share a gift my partner John made from wood scraps in his woodshop and then we’ll have a little New Years Day fun!
I love to save and use fabric scraps for my crafting and quilting projects, and my woodworking partner John does the same with his wood scraps. He is always trying to decide just how small a wood scrap to save.
Well for our friends who enjoy whiskey and bourbon tasting, he made a set of tastingtrays from the wood scraps in his shop and put cool beveled edges to each tasting set.
We found chalkboard stickers at one of the home improvement stores and put a sticker/label on each taster-section along with some chalk, so they could mark what is in each taster glass. We also gave them extra stickers in case the originals wear out.
I think it was a pretty creative use of woodworking scraps and John designed the set himself!
Okay now for the fun, and WARNING: You will not be able to “unsee” what you are about to see.
My partner John has had a receding hairline for many years, and has a good sense of humor about it. One of his sons would tease him that he had a “cul-de-sac” on top of his head!
image of a cul de sac in case you are not familiar with this term
I came across a smartphone app called HairStyleLite where you can try on different hair styles. John being such a great sport and having a wonderful sense of humor, let me play with one of his photos to see what he might look like with a full head of hair.
Here is the original photo:
And here are some short hair options for John – ha:
There were a lot more hairstyle options, and I tried both female and male hairstyle options, so there was a lot of hysterical laughter. But here is my favorite one – John as an aging Rock and Roll Star (think of the lead singer of the band Aerosmith or something…):
I warned you that you would never be able to “unsee” it!
Well that was some New Year’s Day Hair fun for you!
If you are new to this blog, here is a little background – in December 2018 my husband died. In December 2017 my beloved mother in law died. In December 2017 my greatest dog love of all time, Sassy the Highly Opinionated Miniature Schnauzer died. My late husband’s birthday is in early December and our wedding anniversary is in late December.
So as you can imagine December is always a challenging month for me. Christmas was always my most favorite holiday (I enjoyed planning for Christmas starting in June or earlier); but my husband died 12 days before Christmas 2018. To add to the unfortunate event, I found him on the floor next to the Christmas tree.
I know this seems like a very morbid opening for a blog post but I just wanted to provide background/perspective for the rest of this post, not to scare you away from reading any further!
After making it through the 3rd anniversary of my late husband’s passing, I realized that I wanted to “take back Christmas” and I was tired of being unrelentingly sad during December. Christmas was my favorite holiday and I needed a way to enjoy it again and not associate it with one of the darkest times of my life.
So we got a Christmas tree and I decorated for the holidays more than I’ve done since my husband passed.
A got a little creative on how to make the TV more festive by adding holiday bunting…
My partner John and I decorated the tree with the collection of ornaments we kept from our previous lives and some new ones we’ve purchased together. Most of my ornaments are schnauzer themed…
Whole lot of schnauzers trimming the tree
John also hung Christmas lights on the front of the house and I placed a Christmas wreath on the front door for the first time together.
In addition to making the house holiday festive, I also did a bunch of holiday baking in anticipation of having John’s immediate family over for Christmas Eve (Originally we had planned to go to the East Coast of the US to spend Christmas with my family, but there is some virus raging…have you heard of it???).
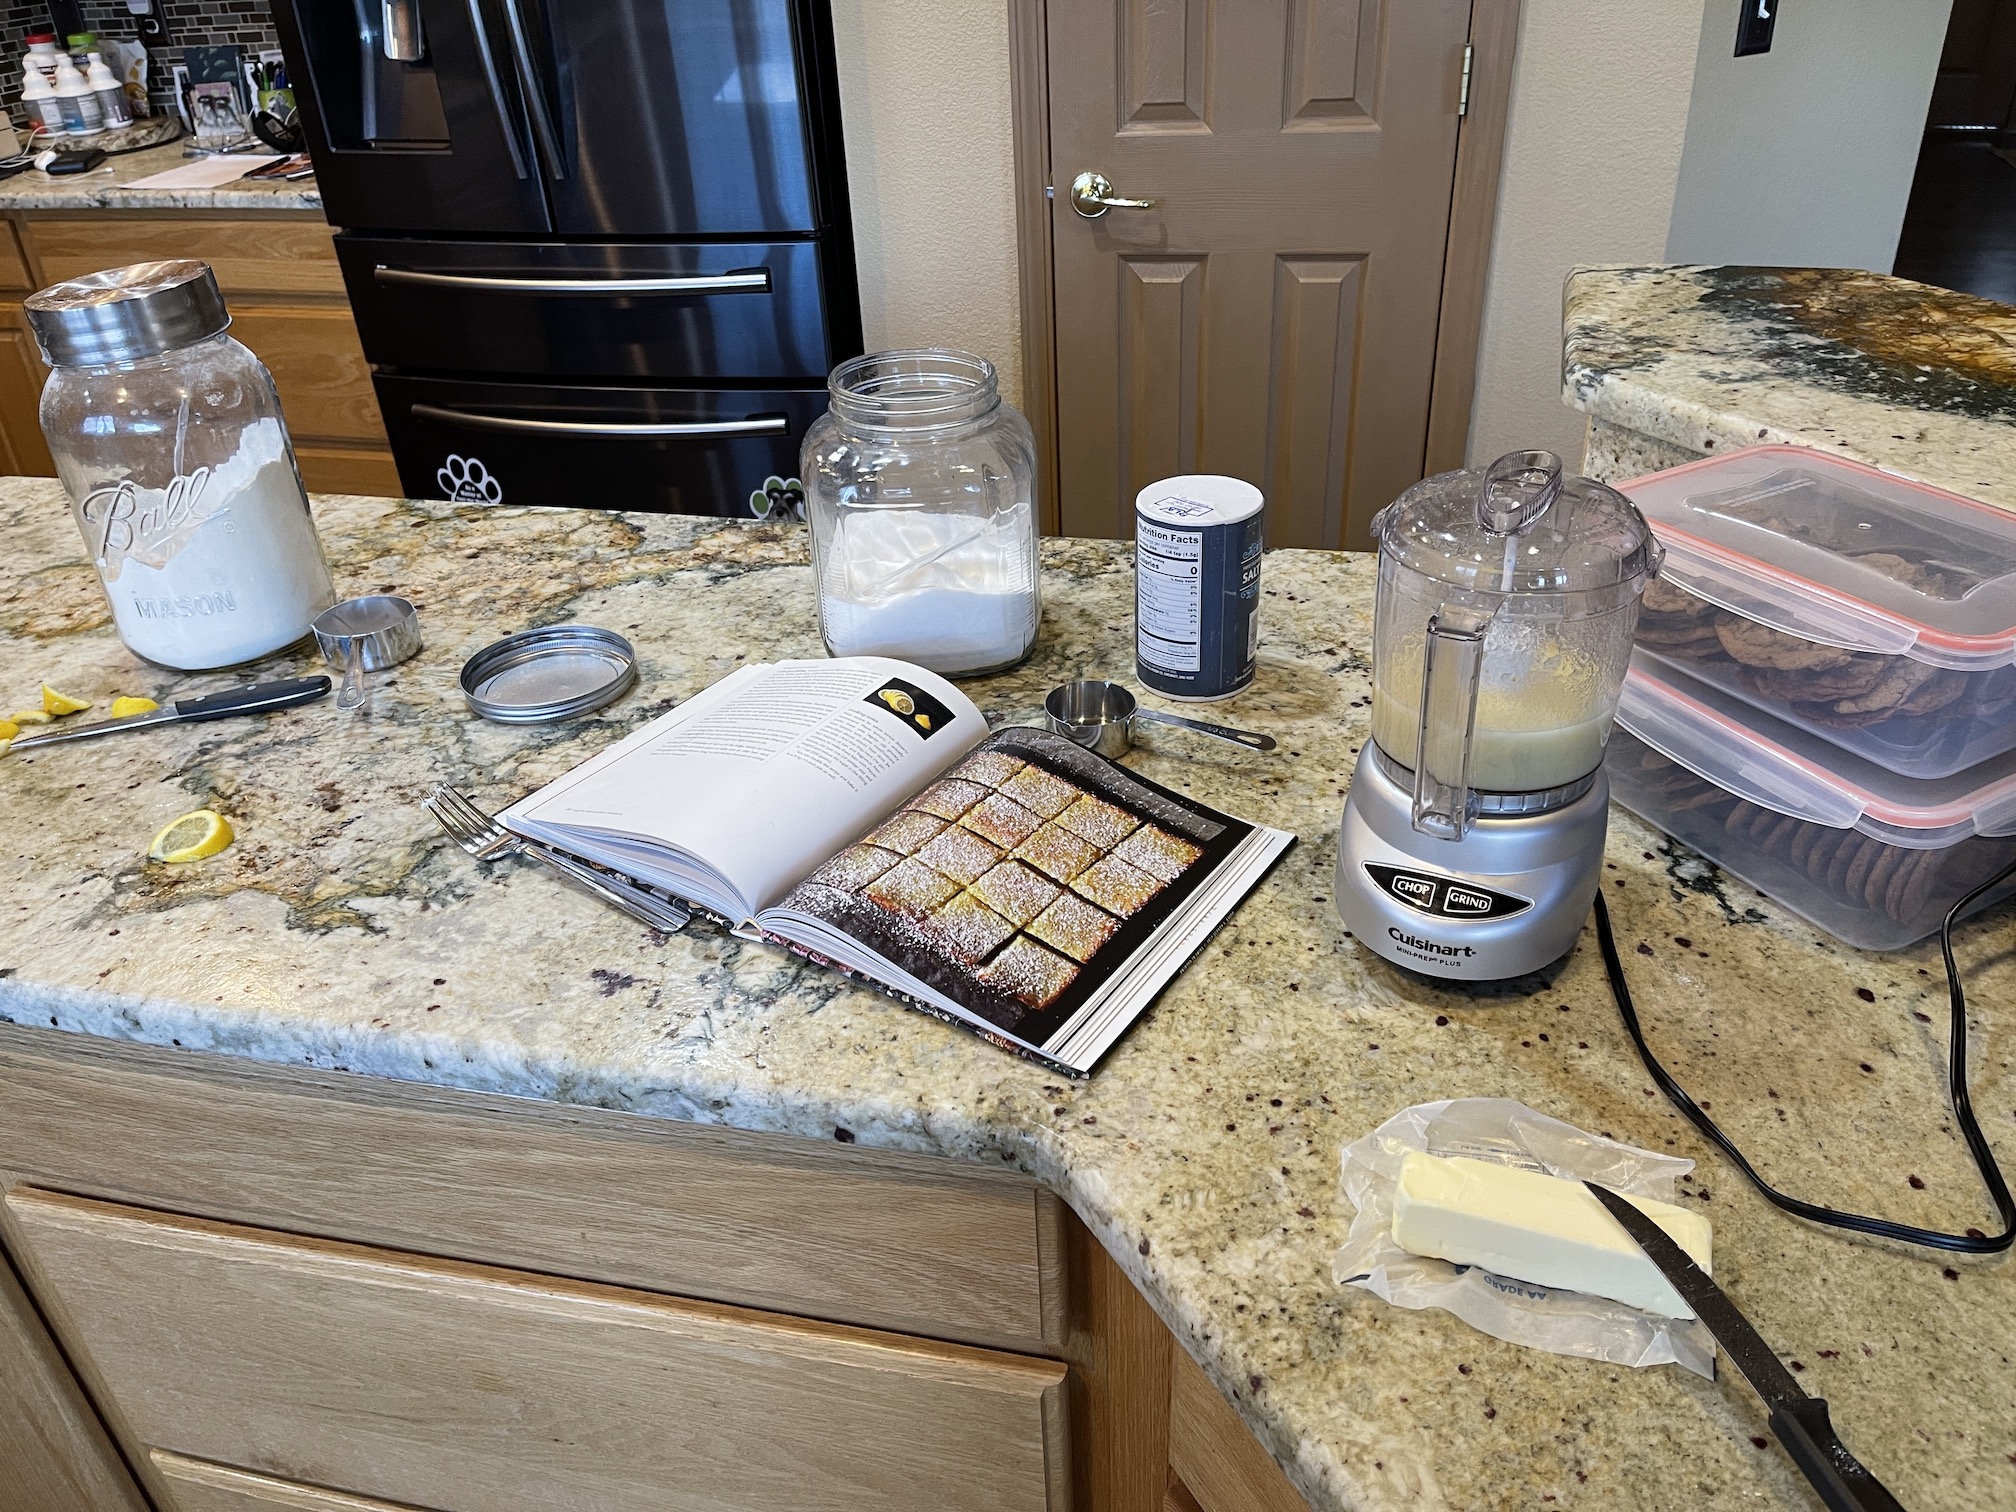
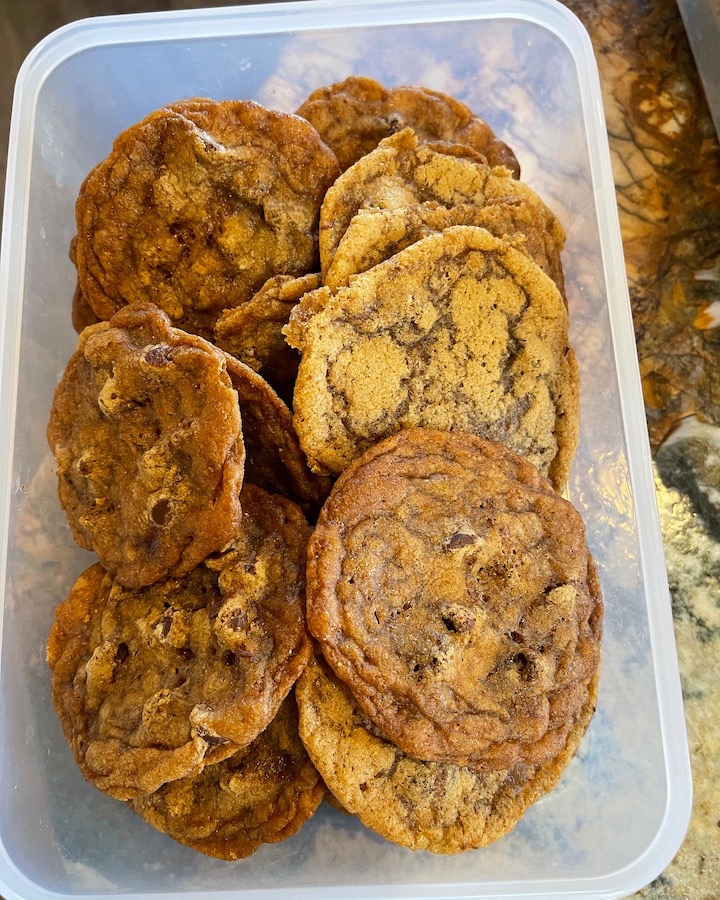
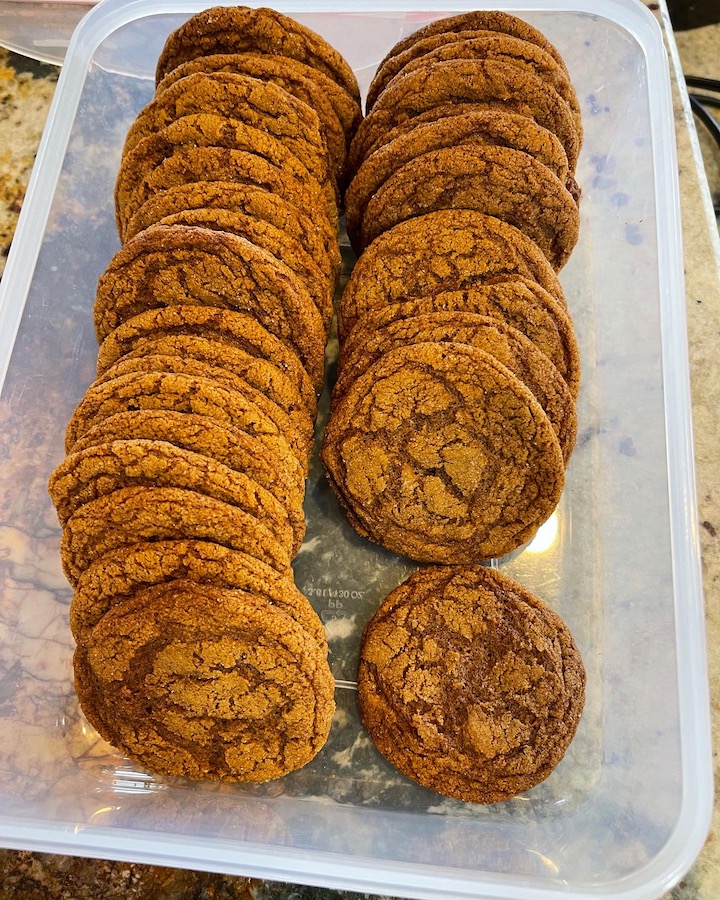
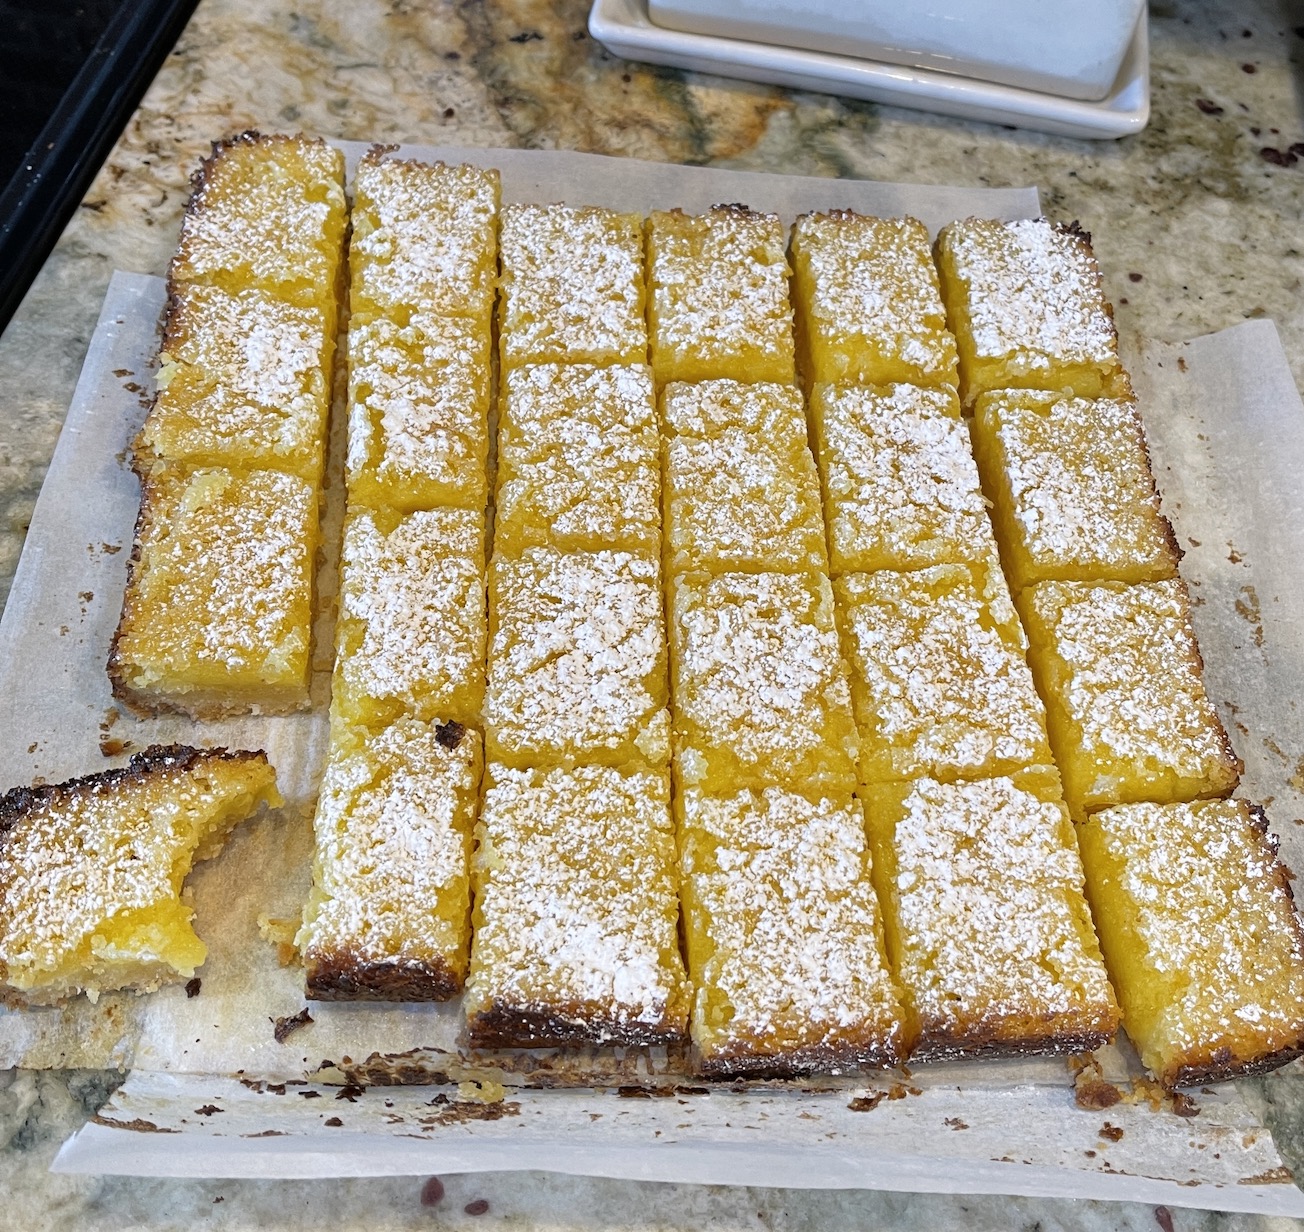
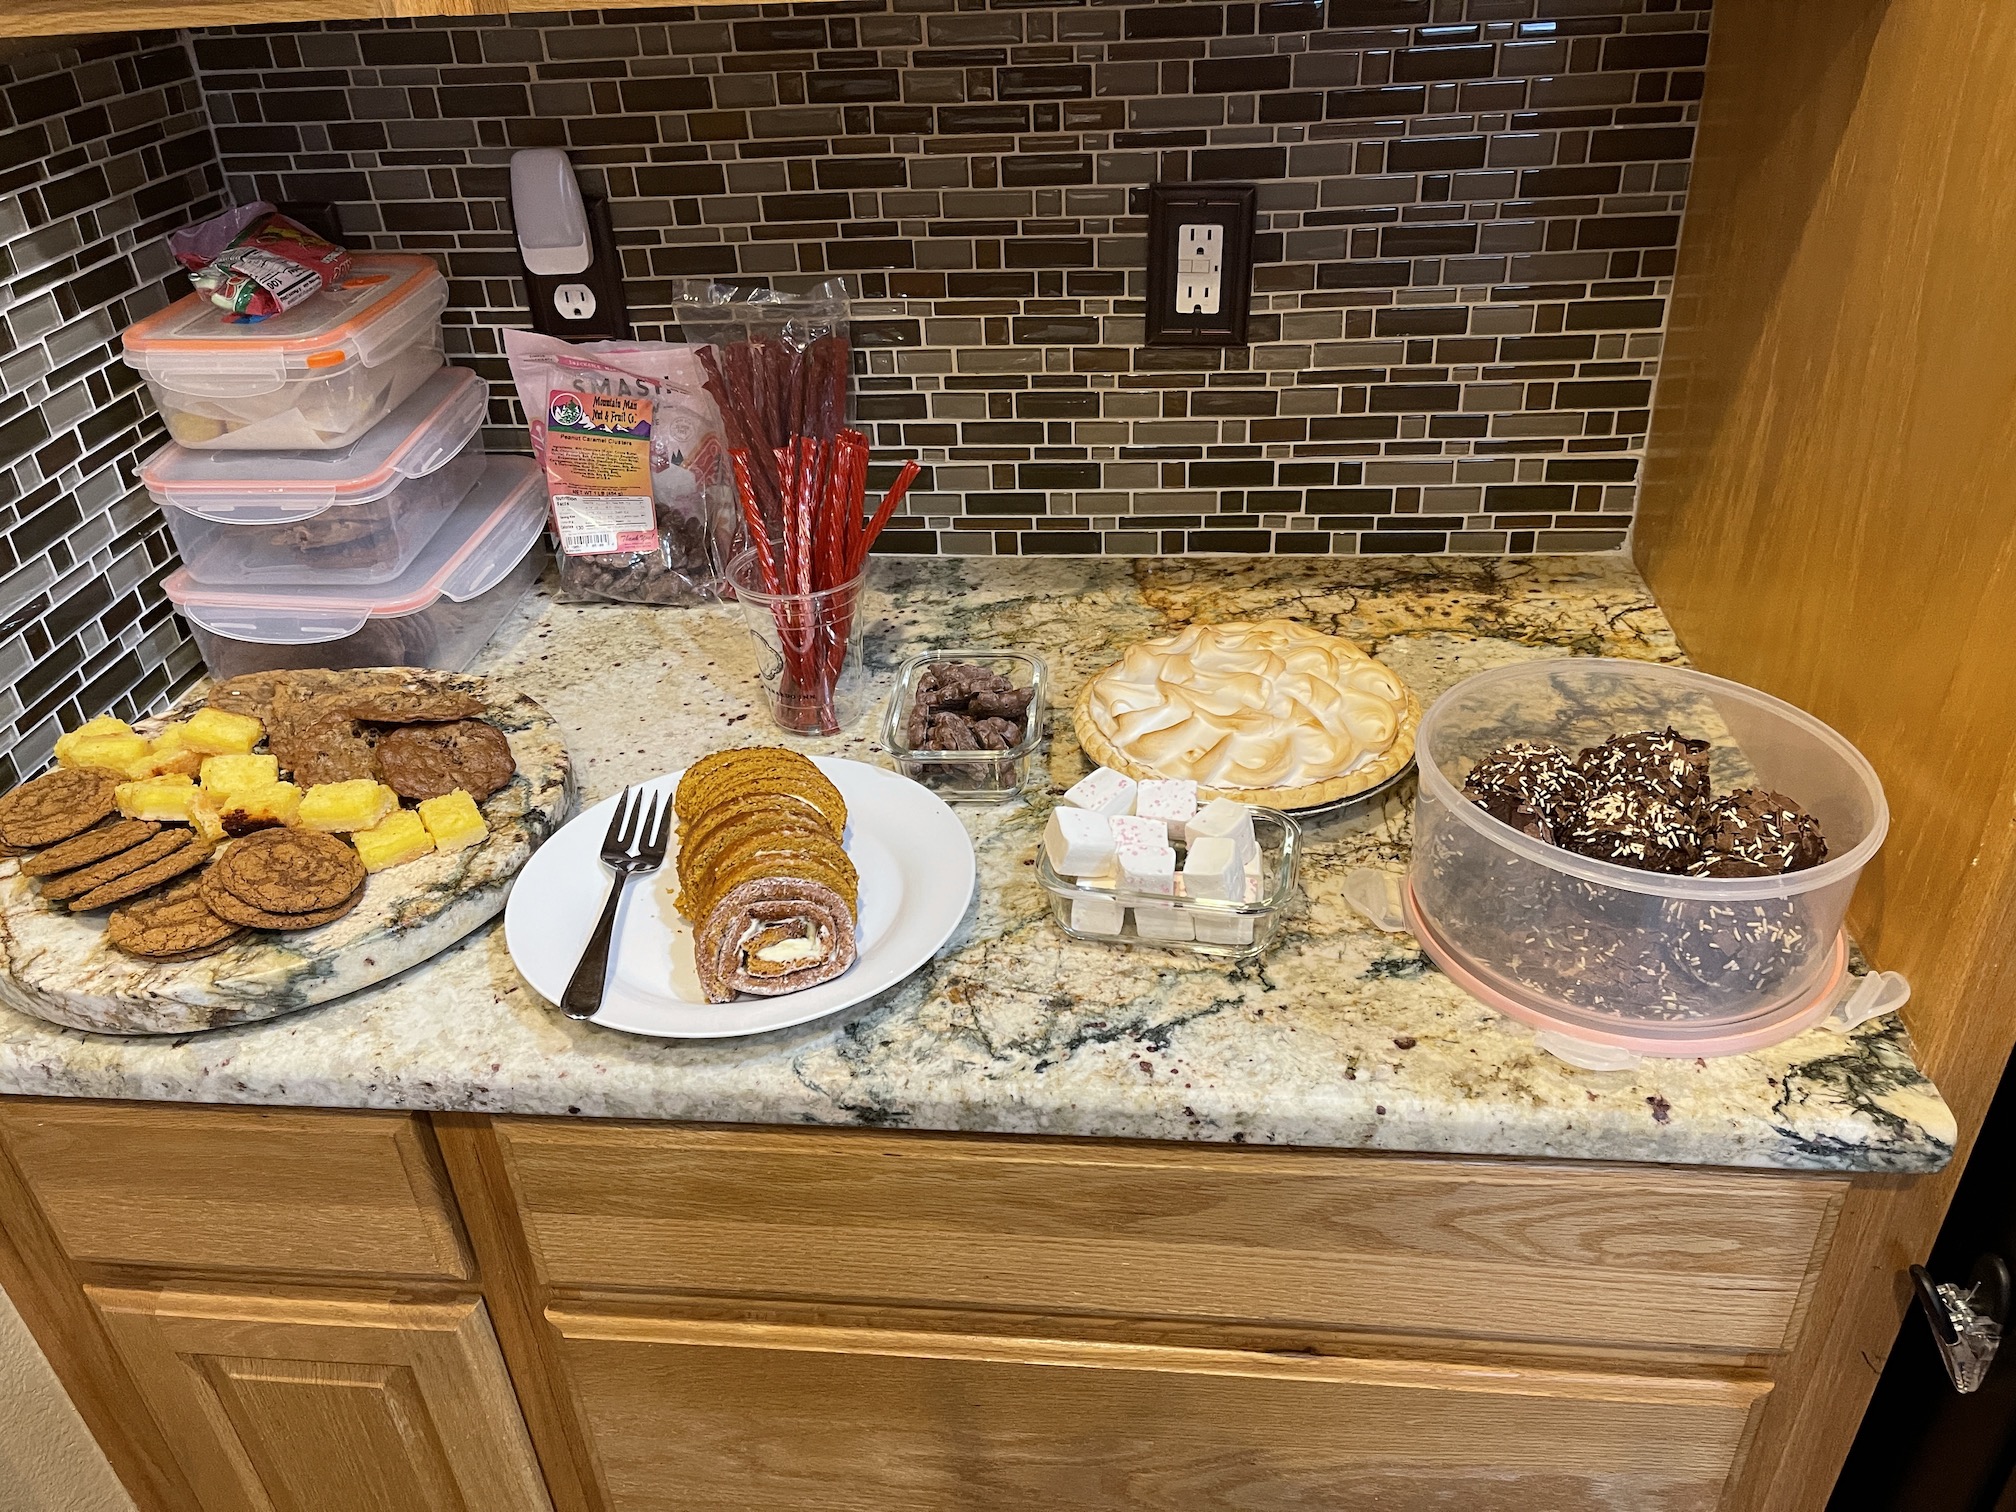
I made Molasses Crinkle cookies, Crispy Chocolate Chip cookies, Lemon Squares, and a Pumpkin Roll.
Here is the messy kitchen during my baking fest:
Here are the cookies I made:
Here are the yummy lemon squares I made:
You’ll see one of the lemon squares above has a bite taken out of it. Well I had to make sure it was not poisonous!
I used my cookbooks for the cookies and lemon squares but for the Pumpkin Roll I used one of my blogging buddy’s (In Diane’s Kitchen) recipe which had awesome directions and worked out very well: Libby’s Pumpkin Roll
Here is the pumpkin roll in progress (this is the second time I’ve made it and I am getting better at the whole jelly roll process):
And the Pumpkin Roll ready to serve our holiday guests:
Here is the whole Christmas Eve dessert spread which includes a bakery bought Lemon Meringue pie and store bought handmade marshmallows:
We did have an actual Christmas Eve meal before the dessert (smile). I set a festive table along with English style Christmas Crackersat each place setting. Of course I forgot to take a photo of the holiday table but use your imagination.
I’ll close this post with a picture of my partner John getting ready to make the gravy for the Prime Rib he made for Christmas Eve dinner, while wearing the paper crown he got from his Christmas Cracker:
I am glad to be regularly blogging and reading posts again, it is actually one of my 2022 New Years Resolutions I am putting in place now. I miss my blogging buddies when I am away!
This post is a follow up to the post – My Etsy Shop is Now Reopened – tierneycreates is now TextilesandSmiles which discusses how in late November 2021 I had to close my former “tierneycreates” Etsy shop instead of reopening it due to technical issues, and instead create a new Etsy shop – Textiles and Smiles (“textiles and smiles” is part of my tagline: “tierneycreates: a fusion of textiles and smiles”).
I started the shop with around 31 listings, added 2 more after opening and I’ve sold in a month’s time 11 items.
Most of my sales were from wonderful people I’ve connected with via social media platforms such as my blog, Instagram and Facebook. I also did a little e-mail marketing (just a one-time thing) to friends who are not on social media.
FROM THE WOODSHOP
My partner John made a couple items for my Etsy shop from his woodshop and we’ve sold two packages of them so far – Wooden Spools:
He even did a custom order when someone reached out and requested an inch longer set of spools. He’s going to make some other items for the Etsy shop someday and he has his own section – “From the Woodshop”:
CREATIVITY KITS
One of the fun things I came up for my shop was to sell “Creativity Kits” when I include the book (from my craft book collection) and the fabric (like a jelly roll or other pre-cut) to make something. I pulled “used” books from my crazy existing craft book collection and was able to package them with fabric at a reasonable price since it was a “used” book.
These sold pretty well and here are some examples:
The photos above are “raw” photos, and I did some clean up and photo editing for then Etsy listings…trying to look as professional as possible (or imaginarily professional – ha!).
There is one Creativity Kit I am surprised has not sold yet, I even have it packed up for shipping as I thought it would “fly off then shelf” – one with then book Scrap Republic and 2 pounds of a rainbow of colors of scraps from my personal scrap pile. Perhaps no one trusts my scrap pile – ha!
This is not a book I would part with because I want to make everything in it, but I had accidentally bought a second copy so I was able to part with one. I had trouble putting up the listing for this creativity kit because I kept setting aside the yummy looking package of scraps I put together to use for my own project. Finally I made myself list it as I have so many more scraps to play with in my stash!
I am sure it will sell eventually when the person it is meant for sees it.
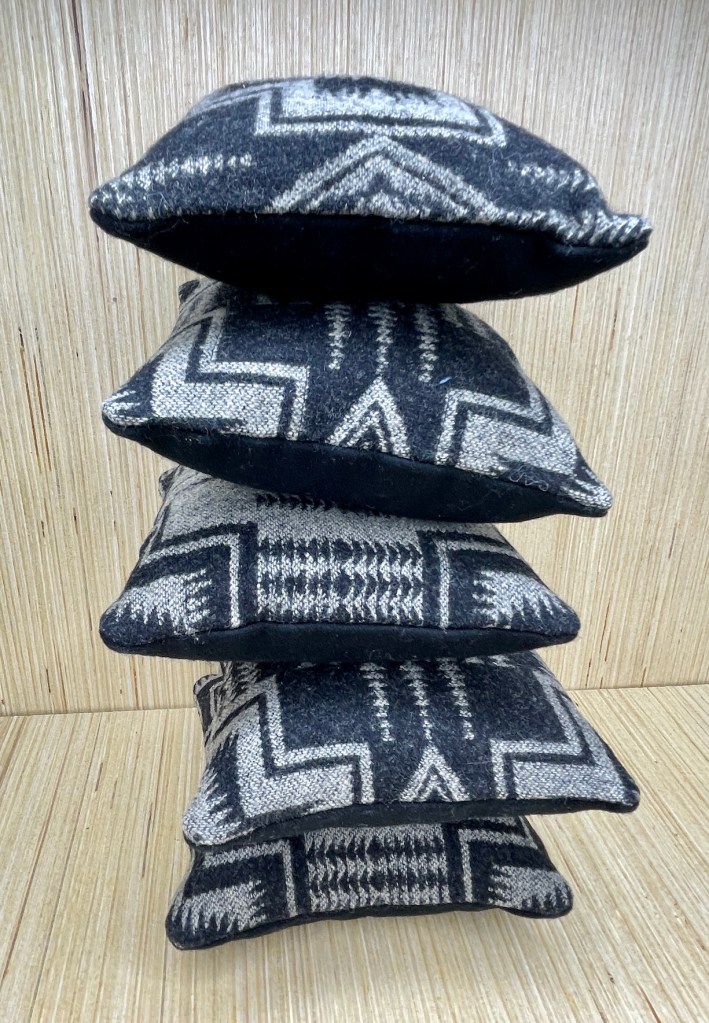
LITTLE PILLOWS
I’ve only made one set and it sold – I love little pillows!
I made the above set of 5 little pillows from recycled Pendleton Wool blanket scraps. I plan to make another set in the future. I don’t have anymore of the black and gray wool scraps but I do have some other Pendleton blanket wool scraps. It isn fun recycling!
When I had my first Etsy shop open, tierneycreates, I was selling a pillow I made from Pendleton Wool scraps and put the word “Pendleton” in the title of the listing. I was contacted by the legal department of the Pendleton Wool company for potential “copyright infringement”. I was totally freaked out as a new seller. The paralegal I dealt with at the company was very nice and provided me with education and of course allowed me to fix my error. I definitely remembered that lesson and when I listed these pillows I wrote for my Etsy listing:
Recycled Wool Little Pillow Set – Five (5) 5 1/2 inch x 5 1/2 inch x 2 inch decorative wool pillows
I love working with recycled materials. This set of 5 small pillows measuring 5 1/2 inches by 5 1/2 inches by 2 inches was made with recycled wool from a well known Oregon based wool manufacturing company. These little pillows would be perfect to decorate your bookshelf!
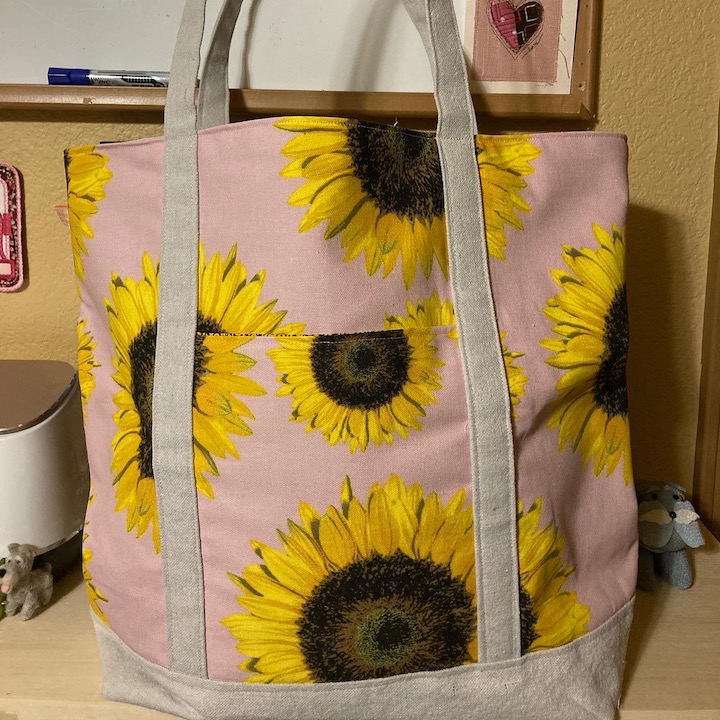
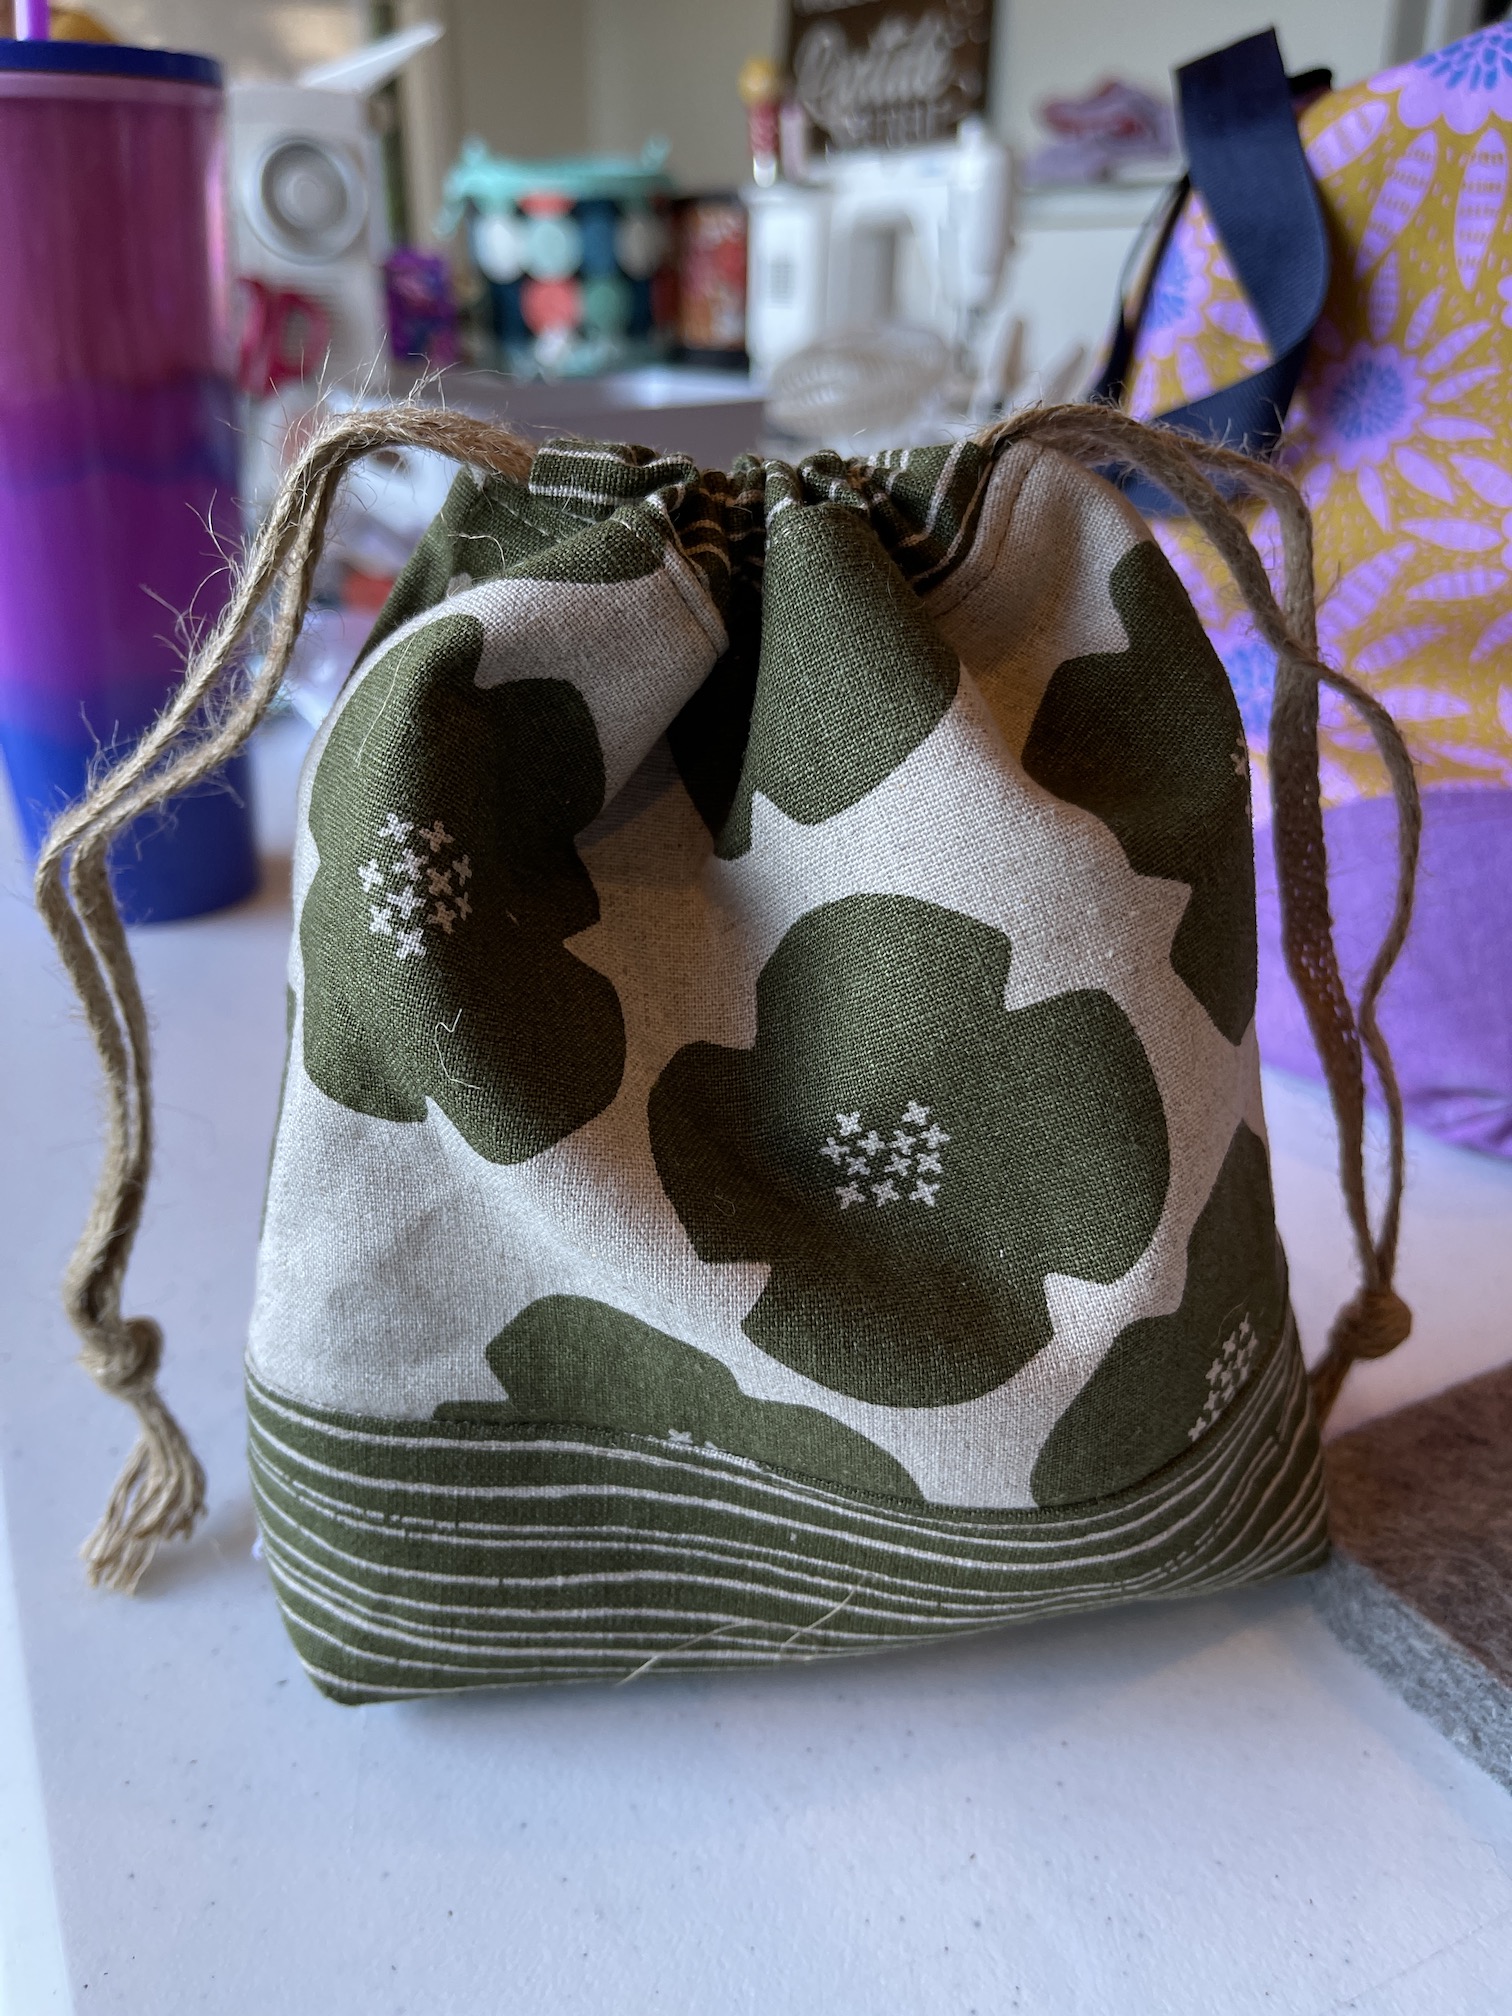
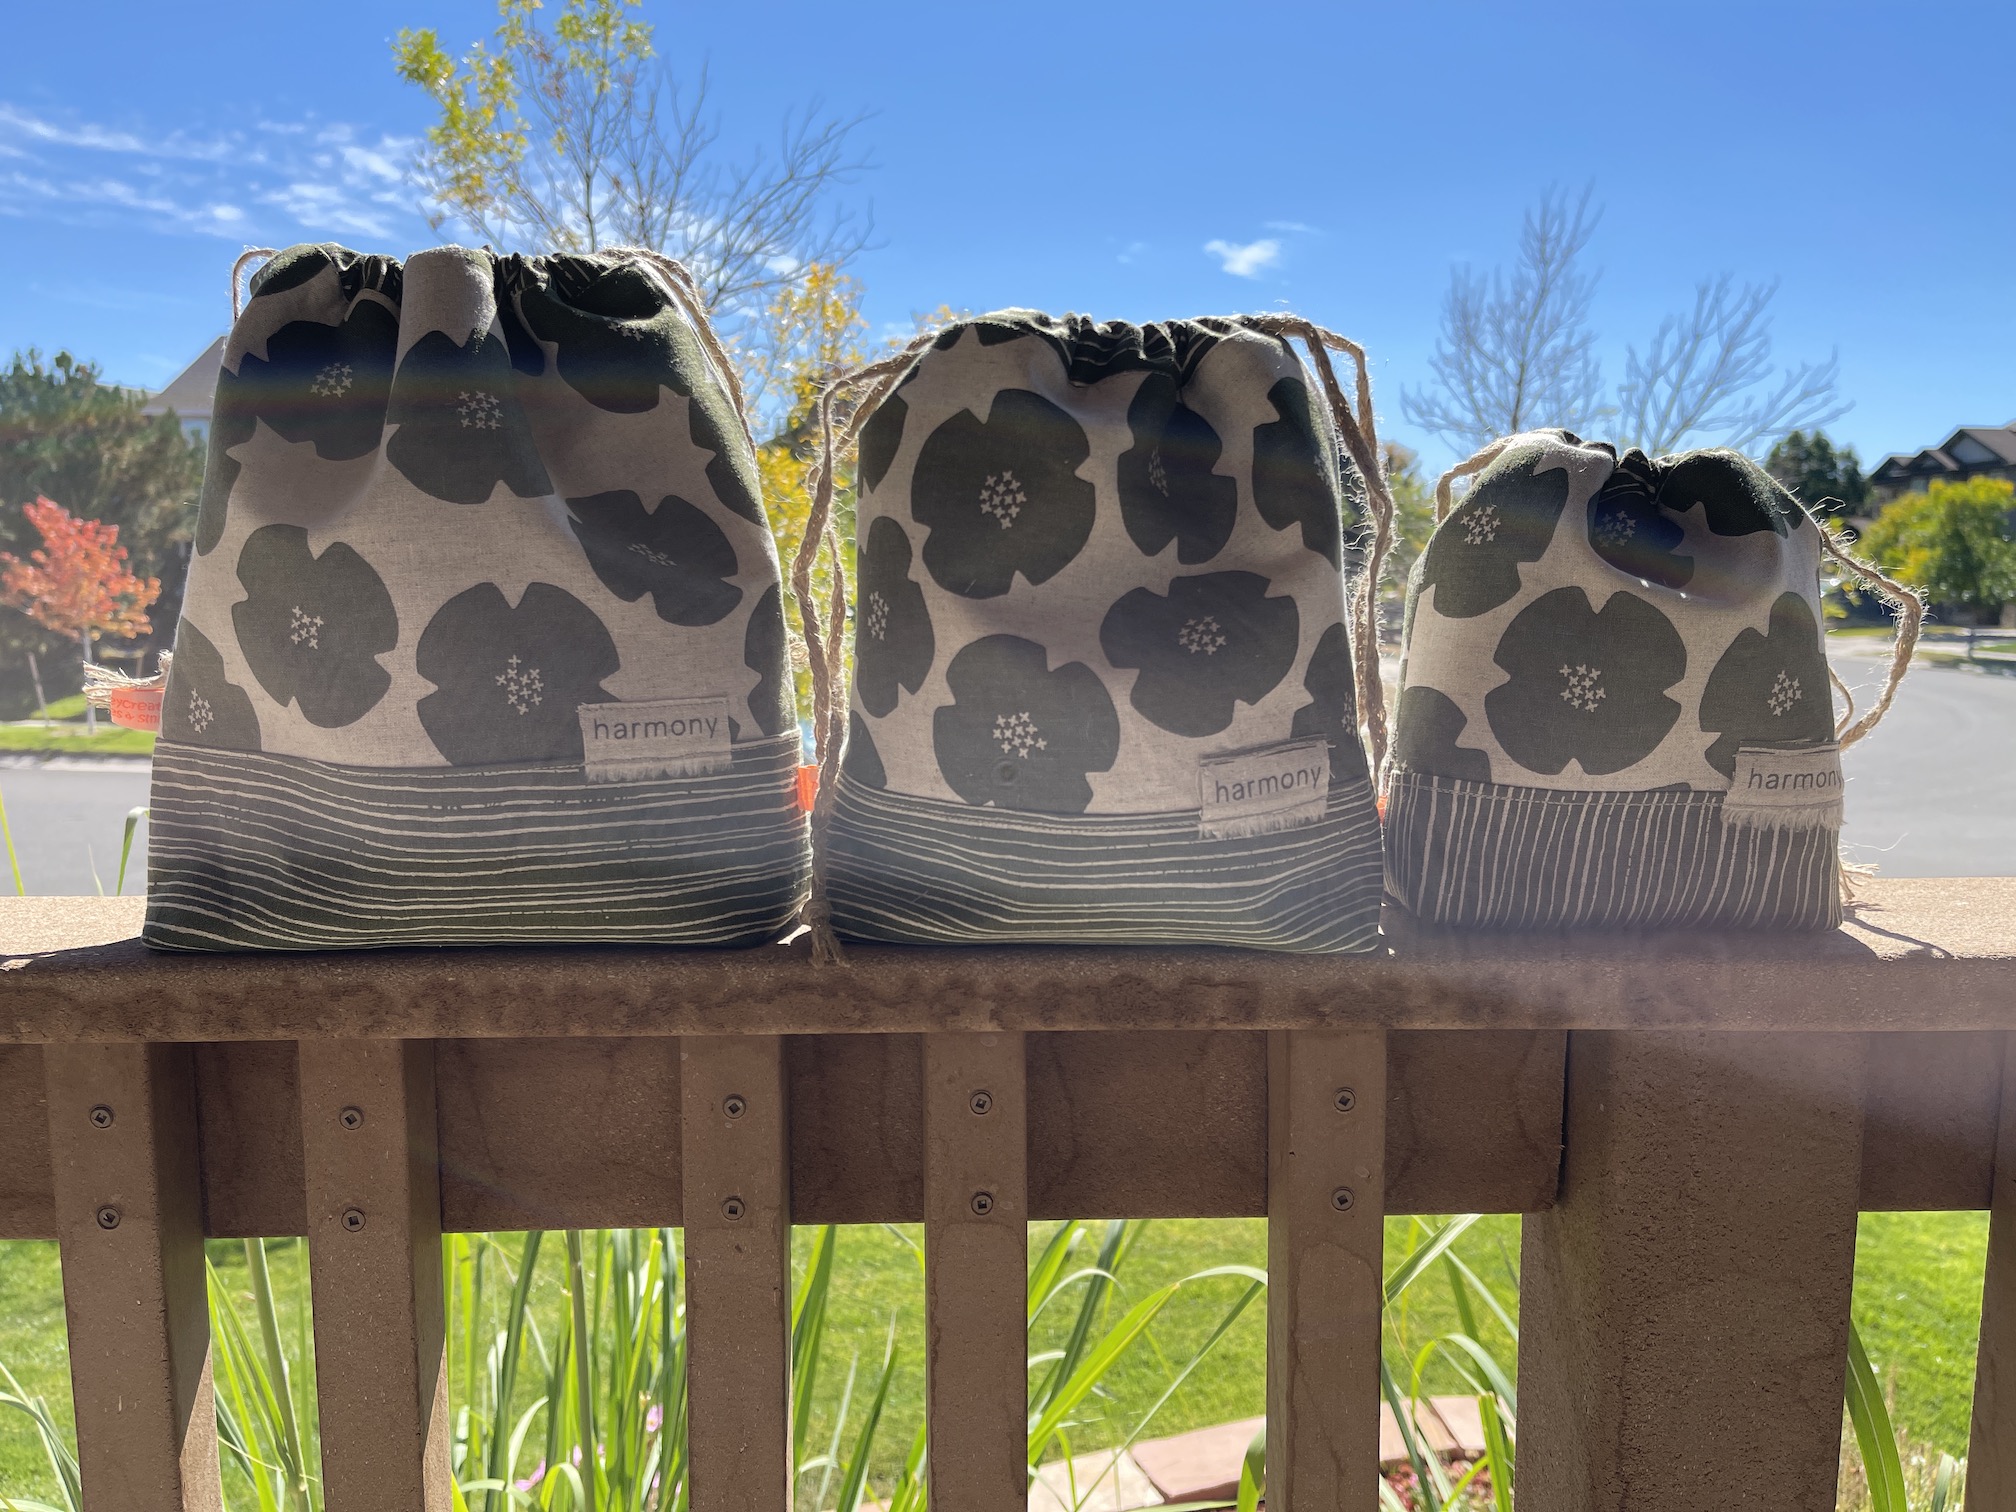
PROJECT BAGS/DRAWSTRING BAGS
My biggest seller was the project bags/drawstring bags I made.
I sold a couple sets of these:
As well as a couple other project/drawstring bags.
In addition to all the items shown above, I also sold a couple other items, including a set of fat quarters and one miniature kimono but I do not want to bore you with a complete listing of my sales.
I really appreciate all the customers who left reviews, and I’ve received 5 star reviews (huge smiles), which really helps since I am considered a “new seller” on Etsy with my new shop!
WHAT IS NEXT
I am pretty sure I am going to make some more project bags for the shop and I am working on a strategy of what to make and list next. One of my blogging buddies asked about messenger bags so I am thinking of those.
I noticed that many successful Etsy shops focus on like one thing but there are so many things I enjoy making, and I want to keep the shop a fun hobby, so I do not see myself narrowing to just one type of item.
I will share another update on my Textiles and Smiles Etsy shop if I come up with some fun new items in the future!
I posted the Firefly Tote on Instagram, and as standard etiquette I tagged the pattern designer – Anna Graham of Noodlehead when I credited her patter on my IG post. She has like 90,000 Instagram followers and I was pretty sure she wasn’t going to pay any attention to my tag.
Well next thing I know, she comments on my post and then the next day (I think, or perhaps later the same day), she adds it to her Instagram story!
In addition to tagging me, she also tagged the fabric designer Sarah Golden of that amazing “Maker” fabric that I love so much!
I was blown away on having such exposure as I’ve loved (and purchased) Noodlehead patterns for years; and she is a very well known pattern maker.
What an honor when the pattern designer likes your bag!
In the post I linked above, I sort of whined about the challenges of making the backpack with quilting weight fabric when it is supposed to be made with canvas as well as the hours it took me to complete it in time for their family Christmas celebration (a couple all nighters).
Well this morning I received an e-mail from the woman who commissioned the backpack as a surprise for her sister, and any whininess I previously had about the commission evaporated!
Here it is:
I just looked at our correspondence and realized I had been sending email updates to my husband instead of you!! I had emailed immediately when the backpack was finished AND when it came because it was so perfect and beautiful!!!!! I knew it would be amazing but honestly, I was so impressed with the creativity and talent you poured into our special present for her. It literally could not have been more perfect. I kept going over the fabric choices you made for her and all the sweet details and I just feel so thankful for you – you really “got” the heart behind the gift. THANK YOU SO MUCH. This will be one of those gifts that I know she will always treasure. She was SHOCKED and so surprised once she figured out it was made specifically for her. She carried it around with her the rest of our Christmas celebration and then hung a special hook in her sewing room so she could look at it as she works. Thank you. Your craft is beautiful and clearly – you are a beautiful person!
Okay now I’d gladly do another all nighter after receiving that e-mail!
Just wanted to share this as a follow up to me being sort of whiny over late nights and that the time I put in to make the backpack way exceeded what I charged. A heartfelt thank you can be quite the currency!
I now feel well compensated for my time and effort (smile).
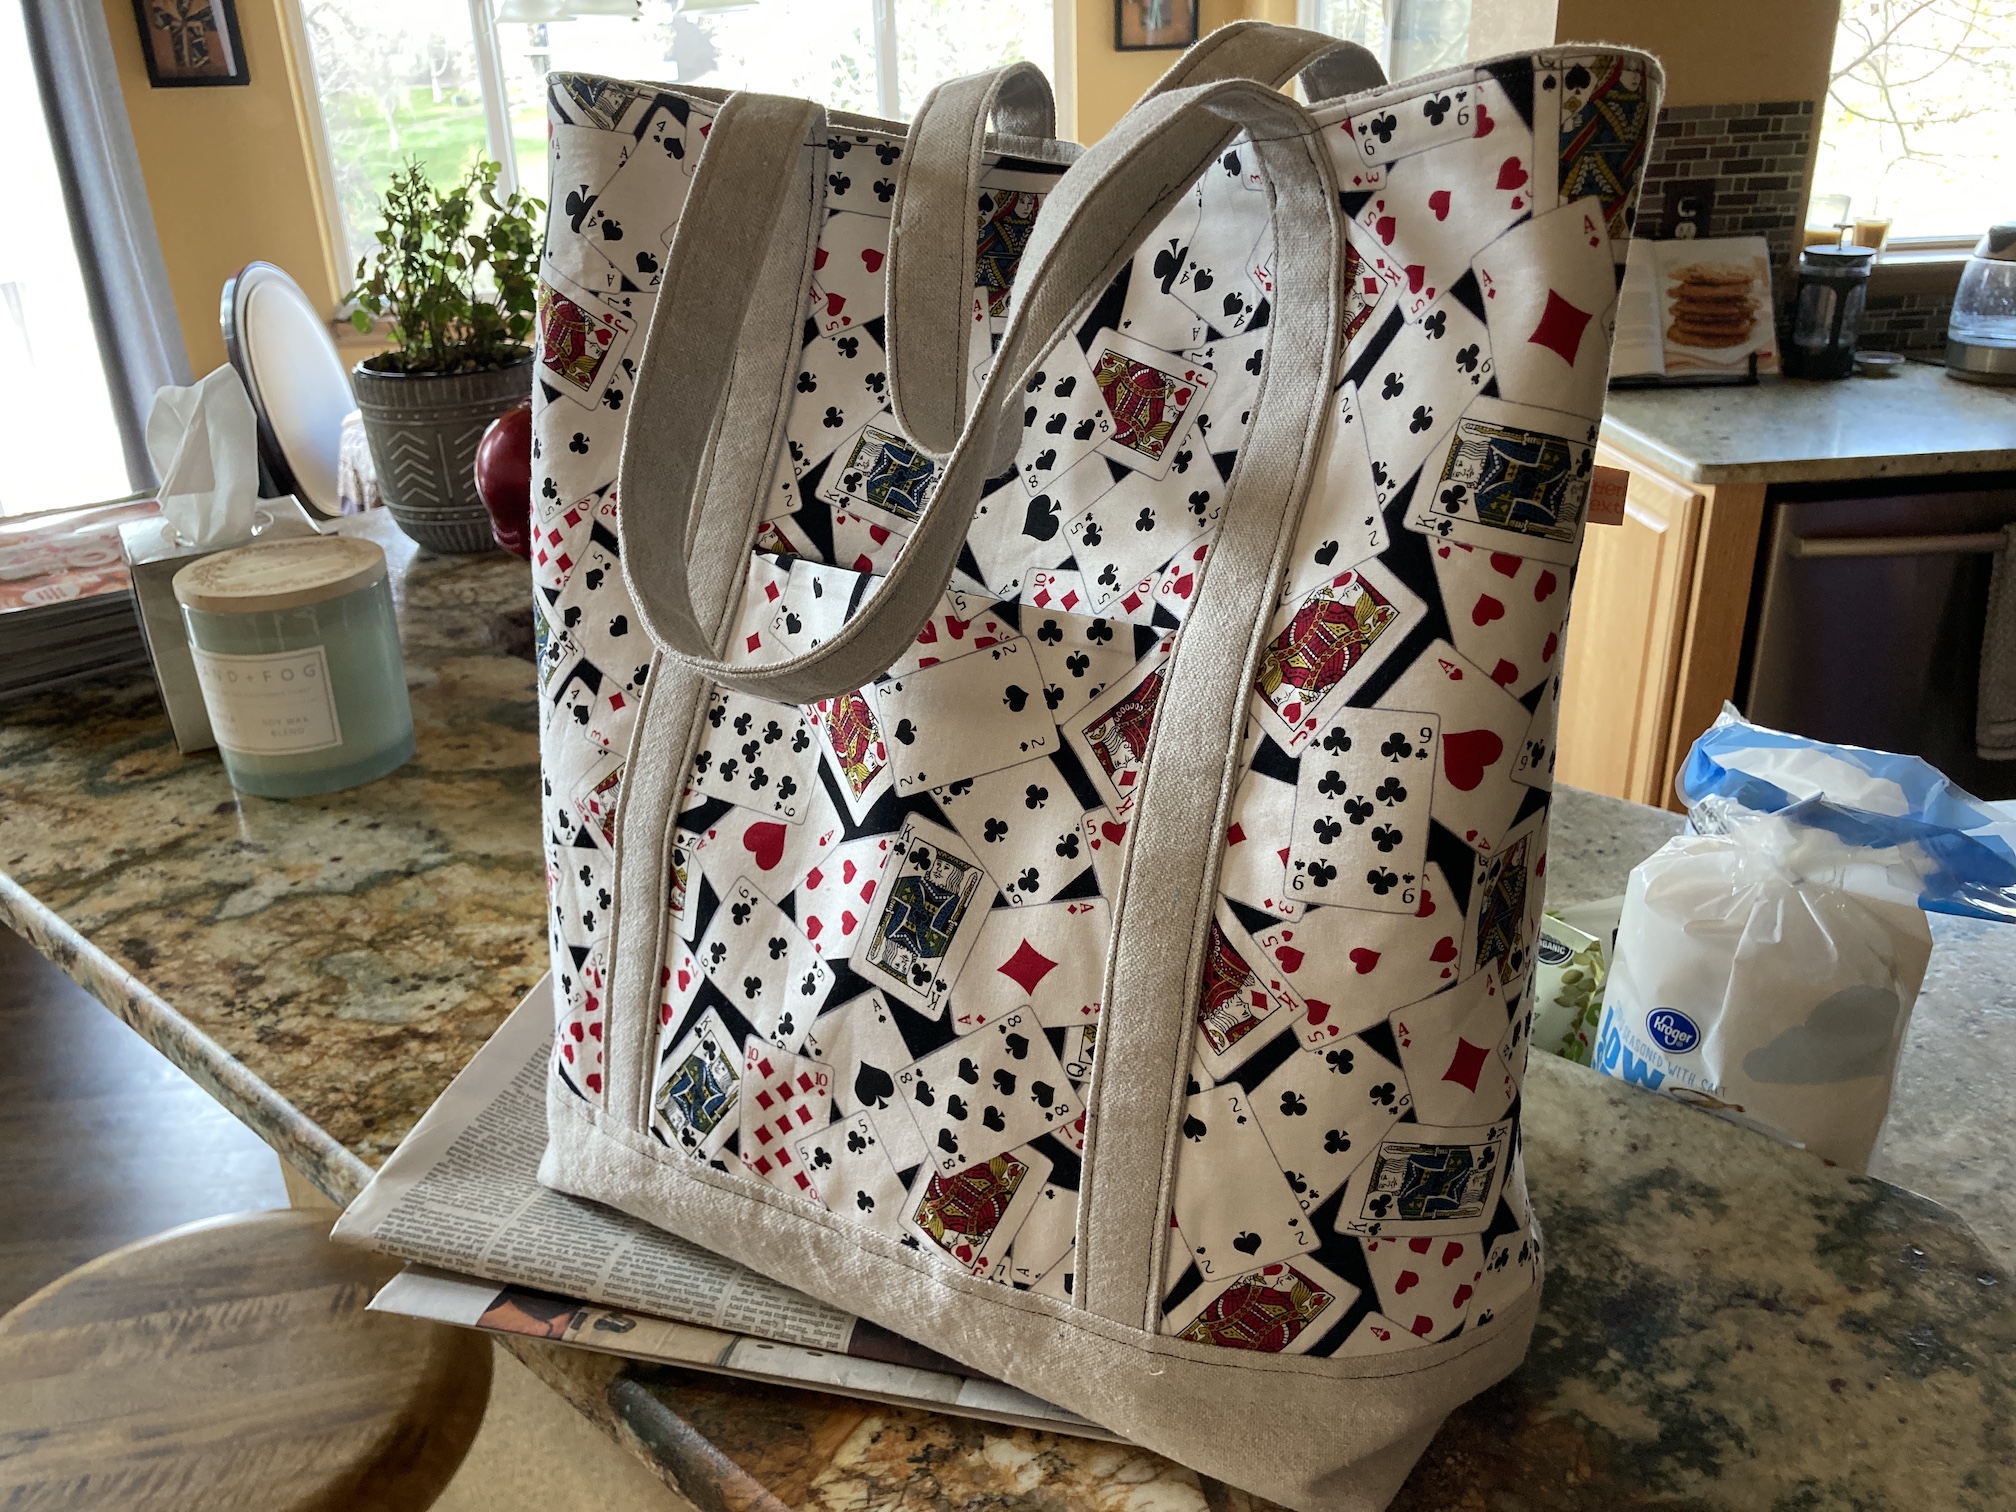
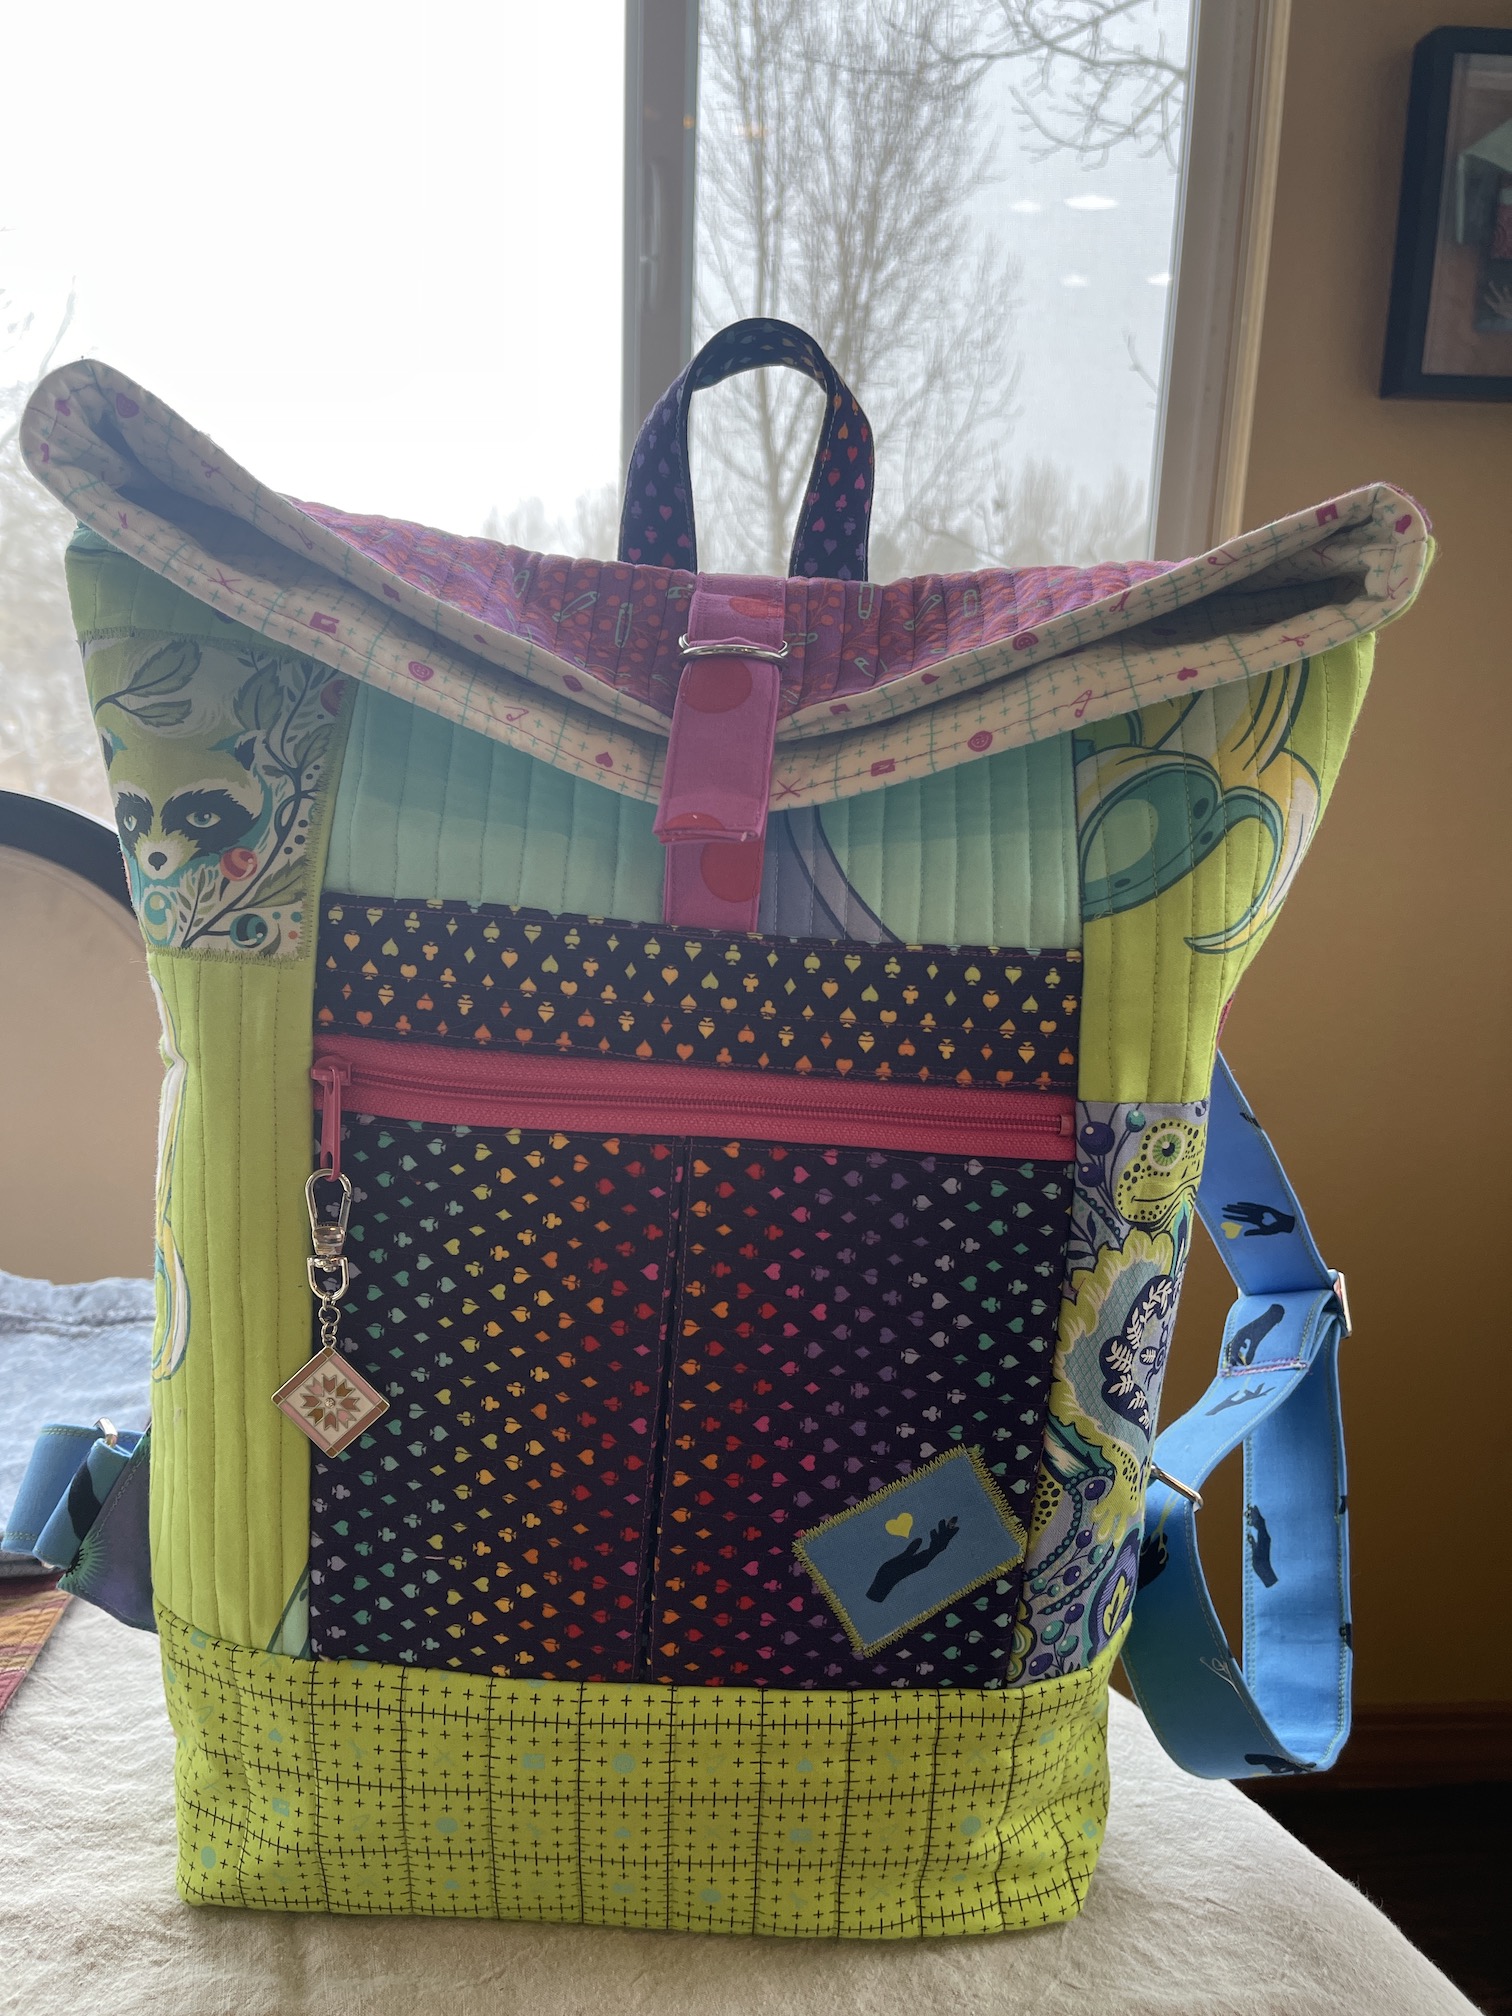
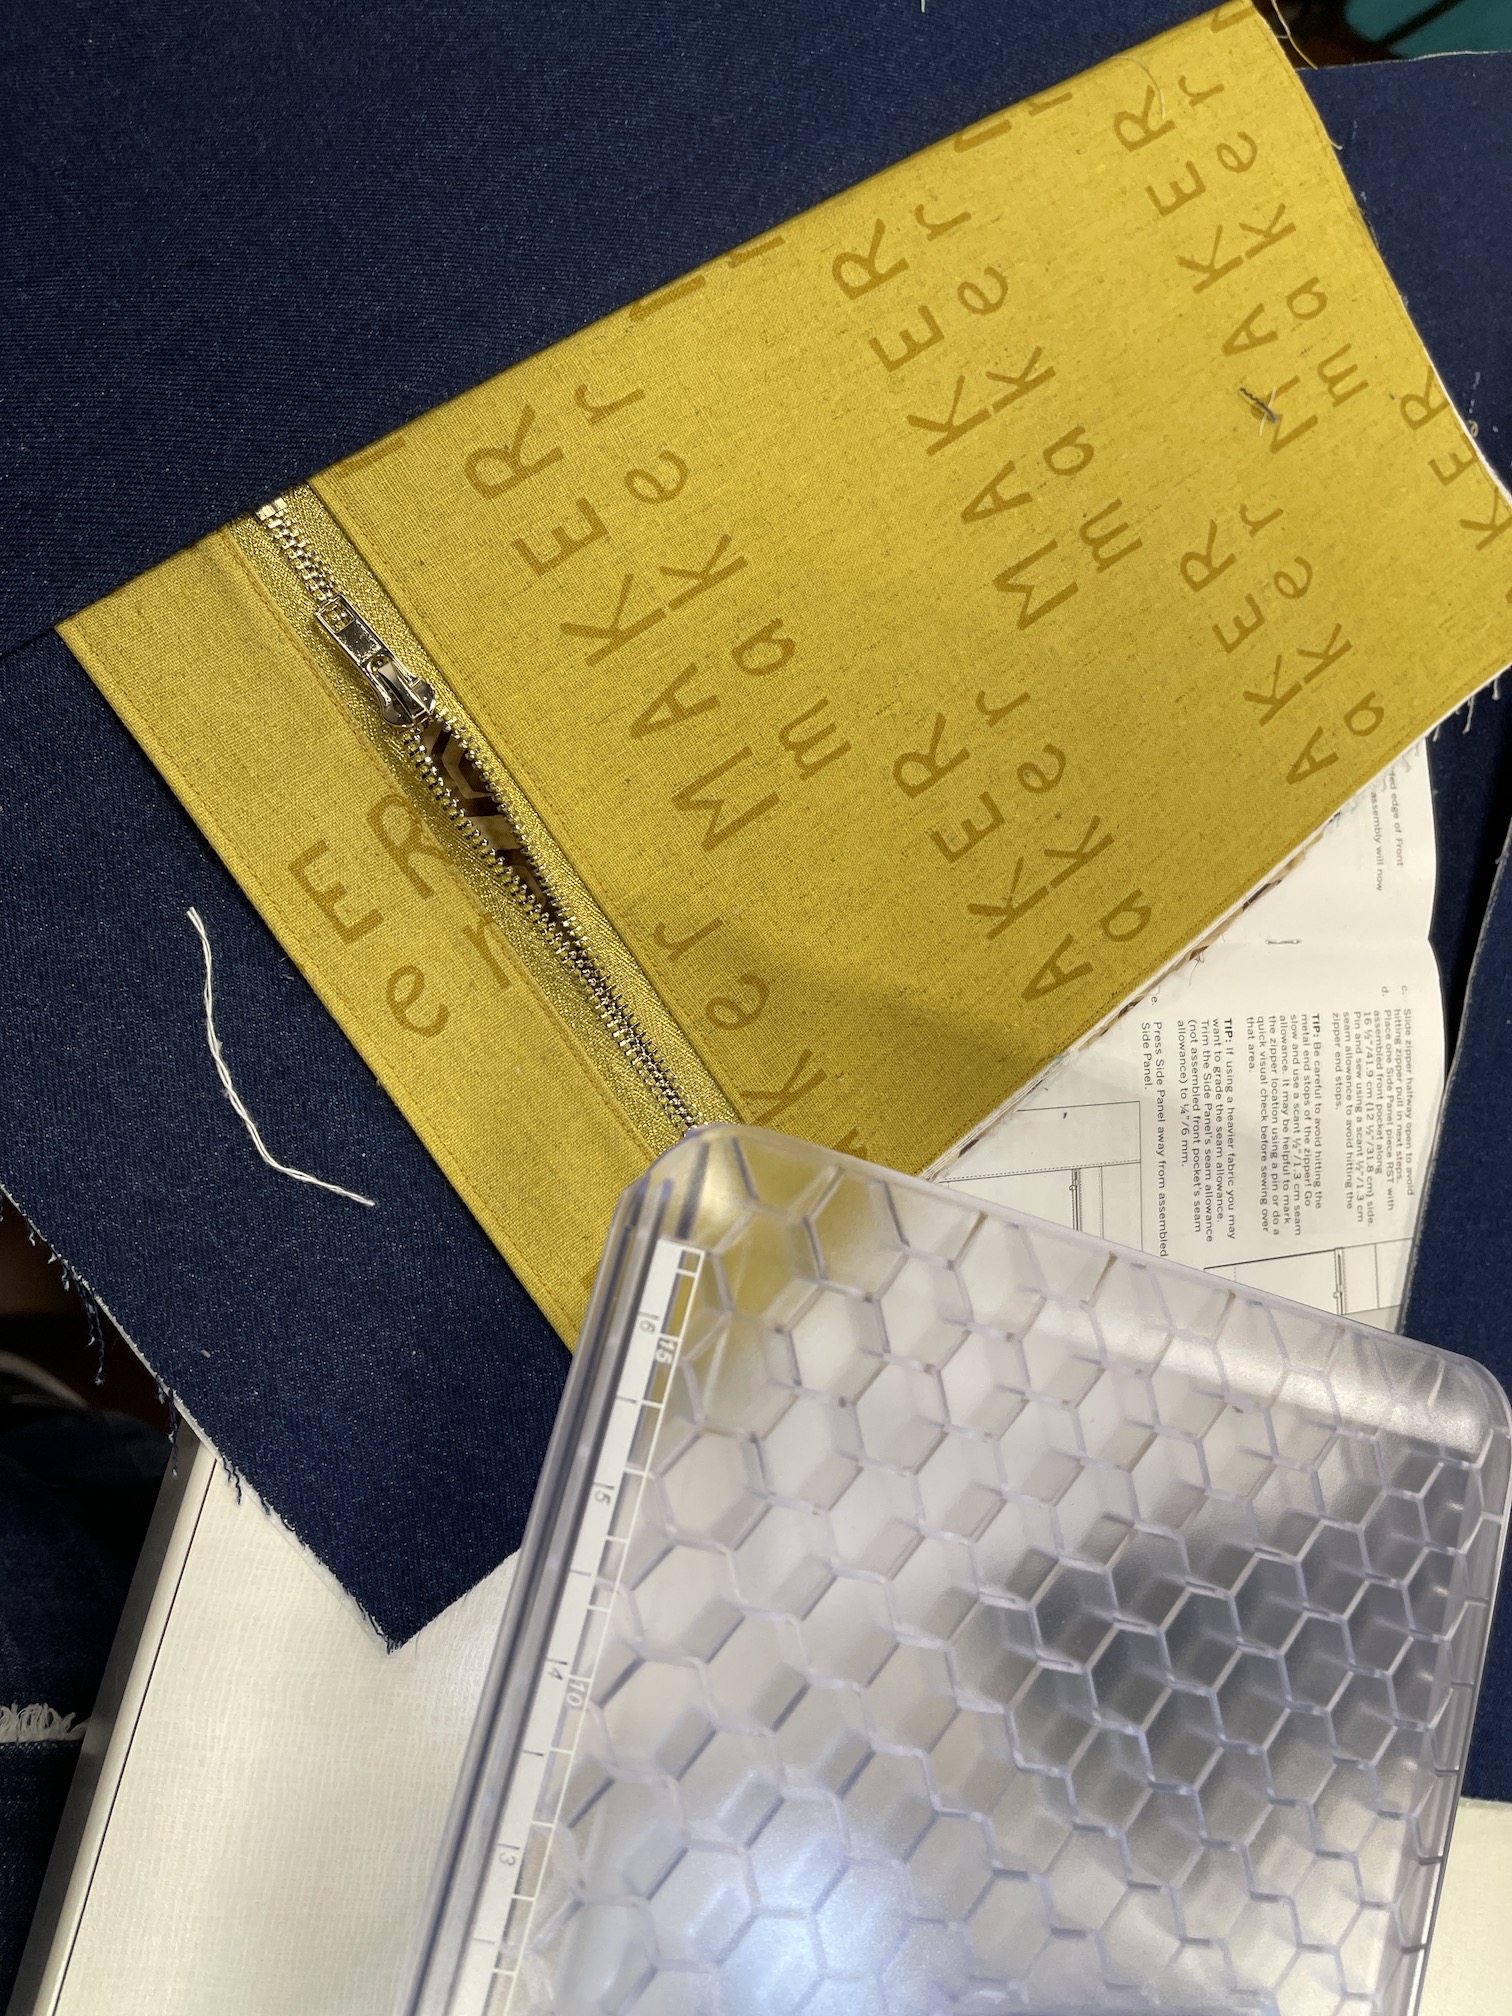
Last night I finished the Noodlehead Firefly Tote that I started in early December at a bag making class as Treelotta Fabrics quilt shop.
I made it with the same fabric and gold zipper as the Noodlehead Range Backpack (see post Adventures in Bag Making: Range Backpack DONE! ) I made the month prior. I did add a bit more “pizazz” to the tote bag by adding in some sparkly gold handles.
Here are the photos of the completed Firefly Tote!
And here is it hanging out with it’s coordinating backpack:
If you purchase the pattern, the pattern designer, Noodlehead, allows you to make it to sell on Etsy, etc. (but no commercial production, just small handmade shops) as long as you credit her. I think the tote size and the smaller “project” size bag would sell in my shop but it took so long to make that bag I am not sure at this point.
Speaking of my Etsy shop, I am up to 11 sales since opening in November and I still plan to post about my shop in the future. We had a nice but busy holiday with my partner’s son visiting from out of town and I am rather behind in blogging!
I was going to post about my Etsy shop but I thought I would share what my woodworking partner has been up to instead.
Yesterday my partner John and I met up with our friends for dinner and gave them a handmade Lazy Susan for Christmas!
Sometime earlier this year (2021 is a blur for me) they mentioned they’ve been struggling to find a Lazy Susan for their large round table for quite a while. They have 3 kids and passing things about the table at dinner can get quite tedious.
My partner John, whose hobby is woodworking, never made a Lazy Susan before, felt he should put himself up to the challenge of making his first Lazy Susan and gift it to them for Christmas!
The first one he made came out 26 inches in diameter and he was not completely pleased with it as there were tiny mistakes (ones I did not even notice), and we decided to keep it for our table:
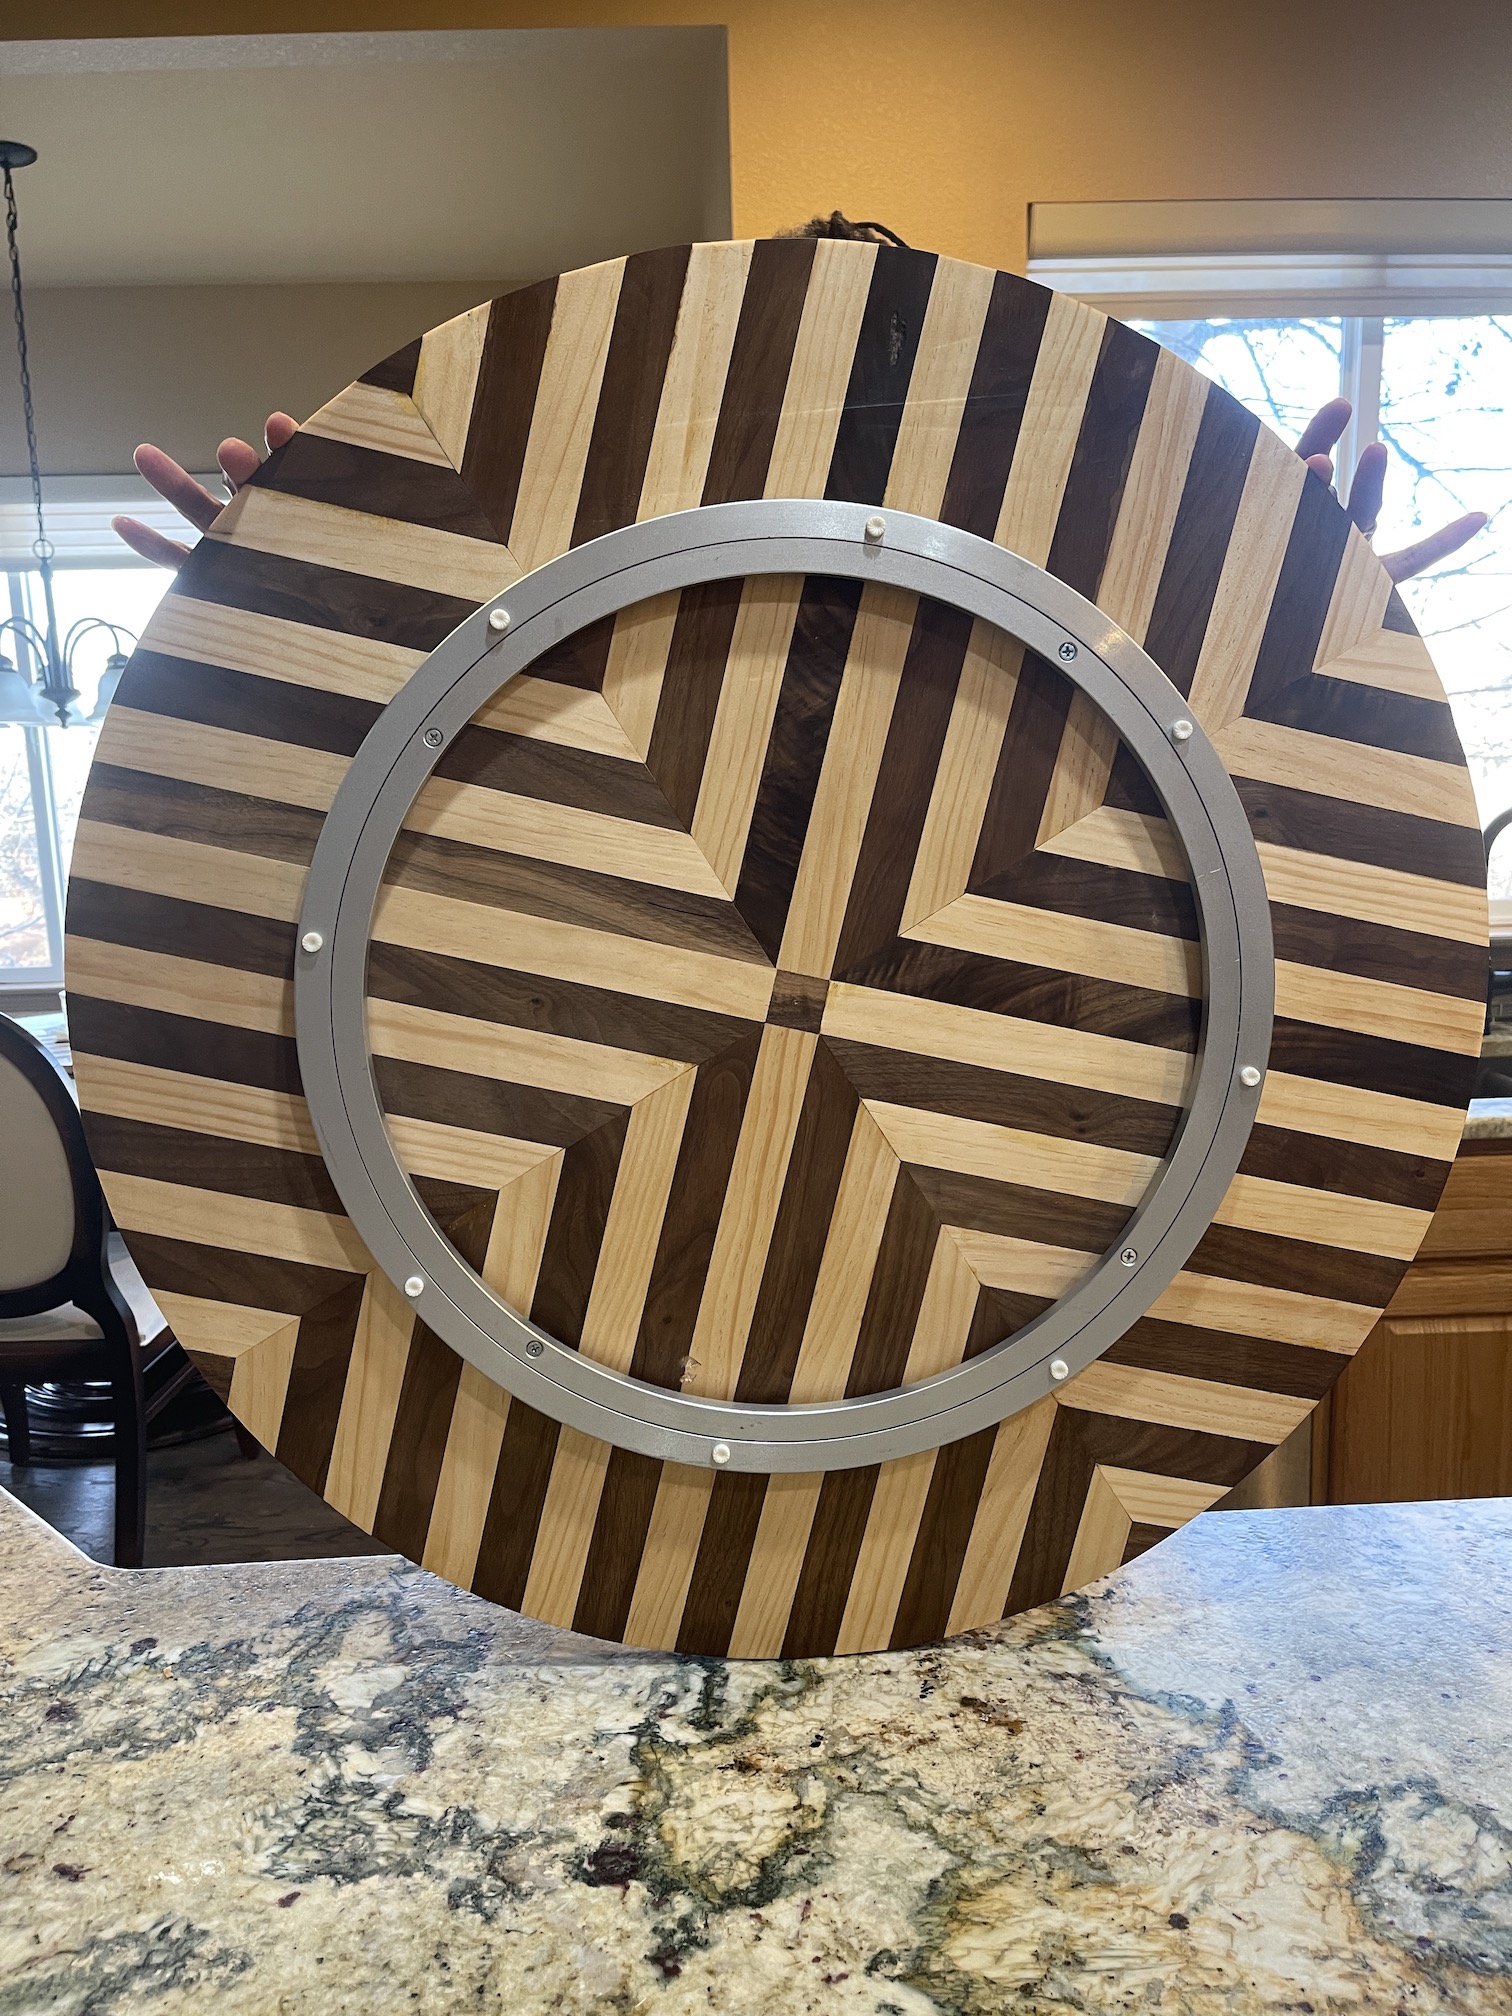
The Lazy Susan is his own original design. So not only did he make his first Lazy Susan but he did not use a published pattern, he just created the design and his own pattern!
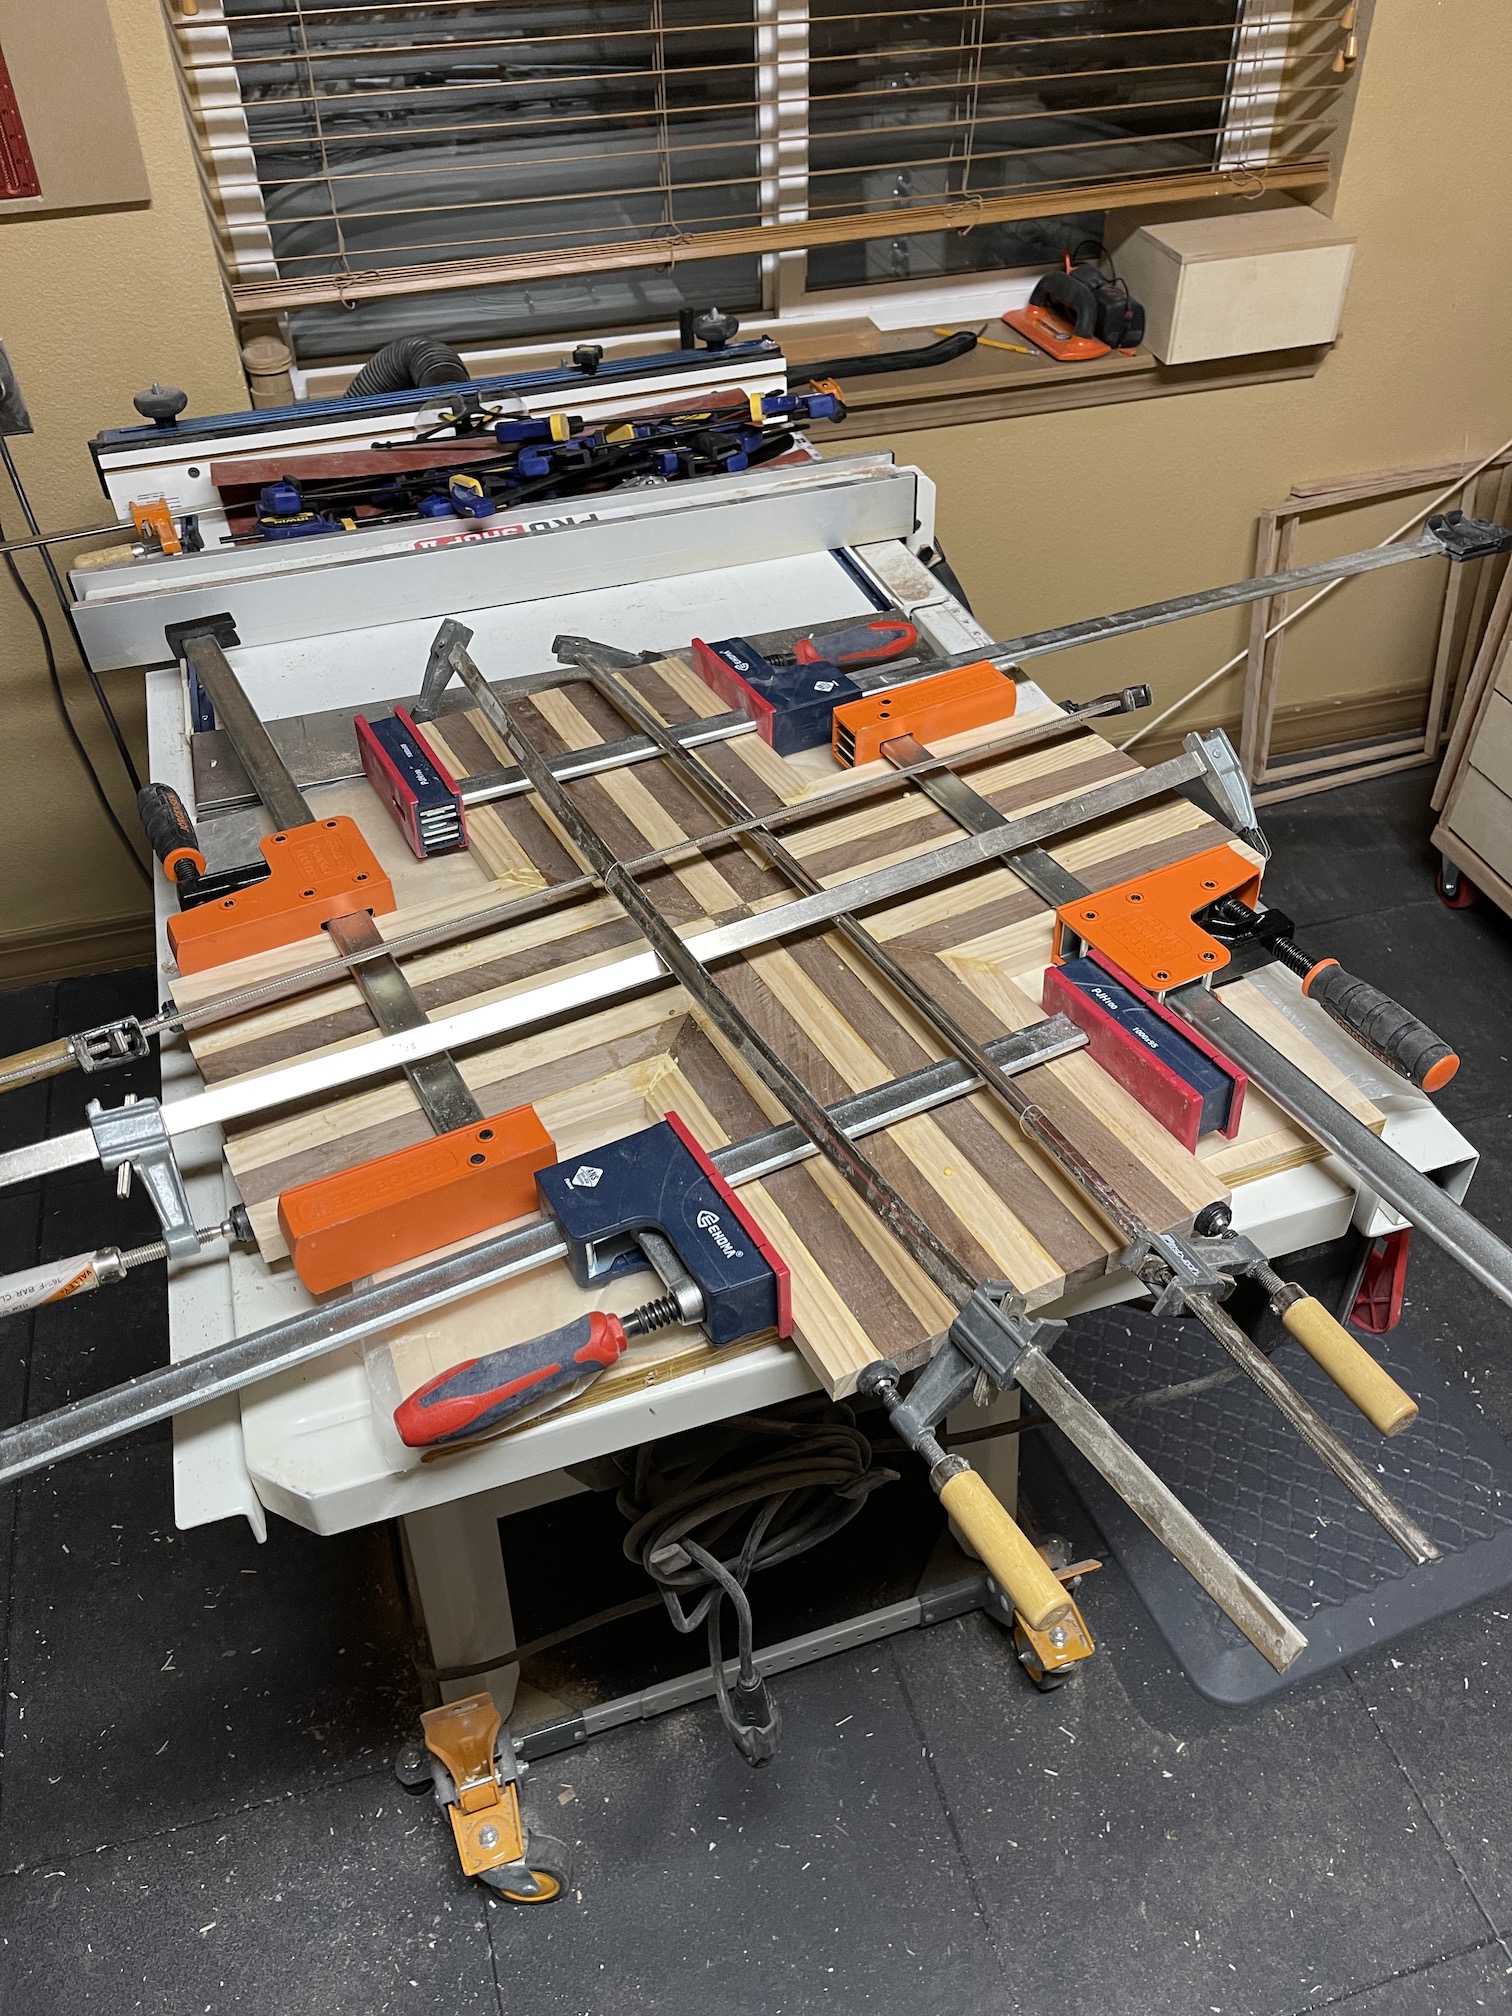
For his next Lazy Susan, he made it 29 inches in diameter which was a better size for our friends’ large round table.
Here are some images from the creation of the second Lazy Susan:
Here are photos of the completed Lazy Susan (it is so beautiful in person, he did an amazing job with sanding the piece and finishing it off with layers and layers of a bees wax protectant):
Hello everyone, hope your December is going well. After I write this post I have to go catch up on all my blogging buddies’ posts as I was away from Blogtopia for a while.
Someone had reached out to me via the Inquiries page on my website in November and asked if I knew anyone who was selling a Tula Pink fabric quilt. They wanted to do a special Christmas gift for their sister who loves Tula Pink fabric. I reached out to a couple quilter connections who’ve also love Tula Pink fabric and have made Tula Pink fabric quilts, but none of them had a quilt to sell or time to take on a commission so close to Christmas.
I did suggest Etsy but the only nice (in my opinion) Tula Pink quilt I saw for sale was like $1000. I am not surprised as it was gorgeous and several of you in the past have shared posts about how much time and money it takes to make a quilt (and have it professionally long arm quilted); and I’ve had the same experience of course.
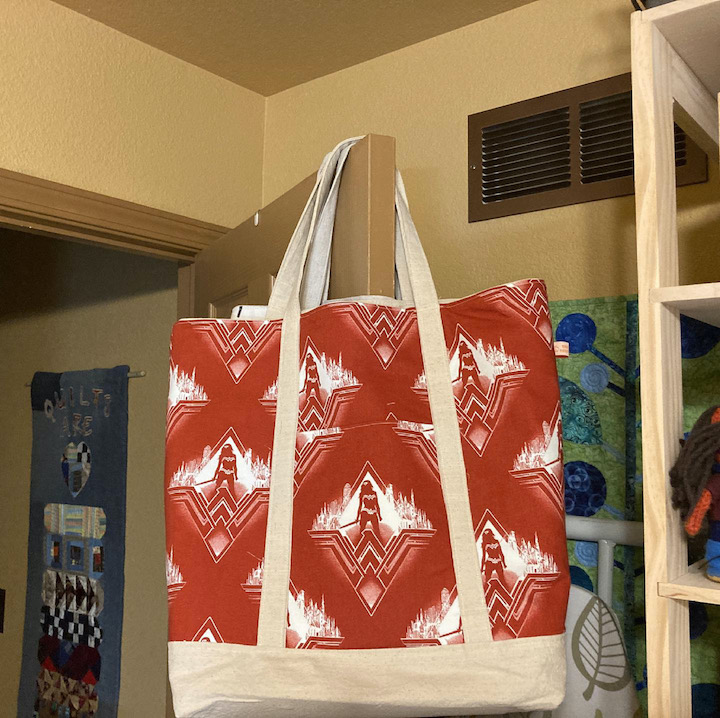
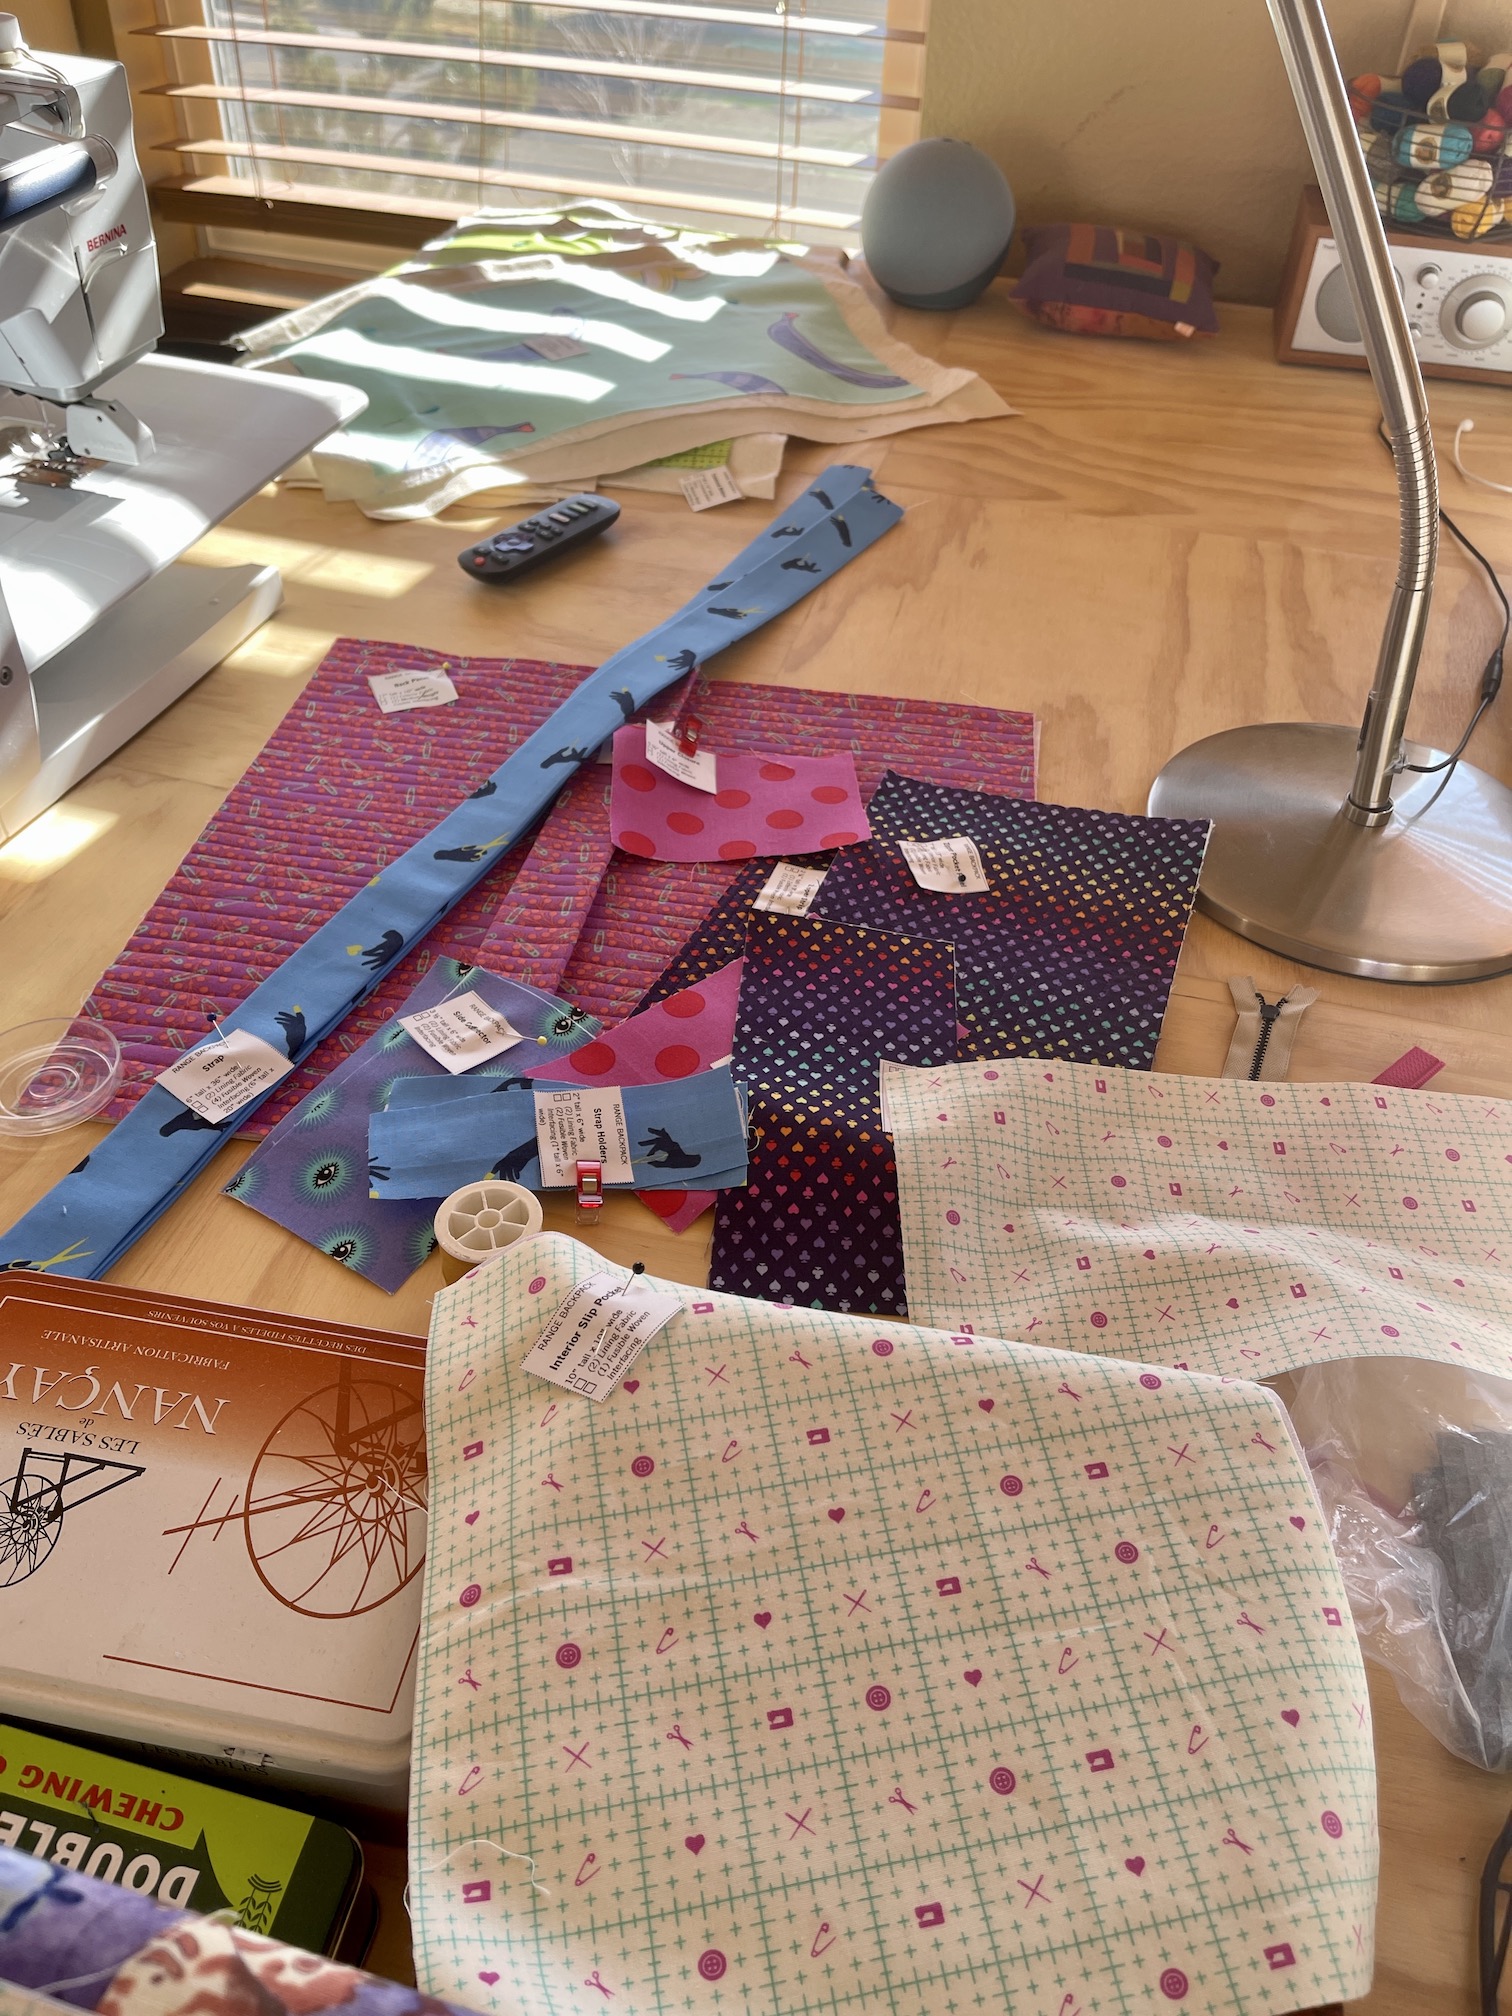
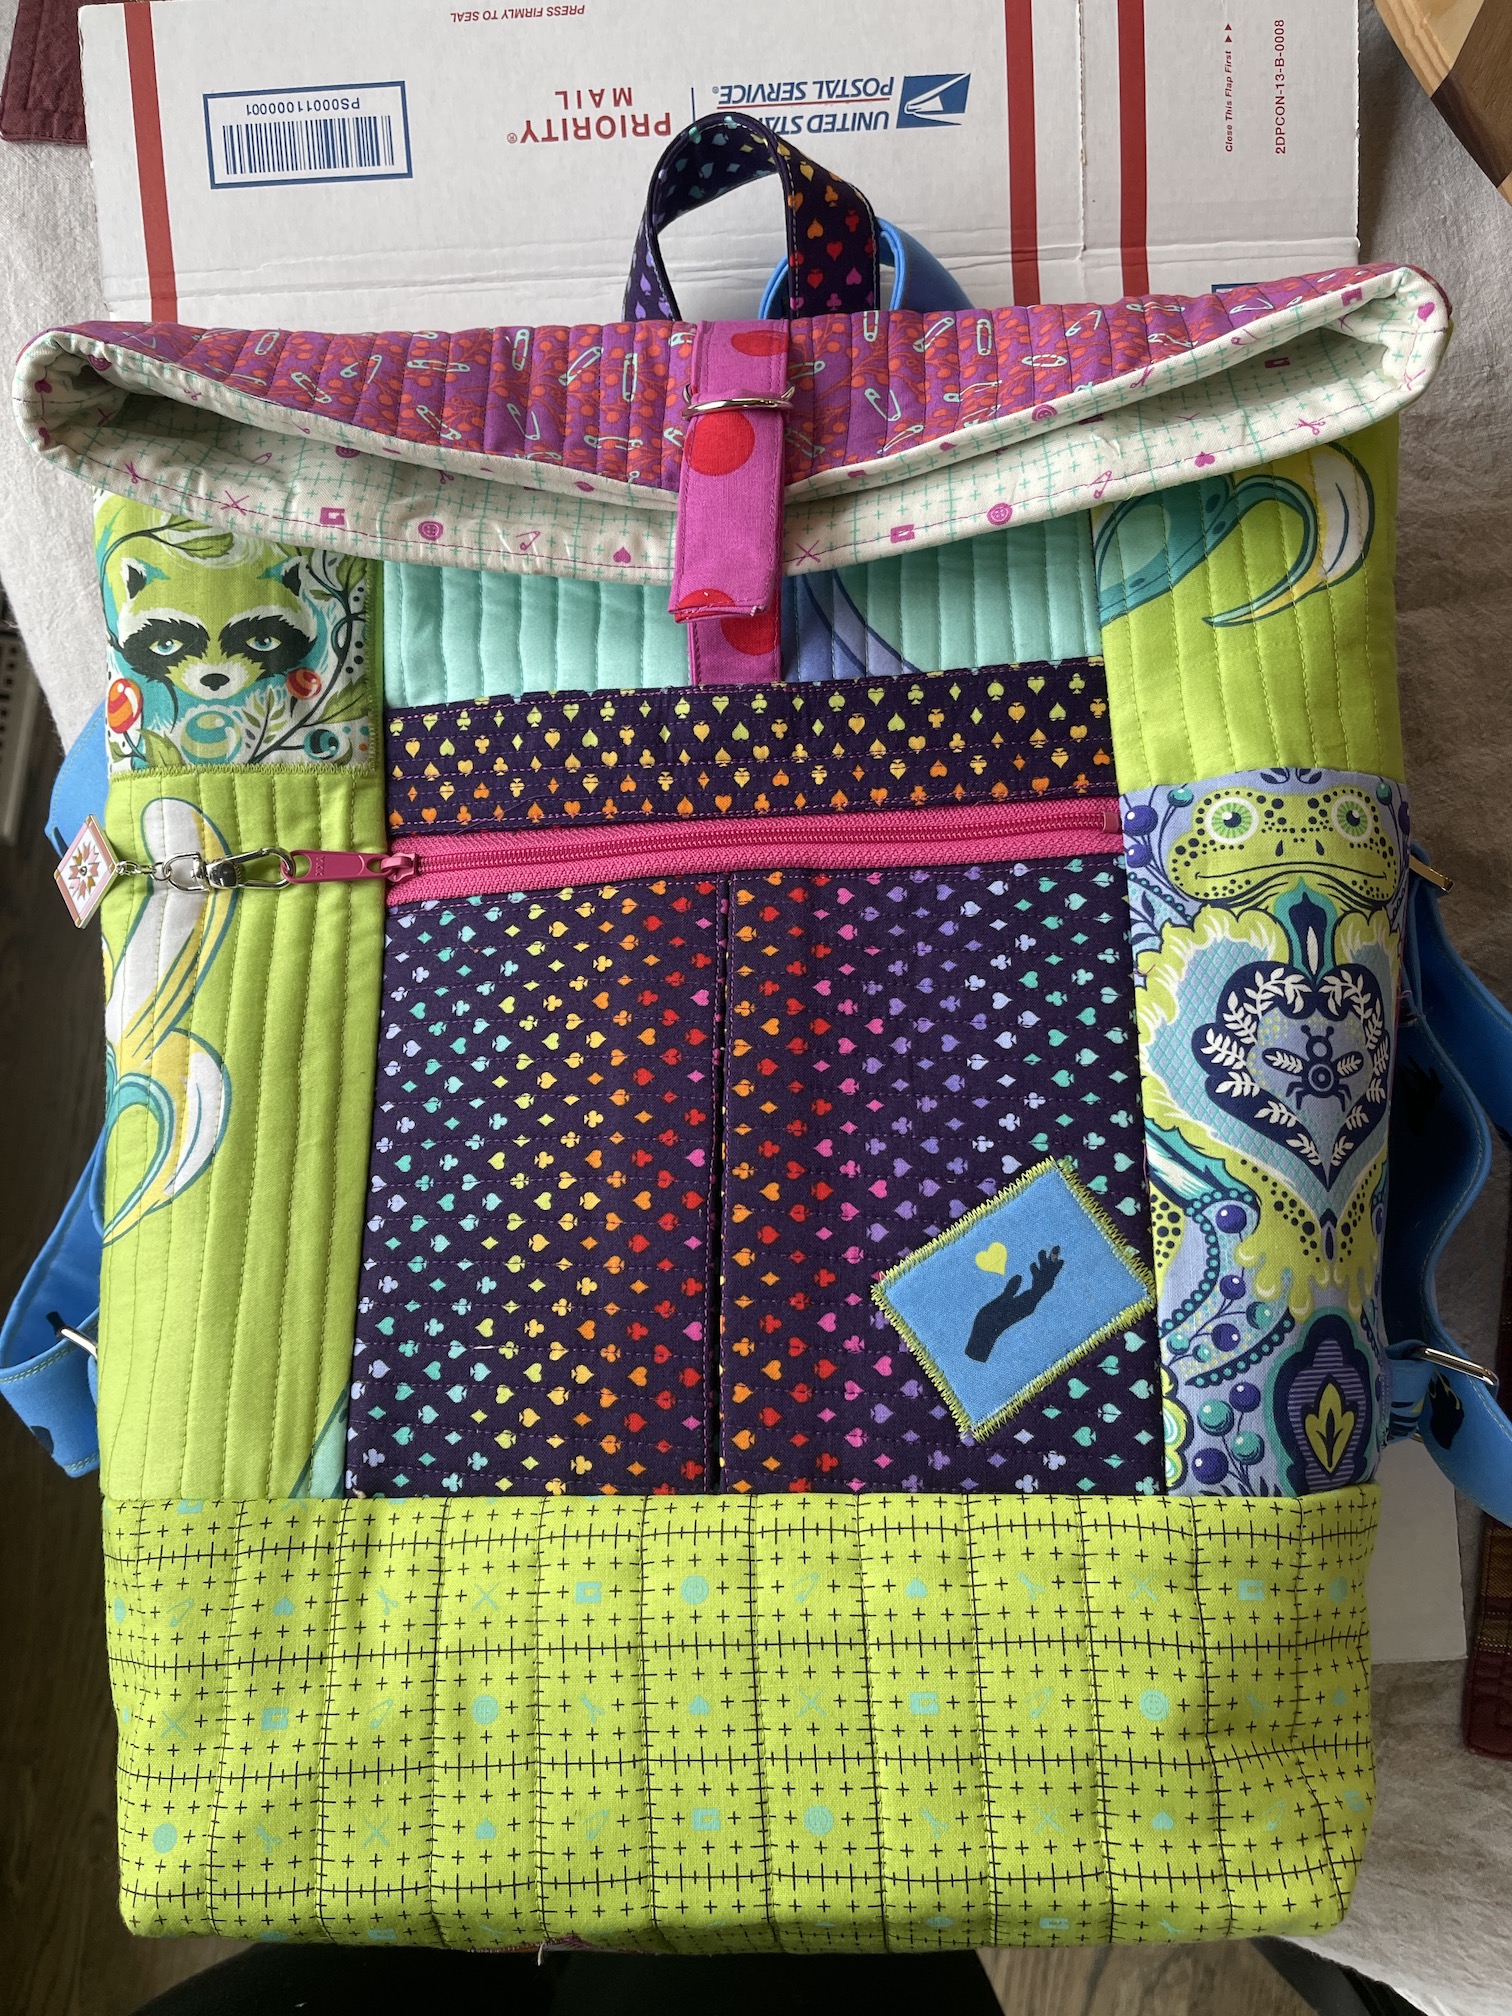
So (perhaps like an idiot), I offered an alternative – I could make the sister a Range Backpack out of my Tula Pink fabric scraps…how hard could that be I (foolishly) thought?
I was quite ambitious in my design at first trying to use as many small scraps as possible and here is a photo of my design wall that I shared in that previous post I linked above, showing the piecing for the backpack:
Quickly (but not quickly enough), I discovered that if I was to make the backpack this way, I would not have it finished until January.
Why?
Because the backpack was designed to be made with canvas, waxed canvas, canvas-linen blend, etc. fabric. If you want to use quilter cotton weight fabric (which my Tula Pink scraps were) then you had to QUILT with batting and canvas backing the fabric,
Gasp!
Why didn’t I read that part of the pattern before I offered to make the backpack?!?!?
So piecing the fabric and then quilting it, was going to take forever. Plus is was getting into December and I was facing of course a challenging anniversary, as well as my own last minute projects for December (and holiday shopping, etc.). Also I was in the process of opening my Textiles & Smiles Etsy shop (and will update you on that in a future post).
So I decided I was going to have to break into my Tula Pink yardage (frown) instead of just using scraps. So with that move the backpack became more expensive to make. Then with all the time I spent quilting each section (I still made it scrappy as the person requested that I use a lot of Tula Pink fabrics in the quilt) I am pretty sure if you minus the cost of supplies from what I charged for the commission, I made about 75 cents to 1 dollar an hour for my time – ha!
But it was a lesson and I will rethink commissions in the future. I did finally decide to look at it more as a “labor of love” and feel gratitude that I get to be part of a special gift for a special person. (And I got reimbursed for the cost of the supplies and for a tiny bit of time…).
Hope that does not sound too whiny. I was overjoyed when I finished the piece and could wrap it up nicely for shipping. They were going to celebrate Christmas as a family on 12/21 so with the magic of priority shipping, I was able to get it to them on time.
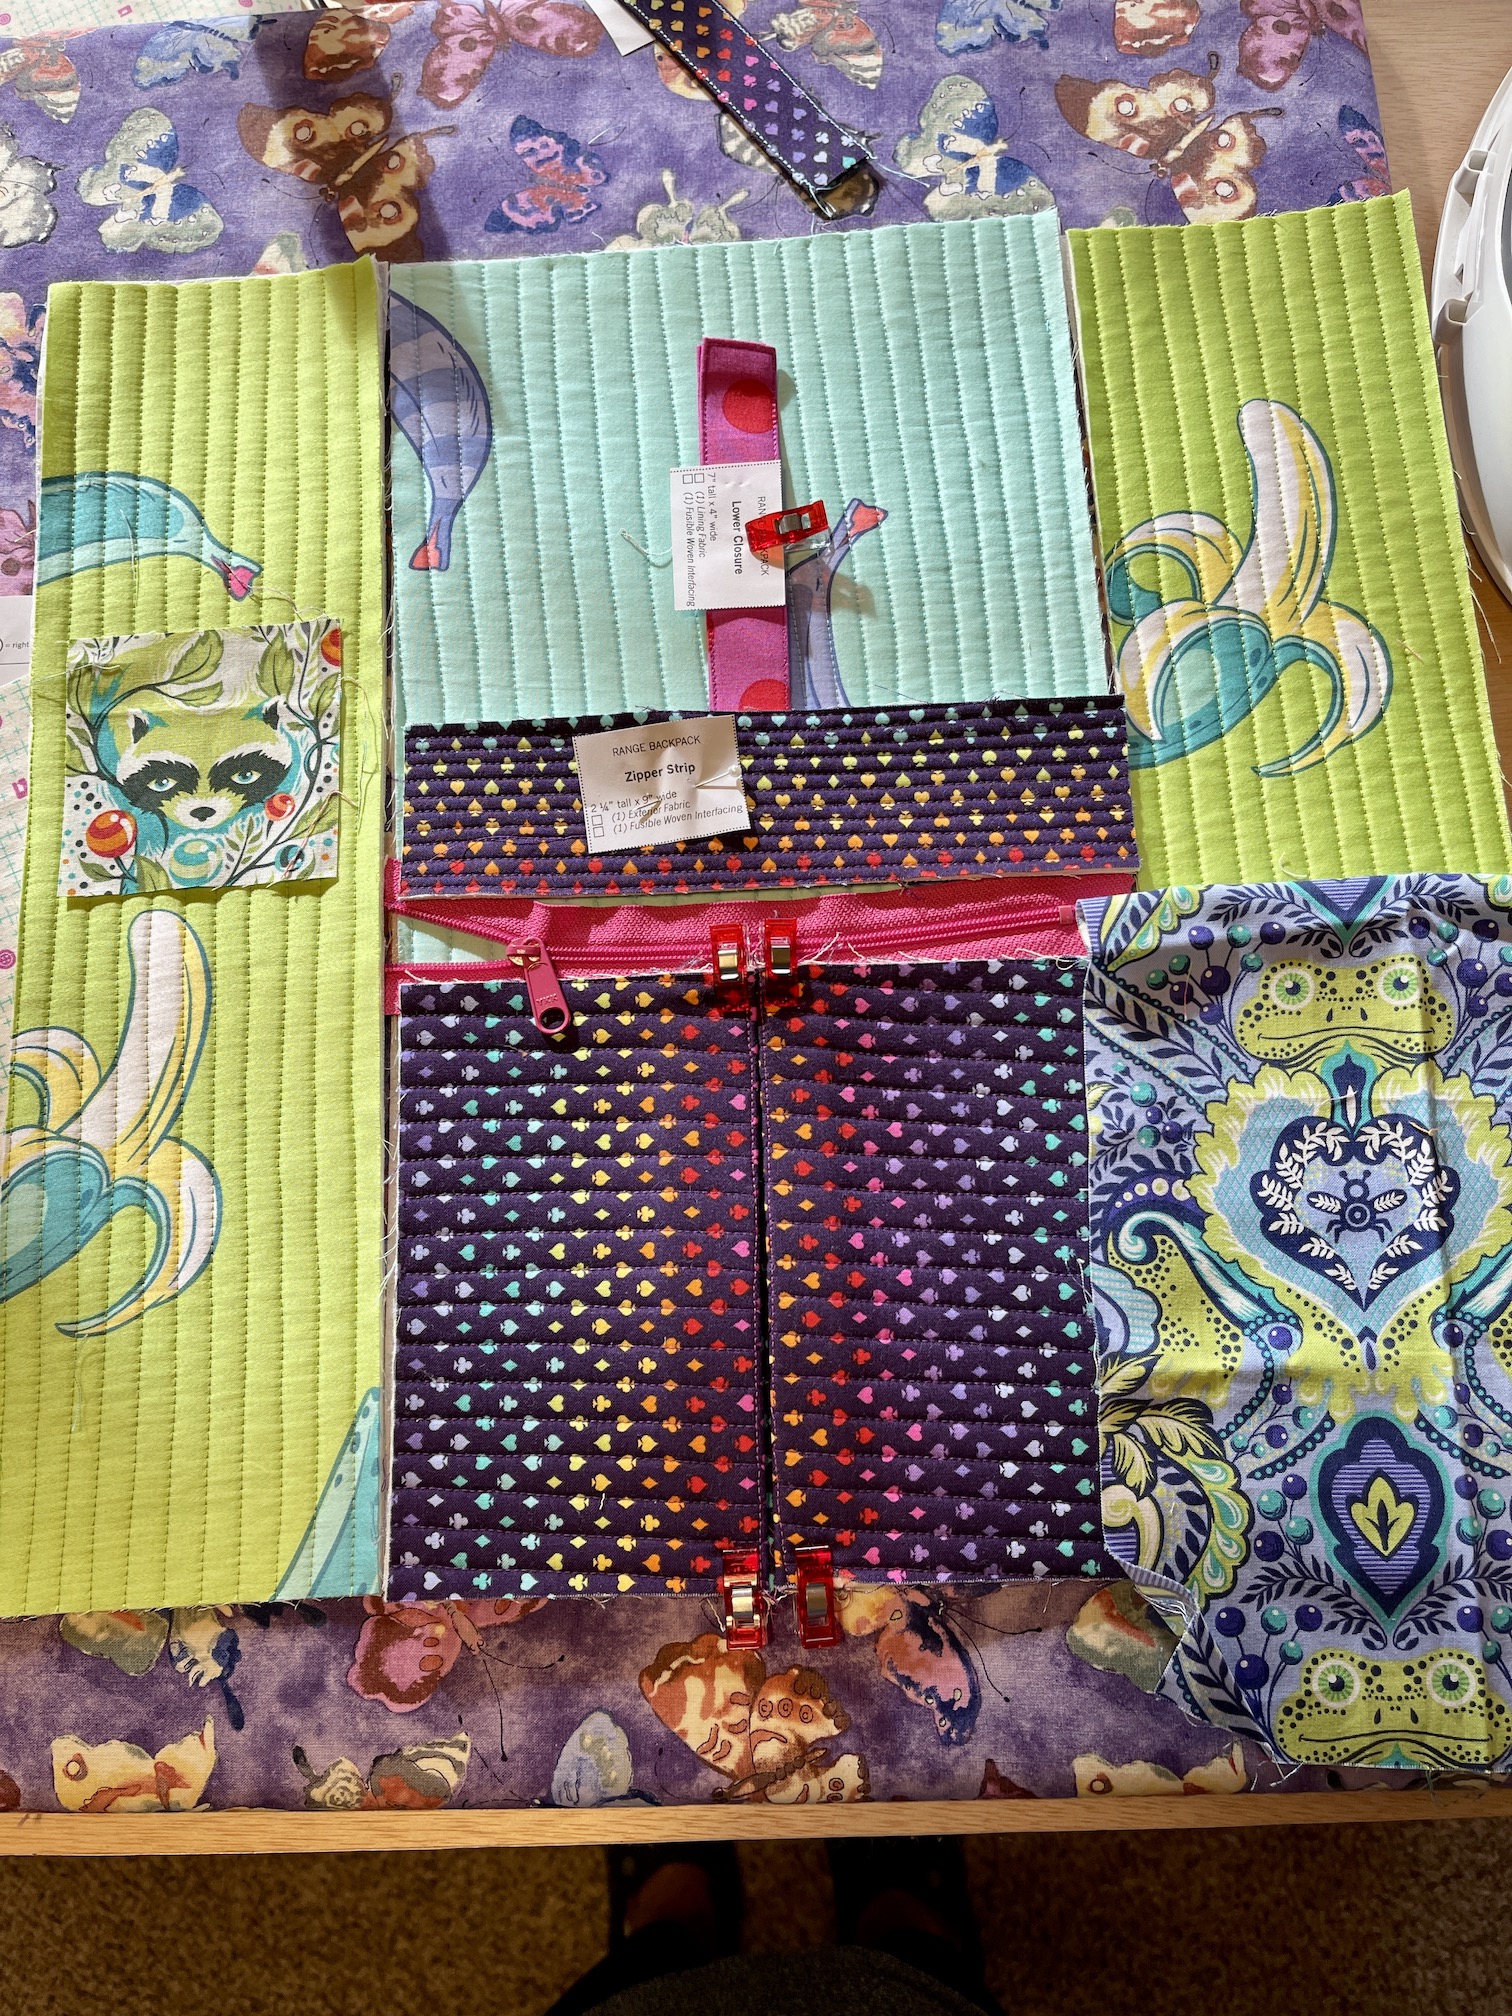
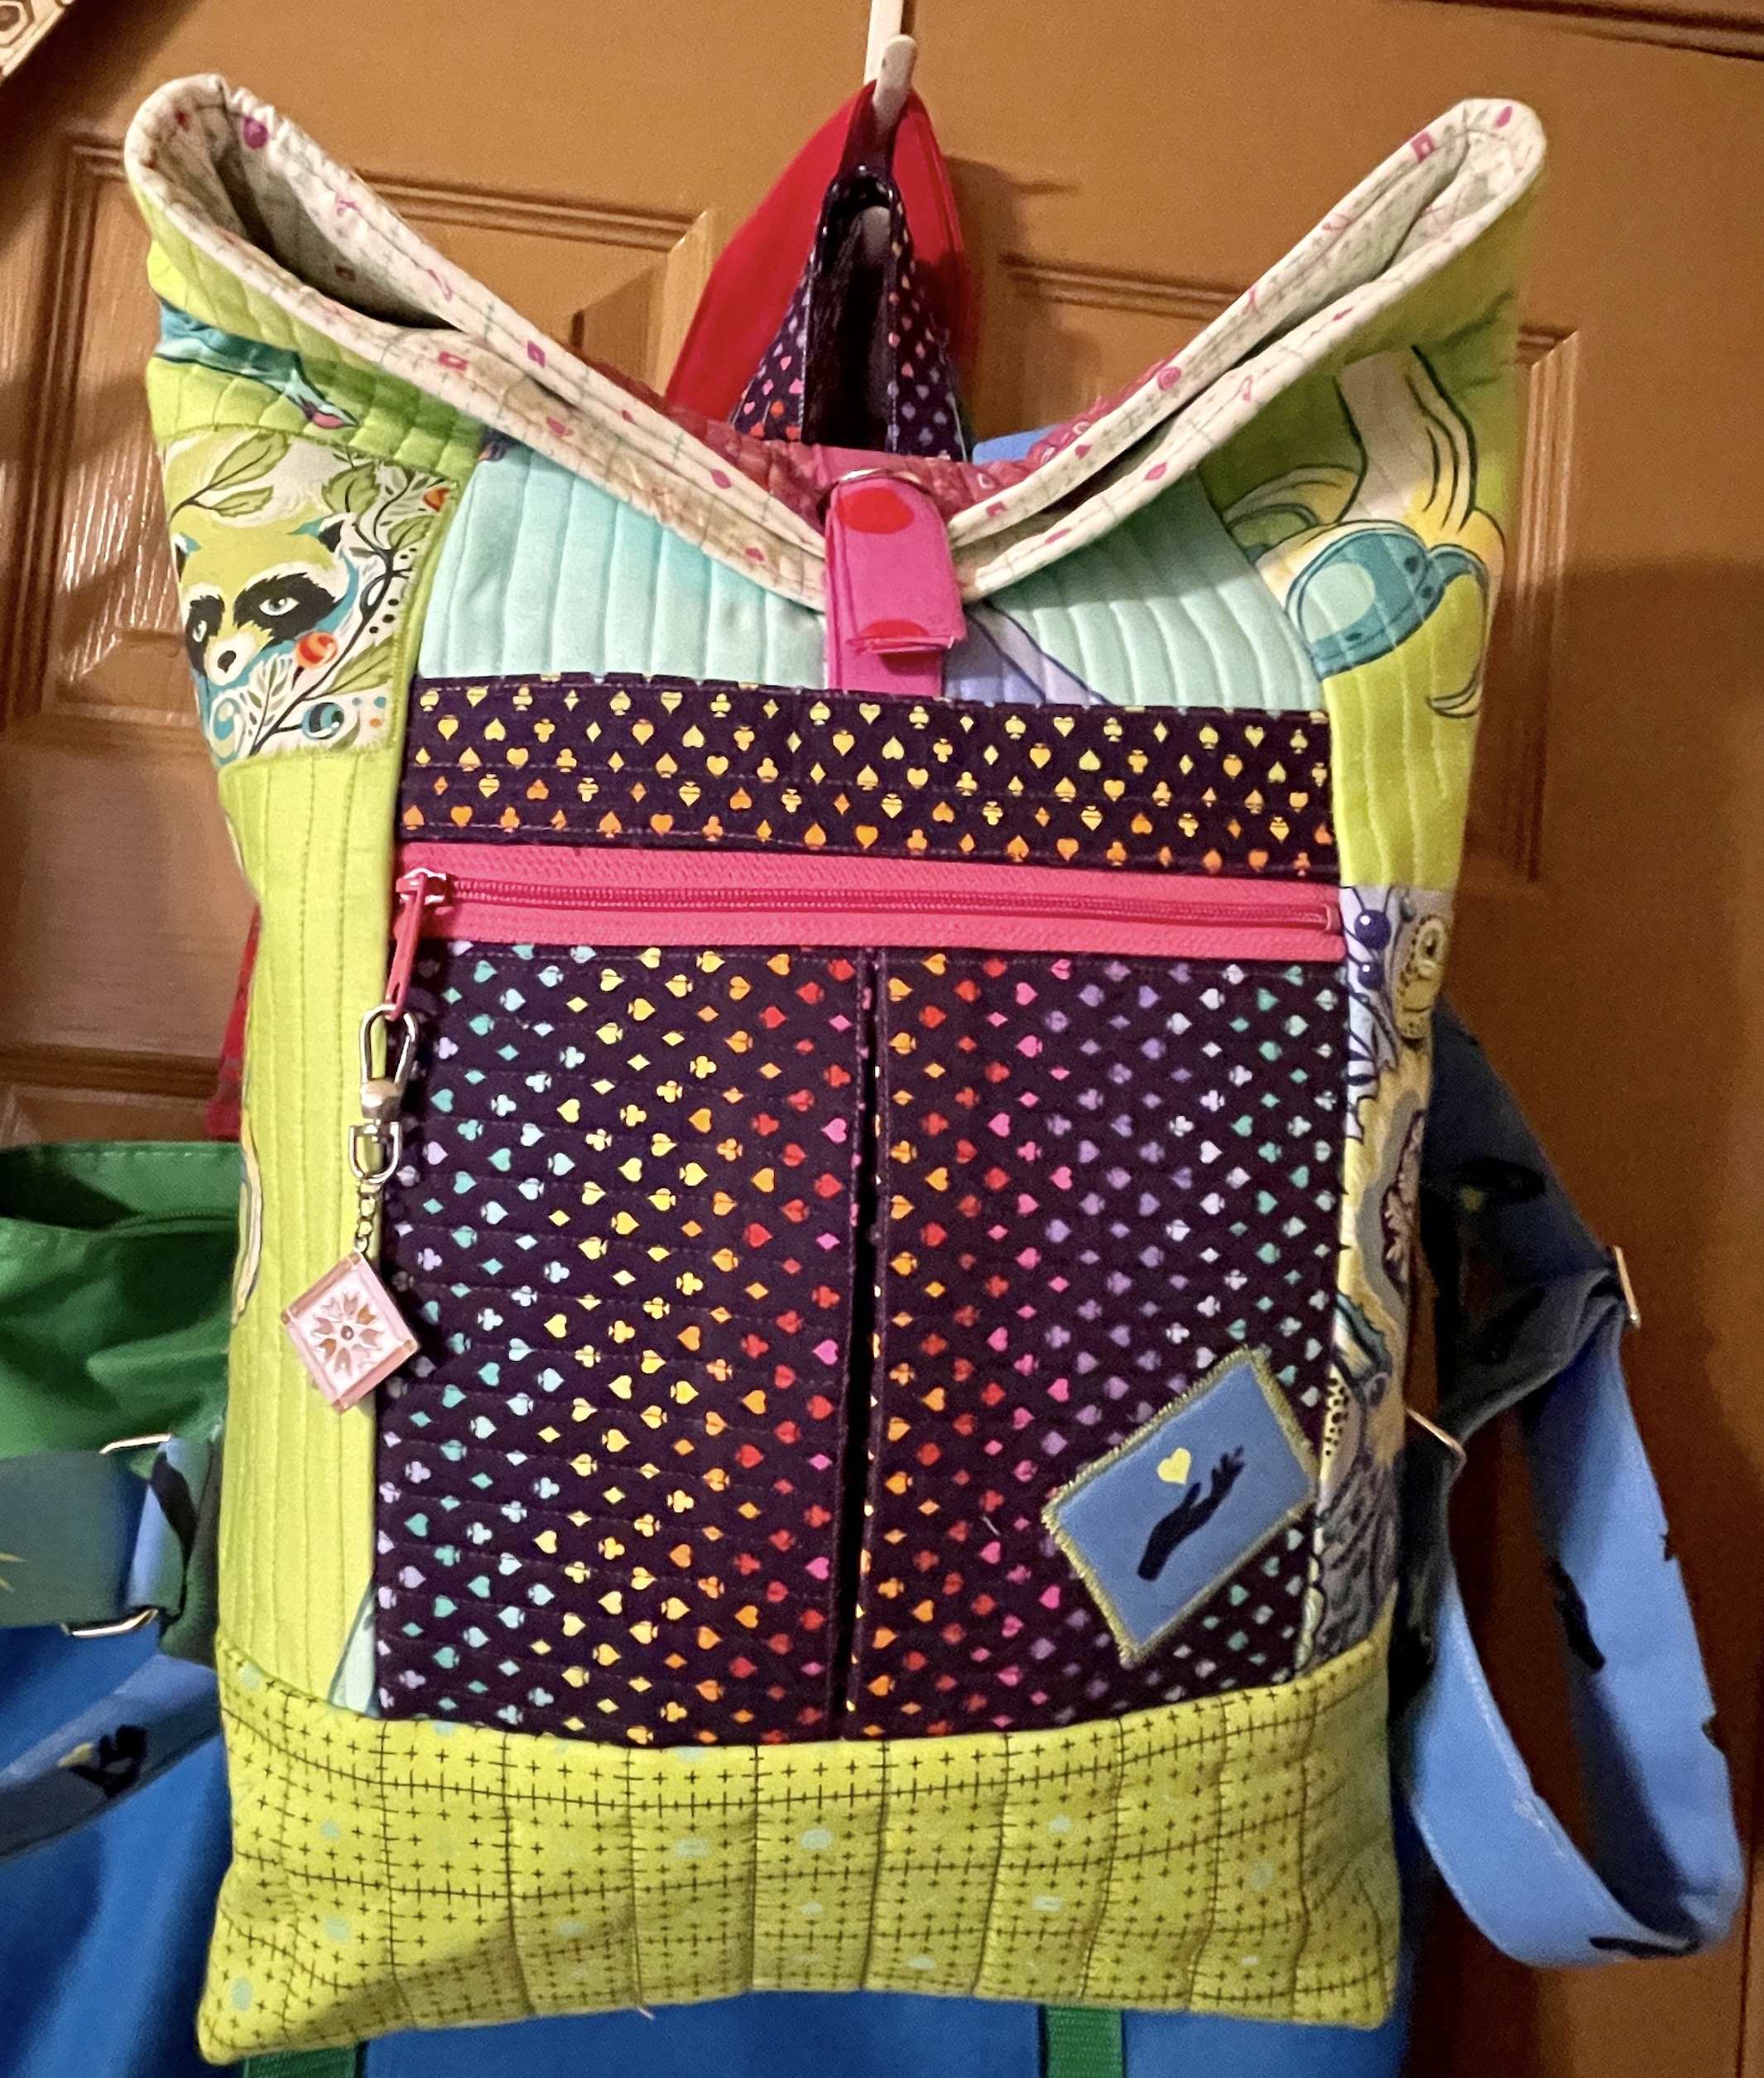
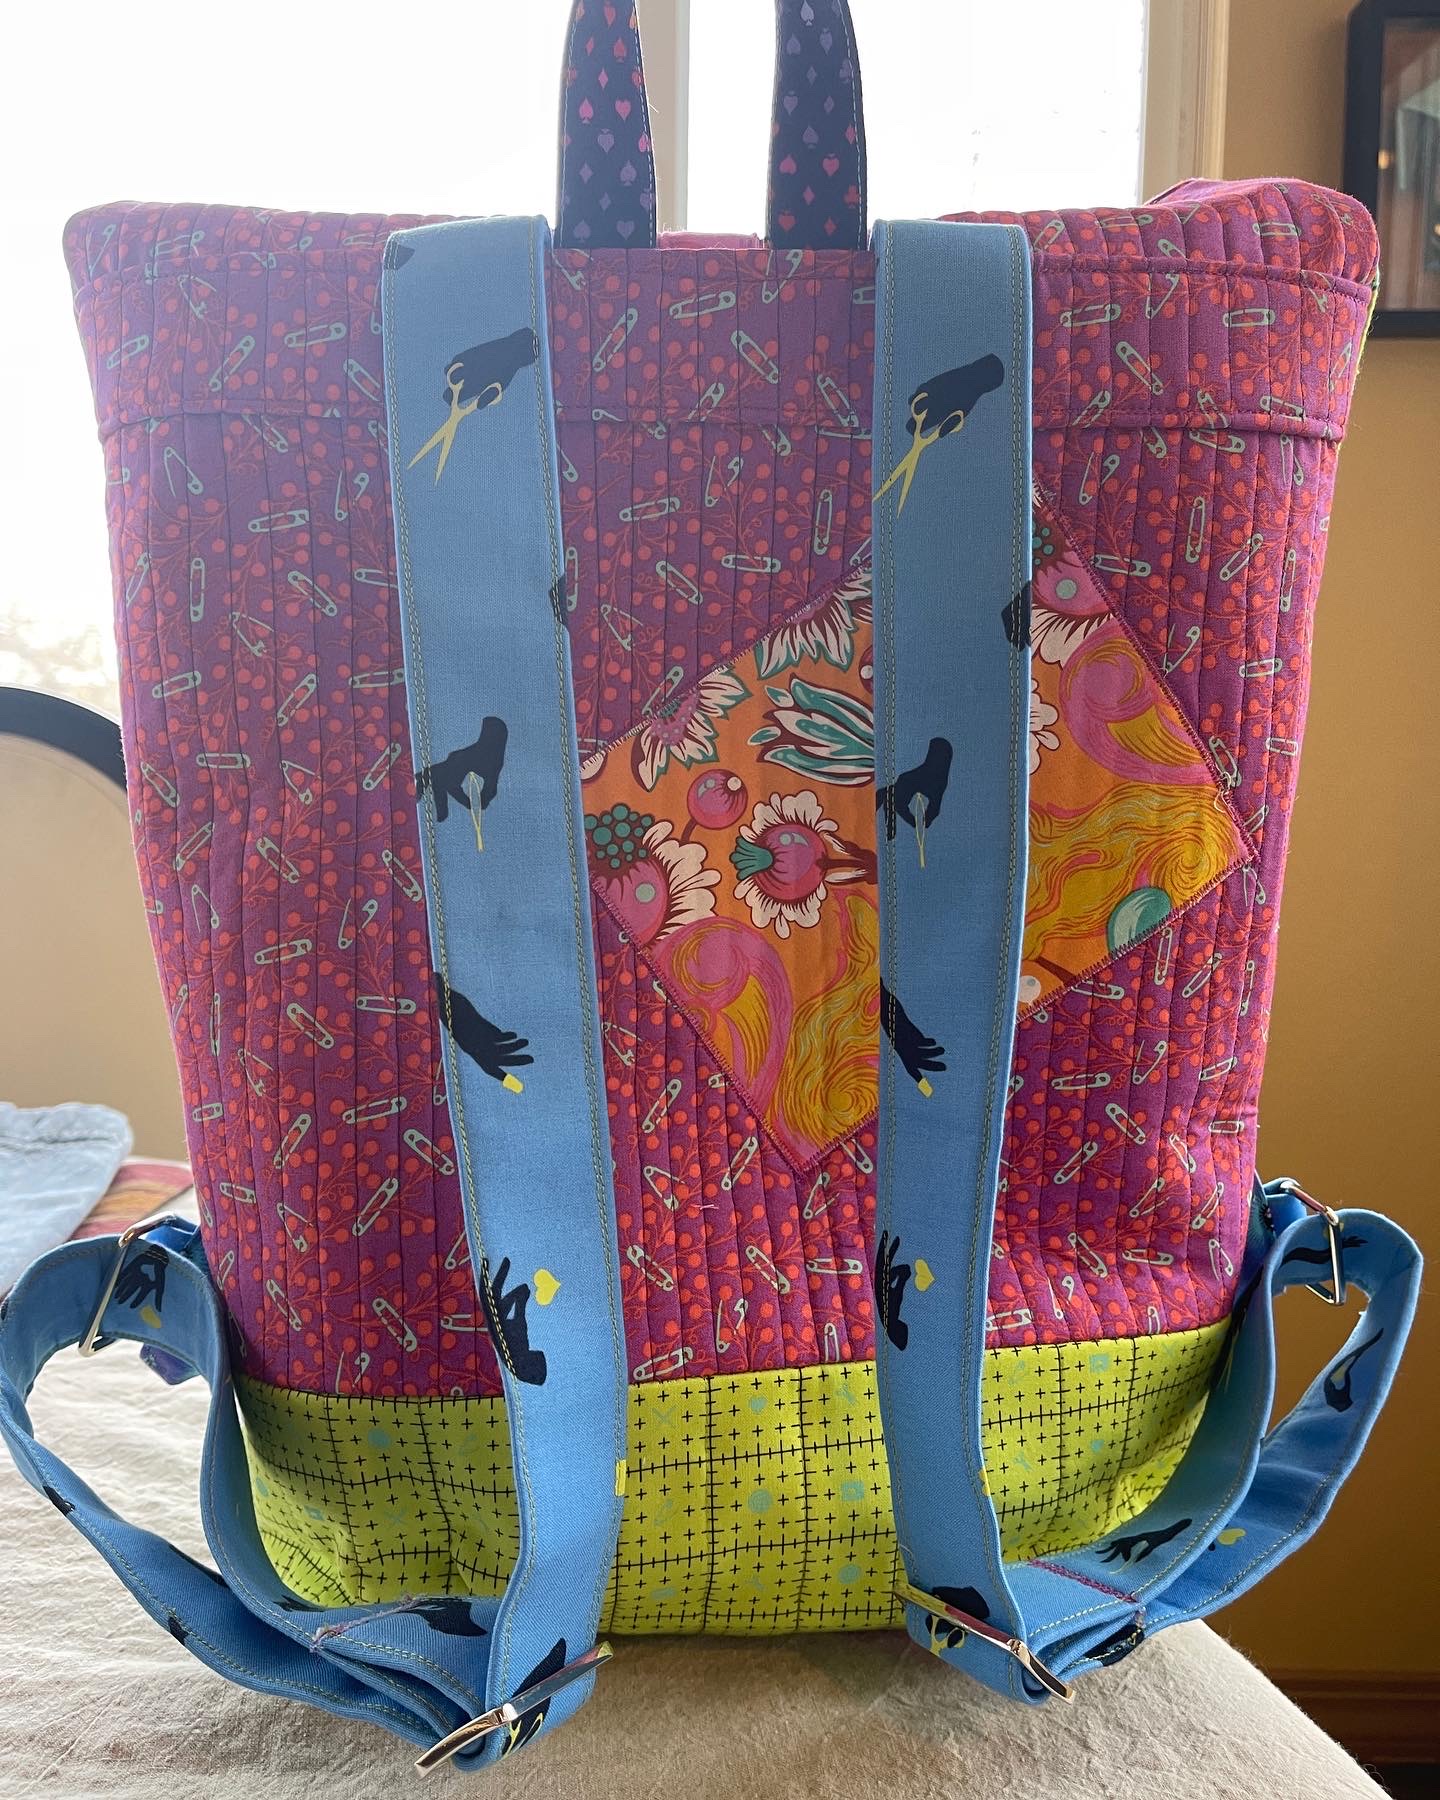
So here are photos from the creation of to the completion of the backpack (it feels like I lived and breathed this backpack and did a couple all nighters on it):
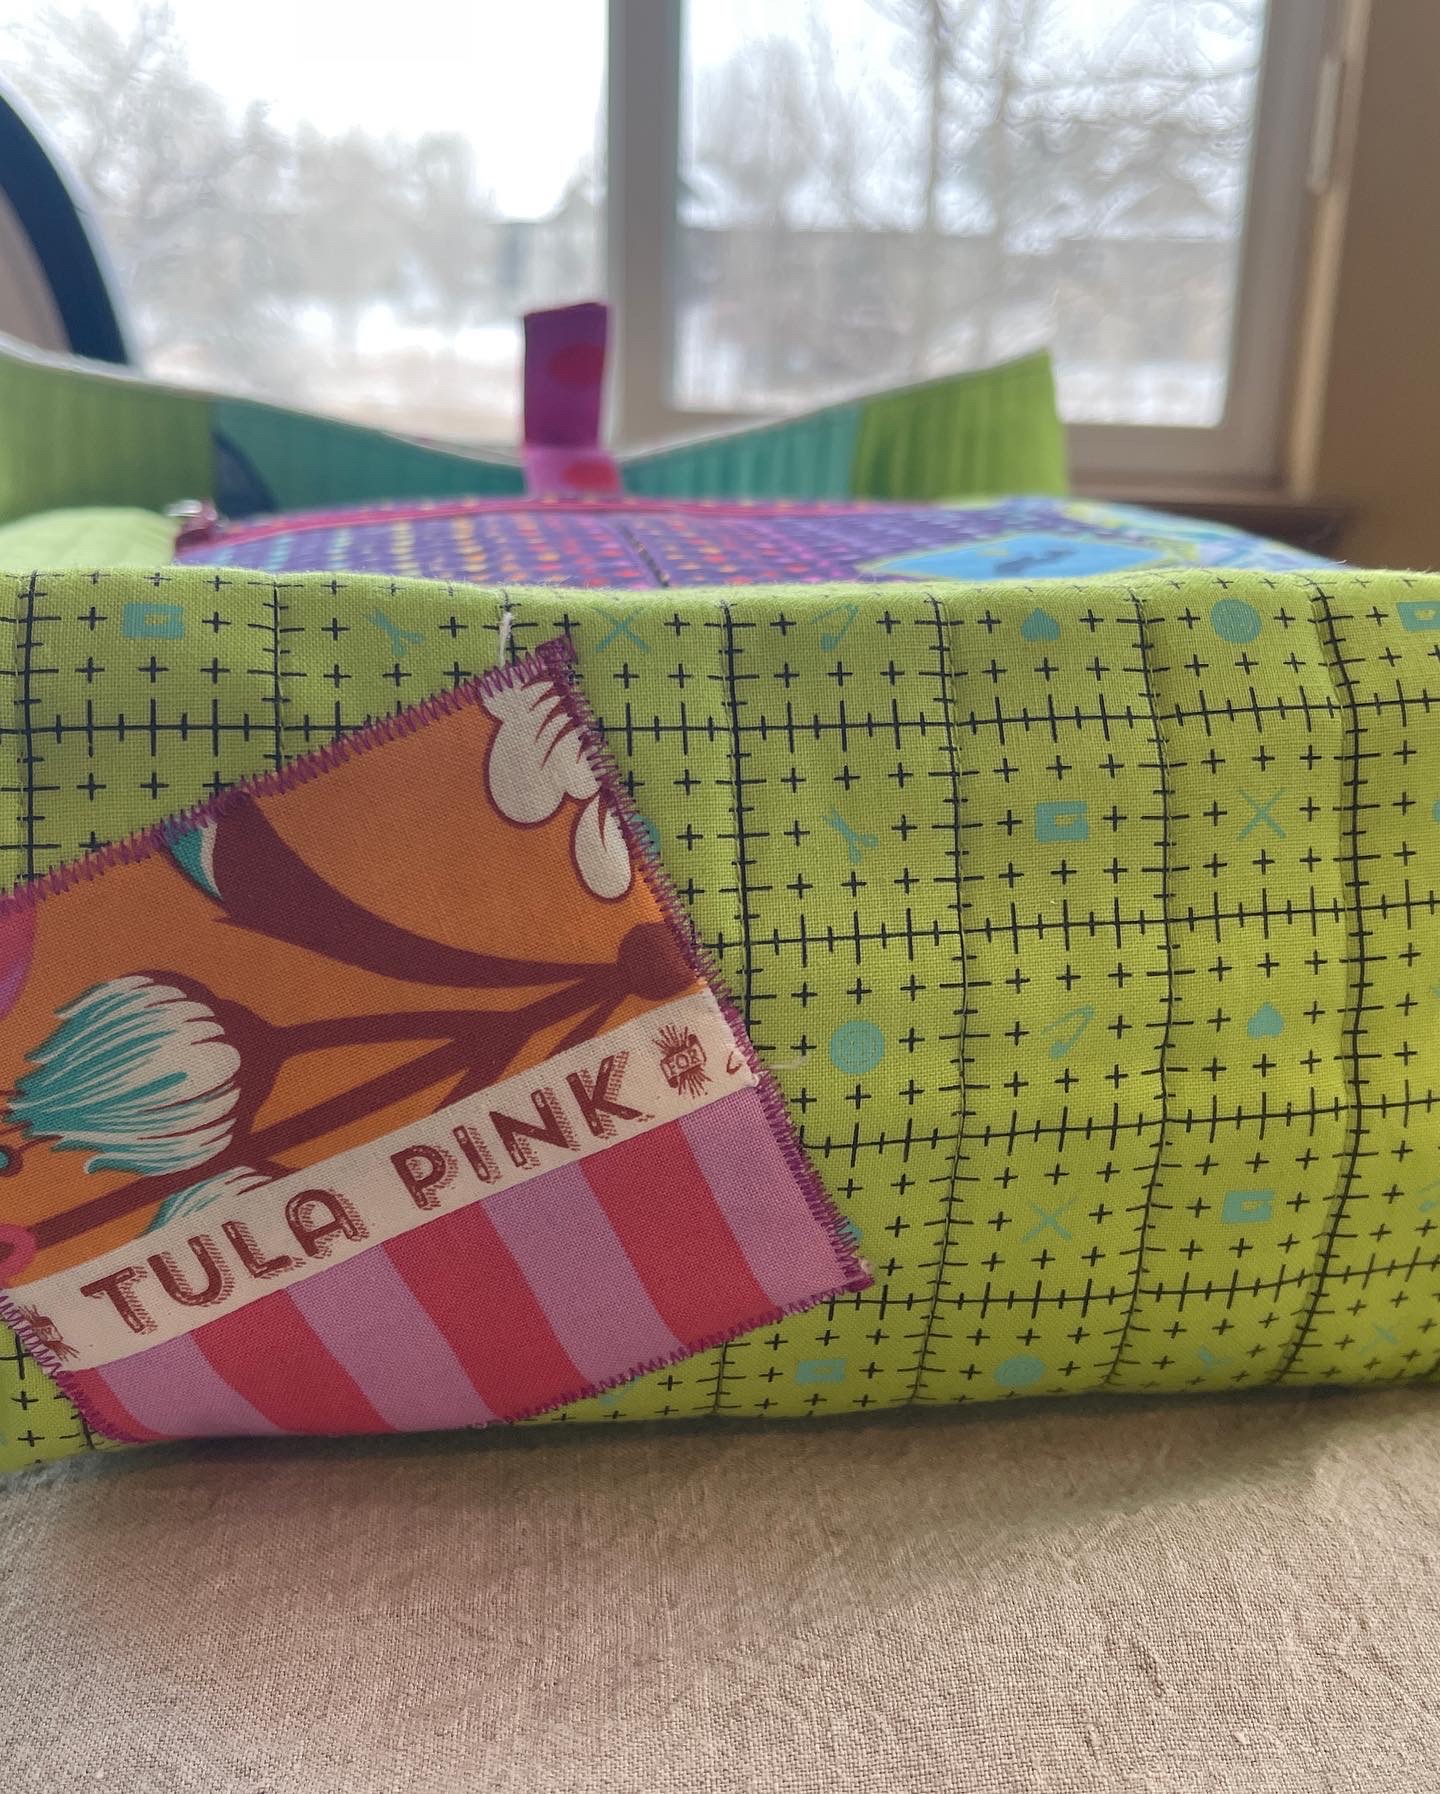
You can see in the photo above that although I had to quilt larger pieces of fabric to make the sections, I tried to make it more “scrappy” by creating and sewing on “patches” of Tula Pink fabrics.
One thing that I did enjoy while making the backpack was getting to use a bunch of my Aurifil threads I rarely use – very fun colors:
Well it’s all shipped off and per the postal tracking it was delivered. I’ve not heard back from the person who requested the commission and I am not sure I will get feedback on how it went when the sister opened her gift on 12/21, but we will see.
After I shipped it off, I came across this awesome quote by the author Barbara Kingsolver, and I took her advice:
Now I am working on a couple of my personal projects and relaxing and enjoying the holiday season. I am not even working on more stuff for my Etsy shop yet.
This time we worked on the Firefly Tote by Noodlehead. A month ago I shared photos of the quilt shop’s class sample of the tote:
Class sample photo 1Class sample photo 2
The pattern has instructions for two sizes – a smaller “project” size; and a larger “tote” size. I figured I would make the tote size.
I decided to make it in the same fabrics as the Range backpack also by Noodlehead that I made in the previous class and here are photos in progress during the class last night:
My partially finished Firefly Tote
That was as far as I got (photo above) during class and I still need to make the lining and the drawstring topper. I found the “blingy” gold handles at the quilt shop and they go with the shiny gold zipper I used also in my coordinating backpack, also found at the quilt shop.
One class attendee got way farther than I did, and she was making the “project” size tote bag. Here is her nearly finished adorable project size bag being held up by our wonderful instructor:
Another student’s nearly finished project size Firefly Tote
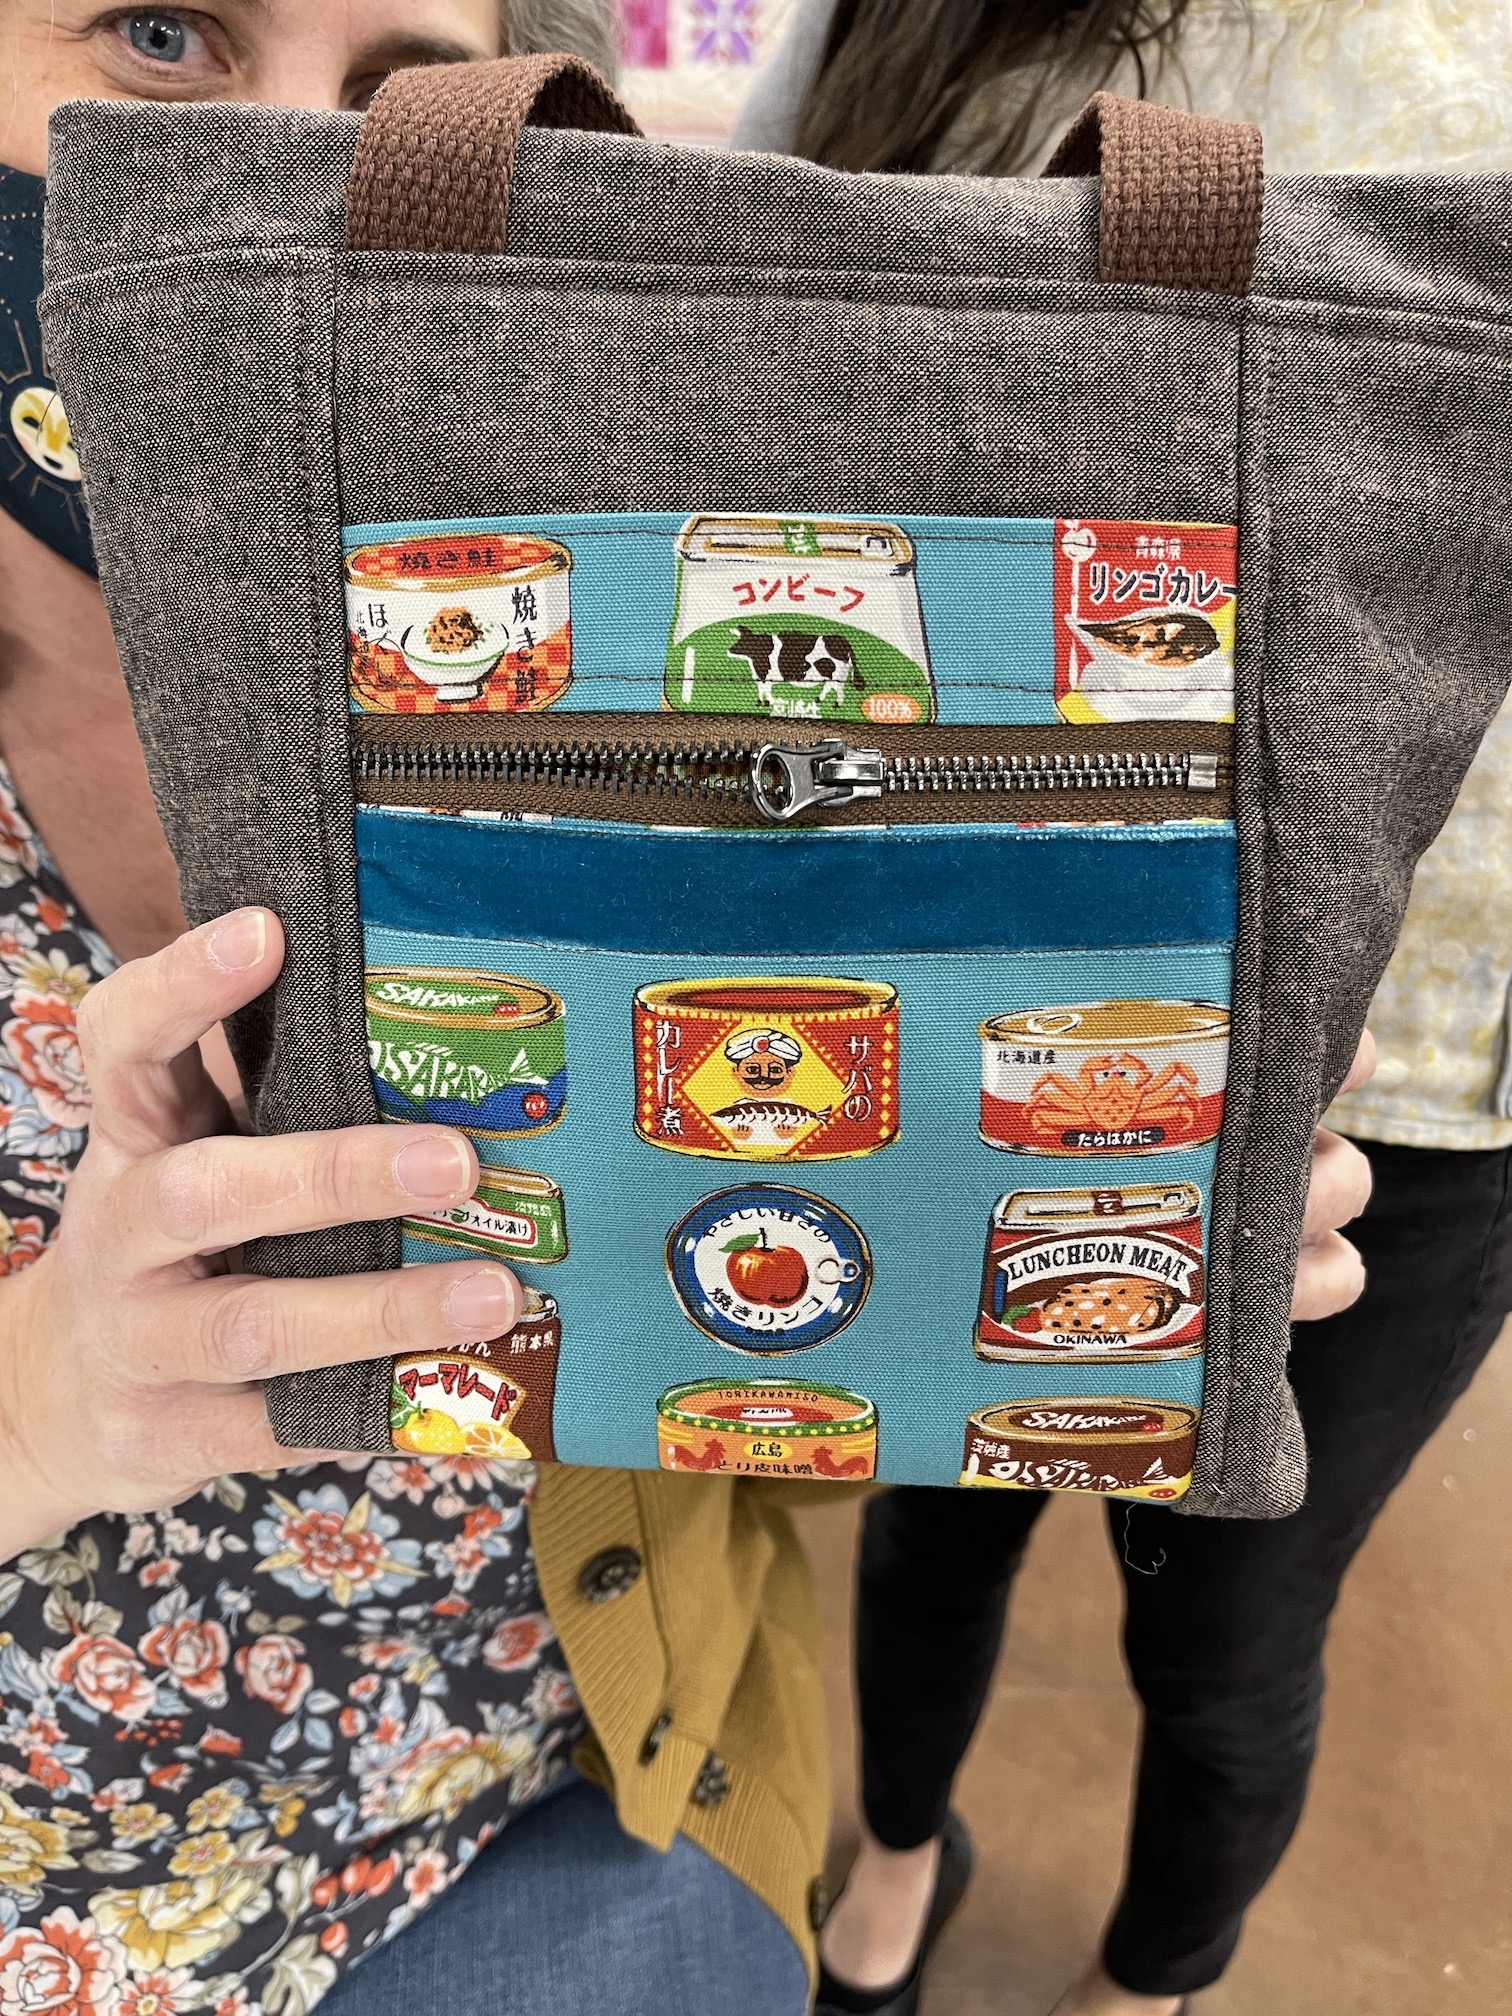
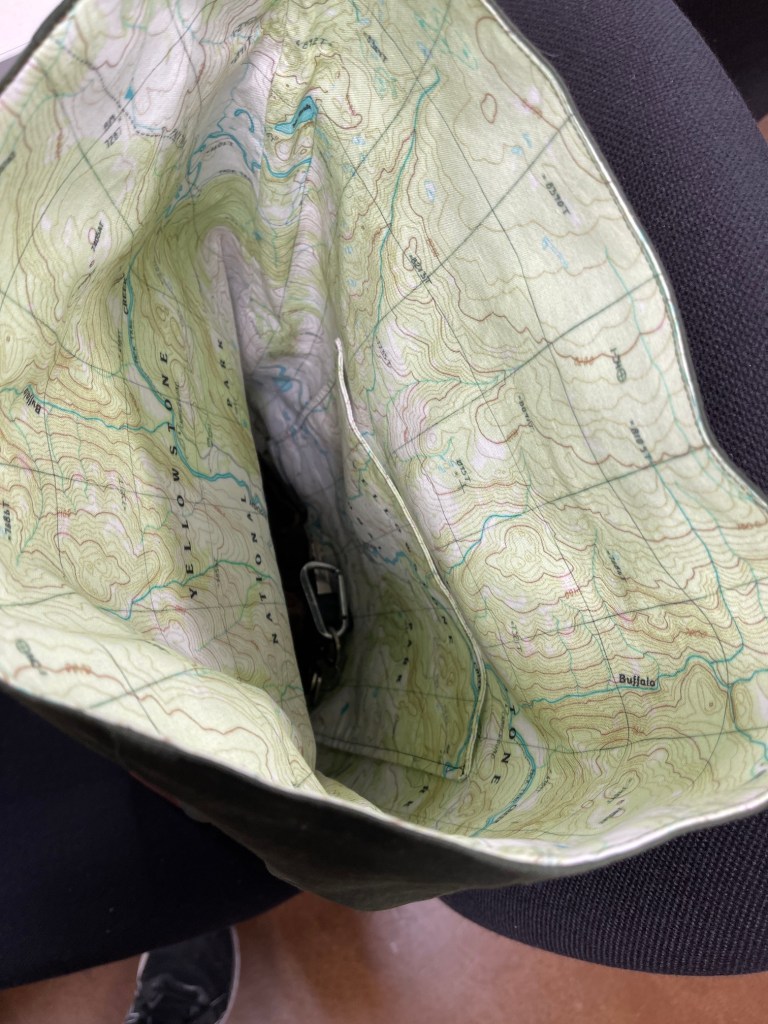
Another student in the class brought her finished Range backpack to class and it was so cool I had to photograph it – she has it lined with a custom Yellowstone map fabric she found on Spoonflower:
If you are just joining us, here is the Range backpack I finished a couple weeks ago from the class I took a month ago. As you can see my Firefly Tote will coordinate with it:
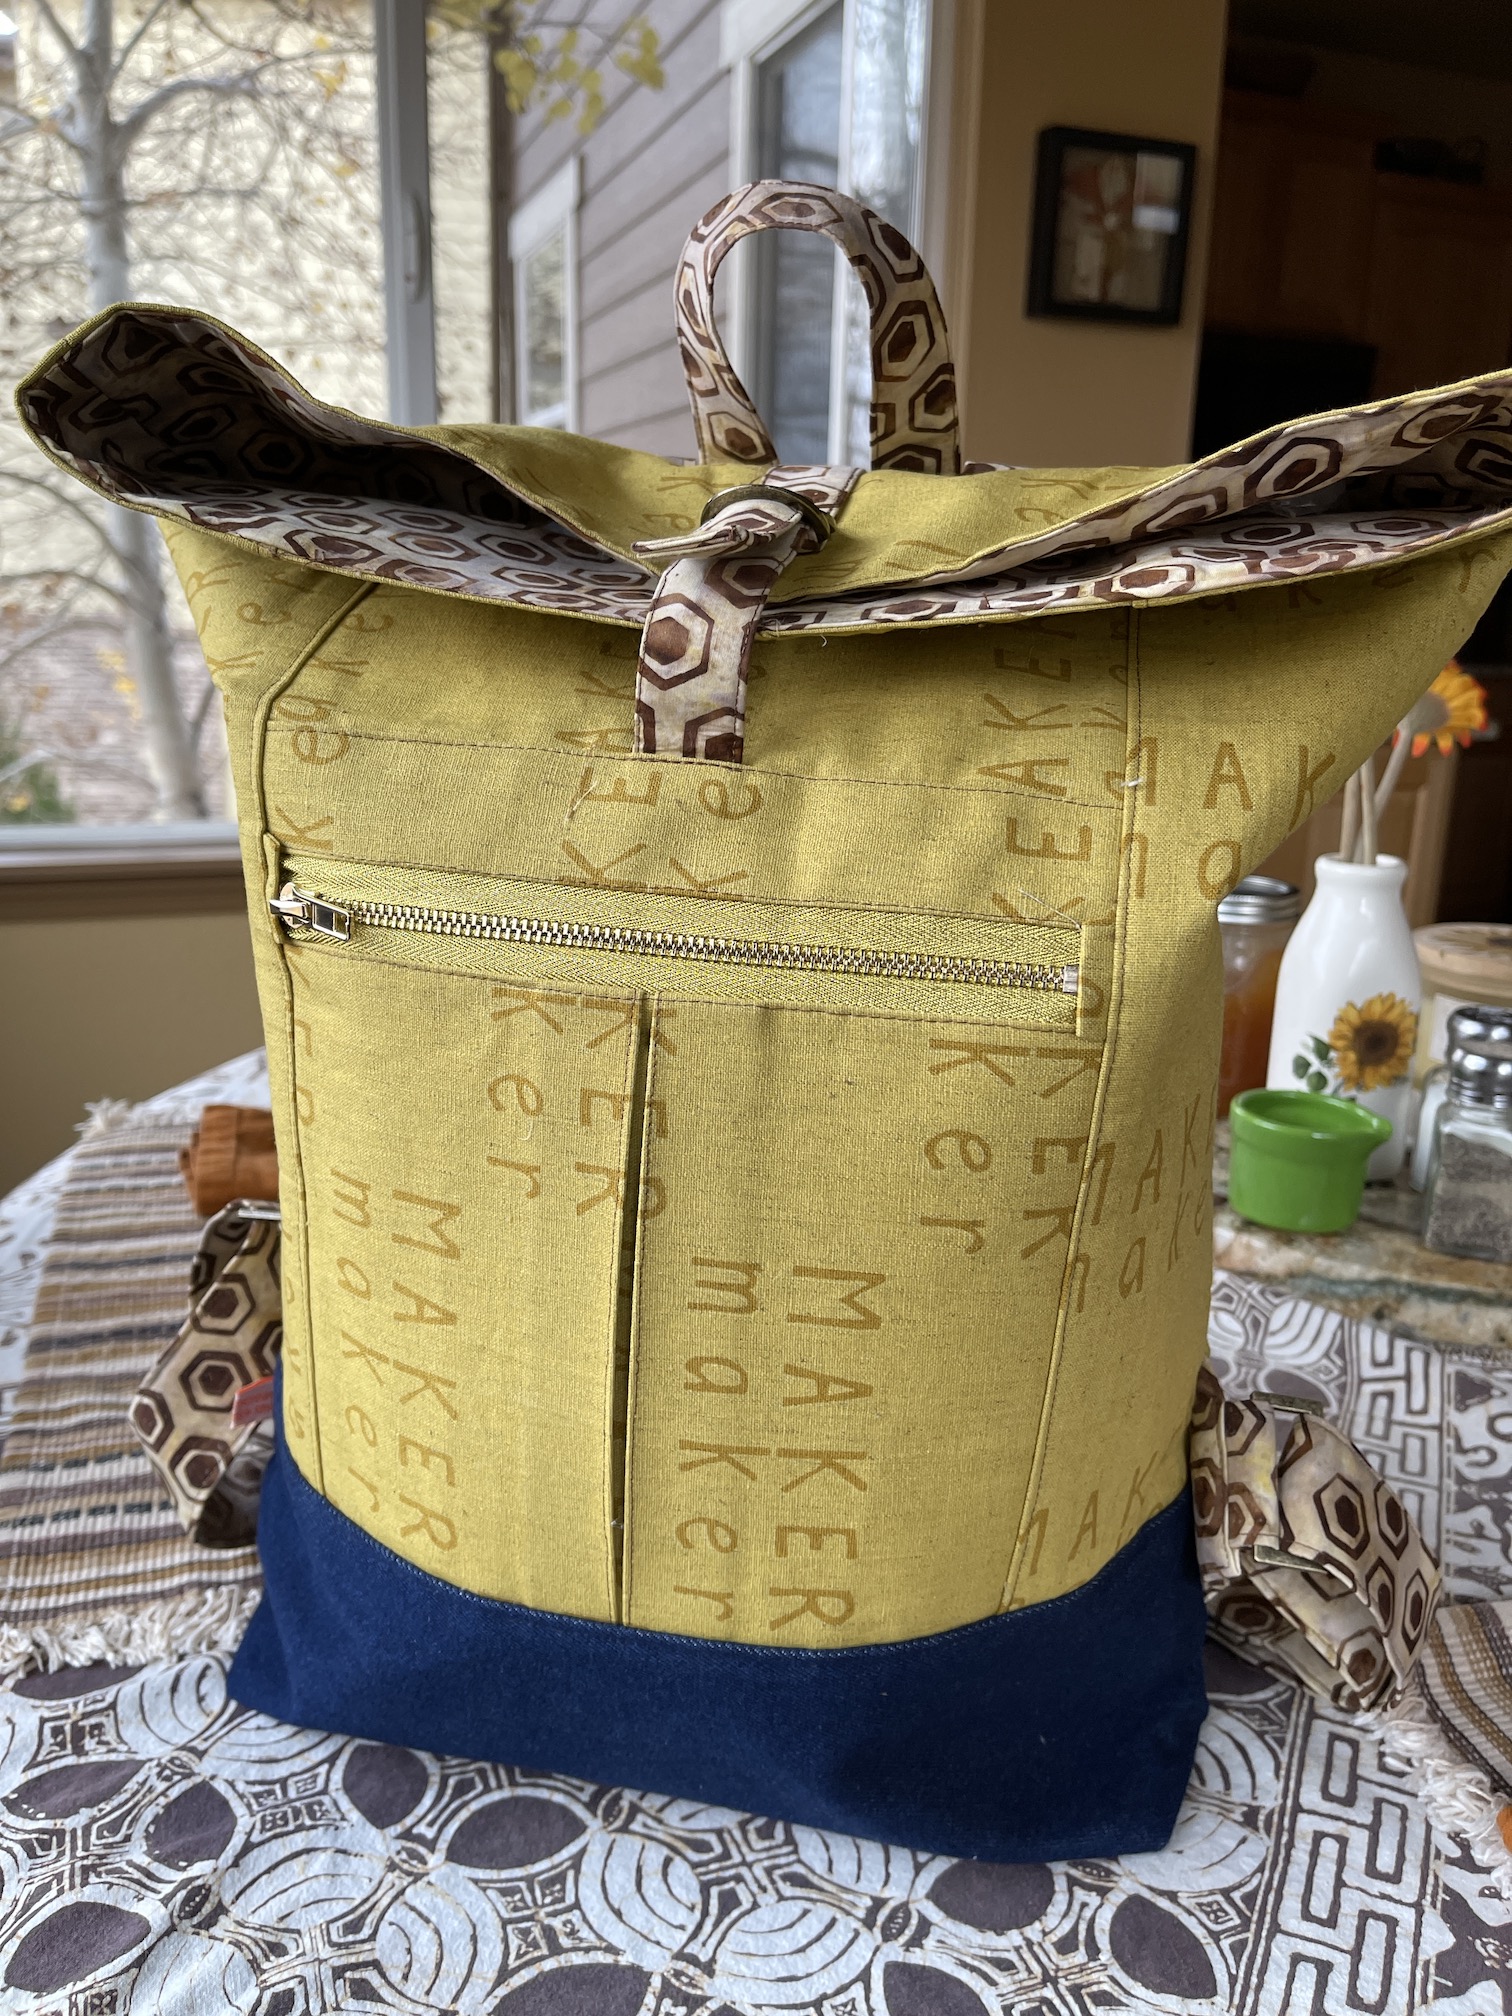
And speaking of backpacks, I am currently working on a commission project of a scrappy Tula Pink Range backpack for a gift for someone who is a Tula Pink aficionado. The family member who commissioned it as a surprise gift asked me to include lots of Tula Pink fabrics. I am trying my best but I have a limited range of her fabric lines (but lots of scraps!)
Lots of Tula Pink All Stars line fabric scraps in my stash
Here is my design wall in progress as I work on piecing together/creating my own “fabric” to start cutting the sections for the backpack:
This is just a little bit of the fabrics I am using, it will be super scrappy. I am going to first make “fabric” from the scraps and do some simple quilting on it to reinforce it before I start cutting sections for the backpack pieces. I will share a photo when it is done!
I have to set finishing my Firefly Tote from last night’s class aside for now as I need to get the backpack done and shipped so they can surprise their sister for Christmas!
Are you working on any last minute December projects?
Today would have been the 61st birthday of Terry the Quilting Husband (1960 – 2018), and I want to celebrate him on his birthday with this post.
In 2019 I began doing a remembrance post on this birthday but it was not until earlier this year, after a discussion with a friend who had lost her sibling, that I made the decision not to officially celebrate his life any longer on the date of his passing but instead on the date he came into this world.
His life was more than his sudden death at 58, he had 58 years of life, and over 30 of those with me before he left this earth and moved onto his next plane of existence.
I do not want you to be sorry for my loss, I just want you to celebrate with me this awesome man who I grew up with and became who I am as a person with during the 30+ years we were together.
Here is an excerpt from his obituary (writing his obituary was one of the most difficult things I had to do in my life – how do you summarize the life of the person who was your integral to life for 30+ years?):
Terry was a quiet and gentle soul who always treated people with respect and great kindness; a very patient person; and a loyal friend. He was an awesome husband, best friend and life-partner to his wife and made marriage a rewarding union. He was brilliant on many topics such as Military History and Military Strategy, his favorite hobbies. Terry was also a quilter and his quilts were part of the “Man Made” exhibit at the Sisters Outdoor Quilt Show. In addition to sharing a love of quilts, he also shared with his wife a passion for dogs, and adopted numerous rescue dogs throughout his life.
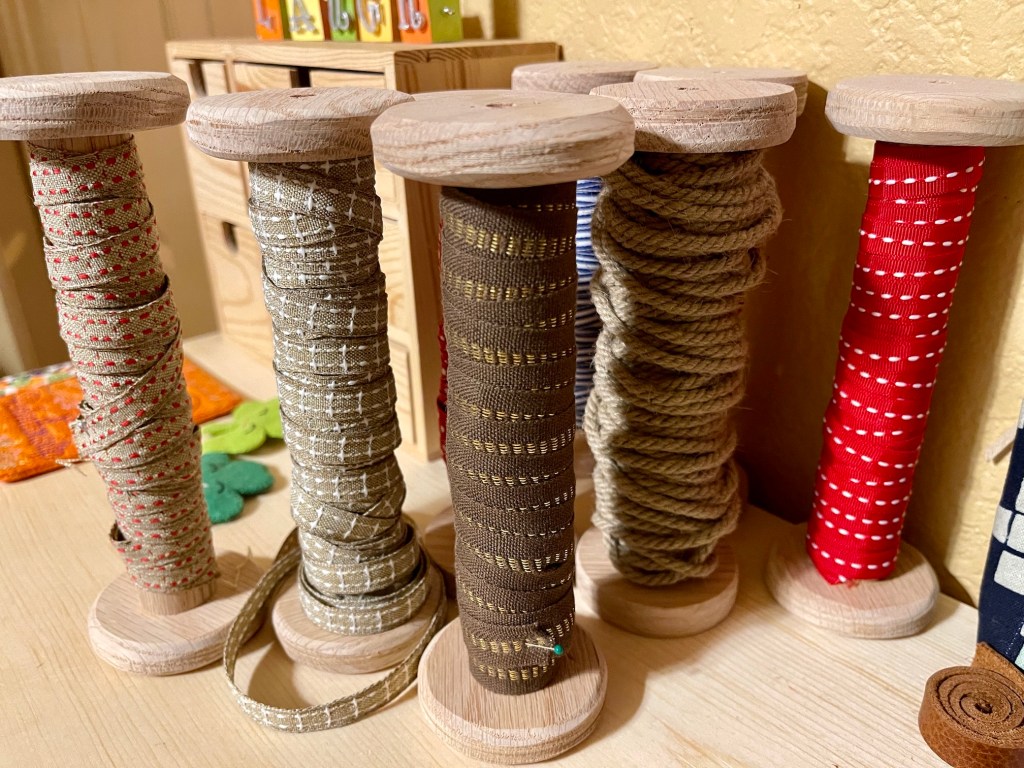
Terry was a “Quilting Husband” and a “Crafting Husband” here is a photo below of him helping me on a crafting project (making the covered rope for fabric baskets that I would eventual give to his sisters and keep one for myself after his passing – see post The Last Baskets)
To my blogging friends who’ve been with me for a while – thanks for all your support and encouragement over the past couple of years as I’ve navigated my new reality of widowhood and dealing with a level of grief I did not know existed prior (and it is a terrible hobby, I do not recommend it!).
Here are the links to some posts on Terry’s creativity during his years as “TTQH”, if you’d like to take a trip down memory lane:
He was an amazing life partner, best friend and partner in crafting/quilting. He always believed in me and encouraged me in everything I did (or tried to do). Now that I am gaining distance from the day that he passed, I can focus more on just how lucky I was to have him in my life for so long.
I like to think that he and Sassy the Highly Opinionated Miniature Schnauzer (who passed in 2017), his amazing Mom (who passed in 2017), my Father (who loved him), and all our other rescued Miniature Schnauzers (Fritz, Snickers and Kerie), his Father, as well as his Grandfather that he loved so much, are all hanging out in the afterlife together or that their souls have all been reincarnated and they meet again somehow in their next life.
I know that I will carry TTQH always in my heart and he lives on in my memories.
Postscript
I wanted to follow up on my “oversharing” post My Etsy Shop is Now Reopened – tierneycreates is now TextilesandSmiles from Saturday. A friend reached out via email after that post and shared an AMAZING story of how she had to reinvent herself and her life after a major life change. It was one of those emails that you hold on to the rest of your life and refer to as needed.
One of the profound things she shared/reminded me of is that when the titles that we assign ourselves (“wife”, “employee of _____”, “owner of ____”, etc.) change this does not alter the CORE of who we are. We are still that CORE and it does not change by the loss of any “title”. It helped remind me that I am more than those “titles” and although I may need to reinvent myself into new titles because of life losses or changes, I am not losing my CORE.
Feature Photo is TTQH along with Sassy and Mike “field testing” a quilt Terry just completed –“Field Testing” a TTQH Quilt