Alas, I am not sharing my studio and house tour. It is more like I am sharing my dream studio and house tour (smile). My house and studio are currently partially packed up and a mess as I sort my stuff out for my move to Colorado this Spring.
This post about another quilter’s studio and house tour.
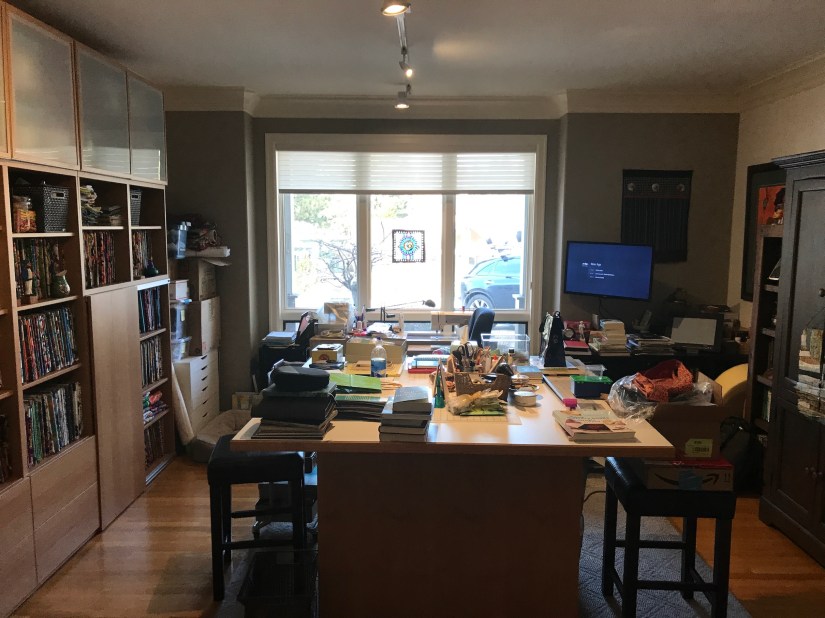
My dear friend Marla Jo (and her wonderful husband Jason) have been incredibly supportive during this difficult period in my life (my new life as a recent widow) and to give me a distraction from my grief, a couple of weekends ago she invited me see the studio and home of one of her clients/friends (Jaime) who is a quilter.
I thought it would be fun to share some photos from that visit as I would guess many of you, like me, enjoy artist studio tour posts!
The Studio
Here are images of Jaime’s yummy quilt studio:
She has beautiful custom designed cabinetry throughout her gorgeous home.
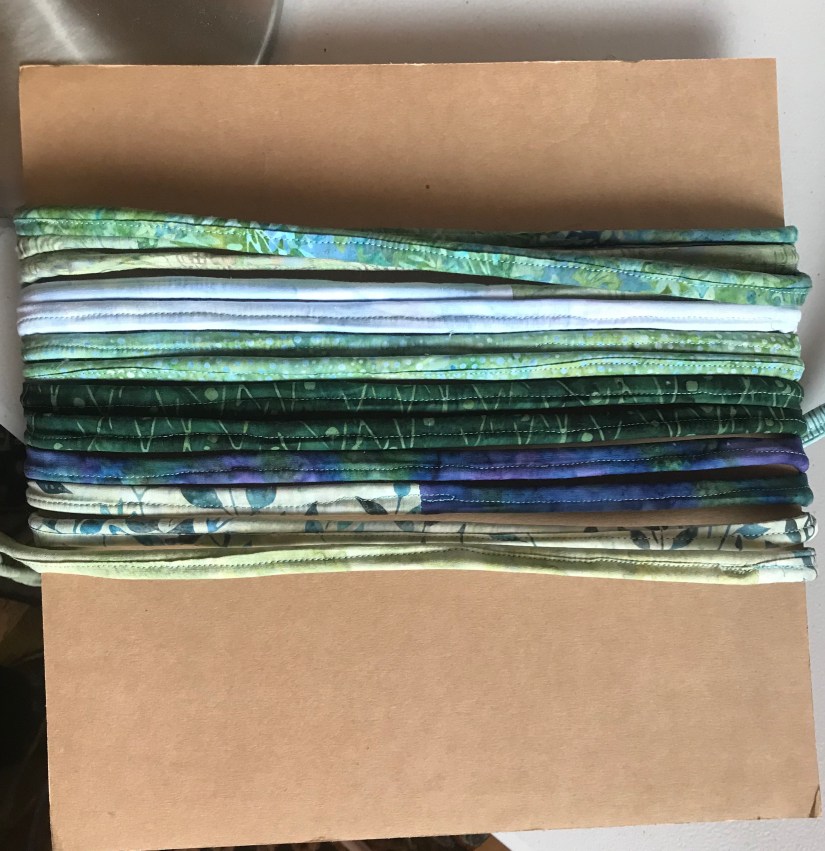
I was fascinated by how she organized her fabric:
She showed me that she used scrap thin cardboard cut to a uniform size to organize the fabric:
I love how her fabric stands upright like in a quilt shop.
Her organizationreminded me of the studio of my friend Dana which I shared on this post – Ultimate Studio Fabric Organization and the way Dana organized her fabric yardage.
Dana used recycled cardboard from fabric bolts that quilt shops gave to her. She cut them in half and wrapped her fabric around them:
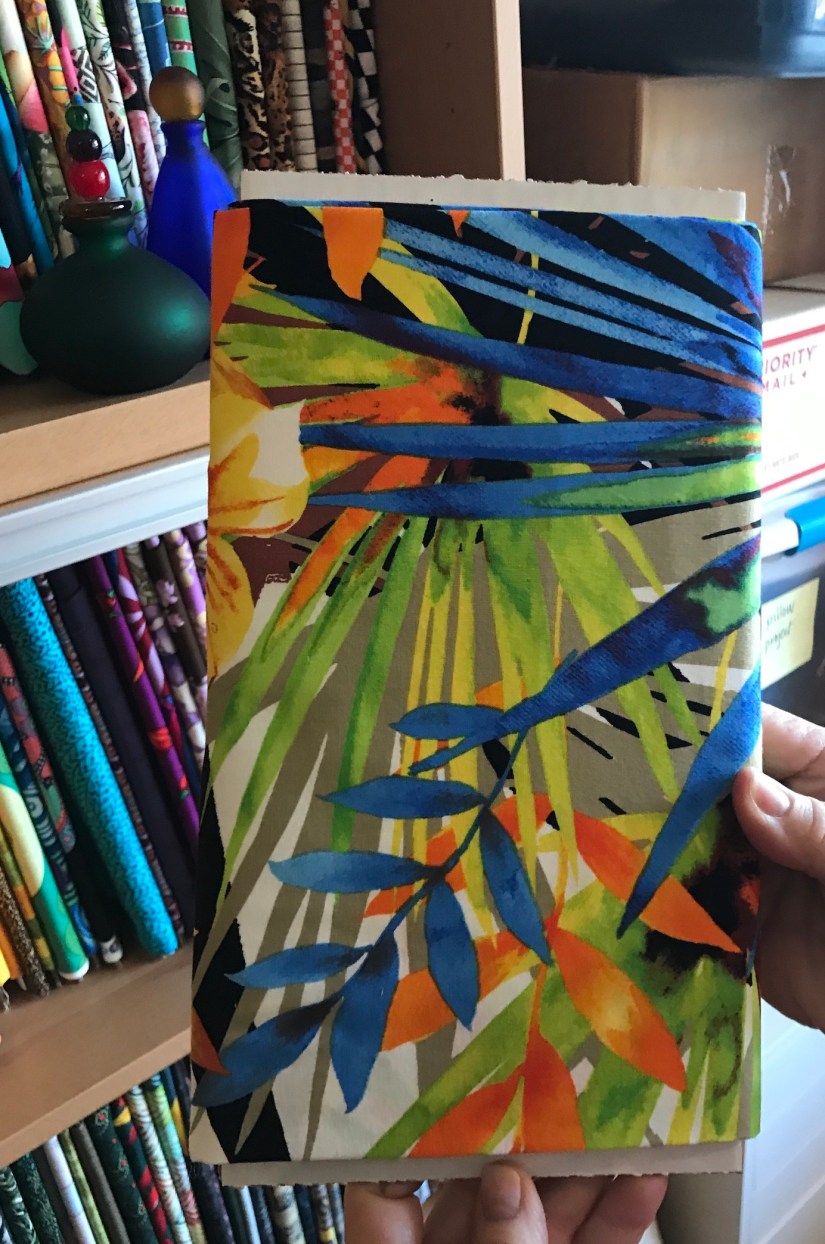
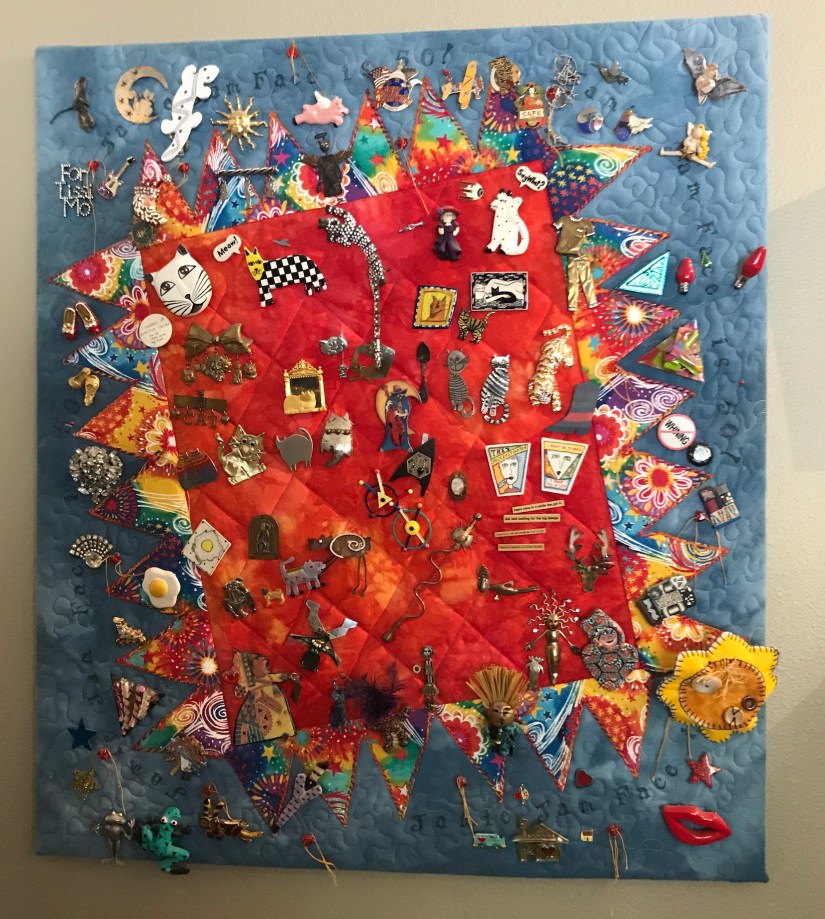
Jaime had a wonderful wallhanging in her studio, made by her sister, celebrating her collection of decorative pins:
The House
The studio was spectacular and the house was equally as spectacular. Here are a couple of my favorite areas of Jaime’s beautiful home:
The Entire Wall Bookcase in the Living Room
My dream!
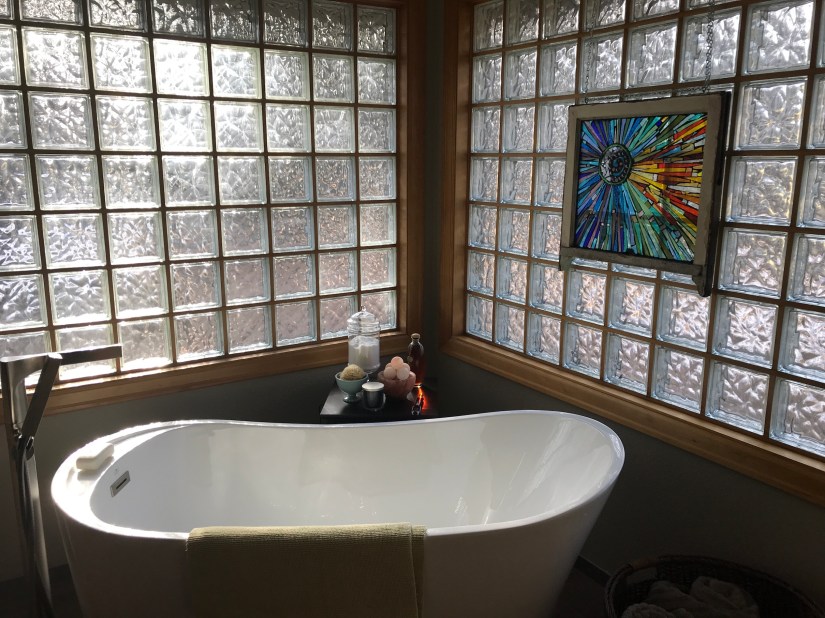
The Dream Soaking Tub
Jaime is an artful decorator and designed a nook in her bathroom to put a peaceful soaking tub:
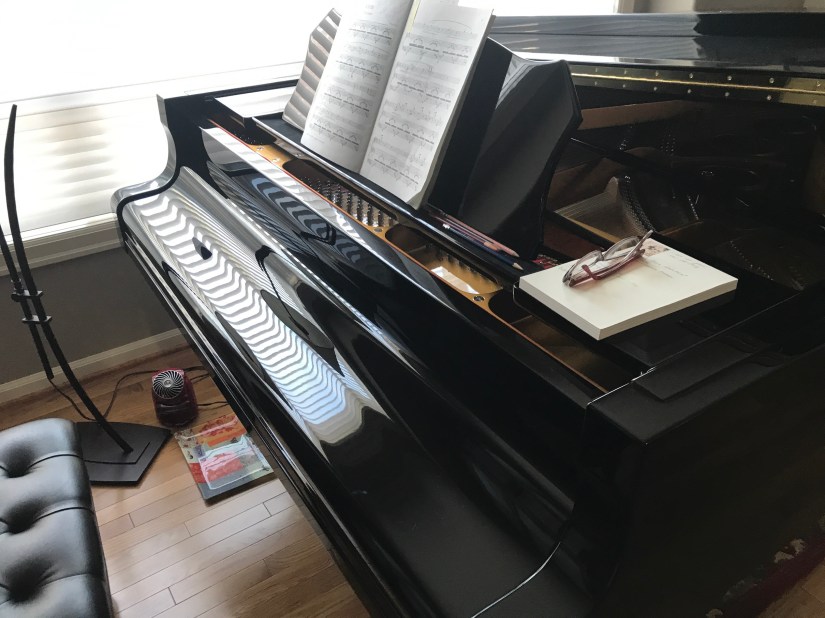
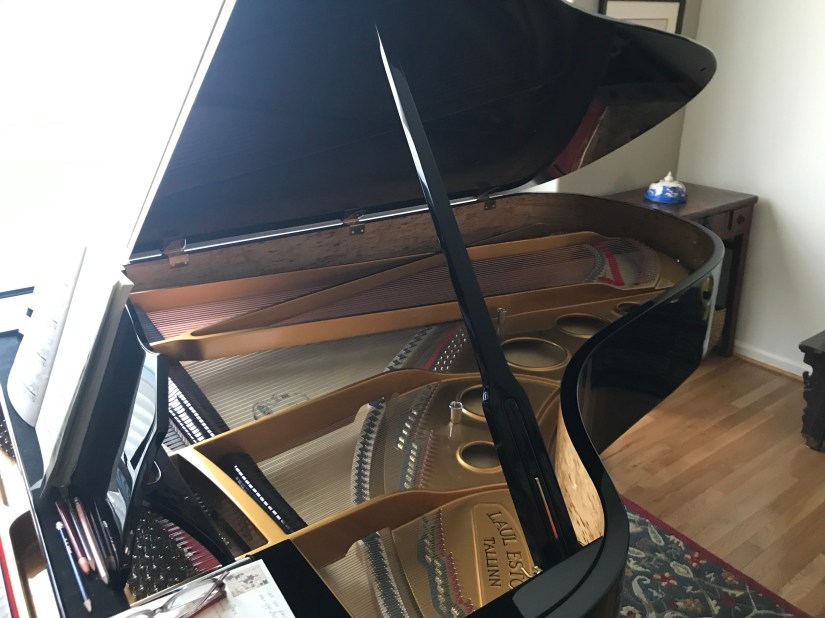
The Grand Piano
At one point in my young life I studied piano and I have always been fascinated with pianos. Jaime had in her sitting room a custom made piano from Estonia that had an exquisite sound (she treated us to a mini concert):
There were many other magical rooms/areas of her home but I wanted to spend time visiting with her and Marla Jo and not be rude and just take photos.
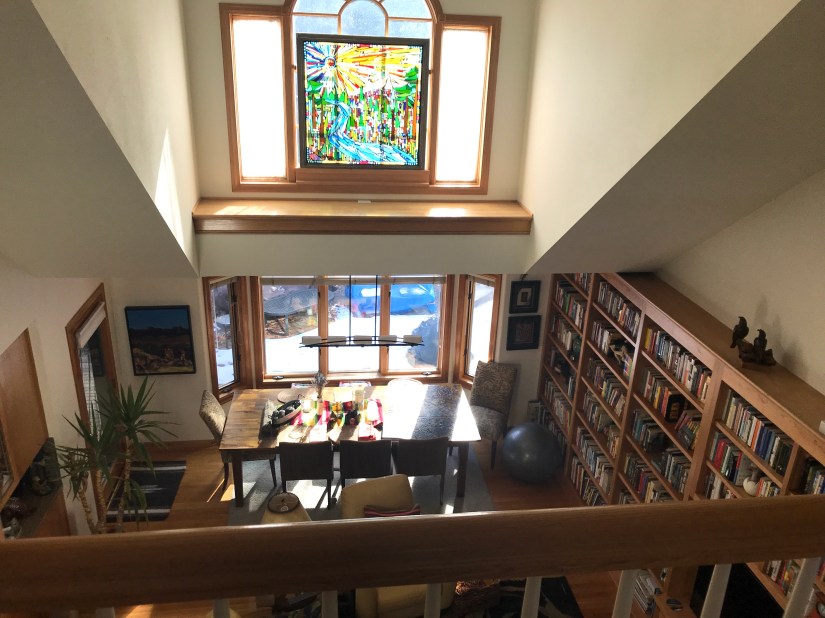
But let’s close this post with a view that took my breath away (my photo does not do it justice) – the view from the upstairs balcony of her home with a view down to the living room:
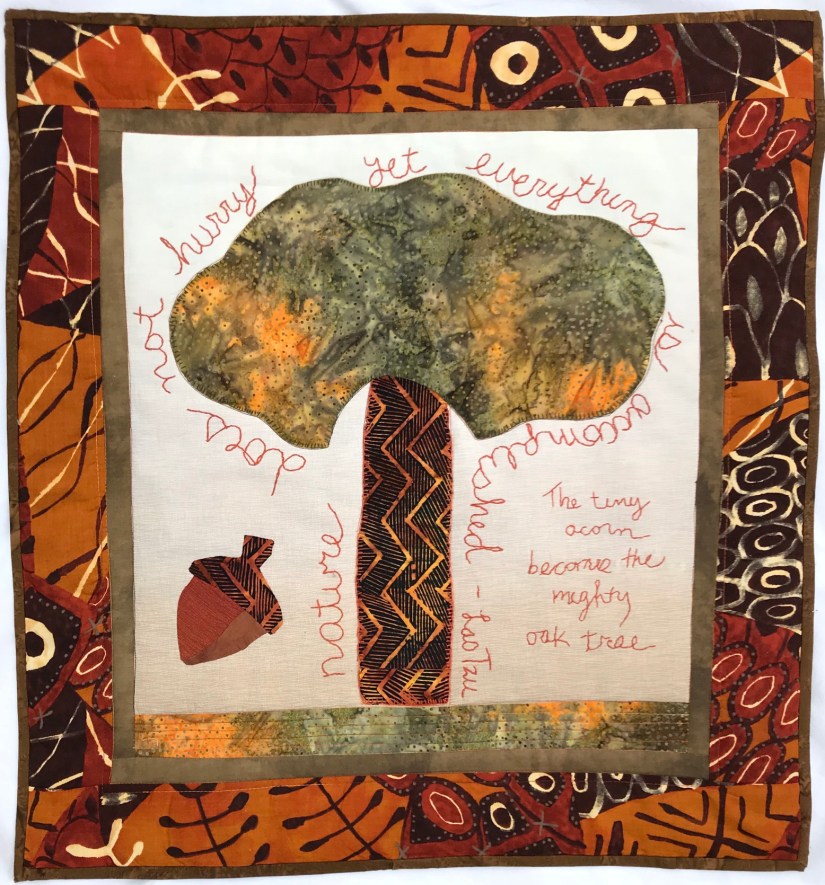
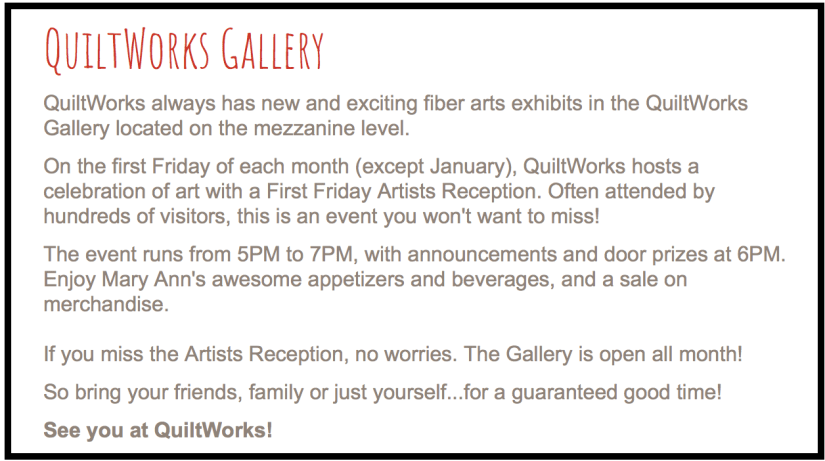
Tree of No Hurry (2017) will be part of the Trees Exhibit at QuiltWorks Gallery which opens on Friday July 6, 2018. The show will run through July.
Tree of No Hurry (2017)
QuiltWorks is a Central Oregon quilt shop that has a gallery upstairs and supports the Central Oregon traditional and art quilting community through its monthly shows featuring the works of local quilters, quilting groups and guilds.
Here is more about the QuiltWorks Gallery from their website:
If you are new to my blog, Tree of No Hurry began in an appliqué class with the wonderful teacher Janet Shorten at the Stitchin’ Post quilt shop in Sisters, Oregon in May 2016. Here are the related posts about the beginning of the piece, it’s evolution, wrangling embroidery floss, etc.:
Tree of No Hurry is part of my “Nature Stories” series of quilts. You can view my current four series of art quilts on my Art Quilt Stories page.
Here is the Artist Statement/story behind it:
TREE OF NO HURRY (2017)
25.5” W x 27” L, cotton fabric, embroidery floss
Designed, pieced and quilted by Tierney Davis Hogan
THE STORY OF THIS PIECE:
How often do we hurry about in our lives attempting “to do” everything we feel we must accomplish?
This quote by ancient Chinese philosopher Lao Tzu reminds us that a force as powerful as Nature (with a “to-do list” greater than we could imagine) does not hurry and still gets the important stuff accomplished.
Nature does not hurry, yet everything is accomplished. – Lao Tzu
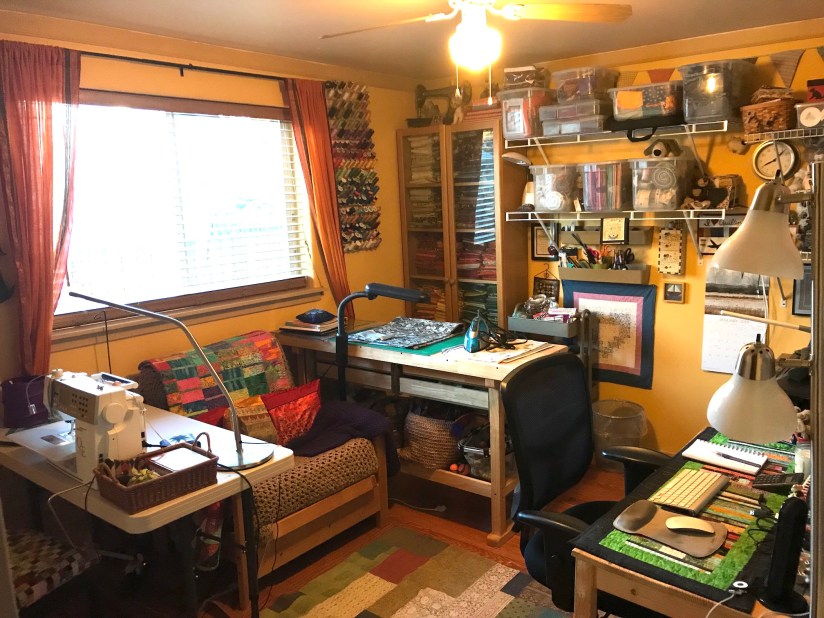
My tiny studio is nothing to “write home about” but I share photos to encourage other crafters who have not yet created their own little crafting space in their abode to do so.
I’ve proven you can cram a lot into a tiny bedroom (and someday I will install decent lighting into it)!
My studio makes me smile even if is it missing the sense of crisp, coordinated, moderns, elegant, organized, etc. style that I’ve seen in other quilters/crafters/artists’ studio (you’ll never see it featured in magazines such as Where Women Create).
It is a little sanctuary where I have hung on the wall quilts by my Quilting Sisters Kathy R. and Judy D. reminding me of the beauty of life-long true friendships. It is where I enjoy my collection of little toy schnauzers and rabbits, my collection of fabric treats and delights, and a closet full of projects to be made!
From the book Your Creative Work Space: The Sweet Spot Style Guide to Home Office + Studio Decor by Desha Peacock:
A mother bird doesn’t complain that she doesn’t have time or space to create her nest, she just makes do with the resources available to her at the time…Her job is not finished when the nest is built. She still needs to protect it until her babies are strong enough to go out on their own…think of what would happen if the momma bird neglected to actually build the nest because she couldn’t find the perfect materials. Don’t let your creativity suffer or, worse, die because you can’t find the perfect lamp…don’t worry if it’s not perfect. Use the resources you have around you and allow them to blossom with age and use.
Once you create your space, do not abandon it. Protect it fiercely with that momma bird love… – Desha Peacock, Your Creative Work Space (2017)
I hope you all make a nest for the precious baby birds of your creations!
Continuing my series of posts about the annual May quilting retreat I attended with my Quilting Sisters in Vancouver, WA May 17 – 20. To read my previous posts about quilting retreats I’ve attended, see my post category – Retreats.
In the post ThePillow ProjectI mentioned that for this May’s annual quilting retreat I pulled out some old unfinished objects/projects (UFOs); or as my blogging buddy Shirley @ handmadehabit calls them – “stranded” projects.
Well another “stranded” project that I brought to the quilt retreat was the Tango Stripe(pattern by Jean Wells of the Stitchin‘ Post) project.
This quilt is made with Kaffe Fassett stripes fabric and coordinating solids. I’ve wanted to make this quilt for years after falling in love with the store sample when visiting the Stitchin’ Post.
I’ve nearly started it a couple times as evidenced by these posts:
A couple of months ago at the monthly art quilter group I attend, our group leader brought in her completed Tango Stripe quilt, set in olive green fabric instead of denim colored fabric, and it was fantastic. This reminded me how much I want to make my own.
So I brought my collection of Kaffe Fassett striped fabrics and solids to the retreat and finally started cutting the blocks with the templates from the pattern:
I got this far in my progress on the quilt top during the quilting retreat:
I know it does not seem like a lot but there is a lot of template work to create the effect of the quilt. You do not cut the whole quilt out at once per instructions but you design as you go.
I did not finish it as you can see but I made a lot more progress than I had in the 5+ years since buying the pattern!
For now it is put away as I need my large design wall to finish it up and currently my large design wall has a quilt in progress for a future WCQN exhibit that I cannot yet share. But once I finish that piece, Tango Stripe is going up on the design wall and is going to be finished!
It is a tale whose story needs to end (with a completed quilt!)
Postscript
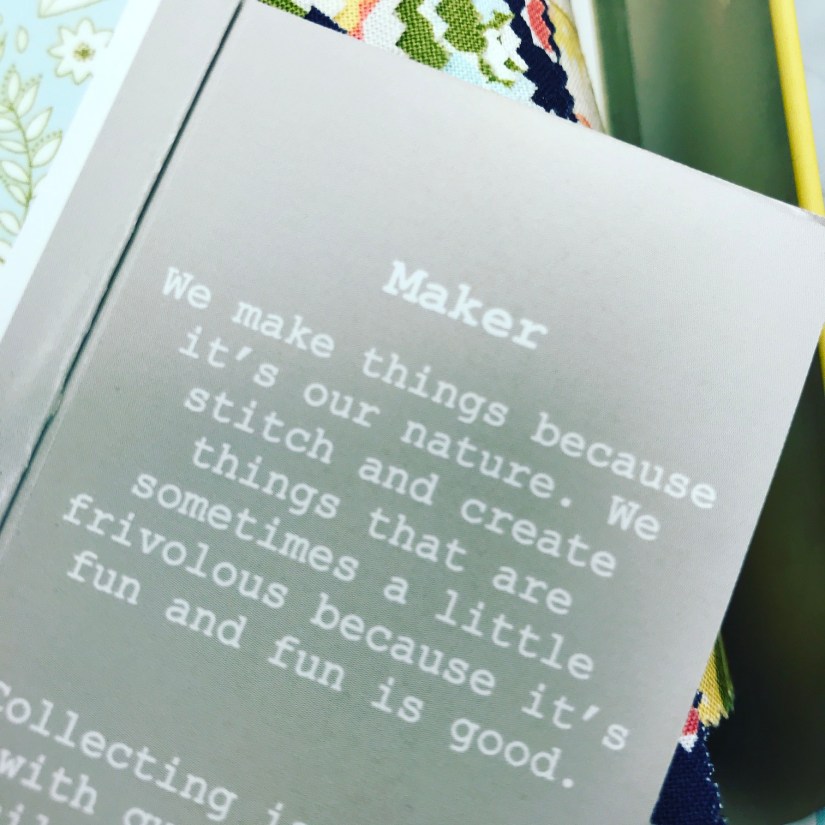
During the retreat, one of my quilting sisters gave me a sweet Moda fabrics Frivols quilt kit for my birthday:
This section of the insert inside the tin made me smile as I think it describes many of us well:
Hope you have a great week of “making” if you are a “Maker“!
More stories from the May quilt retreat are coming.
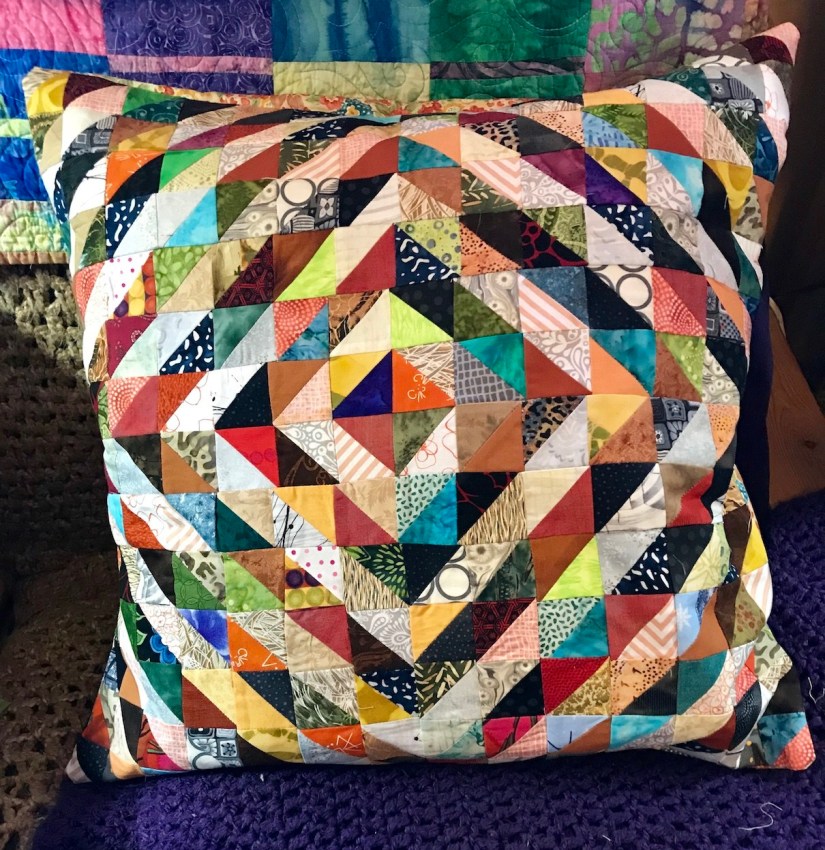
I’ve completed the Pillow Project – 5 pillows are made: 4 for my living room and one for my studio. Several of the pillows I began at the recent quilting retreat I attended (see post The Pillow Project).
If you are just joining us, this post is a follow up to these five posts (as well as various other older posts as I procrastinated through some of my projects):
Yikes Tierney, it sure takes you a lot of posts to stop talking about a project? Yes, true…and? (smile).
So here are the completed pillows.
Studio/Office Pillow
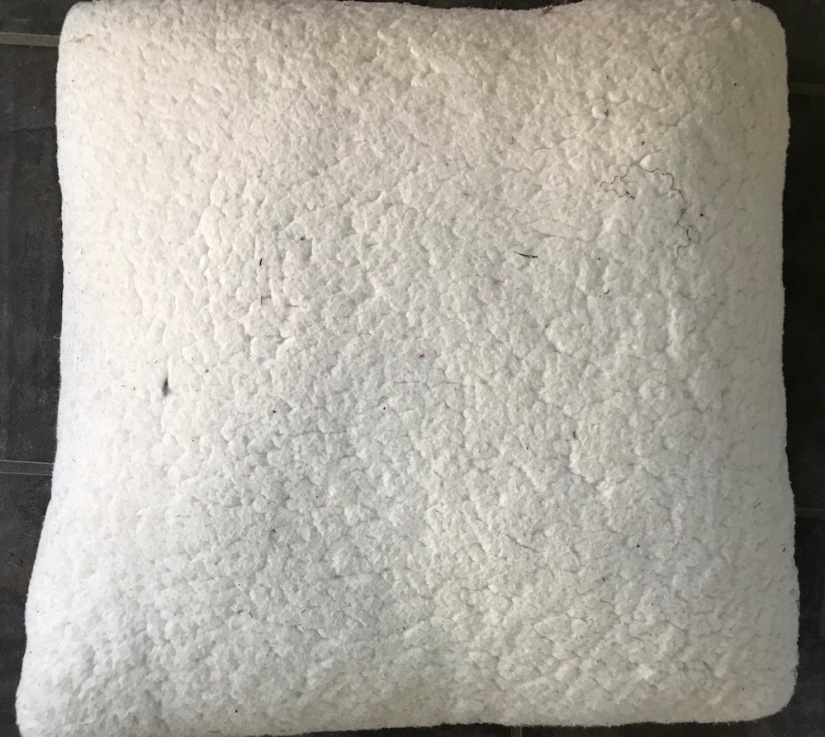
Made from recycled 2.5 inch x 2.5 inch fabric scrap squares that were turned into half-square triangles (it took 196 half-square triangles to complete!), this pillow measures approximately 22 inches x 22 inches:
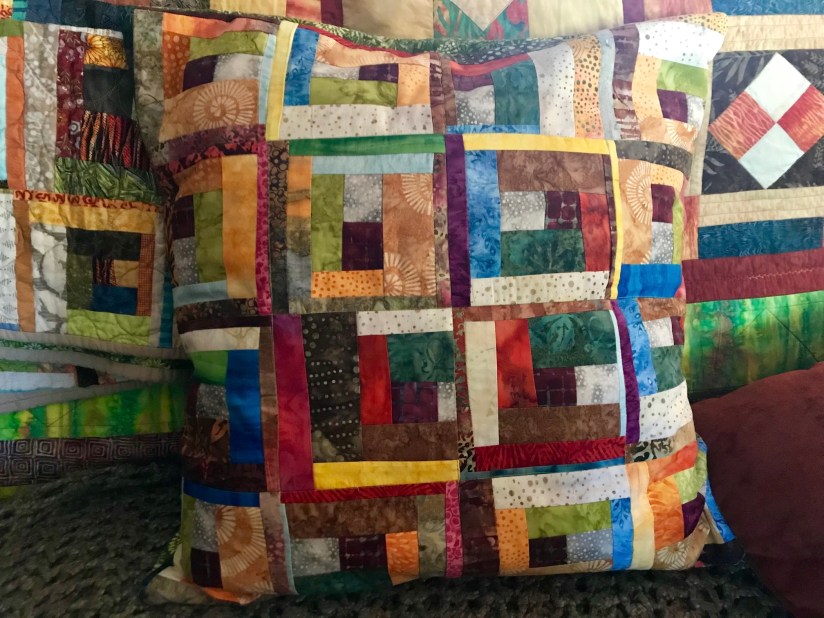
Living Room Pillows
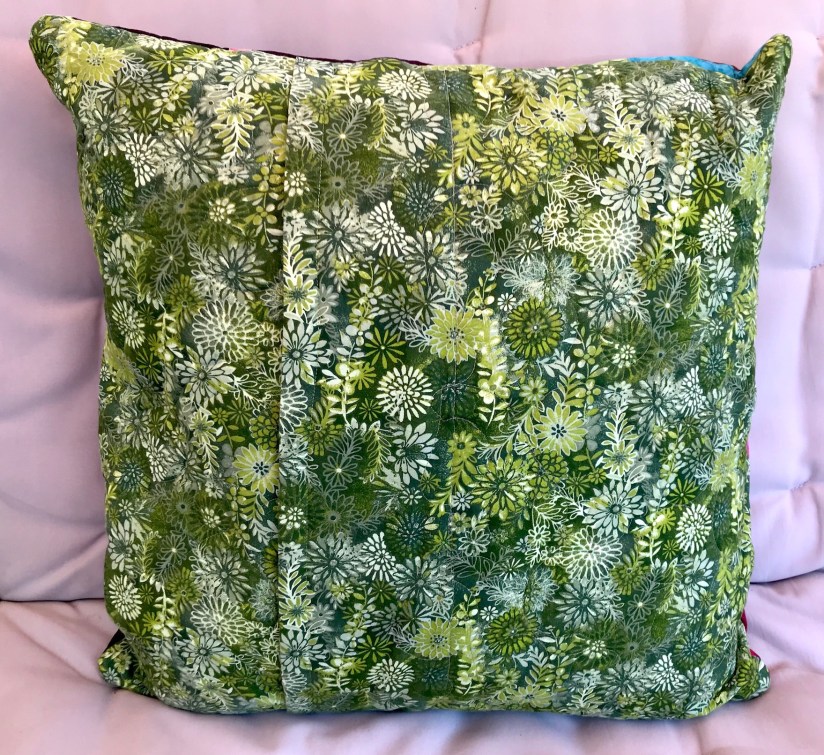
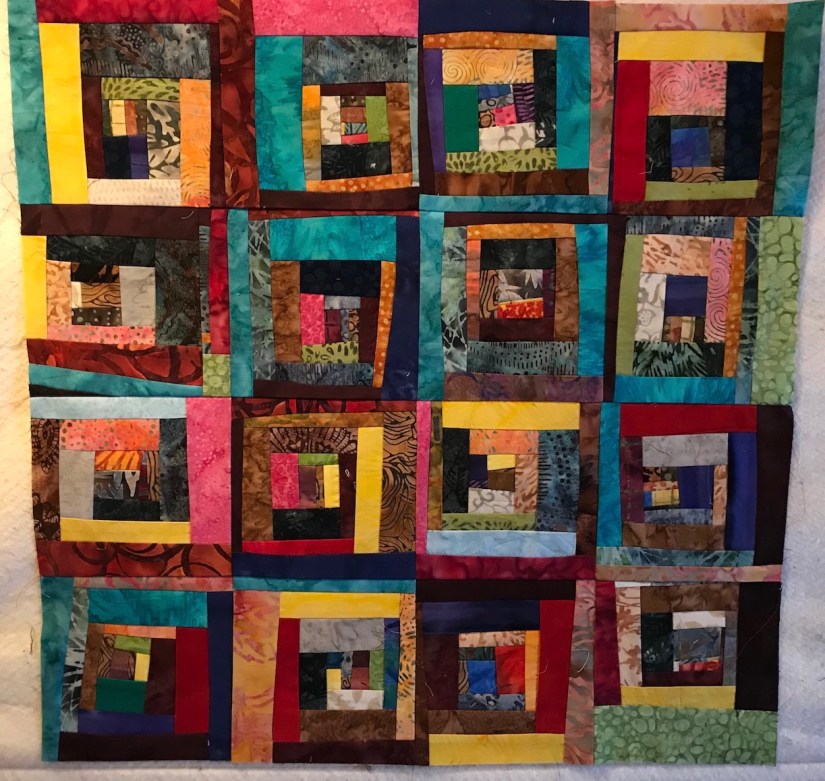
These pillows measure appropriately 23 inches x 23 inches and were made from batik fabric scraps pieced into improvisational (“log jamming”) log cabin style blocks:
Photo shoot on the porch swingOne of my favorite of the four pillows
Here is what the back of the pillows looks like – made with recycled quilting fabric trimmed from a quilt after long-arm quilting:
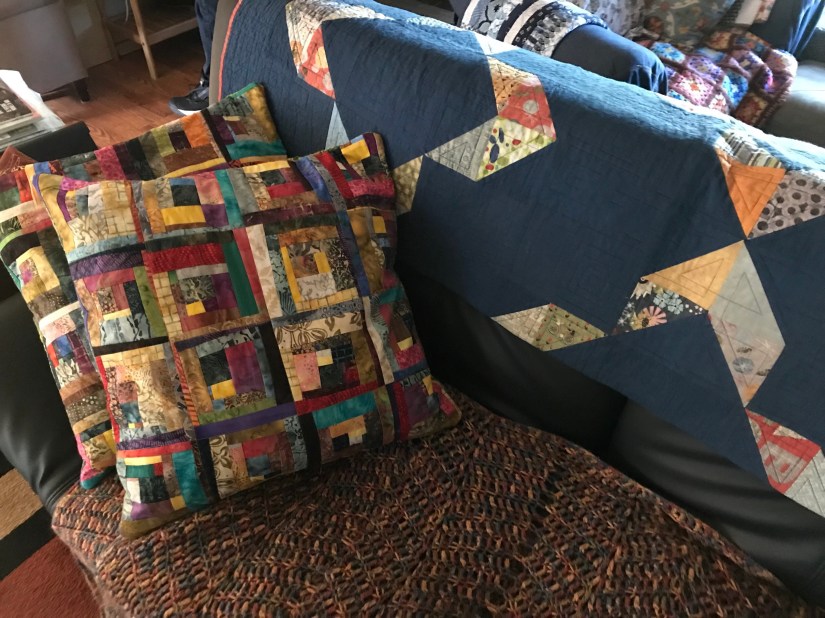
We have two sofas in the living room that face each other – I usually hang out on one and Terry the Quilting Husband (TTQH) hangs out on the other.
My sofa with two of the cushions:
TTQH’s sofa with the other two cushions:
Yes, we have a crazy amount of color in our house (our house is not for the bold color faint-hearted!)
To close this post, here is a random gratuitous photo of a lovely purple iris from my walk yesterday:
I still have more stories to share from he annual May quilting retreat I attended with my Quilting Sisters in Vancouver, WA May 17 – 20, 2018. I just wanted to share the follow up on the whole pillow making saga 🙂
Continuing my series of posts about the annual May quilting retreat I attended with my Quilting Sisters in Vancouver, WA May 17 – 20. To read my previous posts about quilting retreats I’ve attended, see my post category – Retreats.
Pulling Out the Old UFOs
For this May’s annual quilting retreat I pulled out some old unfinished objects/projects (UFOs) or as my blogging buddy Shirley @ handmadehabit calls them – “STRANDED” projects.
Those of you who have followed my blog a long time (I mean a long time) – do you remember this project and post from August 2016 “What’s on the Design Wall (Need YourHelp)“:
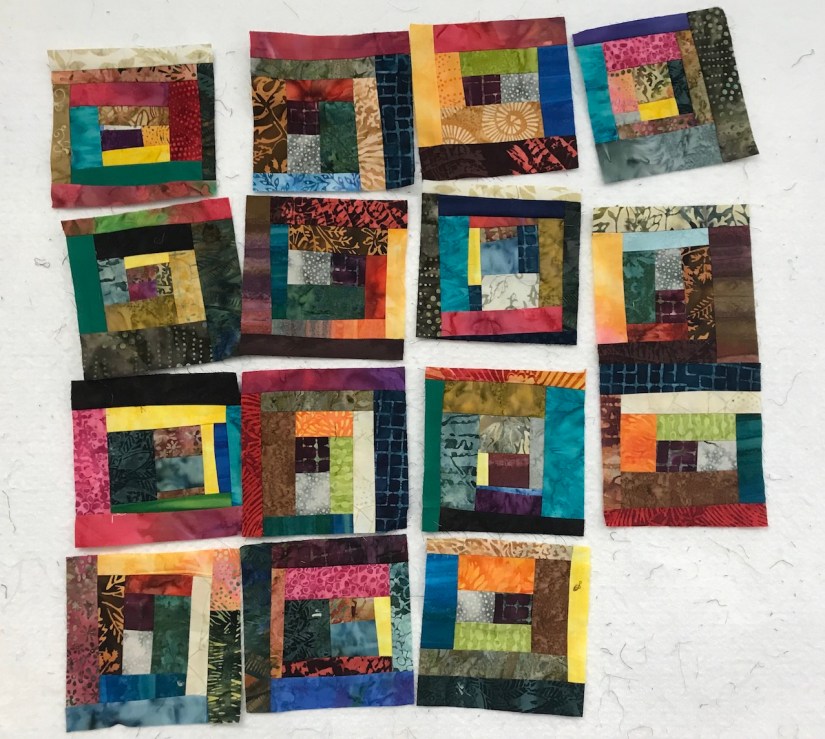
So many readers provided great suggestions on the color of setting fabric for these “log jam” (freestyle log cabin) blocks. Alas, I could not make up my mind and eventually put the blocks away.
I bought the blocks to the retreat to make them into pillow covers!
In Need of Pillow Covers
We have four (4) cozy fleece pillows in the living room that we used in the late Fall, Winter and early Spring but they would be strange to use in the late Spring and Summer:
I decided to use the log jam blocks to create Summer pillow colors for the four pillows and started assembling the pillow tops at the retreat:
Between the retreat and last week, I completed four pillow tops:
Next step is to quilt the pillows tops and then add envelope backs.
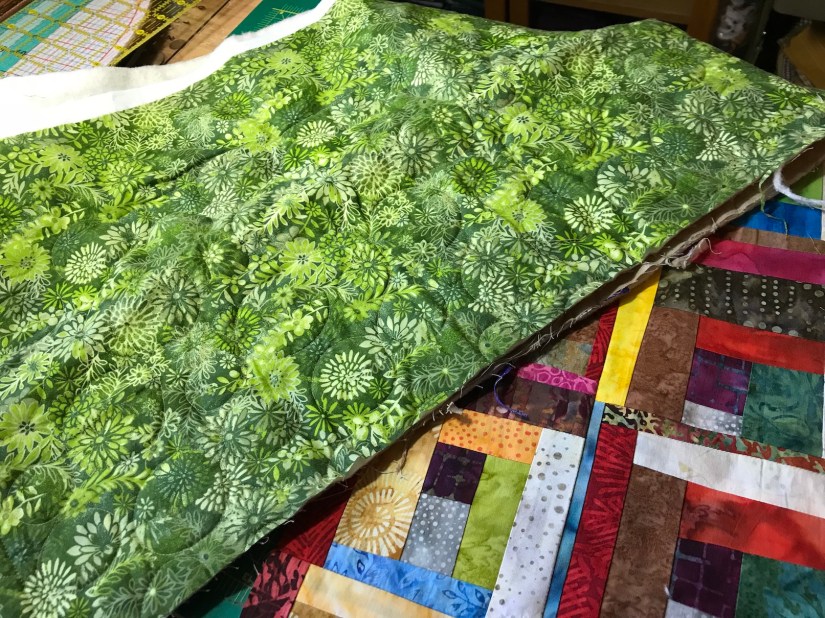
I have some already quilted fabric left over from another project to use in the back:
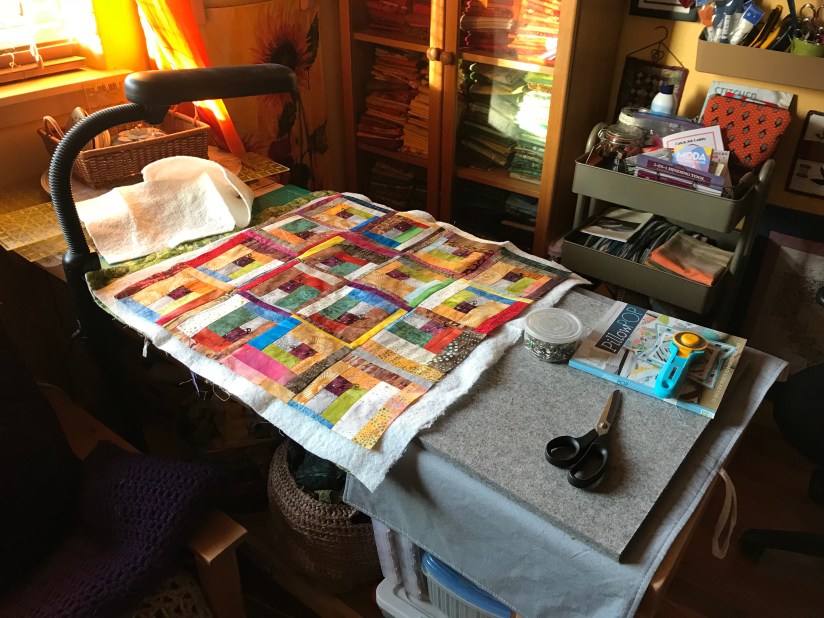
Here is one of the pillow tops awaiting quilting:
I used up all my already pieced blocks from 2016 and used the rest of the remaining batik fabric scraps from the project to make additional blocks for the four pillows, each made with 16 blocks.
I will of course share photos in a future post of the completed pillow covers, covering the existing fleece pillows!
UPDATE 05/29/18 – one reader asked the size of the pillows – they are approximately 23″ x 23″ each.
I completed the pillow top from scrap 2.5″ squares:
I decided not to quilt the pillow top but instead added fusible interfacing. I made an envelope style back and here is the completed pillow on my studio chair:
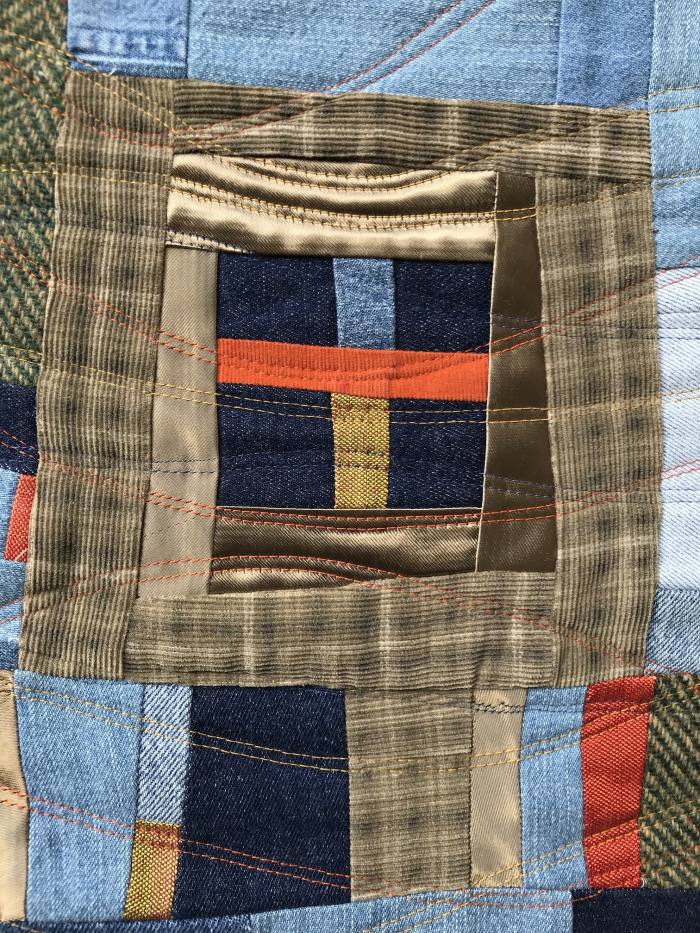
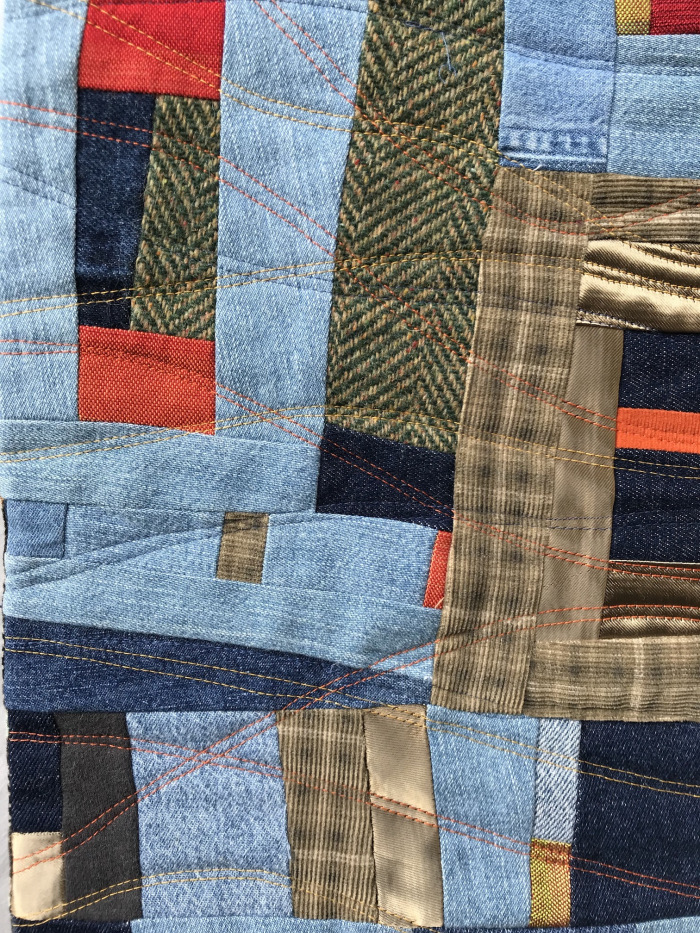
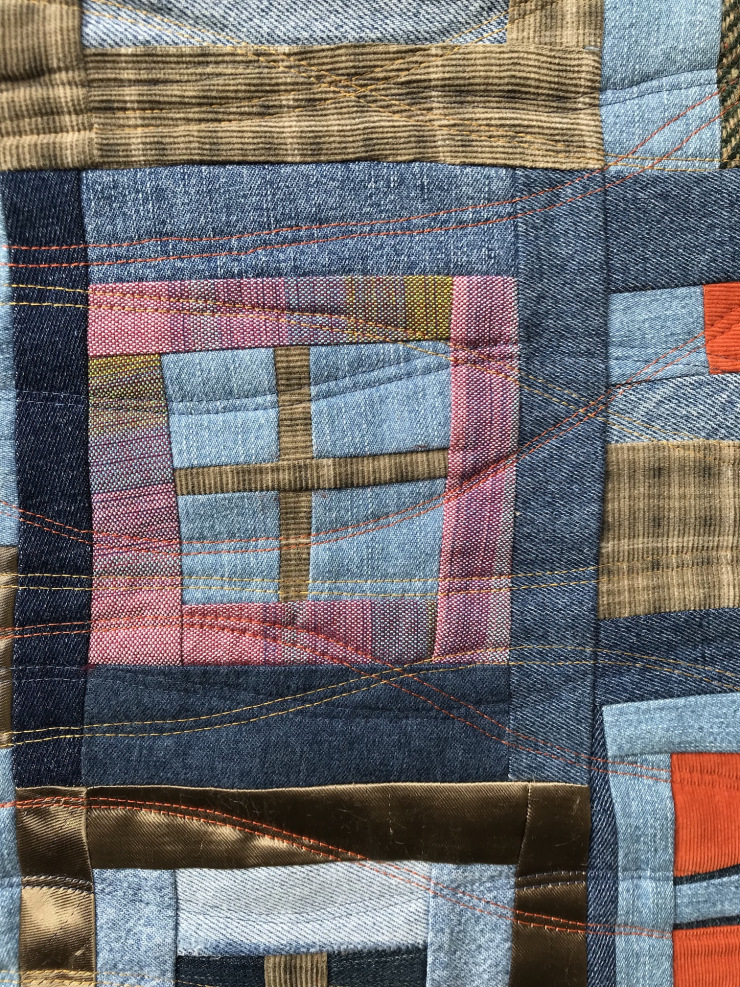
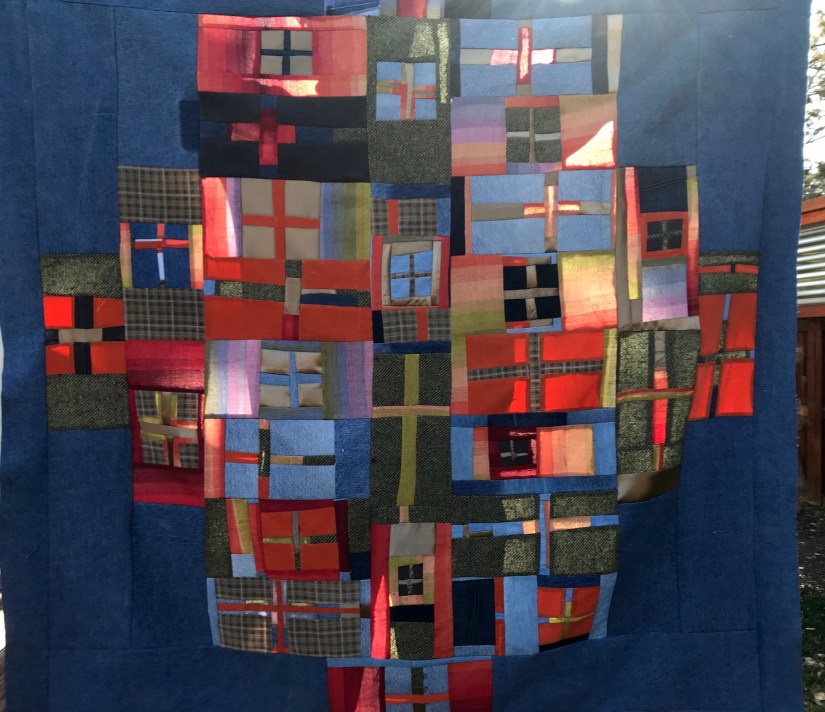
In late October 2017 I completed a quilt from recycled materials (denim, home decor, clothings, etc.) called Additional Conversations. My original plan was to hand quilt the piece, then my plan was to machine quilt the piece, and then growing inpatient and nervous on quilting a 59″ x 55″ denim quilt I turned it over the the long-arm quilter for “quilting by check”.
Well here is the completed quilt, I finished it with facing rather than binding:
Additional Conversations (2017) by Tierney Davis Hogan, quilted by Guadalupe Designs
I’ve hung it my living/dining room area along with the other quilts that fill my living/dining room area:
I appreciate the work by the long-arm quilter and I’ve decided that I am going to be more fearless in the future and quilt all my own art quilts from this point forward.
I had a specific vision for the finished quilt and I feel I could have realized it if I had quilted it myself. It is difficult to direct someone else to quilt a quilt in your vision as each person brings their own eye and perspective to a project when it is collaborative.
This experience has encouraged me to take more risks in the future and believe more in my abilities (and give myself the opportunity to learn and grow in those abilities)!
My friend Judy got me into quilting (I have her to blame for all this…smile).
Recently she shared a couple photos of her re-organized sewing room and gave me permission to share on my blog. However, I cannot share her photos without briefly mentioning her “Jelly Roll Love” (notice I am using the term “Love” and not “Addiction”, ha!) and that perhaps this is a love that I also share…
I met Judy years ago when she was a colleague at a job that seems like a lifetime ago. She is one of my “Quilting Sisters“. You know how I refer to my husband Terry as Terry the Quilting Husband (TTQH) – well Judy is my Number One Quilting Sister (after all she got me into quilting) and her new moniker is the “#1QS“!
I appreciate that non-quilters follow my blog and out of respect for those who’ve never heard of fabric “jelly rolls” (other than a delicious bakery delight) here is an image of a fabric jelly roll:
Image credit: Missouri Star Quilt Company
A jelly roll is a 42 piece collection of pre-cut 2.5 inch quilting fabric strips and are very popular among quilters (and quite addicting to collect). The appeal for quilters to use “pre-cuts” (pre-cut fabric collections) is that they are time saving and the fabrics are already coordinated.
In the late 2000s to early 2010s jelly rolls pre-cuts were gaining huge popularity with quilters. Numerous jelly roll fabric collections and books with patterns on creating quilts made with jelly rolls were flooding the market. I am guilty of buying several of these books myself as you can see in the image from my bookshelf below:
A small section of the obscene tierneycreates craft book library
Judy’s Sewing Space & Jelly Roll Love
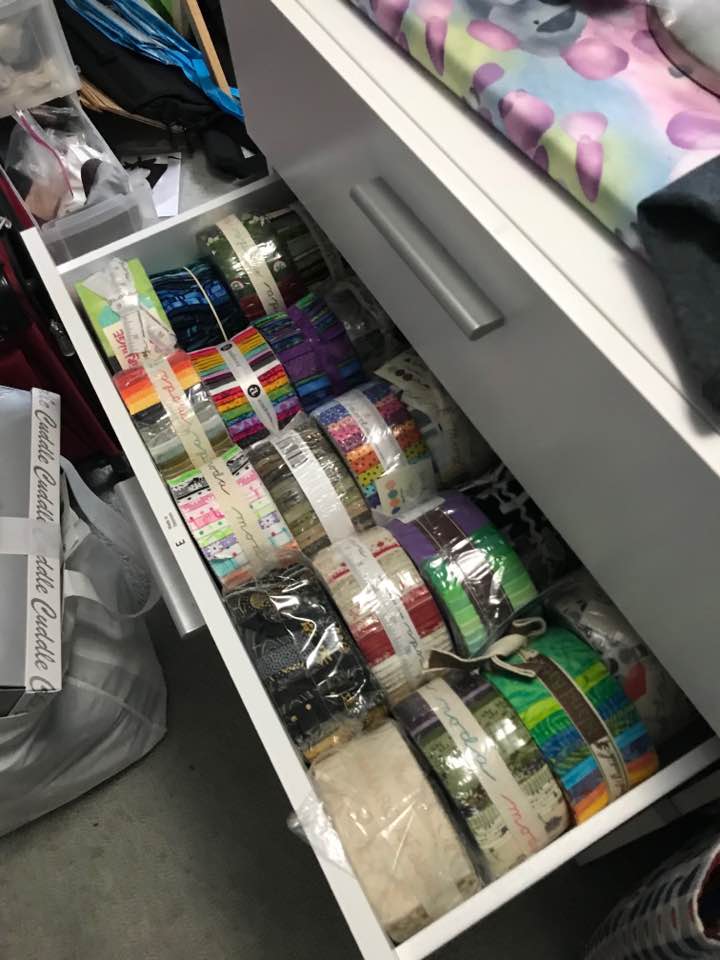
Judy, aka the #1QS, used to sew in a corner of her family room.
A couple of years ago, she emptied out a spare bedroom and turned it into her “Sewing Retreat”. Recently re-organized her sewing space and below are a couple photos include one of her drawer of jelly rolls that she has been collecting for years.
Projects, so many projects:
As you can tell, she will never grow bored with all those glorious sewing projects in queue!
Fabric Organized on “Mini-Bolts”
Is that calendar in order to organize when all those projects get started?!?!!
Judy uses cardboard bolts that fabric yardage comes on (like you see in fabric shops), cuts them in half and then used them to wrap her yardage and organize her fabric like a miniature quilt shop!
Another Quilting Sister Dana has done the same thing in her studio/sewing space:
I’ve been with Judy and Dana, during a quilt retreat, when they’ve asked a quilt shop owner for any empty fabric bolts they can spare. Many quilt shops just recycle the cardboard bolts so they are happy to give them to a quilter to use (at least the shops I’ve seen Judy and Dana ask for empty bolts from).
I think the effect of the mini bolts, besides nicely organizing yardage of fabric, is it makes your sewing room look like a mini Quilt Shop!
And Now For the Jelly Rolls
Judy stated this is not her only drawer of jelly rolls but she did not share a photo of her other drawer (or drawers?!?!?).
Judy is not alone in her “Jelly Roll Love”, I’ve been guilty of it myself:
Tub-o-Jelly-Rolls patiently waiting to be loved in the tierneycreates Studio
I won’t tell you the container’s dimensions or just how filled with jelly rolls my “Tub-o-Jelly-Rolls” is: a girl has to keep some things private….
I finished the piece made from recycled textiles (clothing, home decor, manufacturing samples, hand-dyed silk samples, etc.) for our local art group’s annual show with the theme “The Threads that Bind” – The Recycled Love. The 03/29/18 post provides details of the 8 types of recycled fibers that are contained in the piece and my musing on writing the Artist Statement for this piece.
The Recycled Love (2018) by Tierney Davis Hogan
Here is my finalized Artist Statement for the piece:
The first law of thermodynamics states that the total amount of energy in a system cannot be created nor destroyed, it can only be changed from one form to another. A quilt is made from changing the existing “love energy” from the quilt maker’s heart into a pieced textile; ultimately recycling that love energy into the quilt’s recipient heart
I think this piece is a better option than those materials ending up in a landfill.
Postscript
My long time blogging buddies really inspire me such as Claire @knitNkwiltwith her social justice and charity works, Cindy @inastitchquilting (A Quilter’s Corner) with the inspirational quotes she posts, and Melanie @catbirdquilts with her insightful musings.
I’ve been thinking a lot about kindness lately. With all that is going on in our world, each day I think about intentionally filling my heart with as much kindness and empathy as it can hold.
I came across this simple quote a week or so ago. I do not know who to credit with it so I will just post it as I found it:
I cannot give everyone in the world who is hurting a quilt but I can send them some virtual “recycled love” from my heart.
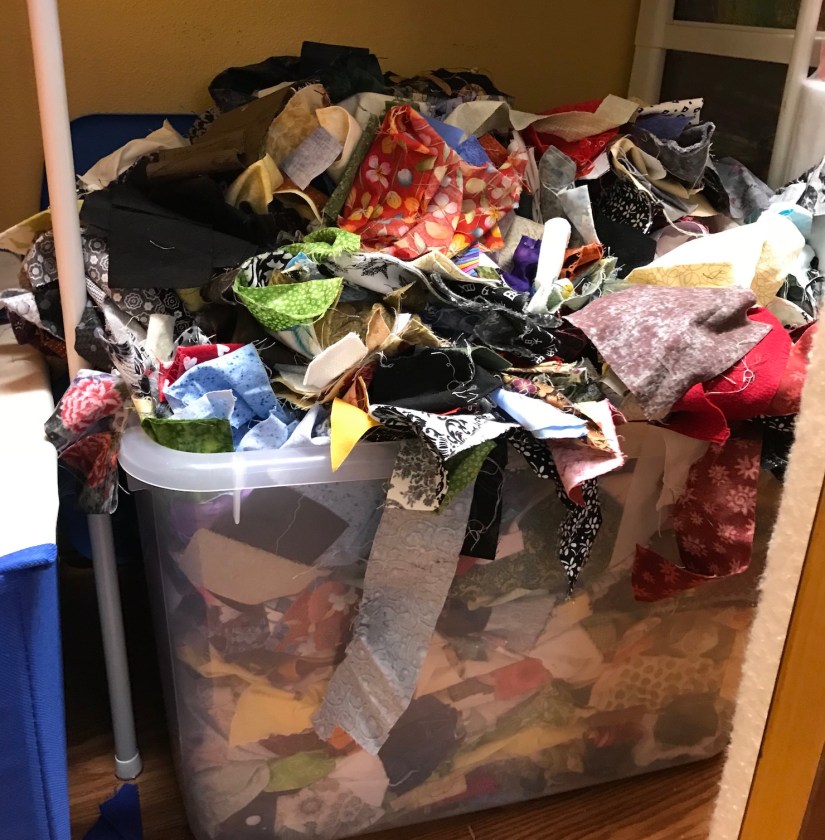
It’s no secret, especially if you’ve followed my blog for a while, that I am obsessed with fabric scraps. I won’t try to link any of my numerous previous posts on fabric scraps. If you are new to my blog, you will have to just trust me 🙂
Well one of my quilting friends, actually the one who got me into appreciating the value and opportunity for unlimited creativity provided by using fabric scraps, is coming over tomorrow for a SCRAP PARTY!
She had a birthday a couple of weeks ago and we are going to do a belated celebration by going to out to lunch and then coming back to my house and spending the afternoon playing in my fabric scrap pile:
I did not post about it (as those of you who’ve followed me for a while may have grown weary of my constantly talking about fabric scraps) but last weekend I thinned out my scrap pile. I pulled out any remaining old lower quality fabric and donated more to a local charity thrift shop.
During a previous donation, a volunteer at one of our local charity thrift shops (for our local Humane Society shelter), told me that fabric scraps sell very well at the thrift shop. They cannot keep fabric scrap bags in stock, they sell out immediately! (See there are more weird obsessed people like myself in Central Oregon).
So what are we going to do at a so called “Scrap Party”? Well I am going to dump the whole box onto a plastic tarp on the floor of my master bedroom (as not to take up precious space in my tiny studio space that we will be sharing) and let my friend go wild playing with my fabric scrap collection. She is really into improvisational piecing (she is the one who helped me move from traditional quilting to art/improvisational quilting) so fabric scraps are one of her favorite textile mediums!
I’ve set up my travel sewing machine for her in my studio so we can sew together. I have two design walls (a small one on the closet door in my studio and then the big one in the hall way) so we won’t have to battle for design wall space!
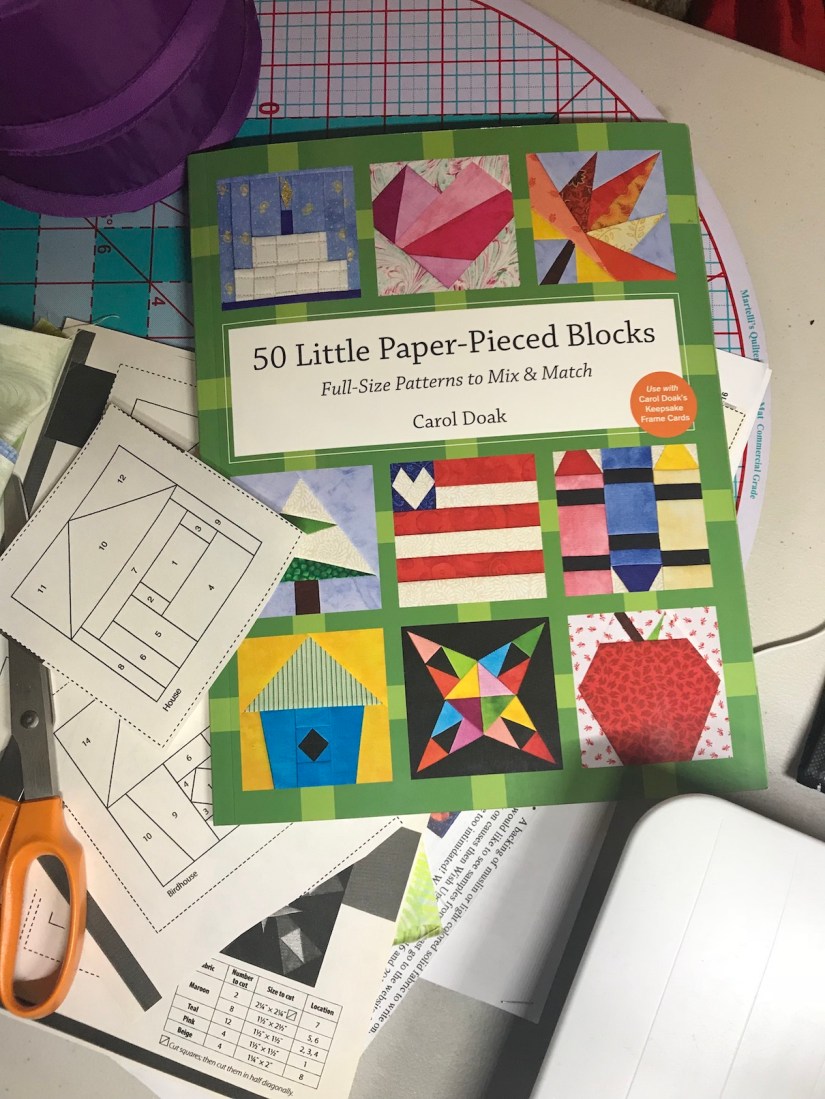
I’m not sure what she is going to work on, but I plan to work on some paper piecing. I’m trying to spend more time with my extensive (ridiculous) craft book collection and rediscovered in my craft book collection – 50 Little Paper-Pieced Blocks by Carol Doak. Playing with fabric scraps seems like a great time to work on my paper-piecing skills.
My friend is bringing over her miniature schnauzer so Mike will have a furry friend visiting.
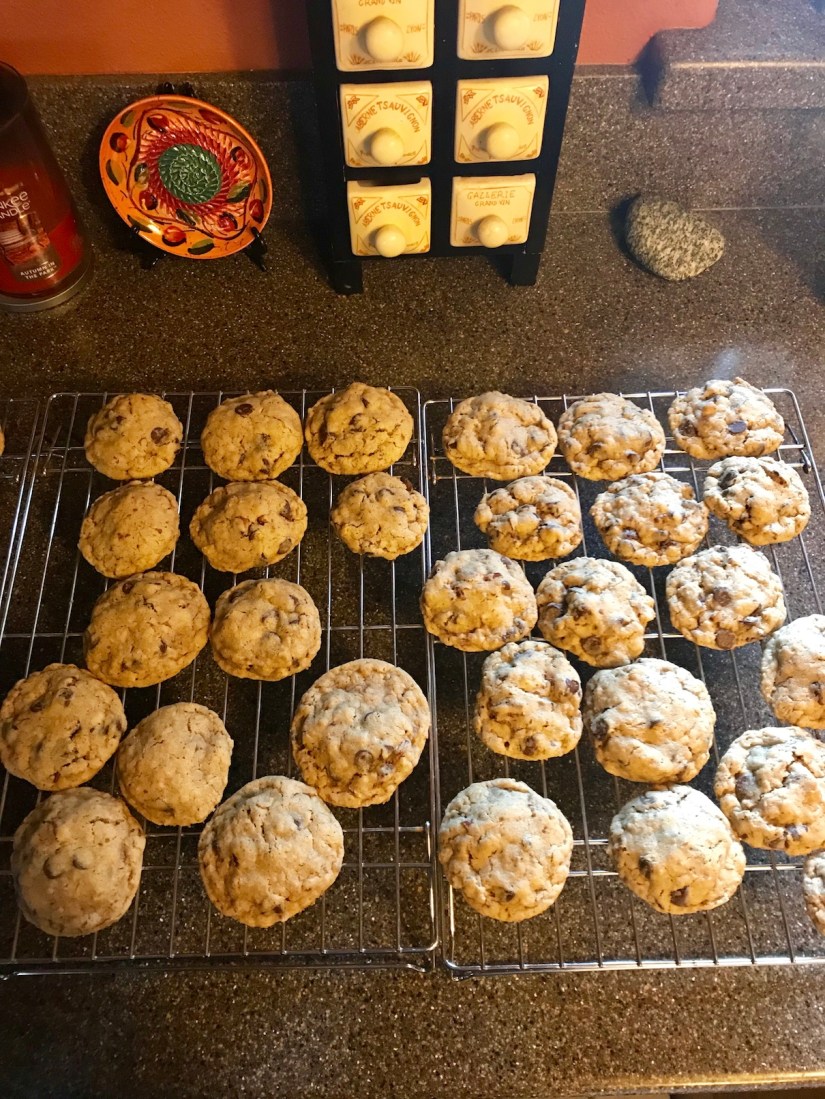
Terry the Quilting Husband (TTQH) made us chocolate chip cookies (to keep our sugar fueled energy level high for crafting!!!):
Of course I will share the outcomes of our Scrap Party!
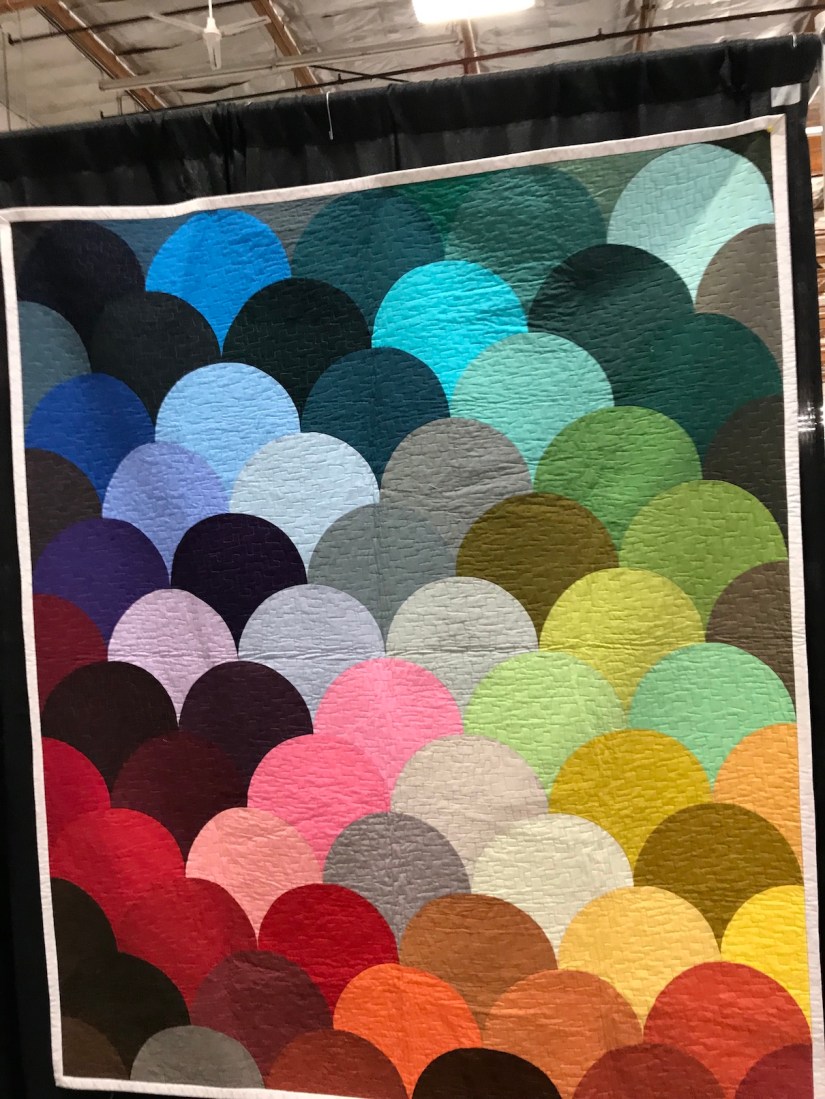
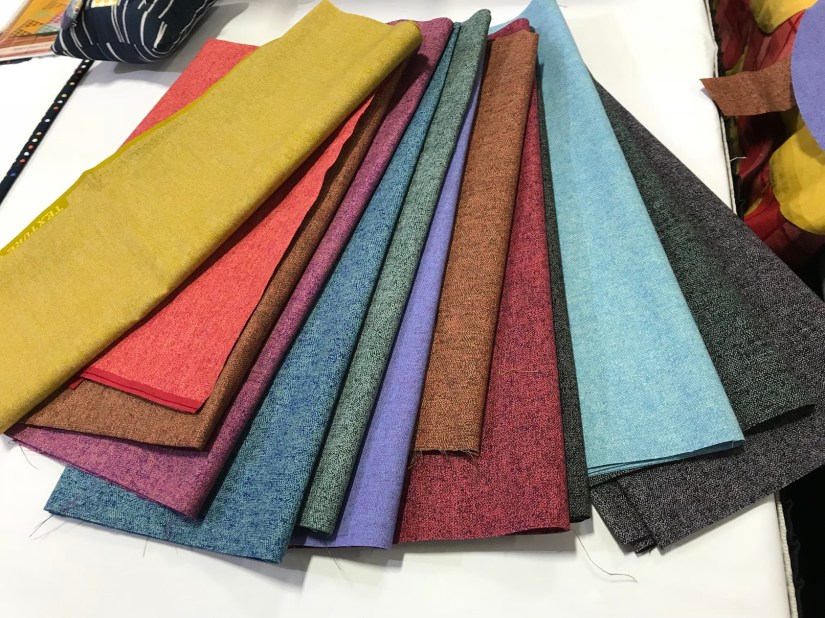
She demonstrated her brilliant method for piecing curves using pieces cut from The Clammy, her giant clamshell maker template. Below are photos from the class (including some yummy fabric she used for her demo):
Later that day I was fortunate enough to share a shuttle bus ride (EE Schencks provided a free shuttle to and from the hotel to the Trends show) with Latifah and hear more about her transition from scientist to quilting guru!
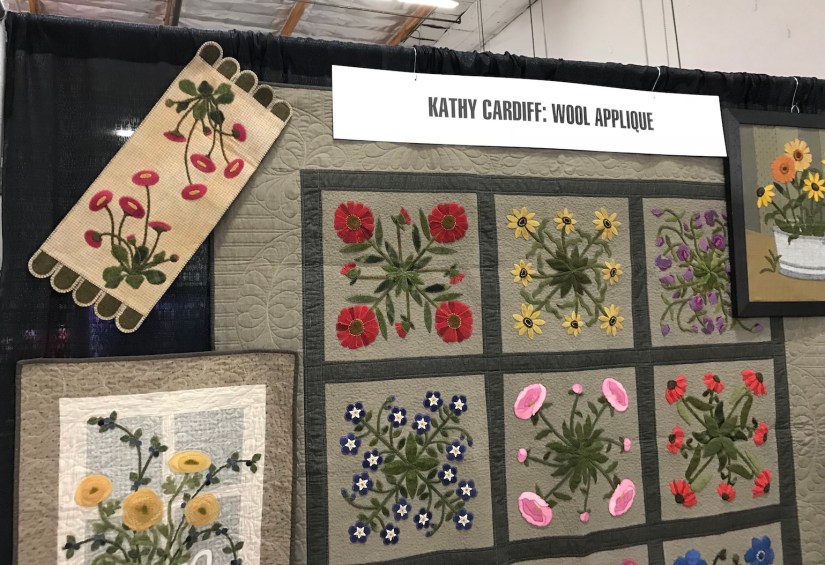
Kathy Cardiff: Wool Appliqué
Kathy Cardiff is a Washington state based designer, author and teacher who specializes in wool appliqué. Check out her website – The Cottageat Cardiff Farms.
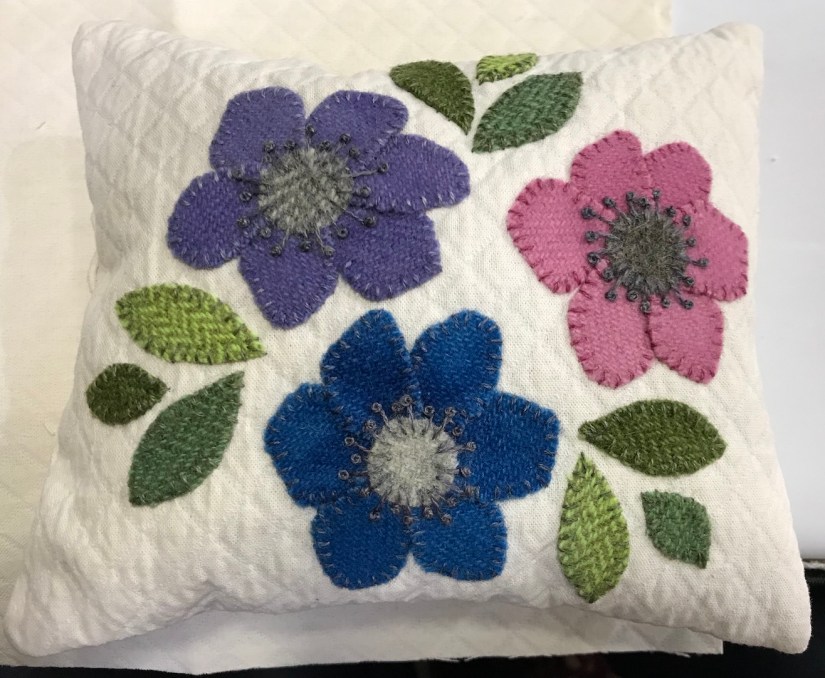
She taught a hands on wool appliqué class in which she prepped our little wool appliqué pieces with fusible backed paper, we just needed to cut the little pieces out to make this (her sample):
She also prepared templates for us to use to press the pieces together onto freezer paper before peeling them off to place the fabric for the little pillow:
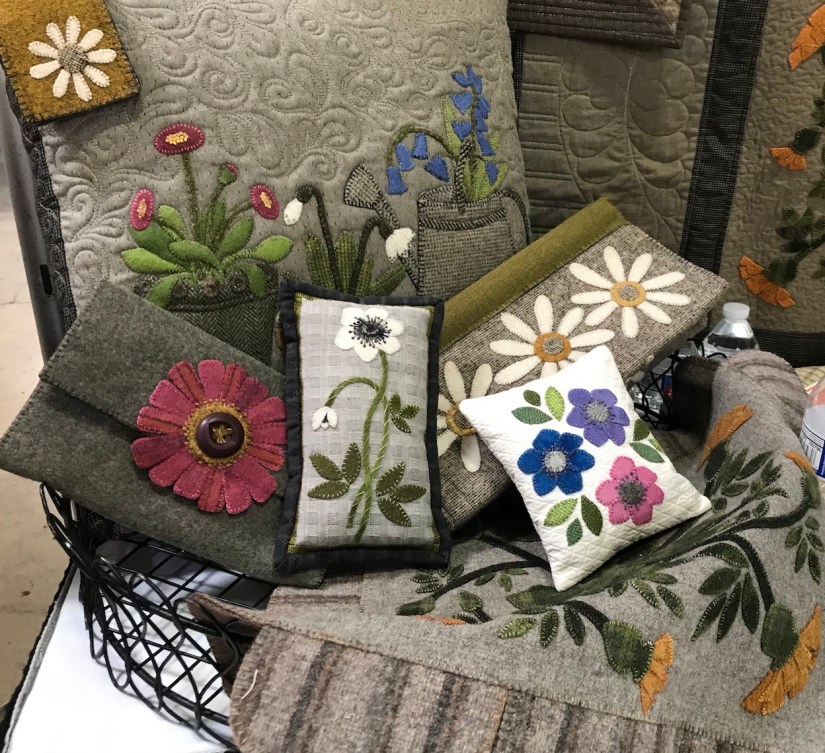
Her work is amazing, here are so additional photos from the class and her booth:
She definitely took the fear out of wool appliqué for me like Latifah Saafir took the fear out of curved piecing for me!
Here is my wool appliqué piece currently in progress from the class:
The funny thing is I’ve had a The Cottage at Cardiff Farms sunflower wool appliqué pillow pattern and supplies for many years but I was too intimidated to get started on it. It no longer seems scary – especially now that I have learned a quick way to put the appliqué pieces together and fuse them!
I told Kathy about the pattern I’ve had for years (purchased at the Stitchin’ Post in Sisters, OR); she knew which one I referenced and gave me tips after class on how to complete it!
There’s No Place Like Home
We had fun in Portland but I was also happy to return home again. My heart always soars when we drive from the Mount Hood pass area into Central Oregon. It is so interesting how the climate and the landscapes change from Portland to Mount Hood to Central Oregon.
The moment I saw my beloved “high desert” landscape, blue skies and Cascade Mountains everywhere – I knew I was home!
View from inside the car window before Madras Oregon (still too cold to roll the window down!)
Postscript
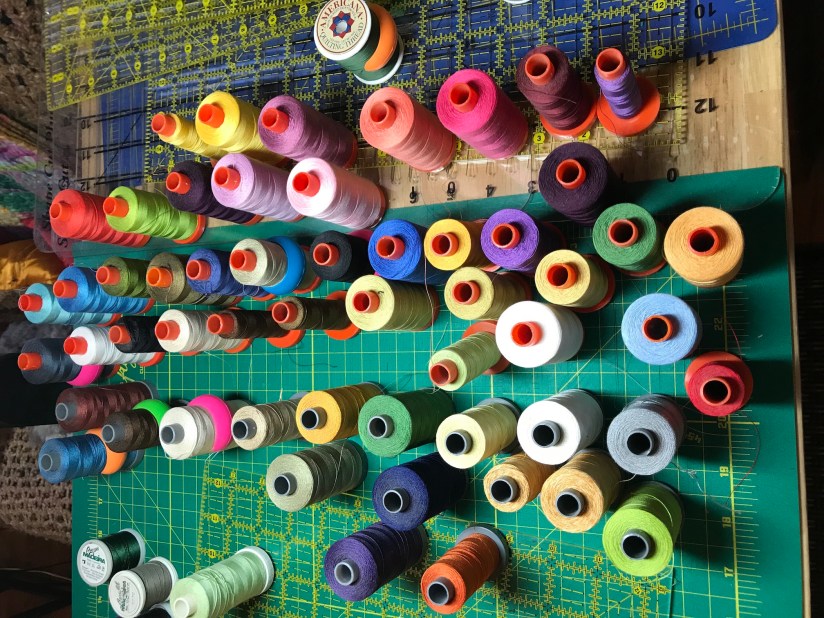
Recently I read an article online (oops I do not remember the website) that strongly recommended you do not store your thread out in the open because of dust, etc. In a previous post,Aurifilia, I discussed my beloved collection of AURIfil thread (actually obsession).
Well I decided to take down my mounted thread racks and store my thread collection instead in bins to protect the thread.
So I went from this:
To this:
Note the AURIfil is neatly stored in the top 4 containers and the “non-AURIfil” thread is casually strew about in the bottom container – ha!
I also decided to put up more quilted art/gifts from my Quilting Sisters in my Studio.
Here is a quilt made for me a couple years ago by my Quilting Sister Kathy when our group did a quilt exchange:
I’ve been waiting to share this with you for quite a while. First, I needed to wait until the show’s curator gave me permission to share, and then I needed to be ready to share.
I am ready to share!
This post is an overdue follow up to my post Creative Inspiration: Stories My Father Told Me, originally posted in April 2016. You are welcome to read the original post but here is a synopsis of some of this post and a little bit of additional information:
While browsing the magazine section at our local Barnes & Noble bookstore in March 2016, I came across this magazine that I’ve never seen before: American Craft Magazine:
Image credit: craftcouncil.org
In the April 2016 issue of American Craftthey had an article about an exhibit, And Still We Rise by the Women of Color Quilting Network (WCQN). I never heard of WCQN and immediately knew I wanted to join!
I reached out to Dr.Carolyn Mazloomi, founder of WCQN, shared my blog links with images of my work and asked if I could join and she said yes.
I then spent a lot of time looking through the WCQN website and was inspired to create a series based on the incredible stories my father, Raoul Davis, Sr., told me while growing up – Stories My Father Told Me.
I shared this with Dr. Mazloomi and she invited me to participate in the next WCQN show. (I was terrified and wanted to say “No” but I made myself say “Yes”)
The Lesson & The Equation
The WCQN show that I was incredibly lucky enough to be invited to participate, was based on the United Nations (U.N.) Universal Declaration ofHuman Rights. Participants had to select one of the thirty (30) Articles in this declaration and make a quilt inspired by the Article.
I selected Article 1 as it aligned with the lessons and values my father taught us as children:
“All human beings are born free and equal in dignity and rights. They are endowed with reason and conscience and should act towards one another in a spirit of brotherhood.”
I’ve shared partial images from the quilt I created, which is the first quilt in my series Stories My Father Told Me. Here is a full image of the quilt, courtesy of Dr. Carolyn Mazloomi, and below the image is my Artist Statement.
Image courtesy of Dr. Carolyn Mazloomi
ARTIST STATEMENT
The Lesson & The Equation (2016) 50 x 50 inches
Applique, cotton, batiks, quilted
“Article I: All human beings are born free and equal in dignity and rights. They are endowed with reason and conscience and should act towards one another in a spirit of brotherhood.” – U.N. Universal Declaration of Human Rights
Article I of the Universal Declaration of Human Rights resonates the values that my father instilled in my siblings and me, as young children. My father grew up in the segregated South in the 1940s and embraced at an early age that change comes from respectful dialogue, not violence.
He taught us that regardless of what adversity we faced in life, we must face it with grace; and treat others with respect, dignity, and brotherhood. The foundation for a life lived embracing the values illustrated in Article I, begins at home, modeled and mentored by the adults in a child’s life. (THE LESSON)
In this quilt, a father (modeled after my own father in the 1970s) is teaching his children, on the main blackboard, THE EQUATION to achieving a world in which people are Free and Equal: Reason + Conscience = Spirit of Brotherhood
The two individual blackboards, “Dignity” and “Respect”, are the building blocks of the Free & Equal equation. I am from a family of educators, beginning with my great-grandfather. The blackboards in the quilt honor that legacy.
My father also taught us another key lesson, which is best expressed in the words of Mahatma Gandhi: “I will not let anyone walk through my mind with their dirty feet”.
WCQN Show
This quilt will debut in the WCQN show, Visioning Human Rights in the New Millennium: Quilting the World’s Conscience, on August 17, 2018 at the FiltonCenterfor Creative Arts in Hamilton, OH.
Image credit: ohio.org
Yes I will be attending the opening in August and there are no words I could type that would convey my excitement to be participating in this important exhibit. I am feeling very blessed to have been given this opportunity.
There will also be a book that accompanies the exhibit and Dr. Mazloomi’s books are incredible. Search “Carolyn Mazloomi” on Amazon to see a sample of books related to past exhibits. I own several of these books and to call them “inspirational” would be an understatement.
Below is an example of one of the books from a WCQN exhibit (which is currently touring):
Image credit: schifferbooks.com
And Still We Rise: Race, Culture and Visual Conversationsis on exhibit at the Freedom Center until September 1, 2018 – here is thelink if you would like to check out more information on this exhibit.
I had the opportunity to finally meet Dr. Carolyn Mazloomi in person this past September when I attended Quilters Take Manhattan (see post The “Dance Partner” – Michael Cummings at QTM 2017). I tried not to behave like too much of a “fan girl” but I was completely in awe of this amazing and accomplished woman.
What is Next?
I mentioned in my post Art& Fear, etc., I was struggling with two looming art quilt deadlines.
One of those quilts is for my local SAQA group annual show which I have started (will share in upcoming post); and the other one is a new art quilt for the next WCQN show I have been invited to participate in. I cannot share the details at the time, I need to wait until the curator is ready to officially announce the show – but it is another really exciting opportunity!
With the first quilt done in the Stories My Father Told Me series,I have mapped out the next 6 – 8 quilts in the series based on stories from my father’s life and lessons he taught me.
I just need to start making them (and if I win the lottery I plan to work full-time on completing this series)…
Postscript
I think my whole experience demonstrates that you have to take risks in life and when an opportunity comes to your door – take it!
“Go out on a limb. That’s where the fruit is.” — Jimmy Carter
Imagine if I never contacted Dr. Mazloomi? (Of course imagine if I never randomly opened that magazine at my local Barnes & Noble…thank you Universe!)
This post is actually for me, but I will explain more about that later.
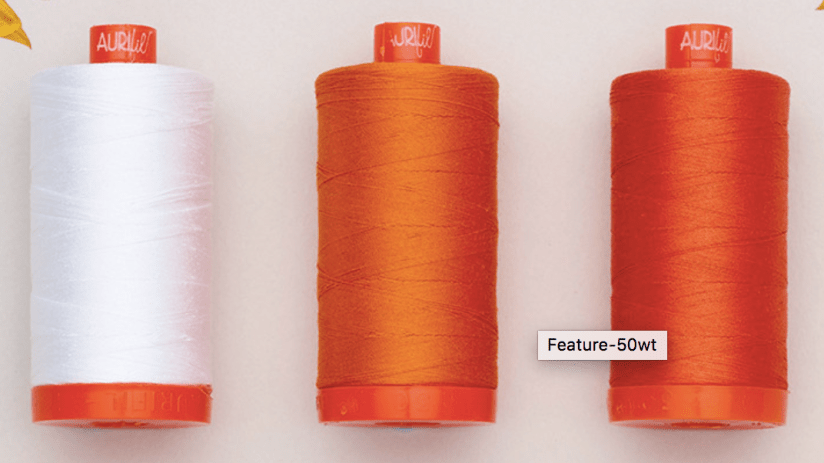
First I want to talk about Aurifilia. Yes, I completely made this term up, however, “Aurifilia” is an obsession, perhaps unhealthy perhaps not, with AURIfilItalian Threads.
Quilter True Confessions
My “Aurifilia” began 5 – 6 years ago when another quilter introduced me to these addicting Italian threads.
Photo credit: aurifil.com
It started with purchasing multipurpose neutral colored threads: cream, white, light gray etc. It progressed into buying less multipurpose colored threads: blues, greens, purples, browns.
Finally, it evolved into buying quilt designer collections of AURIfil thread in unusual bright or strong colors, with no specific plan or purpose for these threads.
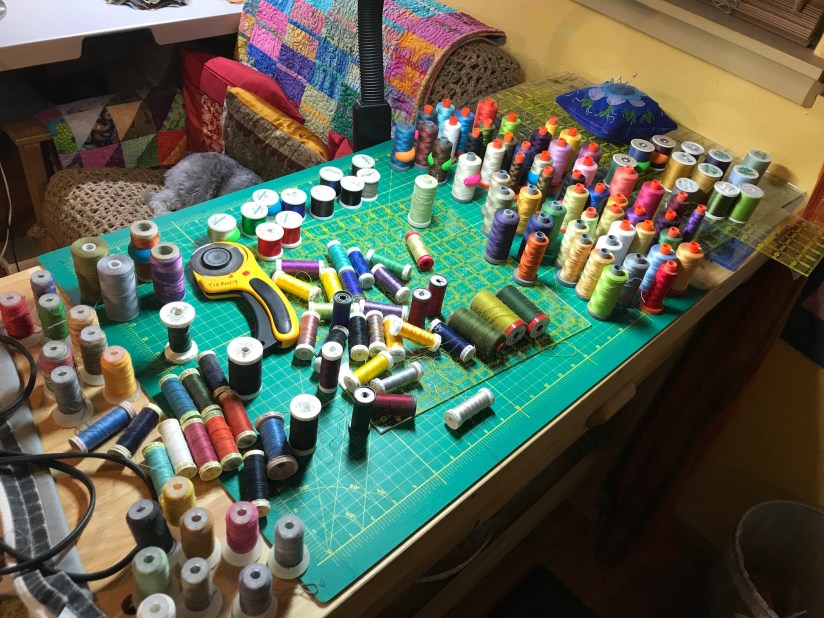
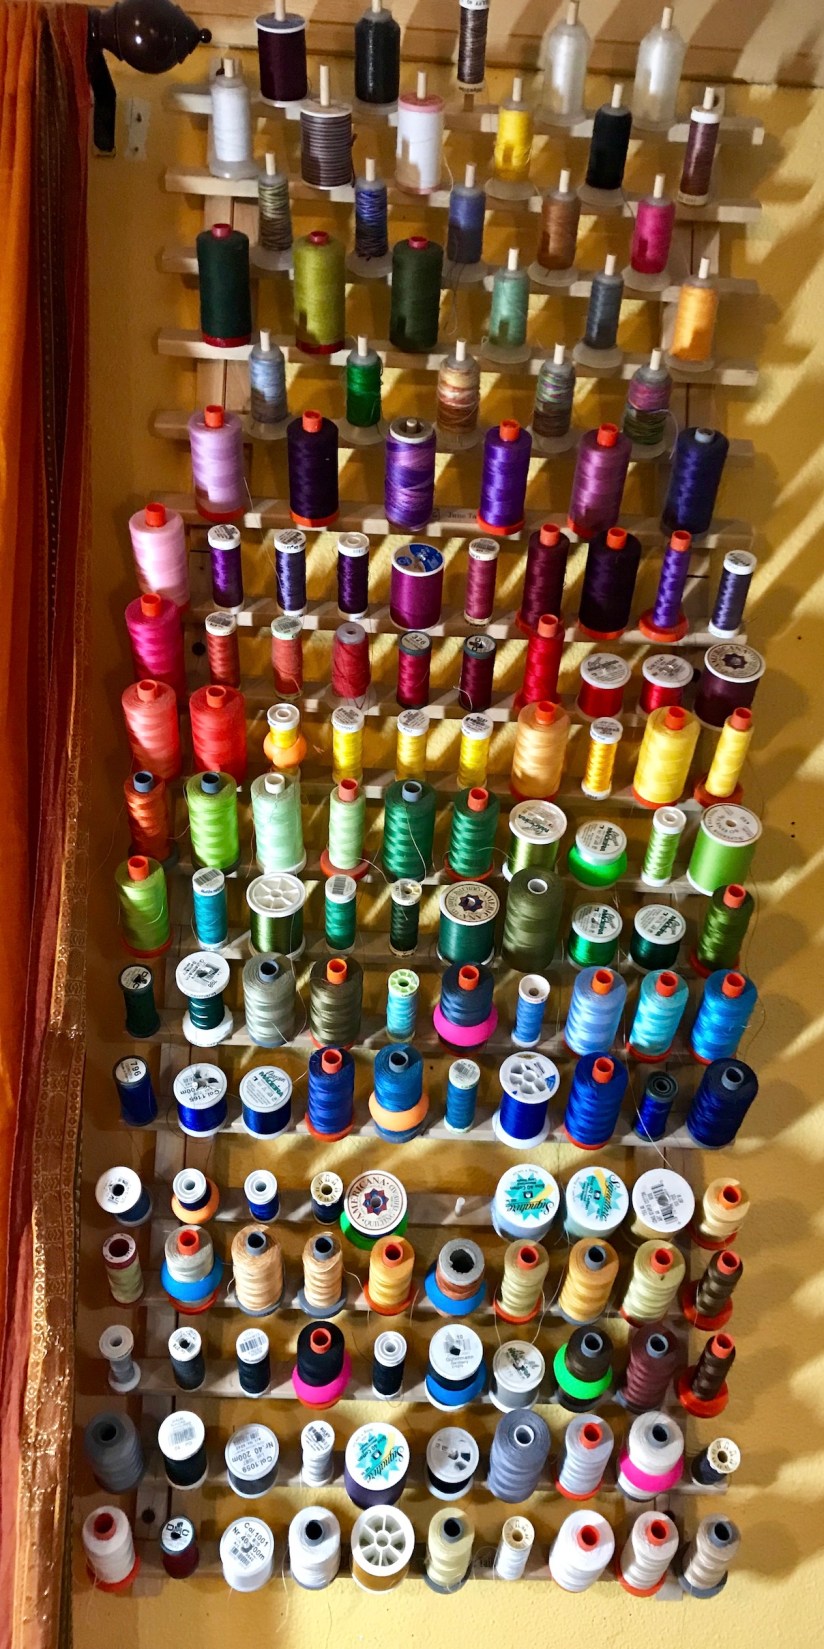
Realizing my “Aurifilia” has gotten a bit out of control, I decided to reorganize my threads by brand, instead of color, to see just how much AURIfil (and in what colors) I had on hand.
I went from this organization (by color):
To this organization (by brand):
After organizing my Aurifil threads, I discovered I currently have no gray! Light gray is a great neutral color, in my opinion) for stitching; and medium and dark gray would look lovely as topstitching.
Why this post is for me
It is inevitable I am going to bring more AURIfil thread into my life (at least some gray!). The problem in the past is I could not remember what colors I had on hand when I was at shop and fell into an acute bout of Aurifilia.
Now I can whip out my smartphone, pull up this post and see what Aurifil I already have in my collection.
I might even update this post ever so often with the latest photo of my Aurifil collection!
Postscript
I decided to do the same thing with my fabric yardage collection – keep on my blog photos of my current fabric collection. I added these photos to my tierneycreates StudioTourpage at the bottom if you would like to take a peek.
Yes our blogs can be our online diaries, why can’t they be our online catalogues too?
I could not decide what to title this post. I started with “An Unexpected Surprise” but that sounded redundant as “surprises” are “unexpected”. Next title idea as “A Surprise Treat”. Finally I went with “An Unexpected Treat”. (Blog post naming, one of the great struggles in my world…)
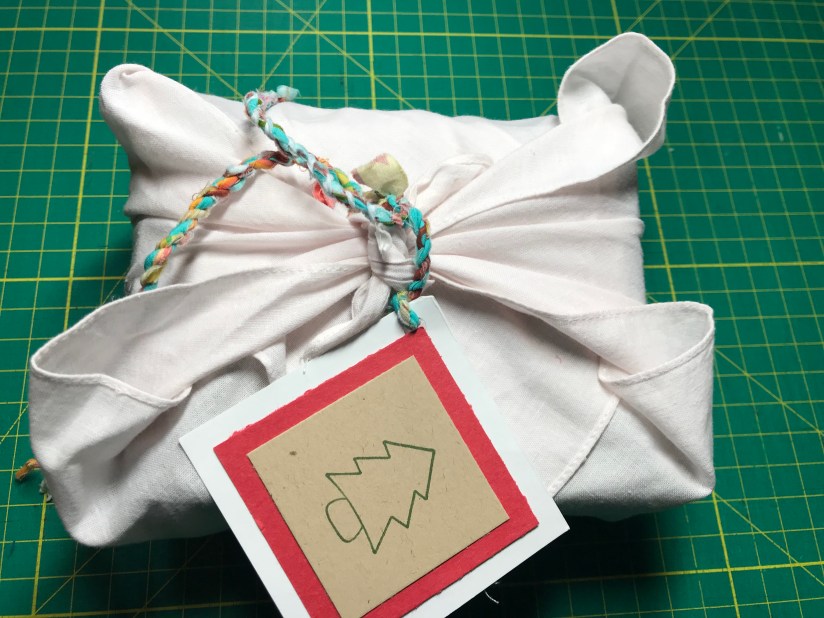
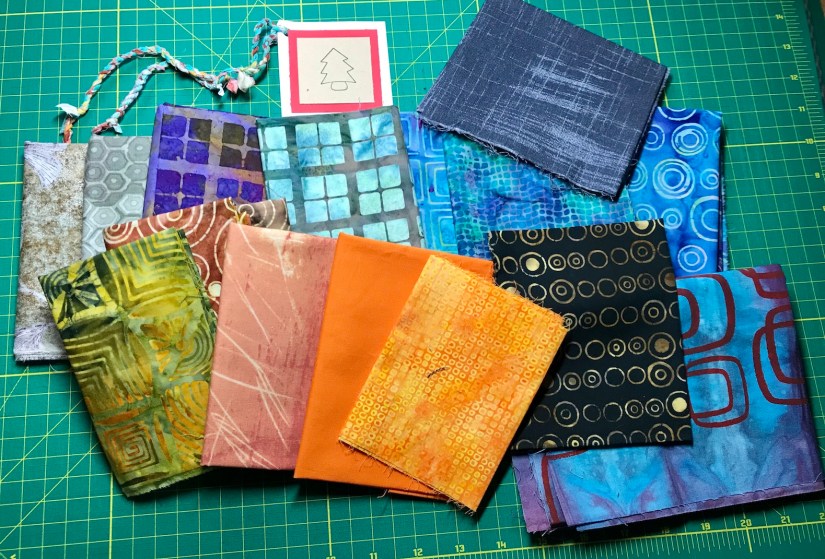
This afternoon I attended our Central Oregon SAQA (Art quilters) group. A very awesome SAQA member, Marion, gave me a belated holiday gift – a stash of fabrics!
She wrapped the stash very sweetly in the Japanese fabric wrapping style with a handmade braided fabric ribbon. I opened it in front of her but I have attempted (poorly) to rewrap it to give you a feel of how it looked when she presented to me:
A very subpar re-creation of a once beautifully fabric wrapped gift
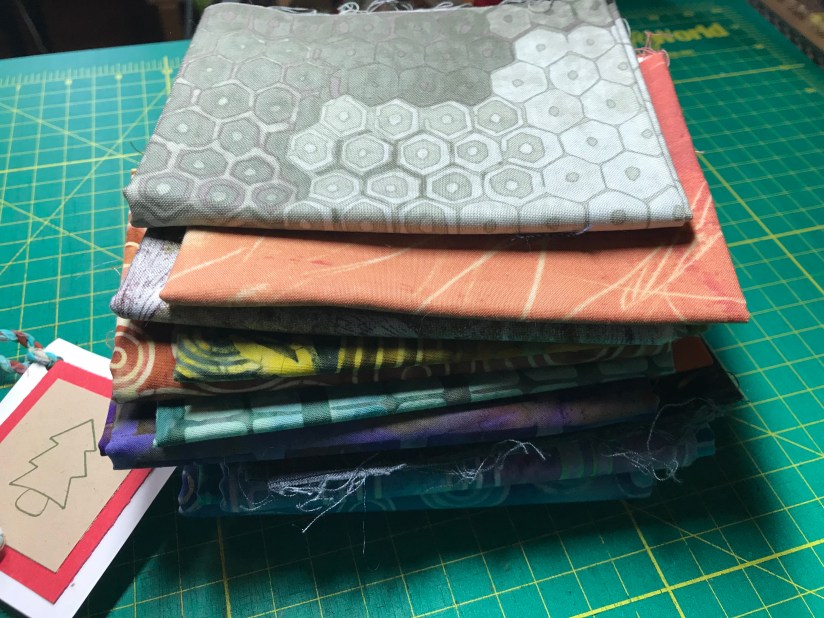
Inside was a stack of fabric scraps, fat quarters and yardage:
Yummy stack!
Here is what the gift looks like laid out:
Yummy pile!
Did Marion randomly give me fabric from her stash? No. The story behind this is a while back one of the SAQA members who lives in Portland, Elizabeth, who is a prolific art quilter, was thinning her immense fabric stash. She posted to our Oregon SAQA facebook group that any SAQA member in the Portland area could drop and take away a haul of beautiful fabrics on a specific date.
Portland is a 4 hour drive for me and as much as I love free beautiful fabric selected by talented art quilters, an 8+ hour road trip was a bit much for free fabric.
What I did not realize is that Marion, who has a good feel for my taste in fabric, was picking me up a surprise stash!
Believe it or not, he actually returned to my sewing area today (with a gentle suggestion) and worked on a couple more feet of the coil for the fabric baskets/bowls.
He’s back!This time Mike the Mini Schnauzer settles into the chair in my studio to monitor TTQHIs Mike comfortably napping or fretting over when this whole TTQH sewing abuse will be over?
Now that we were getting some serious length on completed coil, we needed to do something to keep it organized and accessible (instead of become a twisted mess) for when it was time to make the fabric bowls. So I started wrapping it around an old piece of cardboard (I save cardboard from calendars, etc. to use as a surface when making cards, etc.):
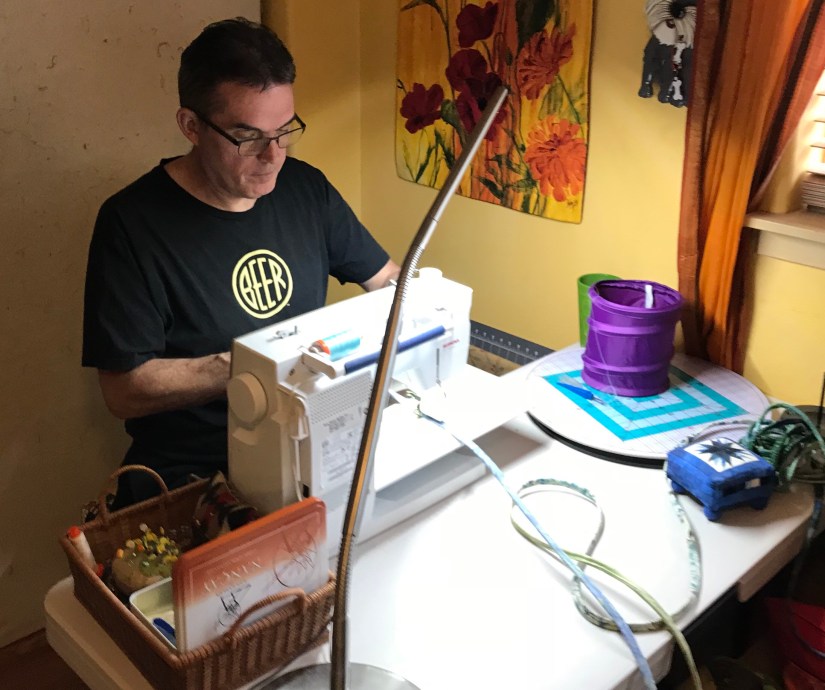
This post is an addendum to yesterday’s post Prepping to Make Fabric Bowlsand contains a rare photo of Terry the Quilting Husband (TTQH) who usually avoids being photographed for my tierneycreates posts!
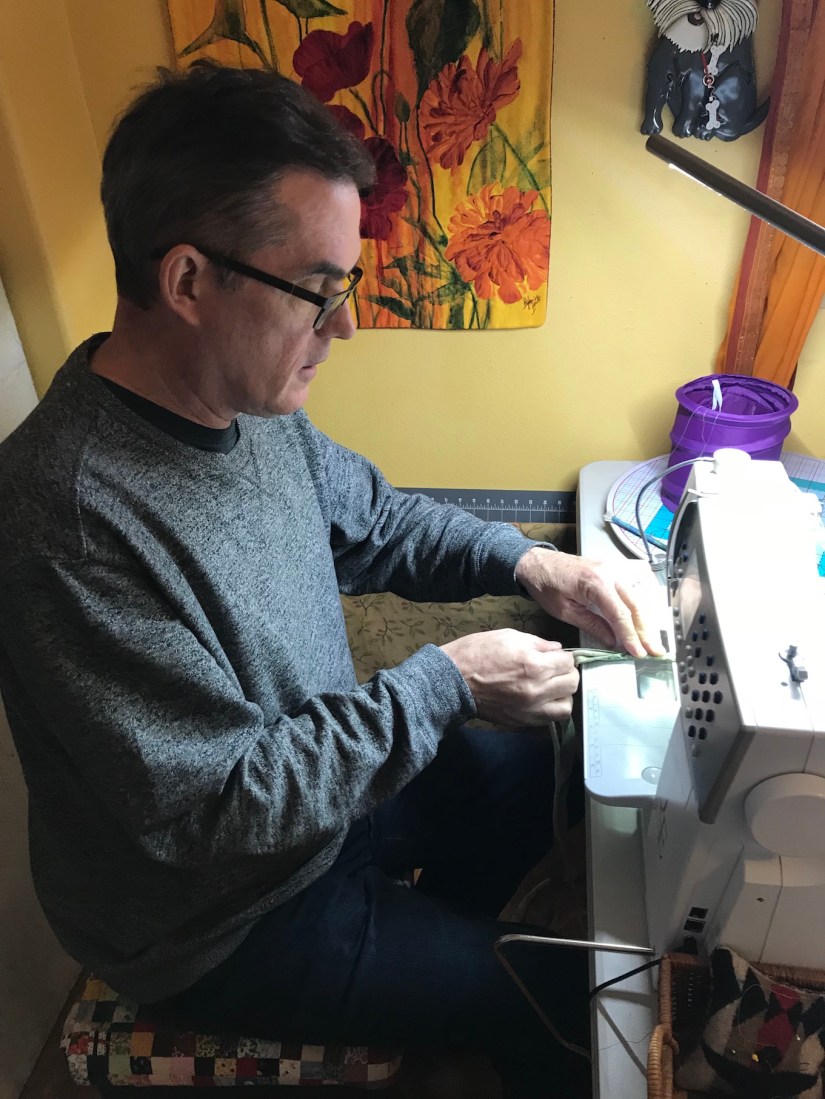
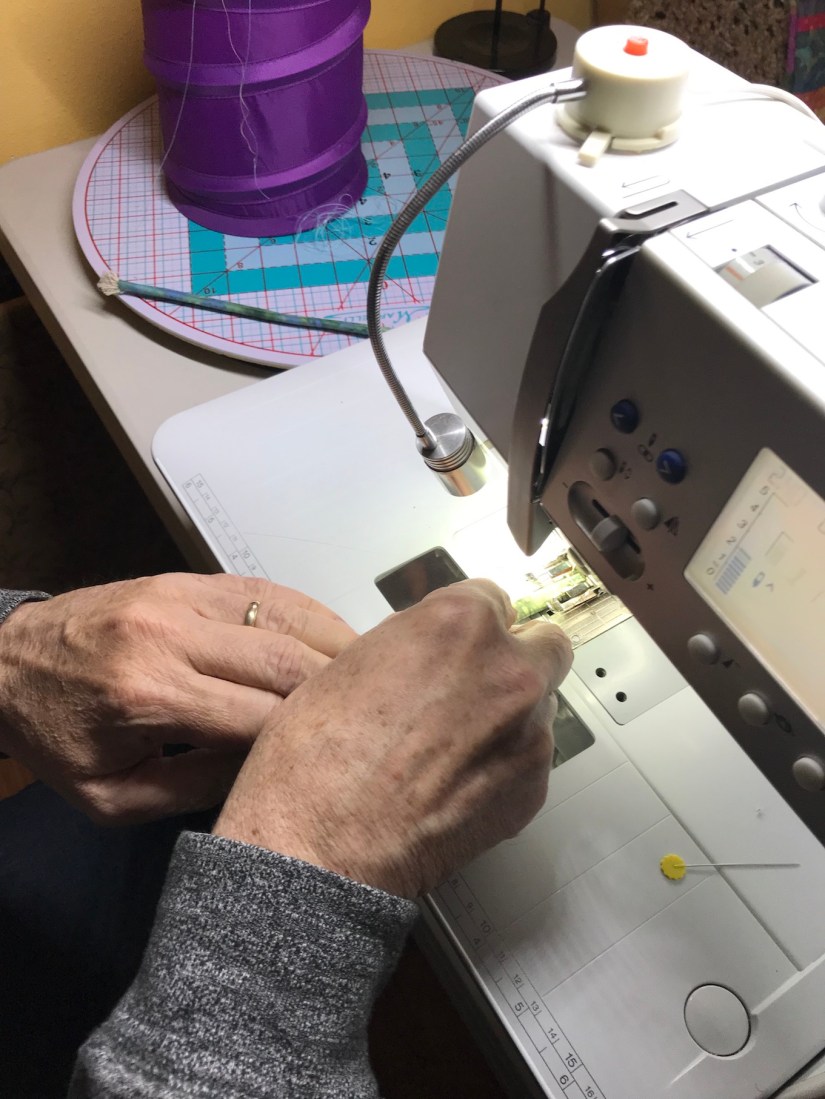
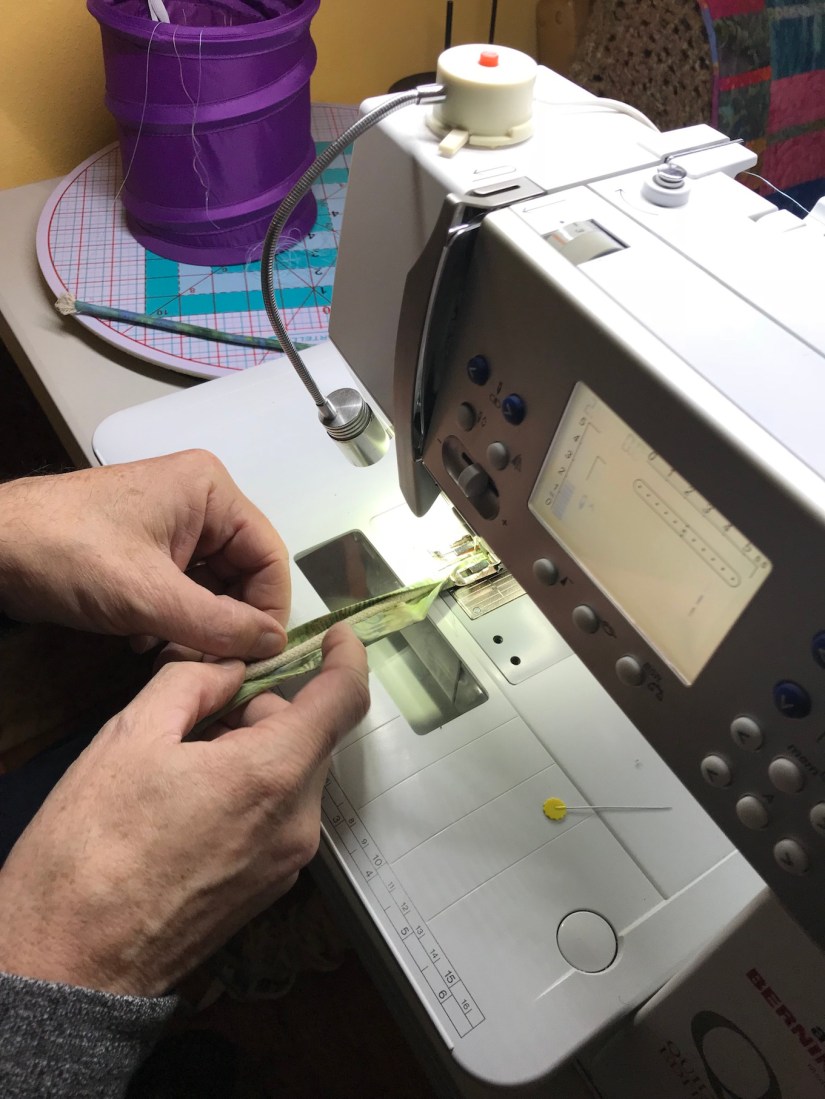
Alright, this is going to appear like major husband abuse, but somehow I convinced TTQH to work on tedious sewing the coil of batik strips and clothesline required as prep to eventually make more fabric bowls.
I set it all up on my machine, provided training, and he got to work!
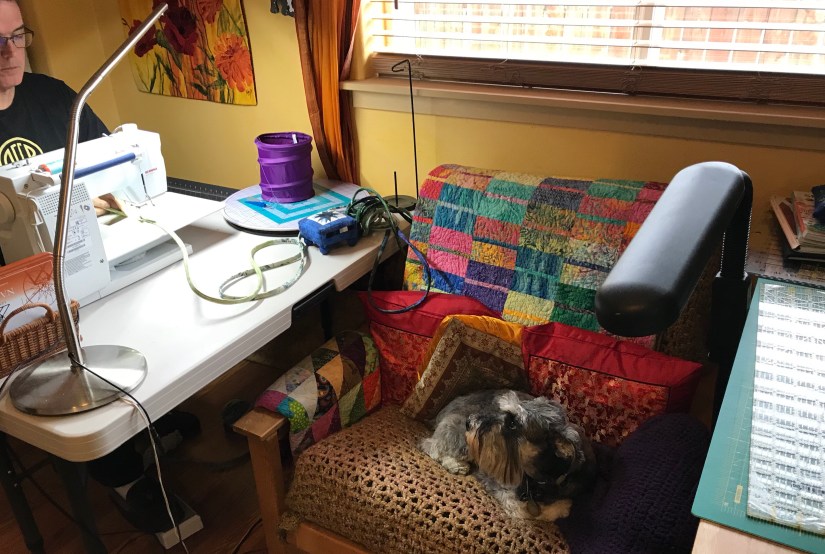
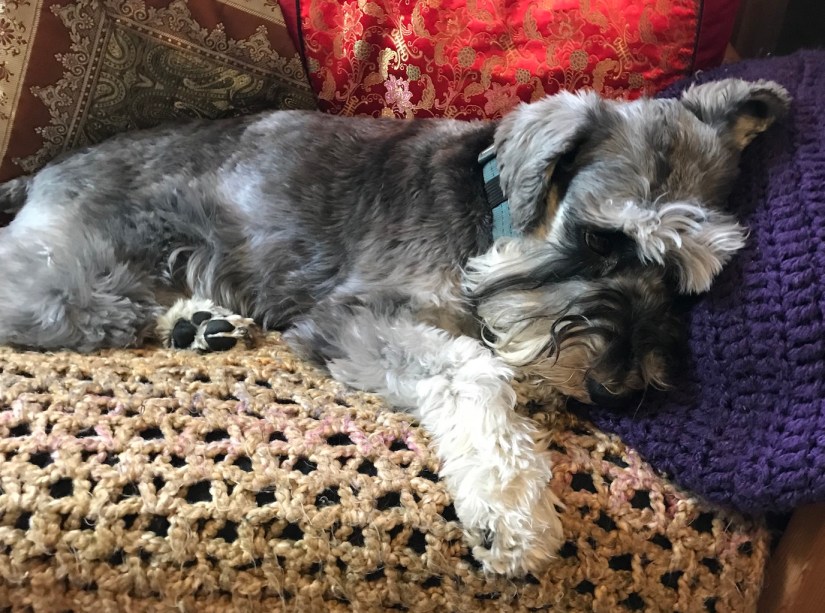
After a while, Mike the miniature schnauzer came in the room to check on him and witness the abuse:
Mike: “What is she making you do?!?!?”
Mike gave me the “furry eye ball” for putting TTQH through such tedium!
Mike: “I want to extract him from this room and bring him back to snuggle with me on the sofa”
TTQH finished about 12 – 15 feet of coil and then took a break for an underdetermined amount of time (though he promises to return to it in the future):
I did take TTQH out to dinner to his favorite brewery this evening, so this makes up for the tedious task as well as upcoming tedium!
Postscript
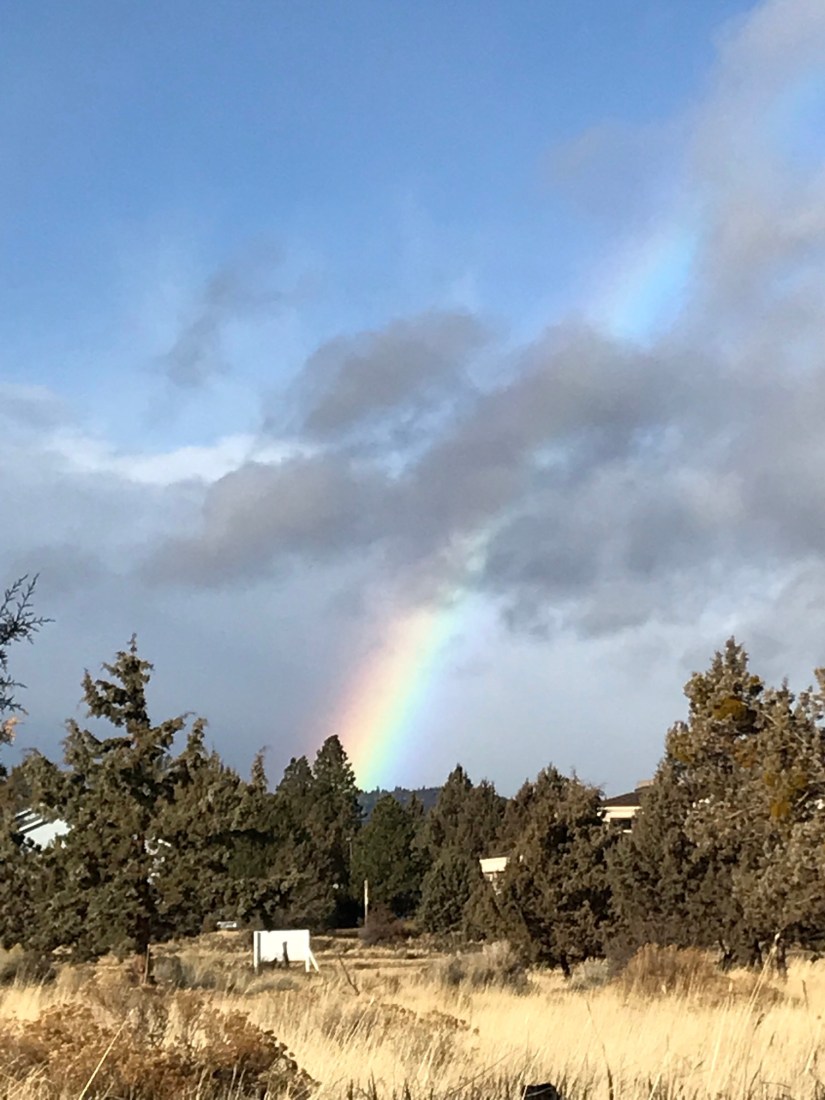
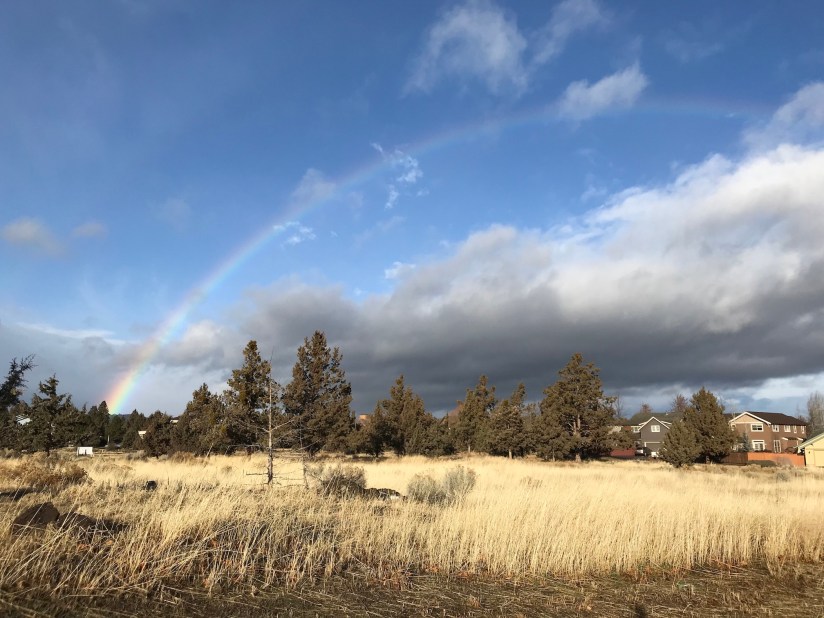
I love real rainbows, they make me smile.
Our winter has been surprisingly mild in Central Oregon so far and last week we had rain instead of snow. We seem to always get rainbows after a rainstorm here and I took a couple photos while on a neighborhood walk.
This is a follow up to my 12/30/17 post “ThrowingPottery” on the Sewing Machine in which I shared images from making this fabric bowl from batik strips sewn onto clothesline:
In the post I mentioned that I do not make a lot of these baskets because the preparation to make these baskets is so time consuming.
Recently I was cleaning out old projects and found the start of a prep for another set of fabric bowls. I thought: “what the heck, let’s finish up the prep and maybe make some more bowls”. This time I enlisted the help of Terry the Quilting Husband (TTQH) to help me with the prep.
Below I will share a summarized overview of the cumbersome prep and where I currently am on my journey to make more fabric baskets.
It Starts with Strips
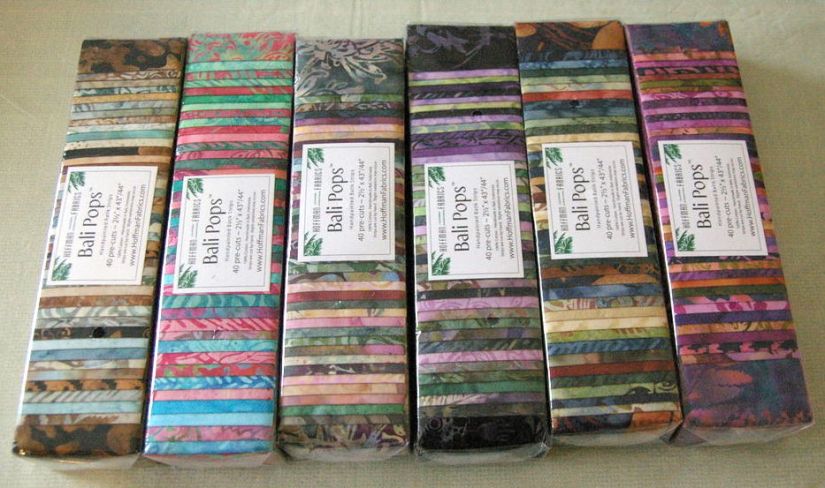
The pattern I originally used, Bali Boxes pattern by Aunties Two, appears to have been designed/inspired by the famous (and addicting) Hoffman Bali Pops. I know not everyone reading this blog is a quilter, so let me share an image of the packages of 42 pre-cut 2.5″ color coordinated/themed batik fabric strips:
image from eBay, photographer unknown
Did any of you who are quilters, get addicted to collecting sets of Bali Pops when they came out in the 2000s? Hoffman still makes them but for me the novelty wore off (as did the novelty of buying “jelly rolls” which are another configuration of 42 2.5″ coordinating fabric strips).
I still have 3 – 4 Bali Pops leftover from my Bali Pop days; and all the fabric baskets and bowls I have made are from HoffmanBali Pop sets. One set actually makes a couple baskets – 2 or more depending on how deep you make each basket. I am thinking I could get 3 bowls out of a Bali Pop.
I do not know the name of the Bali Pop I am currently using (they all have cute names for their color combinations like “Green Tea” and “Citrus Grove”) but I think it had to something to do with the ocean as you can see the colors are blues and greens.
The Tedious Steps Begin
This post is not intended to discourage you from making a covered clothesline fabric bowl or basket, but I want to show that a bit of patience with tedious tasks is required to make these items via the Bali Boxes pattern method.
First you have to sew forty-two (42), 2.5″ strips which each measure 44″ long, end to end. Do the math – that is one mega long strip you are creating. Not accounting for all the 1/4″ seams you are creating sewing end to end, 42″ x 44″ = 1848 inches, or 154 feet (46.94 meters).
After that is done, you have to fold each strip in half and then fold into itself again, to create a pocket/tunnel to nestle the clothesline.
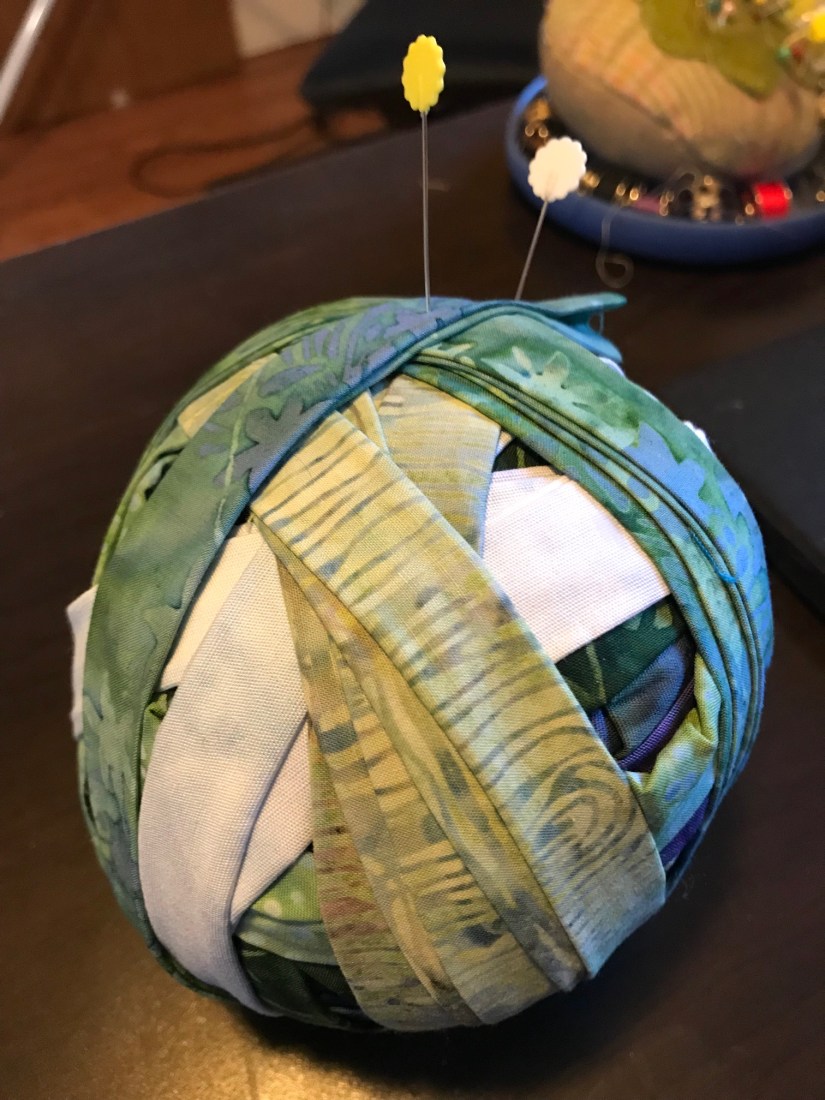
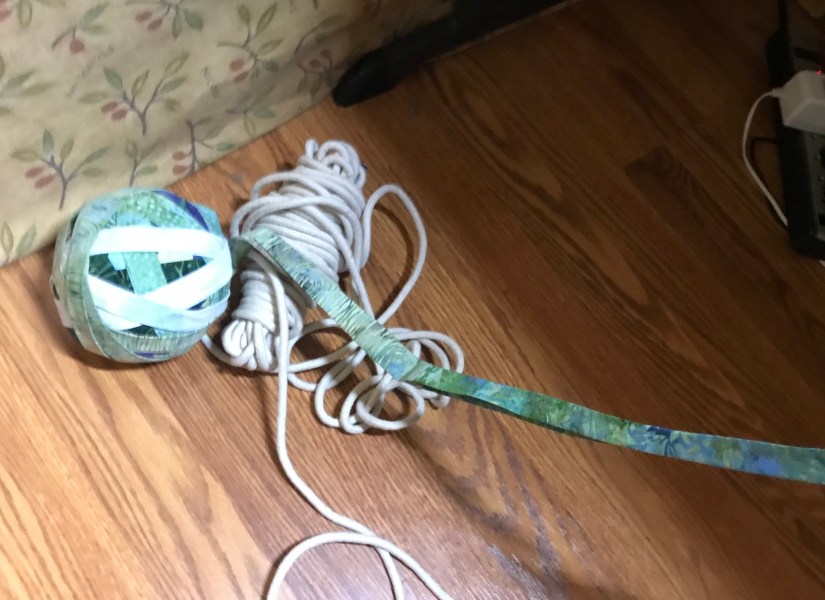
Now for the steps above, this time I enlisted (or would this be considered “abused”) TTQH. He amazingly created this ball of batik strips after much work:
It is a large ball and tightly wound/packed. I am amazed at his patience to do this for me, especially to double fold like 140+ feet of sewn strips (I used some quick and suspicious math to subtract 42 quarter inch seams).
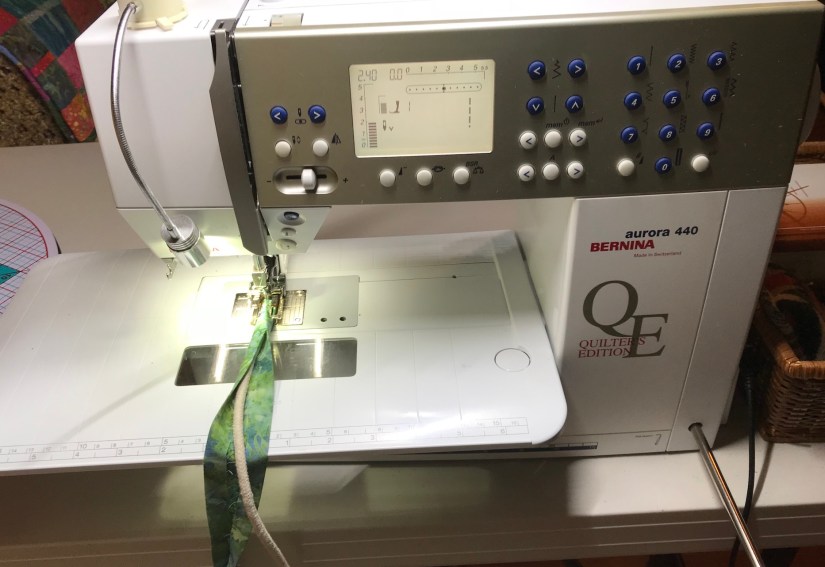
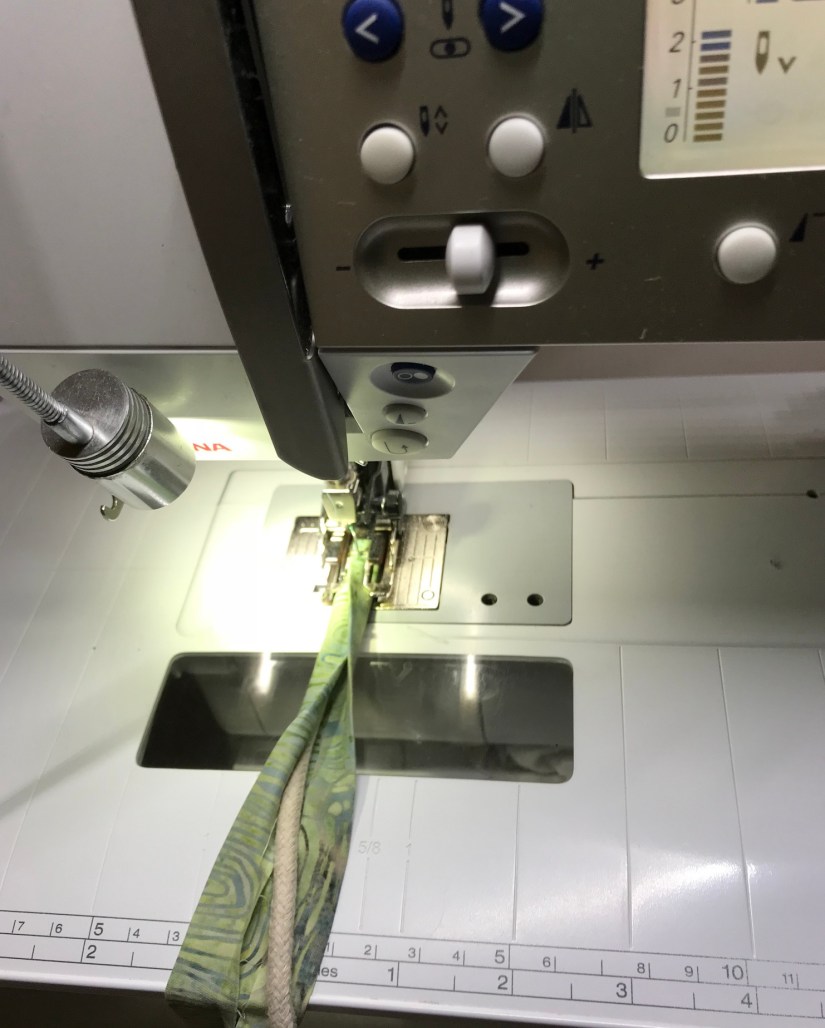
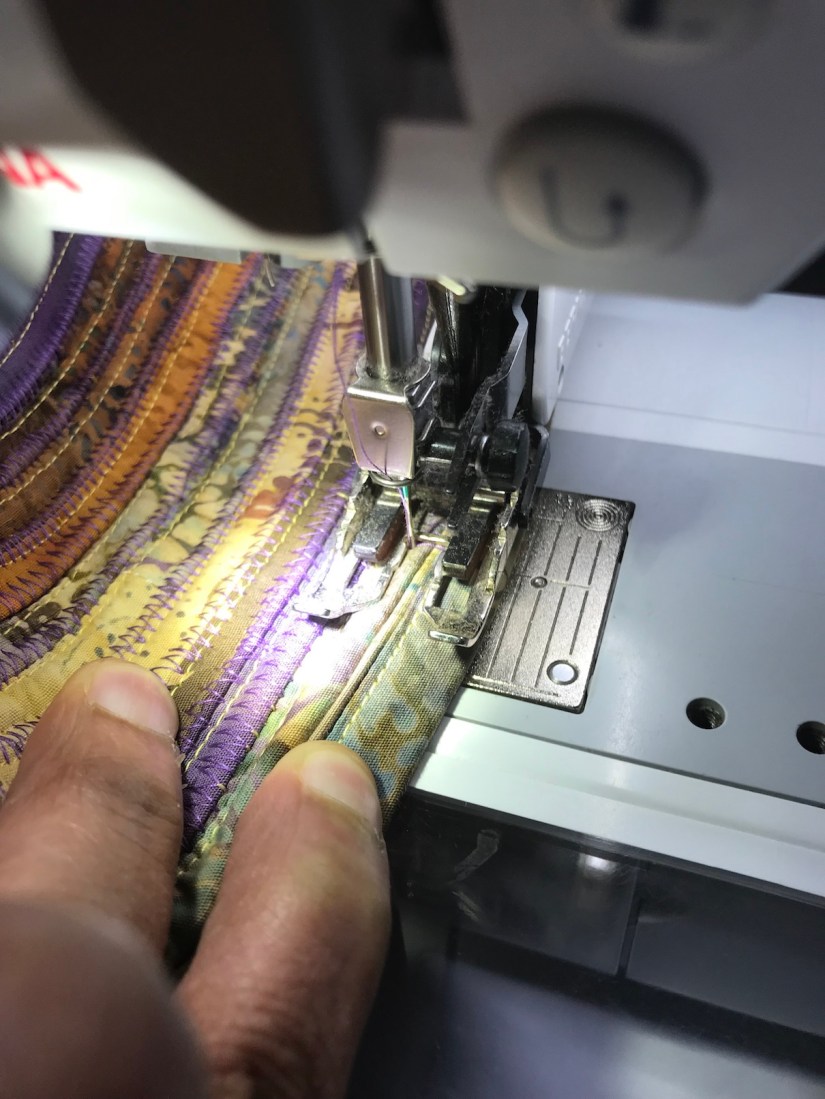
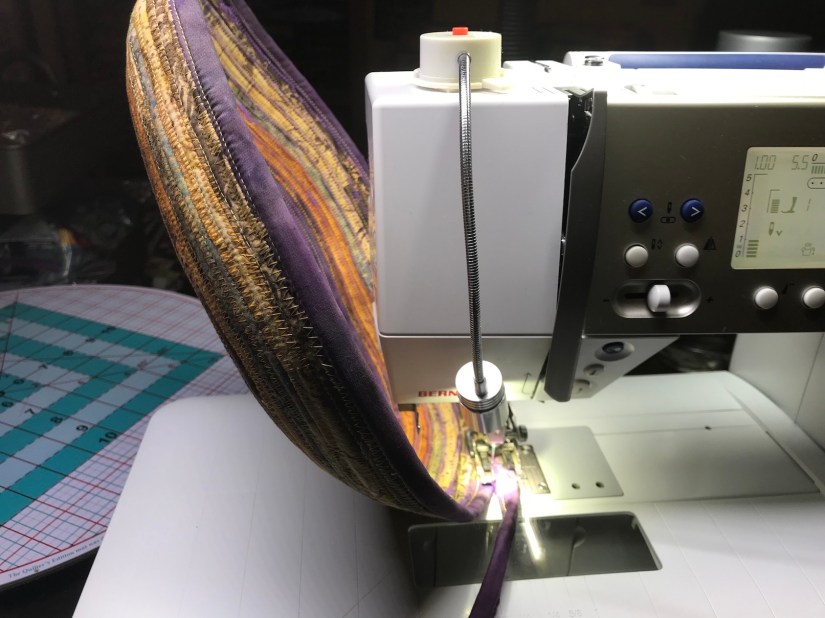
Creating the Coil
I am on the last part of the prep to make fabric bowls/baskets – and it is equally as tedious. I have to stitch cotton clothesline into the center of the 140+ feet of sewn strips to create the coil.
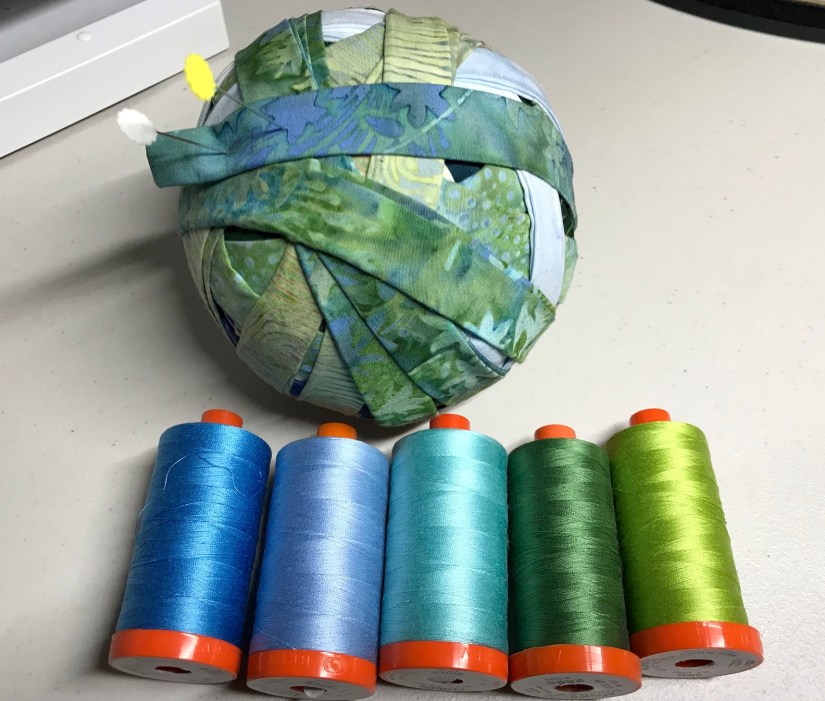
But first I had to decide what coordinating thread to use, so I put together some options:
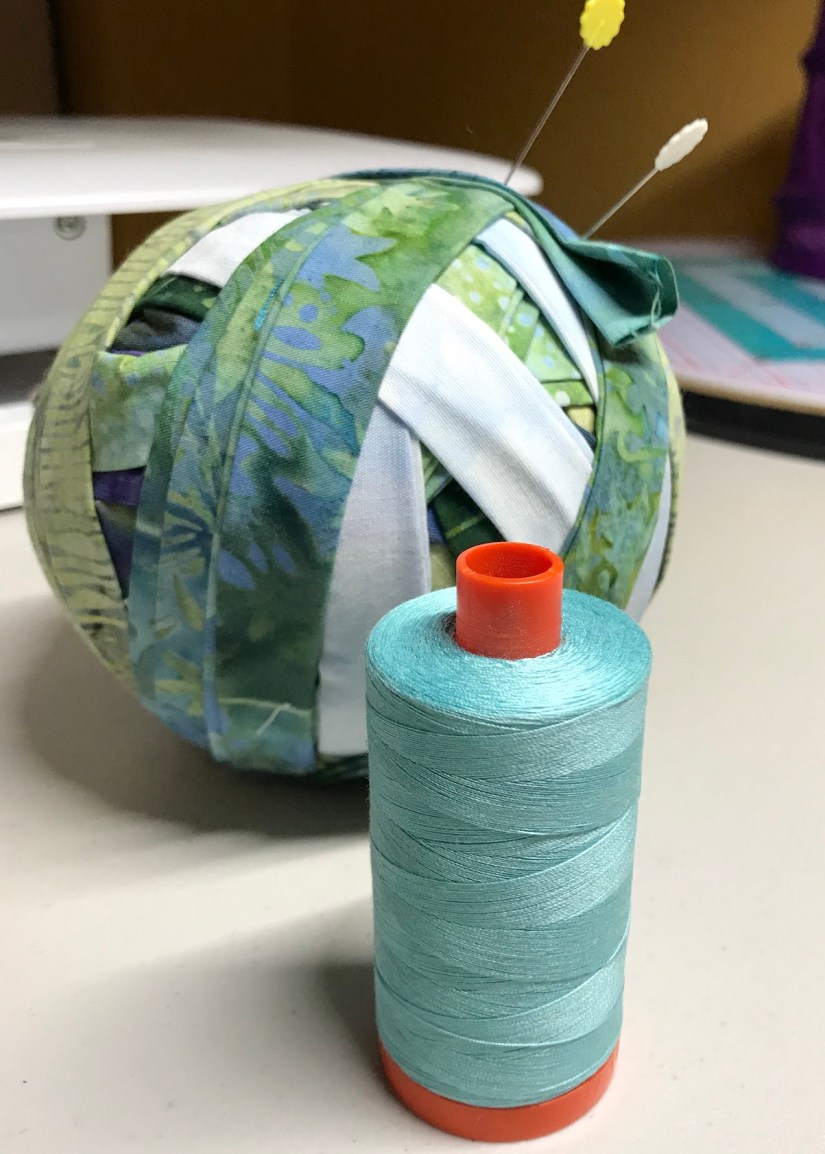
I let TTQH select the thread (he likes to make design choices like that) since he did all that work to create the “Ball-o-Batiks” for me. Here is the thread he selected from the options above:
After winding coordinating bobbins (making a basket or bowl on the sewing machine used a lot of bobbin thread) I was ready to start making the coil on my sewing machine:
I set the ball of clothesline and the “Ball-o-Batiks” on the floor side to side as I work them together through the sewing machine:
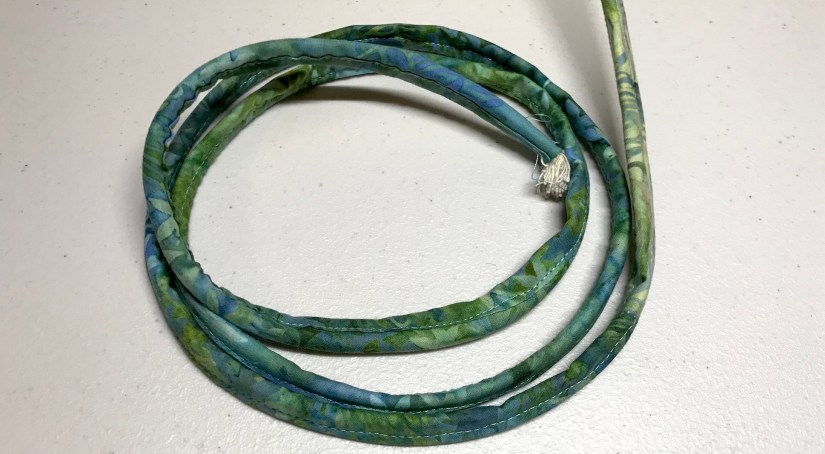
Here is what I have finished so far, not very much but I plan to work on it at a leisurely pace:
2 feet down, 138 feet more to go…
I will share a photo of my progress in a future post.
Postscript
In yesterday’s post, OhScrap!, I mentioned that I had moved the fabric scraps from their organization in color themed boxes to a large bag. Well after completing this process I also ended up re-arranging my tiny sewing room again and thought I would share a photo:
I’ve added this photo as an update to my page tierneycreates StudioTour, where you can see a tour of my entire studio.
Although I could use the space for something else, I always try to find a way to keep my old futon chair (it coverts to a bed for a very small person) in my studio to always have a cozy place to sit and think (about my next studio reorganization project, ha!)
Recently a couple of my blogging buddies, Mary at ZippyQuiltsand Claire at knitNkwilt posted about starting projects from their fabric scrap piles and “fabric scrap wrangling” (organizing a crafter’s crazy scrap pile).
As fabric scraps are my secret (well..not so secret) obsession, I want to join the conversation!
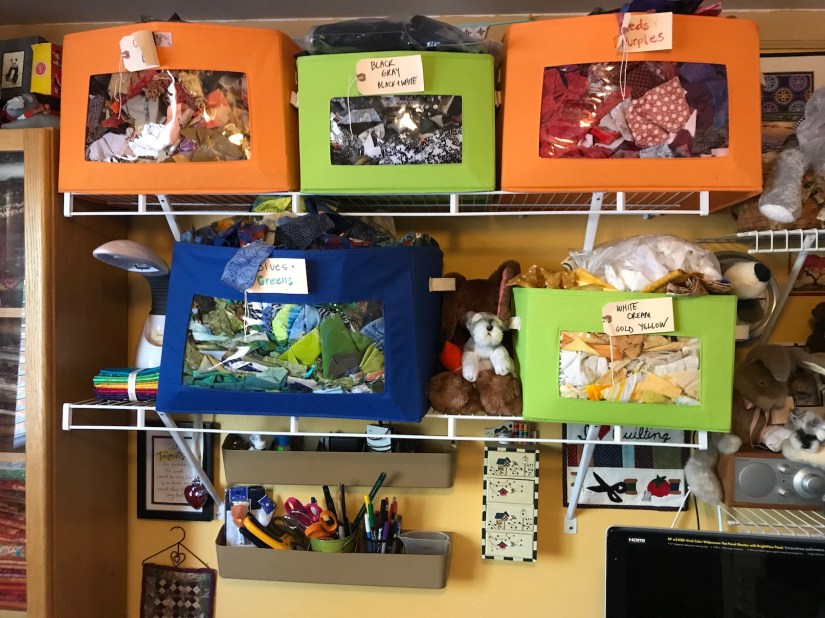
Last time I posted about my fabric scrap organization, I shared this photo of my fabric scraps organized in windowed boxes by color:
Fabric scraps organized by color
Well this organization failed. Why? Because I was not using the scraps, I was just enjoying them as “decoration” in my studio!
I knew I needed to do something and rethought how I was create with scraps I realized it was too cumbersome to pull down individual boxes by color to access scraps (my studio is small and I could only pull down 1-2 boxes at a time without serious crowding!). So I did something crazy: I pulled all the scraps out of the boxes and put them into a bag:
Yes it is a giant bag! It measures 22″ in height and approximately 22″ in diameter…and it is packed (but not too tightly…just fairly tightly, ha!). I’ve named it “Giant-Bag-O-Scraps” and I love it!
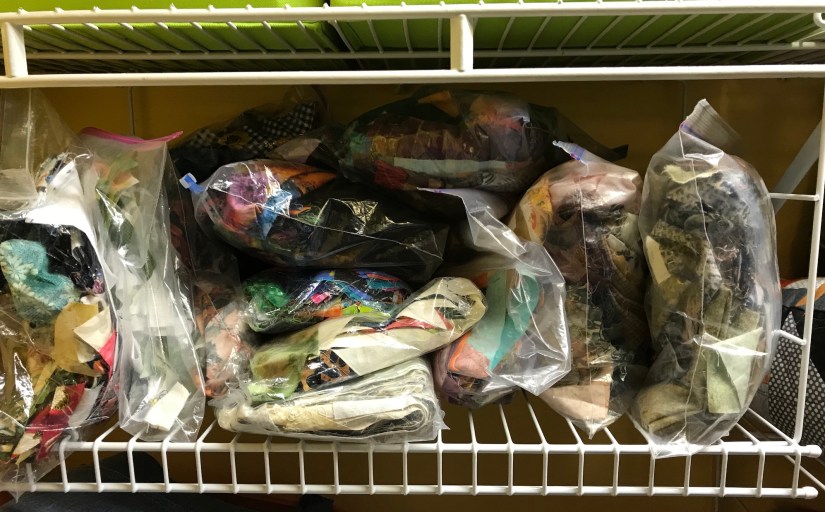
In addition to moving the fabric scraps out of their boxes by color, I also thinned out my collection of “Challenge Bags” (see post Basket of Challenges) and moved many of the scraps from these bags into the Giant-Bag-O-Scraps. I narrowed by huge “Challenge Bag” collection down to this:
Note the random “tailor ham” in this area, hoping someday to be used to make a fabric cap…
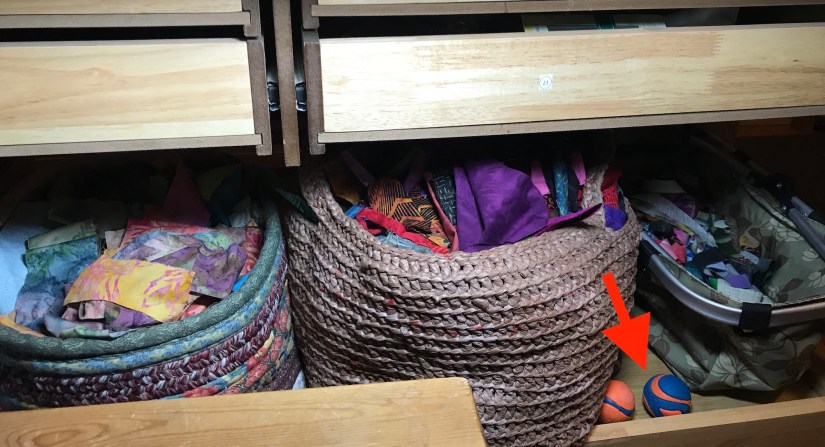
I did keep one type of fabric scraps separate from the others – batik scraps. They have their own organization into three baskets under my cutting table: 1) light and medium-light colors; 2) medium-dark to dark colors; and 3) thin strips:
Note the red arrow – this is Mike the miniature schnauzer’s ball storage in my studio
The reason for this separation is I want to make some landscape quilts using batik strips. I recently bought a book on Landscape quilts that I will discuss in a future post (once I start an actual landscape quilt project).
During this entire “scrap wrangling” project I did pull out a lot of scraps to donate to our local Humane Society Thrift Store. The thrift store has a crafting section and packages of fabric scraps sell very quickly there (other weird people like me who are also obsessed I guess..). Check out my post from October 2016 – A “Humane” Way to Eliminate FabricScraps to see how I packed up a huge donation of fabric scraps during my purging in 2016. The packages of scraps shown in that post sold within a week at the thrift shop!
Although I am not seeking out any additional fabric scraps, currently I am embracing my fabric scrap obsession. I remind myself that my quilting studio area is “my playroom” and it is okay to go in there and just play with my scraps!
Postscript
Happy MLK Day! When the political landscape feels challenging to me as a person of color and as a woman, I remember his words and I am re-inspired:
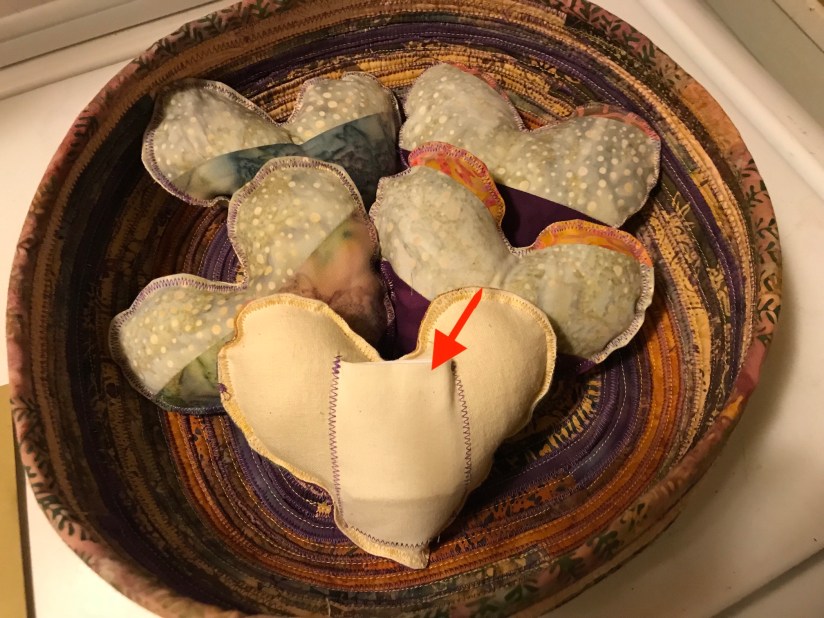
There are additional details on the fabric basket I recently “threw” on my sewing machine: It was part of a wedding gift for a dear friend. Now that my friend has received her gift I can share the additional photos/story!
What began as this –
Became this once five (5) little scrappy batik heart pillows were added to make it the tierneycreates Basket of Love:
My friend has a modified “Brady Bunch” situation going on. When she wed her wonderful finance they joined their families and became a blended family of five.
So I made each family member a little scrappy fabric heart and on the back of each heart I added a pocket so they could use the hearts to share little notes of love and appreciation to each other.
For fun I even made up five generic “sample love notes” and placed them in the pocket of each heart.
Working on this piece and sewing in general was a nice bit of healing for me as I deal with the grief of the recent loss of my beloved mother-in-law and the loss of my Sassy the Highly Opinionated Miniature Schnauzer. As you all probably know, grief comes in waves and it seems better to be sewing than just sitting around when one of these waves hits.
My friend and her fiancé are wonderful loving parents and I know their joined family and new home is likely filled with lots of love, but it made me very happy to make a gift that does more than celebrates their marriage – it celebrates their new family!
Postscript
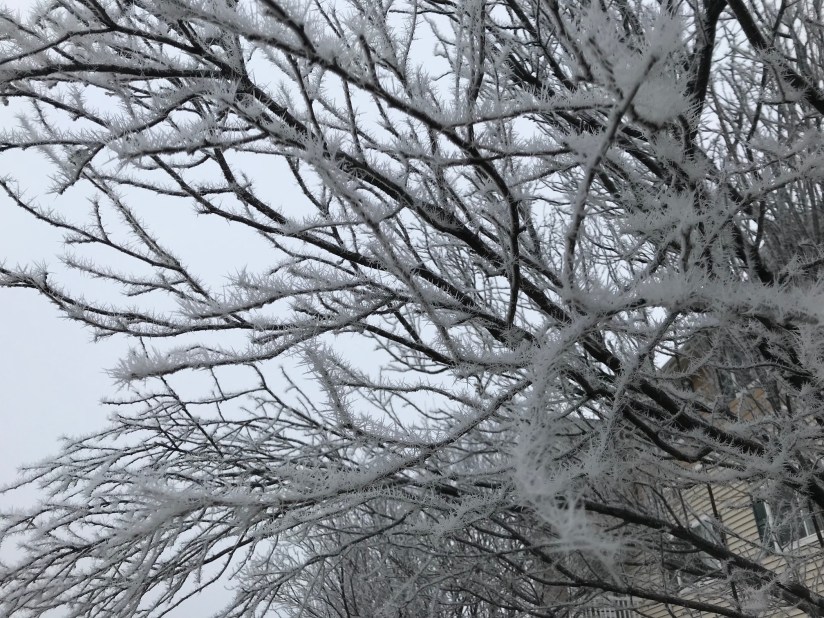
We had a couple days of warmth (up to 61 degrees F) in Central Oregon but now a deep chill has set in. Not as bad as parts of the US where a terrible Arctic freeze/chill is leading to record lows, so I will not complain.
We have quite a bit of “hoar frost” in Central Oregon. Every time I hear the words “hoar frost” I laugh to myself. I remember when I first moved to the Pacific NW in the late 1990s and heard the term “hoar frost” for the first time. I thought my friend was saying something else completely in regards to the frost (hint: sounds like wh___). And I thought: “Wow, in the Pacific NW they really hate frost!”
In case you have not heard of “hoar frost” before, according to the Google dictionary it is:
a grayish-white crystalline deposit of frozen water vapor formed in clear still weather on vegetation, fences, etc.
Here is a tree loaded with hoar frost from my morning walk:
I want to close this post by mentioning how much I have enjoyed reading “end-of-year” summaries by my blogging buddies. I might write up one myself when I feel ready.
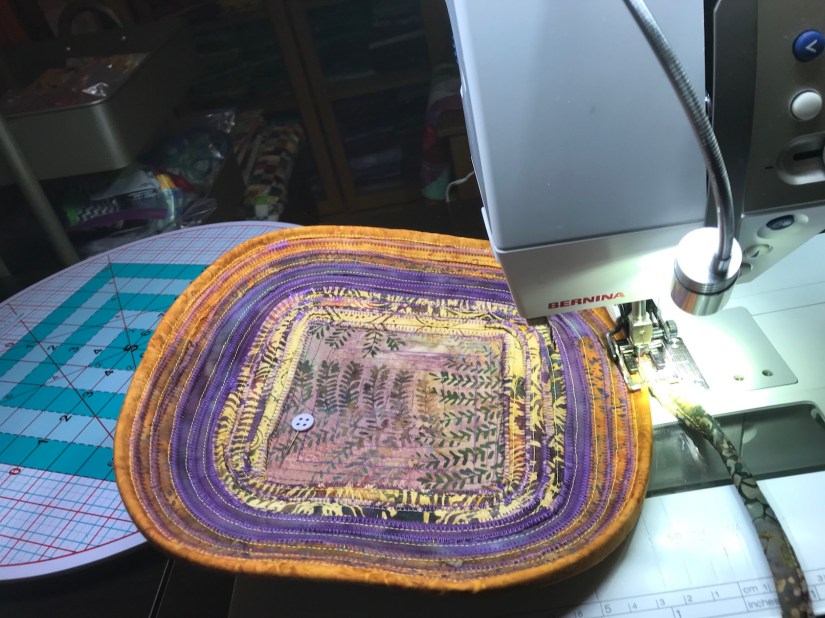
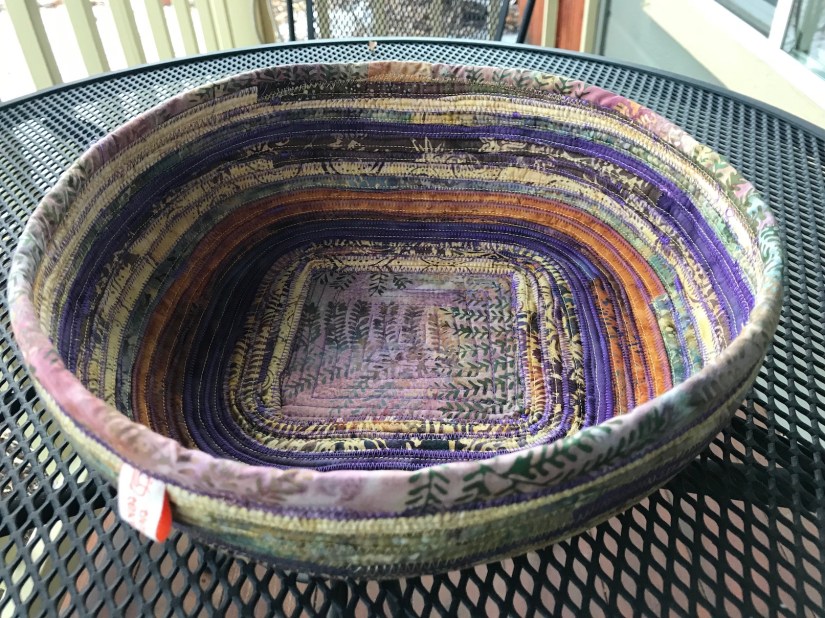
Are you familiar with the phrase “throwing pottery”? This phrase relates to creating some type of clay vessel/bowl on a pottery wheel.
Recently I made a fabric bowl by “throwing” it on my sewing machine!
This bowl is made from batik fabric strips wrapped around clothesline using the instructions from the Bali Boxes pattern by Aunties Two.
It measures approximately 11.5″ in diameter and is 4″ deep.
Several years ago I was really into making batik fabric bowls and boxes and had a stash of cotton clothesline and 2.5″ pre-cut batik fabric strips (like Hoffman Bali Pops). Here are a couple of my baskets from that period:
I burned out on making these baskets, however I had enough wrapped clothesline to make one more small basket and set it aside for the day I wanted to make another basket (into my “abandoned project stash”).
Well that day arrived a week ago – I was ready to “throw” a new basket!
Here is the wrapped clotheslines and the fabric for the center:
Making the basket begins with making a coiled foundation around a Timtex (heavy interfacing) filled center fabric pouch:
Once the base is created, it is time to “throw” the basket and angle it around the sewing machine as you add rows of covered clothesline using a zig-zag stitch:
The piece is finished off with a binding on top to cover the ends of the wrapped clothesline:
And now a couple images of the completed bowl (I added a little tierneycreates tag to the top under the binding):
I am pleased with my “thrown” fabric bowl and glad I pulled the remaining wrapped clothesline out of my abandoned project stash!
Update 01/14/18 – this piece is now named “Recycled Windows” and the Artist Statement and photos are posted on the Improvisational Textiles website on the Tierney Davis Hoganpage. It was added to the Recycled Denim Stories series.
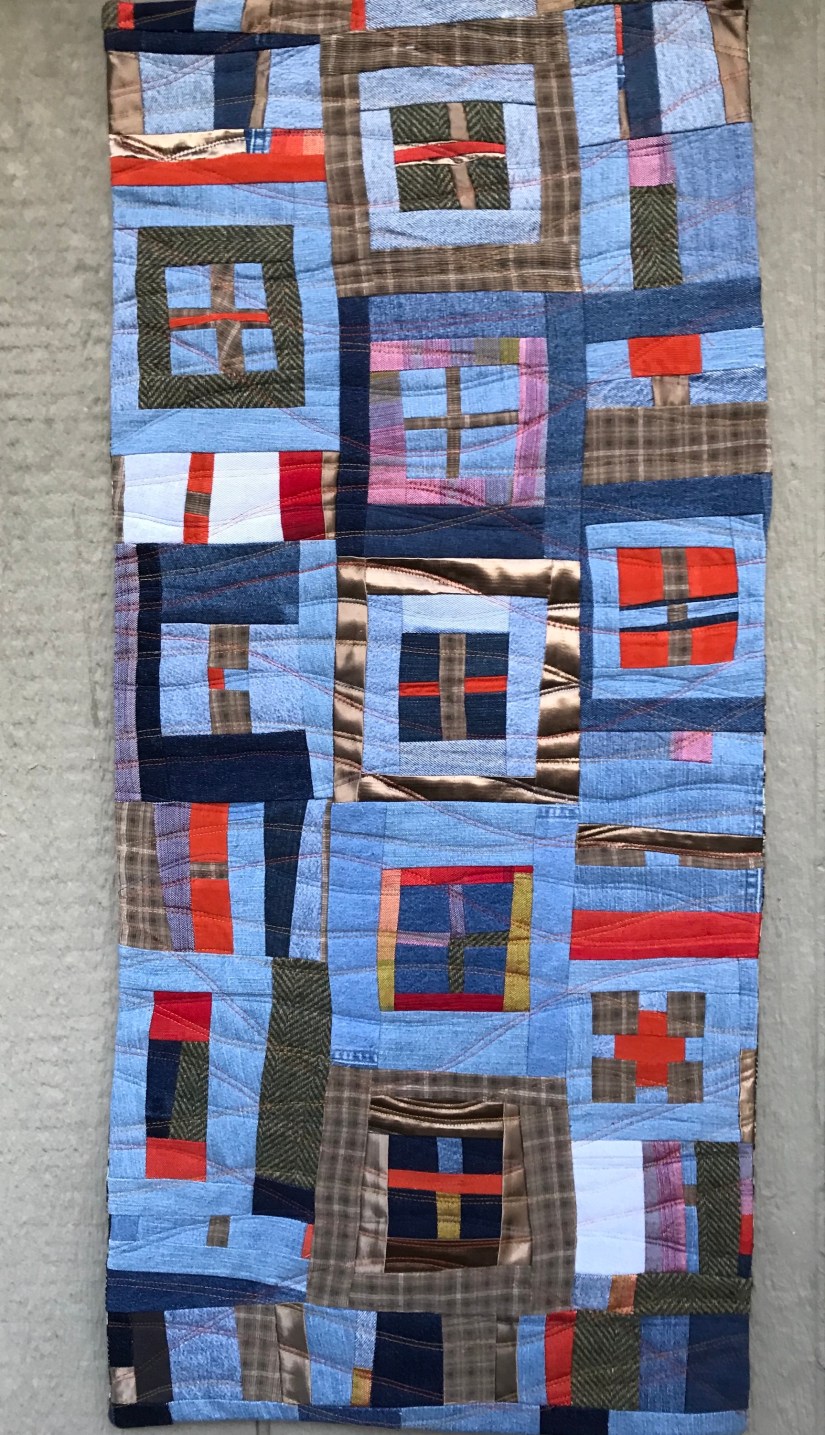
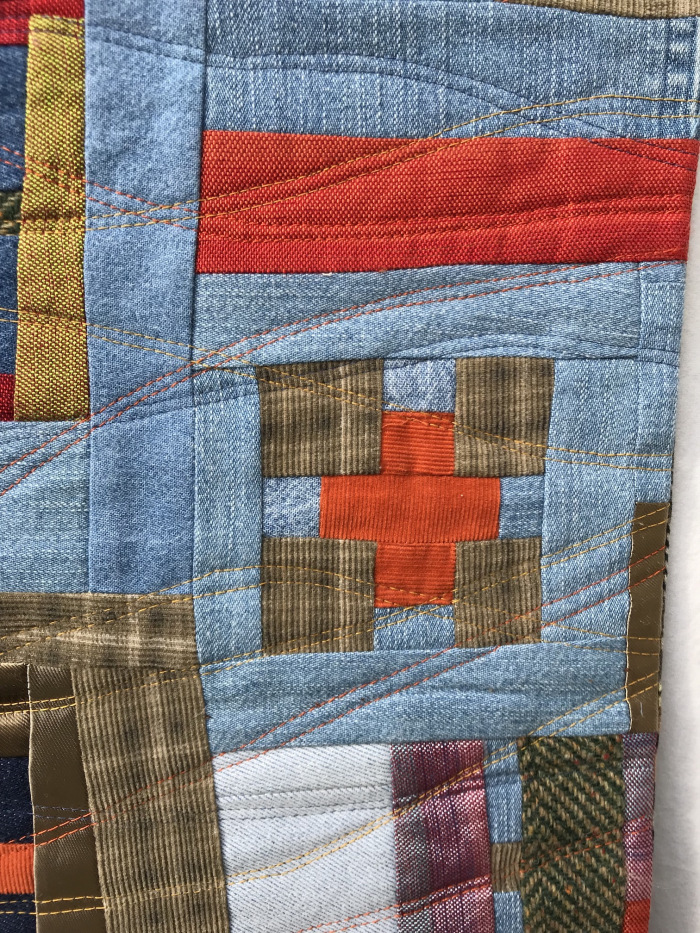
This post is a follow up to my December 10th post What’son the Design Wall where I shared my piece Recycled Windows of Conversation in progress.
I completed the machine quilting this art quilt made from all recycled materials (clothing, home decor, see previous post for more details). I took several quick photos for his post and later on plan to take higher quality photos:
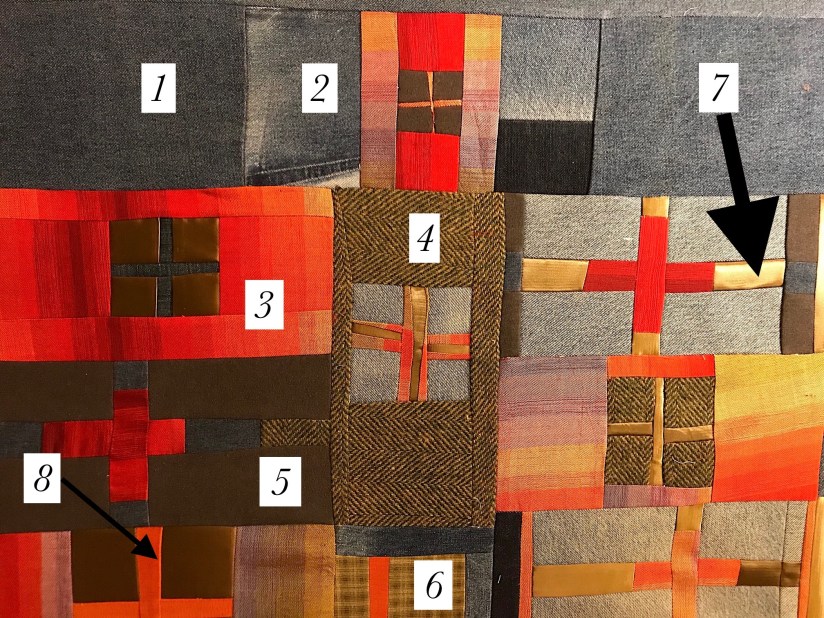
Here is a close up of the machine quilting. I used three different threads: orange, blue and variegated gold.
Have you ever purchased something for a future art/crafting project and you had absolutely no idea of what you were going to do with it at the time you purchased it?
It was just something you just knew you needed to have in your collection?
If you are an artist, crafter, quilter or any type of creative person, I am guessing the answer is “Yes” (at least for 95% of you – perhaps 5% of you only buy things for planned projects…)!
In previous posts I have shared MyMinimalism Journey and my ongoing mission to curate my life. This curation involved not buying things I do not have a purpose for at the time. A recent experience is making me rethink some of the rules I have placed upon myself as I tried to embrace minimalism.
The perfect thingI needed for a recent craft project I purchased 16 – 17 years ago when I had not yet embraced minimalism (back then – if I liked it, I bought it!)
Cannon Beach Oregon
In the early 2000s, when Terry the Quilting Husband (TTQH) and I lived in Seattle, WA, we discovered the beautiful Oregon coast. We had no idea that someday we would be living in Oregon, but we knew the coast was beautiful and wanted to see the whole thing.
It took three vacation trips (the Oregon coast is long and there is much to see). The first one focused on the northern Oregon coast (starting at the Washington State coast board); the second on the central Oregon coast; and the third was to see the southern Oregon coast (to the Northern California coast border).
Image credit: Oregon Coast postcard
There are many beautiful places along the Oregon coast. I have so many wonderful memories from those Oregon coast road trips which we made with our two miniature schnauzer at the time – Fritz & Snickers:
Fritz and Snickers on the Oregon Coast, 2000
Of all the Oregon coastal towns we visited, CannonBeach, Oregon captured our hearts the most and remains our favorite place on the Oregon coast.
Image credit: www.cannonbeachyogafestival.com
Cannon Beach has a charming downtown (we love to stroll it with the miniature schnauzers in their backpacks) with many quaint shops.
Our first trip to Cannon Beach was in 2000 and I was a new very new quilter. During my first visit to the amazing Center Diamond Fabrics quilt shop I purchased a Cannon Beach panel that I had no idea what I was going to do with it. 17 years later I figured out what to do with it – make a wallhanging for a friend of mine who loves Cannon Beach as much as I do!
By the way, my Central Oregon blogging buddy, Anna of the WoolieMammoth blog, posted a recent video on her QuiltRoadies YouTube channel about this awesome quilt shop if you would like to get a first hand peek inside this shop:
The Wallhanging
Here is how I used the panel, 16 – 17 years later, I made a small quilted wall hanging for my friend Nancy who loves Cannon Beach. I used a folded log cabin technique to make the wallhanging, sewing folded strips of fabric in colors coordinating with the center panel.
Cannon Beach wallhanging with a painted center panel featuring Haystack Rock
My friend Nancy likes blues and green so I tried to include as much blue and green as I could in the piece. Put a hanging sleeve on back for a hanging rod.
She received it yesterday in the mail as a surprise and she is quite pleased with her gift! She plans to use a piece of beach driftwood to hang it it on.
I am so thankful I was not a minimalist 16 – 17 years ago when I bought it and put it away with no clue on what I was going to make with it!
She knits these amazing creatures with adorable hand knitted sweaters and other paraphernalia. You should check out her blog and read some of her charming posts about the monster’s adventures or follow her on Instagram @crawcraftbeasties and see the sweet images of her creations and their adventures!
I cannot wait for my tierneycreates Beastie! I left it up to her to design what she thought a tierneycreates little knitted monster would look like 🙂
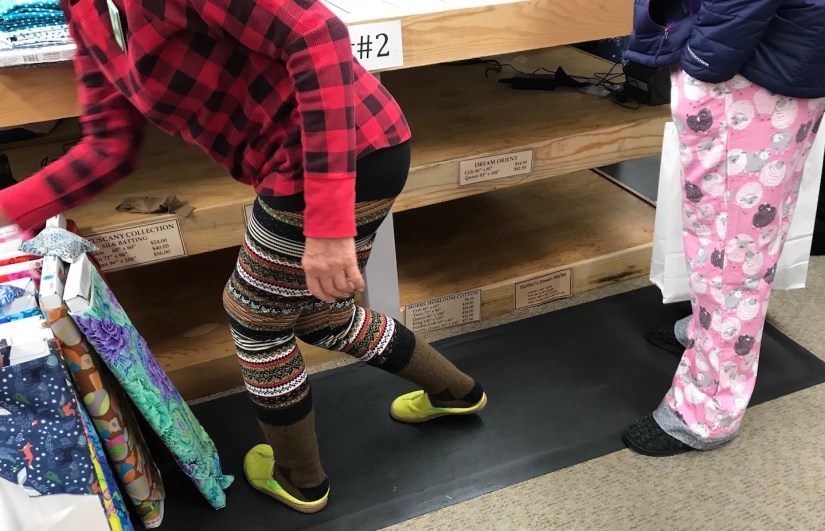
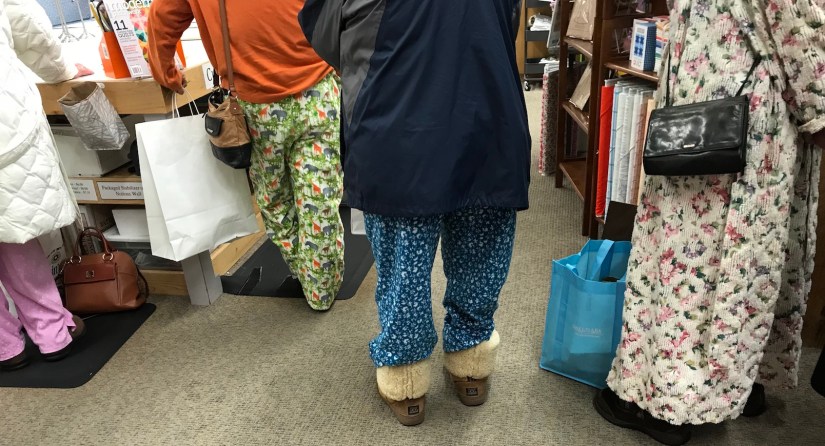
Saturday November 11th was the annual PJ Sale at the Stitchin’ Postin Sisters, Oregon. Each year I attend with quilting friends and last year I started bring Terry the Quilting Husband (TTQH) to the sale (as a bonus he drives there in the cold, dark and sometimes snowy weather as the sale starts early).
Each of our wonderful quilt shops in Central Oregon has their own special focus when it comes to fabric collection. The Stitchin’ Post has the best selection of unique art quilter focused fabrics in the region. It also carries fabrics that would appeal to traditional quilters.
During the Pajama Sale, if you get there before 8:30 am (doors open at 6:30 am) AND you are in your PJs, you get 35% off nearly everything in the store!
I did not buy that much – a couple books and notions. My favorite part of the PJ Sale is hanging out with fellow quilters all in our PJs wandering around a quilt shop and then going out to breakfast afterwards – in our PJs! It is like the morning after a huge sleepover, ha!
I figured no one wanted to be on my blog photographed in their PJs so the photos below give you a feel but do not have any faces:
One lady had an over the top robe from the 1970s. I asked her if I could take a photo and suggested she turn around unless she wanted to have herself in her robe featured on my blog, ha!
The photo does not quite capture the brightness of the 1970s robe – it was over the top and of course made of some type of synthetic material
We went to the Gallery Restaurant in Sisters for breakfast after an hour wandering around the sale. It very quite fun with a group of us gathered around a large table in a restaurant, all in our PJs (except for my friend’s 96 year old Dad who lives in town and another husband who joined us in their regular clothes).
Breakfast after early morning quilt shop shopping! (This was actually TTQH’s breakfast as I only like my eggs scrambled)
One of my friends had a spectacular set of PJs with the words “Queen Bee” all over them:
I wore my traditional schnauzer themed PJs (they are actually Scotties in gray and black and I pretend like the gray ones are schnauzers).
It measures 16.5″ x 44″ which seems to fall into a fairly standard table runner length.
I’ve not decided if I am going to quilt the other four (4) table runner tops I made or stick them away for now (oh no they will become “UFOs”!!!). I do not think I will re-open the tierneycreates Etsy shop at this time. I’ve had some recent art quilting related exciting news, that I will share at a later date, that makes me want to focus on my efforts on building my art quilt portfolio rather than trying to make stuff to sell on an Etsy shop.
There are only so many hours in the day!
Postscript
In my previous post, AGood Mess, I shared some statistics from a recent national survey (The Quilting in America 2017 survey) on how much money the average quilter spends a year on quilting related supplies and activities. The two numbers were $442 and $500 per year depending on how “dedicated” the quilter is.
I really enjoyed the comments some of you made on these figures; and wanted to share how I nearly FAR EXCEEDED this number during the Stitchin’ Post’s Pajama Sale on Saturday!
There was glitch in their cash register and my total came to $730,000! The Stitchin’s Post staff behind the register, a couple other customers and I had a huge laugh over this! I asked if my purchase also came with a new luxury home, a car, and an outfitted sewing studio with a stocked fabric closet?
They re-rang my purchase and with my 35% off discount (we arrived at 6:50 am and I was in my PJs) my purchase came to $73 instead of $730,000.
My studio/sewing area is currently very messy, but it is a “good mess”!
Here is what I have going on in the room:
I just got my quilt Cozy Cobblestone (What’sOff the Design Wall: Cozy Cobblestones) back from the talented long-arm quilter and my longtime blogging buddy, Cindy at inastitchquilting.com. I just trimmed the edges (hence the mess on the ironing board) and need to put the binding together and sew it on to finish the quilt.
I am quilting the first of the five (5) table runners I recently put together (Can We Talk About Table Runners? ) as you can see from what is on my sewing machine.
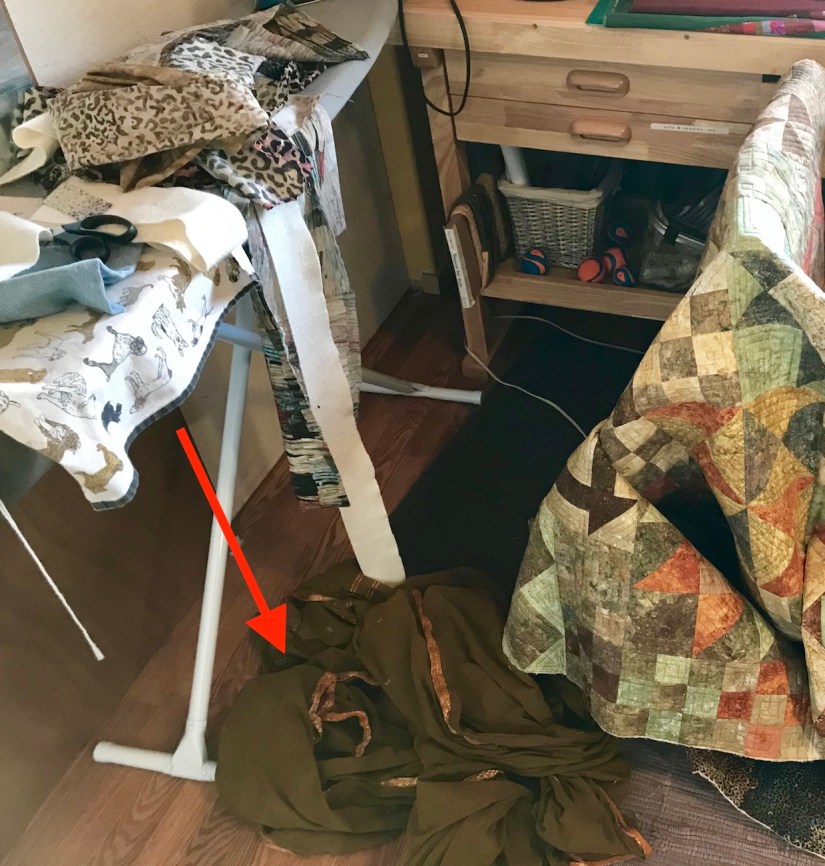
In addition to the recently quilted quilt and the table runner, also adding to the clutter is an awesome Sari a friend of my just sent me. I just laundered it and it is on the floor awaiting pressing (as the ironing board is currently busy as are the other surfaces…but the floor is relatively clean…)
She got it second hand for a very good deal and originally I was thinking about using it in a future recycled clothing art quilt. It is however a lot of nice fabric and it coordinates with colors in my living room, so I am mulling over the idea of making it a valance for my front window.
Well I better start working on my mess!
Postscript
Recently I received a complimentary download of the publication – AMERICAN QUILT RETAILER fall market 2017. (While running my tierneycreates Etsy shop I had a wholesale license and I was on the mailing list to receive these types of promotions.)
Inside the issue was an interesting profile (for quilt shop owners) on the results of The Quilting in America 2017 survey (pg 48).
Those of you who are quilters might find these excerpts from the article on this survey interesting:
“There are an estimated 7 to 10 million quilters in the U.S. The total number of households with a quilter is 6 to 8.3 million, and that each quilting household spends an average of $442 annually – that’s a 48% increase since 2014.”
“Within that total group of U.S. quilters are “Dedicated Quilters” who spend $500 or more a year on their art form and hobby.”
“The average Dedicated Quilter is female, 63 years old, down by a year in age since 2014, and has been quilting for 19 years. She is well educated (70% attended college), affluent (average household income of $95,900), and leans toward a preference of traditional quilting styles (85%) over modern (37%) and art (20%).”
Interesting! Any demographics sound familiar (especially the spending $500 or more per year on our art form…)?
Perhaps I should not let you in on a little secret: Occasionally one of our beloved Central Oregon quilt shops has spectacular Scrap Bags for sale for $8. I promised a couple quilting friends I would not reveal which shop (so that everyone does not suddenly get in their car or jump on a plane to rush to Central Oregon to get some of our Scrap Bags!).
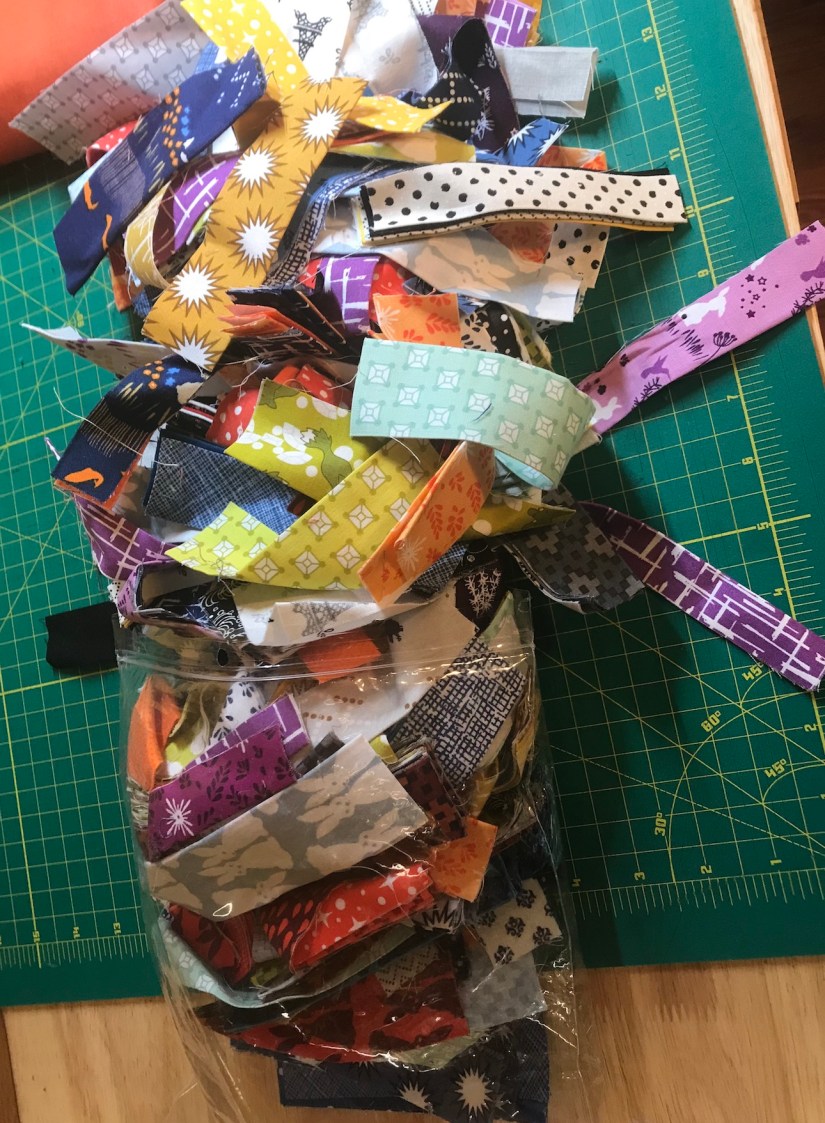
A couple weeks ago, while wandering about a certain Central Oregon quilt shop with quilting friends, I found this bag of scraps for sale:
I have plenty of fabric scraps (most are from my own quilt making or were donated by friends) and normally I do not buy these bags – but it was one of those deals not to be passed up!
The bag was jammed packed with coordinated scraps, apparently from the same fabric line:
Each scrap was folded/pressed in half. I was curious how wide and long the scraps would be once opened.
Terry the Quilting Husband (TTQH) helped me unfold, press and organize the coordinate scrap collection. Here are the photos of MY HAUL from the $8 scrap bag:
TTQH was so patient as we sorted the scraps by color/pattern. They took up my entire cutting table and spilled onto my ironing board!
The average size scrap unfolded and pressed measured around 2.5″ x 5″:
What to do with these scraps? (By the way: Does anyone know what fabric line for these scraps? I am guessing Cotton + Steel or Tula Pink)
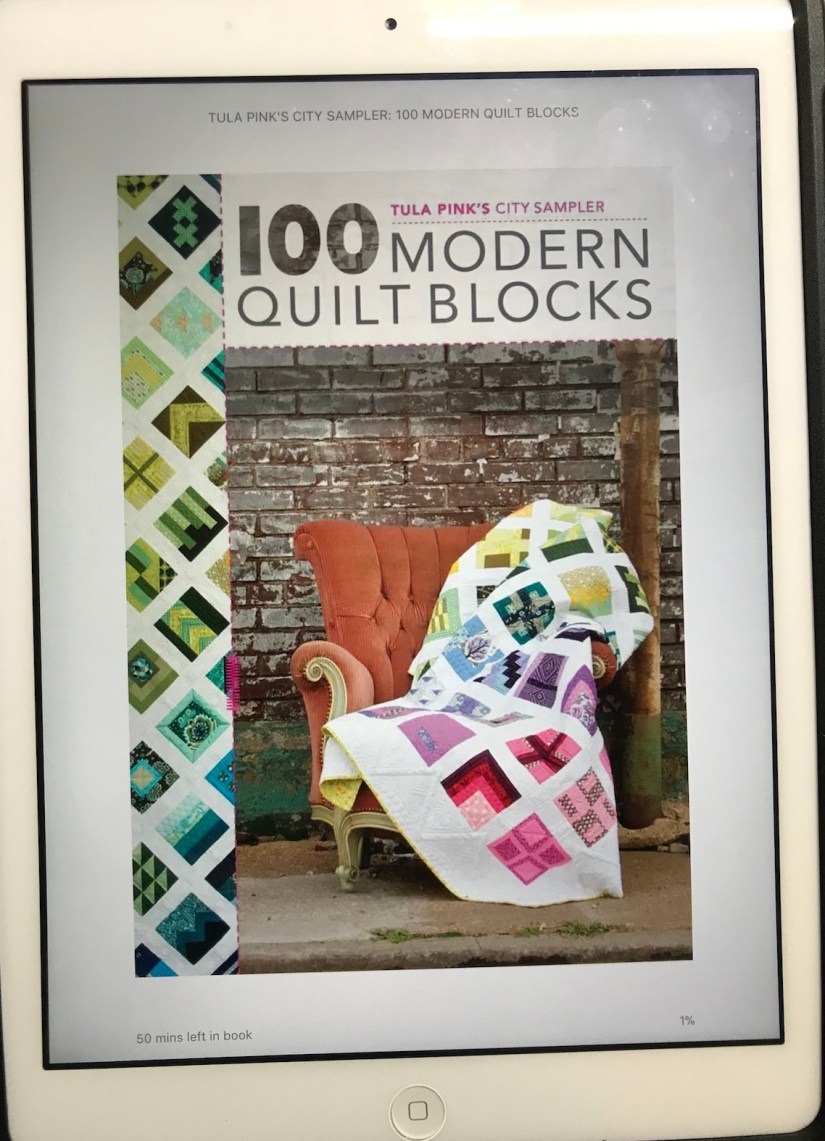
Well on my Kindle is a copy of Tula Pink’s 100 Modern Quilt Blocks:
I flipped through this book to get a feel for the dimensions of the pieces requires to complete the blocks for this sampler and in general they were within the dimensions of the scraps from my $8 bag. I just need a coordinating fabric to fill in when large pieces are needed.
Well I pulled out yardage of “Saffron” Peppered Cotton from my stash that I think will coordinate well with the palette of the scraps:
It could also serve as a very bold setting fabric for the blocks!
I have so many projects in queue, I am not ready to start this one (for example I still need to finish up my Farm Girl Vintage sampler!). So I sorted the scraps into color stacks and packaged up the scraps and put them away in my Project Queue!
It may be difficult to gauge by the photos but I think there are enough scraps to become a full sampler quilt with the Saffron Peppered Cotton fabric added to the pile! So it would be an $8 quilt (okay I am stretching this idea as I also paid for the Peppered Cotton but just play along, okay?)
Where did these scraps come from? My best guesses are they are either leftovers from a sampler quilt created for the quilt shop; or from cutting kits for the shop. I do not care where they came from, I am just so grateful for them!
(And thanks in advance if any of you recognize the fabric line and can share with the rest of us!)
Postscript
Look at these adorable socks one of my Quilting Sisters gave me.
Hopefully the salty word in the socks does not offend anyone, if so then my sincere apologies.
Terry the Quilting Husband (TTQH) and I did an outside photo shoot with Additional Conversations, the improvisational art quilt from recycled materials I completed yesterday.
Here are some better photos of the piece (as opposed to those from yesterday where I squished myself to the hallway wall to take photos…):
Now the quilt sit on the ironing board awaiting batting, backing, and quilting.
The Recycled Materials
In case you are curious, here is a list of the recycled materials used in this piece:
Denim duvet cover
Old jeans
Curtain (valence scarf)
Tweed jumper
Old sweat pants
Corduroy Shirt
Gold home decorating fabric scraps (given to me by an interior decorator from her sample collection)
The world’s ugliest orange corduroy pants
All these items were destined for the landfill but instead they became this quilt!
Postscript
Tomorrow is the last day of October (and Halloween) and the end my month long 4th blog anniversary celebration (see post BlogAnniversary Celebration & Giveaway).
To close out the 4th anniversary I am putting together a post called “Random Follow-ups“. I am going to randomly follow up on posts over the past four years that are hopefully deserving of follow up!